Hunter Port Royale Ceiling Fans: Elevate Your Home’s Elegance

Transform your living space into a haven of luxury and comfort with the exquisite Hunter Port Royale Ceiling Fans. Explore the features and benefits of this sophisticated fan that combines timeless design with superior performance.

Hunter Port Royale Ceiling Fan

Introducing the Hunter Port Royale Ceiling Fan

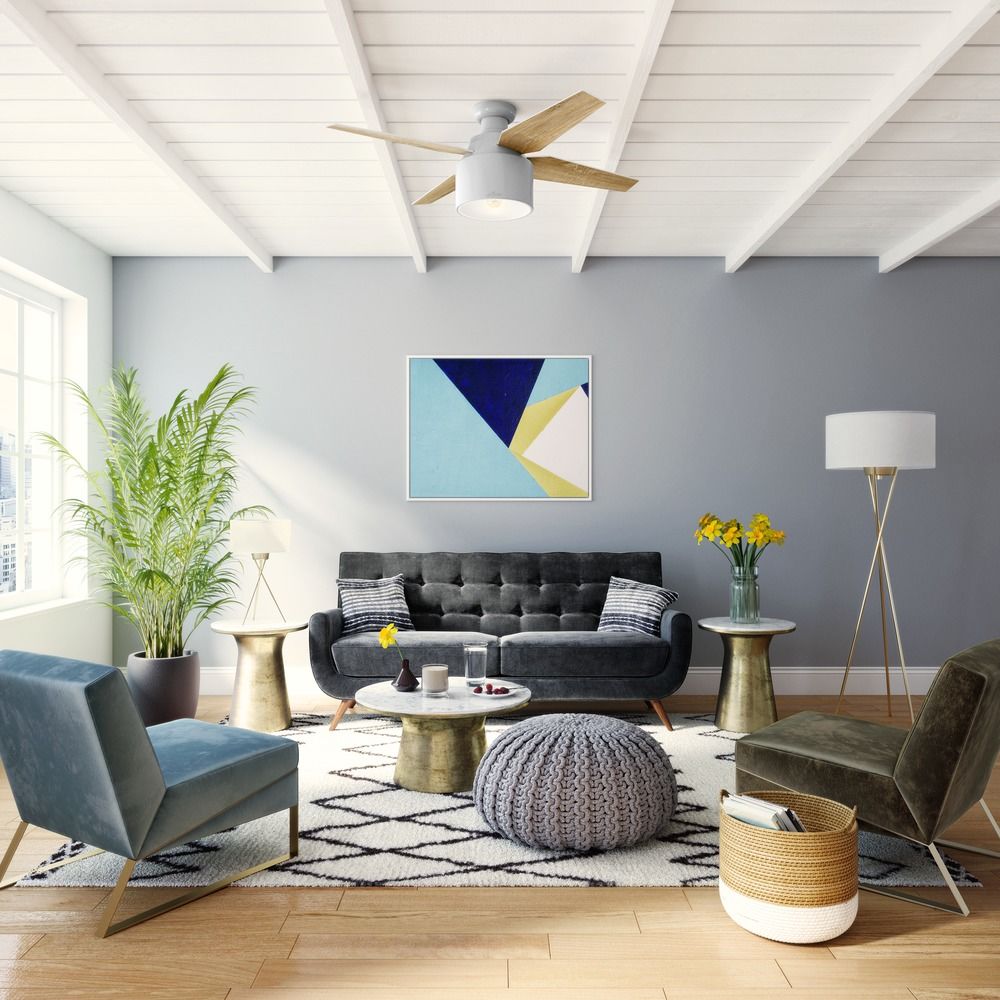
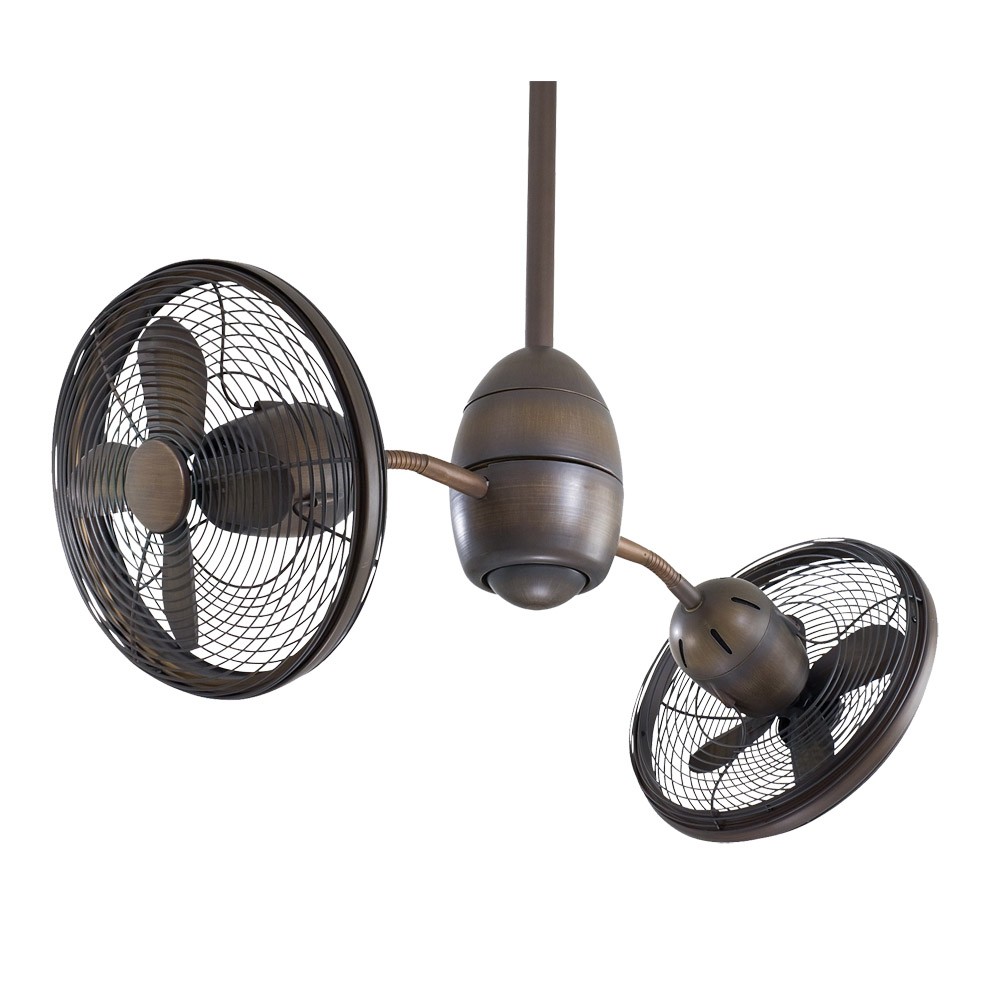
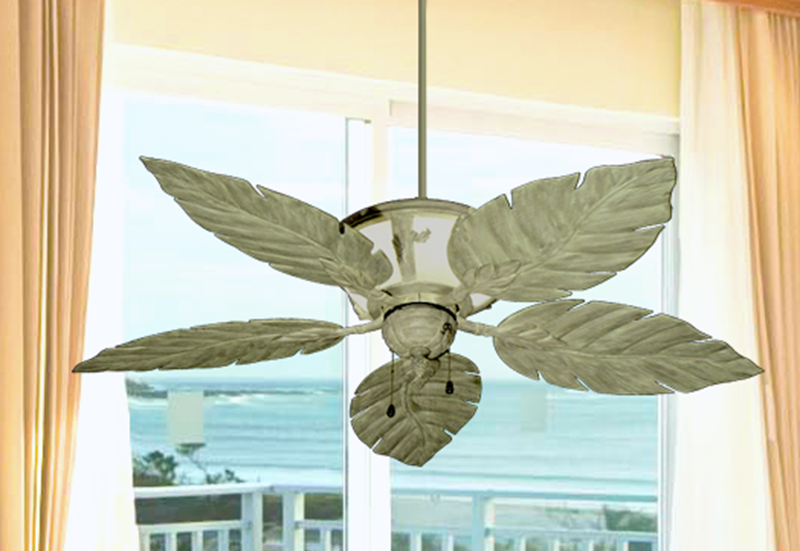
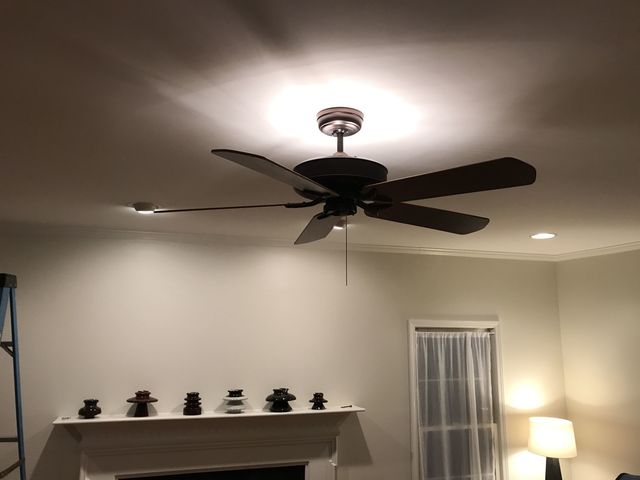
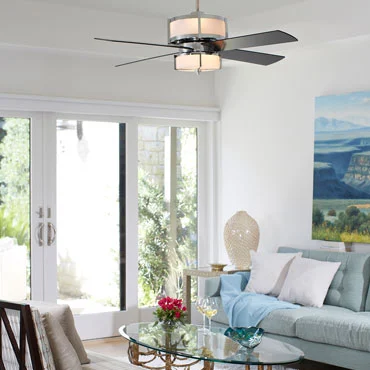
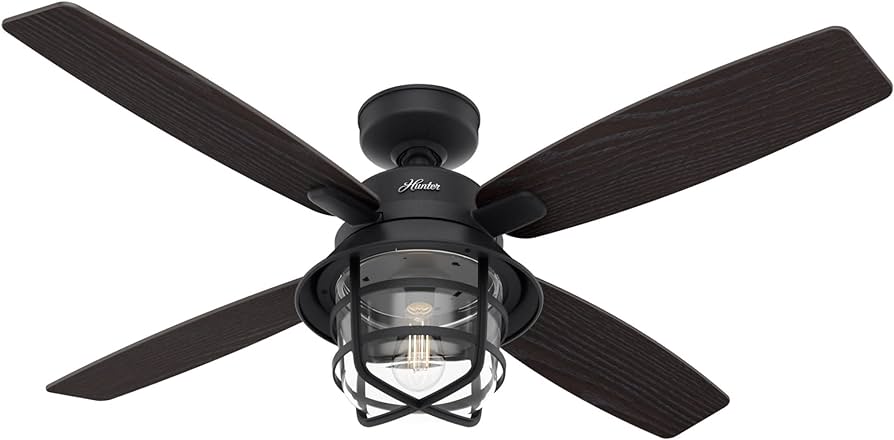
The Hunter Port Royale Ceiling Fan is a statement piece that exudes elegance and sophistication. Crafted with meticulous attention to detail, this fan features a classic design with modern touches, making it the perfect addition to any upscale home décor.

Features and Benefits of the Hunter Port Royale Ceiling Fan

  1. Regal Design: Inspired by the grandeur of traditional European architecture, the Hunter Port Royale Ceiling Fan boasts intricate details and ornate accents that add a touch of luxury to any room. From its rich wood finishes to its decorative metalwork, every aspect of this fan reflects opulence and refinement.
  2. Exceptional Performance: Despite its ornamental appearance, the Hunter Port Royale Ceiling Fan delivers exceptional performance with its powerful motor and precision-engineered blades. Experience optimal airflow and cooling comfort, even in larger rooms, thanks to the fan’s high-quality construction and advanced technology.
  3. Customizable Options: The Hunter Port Royale Ceiling Fan offers customizable options to suit your unique preferences and décor style. Choose from a variety of finishes, including antique brass, brushed nickel, and oil-rubbed bronze, to complement your existing furnishings and color scheme.
  4. Quiet Operation: Equipped with WhisperWind® motor technology, the Hunter Port Royale Ceiling Fan operates quietly and efficiently, ensuring a peaceful and comfortable indoor environment. Enjoy the benefits of improved air circulation without the distraction of noisy fan blades.
  5. Remote Control Convenience: Control the fan speed, lighting, and direction of airflow with the included handheld remote control. Adjust settings from the comfort of your couch or bed, providing added convenience and ease of use.

Installation and Maintenance of the Hunter Port Royale Ceiling Fan

Installing the Hunter Port Royale Ceiling Fan is a straightforward process, thanks to the included step-by-step instructions and mounting hardware. However, it’s essential to follow safety guidelines and precautions during installation to ensure proper operation and longevity of the fan.

Regular maintenance is key to preserving the performance and appearance of your Hunter Port Royale Ceiling Fan. Clean the blades and housing regularly to remove dust and debris buildup, and lubricate the motor bearings as needed to keep the fan running smoothly.

Conclusion

The Hunter Port Royale Ceiling Fans combines timeless elegance with superior performance to create a luxurious cooling solution for any home. With its regal design, customizable options, and whisper-quiet operation, this fan is sure to elevate the ambiance of your living space while providing optimal comfort and style.

Hunter Cranbrook Ceiling Fans: Elevate Your Home Décor with the Stylish

Upgrade your home’s ambiance and cooling efficiency with the elegant and modern Hunter Cranbrook Ceiling Fans. Discover why this stylish fan is a must-have addition to any living space.

Hunter Cranbrook Ceiling Fan

Introducing the Hunter Cranbrook Ceiling Fan

The Hunter Cranbrook Ceiling Fan combines sleek design with powerful performance to create a perfect blend of form and function. With its striking geometric profile and vintage-inspired blade design, this fan adds a touch of sophistication to any room while providing optimal airflow and comfort.

Features and Benefits of the Hunter Cranbrook Ceiling Fan

  1. Unique Design: The Hunter Cranbrook Ceiling Fan features a distinctive caged design with exposed LED bulbs, creating a statement piece that enhances the aesthetics of any room. Available in various finishes, including mint, gloss black, and gloss white, this fan allows you to customize the look to suit your décor preferences.
  2. Powerful Performance: Despite its stylish appearance, the Hunter Cranbrook Ceiling Fan delivers exceptional performance with its reversible motor and 4-speed settings. Whether you need to cool down during the summer months or improve air circulation throughout the year, this fan provides reliable and efficient operation.
  3. Quiet Operation: Equipped with WhisperWind® motor technology, the Hunter Cranbrook Ceiling Fan operates quietly, ensuring minimal disruption to your indoor environment. Enjoy the benefits of improved air circulation without the distracting noise commonly associated with ceiling fans.
  4. Remote Control Convenience: Control the fan speed and lighting settings effortlessly with the included handheld remote control. Adjust the fan speed, dim the lights, or reverse the direction of the blades with the touch of a button, providing convenience and ease of use.
  5. Energy Efficiency: The Hunter Cranbrook Ceiling Fan is ENERGY STAR® certified, offering energy-efficient operation that helps reduce electricity consumption and lower utility bills. Enjoy the benefits of a stylish and functional ceiling fan while minimizing your environmental impact.

Hunter Cranbrook Ceiling Fan Installation and Maintenance

Installing the Hunter Cranbrook Ceiling Fan is a straightforward process, thanks to the included step-by-step instructions and mounting hardware. However, it’s essential to follow safety guidelines and precautions during installation to ensure proper operation and longevity of the fan.

Regular maintenance is key to preserving the performance and appearance of your Hunter Cranbrook Ceiling Fan. Clean the blades and housing regularly to remove dust and debris buildup, and lubricate the motor bearings as needed to keep the fan running smoothly.

Read too: Exploring the Benefits and How-Tos of DIY Ceiling Cassette Mini Split Installation: Revolutionizing Comfort

Conclusion

The Hunter Cranbrook Ceiling Fans combines style, performance, and convenience to create an exceptional cooling solution for any home. With its unique design, powerful airflow, and energy-efficient operation, this fan is sure to enhance your living space while providing comfort and functionality year-round.

How To Fix Mobile Home Ceiling: Tips and Techniques

Mobile homes offer flexibility and affordability, but they may require occasional maintenance, including fixing ceiling issues. Knowing how to fix mobile home ceiling problems can save you time and money while ensuring your home remains safe and comfortable. In this comprehensive guide, we’ll explore various techniques and tips for repairing mobile home ceilings, empowering you to tackle common issues with confidence.

How To Fix Mobile Home Ceiling

Understanding Common Mobile Home Ceiling Issues

Mobile home ceilings are prone to several issues, including water damage, sagging, cracks, and discoloration. Identifying the underlying cause of the problem is crucial for determining the appropriate repair method.

How To Fix Mobile Home Ceiling: Step-by-Step Guide

  1. Assessment and Preparation: Begin by assessing the extent of the damage to your mobile home ceiling. Look for signs of water damage, such as stains or mold growth, and identify any areas that are sagging or cracked. Prepare the workspace by removing furniture and covering the floor with a drop cloth to catch debris.
  2. Repairing Water Damage: If your mobile home ceiling has water damage, it’s essential to address the source of the water intrusion before repairing the ceiling. Once the source is fixed, remove any damaged ceiling panels or tiles and replace them with new ones. Ensure that the area is properly dried and treated for mold before installing the new panels.
  3. Fixing Sagging Ceilings: Sagging ceilings in mobile homes are often caused by the settling of the home or insufficient support. To fix a sagging ceiling, locate the ceiling joists and install additional support beams or braces as needed. Use a level to ensure that the ceiling is properly aligned before securing it in place.
  4. Repairing Cracks and Holes: Small cracks and holes in the ceiling can be repaired using patching compound or spackling paste. Fill the cracks and holes with the compound, smooth it out with a putty knife, and allow it to dry completely. Sand the area lightly to blend it with the surrounding ceiling texture before painting or applying a finishing coat.
  5. Painting and Finishing: Once the repairs are complete, consider painting the ceiling to give it a fresh look. Choose a paint color that complements your mobile home’s interior design and apply it evenly using a roller or paintbrush. Allow the paint to dry thoroughly before reapplying furniture or decorations.

Tips for Success

  • Wear appropriate safety gear, such as gloves and goggles, when working on ceiling repairs to protect yourself from debris and fumes.
  • Use high-quality materials and tools for more durable and long-lasting repairs.
  • Consider consulting a professional if you’re unsure about the extent of the damage or the repair process.

Conclusion

Knowing how to fix mobile home ceiling issues is essential for maintaining the integrity and appearance of your home. By following the steps outlined in this guide and taking proactive measures to address common issues, you can keep your mobile home ceiling in excellent condition for years to come.

Read too: Exploring the Benefits and How-Tos of DIY Ceiling Cassette Mini Split Installation: Revolutionizing Comfort

How To Extend Kitchen Cabinets To The Ceiling: A Complete Guide for Maximizing Space and Style

In many kitchens, the space above the cabinets often goes unused, leaving a gap between the top of the cabinets and the ceiling. This unused space not only collects dust but also misses out on the opportunity to enhance the aesthetic appeal and storage capacity of the kitchen. Fortunately, extending kitchen cabinets to the ceiling is a practical solution that can transform your kitchen’s look while maximizing storage space. In this comprehensive guide, we’ll delve into the steps and considerations involved in extending kitchen cabinets to the ceiling, empowering you to make the most of your kitchen space efficiently.

How To Extend Kitchen Cabinets To The Ceiling

Why Extend Kitchen Cabinets To The Ceiling?

Extending kitchen cabinets to the ceiling offers several benefits beyond just aesthetics. It maximizes storage space, allowing you to utilize every inch of vertical space in your kitchen. By eliminating the gap between the cabinets and the ceiling, you prevent dust and grime buildup, making cleaning easier and reducing maintenance efforts. Additionally, extending cabinets to the ceiling creates a seamless and cohesive look, enhancing the overall design and visual appeal of your kitchen.

Planning Your Cabinet Extension

Before you embark on extending your kitchen cabinets to the ceiling, thorough planning is essential. Begin by assessing the current layout of your kitchen and identifying the cabinets that you wish to extend. Consider factors such as ceiling height, cabinet material, and existing design elements to ensure a cohesive look.

How To Extend Kitchen Cabinets To The Ceiling: Step-By-Step Guide

  1. Measurements and Preparation: Start by measuring the height and width of the cabinets you plan to extend. Take accurate measurements of the space between the cabinets and the ceiling to determine the size of filler strips or crown molding needed.
  2. Remove Existing Molding: If your cabinets have crown molding or trim at the top, carefully remove it using a pry bar or a similar tool. Be cautious to avoid damaging the cabinets or the surrounding wall.
  3. Install Filler Strips: Cut filler strips from the same material as your cabinets to fill the gap between the cabinets and the ceiling. Secure the filler strips in place using wood glue and nails or screws.
  4. Attach Crown Molding: To create a polished look, install crown molding along the top of the cabinets. Cut the molding to size and attach it securely using a nail gun or finishing nails. Ensure that the molding is level and aligned properly for a professional finish.
  5. Paint or Finish: Once the extension is complete, paint or finish the cabinets and molding to match the existing kitchen décor. Choose a color or finish that complements your kitchen style and enhances the overall aesthetic appeal.

Tips for Success

  • When selecting filler strips and crown molding, opt for materials that match your existing cabinets to maintain a cohesive look.
  • Use a stud finder to locate studs in the wall when securing filler strips and crown molding for added stability.
  • Consider adding LED strip lighting above the cabinets to illuminate the space and create ambiance.

Conclusion

Extending kitchen cabinets to the ceiling is a practical and stylish way to maximize space and enhance the aesthetics of your kitchen. By following the steps outlined in this guide and considering essential factors, you can transform your kitchen into a functional and visually appealing space. With careful planning and attention to detail, you can achieve a seamless integration that elevates the overall design of your kitchen.

Read too: Exploring the Benefits and How-Tos of DIY Ceiling Cassette Mini Split Installation: Revolutionizing Comfort

Creating the Perfect Home Gym for Low Ceilings: Maximizing Space and Fitness

Are you eager to embrace a healthier lifestyle but limited by low ceilings in your home? Discover how to optimize your space and achieve your fitness goals with a specially tailored “Home Gym For Low Ceilings.” Whether you’re a fitness enthusiast or a beginner looking to start your wellness journey, this guide will help you design a functional and inspiring workout space that fits perfectly within your home.

Home Gym For Low Ceilings

Introduction

In today’s fast-paced world, maintaining a healthy lifestyle is more important than ever. However, finding the time and motivation to hit the gym regularly can be challenging, especially when faced with busy schedules and limited access to fitness facilities. That’s where the convenience of a home gym comes into play. And if you’re dealing with low ceilings, fear not – with the right planning and equipment, you can still create a highly effective workout space without sacrificing comfort or safety.

Benefits of a Home Gym For Low Ceilings

  1. Space Optimization: Low ceilings present a unique challenge when designing a home gym, but they also offer opportunities for creative space optimization. By strategically placing equipment and choosing compact, low-profile options, you can maximize every square inch of your workout area.
  2. Safety and Comfort: With limited overhead clearance, safety becomes a top priority in a low-ceilinged home gym. By selecting equipment with appropriate height dimensions and ensuring adequate ventilation and lighting, you can create a safe and comfortable environment for your workouts.
  3. Privacy and Convenience: One of the biggest advantages of a home gym is the privacy and convenience it offers. Say goodbye to crowded fitness centers and long commutes – with a home gym, you can exercise on your own schedule, in the comfort of your own space.
  4. Cost Savings: Over time, investing in a home gym can lead to significant cost savings compared to gym memberships and class fees. Plus, with the rise of affordable and high-quality home fitness equipment, creating a budget-friendly workout space has never been easier.

Essential Equipment for a Home Gym For Low Ceilings

  1. Compact Cardio Machines: Opt for low-profile cardio machines such as compact treadmills, ellipticals, or stationary bikes that won’t interfere with low ceilings. Look for models with folding mechanisms for easy storage when not in use.
  2. Vertical Resistance Training Equipment: Maximize floor space by incorporating vertical resistance training equipment like power towers, multi-functional workout stations, or wall-mounted resistance bands. These versatile options provide a full-body workout without the need for bulky machines.
  3. Adjustable Height Benches: Choose adjustable height benches that can be easily customized to fit within the constraints of low ceilings. Look for benches with a sturdy construction and cushioned padding for added comfort during strength training exercises.
  4. Compact Free Weights: Invest in a set of compact free weights such as dumbbells or kettlebells that can be stored neatly on racks or shelves when not in use. Opt for hexagonal-shaped weights to prevent rolling and ensure stability during workouts.

Creating a Functional Workout Space

Now that you’ve selected the essential equipment for your home gym, it’s time to focus on creating a functional and inspiring workout space. Follow these tips to make the most of your low-ceilinged environment:

  1. Maximize Vertical Space: Take advantage of vertical wall space for storage, organization, and mounting equipment such as resistance bands or suspension trainers.
  2. Opt for Mirrors: Mirrors not only create the illusion of space but also allow you to monitor your form and technique during workouts. Install mirrors on one or more walls to enhance visibility and motivation.
  3. Ensure Adequate Lighting: Proper lighting is essential for safety and visibility in a home gym. Choose bright, energy-efficient lighting fixtures that illuminate the entire space without casting harsh shadows or glare.
  4. Incorporate Inspirational Decor: Personalize your home gym with motivational quotes, posters, or artwork that inspire you to stay active and committed to your fitness goals.

Read too: Exploring the Benefits and How-Tos of DIY Ceiling Cassette Mini Split Installation: Revolutionizing Comfort

Conclusion

With careful planning and thoughtful consideration, you can transform even the smallest space into a highly functional and inspiring home gym for low ceilings. By selecting compact equipment, maximizing vertical space, and creating a comfortable workout environment, you’ll be well on your way to achieving your fitness aspirations without ever leaving the comfort of your home.

Explore the Magic of Flush Star Ceiling Light Fixtures: Illuminate Your Space with Elegance

Are you looking to elevate the ambiance of your space with a touch of elegance and sophistication? Look no further than the enchanting allure of Flush Star Ceiling Light fixtures. These captivating lighting solutions not only brighten up your room but also add a celestial charm that mesmerizes anyone who enters. Let’s delve into the world of Flush Star Ceiling Lights and discover how they can transform your space into a celestial sanctuary.

Flush Star Ceiling Light

Introduction

In the realm of interior design, lighting plays a pivotal role in setting the mood and ambiance of a space. Whether you’re designing a cozy living room, a serene bedroom, or a luxurious dining area, the right lighting can make all the difference. And when it comes to creating a truly enchanting atmosphere, Flush Star Ceiling Lights emerge as a shining star in the world of interior lighting.

What are Flush Star Ceiling Lights?

Flush Star Ceiling Lights are fixtures designed to mimic the twinkling beauty of a starry night sky right in your own home. These innovative lighting solutions feature an array of tiny LED lights embedded within a flush-mounted ceiling panel, creating a breathtaking illusion of stars scattered across the ceiling. With their sleek and minimalist design, Flush Star Ceiling Lights seamlessly blend into any décor style, adding a touch of celestial magic to both modern and traditional spaces.

Benefits of Flush Star Ceiling Lights

  1. Enhanced Ambiance: Flush Star Ceiling Lights instantly elevate the ambiance of any room, creating a serene and enchanting atmosphere that invites relaxation and tranquility.
  2. Space-Saving Design: Unlike traditional chandeliers or pendant lights that can take up valuable space, Flush Star Ceiling Lights are flush-mounted, making them ideal for rooms with low ceilings or limited overhead clearance.
  3. Energy Efficiency: With the widespread adoption of LED technology, Flush Star Ceiling Lights offer excellent energy efficiency, consuming significantly less power than traditional lighting fixtures while providing ample illumination.
  4. Versatile Applications: From bedrooms and living rooms to home theaters and meditation spaces, Flush Star Ceiling Lights are versatile enough to enhance the ambiance of any room in your home.
  5. Customization Options: Many Flush Star Ceiling Lights come with customizable features, allowing you to adjust the brightness, color temperature, and even create dynamic lighting effects to suit your preferences.

Choosing the Right Flush Star Ceiling Light

When selecting a Flush Star Ceiling Light for your space, consider the following factors:

  1. Size and Shape: Choose a fixture size and shape that complements the dimensions and layout of your room.
  2. Light Output: Determine the desired brightness level and color temperature to create the perfect ambiance.
  3. Installation Requirements: Consider the installation method and any additional hardware or wiring needed to integrate the fixture seamlessly into your ceiling.
  4. Budget: Establish a budget and explore options that offer the best combination of quality and affordability.

Installation and Maintenance

While Flush Star Ceiling Lights may seem like a complex lighting solution, installation is relatively straightforward, especially if you opt for a surface-mounted fixture that doesn’t require recessing into the ceiling. However, for more intricate designs or custom installations, professional assistance may be necessary to ensure proper wiring and alignment. Once installed, Flush Star Ceiling Lights require minimal maintenance, with occasional dusting to keep the LED panels clean and bright.

Enhance Your Space with Flush Star Ceiling Lights

Transforming your space into a celestial oasis has never been easier with Flush Star Ceiling Lights. Whether you’re looking to create a serene bedroom retreat, a captivating home theater experience, or a cozy living area for relaxation and rejuvenation, these enchanting lighting fixtures offer a magical solution that transcends traditional lighting concepts. Elevate your ambiance and indulge in the celestial splendor of Flush Star Ceiling Lights today!

Conclusion

Flush Star Ceiling Lights represent a harmonious blend of innovation, elegance, and celestial beauty in the realm of interior lighting. With their enchanting design, energy efficiency, and versatility, these captivating fixtures have become a must-have addition for anyone seeking to elevate the ambiance of their space. Illuminate your home with the mesmerizing allure of Flush Star Ceiling Lights and bask in the celestial splendor they bring to your living space.

Read too: Exploring the Benefits and How-Tos of DIY Ceiling Cassette Mini Split Installation: Revolutionizing Comfort

Floor To Ceiling Sycamore Il – Transforming Spaces with Timeless Style

In the heart of Sycamore, Illinois, lies a hidden gem for homeowners and interior design enthusiasts alike: Floor To Ceiling Sycamore Il. This premier destination offers a comprehensive range of flooring, cabinetry, and home improvement solutions, all under one roof. Whether you’re embarking on a renovation project or building your dream home from scratch, Floor To Ceiling Sycamore Il provides everything you need to elevate your space with style and functionality.

Floor To Ceiling Sycamore Il

Unraveling the Essence of Floor To Ceiling Sycamore Il

At Floor To Ceiling Sycamore Il, the emphasis is not just on products but on the experience of creating a home that reflects your unique taste and personality. From the moment you step into their showroom, you’re greeted with a vast array of options curated to inspire and ignite your imagination.

Exploring Flooring Options

Flooring sets the foundation for any room, and at Floor To Ceiling Sycamore Il, the possibilities are endless. Whether you prefer the timeless elegance of hardwood, the durability of laminate, or the versatility of luxury vinyl, you’ll find an extensive selection to suit your needs and preferences. Their team of experts is on hand to guide you through the selection process, ensuring that you find the perfect flooring solution for every space in your home.

Elevating Spaces with Cabinetry

The kitchen is often referred to as the heart of the home, and with Floor To Ceiling Sycamore Il’s premium cabinetry options, you can make it the epitome of style and functionality. From sleek and modern designs to classic and timeless aesthetics, their collection features something for every taste. With customizable options and expert craftsmanship, you can bring your vision to life and create a kitchen that is as beautiful as it is functional.

Transformative Home Improvement Solutions

In addition to flooring and cabinetry, Floor To Ceilings Sycamore Il offers a wide range of home improvement solutions to enhance every aspect of your living space. From lighting fixtures and window treatments to countertops and hardware, every detail is meticulously curated to elevate your home’s aesthetic appeal. Their team of professionals actively dedicates themselves to providing personalized service and expert advice, actively assisting you in bringing your vision to life, regardless of the size of your project.

Experience the Difference

What sets Floor To Ceilings Sycamore Il apart is not just the quality of their products but the level of service they provide. From concept to completion, their team actively commits to exceeding your expectations and ensuring that your journey to creating the perfect home is seamless and enjoyable. With a focus on innovation, quality, and customer satisfaction, Floor To Ceilings Sycamore Il is your ultimate destination for all your home improvement needs.

Read too: Exploring the Benefits and How-Tos of DIY Ceiling Cassette Mini Split Installation: Revolutionizing Comfort

Conclusion: Elevate Your Space with Floor To Ceiling Sycamore Il

Whether you’re renovating your current home or building a new one, Floor To Ceiling Sycamore Il offers everything you need to transform your space into a reflection of your style and personality. With a comprehensive range of products, expert guidance, and unparalleled customer service, they are your trusted partner in creating the home of your dreams. Visit Floor To Ceiling Sycamore Il today and unlock the potential of your living spaces.

Extra Large Modern Chandeliers For High Ceiling: Elevate Your Space

Illuminate your home in style with Extra Large Modern Chandeliers For High Ceiling, the epitome of elegance and sophistication. Discover how these stunning fixtures can transform your space into a breathtaking masterpiece.

Extra Large Modern Chandeliers For High Ceilings

Introduction

Chandeliers have long been associated with luxury and grandeur, serving as focal points in any room they adorn. However, for spaces with high ceilings, finding the perfect chandelier can be a challenge. Enter Extra Large Modern Chandeliers For High Ceilings – the solution to your lighting woes. In this article, we’ll explore the beauty and functionality of these statement pieces and why they’re the perfect choice for tall spaces.

Understanding Extra Large Modern Chandeliers For High Ceilings

What sets these chandeliers apart?

Extra Large Modern Chandeliers For High Ceilings actively enhance tall spaces, making a bold statement while actively providing ample illumination. These fixtures feature sleek, contemporary designs that add a touch of modern sophistication to any room.

Benefits of Extra Large Modern Chandeliers For High Ceilings

  1. Dramatic Impact: With their impressive size and striking designs, Extra Large Modern Chandeliers For High Ceilings command attention and instantly elevate the ambiance of any room.
  2. Optimal Lighting: High ceilings can often result in poor lighting distribution, but Extra Large Modern Chandeliers are equipped to illuminate even the largest of spaces with ease, ensuring every corner is bathed in warm, inviting light.
  3. Contemporary Style: Unlike traditional chandeliers, which may feel outdated in modern spaces, Extra Large Modern Chandeliers boast sleek lines and innovative designs that complement contemporary interiors perfectly.
  4. Versatile Placement: While these chandeliers are ideal for high ceilings, their versatility allows them to enhance the beauty of any space, whether it’s a grand foyer, dining room, or even a commercial venue.

Applications of Extra Large Modern Chandeliers For High Ceilings

Extra Large Modern Chandeliers For High Ceilings are suitable for a variety of settings, including:

  • Luxury Homes: Make a statement in your high-ceilinged living room or foyer with a dazzling Extra Large Modern Chandelier that exudes elegance and sophistication.
  • Hotel Lobbies: Create a memorable first impression for guests with a show-stopping chandelier that adds a touch of opulence to your hotel’s entrance.
  • Event Spaces: Whether it’s a wedding venue or a corporate event space, Extra Large Modern Chandeliers can enhance the atmosphere and leave a lasting impression on attendees.

Conclusion

In conclusion, Extra Large Modern Chandeliers For High Ceiling are more than just lighting fixtures – they’re works of art that can transform any space into a luxurious haven. With their dramatic impact, optimal lighting, and contemporary style, these chandeliers are the perfect choice for spaces with soaring ceilings. Elevate your home or commercial venue with the timeless beauty of Extra Large Modern Chandeliers For High Ceilings today.

Read too: Exploring the Benefits and How-Tos of DIY Ceiling Cassette Mini Split Installation: Revolutionizing Comfort

Dual Oscillating Ceiling Fan Technology: Maximizing Comfort and Efficiency

In today’s fast-paced world, where comfort and efficiency are paramount, the humble ceiling fan has evolved into a technological marvel. Enter the Dual Oscillating Ceiling Fan – a revolution in air circulation that combines style, functionality, and innovation. Discover how this cutting-edge appliance can transform your living space into a haven of cool tranquility.

Dual Oscillating Ceiling Fan

Introduction

Ceiling fans have long been a staple in homes and offices worldwide, providing a cost-effective and energy-efficient way to stay cool during hot weather. However, traditional ceiling fans are limited in their ability to distribute air evenly throughout a room. This is where Dual Oscillating Ceiling Fans step in, offering a dynamic solution to this age-old problem.

Understanding Dual Oscillating Ceiling Fans

What sets Dual Oscillating Ceiling Fans apart?

Dual Oscillating Ceiling Fans actively feature dual fan heads that rotate both horizontally and vertically, enabling multidirectional airflow. This innovative design actively ensures even circulation of air throughout the room, actively eliminating hot spots and maximizing comfort.

Benefits of Dual Oscillating Ceiling Fans

  1. Enhanced Air Circulation: Unlike conventional ceiling fans that only move air in one direction, Dual Oscillating Ceiling Fans distribute air evenly in all directions, creating a pleasant breeze throughout the room.
  2. Improved Comfort: With dual oscillation capabilities, these fans can provide cooling relief to everyone in the room, regardless of their location. Say goodbye to feeling too hot or too cold in certain spots – Dual Oscillating Ceiling Fans ensure a consistent and comfortable temperature.
  3. Energy Efficiency: By circulating air more effectively, Dual Oscillating Ceiling Fans can help reduce the workload on your HVAC system, leading to potential energy savings. This eco-friendly option allows you to stay comfortable without breaking the bank.
  4. Stylish Design Options: Dual Oscillating Ceiling Fans come in a variety of styles and finishes to complement any décor. Whether you prefer a sleek and modern look or a more traditional aesthetic, there’s a Dual Oscillating Ceiling Fan to suit your taste.

Applications of Dual Oscillating Ceiling Fans

Dual Oscillating Ceiling Fans actively oscillate and provide versatility for use in a variety of settings, including:

  • Residential Spaces: Keep your home cool and comfortable year-round with a Dual Oscillating Ceiling Fan in your living room, bedroom, or even outdoor patio.
  • Commercial Buildings: From offices to restaurants, Dual Oscillating Ceiling Fans can help create a welcoming environment for customers and employees alike.
  • Industrial Facilities: Improve air circulation and ventilation in warehouses, workshops, and manufacturing plants with the powerful performance of Dual Oscillating Ceiling Fans.

Read too: Exploring the Benefits and How-Tos of DIY Ceiling Cassette Mini Split Installation: Revolutionizing Comfort

Conclusion

In conclusion, Dual Oscillating Ceiling Fans represent the pinnacle of ceiling fan technology, offering unmatched comfort, efficiency, and style. Whether you’re looking to upgrade your home’s cooling system or enhance the atmosphere of your business, investing in a Dual Oscillating Ceiling Fan is a decision you won’t regret.

Upgrade to Dual Oscillating Ceiling Fans today and experience the difference for yourself!

Drop Ceiling Tile Speaker: Elevate Your Audio Experience with Innovative

Are you searching for a discreet and sophisticated audio solution for your home or office? Look no further than drop ceiling tile speakers. In this comprehensive guide, we’ll explore the world of drop ceiling tile speaker, from their innovative design and installation process to the benefits of incorporating them into your audio setup. Whether you’re a music enthusiast, movie buff, or simply seeking to enhance your space with immersive sound, drop ceiling tile speakers offer a seamless and stylish solution.

Drop Ceiling Tile Speakers

Exploring Drop Ceiling Tile Speakers

Understanding Drop Ceiling Tile Speakers:

Drop ceiling tile speakers are audio devices designed to be installed directly into standard drop ceiling grid systems, allowing for a sleek and unobtrusive audio solution. These speakers are typically flush-mounted within ceiling tiles, blending seamlessly into the surrounding decor for a discreet yet immersive audio experience.

Key Features of Drop Ceiling Tile Speakers:

  • Low-profile design: Drop ceiling tile speakers are engineered to be unobtrusive, providing high-quality sound without taking up valuable floor or wall space.
  • Easy installation: With their simple installation process, drop ceiling tile speakers can be quickly and easily integrated into existing drop ceiling systems, making them an ideal choice for both residential and commercial spaces.
  • Customizable options: From single speakers to multi-zone audio systems, drop ceiling tile speakers offer a range of customizable options to suit different audio needs and preferences.

Benefits of Drop Ceiling Tile Speakers

1. Seamless Integration:

One of the primary benefits of drop ceiling tile speakers is their ability to seamlessly integrate into any space. By mounting directly within the ceiling tiles, these speakers become virtually invisible, allowing you to enjoy high-quality sound without disrupting the aesthetic of your room.

2. Enhanced Sound Distribution:

Drop ceiling tile speakers are strategically positioned to distribute sound evenly throughout the room, ensuring optimal audio performance regardless of the listener’s location. This even distribution creates a more immersive listening experience, whether you’re hosting a party or enjoying a quiet night at home.

3. Space-saving Solution:

Drop ceiling tile speakers conserve valuable floor and wall space, making them an excellent choice for rooms with limited space, unlike traditional floor-standing or wall-mounted speakers. By eliminating bulky speaker systems, you can maximize the functionality and versatility of your space without sacrificing audio quality.

Installing Drop Ceiling Tile Speakers

1. Planning and Preparation:

Before installing drop ceiling tile speakers, carefully plan the layout and placement of each speaker to ensure optimal sound coverage. Consider factors such as room size, ceiling height, and seating arrangement to determine the best placement for your speakers.

2. Cutting Ceiling Tiles:

Using a utility knife or ceiling tile cutter, carefully cut holes in the ceiling tiles to accommodate the speakers. Be sure to measure and mark the precise locations for each speaker before cutting to avoid errors or misalignment.

3. Wiring and Connection:

Once you cut the holes, carefully run speaker wire from the audio source to each speaker location. Follow the manufacturer’s instructions for wiring and connection, ensuring that all connections are secure and properly insulated.

Read too: Exploring Craftsman Style Ceiling Fans for Your Home: Embracing Timeless Elegance

Conclusion

Drop ceiling tile speaker offer a sleek, space-saving, and immersive audio solution for any home or office environment. By seamlessly integrating high-quality sound into your ceiling, these speakers provide an unparalleled listening experience while maintaining the aesthetic integrity of your space. Whether you’re hosting a movie night, entertaining guests, or simply enjoying your favorite music, drop ceiling tile speakers deliver crystal-clear sound and superior performance. Upgrade your audio experience today with the innovative technology of drop ceiling tile speakers.

Driftwood Ceiling Fan With Light Fixture: Enhance Your Home Decor with a Stylish

Are you looking to infuse your home with the tranquil vibes of coastal living? Consider adding a driftwood ceiling fan with a light fixture to your space. In this guide, we’ll delve into the allure and practicality of driftwood ceiling fans with lights, exploring their design, features, installation, and more. Whether you’re aiming for a beach house aesthetic or simply seeking to bring a touch of nature indoors, a driftwood ceiling fan with light is sure to captivate and elevate your home decor.

Driftwood Ceiling Fan With Light

Unveiling the Beauty of Driftwood Ceiling Fans With Lights

What Sets Driftwood Ceiling Fans With Lights Apart?

Driftwood ceiling fans with lights offer a unique blend of rustic charm and modern functionality, making them an ideal choice for coastal-inspired interiors. Crafted from weathered wood or finished to mimic the look of driftwood, these fans evoke the natural beauty of seaside landscapes, infusing any room with a sense of serenity and style.

Key Features of Driftwood Ceiling Fans With Lights:

  • Weathered finish: Driftwood ceiling fans often feature a distressed or weathered finish, giving them an authentic and aged appearance reminiscent of driftwood washed ashore.
  • Integrated lighting: Many driftwood ceiling fans come equipped with built-in light fixtures, providing both illumination and cooling comfort in one stylish package.
  • Versatile design: From traditional to contemporary styles, driftwood ceiling fans with lights come in a variety of designs to suit different decor preferences and room aesthetics.

Benefits of Choosing a Driftwood Ceiling Fan With Light

1. Coastal Elegance:

A driftwood ceiling fan with a light fixture instantly adds a touch of coastal elegance to any room. Whether installed in a living room, bedroom, or outdoor patio, these fans evoke the relaxed atmosphere of beachside living, creating a serene and inviting ambiance.

2. Dual Functionality:

Combining a ceiling fan with a light fixture offers dual functionality, allowing you to circulate air and illuminate your space simultaneously. This versatility makes driftwood ceiling fans with lights a practical and space-saving solution for rooms where both cooling and lighting are needed.

3. Energy Efficiency:

Many driftwood ceiling fans with lights are designed with energy-efficient motors and LED light bulbs, helping you reduce energy consumption and lower utility costs. By choosing an eco-friendly option, you can enjoy year-round comfort while minimizing your environmental footprint.

Installing a Driftwood Ceiling Fan With Light

1. Pre-Installation Preparation:

Before installing a driftwood ceiling fan with a light fixture, ensure that you have the necessary tools and equipment on hand. Measure the ceiling height and the space where the fan will be installed to ensure proper clearance and functionality.

2. Mounting the Fan:

Follow the manufacturer’s instructions for mounting the fan to the ceiling, taking care to secure it properly and balance the blades for smooth and efficient operation. Use a sturdy mounting bracket and hardware to ensure the fan is securely attached to the ceiling.

3. Wiring and Electrical Connections:

Carefully wire the fan to the electrical circuit, following the wiring diagram provided by the manufacturer. Make sure to turn off the power at the breaker box before making any electrical connections and consult a qualified electrician if you’re unsure about the wiring process.

Conclusion

A driftwood ceiling fan with a light fixture is more than just a functional appliance—it’s a statement piece that adds character, charm, and coastal flair to any room. By choosing a driftwood ceiling fan with light, you can create a relaxing and inviting atmosphere that captures the essence of beachside living. Whether you’re decorating a seaside retreat or bringing a touch of coastal style to your inland home, a driftwood ceiling fan with light is sure to become the focal point of your decor.

Read too: Exploring Craftsman Style Ceiling Fans for Your Home: Embracing Timeless Elegance

DIY Mini Split Ceiling Cassette Installation: Transform Your Space

Are you looking to upgrade your home’s cooling or heating system with a sleek and efficient solution? Consider installing a DIY mini split ceiling cassette system. In this guide, we’ll explore everything you need to know about DIY mini split ceiling cassettes, from their benefits and installation process to important considerations for a successful project. Whether you’re a seasoned DIY enthusiast or a first-time homeowner, a mini split ceiling cassette system can help you achieve optimal comfort in your space while maintaining a modern and unobtrusive aesthetic.

Diy Mini Split Ceiling Cassette

Understanding DIY Mini Split Ceiling Cassettes

What is a DIY Mini Split Ceiling Cassette?

A DIY mini split ceiling cassette is a compact and versatile heating and cooling system designed to be installed directly into the ceiling of a room. Unlike traditional HVAC systems that require bulky ductwork and extensive installation, mini split ceiling cassettes offer a streamlined and efficient solution for maintaining comfortable indoor temperatures.

Key Features of DIY Mini Split Ceiling Cassettes:

  • Compact design: Mini split ceiling cassettes are designed to be discreet and unobtrusive, blending seamlessly into the ceiling for a sleek and modern look.
  • Zone control: With individual air handlers installed in different rooms or zones, mini split ceiling cassettes offer customizable temperature control for enhanced comfort and energy efficiency.
  • Quiet operation: Advanced technology ensures that mini split ceiling cassettes operate quietly and efficiently, minimizing noise disturbance while providing reliable heating and cooling.

Benefits of DIY Mini Split Ceiling Cassettes

1. Space-saving Design:

One of the primary advantages of DIY mini split ceiling cassettes is their space-saving design. By eliminating the need for bulky ductwork and wall-mounted units, these systems free up valuable floor and wall space, allowing for greater flexibility in room layout and design.

2. Energy Efficiency:

DIY mini split ceiling cassettes are highly energy-efficient, allowing you to heat or cool specific rooms or zones without wasting energy on areas that are not in use. This targeted approach to heating and cooling can lead to significant energy savings and lower utility bills over time.

3. Enhanced Aesthetics:

Unlike traditional HVAC systems, which often feature bulky and unsightly components, DIY mini split ceiling cassettes are designed to blend seamlessly into the ceiling for a sleek and modern look. This minimalist design aesthetic can enhance the overall appearance of your space while maintaining optimal comfort.

Installing a DIY Mini Split Ceiling Cassette

1. Assessing Your Space:

Before installing a DIY mini split ceiling cassette, carefully assess your space to determine the best location for the unit. Consider factors such as room size, ceiling height, and existing electrical wiring to ensure proper installation and functionality.

2. Selecting the Right Unit:

Choose a DIY mini split ceiling cassette system that is appropriate for your space and heating/cooling needs. Consider factors such as BTU capacity, energy efficiency rating, and additional features such as Wi-Fi connectivity or programmable settings.

3. Professional Consultation:

While DIY installation is possible for some homeowners, it’s essential to consult with a professional HVAC technician or contractor before beginning the installation process. A professional can provide valuable guidance and ensure the correct and safe installation of the system.

Conclusion

DIY mini split ceiling cassettes offer a convenient, energy-efficient, and aesthetically pleasing solution for heating and cooling your space. By understanding the benefits, installation process, and considerations associated with these systems, you can confidently upgrade your home’s HVAC system and enjoy optimal comfort year-round. Whether you’re looking to cool a single room or multiple zones, a DIY mini split ceilings cassette can help you achieve your heating and cooling goals with ease.

Read too: Exploring Craftsman Style Ceiling Fans for Your Home: Embracing Timeless Elegance

Decorative 2X2 Ceiling Tile: Elevate Your Space with Stylish and Functional

Decorative 2X2 ceiling tiles offer a versatile and stylish solution for enhancing the aesthetics of any room. In this comprehensive guide, we’ll delve into the world of decorative 2X2 ceiling tile, exploring their benefits, design options, installation tips, and more. Whether you’re looking to add a touch of elegance to your home or create a stunning focal point in a commercial space, decorative 2X2 ceiling tiles are sure to elevate your interior design.

Decorative 2X2 Ceiling Tiles

Exploring the Beauty of Decorative 2X2 Ceiling Tiles

1. Versatile Design Options:

Decorative 2X2 ceiling tiles come in a wide range of styles, patterns, and finishes, allowing you to customize the look of your space to suit your taste and decor preferences. From classic designs like tin and faux tin to contemporary options like wood and metal, there’s a decorative 2X2 ceiling tile to complement any design aesthetic.

2. Enhanced Aesthetics:

One of the primary benefits of decorative 2X2 ceiling tiles is their ability to enhance the aesthetics of a room. Whether used as a subtle accent or a bold statement piece, these tiles add texture, depth, and visual interest to ceilings, transforming them from ordinary to extraordinary.

3. Easy Installation:

Despite their intricate appearance, decorative 2X2 ceiling tile are relatively easy to install, making them a popular choice for DIY enthusiasts and professional contractors alike. With the right tools and techniques, you can quickly and easily transform the look of your space with decorative ceiling tiles.

Read too: Exploring Craftsman Style Ceiling Fans for Your Home: Embracing Timeless Elegance

Benefits of Decorative 2X2 Ceiling Tiles

1. Conceal Imperfections:

Decorative 2X2 ceiling tiles are an excellent solution for concealing imperfections in ceilings, such as cracks, stains, and uneven surfaces. By covering these flaws with stylish tiles, you can create a smooth and uniform ceiling surface that enhances the overall appearance of the room.

2. Improved Acoustics:

In addition to their aesthetic benefits, decorative 2X2 ceiling tiles can also help improve acoustics in a room by absorbing sound and reducing echo. This makes them an ideal choice for spaces where noise control is a concern, such as offices, restaurants, and home theaters.

3. Durability and Longevity:

Decorative 2X2 ceiling tiles are typically made from durable materials such as metal, PVC, or fiberglass, ensuring long-lasting performance and resistance to damage. With proper care and maintenance, these tiles can retain their beauty and functionality for years to come.

Installing Decorative 2X2 Ceiling Tiles

1. Preparation:

Before installing decorative 2X2 ceiling tiles, ensure that the ceiling surface is clean, smooth, and free of any debris or obstructions. Remove existing ceiling tiles or panels, if necessary, and make any repairs or adjustments as needed.

2. Installation:

Begin by measuring the dimensions of the ceiling and marking the layout for the tiles. Use adhesive or nails to secure the tiles in place, following the manufacturer’s instructions for proper installation. Ensure that the tiles are aligned correctly and evenly spaced for a professional-looking finish.

3. Finishing Touches:

Once all the tiles are installed, add finishing touches such as trim pieces or decorative accents to complete the look. Caulk any gaps or seams between tiles to create a seamless appearance, and touch up any paint or finish as needed to ensure a polished finish.

Conclusion

Decorative 2X2 ceiling tiles offer a stylish, versatile, and easy-to-install solution for enhancing the aesthetics of any room. Whether used as a subtle accent or a bold statement piece, these tiles add texture, depth, and visual interest to ceilings, transforming them into stunning focal points. With a wide range of design options and easy installation process, decorative 2X2 ceiling tiles are sure to elevate the look of your space and impress visitors for years to come.

Ceiling Sprinkler Cover Plate: Enhance Safety and Style

Ceiling sprinkler cover plate play a crucial role in fire protection systems, offering both safety and aesthetic benefits. In this comprehensive guide, we’ll explore everything you need to know about ceiling sprinkler cover plates, including their importance, functionality, installation process, and design options. Whether you’re a homeowner, building manager, or safety professional, understanding the role of ceiling sprinkler cover plates is essential for ensuring the safety of occupants and protecting property in the event of a fire.

Ceiling Sprinkler Cover Plate

Understanding the Role of Ceiling Sprinkler Cover Plates

1. Fire Protection:

Ceiling sprinkler cover plates are an integral component of automatic fire sprinkler systems, designed to prevent water from prematurely discharging from the sprinkler head. By covering the sprinkler head with a heat-sensitive plate, ceiling sprinkler cover plates help contain the flow of water until activated by high temperatures caused by a fire.

2. Aesthetic Enhancement:

In addition to their fire protection function, ceiling sprinkler cover plates also contribute to the overall aesthetics of a space. With a variety of finishes and designs available, cover plates can blend seamlessly into the ceiling or add a decorative touch to complement the interior design of the room.

3. Safety Compliance:

Ceiling sprinkler cover plates are subject to strict regulatory standards and building codes to ensure their effectiveness in fire protection. Compliance with these standards is essential for ensuring the safety of building occupants and minimizing property damage in the event of a fire.

Read too: Exploring Craftsman Style Ceiling Fans for Your Home: Embracing Timeless Elegance

Exploring the Benefits of Ceiling Sprinkler Cover Plates

1. Concealed Protection:

Ceiling sprinkler cover plates provide discreet protection against fire hazards, blending into the ceiling when not in use to maintain the aesthetic integrity of the space. This concealed protection ensures that occupants feel safe without compromising the visual appeal of the environment.

2. Quick Response:

In the event of a fire, ceiling sprinkler cover plates are designed to respond rapidly to elevated temperatures, activating the sprinkler system and releasing water to suppress the fire. This quick response helps minimize the spread of flames and smoke, allowing occupants to evacuate safely and reducing property damage.

3. Versatile Design Options:

Ceiling sprinkler cover plates are available in a wide range of materials, finishes, and designs to suit various aesthetic preferences and architectural styles. Whether you prefer a seamless integration with the ceiling or a decorative embellishment, there’s a cover plate option to meet your needs.

Installing Ceiling Sprinkler Cover Plates

1. Professional Installation:

Ceiling sprinkler cover plates should be installed by qualified professionals familiar with fire protection system regulations and guidelines. Professional installers can ensure proper placement, alignment, and functionality of the cover plates to maximize their effectiveness in fire suppression.

2. Regular Maintenance:

It’s essential to conduct regular inspections and maintenance of ceiling sprinkler cover plates to ensure they are free from obstruction and damage. Any signs of wear or corrosion should be addressed promptly to maintain the integrity of the fire protection system.

3. Compliance with Regulations:

When installing or replacing ceiling sprinkler cover plates, ensure compliance with local building codes and fire protection regulations. Non-compliance can result in fines, penalties, and compromised safety in the event of a fire.

Conclusion

Ceiling sprinkler cover plates are vital for fire protection and aesthetics in automatic sprinkler systems. Understanding their role, benefits, and installation is crucial for safety and compliance. Investing in quality covers and following standards enhances safety, protects property, and maintains visual appeal.

Ceiling Hanging Sliding Door: Elevate Your Space with Stylish and Functional

Ceiling hanging sliding doors are not only practical space-saving solutions but also stylish additions to any interior space. In this comprehensive guide, we’ll explore the versatility and elegance of ceiling hanging sliding door, offering valuable insights into their benefits, design options, and installation tips to help you elevate your space with ease.

Ceiling Hanging Sliding Doors

Embracing the Versatility of Ceiling Hanging Sliding Doors

1. Maximizing Space:

Ceiling hanging sliding doors are ideal for maximizing space in any room, particularly in areas where traditional swinging doors may be impractical due to limited floor space. By suspending the doors from the ceiling track, you can free up valuable floor space and create a more open and spacious environment.

2. Modern Elegance:

With their sleek and minimalist design, ceiling hanging sliding doors add a touch of modern elegance to any interior space. Whether used as room dividers, closet doors, or pantry doors, these stylish doors make a statement while seamlessly blending into the overall aesthetic of the room.

3. Versatile Design Options:

From frosted glass panels to solid wood panels, ceiling hanging sliding doors come in a variety of materials and finishes to suit any decor style. Choose from different hardware finishes, track styles, and door designs to customize the look of your doors and complement your existing decor.

Read too: Exploring Craftsman Style Ceiling Fans for Your Home: Embracing Timeless Elegance

Exploring the Benefits of Ceiling Hanging Sliding Doors

1. Space Efficiency:

Ceiling hanging sliding doors are a space-efficient solution for rooms with limited square footage. Unlike traditional swinging doors that require clearance space to open and close, sliding doors glide along a ceiling-mounted track, allowing you to make the most of your available space.

2. Seamless Integration:

Ceiling hanging sliding doors seamlessly integrate into the architecture of a space, providing a clean and unobtrusive design solution. Whether used to divide a living area from a dining area or to conceal a closet or storage space, these doors create a seamless transition between rooms while maintaining a sense of openness.

3. Enhanced Privacy:

In addition to their space-saving benefits, ceiling hanging sliding doors also offer enhanced privacy when closed. Whether used in bedrooms, bathrooms, or home offices, these doors provide a barrier between spaces without compromising on style or functionality.

Tips for Installing Ceiling Hanging Sliding Doors

1. Measure Carefully:

Before purchasing ceiling hanging sliding doors, carefully measure the height and width of the door opening to ensure a proper fit. Take into account the height of the ceiling and any obstructions that may interfere with the installation process.

2. Choose Quality Hardware:

Invest in high-quality hardware for your ceiling hanging sliding doors to ensure smooth operation and long-lasting performance. Look for sturdy ceiling tracks, durable rollers, and reliable door handles to prevent issues such as sticking or jamming.

3. Consider Professional Installation:

While ceiling hanging sliding doors can be installed as a DIY project, consider hiring a professional contractor or carpenter for more complex installations. A professional installer can ensure proper alignment, secure mounting, and smooth operation, resulting in a flawless finished product.

Conclusion

Ceiling hanging sliding door offer a winning combination of style, functionality, and space efficiency, making them a valuable addition to any interior space. Whether used as room dividers, closet doors, or pantry doors, these versatile doors provide a sleek and modern solution for maximizing space and enhancing privacy. With careful planning and attention to detail, you can transform your space with the elegance and sophistication of ceiling hanging sliding doors.

Ceiling Fans with Uplighting Features: Elevate Your Home Decor with Stylish

Ceiling fans are not only practical cooling solutions but also essential elements of interior design. When equipped with uplighting features, ceiling fans become even more versatile, providing both functional illumination and enhancing the ambiance of any space. In this comprehensive guide, we’ll explore the elegance and functionality of ceiling fans with uplighting, offering valuable insights into their benefits, design options, and installation tips to help you elevate your home decor with ease.

Ceiling Fans With Uplighting

Unveiling the Beauty of Ceiling Fans with Uplighting

1. Dual Functionality:

Ceiling fans with uplighting features offer the dual benefit of providing both cooling and ambient lighting. The uplighting component directs soft, diffused light upwards towards the ceiling, creating a warm and inviting glow that enhances the overall ambiance of the room. This additional layer of illumination complements existing lighting fixtures and adds depth to the space.

2. Versatile Design Options:

From sleek and modern to classic and traditional, ceiling fans with uplighting features come in a variety of styles to suit any decor aesthetic. Choose from different finishes, blade designs, and uplighting fixtures to complement your home’s interior design and elevate its visual appeal. Whether you prefer a contemporary look or a more traditional style, there’s a ceiling fan with uplighting to suit your taste.

3. Energy Efficiency:

Many ceiling fans with uplighting features are equipped with energy-efficient LED bulbs, offering long-lasting illumination while minimizing energy consumption. LED bulbs are known for their durability and low heat output, making them an eco-friendly lighting option for your home. By choosing a ceiling fan with uplighting, you can enjoy stylish illumination without compromising on energy efficiency.

Exploring the Benefits of Ceiling Fans with Uplighting

1. Enhanced Ambiance:

The soft, diffused light emitted by the uplighting component of ceiling fans creates a warm and inviting ambiance in any room. Whether used alone or in conjunction with other lighting fixtures, uplighting adds a layer of sophistication and elegance to your home decor, enhancing the overall atmosphere of the space.

2. Flexible Lighting Control:

Many ceiling fans with uplighting features come with built-in dimmer switches or remote control capabilities, allowing you to adjust the brightness and intensity of the uplighting to suit your preferences. This flexibility allows you to create the perfect ambiance for any occasion, whether you’re entertaining guests or enjoying a quiet evening at home.

3. Space-Saving Solution:

Combining a ceiling fan with uplighting features eliminates the need for separate light fixtures and fans, saving valuable space in smaller rooms or areas with low ceilings. This streamlined design maximizes both functionality and visual appeal, creating a cohesive look in your home without sacrificing comfort or style.

Tips for Installing Ceiling Fans with Uplighting

1. Choose the Right Size:

When selecting a ceiling fan with uplighting features, consider the size of the room and the fan’s blade span. Choose a fan with an appropriate size and blade span to ensure optimal air circulation and lighting coverage.

2. Follow Installation Instructions:

Carefully follow the manufacturer’s installation instructions when installing your ceiling fan with uplighting features. Ensure proper wiring and mounting to prevent accidents and ensure safe operation.

3. Hire a Professional:

If you’re not comfortable installing the ceiling fan yourself, consider hiring a licensed electrician or handyman to handle the installation. A professional installer can ensure proper wiring, mounting, and safety compliance, giving you peace of mind.

Conclusion

Ceiling fan with uplighting features offer a winning combination of style, functionality, and energy efficiency, making them a valuable addition to any home. Whether you’re looking to enhance illumination, improve air circulation, or elevate your home decor, these versatile fixtures provide the perfect solution. Explore the endless design options and benefits of ceiling fan with uplighting features to create a comfortable and stylish indoor environment for you and your family to enjoy.

Read too: Exploring Craftsman Style Ceiling Fans for Your Home: Embracing Timeless Elegance

Ceiling Fan with Uplight and Downlight Features: Exploring the Beauty

Ceiling fans are not only functional cooling solutions but also stylish additions to any room. When combined with uplight and downlight features, ceiling fans become even more versatile, providing both illumination and air circulation. In this guide, we’ll delve into the beauty and functionality of ceiling fan with uplight and downlight features, exploring their benefits, design options, and installation tips to help you enhance your home decor with ease.

Ceiling Fans With Uplight And Downlight

Embracing the Versatility of Ceiling Fans with Uplight and Downlight

1. Enhanced Illumination:

Ceiling fans with uplight and downlight features offer the dual benefit of providing both ambient and task lighting. The uplight feature illuminates the ceiling, creating a soft, indirect glow that enhances the overall ambiance of the room. Meanwhile, the downlight provides focused illumination, perfect for reading, working, or highlighting specific areas of the space.

2. Energy Efficiency:

Many ceiling fans with uplight and downlight features are equipped with energy-efficient LED bulbs, offering long-lasting illumination while minimizing energy consumption. LED bulbs are known for their durability and low heat output, making them an eco-friendly lighting option for your home.

3. Stylish Design Options:

From sleek and modern to classic and traditional, ceiling fans with uplight and downlight features come in a variety of styles to suit any decor aesthetic. Choose from different finishes, blade designs, and light fixture designs to complement your home’s interior design and elevate its visual appeal.

Exploring the Benefits of Ceiling Fans with Uplight and Downlight

1. Year-Round Comfort:

Ceiling fans with uplight and downlight features are designed to provide year-round comfort by circulating air and providing supplemental lighting. In the summer months, the fan’s cooling breeze helps create a comfortable indoor environment, while the downlight provides additional illumination during the darker winter months.

Read too: Exploring Craftsman Style Ceiling Fans for Your Home: Embracing Timeless Elegance

2. Space-Saving Solution:

Combining a ceiling fan with uplight and downlight features eliminates the need for separate light fixtures and fans, saving valuable space in smaller rooms or areas with low ceilings. This streamlined design maximizes both functionality and visual appeal, creating a cohesive look in your home.

3. Remote Control Convenience:

Many ceiling fans with uplight and downlight features come with remote control capabilities, allowing you to adjust fan speed, light intensity, and direction from the comfort of your seat. This added convenience makes it easy to customize your indoor environment according to your preferences and needs.

Tips for Installing Ceiling Fans with Uplight and Downlight

1. Choose the Right Size:

When selecting a ceiling fan with uplight and downlight features, consider the size of the room and the fan’s blade span. Choose a fan with an appropriate size and blade span to ensure optimal air circulation and lighting coverage.

2. Follow Installation Instructions:

Carefully follow the manufacturer’s installation instructions when installing your ceiling fan with uplight and downlight features. Ensure proper wiring and mounting to prevent accidents and ensure safe operation.

3. Hire a Professional:

If you’re not comfortable installing the ceiling fan yourself, consider hiring a licensed electrician or handyman to handle the installation. A professional installer can ensure proper wiring, mounting, and safety compliance, giving you peace of mind.

Conclusion

Ceiling fan with uplight and downlight features offer a winning combination of style, functionality, and energy efficiency, making them a valuable addition to any home. Whether you’re looking to enhance illumination, improve air circulation, or elevate your home decor, these versatile fixtures provide the perfect solution. Explore the endless design options and benefits of ceiling fans with uplight and downlight features to create a comfortable and stylish indoor environment for you and your family to enjoy.

Ceiling Drapery for Wedding Receptions: Elevate Your Wedding Decor

When it comes to creating an enchanting atmosphere for your wedding reception, every detail matters. One element that can make a significant impact on the overall ambiance is ceiling drapery. In this guide, we’ll explore the magic of ceiling drapery for wedding receptions, offering creative ideas and inspiration to help you elevate your wedding decor and create a memorable experience for you and your guests.

Ceiling Drapery For Wedding

Unveiling the Beauty of Ceiling Drapery for Wedding Receptions

1. Romantic Elegance:

Ceiling drapery adds an element of romantic elegance to any wedding venue, instantly transforming the space into a fairytale setting. Soft, billowing fabrics cascading from the ceiling create a sense of intimacy and romance, setting the stage for a magical celebration of love.

2. Versatile Design Options:

One of the great advantages of ceiling drapery is its versatility. Whether you’re planning a rustic barn wedding, a glamorous ballroom affair, or an outdoor garden celebration, ceiling drapery can be tailored to suit any venue and style. From delicate chiffon to luxurious satin, there are endless fabric options to choose from to complement your wedding theme.

3. Customizable Decor Elements:

Ceiling drapery provides a blank canvas for incorporating other decor elements into your wedding design. Consider embellishing the drapery with fairy lights, floral garlands, or hanging lanterns to add texture and visual interest. Personalized touches such as monogrammed initials or decorative accents that reflect your love story can further enhance the ambiance and create a unique atmosphere for your celebration.

Read too: Exploring Craftsman Style Ceiling Fans for Your Home: Embracing Timeless Elegance

Creative Ideas for Ceiling Drapery at Wedding Receptions

1. Canopy of Love:

Create a romantic canopy of drapery above the dance floor or sweetheart table to make a focal point for your reception. Drape sheer fabric in soft, flowing layers and add twinkling fairy lights or cascading floral arrangements for an ethereal effect.

2. Tent of Tranquility:

Transform an outdoor wedding venue into a luxurious oasis with a tented ceiling draped in billowing fabric. Opt for sheer, lightweight materials that allow natural light to filter through during the day and glow softly under the stars at night.

3. Garden-Inspired Romance:

Bring the beauty of the outdoors inside by incorporating ceiling drapery adorned with fresh flowers and greenery. Create a lush canopy above the reception tables or hang floral chandeliers from the ceiling for a whimsical touch.

Tips for Incorporating Ceiling Drapery Into Your Wedding Decor

1. Consult with a Professional:

Work with a wedding decorator or event planner who specializes in ceiling drapery to bring your vision to life. They can offer expert advice on fabric selection, design options, and installation techniques to ensure a flawless execution on your wedding day.

2. Consider Venue Logistics:

Before finalizing your ceiling drapery design, consider the logistics of your wedding venue, including ceiling height, structural limitations, and access for installation. Conduct a site visit with your decorator to assess the space and discuss any potential challenges or considerations.

3. Lighting Matters:

Don’t underestimate the power of lighting when it comes to showcasing your ceiling drapery. Work with a lighting designer to create a custom lighting scheme that enhances the beauty of the drapery and sets the mood for your reception.

Conclusion

Ceiling drapery is a versatile and beautiful decor element that can transform any wedding venue into a magical setting. From romantic canopies to garden-inspired installations, the possibilities are endless when it comes to incorporating ceilings drapery into your wedding decor. With careful planning and attention to detail, you can create a breathtaking ambiance that will leave a lasting impression on you and your guests for years to come.

Armstrong Sahara Ceiling Tile: Elevate Your Space

When it comes to enhancing the aesthetics and functionality of interior spaces, Armstrong Sahara ceiling tiles stand out as a top choice for architects, designers, and homeowners alike. In this comprehensive guide, we’ll explore the beauty and versatility of Armstrong Sahara ceiling tile, providing valuable insights into their features, benefits, and installation process, allowing you to transform any space with ease.

Armstrong Sahara Ceiling Tiles

Introducing Armstrong Sahara Ceiling Tiles

1. Elegance and Style:

Armstrong Sahara ceiling tiles are renowned for their timeless elegance and sophisticated style, making them a popular choice for a wide range of commercial and residential applications. Featuring a subtle textured surface and clean lines, Sahara tiles add a touch of sophistication to any space, enhancing its overall aesthetics.

2. Versatility and Functionality:

One of the key advantages of Armstrong Sahara ceiling tiles is their versatility and functionality. Available in a variety of sizes, colors, and edge details, Sahara tiles can be customized to suit any design vision or architectural style. Whether you’re creating a contemporary office space, a classic retail environment, or a cozy residential setting, Sahara tiles offer the flexibility to bring your vision to life.

3. Acoustic Performance:

In addition to their visual appeal, Armstrong Sahara ceiling tiles are designed to enhance acoustic comfort in interior spaces. Featuring sound-absorbing properties, Sahara tiles help reduce noise levels, creating a quieter and more comfortable environment for occupants. This makes them an ideal choice for spaces such as offices, classrooms, healthcare facilities, and more.

Features and Benefits of Armstrong Sahara Ceiling Tiles

1. Durable Construction:

Constructed from high-quality materials, Armstrong Sahara ceiling tiles are built to withstand the rigors of daily use while maintaining their beauty and integrity over time. Their durable construction makes them resistant to sagging, warping, and discoloration, ensuring long-lasting performance in any environment.

2. Easy Installation:

Installing Armstrong Sahara ceiling tiles is a straightforward process that requires minimal time and effort. With a variety of installation options, including drop-in, concealed, and surface mount, Sahara tiles can be easily integrated into new construction or renovation projects. Their lightweight design and precise dimensions make them easy to handle and install, saving time and labor costs.

3. Low Maintenance:

Maintaining Armstrong Sahara ceiling tiles is simple and hassle-free, thanks to their smooth, non-porous surface. Routine cleaning with a mild detergent and water is all that’s needed to keep Sahara tiles looking fresh and vibrant for years to come. Their resistance to mold, mildew, and bacteria makes them an ideal choice for spaces where hygiene is a priority.

Installing Armstrong Sahara Ceiling Tiles

1. Preparation:

Before installing Armstrong Sahara ceiling tiles, ensure that the ceiling grid is properly installed and leveled. Remove any existing ceiling tiles or panels and clean the surface to remove dust, dirt, and debris.

2. Cutting and Fitting:

Measure the dimensions of the ceiling area and cut the Sahara tiles to size using a sharp utility knife or a specialized ceiling tile cutter. Take care to make precise cuts to achieve a seamless fit.

3. Installation:

Place the cut Sahara tiles into the ceiling grid, starting from one corner and working your way across the ceiling. Ensure that the tiles are properly aligned and securely seated within the grid.

4. Finishing Touches:

Once all Sahara tiles are installed, inspect the ceiling for any gaps or unevenness. Make any necessary adjustments and add trim or molding as desired to complete the installation.

Conclusion

Armstrong Sahara ceiling tile offer a perfect blend of style, versatility, and functionality, making them an excellent choice for enhancing interior spaces. Whether you’re designing a commercial office, a retail store, or a residential home, Sahara tiles provide the aesthetic appeal, acoustic comfort, and durability needed to create a truly exceptional environment. Explore the endless design possibilities with Armstrong Sahara ceiling tiles and elevate your space to new heights of sophistication and style.

Read too: Exploring Craftsman Style Ceiling Fans for Your Home: Embracing Timeless Elegance

Armstrong Ceiling Plank Installation: Tips and Techniques

Armstrong ceiling planks offer a stylish and durable solution for enhancing the look of any space. In this comprehensive guide, we’ll walk you through the steps of Armstrong ceiling plank installation, covering everything from preparation and tools to finishing touches. Whether you’re a seasoned DIY enthusiast or a first-time installer, this article will provide you with the knowledge and confidence to achieve professional results.

Armstrong Ceiling Plank Installation

Getting Started: Preparation and Planning

Before you begin the installation process, it’s essential to properly prepare your space and plan out the layout of your ceiling planks. Here are some key steps to consider:

  1. Measure the Space: Accurately measure the dimensions of your ceiling to determine how many planks you’ll need for the installation.
  2. Prepare the Surface: Ensure that the ceiling surface is clean, smooth, and free of any debris or imperfections that could affect the installation process.
  3. Gather the Necessary Tools: Gather all the tools and materials you’ll need for the installation, including ceiling planks, adhesive, nails or screws, a saw, a level, and safety equipment.

Armstrong Ceiling Plank Installation: Step-by-Step Guide

Follow these step-by-step instructions for a successful Armstrong ceiling plank installation:

  1. Prepare the First Row: Start by measuring and cutting the first row of planks to fit the length of the ceiling. Use a saw to make precise cuts as needed.
  2. Apply Adhesive: Apply a recommended adhesive to the back of the first plank using a caulk gun, following the manufacturer’s instructions.
  3. Secure the Planks: Press the first plank firmly onto the ceiling surface, ensuring that it is level and aligned with the starting point. Use nails or screws to secure the plank in place if necessary.
  4. Continue Installation: Repeat the process for the remaining rows of planks, making sure to stagger the joints for a seamless appearance.
  5. Cutting and Fitting: Use a saw to cut planks to size as needed to fit around corners, fixtures, and other obstacles.
  6. Finishing Touches: Once all the planks are installed, apply any finishing touches, such as trim or molding, to complete the look of your ceiling.

Read too: Exploring the Innovation and Efficiency of Ceiling Mounted Surgical Light Solutions: Illuminating Precision

Tips and Techniques for Success

  • Take Your Time: Patience is key when it comes to Armstrong ceiling plank installation. Take your time to ensure each plank is properly aligned and secured.
  • Use Proper Safety Gear: Wear safety goggles, gloves, and a dust mask to protect yourself during the installation process.
  • Follow Manufacturer’s Instructions: Always follow the manufacturer’s instructions and recommendations for the best results.
  • Check for Level: Regularly use a level to ensure even installation of the planks without any dips or unevenness.

Maintenance and Care

After installing your Armstrong ceiling planks, ensure proper maintenance to keep them looking their best. Here are some maintenance tips to keep in mind:

  • Regularly dust or vacuum the ceiling planks to remove any dirt or debris.
  • Avoid using harsh chemicals or abrasive cleaners, as they can damage the finish of the planks.
  • If necessary, touch up any scratches or dents with matching paint or stain to maintain the appearance of the planks.

Conclusion

With the right tools, preparation, and techniques, Armstrong ceiling plank installation can be a rewarding and enjoyable project. By following the steps outlined in this guide and incorporating expert tips and techniques, you can achieve professional-quality results that will enhance the beauty and functionality of any space.