Wood for Outdoor Ceiling Projects: Exploring the Best Types

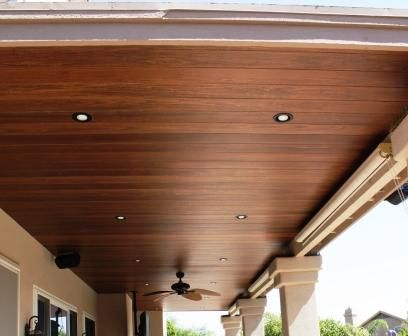
Are you considering adding a touch of warmth and natural beauty to your outdoor space with a wooden ceiling? Choosing the right type of wood is essential for ensuring durability, weather resistance, and aesthetic appeal. In this guide, we’ll explore the best types of wood for outdoor ceiling projects to help you make an informed decision.

Wood For Outdoor Ceiling

Understanding the Importance of Wood Selection for Outdoor Ceilings

When it comes to outdoor ceilings, selecting the appropriate wood is crucial due to exposure to elements such as sunlight, moisture, and temperature fluctuations. The right type of wood can withstand these environmental factors and maintain its structural integrity and appearance over time. Factors to consider when choosing wood for outdoor ceilings include:

  • Durability: Choose a wood species that is naturally resistant to decay, rot, and insect damage to ensure longevity.
  • Weather Resistance: Opt for wood that can withstand exposure to sunlight, rain, snow, and humidity without warping, splitting, or fading.
  • Aesthetic Appeal: Consider the color, grain pattern, and texture of the wood to achieve the desired look for your outdoor space.

Best Types of Wood for Outdoor Ceiling Projects

  1. Cedar: Cedar is a popular choice for outdoor ceilings due to its natural resistance to decay, rot, and insect infestation. It has a beautiful reddish-brown hue and a distinct aroma that adds character to outdoor spaces.
  2. Redwood: Redwood is another excellent option known for its durability and rich, reddish-brown color. It contains natural oils that protect it from moisture and decay, making it an ideal choice for outdoor applications.
  3. Pressure-Treated Pine: Pressure-treated pine is a cost-effective option for outdoor ceilings. It undergoes a treatment process that enhances its resistance to decay, rot, and insect damage, making it suitable for outdoor use.
  4. Mahogany: Mahogany is prized for its rich, dark color and elegant grain pattern. It is naturally resistant to rot and decay, making it a durable choice for outdoor ceilings. However, it may require periodic sealing or staining to maintain its appearance.
  5. Ipe: Ipe, also known as Brazilian walnut, is an extremely durable and weather-resistant hardwood. It has a rich, dark brown color and a dense grain pattern that adds sophistication to outdoor spaces. While more expensive than other options, ipe requires minimal maintenance and can last for decades.

Read too: Discovering the Charm of Nautical Outdoor Ceiling Fans for Your Coastal Retreat: Sail into Style

Factors to Consider When Installing Wood Outdoor Ceilings

  • Proper Ventilation: Ensure adequate ventilation to prevent moisture buildup and reduce the risk of mold and mildew growth.
  • Sealing or Staining: Apply a protective sealant or stain to the wood to enhance its durability and weather resistance.
  • Regular Maintenance: Perform routine inspections and maintenance tasks, such as cleaning and resealing, to prolong the life of your outdoor ceiling.

Conclusion

Choosing the right type of wood for your outdoor ceiling is essential for creating a durable, weather-resistant, and visually appealing outdoor space. By considering factors such as durability, weather resistance, and aesthetic appeal, you can select the perfect wood for your outdoor ceiling project and enjoy years of beauty and functionality.

Star Flush Mount Ceiling Light: Discover the Beauty

Are you searching for a lighting solution that combines functionality with celestial elegance? Look no further than star flush mount ceiling light. In this comprehensive guide, we’ll delve into everything you need to know about these stunning lighting fixtures, from their design versatility to installation tips and design inspiration.

Star Flush Mount Ceiling Light

Introducing Star Flush Mount Ceiling Lights

Star flush mount ceiling lights are more than just lighting fixtures—they’re works of art that add a touch of celestial beauty to any space. Featuring a sleek, low-profile design, these lights are mounted flush against the ceiling, making them ideal for rooms with low ceilings or limited space. With their intricate star-shaped patterns and soft, diffused glow, star flush mount ceiling lights create a captivating ambiance that’s sure to impress.

The Versatility of Star Flush Mount Ceiling Lights

One of the key advantages of star flush mount ceiling lights is their versatility. Available in a variety of sizes, styles, and finishes, these lights can complement a wide range of interior design aesthetics, from contemporary and minimalist to rustic and eclectic. Whether you’re illuminating a bedroom, living room, hallway, or foyer, star flush mount ceiling lights make a statement while seamlessly blending into your existing décor.

Read too: Discovering the Charm of Nautical Outdoor Ceiling Fans for Your Coastal Retreat: Sail into Style

Design Considerations for Star Flush Mount Ceiling Lights

When choosing star flush mount ceiling lights for your space, there are several factors to consider to ensure you find the perfect fixture:

  • Size: Consider the size of the room and the height of the ceiling when selecting the appropriate size for your star flush mount ceiling light. Opt for larger fixtures in spacious rooms to make a bold statement, while smaller lights are ideal for more intimate spaces.
  • Style: From modern and contemporary to traditional and vintage-inspired designs, there’s a wide range of styles to choose from when it comes to star flush mount ceiling lights. Select a style that complements your existing décor and enhances the overall aesthetic of the room.
  • Finish: Choose a finish that coordinates with other fixtures and hardware in the space, such as brushed nickel, oil-rubbed bronze, or matte black, for a cohesive look.

Installing Star Flush Mount Ceiling Lights

Installing star flush mount ceiling lights is a relatively simple process that can be completed in just a few steps. Here’s a basic overview of how to install these fixtures:

  1. Turn Off Power: Before beginning the installation process, turn off the power to the existing light fixture at the circuit breaker to prevent electrical accidents.
  2. Remove Old Fixture: If replacing an existing light fixture, carefully remove the old fixture from the ceiling, taking care not to damage the electrical wiring.
  3. Install Mounting Bracket: Attach the included mounting bracket to the electrical box in the ceiling using the provided screws, ensuring it is securely fastened.
  4. Connect Wiring: Connect the electrical wires from the ceiling to the corresponding wires on the star flush mount ceiling light fixture, following the manufacturer’s instructions and using wire nuts to secure the connections.
  5. Attach Fixture: After connecting the wiring, carefully position the fixture over the mounting bracket and secure it in place using the included screws.
  6. Test Light: Turn the power back on at the circuit breaker and test the light to ensure it is functioning properly before completing the installation process.

Design Inspiration

Need some inspiration to help you incorporate star flush mount ceiling lights into your home décor? Here are a few design ideas to spark your creativity:

  • Starry Night Bedroom: Create a dreamy bedroom retreat by installing star flush mount ceiling lights above the bed for a celestial-inspired ambiance.
  • Cosmic Café Dining Room: Illuminate your dining area with a cluster of star flush mount ceiling lights suspended at different heights for a striking centerpiece.
  • Galactic Gallery Hallway: Line the hallway with star flush mount ceiling lights to guide the way and create a captivating gallery-like atmosphere.

Conclusion

Star flush mount ceiling lights are more than just lighting fixtures—they’re expressions of style and sophistication that elevate the ambiance of any room. With their versatile designs, easy installation, and celestial charm, these lights are the perfect choice for adding a touch of elegance to your home décor.

Rustic Drop Ceiling Tile: A Guide to Rustic Home Décor

Are you looking to infuse your home with the cozy charm of rustic décor? One way to achieve this aesthetic is by incorporating rustic drop ceiling tile into your interior design. In this guide, we’ll explore everything you need to know about rustic drop ceiling tiles, from their features and benefits to installation tips and design inspiration.

Rustic Drop Ceiling Tiles

Why Choose Rustic Drop Ceiling Tiles?

Rustic drop ceiling tiles offer a unique blend of functionality and style, making them an excellent choice for homeowners seeking to enhance the visual appeal of their living spaces. Here are some reasons to consider incorporating rustic drop ceiling tiles into your home décor:

  • Authentic Aesthetic: Rustic drop ceiling tiles are designed to mimic the look of natural materials such as wood, tin, or reclaimed metal, adding authenticity and character to any room.
  • Versatility: Whether you’re aiming for a farmhouse-inspired kitchen, a cozy cabin retreat, or a rustic industrial loft, there’s a wide range of rustic drop ceiling tile designs to suit your preferred style.
  • Durability: Made from high-quality materials, rustic drop ceiling tiles are durable and long-lasting, providing both aesthetic appeal and practical functionality.
  • Easy Installation: With their lightweight construction and simple installation process, rustic drop ceiling tiles are an accessible option for DIY enthusiasts and professional contractors alike.

Choosing the Right Rustic Drop Ceiling Tiles

When selecting rustic drop ceiling tiles for your home, consider factors such as material, color, and pattern to ensure they complement your existing décor and design preferences. Here are some popular options to explore:

  1. Wood-look Tiles: Embrace the warmth and texture of natural wood with rustic drop ceiling tiles that feature realistic wood grain patterns and finishes.
  2. Tin Tiles: Add a touch of vintage charm to your space with tin drop ceiling tiles, which evoke the look of traditional pressed tin ceilings found in historic homes and buildings.
  3. Metallic Tiles: For an industrial-inspired aesthetic, opt for rustic drop ceiling tiles with metallic finishes such as copper, bronze, or aged metal.

Read too: Discovering the Charm of Nautical Outdoor Ceiling Fans for Your Coastal Retreat: Sail into Style

Installation Tips

Installing rustic drop ceiling tiles is a straightforward process that can be completed in just a few simple steps. Here’s a basic overview of how to install these stylish tiles:

  1. Prepare the Ceiling: Ensure the ceiling surface is clean, dry, and free of any debris or obstructions before beginning the installation process.
  2. Measure and Cut Tiles: Measure the dimensions of the ceiling and use a utility knife or tin snips to cut the rustic drop ceiling tiles to fit accordingly.
  3. Apply Adhesive: Apply a suitable adhesive to the back of each tile and carefully press it into place on the ceiling, starting from one corner and working your way across.
  4. Secure Edges: Use nails or screws to secure the edges of the tiles to the ceiling, ensuring they are firmly in place and evenly spaced.
  5. Finishing Touches: Once all tiles are installed, add finishing touches such as trim pieces or molding to complete the look and enhance the overall aesthetic.

Design Inspiration for Rustic Drop Ceiling Tiles

Need some inspiration to kickstart your rustic ceiling tile project? Here are a few design ideas to spark your creativity:

  • Rustic Farmhouse Kitchen: Install weathered wood-look ceiling tiles in a farmhouse kitchen for a cozy and inviting ambiance.
  • Rustic Cabin Retreat: Create a rustic retreat in your home with tin ceiling tiles that evoke the charm of a mountain cabin or lakeside lodge.
  • Rustic Industrial Loft: Incorporate metallic drop ceiling tiles into an industrial loft space for an edgy and modern twist on rustic design.

Conclusion

Rustic drop ceiling tile are a versatile and stylish option for enhancing the aesthetic appeal of any room in your home. Whether you’re aiming for a cozy farmhouse vibe or an urban industrial look, these tiles offer endless design possibilities to suit your unique style and preferences.

Insulate Your Garage Ceiling Without Drywall: Creative Ways

Are you looking to enhance the comfort and energy efficiency of your garage without the hassle of drywall installation? Insulating your garage ceiling without drywall can be a practical and effective solution. In this guide, we’ll explore creative methods to insulate your garage ceiling, keeping it comfortable and functional in any season.

Insulate Garage Ceiling Without Drywall

Insulate Garage Ceiling Without Drywall: Exploring Your Options

1. Foam Board Insulation

Foam board insulation is a popular choice for insulating garage ceilings without drywall. Available in various thicknesses and R-values, foam board insulation provides excellent thermal resistance and can help reduce heat transfer between the garage and living space above. To install foam board insulation, simply cut the panels to size and secure them to the ceiling joists using adhesive or mechanical fasteners.

2. Spray Foam Insulation

Spray foam insulation offers superior coverage and can effectively seal gaps and cracks in the garage ceiling. This type of insulation expands upon application, filling cavities and creating a seamless thermal barrier. Spray foam insulation is typically installed by professionals, but DIY kits are also available for smaller projects. Be sure to follow proper safety precautions when working with spray foam insulation.

3. Reflective Insulation

Reflective insulation, also known as radiant barrier insulation, is designed to reflect radiant heat away from the garage ceiling. This type of insulation typically consists of a layer of reflective foil laminated to a substrate material such as foam or bubble wrap. Reflective insulation is easy to install and can be stapled or taped directly to the underside of the garage ceiling joists.

Read too: Discovering the Charm of Nautical Outdoor Ceiling Fans for Your Coastal Retreat: Sail into Style

Benefits of Insulating Your Garage Ceiling Without Drywall

  • Improved Comfort: Proper insulation helps regulate the temperature in your garage, making it more comfortable to work in year-round.
  • Energy Savings: By reducing heat transfer, insulation can lower your energy bills by minimizing the need for heating and cooling.
  • Moisture Control: Insulation can help prevent condensation and moisture buildup in the garage, reducing the risk of mold and mildew growth.
  • Noise Reduction: Insulation can dampen sound transmission, making your garage quieter and more peaceful.

DIY Tips for Insulating Your Garage Ceiling

  • Measure Twice, Cut Once: Take accurate measurements of your garage ceiling before purchasing insulation materials to ensure proper coverage and fit.
  • Seal Air Leaks: Before installing insulation, seal any gaps or cracks in the garage ceiling with caulk or spray foam to maximize energy efficiency.
  • Safety First: Wear appropriate safety gear, such as gloves, goggles, and a respirator, when handling insulation materials to protect yourself from irritation and airborne particles.

Conclusion

Insulating your garage ceiling without drywall can provide numerous benefits, from improved comfort and energy savings to moisture control and noise reduction. By exploring innovative insulation methods and following DIY tips, you can create a more comfortable and functional garage space that enhances your home’s overall efficiency and value.

Delta Ceiling Mount Shower Head: Unveiling the Beauty

Are you ready to elevate your shower experience to new heights? Discover the luxurious and innovative Delta Ceiling Mount Shower Head. In this comprehensive guide, we’ll delve into everything you need to know about this exquisite bathroom fixture, from its cutting-edge features to installation tips and more.

Delta Ceiling Mount Shower Head

Introducing the Delta Ceiling Mount Shower Head

What is a Delta Ceiling Mount Shower Head?

A Delta Ceiling Mount Shower Head is a premium-quality shower fixture designed to be mounted directly onto the ceiling of your shower enclosure. This unique installation method creates a sleek and modern aesthetic while providing an immersive shower experience from above.

Read too: Discovering the Charm of Nautical Outdoor Ceiling Fans for Your Coastal Retreat: Sail into Style

Features and Benefits

  1. 360-Degree Rotation: Enjoy full flexibility and control over your shower experience with a Delta Ceiling Mount Shower Head’s 360-degree rotation feature. Easily adjust the angle and direction of the water flow to suit your preferences.
  2. Wide Coverage: Experience luxurious full-body coverage with the wide spray pattern of a Delta Ceiling Mount Shower Head. The strategically designed nozzles ensure even distribution of water for a refreshing and invigorating shower experience.
  3. Multiple Spray Settings: Customize your shower experience with multiple spray settings, including rain shower, massage, and mist. Whether you prefer a gentle rainfall or a powerful massage, there’s a setting to suit every mood and preference.
  4. Easy-to-Clean Design: Designed with convenience in mind, Delta Ceiling Mount Shower Heads feature easy-to-clean surfaces and anti-clog nozzles, ensuring hassle-free maintenance and long-lasting performance.
  5. Sleek and Modern Design: Add a touch of elegance to your bathroom decor with the sleek and modern design of a Delta Ceiling Mount Shower Head. Available in a variety of finishes and styles, you can choose the perfect option to complement your bathroom aesthetic.

Installation Tips

Pre-Installation Preparation

Before installing your Delta Ceilings Mount Shower Head, consider the following:

  • Ensure that your shower ceiling is structurally sound and capable of supporting the weight of the fixture.
  • Measure the dimensions of your shower enclosure to determine the optimal placement of the shower head.
  • Consult the manufacturer’s instructions and recommendations for installation guidelines and best practices.

Installation Process

  1. Prepare the Mounting Surface: Clean the ceiling surface thoroughly and ensure it is free from any debris or moisture.
  2. Mark the Installation Location: Use a pencil to mark the desired location for the shower head on the ceiling, taking into account factors such as shower size and user height preferences.
  3. Drill Pilot Holes: Use a drill to create pilot holes at the marked installation location to facilitate the installation process.
  4. Install Mounting Bracket: Secure the mounting bracket to the ceiling using the provided hardware, ensuring it is level and securely attached.
  5. Attach Shower Head: Connect the Delta Ceilings Mount Shower Head to the mounting bracket according to the manufacturer’s instructions, ensuring a secure and watertight seal.

Conclusion

Transform your daily shower routine into a luxurious and rejuvenating experience with a Delta Ceilings Mount Shower Head. With its innovative design, advanced features, and customizable settings, it’s the perfect addition to any modern bathroom. Elevate your space and indulge in the ultimate shower experience with Delta.

Ceilume Drop Ceiling Tiles for Your Interior Design: Exploring the Versatility

Are you looking to transform the look and feel of your space with an innovative ceiling solution? Ceilume drop ceiling tiles offer a versatile and stylish option for enhancing the aesthetics of any room. In this comprehensive guide, we’ll delve into the world of Ceilume drop ceiling tiles, exploring their features, benefits, and how they can elevate your interior design.

Ceilume Drop Ceiling Tiles

Introducing Ceilume Drop Ceiling Tiles

What are Ceilume Drop Ceiling Tiles?

Ceilume drop ceiling tiles are high-quality, lightweight tiles designed to be suspended from the ceiling grid to create a sleek and polished look. Made from durable materials such as vinyl or PVC, these tiles are known for their versatility, ease of installation, and ability to mimic the appearance of various materials like metal, wood, or plaster.

Benefits of Ceilume Drop Ceiling Tiles

  1. Aesthetic Appeal: Ceilume tiles come in a wide range of styles, patterns, and finishes, allowing you to achieve the desired look for your space. Whether you prefer a classic, modern, or industrial aesthetic, there’s a Ceilume tile to suit your taste.
  2. Durability: Constructed from robust materials, Ceilume drop ceiling tiles are resistant to moisture, mold, mildew, and sagging, ensuring long-lasting performance and durability.
  3. Easy Installation: With their lightweight design and interlocking edges, Ceilume tiles are easy to install, making them suitable for both DIY enthusiasts and professional contractors. They can be quickly and securely fitted into the ceiling grid without the need for specialized tools or equipment.
  4. Acoustic Benefits: Ceilume drop ceiling tiles can help improve the acoustics of a room by absorbing sound and reducing echo, creating a more pleasant and comfortable environment.
  5. Low Maintenance: Once installed, Ceilume tiles require minimal maintenance. They can be easily cleaned with a damp cloth or sponge to remove dust and dirt, helping to keep your space looking fresh and inviting.

Exploring Ceilume Drop Ceiling Tile Options

Styles and Designs

Ceilume offers a diverse selection of drop ceiling tile to suit various design preferences and architectural styles. From traditional to contemporary, you can choose from an array of patterns, textures, and colors to enhance the visual appeal of your space.

Installation Process

To install Ceilume drop ceiling tile, follow a few simple steps:

  1. Prepare the Ceiling Grid: Ensure that the ceiling grid is clean, level, and free from any obstructions.
  2. Measure and Cut Tiles: Measure the dimensions of the ceiling space and cut the tiles to fit using a utility knife or scissors.
  3. Install Edge Trim: Secure edge trim pieces along the perimeter of the ceiling to create a clean and finished look.
  4. Insert Tiles: Place the tiles into the ceiling grid, starting from one corner and working your way across the room.
  5. Secure Tiles: Make sure to securely seat each tile in the grid and align it properly with adjacent tiles.

Maintenance Tips

To keep your Ceilume drop ceiling tile looking their best, follow these maintenance tips:

  • Regularly dust or vacuum the tiles to remove surface dirt and debris.
  • Clean stains or marks promptly with a mild soap solution and water.
  • Avoid using abrasive cleaners or harsh chemicals, as they may damage the surface of the tiles.
  • Inspect the tiles periodically for any signs of damage or wear, and replace any damaged tiles as needed.

Read too: Discovering the Charm of Nautical Outdoor Ceiling Fans for Your Coastal Retreat: Sail into Style

Conclusion

Ceilume drop ceiling tiles offer a stylish, practical, and cost-effective solution for enhancing the look and feel of any interior space. With their wide range of styles, easy installation, and low maintenance requirements, they are an excellent choice for residential, commercial, and industrial applications. Consider incorporating Ceilume drop ceiling tile into your next interior design project to create a visually stunning and functional environment.

Ceiling Mounted Accordion Room Divider Solution: Enhance Your Space with a Versatile

Ceiling mounted accordion room dividers offer a versatile and space-saving solution for dividing large areas into separate zones while maintaining an open and airy feel. Whether you’re looking to create privacy in a shared living space, divide a large room into functional areas, or add flexibility to your workspace, a ceiling mounted accordion room divider provides a stylish and practical solution. In this comprehensive guide, we’ll delve into the features, benefits, installation process, and design considerations of ceiling mounted accordion room dividers, empowering you to optimize your space with ease and style.

Ceiling Mounted Accordion Room Divider

Understanding Ceiling Mounted Accordion Room Dividers

Ceiling mounted accordion room dividers consist of a series of interconnected panels that fold neatly together when not in use and expand accordion-style to create a partition when needed. These dividers are mounted from the ceiling, allowing them to be easily retracted and extended as needed, making them ideal for both residential and commercial applications.

Read too: How To Extend Kitchen Cabinets To The Ceiling: A Complete Guide for Maximizing Space and Style

Benefits of Ceiling Mounted Accordion Room Dividers

  1. Space-saving Design: Ceiling mounted accordion room dividers eliminate the need for floor tracks or support structures, maximizing floor space and maintaining a clean and uncluttered look.
  2. Flexibility: With their accordion-style design, these room dividers can be easily adjusted to create custom configurations, allowing you to adapt your space to suit your changing needs.
  3. Privacy and Division: Accordion room dividers provide privacy and separation between different areas of a room, making them ideal for creating separate living, dining, or work areas in open-concept spaces.
  4. Aesthetic Appeal: Available in a variety of materials, colors, and finishes, ceiling mounted accordion room dividers can enhance the aesthetic appeal of any space, adding visual interest and architectural detail.

Installation Process

Installing a ceiling mounted accordion room divider requires careful planning and precise execution to ensure optimal functionality and appearance:

  1. Determine Placement: Identify the desired location for the room divider and measure the width and height of the space to determine the size of the divider needed.
  2. Mounting: Securely mount the track or rail system to the ceiling using appropriate hardware and anchors, ensuring that it is level and securely anchored to support the weight of the divider.
  3. Hang Panels: Hang the accordion-style panels from the track or rail system, ensuring that they are evenly spaced and aligned for smooth operation.
  4. Test and Adjust: Test the operation of the room divider to ensure that it opens and closes smoothly and adjust as needed for optimal performance.

Design Considerations

When choosing a ceiling mounted accordion room divider, consider the following design factors:

  • Material: Select a material that complements your existing décor and architectural style, such as wood, glass, or fabric.
  • Color and Finish: Choose a color and finish that coordinate with your space, whether you prefer a sleek modern look or a more traditional aesthetic.
  • Soundproofing: For added privacy and noise reduction, consider selecting a room divider with soundproofing features to minimize sound transmission between divided areas.

Maintenance and Care

To keep your ceiling mounted accordion room divider looking and functioning its best, follow these maintenance tips:

  • Regular Cleaning: Wipe down the panels and tracks regularly with a soft cloth or mild detergent to remove dust and debris.
  • Lubrication: Periodically lubricate the moving parts of the room divider to ensure smooth operation and prevent sticking or binding.
  • Inspect for Damage: Regularly inspect the room divider for any signs of damage or wear and tear, such as loose hardware or damaged panels, and address any issues promptly to prevent further damage.

Conclusion

Ceiling mounted accordion room dividers offer a versatile and stylish solution for dividing and organizing interior spaces. Whether you’re looking to create privacy, maximize space, or enhance the aesthetic appeal of your home or workspace, a ceiling mounted accordion room divider provides the flexibility and functionality you need. By understanding the features, benefits, installation process, and design considerations of ceiling mounted accordion room dividers, you can make informed decisions about incorporating this innovative solution into your space and enjoy the benefits of a more versatile and organized environment.

Armstrong Sahara Ceiling Tile: Transform Your Space

Armstrong Sahara ceiling tile offers a stylish and practical solution for enhancing the look and feel of any interior space. Whether you’re renovating a commercial office, a retail store, or a residential home, Armstrong Sahara ceiling tile can elevate your décor with its timeless design and superior performance. In this comprehensive guide, we’ll explore the features, benefits, and installation considerations of Armstrong Sahara ceiling tile, empowering you to transform your space with confidence and ease.

Armstrong Sahara Ceiling Tile

Understanding Armstrong Sahara Ceiling Tile

Armstrong Sahara ceiling tile is a premium ceiling product known for its high-quality construction, durability, and aesthetic appeal. Featuring a smooth, finely textured surface and a classic square edge design, Sahara ceiling tile adds a touch of sophistication to any room. Available in a variety of sizes, colors, and finishes, Sahara ceiling tile offers versatility and flexibility to suit a wide range of design preferences and project requirements.

Read too: How To Extend Kitchen Cabinets To The Ceiling: A Complete Guide for Maximizing Space and Style

Benefits of Armstrong Sahara Ceiling Tile

  1. Timeless Design: Sahara ceiling tile’s classic square edge design and smooth surface create a timeless look that complements any interior décor style, from traditional to contemporary.
  2. Durability: Constructed from durable materials, Sahara ceiling tile is built to withstand the rigors of daily use, making it ideal for high-traffic areas such as offices, retail spaces, and healthcare facilities.
  3. Acoustic Performance: Sahara ceiling tile is engineered to provide excellent sound absorption, helping to improve acoustics and reduce noise levels in interior spaces for enhanced comfort and productivity.
  4. Easy Installation: With its lightweight construction and compatibility with standard grid systems, Sahara ceiling tile is easy to install, saving time and labor costs during the renovation process.

Design Options

Armstrong Sahara ceiling tile offers a variety of design options to suit your project needs:

  • Size: Choose from standard sizes such as 2’x2′ or 2’x4′ to fit your ceiling grid system and room dimensions.
  • Color: Select from a range of colors, including classic white and various shades of gray, beige, and taupe, to complement your design scheme.
  • Finish: Opt for a smooth or textured finish, depending on your preference for a sleek or more tactile surface.

Installation Considerations

When installing Armstrong Sahara ceiling tile, consider the following factors:

  • Ceiling Grid Compatibility: Ensure that Sahara ceiling tile is compatible with your existing ceiling grid system or select a grid system that is compatible with Sahara tile.
  • Room Layout: Plan the layout of the ceiling tiles to ensure a balanced and visually appealing installation, taking into account lighting fixtures, air vents, and other ceiling elements.
  • Professional Installation: For optimal results, consider hiring a professional contractor with experience installing ceiling tile to ensure proper alignment, spacing, and installation techniques.

Maintenance and Care

To maintain the beauty and performance of Armstrong Sahara ceiling tiles, follow these maintenance tips:

  • Regular Cleaning: Clean the ceiling tiles periodically with a soft brush or vacuum attachment to remove dust and debris.
  • Avoid Harsh Chemicals: Use mild cleaning solutions and avoid abrasive or acidic cleaners that may damage the surface of the tiles.
  • Inspect for Damage: Periodically inspect the ceiling tiles for signs of damage, such as cracks, stains, or water damage, and address any issues promptly to prevent further damage.

Conclusion

Armstrong Sahara ceiling tiles offers a versatile and elegant solution for enhancing the look and feel of any interior space. With its timeless design, durability, and superior performance, Sahara ceiling tile is the perfect choice for commercial and residential projects alike. By understanding the features, benefits, and installation considerations of Armstrong Sahara ceiling tiles, you can transform your space with confidence and create a stylish and functional environment that stands the test of time.

Colored Drop Ceiling Tile: Elevate Your Space with Vibrant

Colored drop ceiling tiles offer a creative and versatile solution for enhancing the aesthetic appeal of any space. Whether you’re looking to add a pop of color to a room or create a unique design statement, colored drop ceiling tiles can elevate the look and feel of your interior. In this comprehensive guide, we’ll explore the benefits, design options, and installation considerations of colored drop ceiling tile, empowering you to unleash your creativity and transform your space with vibrant hues and patterns.

Colored Drop Ceiling Tiles

Understanding Colored Drop Ceiling Tiles

Colored drop ceiling tiles, also known as suspended ceiling panels, are decorative panels that are suspended from the ceiling structure using a grid system. These tiles are available in a wide range of colors, patterns, and finishes, allowing for endless design possibilities. Whether you prefer bold and vibrant hues or subtle and understated tones, there’s a colored drop ceiling tile to suit your aesthetic preferences.

Benefits of Colored Drop Ceiling Tiles

  1. Enhanced Aesthetic Appeal: Colored drop ceiling tiles can add visual interest and dimension to any room, transforming dull and uninspired spaces into vibrant and inviting environments.
  2. Versatility: With a vast array of colors and patterns to choose from, colored drop ceiling tiles offer endless design possibilities. Whether you’re aiming for a modern, traditional, or eclectic look, there’s a colored tile to match your vision.
  3. Acoustic Control: Many colored drop ceiling tiles are designed with acoustic properties that help absorb sound and reduce noise levels, creating a more comfortable and peaceful environment.
  4. Concealment of Imperfections: Colored drop ceiling tiles can help conceal imperfections in the ceiling surface, such as cracks, stains, or uneven textures, providing a clean and polished appearance.

Design Options for Colored Drop Ceiling Tiles

When selecting colored drop ceiling tiles for your space, consider the following design options:

  • Solid Colors: Choose from a wide range of solid colors to add a bold or subtle accent to your room’s decor.
  • Patterns and Textures: Opt for tiles with intricate patterns or textured finishes to add visual interest and depth to your ceiling design.
  • Custom Printing: Explore the option of custom printing to create personalized ceiling tiles featuring artwork, graphics, or logos that reflect your unique style and personality.

Read too: How To Extend Kitchen Cabinets To The Ceiling: A Complete Guide for Maximizing Space and Style

Installation Considerations

Before installing colored drop ceiling tiles, consider the following factors:

  • Ceiling Height: Ensure that the height of your ceiling allows for the installation of drop ceiling tiles without encroaching on the space below.
  • Grid System Compatibility: Verify that your existing ceiling grid system is compatible with drop ceiling tiles, or invest in a new grid system if necessary.
  • Lighting Integration: Plan for the integration of lighting fixtures, air vents, and other ceiling accessories to ensure a seamless and cohesive look.

Maintenance and Care

To maintain the beauty and functionality of your colored drop ceiling tiles, follow these maintenance tips:

  • Regular Cleaning: Clean the tiles regularly using a soft brush or vacuum attachment to remove dust, dirt, and debris.
  • Avoid Harsh Chemicals: Use gentle cleaning solutions and avoid harsh chemicals that may damage or discolor the tiles.
  • Inspect for Damage: Periodically inspect the tiles for signs of damage, such as cracks or water stains, and address any issues promptly to prevent further damage.

Conclusion

Colored drop ceiling tile offer a versatile and visually striking solution for enhancing the aesthetic appeal of any space. Whether you’re renovating a residential, commercial, or institutional setting, colored drop ceiling tiles can help you achieve your desired look with ease. By understanding the benefits, design options, and installation considerations of colored drop ceiling tiles, you can unleash your creativity and transform your space into a vibrant and inviting environment that reflects your unique style and personality.

Art Nouveau Ceiling Light Fixture: The Timeless Charm

An Art Nouveau ceiling light fixture embodies the epitome of elegance and sophistication, showcasing intricate details and graceful curves that evoke the charm of a bygone era. In this illuminating guide, we’ll delve into the allure of Art Nouveau ceiling lights, exploring their history, design characteristics, and placement considerations to help you infuse your space with a touch of vintage-inspired beauty.

Art Nouveau Ceiling Light

Understanding Art Nouveau Ceiling Lights

Art Nouveau emerged as an influential artistic movement in the late 19th and early 20th centuries, characterized by its focus on organic forms, intricate patterns, and decorative motifs inspired by nature. Art Nouveau ceiling lights reflect these design principles through their flowing lines, botanical motifs, and opulent materials, creating a sense of elegance and refinement.

The Design Elements of Art Nouveau Ceiling Lights

Art Nouveau ceiling lights exhibit several distinctive design elements that set them apart from other lighting styles:

  1. Curvilinear Forms: Art Nouveau embraces flowing, asymmetrical lines that mimic the shapes found in nature, such as vines, flowers, and tendrils.
  2. Organic Motifs: Botanical motifs, including leaves, flowers, and vines, are commonly featured in Art Nouveau ceiling light designs, adding a sense of natural beauty and vitality.
  3. Stained Glass: Many Art Nouveau ceiling lights incorporate stained glass panels adorned with intricate patterns and vibrant colors, casting a warm and inviting glow when illuminated.
  4. Decorative Details: Art Nouveau lights often feature elaborate decorative details, such as filigree work, embossed patterns, and sculptural elements, showcasing the craftsmanship and artistry of the era.

Incorporating Art Nouveau Ceiling Lights into Your Decor

Here are some tips for incorporating an Art Nouveau ceiling light fixture into your home decor:

  • Choose a Focal Point: Select a prominent location, such as the center of a room or above a dining table, to showcase the beauty of your Art Nouveau ceiling light.
  • Complement Your Decor: Coordinate the colors, materials, and design motifs of the ceiling light with your existing decor to create a cohesive and harmonious look.
  • Consider Scale and Proportion: Ensure that the size and scale of the ceiling light are appropriate for the room, taking into account the ceiling height and available space.
  • Layer Lighting: Pair your Art Nouveau ceiling light with additional lighting sources, such as wall sconces or table lamps, to create layers of illumination and enhance the ambiance of the room.

Read too: Discovering the Charm of Nautical Outdoor Ceiling Fans for Your Coastal Retreat: Sail into Style

Conclusion

An Art Nouveau ceiling lights fixture is more than just a source of illumination—it’s a statement piece that embodies the elegance and beauty of a bygone era. Whether you’re drawn to the intricate details of stained glass or the graceful curves of curvilinear forms, an Art Nouveau ceiling light can add a touch of vintage-inspired charm to any space.

36 Outdoor Ceiling Fan: Upgrade Your Outdoor Space with a Stylish and Functional

Transform your outdoor living space into a cool and inviting oasis with the addition of a stylish and functional 36 outdoor ceiling fan. Whether you’re looking to beat the heat during summer gatherings or create a cozy ambiance on mild evenings, a ceiling fan designed for outdoor use can enhance both the comfort and aesthetics of your patio, deck, or porch. In this comprehensive guide, we’ll explore everything you need to know about 36 outdoor ceiling fans, from their features and benefits to installation tips and design options.

36 Outdoor Ceiling Fan

Understanding the Benefits of 36 Outdoor Ceiling Fans

Efficient Air Circulation

A 36 outdoor ceiling fan provides efficient air circulation, helping to create a comfortable breeze and alleviate heat and humidity during warmer months. By circulating air downward, these fans can also help deter insects and pests, making your outdoor space more enjoyable.

Exploring the Features of 36 Outdoor Ceiling Fans

Durable Construction

Outdoor ceiling fans are built to withstand the elements, with durable materials such as weather-resistant blades, rust-resistant finishes, and sturdy housings designed to withstand exposure to sunlight, rain, and humidity.

Installation Tips

Proper Mounting and Wiring

When installing a 36 outdoor ceiling fan, follow these tips for a successful installation:

  1. Choose the Right Location: Select a suitable location on your patio or deck for mounting the fan, ensuring proper clearance from walls, beams, and other obstacles.
  2. Secure Mounting: Use a sturdy mounting bracket or support system to secure the fan to the ceiling, ensuring stability and safety during operation.

Read too: How To Extend Kitchen Cabinets To The Ceiling: A Complete Guide for Maximizing Space and Style

Design Options for 36 Outdoor Ceiling Fans

Style and Finish Choices

36 outdoor ceiling fans are available in a variety of styles, finishes, and designs to complement any outdoor decor scheme. Whether you prefer a classic, traditional look or a more modern aesthetic, there’s a fan to suit your taste and preferences.

Expert Recommendations for 36 Outdoor Ceiling Fans

Consideration for Size and Space

When selecting a 36 outdoor ceiling fan for your outdoor space, consider factors such as the size of the area, ceiling height, and desired airflow to ensure optimal performance and comfort.

Conclusion

Elevate your outdoor living experience with the addition of a 36 outdoor ceiling fan. Whether you’re hosting gatherings, enjoying quiet moments with family, or simply unwinding after a long day, these fans provide a refreshing breeze and stylish accent to your patio, deck, or porch. Follow the installation tips and expert recommendations outlined in this guide to select and install the perfect 36 outdoor ceiling fan for your outdoor oasis.

Chandelier for High Ceiling: Choosing the Perfect

When it comes to illuminating a room with high ceilings, ordinary lighting fixtures often fall short in both style and functionality. That’s where the majestic chandelier comes into play, offering a stunning focal point that not only provides ample illumination but also adds a touch of elegance and grandeur to any space. In this comprehensive guide, we’ll delve into everything you need to know about selecting the perfect chandelier for high ceiling, from design considerations to installation tips and beyond.

Chandelier For High Ceiling

Understanding the Impact of Chandelier For High Ceiling

Making a Statement

A chandelier for high ceilings is more than just a lighting fixture – it’s a statement piece that commands attention and sets the tone for the entire room. With its intricate design and dazzling illumination, a well-chosen chandelier can transform an ordinary space into a show-stopping masterpiece.

Read too: How To Extend Kitchen Cabinets To The Ceiling: A Complete Guide for Maximizing Space and Style

Factors to Consider When Choosing a Chandelier For High Ceiling

Size and Scale

When selecting a chandelier for a high-ceilinged room, size matters. Opt for a fixture that is proportionate to the size of the space and the height of the ceiling. A chandelier that is too small may get lost in the vastness of the room, while one that is too large can overwhelm the space and feel out of place.

Design Options for Chandelier For High Ceiling

Variety of Styles

Chandeliers for high ceilings come in a wide range of styles to suit any decor preference, from classic and traditional to modern and contemporary. Consider the overall aesthetic of your space when choosing a chandelier design, ensuring that it complements the existing decor and architectural features.

Installation Tips for Chandelier For High Ceiling

Safety First

Installing a chandelier for a high ceiling requires careful planning and attention to safety. Follow these tips to ensure a successful installation:

  1. Secure Mounting: Use a secure mounting bracket or ceiling hook to support the weight of the chandelier and prevent it from swaying or falling.
  2. Professional Installation: If you’re unsure about installing the chandelier yourself, consider hiring a professional electrician or contractor to handle the installation process safely and efficiently.

Benefits of Chandelier For High Ceiling

Enhanced Ambiance

A chandelier for a high ceiling creates a warm and inviting ambiance, casting a soft and flattering glow that enhances the overall atmosphere of the room. Whether you’re hosting a dinner party or enjoying a quiet evening at home, the right chandelier can elevate any occasion.

Conclusion

Elevate your high-ceilinged space to new heights of elegance and sophistication with the perfect chandelier. By considering factors such as size, style, and installation, you can select a chandelier that not only illuminates your room but also enhances its aesthetic appeal. Whether you prefer a timeless crystal design or a sleek modern fixture, there’s a chandelier for high ceilings to suit every taste and preference. Explore your options, unleash your creativity, and transform your space with the timeless beauty of a stunning chandelier.

Ceiling Mounted Rain Shower Heads: Elevate Your Shower Experience with a Luxurious

In the realm of bathroom luxury, few features evoke a sense of indulgence quite like a ceiling mounted rain shower head. Offering a spa-like experience right in the comfort of your own home, these shower heads provide a cascade of soothing water that envelops your body in relaxation. In this comprehensive guide, we’ll delve into everything you need to know about ceiling mounted rain shower heads, from installation tips to the benefits they bring to your daily routine.

Ceiling Mounted Rain Shower Head

Understanding the Appeal of Ceiling Mounted Rain Shower Head

A Touch of Luxury

Imagine stepping into your shower and being greeted by a gentle downpour of water from above, mimicking the sensation of standing beneath a warm summer rain. That’s the allure of a ceiling mounted rain shower head – it adds a touch of luxury and sophistication to any bathroom space.

Read too: How To Extend Kitchen Cabinets To The Ceiling: A Complete Guide for Maximizing Space and Style

Exploring the Features

Design and Functionality

Ceiling mounted rain shower heads come in a variety of styles, sizes, and finishes to suit any bathroom decor. From sleek and modern designs to more traditional options, there’s a rain shower head to complement every aesthetic preference.

Installation Tips

Ensuring Proper Installation

Installing a ceiling mounted rain shower head requires careful planning and precision to ensure optimal performance. Follow these tips for a successful installation:

  1. Choose the Right Location: Determine the ideal location for your shower head based on your shower layout and ceiling height. Ensure that there is sufficient space above the ceiling to accommodate the shower head and any necessary plumbing.
  2. Consider Water Pressure: Ceiling mounted rain shower heads typically require higher water pressure to deliver the desired rainfall effect. Make sure your plumbing system can provide adequate water flow to achieve optimal performance.

Benefits of Ceiling Mounted Rain Shower Head

Spa-like Experience

One of the primary benefits of a ceiling mounted rain shower head is the luxurious showering experience it provides. The gentle, evenly distributed flow of water mimics the sensation of standing beneath a natural rain shower, creating a soothing and immersive bathing experience.

Expert Recommendations for Ceiling Mounted Rain Shower Head

Choosing the Right Model

When selecting a ceiling mounted rain shower head for your bathroom, consider factors such as:

  • Size and Coverage: Choose a shower head with a size and shape that provides adequate coverage for your shower space.
  • Finish Options: Opt for a finish that complements your bathroom decor, whether it’s polished chrome, brushed nickel, or oil-rubbed bronze.

Conclusion

Elevate your daily shower routine to new heights of luxury and relaxation with a ceiling mounted rain shower heads. Whether you’re renovating your bathroom or simply looking to upgrade your shower experience, these stylish and functional fixtures offer a spa-like indulgence right in the comfort of your own home. Follow the tips and recommendations outlined in this guide to select, install, and enjoy the benefits of a ceiling mounted rain shower head in your bathroom sanctuary.

Exploring Pendant Lights for Tall Ceilings: Elevate Your Space

Tall ceilings can create a sense of spaciousness and grandeur in any room, but they also present unique challenges when it comes to lighting. Pendant lights offer an elegant and practical solution for illuminating tall spaces, adding both style and functionality to your interior design. In this guide, we’ll explore the world of pendant lights for tall ceilings, discussing different styles, installation considerations, and design inspirations to help you elevate your space with lighting.

Pendant Lights For Tall Ceilings

Understanding Pendant Lights for Tall Ceilings

Pendant lights are versatile fixtures that hang from the ceiling, typically suspended by a cord, chain, or rod. They come in a variety of shapes, sizes, and designs, making them suitable for various interior styles and ceiling heights. When it comes to tall ceilings, pendant lights offer the advantage of drawing the eye upward, accentuating the verticality of the space while providing focused illumination where it’s needed most.

Exploring Styles and Designs

When choosing pendant lights for tall ceilings, consider the following styles and designs:

  • Large-Scale Pendants: Opt for oversized pendant lights with substantial proportions to make a bold statement in rooms with tall ceilings. These larger fixtures can serve as focal points and add visual interest to the space.
  • Multi-Light Pendants: Multi-light pendants feature multiple bulbs or shades suspended from a single canopy, providing ample illumination for large areas. These fixtures are ideal for tall ceilings where a single pendant may appear disproportionate.
  • Linear Pendants: Linear pendant lights feature a row of lights arranged along a horizontal frame, making them well-suited for elongated spaces such as dining tables or kitchen islands in rooms with tall ceilings.
  • Statement Pendants: Choose pendant lights with unique shapes, materials, or finishes to add personality and style to your space. Statement pendants can become conversation pieces and contribute to the overall design scheme of the room.

Read too: Understanding and Dealing with Ants in the Ceiling Spaces: Navigating the Intrusion

Installation Considerations

Installing pendant lights in rooms with tall ceilings requires careful planning and consideration to ensure optimal performance and aesthetics. Here are some installation tips to keep in mind:

  • Adjustable Suspension: Opt for pendant lights with adjustable suspension systems or cord lengths to accommodate varying ceiling heights. This flexibility allows you to customize the placement of the fixtures and achieve the desired visual impact.
  • Proper Scale: Consider the scale of the pendant lights relative to the size of the room and the height of the ceiling. Oversized pendants may overpower small spaces, while undersized fixtures may get lost in rooms with tall ceilings.
  • Layered Lighting: Supplement pendant lights with additional lighting sources, such as recessed lights or wall sconces, to provide balanced illumination throughout the room. Layering lighting creates depth and visual interest while ensuring adequate brightness levels.

Design Inspirations

Draw inspiration from the following design ideas to incorporate pendant lights into rooms with tall ceilings:

  • Dramatic Entryways: Make a grand entrance by installing a cluster of pendant lights in the foyer or entryway to welcome guests and create a memorable first impression.
  • Dining Drama: Hang a row of statement pendants above the dining table to create a focal point and set the mood for intimate gatherings and festive meals.
  • Kitchen Elegance: Illuminate kitchen islands or breakfast bars with linear pendant lights to enhance functionality and style in high-ceilinged kitchens.
  • Living Room Ambiance: Add warmth and ambiance to living areas with oversized pendant lights suspended at varying heights to create visual interest and focal points.

Conclusion

Pendant lights offer a versatile and stylish lighting solution for tall ceilings, allowing you to enhance your space with both illumination and aesthetics. By choosing the right styles, considering installation factors, and drawing inspiration from design ideas, you can create a visually stunning and functional interior that showcases the beauty of your tall ceilings.

Whether you prefer large-scale statement pendants or sleek linear designs, there’s a pendant light option to suit your taste and complement your tall-ceilinged space perfectly. Elevate your interior design with pendant lights and transform your room into a well-lit and inviting haven.

Exploring Modern LED Chandeliers for High Ceilings: Illuminate Your Space

High ceilings offer a sense of grandeur and spaciousness to any room, but finding the right lighting fixtures to complement such spaces can be a challenge. Modern LED chandeliers for high ceilings provide the perfect solution, offering both style and functionality to illuminate large areas with ease. In this guide, we’ll delve into the world of modern LED chandeliers designed specifically for high ceilings, exploring various styles, installation considerations, and benefits for your space.

Modern Led Chandeliers For High Ceilings
Version 1.0.0

Understanding Modern LED Chandeliers for High Ceilings

Modern LED chandeliers are a popular choice for contemporary interiors, offering energy-efficient lighting solutions with sleek and stylish designs. When it comes to high ceilings, these chandeliers are particularly well-suited due to their ability to provide ample illumination across expansive areas while adding a touch of elegance and sophistication to the space.

Read too: Understanding and Dealing with Ants in the Ceiling Spaces: Navigating the Intrusion

Exploring Styles and Designs

Modern LED chandeliers come in a wide range of styles and designs to suit various aesthetic preferences and interior themes. Some popular options for high ceilings include:

  • Sleek and Minimalist: Minimalist chandeliers with clean lines and simple designs offer a modern and understated look that complements contemporary interiors with high ceilings.
  • Crystal and Glass: Crystal and glass chandeliers add a touch of glamour and luxury to high-ceilinged spaces, creating a dazzling focal point that enhances the overall ambiance.
  • Industrial and Urban: For a more urban and industrial aesthetic, consider chandeliers with metal accents, exposed bulbs, and geometric shapes, adding a touch of edgy sophistication to your space.

Installation Considerations

When installing modern LED chandeliers in rooms with high ceilings, there are several factors to consider to ensure optimal performance and aesthetics:

  • Height and Scale: Choose a chandelier size and height that complements the proportions of the room and the height of the ceiling. Opt for larger fixtures with multiple tiers for grand spaces, while smaller rooms may benefit from more streamlined designs.
  • Mounting Options: Depending on the height of your ceiling, you may need to consider different mounting options for your chandelier, such as flush mount, semi-flush mount, or adjustable suspension systems.
  • Dimming Capabilities: Select chandeliers with dimming capabilities to provide flexibility in lighting levels and create the desired ambiance for different occasions and activities.

Benefits of Modern LED Chandeliers for High Ceilings

Investing in modern LED chandeliers for high ceilings offers several benefits for homeowners and interior designers alike:

  • Energy Efficiency: LED technology provides energy-efficient lighting solutions that help reduce electricity consumption and lower utility costs over time.
  • Longevity: LED bulbs have a longer lifespan compared to traditional incandescent or fluorescent bulbs, reducing the frequency of bulb replacements and maintenance.
  • Customization: LED chandeliers offer customizable lighting options, allowing users to adjust brightness levels, color temperatures, and even control lighting remotely via smart devices.

Conclusion

Modern LED chandeliers for high ceilings offer a perfect blend of style, functionality, and energy efficiency, making them an ideal choice for illuminating expansive spaces with elegance and sophistication. Whether you prefer sleek and minimalist designs or glamorous crystal accents, there’s a modern LED chandelier to suit your high-ceilinged space perfectly.

By understanding the various styles, installation considerations, and benefits of modern LED chandeliers, you can make informed decisions to enhance the ambiance and visual appeal of your home or commercial space.

Hunter Cranbrook Ceiling Fans: Elevate Your Home Décor with the Stylish

Upgrade your home’s ambiance and cooling efficiency with the elegant and modern Hunter Cranbrook Ceiling Fans. Discover why this stylish fan is a must-have addition to any living space.

Hunter Cranbrook Ceiling Fan

Introducing the Hunter Cranbrook Ceiling Fan

The Hunter Cranbrook Ceiling Fan combines sleek design with powerful performance to create a perfect blend of form and function. With its striking geometric profile and vintage-inspired blade design, this fan adds a touch of sophistication to any room while providing optimal airflow and comfort.

Features and Benefits of the Hunter Cranbrook Ceiling Fan

  1. Unique Design: The Hunter Cranbrook Ceiling Fan features a distinctive caged design with exposed LED bulbs, creating a statement piece that enhances the aesthetics of any room. Available in various finishes, including mint, gloss black, and gloss white, this fan allows you to customize the look to suit your décor preferences.
  2. Powerful Performance: Despite its stylish appearance, the Hunter Cranbrook Ceiling Fan delivers exceptional performance with its reversible motor and 4-speed settings. Whether you need to cool down during the summer months or improve air circulation throughout the year, this fan provides reliable and efficient operation.
  3. Quiet Operation: Equipped with WhisperWind® motor technology, the Hunter Cranbrook Ceiling Fan operates quietly, ensuring minimal disruption to your indoor environment. Enjoy the benefits of improved air circulation without the distracting noise commonly associated with ceiling fans.
  4. Remote Control Convenience: Control the fan speed and lighting settings effortlessly with the included handheld remote control. Adjust the fan speed, dim the lights, or reverse the direction of the blades with the touch of a button, providing convenience and ease of use.
  5. Energy Efficiency: The Hunter Cranbrook Ceiling Fan is ENERGY STAR® certified, offering energy-efficient operation that helps reduce electricity consumption and lower utility bills. Enjoy the benefits of a stylish and functional ceiling fan while minimizing your environmental impact.

Hunter Cranbrook Ceiling Fan Installation and Maintenance

Installing the Hunter Cranbrook Ceiling Fan is a straightforward process, thanks to the included step-by-step instructions and mounting hardware. However, it’s essential to follow safety guidelines and precautions during installation to ensure proper operation and longevity of the fan.

Regular maintenance is key to preserving the performance and appearance of your Hunter Cranbrook Ceiling Fan. Clean the blades and housing regularly to remove dust and debris buildup, and lubricate the motor bearings as needed to keep the fan running smoothly.

Read too: Exploring the Benefits and How-Tos of DIY Ceiling Cassette Mini Split Installation: Revolutionizing Comfort

Conclusion

The Hunter Cranbrook Ceiling Fans combines style, performance, and convenience to create an exceptional cooling solution for any home. With its unique design, powerful airflow, and energy-efficient operation, this fan is sure to enhance your living space while providing comfort and functionality year-round.

Explore the Magic of Flush Star Ceiling Light Fixtures: Illuminate Your Space with Elegance

Are you looking to elevate the ambiance of your space with a touch of elegance and sophistication? Look no further than the enchanting allure of Flush Star Ceiling Light fixtures. These captivating lighting solutions not only brighten up your room but also add a celestial charm that mesmerizes anyone who enters. Let’s delve into the world of Flush Star Ceiling Lights and discover how they can transform your space into a celestial sanctuary.

Flush Star Ceiling Light

Introduction

In the realm of interior design, lighting plays a pivotal role in setting the mood and ambiance of a space. Whether you’re designing a cozy living room, a serene bedroom, or a luxurious dining area, the right lighting can make all the difference. And when it comes to creating a truly enchanting atmosphere, Flush Star Ceiling Lights emerge as a shining star in the world of interior lighting.

What are Flush Star Ceiling Lights?

Flush Star Ceiling Lights are fixtures designed to mimic the twinkling beauty of a starry night sky right in your own home. These innovative lighting solutions feature an array of tiny LED lights embedded within a flush-mounted ceiling panel, creating a breathtaking illusion of stars scattered across the ceiling. With their sleek and minimalist design, Flush Star Ceiling Lights seamlessly blend into any décor style, adding a touch of celestial magic to both modern and traditional spaces.

Benefits of Flush Star Ceiling Lights

  1. Enhanced Ambiance: Flush Star Ceiling Lights instantly elevate the ambiance of any room, creating a serene and enchanting atmosphere that invites relaxation and tranquility.
  2. Space-Saving Design: Unlike traditional chandeliers or pendant lights that can take up valuable space, Flush Star Ceiling Lights are flush-mounted, making them ideal for rooms with low ceilings or limited overhead clearance.
  3. Energy Efficiency: With the widespread adoption of LED technology, Flush Star Ceiling Lights offer excellent energy efficiency, consuming significantly less power than traditional lighting fixtures while providing ample illumination.
  4. Versatile Applications: From bedrooms and living rooms to home theaters and meditation spaces, Flush Star Ceiling Lights are versatile enough to enhance the ambiance of any room in your home.
  5. Customization Options: Many Flush Star Ceiling Lights come with customizable features, allowing you to adjust the brightness, color temperature, and even create dynamic lighting effects to suit your preferences.

Choosing the Right Flush Star Ceiling Light

When selecting a Flush Star Ceiling Light for your space, consider the following factors:

  1. Size and Shape: Choose a fixture size and shape that complements the dimensions and layout of your room.
  2. Light Output: Determine the desired brightness level and color temperature to create the perfect ambiance.
  3. Installation Requirements: Consider the installation method and any additional hardware or wiring needed to integrate the fixture seamlessly into your ceiling.
  4. Budget: Establish a budget and explore options that offer the best combination of quality and affordability.

Installation and Maintenance

While Flush Star Ceiling Lights may seem like a complex lighting solution, installation is relatively straightforward, especially if you opt for a surface-mounted fixture that doesn’t require recessing into the ceiling. However, for more intricate designs or custom installations, professional assistance may be necessary to ensure proper wiring and alignment. Once installed, Flush Star Ceiling Lights require minimal maintenance, with occasional dusting to keep the LED panels clean and bright.

Enhance Your Space with Flush Star Ceiling Lights

Transforming your space into a celestial oasis has never been easier with Flush Star Ceiling Lights. Whether you’re looking to create a serene bedroom retreat, a captivating home theater experience, or a cozy living area for relaxation and rejuvenation, these enchanting lighting fixtures offer a magical solution that transcends traditional lighting concepts. Elevate your ambiance and indulge in the celestial splendor of Flush Star Ceiling Lights today!

Conclusion

Flush Star Ceiling Lights represent a harmonious blend of innovation, elegance, and celestial beauty in the realm of interior lighting. With their enchanting design, energy efficiency, and versatility, these captivating fixtures have become a must-have addition for anyone seeking to elevate the ambiance of their space. Illuminate your home with the mesmerizing allure of Flush Star Ceiling Lights and bask in the celestial splendor they bring to your living space.

Read too: Exploring the Benefits and How-Tos of DIY Ceiling Cassette Mini Split Installation: Revolutionizing Comfort

Driftwood Ceiling Fan With Light Fixture: Enhance Your Home Decor with a Stylish

Are you looking to infuse your home with the tranquil vibes of coastal living? Consider adding a driftwood ceiling fan with a light fixture to your space. In this guide, we’ll delve into the allure and practicality of driftwood ceiling fans with lights, exploring their design, features, installation, and more. Whether you’re aiming for a beach house aesthetic or simply seeking to bring a touch of nature indoors, a driftwood ceiling fan with light is sure to captivate and elevate your home decor.

Driftwood Ceiling Fan With Light

Unveiling the Beauty of Driftwood Ceiling Fans With Lights

What Sets Driftwood Ceiling Fans With Lights Apart?

Driftwood ceiling fans with lights offer a unique blend of rustic charm and modern functionality, making them an ideal choice for coastal-inspired interiors. Crafted from weathered wood or finished to mimic the look of driftwood, these fans evoke the natural beauty of seaside landscapes, infusing any room with a sense of serenity and style.

Key Features of Driftwood Ceiling Fans With Lights:

  • Weathered finish: Driftwood ceiling fans often feature a distressed or weathered finish, giving them an authentic and aged appearance reminiscent of driftwood washed ashore.
  • Integrated lighting: Many driftwood ceiling fans come equipped with built-in light fixtures, providing both illumination and cooling comfort in one stylish package.
  • Versatile design: From traditional to contemporary styles, driftwood ceiling fans with lights come in a variety of designs to suit different decor preferences and room aesthetics.

Benefits of Choosing a Driftwood Ceiling Fan With Light

1. Coastal Elegance:

A driftwood ceiling fan with a light fixture instantly adds a touch of coastal elegance to any room. Whether installed in a living room, bedroom, or outdoor patio, these fans evoke the relaxed atmosphere of beachside living, creating a serene and inviting ambiance.

2. Dual Functionality:

Combining a ceiling fan with a light fixture offers dual functionality, allowing you to circulate air and illuminate your space simultaneously. This versatility makes driftwood ceiling fans with lights a practical and space-saving solution for rooms where both cooling and lighting are needed.

3. Energy Efficiency:

Many driftwood ceiling fans with lights are designed with energy-efficient motors and LED light bulbs, helping you reduce energy consumption and lower utility costs. By choosing an eco-friendly option, you can enjoy year-round comfort while minimizing your environmental footprint.

Installing a Driftwood Ceiling Fan With Light

1. Pre-Installation Preparation:

Before installing a driftwood ceiling fan with a light fixture, ensure that you have the necessary tools and equipment on hand. Measure the ceiling height and the space where the fan will be installed to ensure proper clearance and functionality.

2. Mounting the Fan:

Follow the manufacturer’s instructions for mounting the fan to the ceiling, taking care to secure it properly and balance the blades for smooth and efficient operation. Use a sturdy mounting bracket and hardware to ensure the fan is securely attached to the ceiling.

3. Wiring and Electrical Connections:

Carefully wire the fan to the electrical circuit, following the wiring diagram provided by the manufacturer. Make sure to turn off the power at the breaker box before making any electrical connections and consult a qualified electrician if you’re unsure about the wiring process.

Conclusion

A driftwood ceiling fan with a light fixture is more than just a functional appliance—it’s a statement piece that adds character, charm, and coastal flair to any room. By choosing a driftwood ceiling fan with light, you can create a relaxing and inviting atmosphere that captures the essence of beachside living. Whether you’re decorating a seaside retreat or bringing a touch of coastal style to your inland home, a driftwood ceiling fan with light is sure to become the focal point of your decor.

Read too: Exploring Craftsman Style Ceiling Fans for Your Home: Embracing Timeless Elegance

DIY Mini Split Ceiling Cassette Installation: Transform Your Space

Are you looking to upgrade your home’s cooling or heating system with a sleek and efficient solution? Consider installing a DIY mini split ceiling cassette system. In this guide, we’ll explore everything you need to know about DIY mini split ceiling cassettes, from their benefits and installation process to important considerations for a successful project. Whether you’re a seasoned DIY enthusiast or a first-time homeowner, a mini split ceiling cassette system can help you achieve optimal comfort in your space while maintaining a modern and unobtrusive aesthetic.

Diy Mini Split Ceiling Cassette

Understanding DIY Mini Split Ceiling Cassettes

What is a DIY Mini Split Ceiling Cassette?

A DIY mini split ceiling cassette is a compact and versatile heating and cooling system designed to be installed directly into the ceiling of a room. Unlike traditional HVAC systems that require bulky ductwork and extensive installation, mini split ceiling cassettes offer a streamlined and efficient solution for maintaining comfortable indoor temperatures.

Key Features of DIY Mini Split Ceiling Cassettes:

  • Compact design: Mini split ceiling cassettes are designed to be discreet and unobtrusive, blending seamlessly into the ceiling for a sleek and modern look.
  • Zone control: With individual air handlers installed in different rooms or zones, mini split ceiling cassettes offer customizable temperature control for enhanced comfort and energy efficiency.
  • Quiet operation: Advanced technology ensures that mini split ceiling cassettes operate quietly and efficiently, minimizing noise disturbance while providing reliable heating and cooling.

Benefits of DIY Mini Split Ceiling Cassettes

1. Space-saving Design:

One of the primary advantages of DIY mini split ceiling cassettes is their space-saving design. By eliminating the need for bulky ductwork and wall-mounted units, these systems free up valuable floor and wall space, allowing for greater flexibility in room layout and design.

2. Energy Efficiency:

DIY mini split ceiling cassettes are highly energy-efficient, allowing you to heat or cool specific rooms or zones without wasting energy on areas that are not in use. This targeted approach to heating and cooling can lead to significant energy savings and lower utility bills over time.

3. Enhanced Aesthetics:

Unlike traditional HVAC systems, which often feature bulky and unsightly components, DIY mini split ceiling cassettes are designed to blend seamlessly into the ceiling for a sleek and modern look. This minimalist design aesthetic can enhance the overall appearance of your space while maintaining optimal comfort.

Installing a DIY Mini Split Ceiling Cassette

1. Assessing Your Space:

Before installing a DIY mini split ceiling cassette, carefully assess your space to determine the best location for the unit. Consider factors such as room size, ceiling height, and existing electrical wiring to ensure proper installation and functionality.

2. Selecting the Right Unit:

Choose a DIY mini split ceiling cassette system that is appropriate for your space and heating/cooling needs. Consider factors such as BTU capacity, energy efficiency rating, and additional features such as Wi-Fi connectivity or programmable settings.

3. Professional Consultation:

While DIY installation is possible for some homeowners, it’s essential to consult with a professional HVAC technician or contractor before beginning the installation process. A professional can provide valuable guidance and ensure the correct and safe installation of the system.

Conclusion

DIY mini split ceiling cassettes offer a convenient, energy-efficient, and aesthetically pleasing solution for heating and cooling your space. By understanding the benefits, installation process, and considerations associated with these systems, you can confidently upgrade your home’s HVAC system and enjoy optimal comfort year-round. Whether you’re looking to cool a single room or multiple zones, a DIY mini split ceilings cassette can help you achieve your heating and cooling goals with ease.

Read too: Exploring Craftsman Style Ceiling Fans for Your Home: Embracing Timeless Elegance

Decorative 2X2 Ceiling Tile: Elevate Your Space with Stylish and Functional

Decorative 2X2 ceiling tiles offer a versatile and stylish solution for enhancing the aesthetics of any room. In this comprehensive guide, we’ll delve into the world of decorative 2X2 ceiling tile, exploring their benefits, design options, installation tips, and more. Whether you’re looking to add a touch of elegance to your home or create a stunning focal point in a commercial space, decorative 2X2 ceiling tiles are sure to elevate your interior design.

Decorative 2X2 Ceiling Tiles

Exploring the Beauty of Decorative 2X2 Ceiling Tiles

1. Versatile Design Options:

Decorative 2X2 ceiling tiles come in a wide range of styles, patterns, and finishes, allowing you to customize the look of your space to suit your taste and decor preferences. From classic designs like tin and faux tin to contemporary options like wood and metal, there’s a decorative 2X2 ceiling tile to complement any design aesthetic.

2. Enhanced Aesthetics:

One of the primary benefits of decorative 2X2 ceiling tiles is their ability to enhance the aesthetics of a room. Whether used as a subtle accent or a bold statement piece, these tiles add texture, depth, and visual interest to ceilings, transforming them from ordinary to extraordinary.

3. Easy Installation:

Despite their intricate appearance, decorative 2X2 ceiling tile are relatively easy to install, making them a popular choice for DIY enthusiasts and professional contractors alike. With the right tools and techniques, you can quickly and easily transform the look of your space with decorative ceiling tiles.

Read too: Exploring Craftsman Style Ceiling Fans for Your Home: Embracing Timeless Elegance

Benefits of Decorative 2X2 Ceiling Tiles

1. Conceal Imperfections:

Decorative 2X2 ceiling tiles are an excellent solution for concealing imperfections in ceilings, such as cracks, stains, and uneven surfaces. By covering these flaws with stylish tiles, you can create a smooth and uniform ceiling surface that enhances the overall appearance of the room.

2. Improved Acoustics:

In addition to their aesthetic benefits, decorative 2X2 ceiling tiles can also help improve acoustics in a room by absorbing sound and reducing echo. This makes them an ideal choice for spaces where noise control is a concern, such as offices, restaurants, and home theaters.

3. Durability and Longevity:

Decorative 2X2 ceiling tiles are typically made from durable materials such as metal, PVC, or fiberglass, ensuring long-lasting performance and resistance to damage. With proper care and maintenance, these tiles can retain their beauty and functionality for years to come.

Installing Decorative 2X2 Ceiling Tiles

1. Preparation:

Before installing decorative 2X2 ceiling tiles, ensure that the ceiling surface is clean, smooth, and free of any debris or obstructions. Remove existing ceiling tiles or panels, if necessary, and make any repairs or adjustments as needed.

2. Installation:

Begin by measuring the dimensions of the ceiling and marking the layout for the tiles. Use adhesive or nails to secure the tiles in place, following the manufacturer’s instructions for proper installation. Ensure that the tiles are aligned correctly and evenly spaced for a professional-looking finish.

3. Finishing Touches:

Once all the tiles are installed, add finishing touches such as trim pieces or decorative accents to complete the look. Caulk any gaps or seams between tiles to create a seamless appearance, and touch up any paint or finish as needed to ensure a polished finish.

Conclusion

Decorative 2X2 ceiling tiles offer a stylish, versatile, and easy-to-install solution for enhancing the aesthetics of any room. Whether used as a subtle accent or a bold statement piece, these tiles add texture, depth, and visual interest to ceilings, transforming them into stunning focal points. With a wide range of design options and easy installation process, decorative 2X2 ceiling tiles are sure to elevate the look of your space and impress visitors for years to come.