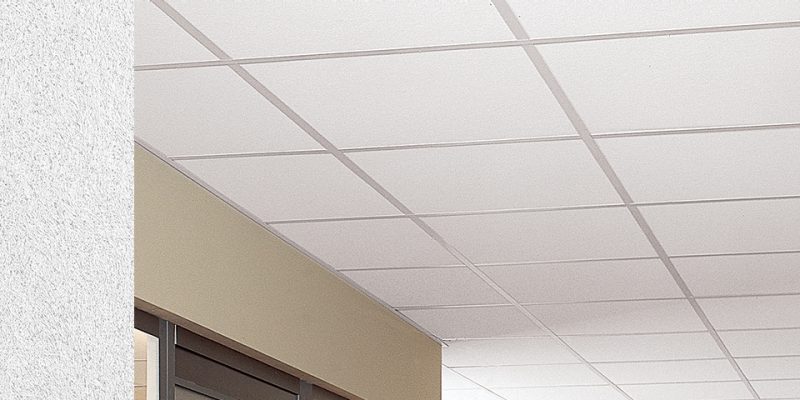
How to Fix Water Spot on Ceiling Under Bathroom

Water spot on ceiling under bathroom can be a serious problem. If left untreated, it can lead to mold growth, structural damage, and other problems. In this article, we will discuss the causes of water damage on ceilings under bathrooms, how to identify the source of the leak, and how to fix the damage.

Water Spot On Ceiling Under Bathroom

Causes of Water Damage on Ceilings Under Bathrooms

There are a number of things that can cause water damage on ceilings under bathrooms. Some of the most common causes include:

  • Leaking pipes: Leaking pipes are one of the most common causes of water damage on ceilings under bathrooms. Leaks can occur in the pipes that supply water to the toilet, sink, or shower. Various factors, including corrosion, wear and tear, or improper installation, can cause leaks.
  • Damaged caulking or sealant: Caulking and sealant seal around bathtubs, showers, and other fixtures in bathrooms. If the caulking or sealant becomes damaged, it can allow water to seep through. Caulking and sealant can be damaged by moisture, chemicals, or physical wear and tear.
  • Clogged drains: Clogged drains can also cause water damage on ceilings under bathrooms. When drains are clogged, water can back up and overflow, causing damage to the ceiling. Clogs can be caused by hair, soap scum, or other debris.
  • Roof leaks: In some cases, water damage on ceilings under bathrooms can be caused by a roof leak. If the roof is damaged, it can allow water to seep into the attic and then drip down onto the ceiling. Roof leaks can be caused by hail, wind, or other weather events.

How to Identify the Source of the Leak

Once you have determined that you have water damage on the ceiling under your bathroom, you need to identify the source of the leak. This can be a difficult task, but there are a few things you can do to help narrow it down.

  • Look for any obvious signs of a leak, such as wet spots on the ceiling, dripping water, or mold growth. If you see any of these signs, you can start your investigation there.
  • Try to trace the path of the water. If you can see where the water is coming from, you will be well on your way to identifying the source of the leak.
  • Turn off the water to the bathroom and see if the leak stops. If the leak stops, you have identified the source of the leak.
  • If you are having trouble identifying the source of the leak, you may need to hire a plumber or other professional to help you.

How to Fix Water Damage on Ceilings Under Bathrooms

Once you have identified the source of the leak, you can start to fix the damage. The specific steps you will need to take will vary depending on the cause of the leak.

Stop the leak: The first step is to stop the leak. This may involve repairing a leaking pipe, replacing damaged caulking or sealant, or clearing a clogged drain.

Clean up the damage: After stopping the leak, you must clean up any existing damage. This may involve removing wet drywall, scraping mold, or repairing structural damage.

Prevent future leaks: After repairing the damage, you should take measures to prevent future leaks. This may require you to replace old or damaged pipes, caulk or seal around fixtures, or repair your roof.

Tips for Fixing Water Damage on Ceilings Under Bathrooms

  • Be patient: Fixing water damage can be a time-consuming process. Do not rush the job, or you may end up making the problem worse.
  • Use the right materials: Make sure you use the right materials to fix the damage. Using the wrong materials can lead to further problems.
  • Get professional help: If you are not comfortable fixing the damage yourself, hire a professional.

Read too: Do All Popcorn Ceilings Contain Asbestos

Additional Information

In addition to the steps listed above, there are a few additional things you can do to help prevent water spot on ceiling under bathroom.

  • Install a moisture sensor: A moisture sensor can help you detect leaks early on, before they cause significant damage.
  • Install a water alarm: A water alarm can sound an alarm if water is detected.
  • Install a sump pump: A sump pump can help to remove water from your basement or crawl space, which can help to prevent leaks from occurring in your bathroom.

Should You Insulate Your Garage Ceiling?

Your garage is an important part of your home, and it can be used for a variety of purposes, from storing your car to working on projects. But if your garage is not insulated, it can be a source of wasted energy and discomfort.

Insulating your garage ceiling is a great way to save money on your energy bills, improve the comfort of your home, and protect your belongings from the elements. In this article, we will discuss the benefits of insulating your garage ceiling in more detail and answer the question, “Should you insulate your garage ceiling?

Should You Insulate Your Garage Ceiling

Benefits of Insulating Your Garage Ceiling

Reduced energy bills: Insulated garage ceilings can help to keep the heat in during the winter and the cool air in during the summer. This can save you money on your energy bills, especially if your garage is attached to your home.

For example, if you live in a cold climate and your garage is attached to your home, insulating your garage ceiling can save you up to 10% on your heating costs. This is because the insulation will help to prevent heat from escaping from your home through the garage ceiling.

Improved comfort: A well-insulated garage will be more comfortable to use, even in cold weather. This is because the insulation will help to trap heat inside the garage, making it warmer and more comfortable to work in.

For example, if you use your garage as a workshop, insulating your garage ceiling will make it more comfortable to work in during the winter. The insulation will help to keep you warm and comfortable, even if the temperature outside is cold.

Protection from the elements: Insulation protects garages from the elements, extending the lifespan of your belongings. This is because the insulation will help to keep out moisture and cold air, which can damage your belongings.

For example, if you store your car in your garage, insulating your garage ceiling will help to protect your car from the elements. The insulation will help to keep your car dry and warm, which can help to extend the life of your car.

Should You Insulate Your Garage Ceiling?

The answer to this question depends on a number of factors, including:

  • The climate in your area: If you live in a cold climate, insulating your garage ceiling is especially important. This will help to keep your home warmer and more comfortable in the winter.

For example, if you live in a cold climate, such as Minnesota or Wisconsin, insulating your garage ceiling is a good investment. The insulation will help to keep your home warmer and more comfortable in the winter, which can save you money on your energy bills.

  • The size of your garage: The larger your garage, the more insulation you will need, and the higher the cost will be.

For example, if you have a two-car garage, you will need about 800 square feet of insulation. The cost of insulation will vary depending on the type of insulation you choose.

  • Your budget: Insulating your garage ceiling can be a significant investment, so it is important to consider your budget before making a decision.

For example, the cost of insulating a two-car garage with fiberglass batts is about $500. The cost of insulating a two-car garage with spray foam insulation is about $2,000.

How to Insulate Your Garage Ceiling

If you decide to insulate your garage ceiling, there are a few things you will need to do:

  1. Remove any existing insulation. If your garage already has insulation, it is important to remove it before installing new insulation.
  2. Inspect the joists. Make sure the joists are in good condition and free of damage. You will need to repair the damaged joists before installing insulation.
  3. Measure the joists. You will need to measure the width and depth of the joists to determine the correct size of insulation.
  4. Cut the insulation to size. Use a sharp knife or saw to cut the insulation to the correct size.
  5. Install the insulation. Staple or screw the insulation to the joists, leaving a small gap between the insulation and the ceiling.
  6. Seal any gaps or cracks. Use insulation tape to seal any gaps or cracks in the insulation.

Conclusion

Insulating your garage ceiling is a wise investment that can save you money, improve your comfort, and protect your belongings. If you are considering insulating your garage ceiling, it is important to do your research and compare prices before making a decision.

How Much Does It Cost to Insulate a Garage Ceiling?

Insulating your garage ceiling is a great way to save money on your energy bills, improve the comfort of your home, and protect your belongings from the elements. But how much does it cost to insulate a garage ceiling?

How Much To Insulate Garage Ceiling

The cost of insulating a garage ceiling can vary depending on a number of factors, including:

  • The size of your garage: The larger your garage, the more insulation you will need, and the higher the cost will be.
  • The type of insulation you choose: Different types of insulation have different costs. Fiberglass batts are the most common type of insulation, and they are relatively inexpensive. Spray foam insulation is more expensive, but it is also more effective at blocking heat transfer.
  • The cost of labor in your area: The cost of labor can vary depending on the location. In general, labor costs are higher in urban areas than in rural areas.

In general, the cost of insulating a garage ceiling ranges from $250 to $3,900.

Here is a breakdown of the costs involved in insulating a garage ceiling:

  • Materials: The cost of insulation materials can range from $1 to $3 per square foot. For a typical 2-car garage, you will need about 800 square feet of insulation. The cost of insulation materials will depend on the type of insulation you choose.
  • Labor: The cost of labor can range from $25 to $50 per hour. The amount of labor required will depend on the size of your garage and the type of insulation you choose.

Here are some tips for reducing the cost of insulating your garage ceiling:

  • Do it yourself: If you are handy, you can insulate your garage ceiling yourself and save money on labor costs. There are many tutorials available online and in home improvement stores.
  • Choose the right insulation: There are a variety of insulation materials available, each with its own advantages and disadvantages. Choose the type of insulation that is best suited for your needs and budget.
  • Get multiple estimates: Get estimates from several contractors before making a decision. This will help you compare prices and find the best deal.

How to Insulate a Garage Ceiling

If you decide to insulate your garage ceiling yourself, you will need the following materials:

  • Insulation: You can choose from a variety of insulation materials, including fiberglass batts, cellulose insulation, and spray foam insulation.
  • Insulation staples or screws: You will need these to secure the insulation to the joists.
  • Insulation tape: You will need this to seal any gaps or cracks in the insulation.
  • Safety gear: You will need safety glasses, gloves, and a dust mask to protect yourself from insulation fibers.

Here are the steps involved in insulating a garage ceiling:

  1. Remove any existing insulation. If your garage already has insulation, it is important to remove it before installing new insulation.
  2. Inspect the joists. Make sure the joists are in good condition and free of damage. If the joists are damaged, you will need to repair them before installing insulation.
  3. Measure the joists. You will need to measure the width and depth of the joists to determine the correct size of insulation.
  4. Cut the insulation to size. Use a sharp knife or saw to cut the insulation to the correct size.
  5. Install the insulation. Staple or screw the insulation to the joists, leaving a small gap between the insulation and the ceiling.
  6. Seal any gaps or cracks. Use insulation tape to seal any gaps or cracks in the insulation.

Benefits of Insulating a Garage Ceiling

Reduced energy bills: Insulating your garage ceiling can help you save money on your energy bills by reducing the amount of heat that escapes from your home. This is especially important if your garage is attached to your home.

  • Improved comfort: A well-insulated garage will be more comfortable to use, even in cold weather. This is because the insulation will help to trap heat inside the garage, making it warmer and more comfortable to work in.
  • Protection from the elements: Insulated garages are better protected from the elements, which can help to extend the life of your belongings. This is because the insulation will help to keep out moisture and cold air, which can damage your belongings.

Conclusion

Insulating your garage ceiling is a wise investment that can save you money, improve your comfort, and protect your belongings. If you are considering insulating your garage ceiling, it is important to do your research and compare prices before making a decision.tunesharemore_vert

How Much Does It Cost to Paint an Exposed Basement Ceiling?

How Much Does It Cost to Paint an Exposed Basement Ceiling? An exposed basement ceiling can be a great way to add character and style to your home. It can also help to improve the appearance of a basement that is in need of a makeover. However, painting an exposed basement ceiling can be a bit of a challenge. The ceiling is often uneven and textured, which can make it difficult to get a smooth finish.

Cost To Paint Exposed Basement Ceiling

Cost Factors

The cost of painting an exposed basement ceiling will vary depending on a number of factors, including:

  • Size of the ceiling: The larger the ceiling, the more paint you will need, and the more time it will take to paint. For example, a 1,000 square foot ceiling will require about 10 gallons of paint if you are using a single coat.
  • Condition of the ceiling: If the ceiling is in poor condition, you may need to repair any cracks or holes before you can paint. This can add to the cost of the project.
  • Type of paint: The type of paint you choose will affect the cost. Latex paint is the most common type of paint used for exposed basement ceilings, and it is relatively inexpensive. Oil-based paint is more expensive and requires more time to dry.
  • Painting supplies: You will need to purchase paint brushes, rollers, and other painting supplies.
  • Labor costs: If you hire a professional painter, you will need to factor in labor costs.

DIY Costs

If you choose to paint your exposed basement ceiling yourself, you can expect to pay about $0.50 to $1 per square foot for materials. This includes the cost of paint, brushes, rollers, and other supplies.

For example, if you have a 1,000 square foot ceiling, you can expect to pay about $500 to $1,000 in materials.

Here are some additional details about the cost of materials for DIY painting:

  • Paint: Latex paint costs about $20 to $30 per gallon. You will need two coats of paint, so you will need about 20 gallons of paint for a 1,000 square foot ceiling.
  • Brushes and rollers: You will need a paint brush for cutting in around the edges of the ceiling and a roller for painting the larger areas. You can purchase a set of brushes and rollers for about $50.
  • Other supplies: You will also need a drop cloth to protect your floors and a ladder to reach the ceiling. You can purchase a drop cloth for about $20 and a ladder for about $50.

Professional Painting Costs

If you hire a professional painter, you can expect to pay about $2 to $3 per square foot for labor. This includes the cost of prep work, painting, and cleanup.

For example, if you have a 1,000 square foot ceiling, you can expect to pay about $2,000 to $3,000 in labor costs.

Here are some additional details about the cost of labor for professional painting:

  • Prep work: The painter will need to prepare the ceiling by cleaning it and repairing any cracks or holes. This can add about $100 to $200 to the cost of the project.
  • Painting: The painter will apply two coats of paint to the ceiling. This will take about two days to complete.
  • Cleanup: The painter will clean up the mess after they are finished painting. This includes removing the drop cloth and ladder.

Read too: Do All Popcorn Ceilings Contain Asbestos

Total Costs

The total cost of painting an exposed basement ceiling will depend on the size of the ceiling, the condition of the ceiling, the type of paint you choose, and whether you choose to do the work yourself or hire a professional painter.

DIY Tips

If you choose to paint your exposed basement ceiling yourself, here are a few tips to help you get a smooth finish:

  • Prepare the ceiling properly. Make sure the ceiling is clean and free of dirt, dust, and cobwebs. You can use a vacuum cleaner or a broom to clean the ceiling. If the ceiling is dirty or dusty, it will be difficult to get a smooth finish.
  • Apply a coat of primer. Primer will help the paint adhere to the ceiling. You can use a latex primer or an oil-based primer.
  • Apply two coats of paint. This will help to create a smooth, even finish. You can use a latex paint or an oil-based paint.

Do All Popcorn Ceilings Contain Asbestos?

Popcorn ceilings were a popular home improvement trend in the United States from the 1950s to the 1980s. They are made by spraying a material onto a ceiling that creates a textured, bumpy surface. Popcorn ceilings can be a good way to hide imperfections in a ceiling, but they can also be a health hazard if they contain asbestos.

Do All Popcorn Ceilings Contain Asbestos

What is Asbestos?

Asbestos is a naturally occurring mineral that is made up of fibers. It has found application in various building materials, including popcorn ceilings, due to its strength and fire resistance properties. However, asbestos is a known carcinogen and can cause a variety of health problems, including lung cancer, mesothelioma, and asbestosis.

Do All Popcorn Ceilings Contain Asbestos?

The short answer is no, not all popcorn ceilings contain asbestos. However, it is estimated that about 50% of popcorn ceilings installed before 1980 contain asbestos. This is because the Environmental Protection Agency (EPA) banned the use of asbestos in popcorn ceiling material in 1978, making it a common ingredient until that time.

How to Tell if Your Popcorn Ceiling Contains Asbestos

If you are concerned that your popcorn ceiling may contain asbestos, there are a few things you can do to check. First, you can look for the following signs:

  • The ceiling was installed before 1980.
  • The ceiling has a crumbly or powdery texture.
  • The ceiling has a gray or brown color.

If you see any of these signs, it is best to have your ceiling tested for asbestos by a qualified professional.

Health Risks of Asbestos Exposure

Asbestos exposure can cause a variety of health problems, including:

  • Lung cancer
  • Mesothelioma
  • Asbestosis

Lung cancer is the most common health problem caused by asbestos exposure. Mesothelioma is a rare cancer that affects the lining of the lungs, heart, or abdomen. Asbestosis is a chronic lung disease that can cause shortness of breath, coughing, and fatigue.

How to Remove Popcorn Ceilings Containing Asbestos

If you have a popcorn ceiling that contains asbestos, it is important to have it removed by a qualified professional. Removing asbestos yourself can be dangerous and can lead to exposure to asbestos fibers.

A professional asbestos removal company will use specialized equipment and procedures to safely remove the popcorn ceiling. They will also take steps to contain the asbestos fibers and prevent them from spreading.

Additional Details

In addition to the signs listed above, there are a few other things you can look for to help determine if your popcorn ceiling contains asbestos. For example, if the ceiling has a strong, musty odor, it may be a sign of asbestos.

If you are concerned that your popcorn ceiling may contain asbestos, it is always best to have it tested by a qualified professional. Asbestos testing is a relatively inexpensive and quick process.

Conclusion

Popcorn ceilings that were installed before 1980 may contain asbestos. If you are concerned that your popcorn ceiling contains asbestos, it is best to have it tested by a qualified professional.

Call to Action

If you are concerned that your popcorn ceiling may contain asbestos, contact a qualified professional to have it tested.

Additional Details

Here are some additional details about the health risks of asbestos exposure:

  • Lung cancer is the most common health problem caused by asbestos exposure. It takes about 20-30 years for lung cancer to develop after asbestos exposure.
  • Mesothelioma is a rare cancer that affects the lining of the lungs, heart, or abdomen. It takes about 30-40 years for mesothelioma to develop after asbestos exposure.
  • Asbestosis is a chronic lung disease that can cause shortness of breath, coughing, and fatigue. It takes about 10-20 years for asbestosis to develop after asbestos exposure.

Read too: What Causes Black Mold On Ceiling

How to Remove Asbestos

Qualified professionals should exclusively undertake the complex and hazardous process of asbestos removal. A professional asbestos removal company will use specialized equipment and procedures to safely remove the asbestos. They will also take steps to contain the asbestos fibers and prevent them from spreading.

How to Test for Asbestos

Asbestos testing is a relatively inexpensive and quick process. A qualified professional will use a variety of methods to test for asbestos, including visual inspection, air sampling, and bulk sampling.

I hope this information is helpful.tunesharemore_vert

Why Is My Bathroom Ceiling Dripping Water After a Shower?

Why Is My Bathroom Ceiling Dripping Water After a Shower? A dripping bathroom ceiling can be a frustrating and even dangerous problem. It can cause water damage to your home, mold growth, and even health problems. If you’re experiencing a dripping bathroom ceiling, it’s important to identify the cause of the leak and take steps to fix it as soon as possible.

Bathroom Ceiling Dripping Water After Shower

What Causes a Dripping Bathroom Ceiling?

There are a number of possible causes of a dripping bathroom ceiling. The most common causes include:

  • Leaking pipes: Leaking pipes are the most common cause of bathroom ceiling leaks. They can be caused by a variety of factors, such as corrosion, wear and tear, or damage from freezing.
  • Damaged tiles or grout: Damaged tiles or grout can allow water to seep through to the ceiling below. This can happen due to impact damage, improper installation, or wear and tear. For example, if you drop a heavy object on your shower tiles, it could crack the tiles and cause a leak.
  • Clogged or damaged drains: Clogged or damaged drains can cause water to back up and leak through the ceiling. This can happen if you don’t regularly clean your shower and bathtub to remove soap scum and other debris that can clog drains.
  • Improper ventilation: Improper ventilation can lead to moisture buildup, which can contribute to mold growth and ceiling leaks. Bathrooms are typically small, enclosed spaces with no windows. This can lead to moisture buildup if there is not enough ventilation.

How to Fix a Dripping Bathroom Ceiling

Once you’ve identified the cause of the leak, you can take steps to fix it. The leak is caused by a leaking pipe, you’ll need to call a plumber to repair the pipe. If the leak is caused by damaged tiles or grout, you’ll need to replace the damaged tiles or grout. If the leak is caused by a clogged or damaged drain, you’ll need to clear the clog or repair the drain. The leak is caused by improper ventilation, you’ll need to improve the ventilation in your bathroom.

Preventing Bathroom Ceiling Leaks

The best way to prevent bathroom ceiling leaks is to take steps to prevent moisture buildup. You can do this by:

  • Fixing any leaks in your pipes or drains. This is the most important step. If you have a leak, it’s only a matter of time before it causes damage.
  • Regularly cleaning your shower and bathtub to remove soap scum and other debris that can clog drains. This will help to prevent clogs that can lead to leaks.
  • Using a dehumidifier to reduce humidity in your bathroom. This is a good option if you have a bathroom that doesn’t have a lot of ventilation.
  • Installing a fan in your bathroom to help ventilate the area. This is the most effective way to reduce moisture buildup in your bathroom.

Conclusion

Bathroom ceiling dripping water after shower can be a serious problem, but it’s one that can be fixed with the right diagnosis and treatment. By identifying the cause of the leak and taking steps to fix it, you can prevent further damage to your home and keep yourself and your family safe.

Call to Action:

If you’re experiencing a dripping bathroom ceiling, it’s important to take action as soon as possible. Contact a plumber or other professional to identify the cause of the leak and fix it.

Additional Information:

Here are some additional tips for preventing and fixing bathroom ceiling leaks:

  • Inspect your bathroom regularly for signs of leaks. This includes looking for water stains on the ceiling, walls, or floors.
  • If you see a leak, take action immediately. The longer you wait to fix a leak, the more damage it can cause.
  • If you’re not comfortable fixing a leak yourself, call a plumber or other professional.
  • When you’re fixing a leak, be sure to use the right tools and materials. This will help to ensure that the leak is fixed properly and that it doesn’t happen again.

By following these tips, you can help to prevent bathroom ceiling leaks and keep your home safe and dry.tunesharemore_vert

What Causes Black Mold On Ceiling: A Comprehensive Guide

Black mold is a type of mold that can grow on ceilings and other surfaces in homes and businesses. It is often caused by moisture and humidity, and can be a health hazard.

In this article, we will discuss the causes of black mold on ceiling, the health risks associated with black mold exposure, and how to prevent and remove black mold.

What Causes Black Mold On Ceiling

What Causes Black Mold On Ceilings?

Black mold is caused by moisture and humidity. When these conditions are present, mold spores can grow and spread.

Moisture

Moisture is the most common cause of black mold. It can come from a variety of sources, including:

  • Leaks: Leaks from roofs, pipes, or other sources can cause moisture to build up in ceilings.
  • Water damage: Water damage from flooding or other events can also lead to moisture and humidity in ceilings.
  • High humidity: High humidity levels can also promote the growth of mold.

Humidity

Humidity is the amount of water vapor in the air. When humidity levels are high, it can be difficult for moisture to escape from ceilings.

Other Factors

Other factors that can contribute to the growth of black mold on ceilings include:

  • Poor ventilation: Poor ventilation can prevent moisture from escaping from ceilings.
  • Debris: Debris, such as leaves or branches, can provide a substrate for mold to grow on.
  • Warm temperatures: Warm temperatures can promote the growth of mold.

Health Risks Associated With Black Mold

Black mold can be a health hazard. It can release toxins that can cause respiratory problems, allergic reactions, and other health problems.

Respiratory problems: Black mold can irritate the respiratory system, causing symptoms such as coughing, wheezing, and shortness of breath.

  • Allergic reactions: Black mold can trigger allergic reactions, such as sneezing, runny nose, and itchy eyes.
  • Sinus infections: Black mold can increase the risk of sinus infections.
  • Eye infections: Black mold can increase the risk of eye infections.
  • Skin infections: Black mold can increase the risk of skin infections.
  • Immune system problems: Black mold can weaken the immune system, making people more susceptible to infections.
  • Neurological problems: Black mold has been linked to neurological problems, such as memory loss and cognitive decline.

Preventing Black Mold

The best way to prevent black mold is to reduce moisture and humidity in your home. You can do this by:

  • Fixing leaks: Fix any leaks in your roof, pipes, or other sources.
  • Improving ventilation: Improve ventilation in your home by installing fans or opening windows.
  • Dehumidifying: Dehumidify your home to reduce humidity levels.
  • Cleaning regularly: Clean surfaces regularly to remove mold spores before they can grow.

Removing Black Mold

If you find black mold in your home, it is important to remove it as soon as possible. You can remove black mold yourself or hire a professional mold remediation company.

Removing black mold yourself:

If you choose to remove black mold yourself, it is important to wear protective gear, such as a respirator, gloves, and goggles. You should also follow the instructions on the mold removal product you are using.

Steps for removing black mold yourself:

  1. Remove any debris or materials that are contaminated with mold.
  2. Clean the affected area with a bleach solution.
  3. Rinse the area thoroughly with water.
  4. Allow the area to dry completely.

Removing black mold with a professional:

If you are not comfortable removing black mold yourself, you should hire a professional mold remediation company. A professional will have the necessary equipment and experience to remove black mold safely and effectively.

Conclusion

Black mold is a serious problem that can cause health problems. It is important to understand the causes of black mold on ceiling, the health risks associated with black mold exposure, and how to prevent and remove black mold.

Read too: Should You Insulate Unfinished Basement Ceiling

Call to Action

If you have found black mold in your home, please contact a qualified mold remediation company to have it removed safely and effectively.

Additional Information

In addition to the information provided in this article, here are some additional tips for preventing and removing black moldtunesharemore_vert

Should You Insulate Your Unfinished Basement Ceiling?

Your basement is a valuable part of your home, but it can be a cold and uncomfortable place if it’s not properly insulated. In fact, up to 25% of heat loss in a home can occur through the basement ceiling.

If you’re considering insulating your unfinished basement ceiling, there are a few things you need to know. In this article, we’ll discuss the pros and cons of insulating your basement ceiling, as well as the different types of insulation available.

Should You Insulate Unfinished Basement Ceiling

Should You Insulate Your Basement Ceiling?

There are several reasons why you might want to insulate your unfinished basement ceiling. Here are a few of the benefits:

  • Increased energy efficiency: Basement insulation can help to keep your home warm in the winter and cool in the summer. This can lead to lower energy bills.

For example, according to the U.S. Department of Energy, insulating your basement ceiling can save you up to 15% on your heating costs. This can add up to hundreds or even thousands of dollars over the lifetime of your home.

  • Improved comfort: A well-insulated basement will be more comfortable to use, whether you’re using it for storage, recreation, or finishing.

For example, if you use your basement for a home office or playroom, you’ll be more comfortable working or playing in a warm and dry environment.

  • Reduced noise levels: Basement insulation can help to reduce noise levels from the outside world. This can be especially important if you live in a noisy area.

For example, if you live near a busy road or train tracks, basement insulation can help to reduce the amount of noise that comes into your home.

Cons of Basement Ceiling Insulation

There are a few potential downsides to basement ceiling insulation. Here are a few things to consider:

The cost of basement ceiling insulation will vary depending on the size of your basement and the type of insulation you choose. However, in general, you can expect to pay between $1 and $2 per square foot.

  • Labor: If you’re not comfortable doing the work yourself, you’ll need to hire a contractor.

Insulating a basement ceiling is a relatively simple project, but it can be time-consuming. If you’re not comfortable doing the work yourself, you can hire a contractor to do it for you.

  • Space: Basement ceiling insulation can reduce the amount of storage space in your basement.

Depending on the type of insulation you choose, you may need to lose a few inches of headroom in your basement. This can reduce the amount of storage space you have available.

Types of Basement Ceiling Insulation

There are two main types of basement ceiling insulation:

  • Fiberglass: Fiberglass insulation is a popular option because it’s relatively inexpensive and easy to install.

Fiberglass insulation is made up of small, glass fibers that are held together by a binder. It comes in rolls or batts that can be cut to fit between the joists in your basement ceiling.

  • Foam insulation: Foam insulation is a more expensive option, but it’s also more effective at preventing heat loss.

Foam insulation comes in a variety of forms, including spray foam, rigid foam, and blown-in foam. Spray foam is the most effective type of foam insulation, but it’s also the most expensive. Rigid foam and blown-in foam are less expensive than spray foam, but they’re also less effective at preventing heat loss.

How to Insulate Your Basement Ceiling

If you’ve decided to insulate your basement ceiling, there are a few things you’ll need to do.

  1. Choose the right insulation: There are a variety of insulation materials and thicknesses available. Choose the type and thickness that’s right for your climate and needs.
  2. Measure and cut the insulation: Use a tape measure and a sharp knife to cut the insulation to the correct length and width.
  3. Install the insulation: There are a variety of ways to install basement ceiling insulation. Follow the instructions on the insulation packaging for specific instructions.

Conclusion

Should you insulate unfinished basement ceiling? Insulating your unfinished basement ceiling is a great way to improve the energy efficiency, comfort, and value of your home. If you’re considering this project, be sure to weigh the pros and cons carefully before making a decision.

Water Leaking Through Ceiling After Bath: Causes, Solutions, and Prevention

Water leaking through the ceiling after a bath can be a frustrating and costly problem. It can cause damage to the ceiling, walls, and floor below, and it can also lead to mold and mildew growth. In some cases, it can even be a sign of a more serious underlying problem, such as a leaking roof or damaged pipes.

Water Leaking Through Ceiling After Bath

Causes of Water Leaks

There are a number of possible causes of water leaks through the ceiling after a bath. Some of the most common causes include:

  • Damaged pipes: Damaged pipes are a common cause of water leaks. This damage can be caused by a number of factors, including corrosion, wear and tear, or even a sudden impact.
  • Loose or damaged seals: Loose or damaged seals can allow water to seep through the pipes and into the ceiling. You can locate these seals at the joints between pipes, fittings, and fixtures.
  • Clogged drains: Clogged drains can cause water to back up and leak into the ceiling. This is often caused by hair, soap scum, or other debris that builds up in the drain.
  • Damaged roof or gutters: Damaged roofs or gutters can allow water to leak into the ceiling. Several factors, such as wind damage, hail, or ice dams, can cause this.

Solutions for Water Leaks

The solution for a water leak will depend on the cause of the leak. In certain instances, fixing the leak can be a straightforward process involving a few simple steps. In other cases, the leak may require professional assistance.

If damaged pipes are the root cause of the leak, you will need to repair or replace the pipes. This can be a difficult and time-consuming task, so it is best to hire a professional plumber.

If loose or damaged seals are the cause of the leak, you will need to replace the seals. Homeowners can easily accomplish this task.

If the leak is caused by clogged drains, the drains will need to be cleared. This can be done with a plunger or a drain snake.

If damage to the roof or gutters is responsible for the leak, you will need to repair the damage. This is a task that is best left to a professional roofer.

Preventing Water Leaks

There are a number of things that can be done to prevent water leaks through the ceiling after a bath. Some of the most important preventive measures include:

  • Regularly inspect the pipes and drains for damage. You can do this by inspecting for any indications of cracks, leaks, or corrosion.
  • Clean the gutters and downspouts regularly. This will help to prevent water from backing up and leaking into the house.
  • Use a plunger or drain snake to clear clogged drains. This will help to prevent water from backing up and leaking into the house.
  • Have the roof inspected regularly for damage. This is especially important if you live in an area with severe weather.

Read too: How To Fix Condensation On Ceiling

Additional Tips

In addition to the preventive measures listed above, there are a few additional tips that can help to prevent water leaking through the ceiling after a bath. These tips include:

  • Install a water leak detector. A water leak detector can alert you to a leak before it causes damage.
  • Use a shower curtain or liner. A shower curtain or liner can help to prevent water from splashing onto the floor and causing damage to the ceiling.
  • Turn off the water when you leave the bathroom. This will help to prevent leaks if a pipe bursts.

By following these tips, homeowners can help to keep their homes dry and safe.

Additional Content

Here are some additional tips for preventing water leaks through the ceiling after a bath:

  • Use a high-quality shower curtain or liner. A cheap shower curtain or liner is more likely to tear or leak.
  • Inspect the shower curtain or liner regularly for damage. If you see any tears or holes, replace the curtain or liner immediately.
  • Keep the shower curtain or liner clean. A dirty shower curtain or liner can harbor mold and mildew, which can damage the ceiling.
  • Clean the shower regularly. A dirty shower can lead to soap scum buildup, which can clog drains and cause leaks.
  • Use a plunger or drain snake regularly to clear clogged drains. A clogged drain can cause water to back up and leak into the ceiling.

By following these tips, homeowners can help to keep their homes dry and safe.

Hearing Crawling in Your Ceiling: What to Do

Hear crawling in your ceiling can be a disturbing and unsettling experience. It can be difficult to sleep or relax knowing that there is something moving around above your head. In some cases, the crawling may be caused by a harmless animal, such as a mouse or a squirrel. However, it is also possible that the crawling is caused by something more serious, such as a structural problem or a pest infestation.

I Hear Crawling In My Ceiling

What to Do

If you are hearing crawling in your ceiling, there are a few things you can do to investigate the cause.

  1. Listen carefully to the noise. Try to determine the location of the noise and the type of sound it is making. Is it a scratching sound, a scurrying sound, or something else?
    • The type of noise you hear can help you to narrow down the possible causes. For example, a scratching sound is more likely to be caused by an animal, while a scurrying sound is more likely to be caused by pests.
  1. Look for signs of pests. Check for droppings, nests, or other signs of animal activity in your attic or crawl space.
    • Pests often leave behind signs of their presence. Look for droppings, nests, or other debris. You may also see the pests themselves, such as mice or ants.
  1. Inspect your ceiling. Look for cracks, holes, or other openings that could allow animals or pests to enter your home.
    • Animals and pests can enter your home through even the smallest openings. Look for cracks, holes, or other gaps in your ceiling. You may also want to inspect your attic or crawl space for any openings that could allow pests to enter your home.

Possible Causes

There are a number of possible causes for hearing crawling in your ceiling. Some of the most common causes include:

  • Animals: Mice, rats, squirrels, and other small animals are common causes of crawling noises in ceilings. These animals may be looking for food, water, or a place to nest.
    • Mice and rats are the most common animals that cause crawling noises in ceilings. These animals are attracted to food and water, and they often look for places to nest in warm, dark areas. Squirrels are less common, but they can also cause crawling noises in ceilings. Squirrels are looking for food and nesting material, and they often enter homes through attics or crawl spaces.
  • Pests: Ants, termites, and other pests can also cause crawling noises in ceilings. These pests may be damaging your home’s structure or eating away at your belongings.
    • Ants are a common pest that can cause crawling noises in ceilings. Ants are looking for food, and they often enter homes through cracks or holes in the foundation. Termites are a more serious pest that can cause significant damage to your home’s structure. Termites often enter homes through cracks or holes in the foundation, and they can spread quickly if not treated.
  • Structural problems: In some cases, crawling noises in ceilings can be caused by a structural problem, such as a loose roof tile or a damaged joist.
    • Loose roof tiles can cause a rattling or scurrying sound when they are hit by rain or wind. Damaged joists can also cause a creaking or groaning sound.

Read too: Should You Insulate Unfinished Basement Ceiling

How to Get Rid of the Crawling

Once you have determined the cause of the crawling, you can take steps to get rid of it.

  • Animals: If animals are the cause of the crawling, you can try to trap them or seal up any openings that allow them to enter your home.
    • There are a number of different ways to trap animals. You can use live traps, snap traps, or glue traps. You can also seal up any openings that could allow animals to enter your home.
  • Pests: If pests are the cause of the crawling, you can use pesticides or other pest control methods to get rid of them.
    • There are a number of different pesticides and pest control methods available. You can choose a method that is appropriate for the type of pest you are dealing with.
  • Structural problems: If a structural problem is the cause of the crawling, you will need to have it repaired by a professional.
    • A structural problem is a serious issue that should be repaired by a qualified professional.

Conclusion

Hear crawling in your ceiling can be a sign of a serious problem. It is important to investigate the cause of the crawling and take steps to get rid of it. By following the tips in this article, you can help to ensure that your home is safe and secure.

How Much Does It Cost to Paint a Room and Ceiling?

Cost to Paint Room and Ceiling. Painting a room or ceiling is a great way to update the look of your home. It can be a relatively inexpensive project to do yourself, but it’s important to understand the costs involved before you get started.

In this article, we’ll discuss the average cost to paint a room and ceiling, as well as the factors that can affect the price. We’ll also provide some tips for saving money on your painting project.

Cost To Paint Room And Ceiling

Average Cost to Paint a Room and Ceiling

The average cost to paint a room and ceiling ranges from $300 to $1,000, depending on the size of the room, the type of paint, and the number of coats required.

For a small room, such as a bedroom or bathroom, the cost to paint the walls and ceiling is typically around $300 to $500. For a larger room, such as a living room or dining room, the cost can range from $500 to $1,000.

Factors Affecting Cost

The following factors can affect the cost to paint a room and ceiling:

  • Size of the room: The larger the room, the more paint you’ll need, which will increase the cost.
  • Type of paint: The type of paint you choose will also affect the cost. For example, latex paint is typically less expensive than oil-based paint.
  • Number of coats: The number of coats of paint you need will also affect the cost. In most cases, two coats of paint are required for a good finish.
  • Labor costs: If you hire a professional painter, you’ll need to factor in labor costs. The cost of professional painting varies depending on the location and the painter’s experience.

Tips for Saving Money

Here are a few tips for saving money on your painting project:

  • Do it yourself: If you’re handy, you can save money by painting the room yourself. There are many resources available to help you learn how to paint, including online tutorials and DIY books.
  • Choose the right paint: Latex paint is a good choice for most rooms. It’s easy to apply and clean up, and it’s available in a variety of colors and finishes.
  • Consider the number of coats: If you’re using a high-quality paint, you may be able to get away with one coat.
  • Shop around for paint and supplies: Compare prices from different retailers to find the best deal.

Call to Action

If you’re ready to start painting, be sure to do your research and get quotes from several painters before making a decision.

Additional Details

In addition to the factors mentioned above, there are a few other things to keep in mind when estimating the cost of painting a room and ceiling.

  • The condition of the walls and ceiling: If the walls or ceiling are in poor condition, you may need to repair or replace them before you can paint. This can add to the cost of the project.
  • The type of finish you want: Different types of finishes, such as flat, semi-gloss, or high-gloss, will affect the cost of the paint.
  • The time of year: Painting in the summer is typically more expensive than painting in the winter. This is because painters are in higher demand during the summer months.

Tips for Hiring a Professional Painter

If you decide to hire a professional painter, be sure to get quotes from several painters before making a decision. Compare the quotes carefully, and make sure you understand what is included in each quote. Here are a few questions to ask potential painters:

  • How much experience do you have painting rooms and ceilings?
  • What type of paint do you use?
  • How many coats of paint do you recommend?
  • What is your labor rate?
  • What is your estimated completion date?

Read too: Should You Insulate Unfinished Basement Ceiling

Conclusion

Painting a room or ceiling can be a great way to update the look of your home. By understanding the costs involved and following a few tips, you can save money on your painting project.tunesharemore_vert

Dream of Water Leaking From Ceiling: Meanings and Interpretations

Have you ever dreamed of water leaking from your ceiling? If so, you’re not alone. This is a common dream that can be interpreted in a variety of ways. In this article, we will explore the meanings and interpretations of dreams about water leaking from the ceiling. We will also provide some tips on how to deal with these dreams if they are causing you distress.

Dream Of Water Leaking From Ceiling

What do dreams about water leaking from the ceiling mean?

There is no one definitive answer to this question. However, there are a few common interpretations that can be drawn from these dreams.

  • Frustration or stress: Dreams about water leaking from the ceiling can be a sign of frustration or stress in your waking life. The water may represent your emotions, which are overflowing and causing problems. For example, if you are feeling stressed about work, you might dream of water leaking from the ceiling of your office.
  • Change: Dreams about water leaking from the ceiling can also be a sign of change. The water may represent new beginnings or challenges that are coming your way. For example, if you are about to start a new job, you might dream of water leaking from the ceiling of your new home.
  • Uncertainty: Dreams about water leaking from the ceiling can also be a sign of uncertainty or anxiety. The water may represent a lack of control or stability in your life. For example, if you are feeling anxious about a relationship, you might dream of water leaking from the ceiling of your bedroom.

How to interpret your dream

The best way to interpret your dream about water leaking from the ceiling is to consider the context of the dream. What was the water like? Where was it leaking from? What were you doing in the dream?

For example, if the water was clear and flowing, it could be a sign of positive change. However, if the water was dirty or stagnant, it could be a sign of negative change.

If the water was leaking from a hole in the ceiling, it could be a sign that you are feeling vulnerable or exposed. However, if the water was leaking from a pipe, it could be a sign that you are feeling stressed or overwhelmed.

How to deal with dreams about water leaking from the ceiling

If dreams about water leaking from the ceiling are causing you distress, there are a few things you can do to deal with them.

  • Talk to someone you trust: Talking to a friend, family member, or therapist can help you to process your dreams and understand their meaning.
  • Journal about your dreams: Keeping a journal of your dreams can help you to track patterns and identify themes.
  • Practice relaxation techniques: Relaxation techniques, such as meditation or yoga, can help to reduce stress and anxiety, which can contribute to nightmares.

Conclusion

Dreams about water leaking from the ceiling can be a sign of a variety of things. By understanding the context of your dream, you can gain insight into your own thoughts and feelings.

Read too: How To Paint A Basement Ceiling

Additional details

In addition to the common interpretations discussed above, there are a few other things to consider when interpreting a dream about water leaking from the ceiling.

  • The location of the leak: The location of the leak can provide additional clues about the meaning of the dream. For example, if the leak is in your bedroom, it could be a sign that you are feeling insecure or anxious about your relationships.
  • The amount of water: The amount of water can also be significant. A small leak could be a sign of a minor problem, while a large leak could be a sign of a major issue.
  • The actions you take in the dream: The actions you take in the dream can also provide insights into your subconscious thoughts and feelings. For example, if you try to fix the leak, it could be a sign that you are trying to address a problem in your waking life.

Tips for dealing with distressing dreams

If dreams about water leaking from the ceiling are causing you distress, there are a few things you can do to deal with them.

  • Try to relax before bed: Stress and anxiety can contribute to nightmares, so it is important to relax before bed. This could include taking a warm bath, reading a calming book, or listening to relaxing music.
  • Create a positive bedtime routine: A positive bedtime routine can help you to wind down and prepare for sleep. This could include reading a book, taking a warm bath, or listening to calming music.
  • Avoid caffeine and alcohol before bed: Caffeine and alcohol can interfere with sleep, so it is best to avoid them before bed.
  • See a therapist: If dreams about water leaking from the ceiling are causing you significant distress, it is important to seek professional

Troubleshooting Water Coming Through Vent in Ceiling: Causes and Solutions

The last thing any homeowner wants to discover is water seeping through a vent in the ceiling. This unexpected issue can lead to significant damage and stress. In this article, we will delve into the problem of “Water Coming Through Vent in Ceiling” and provide essential insights to help you identify the causes and effective solutions to tackle this concerning situation.

Water Coming Through Vent In Ceiling

Understanding the Dilemma of Water Through Ceiling Vents

Experiencing water infiltrating your home through a ceiling vent is unsettling, to say the least. To resolve this issue effectively, let’s first explore the potential reasons behind it:

1. Roof Leaks

Roof leaks are one of the primary culprits when water makes its way into your home through a ceiling vent. Damaged roofing materials, such as missing or cracked shingles, deteriorated flashing, or poorly sealed roof vents, can lead to water infiltration.

2. Plumbing Issues

Leaky plumbing within the structure of your home can be another cause. Water supply lines, drain pipes, or even HVAC condensate lines can leak and send water into your ceiling.

3. Condensation

In some cases, condensation can accumulate within the vent and eventually drip down into your home. This is more common in areas with high humidity or when warm, moist air meets a cooler surface.

4. Blocked Vents

Blocked or clogged vents can also cause water to back up and enter your home. This blockage could be due to debris, leaves, or even bird nests in the vent.

Addressing Water Through Ceiling Vents

If you’re facing the issue of water seeping through a ceiling vent, it’s crucial to take action promptly. Here are the steps to help you address the problem:

1. Identify the Source

The first step is to identify the source of the issue. Is it a roof leak, plumbing problem, condensation, or blocked vents? Thoroughly inspect your ceiling and attic to pinpoint the problem’s origin.

2. Roof Repairs

If a roof leak is the culprit, it’s advisable to contact a professional roofer. They can assess the extent of the damage and recommend the necessary repairs, which may include fixing the damaged area, replacing shingles, or sealing roof vents.

3. Plumbing Repairs

For plumbing-related issues, a plumber can determine the source of the leak and repair the damaged pipes, connections, or fixtures accordingly.

4. Vent Maintenance

Proper maintenance of the vent is essential to prevent blockages and condensation issues. Regularly clean and inspect your vents to ensure they are free from obstructions.

Prevention is Key

Preventing water from infiltrating your home through ceiling vents is the best approach. Here are some proactive measures to minimize the risk:

  1. Regular Roof Inspections: Schedule routine roof inspections to catch and address any potential issues early.
  2. Plumbing Maintenance: Keep plumbing systems in good working order and promptly address any leaks or issues.
  3. Proper Vent Maintenance: Regularly clean and inspect vents to ensure they remain free from blockages or condensation.

Conclusion

“Water Coming Through Vent in Ceiling” is a distressing issue for homeowners. By understanding the potential causes and taking proactive measures, you can safeguard your home from this unexpected problem. If you find yourself facing this issue, acting promptly to identify and address the source of the problem is crucial to prevent further damage. Don’t let water through your ceiling vents disrupt your peace of mind; take action to keep your home dry and secure.

When Rain Water Coming Through Ceiling Fan: Causes and Solutions

When you least expect it, rainwater infiltrating your home through a ceiling fan can be a shocking and stressful experience. Understanding the causes and finding effective solutions are crucial in such a situation. In this article, we’ll explore the phenomenon of “Rain Water Coming Through Ceiling Fan” and provide valuable insights to help you protect your home from this unexpected intrusion.

Rain Water Coming Through Ceiling Fan

The Mystery of Rainwater Through Ceiling Fans

Rain Water Coming Through Ceiling Fan: A Troublesome Scenario

Experiencing rainwater pouring through your ceiling fan can be puzzling and concerning. To tackle this issue effectively, let’s first understand the possible reasons behind it:

1. Roof Leaks

One of the primary culprits when rainwater infiltrates your ceiling fan is a roof leak. Damage to your roof, such as missing or damaged shingles, cracked flashing, or deteriorated sealant, can allow rainwater to seep through and into your home.

2. Inadequate Roof Drainage

Poor roof drainage can lead to water pooling, especially during heavy rain. This accumulation of water can eventually find its way through your ceiling fan, causing a mess in your living space.

3. Damaged Ceiling Fan

In some cases, the problem might originate from the ceiling fan itself. A malfunctioning or improperly installed ceiling fan can allow water to enter the house. Ensuring your ceiling fan is properly sealed and functioning is essential.

Addressing Rainwater Through Ceiling Fans

If you find yourself dealing with rainwater infiltrating through your ceiling fan, it’s crucial to act swiftly. Here are some steps to help you tackle the issue:

1. Identify the Source

Start by identifying the source of the issue. Is it a roof leak, poor drainage, or a damaged ceiling fan? Thoroughly inspect your ceiling and attic to pinpoint the problem.

2. Roof Repairs

If the issue is a roof leak, it’s advisable to consult with a professional roofer. They can assess the extent of the damage and recommend the necessary repairs, which may involve fixing the damaged area, replacing shingles, or resealing seams.

3. Roof Drainage

To prevent water accumulation on the roof, ensure your roof’s drainage system is functioning correctly. Clean gutters and downspouts regularly to allow water to flow freely and away from your home.

4. Ceiling Fan Inspection

Inspect your ceiling fan to ensure it is well-sealed and properly installed. If you suspect a problem with the fan, consult with an electrician to address any electrical issues or leaks.

Prevention is Key

Preventing rainwater from entering your home through the ceiling fan is more preferable than dealing with the aftermath. Here are some proactive measures to minimize the risk:

  1. Regular Roof Inspections: Schedule routine roof inspections to catch and address any potential issues early.
  2. Proper Maintenance: Keep up with roof maintenance, including replacing damaged shingles and addressing any roof-related problems promptly.
  3. Improved Roof Drainage: Consider installing additional roof drainage systems, like roof gutters, to channel water away from your home.
  4. Quality Ceiling Fan Installation: Ensure your ceiling fan is correctly installed and well-sealed to prevent leaks.

Conclusion

Rain Water Coming Through Ceiling Fan” can be a distressing experience for any homeowner. By understanding the causes of this issue and taking appropriate preventive measures, you can safeguard your home from this unexpected intrusion. If you find yourself facing this problem, acting promptly to identify and address the source of the issue is essential to prevent further damage. Don’t let rainwater through your ceiling fan disrupt your peace of mind; take action to keep your home dry and secure.

Unveiling the Mystery of Cracks in Walls and Ceilings: Causes and Solutions

When it comes to the integrity and aesthetics of our homes, the last thing we want to see are unsightly cracks in our walls and ceilings. These flaws can be a nuisance, often causing stress and concern for homeowners. But what causes these cracks, and how can we address them? In this article, we will delve into the world of “Cracks In Walls And Ceilings Causes,” uncovering the underlying reasons for these imperfections and providing valuable insights to help you maintain a pristine interior.

Cracks In Walls And Ceilings Causes

Understanding Cracks in Walls and Ceilings

Cracks in walls and ceilings can be symptomatic of various issues within your home. These imperfections can appear in various sizes and shapes, and they may be more than just surface-level annoyances. Understanding the causes behind these cracks is the first step in addressing the problem effectively.

Cracks In Walls And Ceilings Causes

There are several significant factors that contribute to the development of cracks in walls and ceilings. Let’s explore them in detail:

1. Settlement and Foundation Issues

One of the primary reasons for cracks in walls and ceilings is the settling of a home’s foundation. Over time, the soil beneath your house can shift, causing the foundation to settle unevenly. This differential settlement can lead to structural stress, resulting in cracks in the walls and ceilings.

2. Temperature Fluctuations

Extreme temperature fluctuations can also play a significant role in the formation of cracks. In regions with harsh winters and scorching summers, the expansion and contraction of building materials can lead to cracks. These cracks are often more prominent in older homes with less flexible construction materials.

3. Moisture and Humidity

Excess moisture and humidity in your home can weaken the structural integrity of walls and ceilings. Water infiltration through leaks in the roof or plumbing issues can cause the materials to weaken and lead to cracks over time.

4. Poor Construction Practices

Inadequate construction methods, including the use of low-quality materials or incorrect installation, can result in cracks in walls and ceilings. These defects may not be apparent until years later when the materials start to deteriorate.

5. Earthquakes and Seismic Activity

In regions prone to seismic activity, earthquakes can cause significant structural damage. Cracks in walls and ceilings are common after an earthquake, indicating the need for immediate attention and repair.

Addressing Cracks in Walls and Ceilings

Now that we’ve identified some of the common causes of cracks in walls and ceilings, it’s essential to know how to address these issues effectively. Depending on the root cause, the solutions may vary:

1. Foundation Repairs

If the cracks are a result of foundation settling, it’s crucial to consult with a professional foundation repair specialist. They can assess the extent of the damage and recommend the appropriate repairs, which may include underpinning, piers, or other structural adjustments.

2. Temperature-Related Cracks

For cracks caused by temperature fluctuations, maintenance and preventive measures are essential. Ensure that your home is adequately insulated to minimize temperature-related stresses. Regularly inspect and maintain your home’s exterior to prevent water infiltration.

3. Moisture Management

To address cracks resulting from moisture and humidity, it’s important to address the source of the issue. Fix any leaks in the roof, plumbing, or windows to prevent water from entering your home. Additionally, use dehumidifiers and proper ventilation to maintain ideal indoor humidity levels.

4. Quality Construction

When poor construction practices are to blame, it’s a good idea to consult with a professional contractor. They can assess the quality of your home’s construction and recommend necessary repairs or renovations.

5. Earthquake Preparedness

In earthquake-prone regions, consider reinforcing your home’s structural elements to better withstand seismic activity. Consult with engineers and contractors experienced in earthquake-resistant construction techniques.

Read too: What Causes Water Bubble In Ceiling

Prevention is Key

Preventing cracks in walls and ceilings is always preferable to addressing them after they appear. Here are some proactive steps you can take to minimize the risk of cracks in your home:

  1. Regular Home Inspections: Conduct routine inspections of your home, looking for any signs of potential issues before they become severe.
  2. Proper Maintenance: Keep up with maintenance tasks, such as roof inspections and repairs, to prevent water infiltration.
  3. Foundation Maintenance: Address any foundation issues promptly and consider preventive measures, like installing proper drainage systems.
  4. Climate Control: Invest in climate control solutions, such as insulation and ventilation, to minimize temperature-related stresses.
  5. Quality Construction: When building or renovating, hire experienced professionals who use quality materials and construction practices.

By taking these preventive measures and addressing cracks in walls and ceilings promptly, you can ensure the long-term health and aesthetics of your home.

Conclusion

“Cracks In Walls And Ceilings Causes” can be a headache for any homeowner, but with the right knowledge and action, you can maintain a structurally sound and visually appealing living space. Understanding the underlying causes of cracks, addressing them effectively, and implementing preventive measures are essential steps in preserving the integrity of your home. Don’t let cracks in your walls and ceilings compromise your home’s beauty and safety; take action today to secure your investment.

How Much Does It Cost to Prime and Paint a Ceiling?

Painting your ceiling is a great way to update the look of your home. It can also help to hide any blemishes or damage. However, before you start painting, it is important to understand the cost involved.

In this article, we will discuss the cost to prime and paint a ceiling. We will also provide tips on how to save money on your project.

Cost To Prime And Paint Ceiling

Cost Factors

The cost to prime and paint a ceiling depends on a number of factors, including:

  • The size of the ceiling: The larger the ceiling, the more paint and primer you will need. This will increase the cost of your project.
  • The type of paint and primer: The type of paint and primer you choose will also affect the cost. For example, oil-based paint is more expensive than latex paint.
  • The location of your home: The cost of labor can vary depending on the location of your home.

Cost Range

The cost to prime and paint a ceiling can range from $1 to $2 per square foot. For a 12-foot by 12-foot room, this would mean a cost of $144 to $288.

Cost to Prime

The cost to prime a ceiling is typically about half the cost of painting. For a 12-foot by 12-foot room, this would mean a cost of $72 to $144.

Cost to Paint

The cost to paint a ceiling is typically about $1 per square foot. For a 12-foot by 12-foot room, this would mean a cost of $144.

How to Save Money

There are a few things you can do to save money on your ceiling painting project:

  • Do it yourself: If you are handy, you can save money by painting your ceiling yourself.
  • Buy paint and primer in bulk: Buying paint and primer in bulk can save you money.
  • Shop around for the best prices: Compare prices from different paint retailers to find the best deal.
  • Get quotes from multiple contractors: If you are hiring a contractor, get quotes from multiple contractors to compare prices.

Conclusion

The cost to prime and paint a ceiling can vary depending on a number of factors. By understanding the cost factors and following these tips, you can save money on your project.

Read too: What Causes Water Bubble In Ceiling

Additional Information

In addition to the cost factors listed above, there are a few other things you may need to consider when budgeting for your ceiling painting project. For example, if you need to repair any damage to the ceiling before painting, this will add to the cost of your project. Additionally, if you are painting a ceiling that is difficult to access, this may also increase the cost.

If you are unsure of how much it will cost to prime and paint your ceiling, it is always a good idea to get a quote from a professional. A qualified contractor can help you to determine the cost of your project and provide you with a quote that is accurate and fair.tunesharemore_vert

What Causes Cracks In Your Ceiling

Cracks in your ceiling can be unsightly and even a cause for concern. While some cracks are harmless, others can indicate a more serious problem. In this article, we will discuss the common causes of ceiling cracks and what you can do about them.

What Causes Cracks In The Ceiling

What to Look for

There are a number of things you can look for to determine if you have a ceiling crack. Some of the most common signs include:

  • Hairline cracks: These are the most common type of ceiling crack and are usually harmless. Normal settling or the expansion and contraction of materials in your ceiling causes them.
  • Wider cracks: These cracks are more likely to be a sign of a problem. Structural damage, water damage, or poor workmanship can cause them.
  • Discoloration or stains: If you see discoloration or stains around a crack, it is a sign that water damage may be the cause.
  • Mold or mildew: Mold or mildew can grow in areas where there is water damage.

Common Causes of Ceiling Cracks

There are a number of things that can cause ceiling cracks. Some of the most common causes include:

  • Structural damage: This is the most serious cause of ceiling cracks. A number of things, including earthquakes, foundation problems, or heavy winds, can cause it.
  • Water damage: Water damage can cause the materials in your ceiling to expand and contract, leading to cracks. Water damage can be caused by leaks from pipes, roofs, or appliances.
  • Poor workmanship: If your ceiling was not installed properly, it may be more likely to develop cracks.

What to Do About Ceiling Cracks

If you see a ceiling crack, it is important to take action to determine the cause and fix the problem. If the crack is minor, you may be able to repair it yourself. However, if the crack is wider or is accompanied by other signs of damage, it is best to hire a professional.

Repairing Ceiling Cracks

If you decide to repair a ceiling crack yourself, there are a number of things you can do. For hairline cracks, you can simply apply a coat of drywall mud. For wider cracks, you may need to use a mesh tape to reinforce the crack before applying drywall mud.

Preventing Ceiling Cracks

The best way to prevent ceiling cracks is to take steps to prevent the underlying causes. This includes:

  • Inspecting your roof regularly for damage.
  • Checking your gutters and downspouts for clogs.
  • Fixing any leaky faucets or pipes.
  • Having your foundation inspected regularly.

Conclusion

Ceiling cracks can be a common problem, but they can be easily repaired if you take action quickly. By understanding the causes of ceiling cracks and taking steps to prevent them, you can help to keep your home looking and feeling its best.

Additional Information

In addition to the causes listed above, there are a few other things that can contribute to ceiling cracks. For example, if you live in an area with extreme weather conditions, your ceiling may be more likely to crack due to expansion and contraction. Additionally, if you have a lot of traffic in your home, the vibrations from footsteps or furniture moving can also cause cracks.

If you are concerned about ceiling cracks, it is always best to consult with a professional. A qualified contractor can help you to determine the cause of the cracks and recommend the best course of action for repair.tunesharemore_vert

Signs of Water Damage in Your Ceiling: What to Look for and What to Do

There are a number of signs that you may have water damage in your ceiling. Some of the most common signs include:

  • Discoloration or stains: Water damage can cause discoloration or stains on your ceiling. These stains can be any color, but they are often brown, yellow, or rust-colored.
  • Peeling paint or wallpaper: Water damage can cause paint or wallpaper to peel or bubble.
  • Musty smell: Mold and mildew can grow in water-damaged areas, and they can produce a musty smell.
  • Sagging or bowing: Water damage can cause your ceiling to sag or bow.
  • Cracks or holes: Water damage can cause cracks or holes in your ceiling.
Signs Of Water Damage In Ceiling

What to Do

If you see any of these signs, it’s important to take action immediately. Here are some steps you can take:

  1. Identify the source of the leak. Once you know where the leak is coming from, you can take steps to fix it.
  2. Clean up the water damage. Use a wet/dry vacuum to remove any standing water. Then, use a mild detergent and water to clean the area.
  3. Dry the affected area. Allow the area to dry completely before moving on to the next step.
  4. Repair the damage. Once the area is dry, you can repair any damage that has been caused by the water damage.

Preventing Water Damage

The best way to prevent water damage in your ceiling is to take steps to prevent leaks. Here are a few tips:

  • Inspect your roof regularly for damage.
  • Check your gutters and downspouts for clogs.
  • Fix any leaky faucets or pipes.
  • Install a sump pump in your basement.

Conclusion

Water damage in your ceiling can be a serious problem. If you think you may have water damage, it’s important to take action immediately to prevent further damage. By following the steps above, you can help to prevent water damage and keep your home safe and healthy.

Read too: How To Paint A Basement Ceiling

Additional Information

In addition to the signs listed above, there are a few other things you can look for that may indicate water damage in your ceiling. For example, you may notice that your ceiling is cold to the touch, or that there is condensation on the ceiling. If you see any of these signs, it’s a good idea to have a professional inspect your ceiling for water damage.

Water damage in your ceiling can be a costly and time-consuming problem to repair. By taking steps to prevent water damage, you can help to protect your home and your wallet.tunesharemore_vert

Dream of Water Leak From Ceiling: Meanings and Interpretations

Dreams about water leaks from the ceiling can be a disturbing experience. They can be a sign of financial problems, emotional turmoil, or even physical health issues.

In this article, we will explore the possible meanings and interpretations of dreams about water leaks from the ceiling. We will also provide some tips on how to cope with these dreams if they are causing you distress.

Dream Of Water Leak From Ceiling

What do dreams about water leaks from the ceiling mean?

There are many possible meanings and interpretations of dreams about water leaks from the ceiling. Some common interpretations include:

  • Financial problems: A water leak from the ceiling can symbolize financial problems. The water represents money, and the leak represents the loss of money. This type of dream may be a warning sign that you are spending too much money or that you are at risk of losing your job.

For example, you may dream of a water leak from the ceiling in your home. This could represent a financial problem, such as a debt that you are struggling to pay off. The water could represent the money that you are losing, and the leak could represent the fact that you are unable to control your finances.

  • Emotional turmoil: A water leak from the ceiling can also symbolize emotional turmoil. The water represents your emotions, and the leak represents the release of those emotions. This type of dream may be a sign that you are feeling stressed, anxious, or depressed.

For example, you may dream of a water leak from the ceiling in your workplace. This could represent emotional stress, such as feeling overwhelmed by your job. The water could represent your emotions, and the leak could represent the fact that you are feeling overwhelmed.

  • Physical health issues: In some cases, dreams about water leaks from the ceiling can be a sign of physical health issues. The water represents bodily fluids, and the leak represents a problem with your body. This type of dream may be a warning sign that you are experiencing a medical condition.

For example, you may dream of a water leak from the ceiling in your bathroom. This could represent a medical problem, such as a kidney infection. The water could represent the bodily fluids that are being released, and the leak could represent the problem with your body.

Of course, the meaning of a dream about a water leak from the ceiling will vary depending on the individual dreamer. It is important to consider your own personal circumstances and experiences when interpreting your dream.

How to cope with dreams about water leaks from the ceiling

If you are having dreams about water leaks from the ceiling that are causing you distress, there are a few things you can do to cope:

  • Talk to a therapist or counselor: A therapist can help you to understand the meaning of your dreams and develop coping mechanisms.

Talking to a therapist or counselor can be a helpful way to understand the meaning of your dreams and develop healthy coping mechanisms. A therapist can help you to identify the underlying causes of your dreams and develop strategies for dealing with them.

  • Keep a dream journal: Keeping a dream journal can help you to track your dreams and identify any patterns.

Writing down your dreams as soon as you wake up can help you to remember them in more detail. This can be helpful for identifying any patterns or themes in your dreams.

  • Practice relaxation techniques: Relaxation techniques such as deep breathing and meditation can help to reduce stress and anxiety.

Stress and anxiety can often contribute to nightmares. Practicing relaxation techniques can help to reduce stress and anxiety, which can make it less likely that you will have nightmares.

Read too: How To Paint A Basement Ceiling

Conclusion

Dreams about water leaks from the ceiling can be a disturbing experience, but they can also be a valuable source of insight. By understanding the possible meanings and interpretations of these dreams, you can gain a better understanding of yourself and your life.

Unveiling the Secrets: How To Paint A Basement Ceiling

How to paint a basement ceiling? Your basement is a hidden gem in your home, offering valuable additional living space. However, many homeowners overlook the ceiling when it comes to renovation and design. A painted basement ceiling can add character and charm to the space, making it feel like an integral part of your home. In this article, we will guide you through the process of painting a basement ceiling, from preparation to execution, and reveal the magic of this transformation.

How To Paint A Basement Ceiling

The Importance of a Well-Designed Ceiling

Elevating the Aesthetics of Your Basement

The ceiling of your basement plays a crucial role in the overall aesthetics of the space. A well-designed ceiling can:

1. Enhance the Ambiance:

  • A carefully chosen color and design can make your basement feel warm and inviting.

2. Hide Imperfections:

  • A painted ceiling can conceal imperfections, pipes, wires, and ducts that are often present in basements.

3. Define Zones:

  • By using different colors or finishes, you can create distinct zones within your basement for various purposes.

Preparing for the Paint Job

Setting the Stage for Success

Before you dive into painting your basement ceiling, it’s essential to prepare adequately. Here are the steps to get you started:

1. Clean the Ceiling:

  • Dust and clean the ceiling to ensure that the paint adheres properly. Use a vacuum cleaner with a brush attachment or a duster to remove loose particles.

2. Repair Damage:

  • Inspect the ceiling for any damage, such as cracks or holes. Repair these issues using a suitable filler or patching compound.

3. Protect the Area:

  • Cover the floor and any items in your basement with drop cloths or plastic sheets to prevent paint splatters.

4. Choose the Right Paint:

  • Select a paint that is suitable for your ceiling’s material and your desired finish. Latex or water-based paints are typically recommended for basement ceilings.

Painting the Basement Ceiling

Turning Your Vision into Reality

Now that your basement ceiling is prepped and you’ve gathered the necessary materials, it’s time to start painting.

1. Start with a Primer:

  • Apply a coat of primer to the ceiling to create an even base for the paint. Primer helps the paint adhere better and provides a smoother finish.

2. Use a Roller:

  • A paint roller is an effective tool for applying paint to the ceiling. Use an extension pole to reach high or hard-to-access areas.

3. Work in Sections:

  • Divide the ceiling into manageable sections and work on one section at a time. This approach ensures even coverage and prevents the paint from drying too quickly.

4. Apply Multiple Coats:

  • Depending on the desired finish and the color you’re using, you may need to apply two or more coats of paint. Allow each coat to dry before applying the next.

5. Be Mindful of Drips:

  • Watch out for drips and streaks, especially when applying paint to an overhead surface. Correct any imperfections immediately.

Read too: How Much Ceiling Height For Treadmill

Finishing Touches and Ideas

Bringing Your Vision to Life

As you near the end of your basement ceiling painting project, consider these finishing touches and creative ideas:

1. Accent Colors:

2. Stencils or Patterns:

  • Add flair to your ceiling by using stencils or creating patterns that complement the overall design of your basement.

3. Incorporate Lighting:

  • Well-placed lighting fixtures can highlight your newly painted ceiling, creating a dynamic and appealing look.

Conclusion:

How to paint a basement ceiling? A painted basement ceiling can transform a neglected space into a captivating and functional part of your home. By following the steps outlined in this guide and considering creative ideas for your ceiling, you can achieve a unique and visually appealing basement that suits your style and needs. Don’t let your basement’s potential go to waste; start your ceiling painting project and unlock the beauty of this often-overlooked area.