Ceiling Tiles in Schools: Enhancing Learning Environments

Ceiling tiles may seem like a minor detail in school infrastructure, but their impact on the learning environment cannot be understated. From acoustics to aesthetics, ceiling tiles play a crucial role in creating conducive spaces for teaching and learning. In this comprehensive guide, we’ll explore the importance of ceiling tiles in schools, their benefits, considerations, and their overall contribution to enhancing educational settings.

Ceiling Tiles In Schools

Understanding Ceiling Tiles in Schools

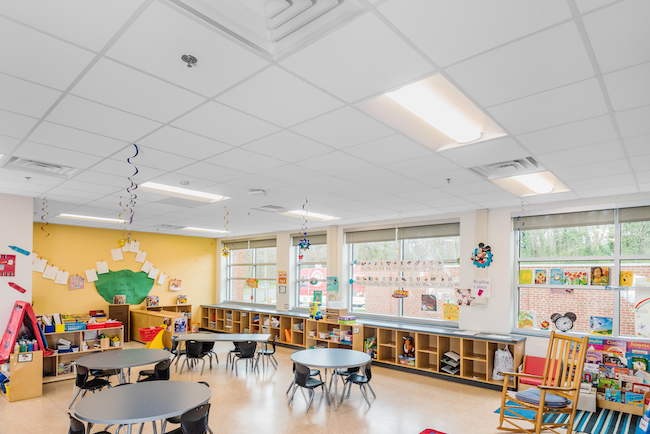
Ceiling tiles, also known as drop or suspended ceilings, are panels that are used to cover the ceiling structure of a room. In schools, ceiling tiles serve multiple purposes beyond simply concealing the overhead infrastructure. They contribute to the overall design and functionality of classrooms, hallways, and other educational spaces.

Importance of Ceiling Tiles in Schools

  1. Acoustic Control: One of the primary functions of ceiling tiles in schools is to control sound and minimize noise levels. Properly selected and installed ceiling tiles can help absorb sound, reduce reverberation, and create a quieter learning environment conducive to concentration and focus.
  2. Aesthetic Appeal: Ceiling tiles come in a variety of designs, textures, and colors, allowing schools to customize the look and feel of their interior spaces. By choosing ceiling tiles that complement the overall design aesthetic of the school, administrators can create visually appealing environments that promote a positive atmosphere for students and staff.
  3. Insulation and Energy Efficiency: Ceiling tiles can help improve insulation and energy efficiency in school buildings by reducing heat loss and minimizing air leakage. This can lead to lower heating and cooling costs, resulting in significant savings for educational institutions over time.
  4. Light Reflectance: Some ceiling tiles actively reflect light to evenly distribute both natural and artificial light throughout the room. This can enhance visibility and reduce the need for additional lighting fixtures, contributing to energy savings and environmental sustainability.

Read too: How To Extend Kitchen Cabinets To The Ceiling: A Complete Guide for Maximizing Space and Style

Considerations for Choosing Ceiling Tiles in Schools

When choosing ceiling tiles for educational settings, it’s important to actively consider several factors:

  • Acoustic Performance: Choose ceiling tiles with appropriate acoustic properties to address the specific needs of classrooms, auditoriums, and other instructional spaces.
  • Durability: Opt for durable and easy-to-maintain ceiling tiles that can withstand the wear and tear of daily use in a school environment.
  • Fire Resistance: Ensure that the ceiling tiles meet fire safety standards and regulations to protect the safety of students and staff in the event of a fire emergency.
  • Environmental Impact: When considering ceiling tile options, look for environmentally friendly choices made from sustainable materials that actively contribute to green building initiatives.

Installation and Maintenance

Proper installation and maintenance of ceiling tiles are essential for maximizing their effectiveness and longevity. Work with experienced contractors to ensure that ceiling tiles are installed correctly and securely. Additionally, establish a regular maintenance schedule to inspect and clean ceiling tiles, addressing any issues such as water damage, mold, or discoloration promptly.

Conclusion

Ceiling tiles play a vital role in creating conducive and functional learning environments in schools. From controlling acoustics to enhancing aesthetics and improving energy efficiency, ceiling tiles contribute to the overall comfort, safety, and productivity of students and educators alike. By understanding the importance of ceiling tiles in schools and making informed decisions when selecting and maintaining them, educational institutions can create optimal environments for teaching and learning.

Ceiling Mounted Outdoor Heater: Elevate Your Outdoor Space with a Stylish

As the temperatures drop and the days grow shorter, spending time outdoors becomes less appealing. However, with the right heating solution, you can extend the usability of your outdoor space well into the cooler months. One such solution is the ceiling mounted outdoor heater. These innovative heaters not only provide warmth and comfort but also add a touch of style to your outdoor living area. In this comprehensive guide, we’ll explore the features, benefits, and installation of ceiling mounted outdoor heaters, helping you create a cozy and inviting outdoor oasis for year-round enjoyment.

Ceiling Mounted Outdoor Heater

Understanding Ceiling Mounted Outdoor Heaters

Ceiling mounted outdoor heaters are heating units designed to be mounted on the ceiling or overhead structure of outdoor spaces such as patios, gazebos, or pergolas. These heaters utilize radiant heat technology to warm objects and people directly, rather than heating the surrounding air. This results in efficient and effective heating that allows you to enjoy your outdoor space comfortably even on chilly days and evenings.

Benefits of Ceiling Mounted Outdoor Heaters

  1. Extended Outdoor Season: With a ceiling mounted outdoor heater, you can extend the usability of your outdoor space well beyond the warmer months, allowing you to entertain guests or relax outdoors comfortably year-round.
  2. Space-Saving Design: By mounting the heater on the ceiling, you can maximize floor space and keep the area free from obstructions, providing more room for seating, dining, or other outdoor activities.
  3. Even Heat Distribution: Ceiling mounted outdoor heaters provide consistent and even heat distribution across the entire area, ensuring that everyone in your outdoor space stays warm and comfortable.
  4. Stylish and Versatile: Available in a variety of styles and designs, ceiling mounted outdoor heaters can complement any outdoor decor scheme, adding both warmth and visual appeal to your outdoor living area.

Read too: How To Extend Kitchen Cabinets To The Ceiling: A Complete Guide for Maximizing Space and Style

Installation and Placement Considerations

Proper installation and placement are essential for maximizing the effectiveness of your ceiling mounted outdoor heater. Here are some key considerations to keep in mind:

  • Ceiling Height: Ensure that the ceiling height is adequate to accommodate the heater and provide sufficient clearance for safe operation and heat distribution.
  • Mounting Surface: Install the heater on a sturdy and stable mounting surface, such as a ceiling beam or structural support, to prevent accidents or damage.
  • Coverage Area: Determine the size and layout of your outdoor space to determine the number and placement of heaters needed to provide adequate coverage and warmth.
  • Electrical Wiring: Ensure that the heater is properly wired and connected to a suitable power source by a qualified electrician to prevent electrical hazards or malfunctions.

Using Your Ceiling Mounted Outdoor Heater

Once installed, using your ceiling mounted outdoor heater is simple and straightforward. Most heaters come with adjustable settings for heat output and direction, allowing you to customize the temperature and coverage area according to your preferences. Additionally, many models are equipped with remote controls or smart technology for convenient operation and temperature management.

Conclusion

A ceiling mounted outdoor heater is an excellent investment for homeowners looking to maximize the usability and enjoyment of their outdoor living spaces. With their efficient heating capabilities, space-saving design, and stylish appearance, these heaters provide warmth, comfort, and ambiance for year-round outdoor entertaining and relaxation. By understanding the features, benefits, and installation considerations of ceiling mounted outdoor heaters, you can create a welcoming and inviting outdoor oasis that you can enjoy in any season.

Ceiling Mounted Motion Sensors Lights: Maximizing Home Security with Innovative

In today’s ever-evolving world, home security has become a top priority for many homeowners. With advancements in technology, there are now various tools and devices available to enhance the safety of your home, one of which is the ceiling mounted motion sensor light. These innovative lights not only provide illumination but also serve as effective deterrents against intruders and trespassers. In this comprehensive guide, we’ll delve into the features, benefits, and installation of ceiling mounted motion sensors lights, empowering you to take proactive steps towards fortifying your home’s security.

Ceiling Mounted Motion Sensor

Understanding Ceiling Mounted Motion Sensor Lights

Ceiling mounted motion sensor lights are lighting fixtures equipped with built-in motion sensors that detect movement within their range. When motion is detected, the lights automatically turn on, illuminating the surrounding area and alerting homeowners to potential intruders or visitors. Typically, people install these lights on ceilings or eaves to provide wide coverage and visibility, enhancing security.

Benefits of Ceiling Mounted Motion Sensor Lights

  1. Enhanced Security: Ceiling mounted motion sensor lights act as a deterrent against intruders by illuminating dark areas and alerting homeowners to suspicious activity.
  2. Convenience: With automatic activation, ceiling mounted motion sensor lights eliminate the need for manual operation, providing convenient lighting when needed.
  3. Energy Efficiency: Many modern ceiling mounted motion sensor lights feature energy-efficient LED bulbs, reducing energy consumption and lowering utility costs.
  4. Customizable Settings: Most ceiling mounted motion sensor lights offer adjustable settings for sensitivity, duration, and brightness, allowing homeowners to customize their security lighting preferences.

Read too: How To Extend Kitchen Cabinets To The Ceiling: A Complete Guide for Maximizing Space and Style

Installation and Placement Tips

Installing ceiling mounted motion sensor lights requires careful planning and consideration to ensure optimal performance and coverage. Here are some installation and placement tips to keep in mind:

  • Location: Place motion sensor lights in strategic locations around your home, such as near entryways, pathways, or dark corners where intruders may attempt to gain access.
  • Height: Install the lights at a height that provides maximum coverage while still allowing easy access for maintenance and adjustments.
  • Range and Sensitivity: Adjust the sensor’s range and sensitivity settings to prevent false alarms caused by pets, foliage, or other non-threatening movements.
  • Wiring: Ensure proper wiring and electrical connections during installation to prevent accidents or malfunctions. If you’re unsure, consult a professional electrician for assistance.

Maintenance and Troubleshooting

Regular maintenance is essential to ensure the continued functionality of your ceiling mounted motion sensor lights. Here are some maintenance tips to keep your lights in optimal condition:

  • Cleanliness: Regularly clean the light fixtures and sensors to remove dirt, debris, and insects that may interfere with motion detection.
  • Battery Replacement: If your motion sensor lights are battery-operated, replace the batteries as needed to maintain reliable performance.
  • Testing: Periodically test the lights to ensure they activate properly when motion is detected. Adjust settings as necessary to address any issues or inconsistencies.

Conclusion

Ceiling mounted motion sensors lights are valuable additions to any home security system, providing enhanced safety, convenience, and peace of mind for homeowners. By understanding the benefits, installation process, and maintenance requirements of these innovative lights, you can effectively bolster your home’s security and create a safer environment for you and your loved ones.

Ceiling Fans with Up Light: Enhance Your Home’s Ambiance with Stylish

Ceiling fans are not only functional additions to a home, but they can also serve as stylish accents that enhance the overall ambiance of any room. When it comes to selecting the perfect ceiling fan for your space, consider opting for ceiling fans with up lights. These innovative fixtures combine the cooling power of a traditional ceiling fan with the subtle illumination provided by upward-facing light, adding both functionality and sophistication to your home decor. In this guide, we’ll explore the features, benefits, and design options of ceiling fans with up lights, helping you elevate your home’s interior design with ease.

Ceiling Fans With Up Lights

Understanding Ceiling Fans with Up Lights

Ceiling fans with up lights feature integrated light fixtures positioned above the fan blades, allowing for gentle illumination that adds warmth and ambiance to any room. Unlike traditional ceiling fans that rely solely on downward-facing lights, ceiling fans with up lights cast a soft, indirect glow that enhances the overall atmosphere without creating harsh shadows or glare.

Benefits of Ceiling Fans with Up Lights

  1. Enhanced Ambiance: The upward-facing lights of ceiling fans with up lights create a cozy and inviting atmosphere, perfect for relaxation or entertaining guests.
  2. Versatility: Ceiling fans with up lights offer versatile lighting options, allowing you to adjust the brightness and ambiance of a room to suit your preferences.
  3. Space-Saving Design: By combining the functions of a ceiling fan and a light fixture into one unit, ceiling fans with up lights help save space and streamline your home’s decor.
  4. Energy Efficiency: Many modern ceiling fans with up lights feature energy-efficient LED bulbs, providing ample illumination while consuming minimal energy.

Read too: How To Extend Kitchen Cabinets To The Ceiling: A Complete Guide for Maximizing Space and Style

Design Options

Ceiling fans with up lights come in a variety of styles, finishes, and sizes to complement any decor scheme. Whether you prefer a sleek and modern aesthetic or a more traditional look, there’s a ceiling fan with up lights to suit your taste. Some popular design options include:

  • Contemporary Sleek: Minimalist designs with clean lines and brushed metal finishes add a modern touch to any room.
  • Rustic Charm: Distressed wood blades and antique-inspired light fixtures lend a rustic charm to farmhouse or cottage-style interiors.
  • Transitional Elegance: Timeless designs with classic elements such as ornate detailing and glass shades offer a sophisticated look that blends seamlessly with various decor styles.

Installing and Using Ceiling Fans with Up Lights

Installing a ceiling fan with up lights follows a similar process to installing a standard ceiling fan. However, it’s essential to ensure that the electrical wiring supports both the fan and light functions. Once installed, use the fan’s remote control or wall switch to adjust the fan speed and light intensity according to your preferences.

Conclusion

Ceiling fans with up light offer a stylish and functional solution for enhancing the ambiance of any room in your home. With their versatile design options and energy-efficient features, these innovative fixtures can elevate your home’s interior decor while providing efficient cooling and gentle illumination. Consider incorporating ceiling fans with up lights into your space to create a welcoming and comfortable environment for all to enjoy.

Exploring the Versatility of Canopy Kit for Ceiling Light Fixtures: Upgrade Your Lighting

Canopy kit for ceiling light fixtures offer a practical and stylish solution for upgrading your home lighting. In this comprehensive guide, we’ll delve into the world of canopy kits, exploring their installation process, design versatility, and the numerous benefits they bring to your interior space.

Canopy Kit For Ceiling Light Fixtures

Elevating Your Lighting: Canopy Kit For Ceiling Light Fixtures

A canopy kit is an accessory used to cover and conceal the electrical junction box that connects ceiling light fixtures to the wiring in your home. These kits come in various styles and finishes, allowing you to customize the look of your ceiling lights while providing a clean and polished appearance.

Exploring Canopy Kit Options

When shopping for canopy kits for your ceiling light fixtures, consider the following factors:

  • Material: Canopy kits are available in materials such as metal, plastic, and wood, each offering different aesthetics and durability.
  • Finish: Choose from finishes like brushed nickel, oil-rubbed bronze, or matte black to complement your existing decor and light fixture.
  • Size and Shape: Ensure that the canopy kit is compatible with the size and shape of your ceiling light fixture and electrical junction box for a seamless installation.

Read too: Discovering the Charm of Nautical Outdoor Ceiling Fans for Your Coastal Retreat: Sail into Style

Installation Process

Installing a canopy kit for your ceiling light fixture is a straightforward process that typically involves the following steps:

  1. Turn Off Power: Before starting the installation, turn off the power to the light fixture at the circuit breaker to prevent electrical accidents.
  2. Remove Existing Canopy: If your light fixture already has a canopy, carefully remove it using a screwdriver or other appropriate tools.
  3. Attach New Canopy: Place the new canopy over the electrical junction box, aligning the screw holes with the mounting screws on the box.
  4. Secure in Place: Use screws or bolts to secure the canopy to the junction box, ensuring that it is firmly attached and level.
  5. Wire Connections: Make the necessary wire connections between the light fixture and the electrical wiring in the junction box, following the manufacturer’s instructions.
  6. Finishing Touches: Once the wiring is complete, attach the light fixture to the canopy according to the fixture’s instructions, and test the light to ensure it is functioning properly.

Benefits of Canopy Kit For Ceiling Light Fixtures

Canopy kits offer several benefits for ceiling light fixtures, including:

  • Concealed Wiring: Canopy kits hide unsightly wiring and electrical components, providing a clean and professional-looking installation.
  • Enhanced Safety: By covering the electrical junction box, canopy kits reduce the risk of accidental contact with live wires, improving safety in your home.
  • Design Flexibility: With a variety of styles and finishes available, canopy kits allow you to customize the look of your ceiling lights to suit your personal taste and decor style.

Conclusion

Canopy kits for ceiling light fixtures are a simple yet effective way to enhance the aesthetics and functionality of your home lighting. With their easy installation process, design versatility, and practical benefits, canopy kits offer a convenient solution for upgrading your ceiling lights with style.

Installing Shiplap on Vaulted Ceiling for Rustic Charm: Enhancing Your Space

Adding shiplap to vaulted ceilings brings a rustic and inviting aesthetic to any space. In this comprehensive guide, we’ll explore the process of installing shiplap on vaulted ceiling, along with design tips and the advantages of incorporating this classic material into your home decor.

Shiplap On Vaulted Ceiling

Embracing Rustic Charm: Shiplap On Vaulted Ceilings

Shiplap is a type of wooden board commonly used in interior design to create a rustic, farmhouse-inspired look. When installed on vaulted ceilings, shiplap adds warmth and character to the space, enhancing its architectural features and creating a cozy atmosphere.

Installation Guide

Follow these steps to install shiplap on a vaulted ceiling:

1. Measure and Prepare the Ceiling

  • Measure the dimensions of the vaulted ceiling to determine the amount of shiplap needed.
  • Prepare the ceiling surface by removing any existing finishes or debris and ensuring it is clean and dry.

2. Choose the Right Materials

  • Select high-quality shiplap boards in your desired wood species and finish.
  • Consider factors such as board width, thickness, and tongue-and-groove design for seamless installation.

Read too: Discovering the Charm of Nautical Outdoor Ceiling Fans for Your Coastal Retreat: Sail into Style

3. Install Furring Strips

  • Attach furring strips perpendicular to the ceiling joists using screws or nails, spaced according to the width of the shiplap boards.
  • Ensure that the furring strips are level and securely fastened to provide a stable base for the shiplap installation.

4. Install Shiplap Boards

  • Begin installing shiplap boards at one end of the ceiling, starting from the bottom and working your way up.
  • Secure each board to the furring strips using nails or screws driven through the tongue at an angle.
  • Leave a small gap between each board to accommodate expansion and contraction.

5. Finish and Seal

  • Once all the shiplap boards are installed, fill any nail holes or gaps with wood filler and sand the surface smooth.
  • Apply a coat of wood stain or paint to enhance the natural beauty of the shiplap and protect it from moisture and wear.

Design Considerations for Shiplap On Vaulted Ceilings

When incorporating shiplap into your vaulted ceiling design, consider the following factors:

  • Color and Finish: Choose a stain or paint color that complements your existing decor and enhances the rustic charm of the shiplap.
  • Orientation: Decide whether to install the shiplap boards horizontally, vertically, or diagonally for different visual effects.
  • Accent Lighting: Explore options for incorporating recessed lighting or pendant fixtures into the shiplap ceiling to highlight its texture and create ambiance.

Benefits of Shiplap On Vaulted Ceilings

Adding shiplap to your vaulted ceilings offers several advantages, including:

  • Enhanced Aesthetic: Shiplap adds texture and visual interest to vaulted ceilings, creating a cozy and inviting atmosphere.
  • Increased Insulation: The added layer of wood provides additional insulation, helping to regulate indoor temperatures and improve energy efficiency.
  • Versatile Design: Shiplap is a versatile material that can be painted, stained, or left unfinished to suit a variety of design styles and preferences.

Conclusion

Installing shiplap on vaulted ceilings is a surefire way to infuse rustic charm and timeless elegance into your home decor. With its straightforward installation process, versatile design options, and numerous benefits, shiplap offers a simple yet impactful way to transform any space into a cozy retreat.

Linear Flush Mount Ceiling Light: Exploring the Versatility

Linear flush mount ceiling light offer a sleek and modern lighting solution for any space, providing both style and functionality in one elegant package. In this illuminating guide, we’ll explore the versatility of linear flush mount ceiling lights, from their contemporary design options to their practical installation tips and benefits for enhancing your home’s interior.

Linear Flush Mount Ceiling Light

Embracing Modernity: Linear Flush Mount Ceiling Lights

A linear flush mount ceiling light is a type of fixture that sits flush against the ceiling surface, featuring a linear or rectangular shape that provides a streamlined and contemporary look. These lights are popular choices for modern interiors due to their clean lines, minimalistic design, and versatile functionality.

Read too: Discovering the Charm of Nautical Outdoor Ceiling Fans for Your Coastal Retreat: Sail into Style

The Appeal of Linear Flush Mount Ceiling Lights

Here are some key reasons why linear flush mount ceiling lights are favored by homeowners and designers alike:

  1. Space-Saving Design: Flush mount ceiling lights are ideal for rooms with low ceilings or limited overhead space, as they sit close to the ceiling surface without protruding downward.
  2. Modern Aesthetic: Linear flush mount ceiling lights offer a sleek and minimalist aesthetic that complements contemporary and transitional interior styles.
  3. Even Illumination: The linear design of these fixtures allows for even distribution of light across the room, providing ample illumination without harsh glare or shadows.
  4. Versatile Applications: Linear flush mount ceiling lights are suitable for a variety of spaces, including kitchens, bathrooms, hallways, and bedrooms, offering both ambient and task lighting options.

Design Options for Linear Flush Mount Ceiling Lights

Linear flush mount ceiling lights are available in a wide range of design options to suit different preferences and interior themes:

  • Materials: Choose from materials such as metal, glass, or acrylic for the fixture body and diffuser to achieve the desired aesthetic.
  • Finishes: Select finishes like brushed nickel, matte black, or polished chrome to complement your existing decor or create a striking contrast.
  • Shapes and Sizes: Opt for linear fixtures with varying lengths and widths to accommodate different room sizes and ceiling configurations.
  • Lighting Technology: Explore LED options for energy-efficient and long-lasting illumination, or select fixtures with integrated dimming capabilities for customizable ambiance.

Installation Tips

Here are some tips to consider when installing linear flush mount ceiling lights in your home:

  1. Ceiling Height: Ensure that the fixture’s dimensions and mounting height are compatible with your ceiling height to avoid clearance issues.
  2. Support Structure: Check the ceiling’s support structure to determine if additional reinforcement or electrical modifications are necessary for installation.
  3. Wiring Considerations: Follow manufacturer instructions and local electrical codes when wiring the fixture, and consider hiring a licensed electrician for professional installation if needed.

Benefits of Linear Flush Mount Ceiling Lights

Incorporating linear flush mount ceiling lights into your home offers numerous benefits, including:

  • Space Optimization: These fixtures maximize overhead space while providing ample illumination, making them ideal for rooms with low ceilings or tight quarters.
  • Clean Aesthetic: Linear flush mount ceiling lights offer a sleek and unobtrusive appearance that enhances the overall aesthetic of any room.
  • Functional Lighting: Whether used for general illumination or task lighting, linear flush mount ceiling lights provide efficient and effective lighting solutions for various living spaces.

Conclusion

Linear flush mount ceiling lights combine modern design with practical functionality to create a versatile lighting solution for contemporary interiors. With their sleek appearance, even illumination, and space-saving design, these fixtures are an excellent choice for enhancing the ambiance and functionality of any room in your home.

Exposed Spray Foam Ceiling Designs for Modern Spaces: Unveiling the Beauty

Exposed spray foam ceilings offer a unique and contemporary alternative to traditional ceiling materials, providing both insulation and design flexibility for modern spaces. In this comprehensive guide, we’ll delve into the world of exposed spray foam ceilings, exploring their benefits, installation techniques, and design possibilities to inspire your next interior renovation project.

Exposed Spray Foam Ceiling

Unveiling the Beauty of Exposed Spray Foam Ceilings

An exposed spray foam ceiling is created by applying polyurethane spray foam insulation directly onto the ceiling surface, leaving it exposed to create a sleek and modern aesthetic. This versatile material offers numerous benefits, including superior insulation properties, moisture resistance, and the ability to conform to irregular ceiling shapes and surfaces.

Benefits of Exposed Spray Foam Ceilings

Here are some of the key benefits of choosing an exposed spray foam ceiling for your space:

  1. Insulation: Spray foam insulation provides excellent thermal resistance, helping to regulate indoor temperatures and reduce energy consumption.
  2. Seamless Application: Unlike traditional insulation materials, spray foam can seamlessly apply to create a smooth and uniform surface without gaps or seams.
  3. Moisture Resistance: Spray foam is resistant to moisture and mold growth, making it ideal for use in humid or damp environments such as bathrooms and basements.
  4. Design Flexibility: Exposed spray foam ceilings offer virtually limitless design possibilities, allowing for custom textures, shapes, and finishes to suit any aesthetic preference.

Installation Process for Exposed Spray Foam Ceilings

The installation of an exposed spray foam ceiling typically involves the following steps:

  1. Surface Preparation: The ceiling surface is cleaned, primed, and prepared for the application of spray foam insulation.
  2. Spray Application: A professional installer applies the spray foam insulation evenly across the ceiling surface, using specialized equipment to achieve the desired thickness and coverage.
  3. Finishing Touches: Once the spray foam cures, perform any necessary trimming or shaping to create a smooth and uniform finish.
  4. Optional Finishes: Depending on the desired aesthetic, you can leave the exposed spray foam ceiling as-is for a modern industrial look or apply paint, plaster, or other finishes for added texture and visual interest.

Read too: Discovering the Charm of Nautical Outdoor Ceiling Fans for Your Coastal Retreat: Sail into Style

Design Possibilities with Exposed Spray Foam Ceilings

Exposed spray foam ceilings offer endless design possibilities, allowing for creative expression and customization in any space:

  • Textured Finishes: Create visual interest with textured finishes such as stippling, swirling, or stippling.
  • Color Options: Choose from a wide range of paint colors or pigments to match your desired color scheme or create a bold accent.
  • Architectural Details: Incorporate architectural details such as beams, trusses, or recessed lighting into the spray foam ceiling design for added dimension and character.
  • Custom Shapes: Experiment with custom shapes and patterns to add visual intrigue and define different areas within a room.

Conclusion

Exposed spray foam ceilings offer a modern and innovative solution for both insulation and design in contemporary interiors. With their numerous benefits, versatile installation process, and limitless design possibilities, exposed spray foam ceilings are sure to make a stylish statement in any modern space.

Installing a Ceiling Fan on a Vaulted Ceiling for Enhanced Comfort: Elevate Your Space

Installing a ceiling fan on a vaulted ceiling can significantly enhance comfort and airflow in your home, providing efficient cooling and ventilation in high-ceilinged rooms. In this comprehensive guide, we’ll explore the process of installing a ceiling fan on a vaulted ceiling, along with design considerations and benefits to help you make the most of your elevated living space.

Ceiling Fan On Vaulted Ceiling

Understanding Ceiling Fans on Vaulted Ceilings

Ceiling fans are popular additions to homes with vaulted ceilings, as they help circulate air and maintain a comfortable temperature throughout the room. However, installing a ceiling fans on a vaulted ceiling requires careful planning and consideration to ensure proper functionality and aesthetics.

Read too: Discovering the Charm of Nautical Outdoor Ceiling Fans for Your Coastal Retreat: Sail into Style

Installation Guide

Follow these steps to install a ceiling fans on a vaulted ceiling:

1. Determine Mounting Method

  • Choose between a standard downrod mount or an angled mount adapter, depending on the slope and height of your vaulted ceiling.
  • Measure the angle of the ceiling slope to determine the appropriate mounting method for your ceiling fan.

2. Select the Right Size Fan

  • Choose a ceiling fans size that complements the scale of your room and the height of your vaulted ceiling.
  • Consider the blade span and motor size to ensure optimal airflow and performance.

3. Locate Ceiling Joists

  • Use a stud finder to locate ceiling joists or support beams in the vaulted ceiling where you plan to install the ceiling fan.
  • Ensure that the mounting location provides sufficient support for the weight of the fan and minimizes vibration.

4. Install Mounting Bracket

  • Attach the mounting bracket to the ceiling joist using heavy-duty screws or bolts, following the manufacturer’s instructions.
  • Use a level to ensure that the mounting bracket is installed evenly and securely.

5. Assemble and Install the Fan

  • Assemble the ceiling fan according to the manufacturer’s instructions, attaching the blades, motor housing, and light fixture (if applicable).
  • Carefully lift the assembled fan onto the mounting bracket and secure it in place using the provided hardware.

Design Considerations for Ceiling Fans on Vaulted Ceilings

When choosing a ceiling fans for a vaulted ceiling, consider the following design factors:

  • Blade Pitch: Opt for a ceiling fan with a steeper blade pitch to maximize airflow efficiency on a vaulted ceiling.
  • Style and Finish: Select a fan style and finish that complements the decor and architectural features of your room.
  • Remote Control or Wall Switch: Choose a ceiling fan with remote control or wall switch capabilities for convenient operation on a vaulted ceiling.

Benefits of Ceiling Fans on Vaulted Ceilings

Installing a ceiling fan on a vaulted ceiling offers several benefits, including:

  • Improved Air Circulation: Ceiling fans help distribute air evenly throughout the room, promoting better ventilation and comfort.
  • Energy Efficiency: By circulating air and reducing reliance on air conditioning, ceiling fans can help lower energy costs and consumption.
  • Enhanced Aesthetics: A well-chosen ceiling fan can serve as a stylish focal point in a room with a vaulted ceiling, enhancing its overall aesthetic appeal.

Conclusion

Installing a ceiling fan on a vaulted ceiling is a practical and stylish way to enhance comfort and airflow in your home. By following the installation tips and design considerations outlined in this guide, you can enjoy the benefits of efficient ventilation and cooling while adding a touch of elegance to your elevated living space.

Art Nouveau Ceiling Light Fixture: The Timeless Charm

An Art Nouveau ceiling light fixture embodies the epitome of elegance and sophistication, showcasing intricate details and graceful curves that evoke the charm of a bygone era. In this illuminating guide, we’ll delve into the allure of Art Nouveau ceiling lights, exploring their history, design characteristics, and placement considerations to help you infuse your space with a touch of vintage-inspired beauty.

Art Nouveau Ceiling Light

Understanding Art Nouveau Ceiling Lights

Art Nouveau emerged as an influential artistic movement in the late 19th and early 20th centuries, characterized by its focus on organic forms, intricate patterns, and decorative motifs inspired by nature. Art Nouveau ceiling lights reflect these design principles through their flowing lines, botanical motifs, and opulent materials, creating a sense of elegance and refinement.

The Design Elements of Art Nouveau Ceiling Lights

Art Nouveau ceiling lights exhibit several distinctive design elements that set them apart from other lighting styles:

  1. Curvilinear Forms: Art Nouveau embraces flowing, asymmetrical lines that mimic the shapes found in nature, such as vines, flowers, and tendrils.
  2. Organic Motifs: Botanical motifs, including leaves, flowers, and vines, are commonly featured in Art Nouveau ceiling light designs, adding a sense of natural beauty and vitality.
  3. Stained Glass: Many Art Nouveau ceiling lights incorporate stained glass panels adorned with intricate patterns and vibrant colors, casting a warm and inviting glow when illuminated.
  4. Decorative Details: Art Nouveau lights often feature elaborate decorative details, such as filigree work, embossed patterns, and sculptural elements, showcasing the craftsmanship and artistry of the era.

Incorporating Art Nouveau Ceiling Lights into Your Decor

Here are some tips for incorporating an Art Nouveau ceiling light fixture into your home decor:

  • Choose a Focal Point: Select a prominent location, such as the center of a room or above a dining table, to showcase the beauty of your Art Nouveau ceiling light.
  • Complement Your Decor: Coordinate the colors, materials, and design motifs of the ceiling light with your existing decor to create a cohesive and harmonious look.
  • Consider Scale and Proportion: Ensure that the size and scale of the ceiling light are appropriate for the room, taking into account the ceiling height and available space.
  • Layer Lighting: Pair your Art Nouveau ceiling light with additional lighting sources, such as wall sconces or table lamps, to create layers of illumination and enhance the ambiance of the room.

Read too: Discovering the Charm of Nautical Outdoor Ceiling Fans for Your Coastal Retreat: Sail into Style

Conclusion

An Art Nouveau ceiling lights fixture is more than just a source of illumination—it’s a statement piece that embodies the elegance and beauty of a bygone era. Whether you’re drawn to the intricate details of stained glass or the graceful curves of curvilinear forms, an Art Nouveau ceiling light can add a touch of vintage-inspired charm to any space.

10000 CFM Ceiling Fan: Exploring the Benefits

A 10000 CFM ceiling fan is a powerful ventilation solution that can significantly improve airflow and comfort in large spaces. In this comprehensive guide, we’ll delve into the features, benefits, and applications of a ceiling fan with a remarkable airflow capacity of 10000 CFM. Whether you’re looking to cool a spacious room or enhance ventilation in a commercial setting, a fan of this caliber can make a substantial difference.

10000 Cfm Ceiling Fan

Understanding 10000 CFM Ceiling Fans

Ceiling fans are measured by their airflow capacity, typically expressed in cubic feet per minute (CFM). A 10000 CFM ceiling fan is capable of moving a substantial volume of air, making it an ideal choice for rooms or areas with high ceilings or extensive square footage.

Read too: Discovering the Charm of Nautical Outdoor Ceiling Fans for Your Coastal Retreat: Sail into Style

Benefits of a 10000 CFM Ceiling Fan

Here are some of the key benefits of investing in a ceiling fans with a 10000 CFM airflow capacity:

  1. Enhanced Air Circulation: A high CFM ceiling fan helps promote better air circulation, distributing cool air evenly throughout the room and minimizing hot spots.
  2. Improved Comfort: By increasing airflow and ventilation, a 10000 CFM ceiling fan can create a more comfortable environment, especially during hot and humid weather conditions.
  3. Energy Efficiency: Despite its powerful airflow capabilities, a 10000 CFM ceiling fan consumes relatively low energy compared to other cooling systems, helping reduce electricity costs.
  4. Versatility: Ceiling fans with a 10000 CFM rating are suitable for a wide range of applications, including residential living spaces, commercial buildings, warehouses, and industrial facilities.

Applications of 10000 CFM Ceiling Fans

Here are some common applications where a ceiling fan with a 10000 CFM airflow capacity can be beneficial:

  • Large Living Rooms: A 10000 CFM ceiling fans can effectively cool and ventilate spacious living rooms with high ceilings, providing comfort for occupants.
  • Commercial Spaces: Retail stores, restaurants, offices, and other commercial establishments can benefit from the airflow and ventilation provided by a high CFM ceiling fan.
  • Industrial Settings: Warehouses, manufacturing facilities, and workshops often require robust ventilation solutions to maintain a comfortable working environment and dissipate heat generated by machinery.

Installing and Operating

Installing a 10000 CFM ceiling fans follows similar steps to installing standard ceiling fans, but it’s essential to ensure proper support and wiring for the increased weight and power requirements. Once installed, the fan can be operated using a wall-mounted switch or remote control, allowing users to adjust speed settings and airflow as needed.

Conclusion

A 10000 CFM ceiling fans offers exceptional airflow performance and versatility, making it a valuable addition to any space in need of enhanced ventilation and comfort. Whether you’re looking to cool a large living room, commercial space, or industrial facility, a fan of this caliber can provide reliable airflow and circulation to improve overall air quality and comfort.

Westinghouse Comet Ceiling Fan Review and Installation Guide: Enhance Your Space with Style

The Westinghouse Comet ceiling fan combines stylish design with powerful performance to create a comfortable and inviting atmosphere in any room. In this detailed review and installation guide, we’ll explore the features, benefits, and installation process of the Westinghouse Comet ceiling fan, helping you make an informed decision about adding this stylish and functional fixture to your home.

Westinghouse Comet Ceiling Fan

Introducing the Westinghouse Comet Ceiling Fan

The Westinghouse Comet ceiling fan features a sleek and modern design that complements a variety of interior styles. Available in multiple finishes, including brushed pewter, matte black, and white, the Comet fan adds a touch of sophistication to any room while providing optimal airflow and comfort.

Key Features of the Westinghouse Comet Ceiling Fan

The Westinghouse Comet ceiling fan boasts several features that set it apart from other ceiling fans on the market:

  1. Powerful Motor: The Comet fan is equipped with a high-quality motor that delivers powerful and efficient airflow, making it ideal for both small and large rooms.
  2. Reversible Blades: The fan’s reversible blades allow you to customize the look of your space and adapt to changing seasons. Choose between a sleek black finish or a classic wood grain design.
  3. Integrated Light Fixture: The Comet fan includes an integrated light fixture with a frosted glass shade, providing both illumination and ambiance to your room.
  4. Remote Control Compatibility: The fan can be operated via remote control for added convenience, allowing you to adjust the fan speed and light settings from anywhere in the room.

Read too: Discovering the Charm of Nautical Outdoor Ceiling Fans for Your Coastal Retreat: Sail into Style

Installation Guide for the Westinghouse Comet Ceiling Fan

Follow these steps to install the Westinghouse Comet ceiling fans in your home:

1. Gather Tools and Materials

  • Before you begin, gather the necessary tools and materials, including a screwdriver, wire stripper, ladder, and electrical tape.
  • Ensure that the power to the ceiling fan circuit is turned off at the breaker box before starting the installation process.

2. Mount the Ceiling Bracket

  • Install the ceiling bracket provided with the fan according to the manufacturer’s instructions, ensuring that it is securely attached to the ceiling joist or support structure.

3. Wire the Fan

  • Follow the wiring diagram included with the fan to connect the electrical wires from the ceiling to the fan motor.
  • Use wire nuts to secure the connections and electrical tape to cover exposed wires.

4. Attach the Fan Blades and Light Fixture

  • Attach the fan blades to the motor housing using the screws provided, ensuring that they are securely fastened.
  • Install the light fixture onto the fan motor housing, following the manufacturer’s instructions for assembly.

5. Test the Fan

  • Once the fan is fully assembled and securely mounted to the ceiling, turn the power back on at the breaker box and test the fan and light functions using the remote control.

Conclusion

The Westinghouse Comet ceiling fans offers a stylish and practical solution for enhancing the comfort and ambiance of your home. The Comet fan’s sleek design, powerful motor, and integrated light fixture make it a standout feature in any room.

Pendant Lights for Cathedral Ceilings Bring Elegance and Ambiance: Elevate Your Space

Pendant lights for cathedral ceilings offer a stunning lighting solution that not only illuminates your space but also adds visual interest and elegance. In this comprehensive guide, we’ll explore the beauty and functionality of pendant lights designed specifically for cathedral ceilings. From stylish designs to practical installation tips, you’ll learn everything you need to know to elevate your space with pendant lighting.

Pendant Lights For Cathedral Ceilings

Understanding Pendant Lights for Cathedral Ceilings

Pendant lights are suspended from the ceiling by a rod, chain, or cord, creating a striking focal point in any room. When installed in cathedral ceilings, these lights can enhance the architectural beauty of the space and provide ample illumination for both aesthetic and practical purposes.

Choosing the Right Pendant Lights

When selecting pendant lights for cathedral ceilings, consider the following factors:

  1. Size and Scale: Choose pendant lights that complement the scale of your cathedral ceiling without overwhelming the space. Larger rooms may require multiple pendant lights or larger fixtures to provide adequate illumination.
  2. Style and Design: Select pendant lights that reflect your personal style and complement the overall aesthetic of your home. From modern and minimalist to vintage and ornate, there are countless options to choose from.
  3. Lighting Needs: Consider the lighting needs of the room when choosing pendant lights. Are you looking for ambient lighting to create a warm and inviting atmosphere, or task lighting for specific activities such as reading or cooking?
  4. Installation Requirements: Take into account the installation requirements of pendant lights for cathedral ceilings, including the height of the ceiling and the accessibility of electrical wiring.

Pendant Lights for Cathedral Ceilings: Installation Tips

Follow these tips to ensure a successful installation of pendant lights in cathedral ceilings:

1. Measure Carefully

  • Measure the height and width of your cathedral ceiling to determine the appropriate placement and size of pendant lights.
  • Consider the location of other fixtures and furniture in the room to avoid overcrowding or obstructing the space.

2. Choose the Right Hanging Length

  • Adjust the hanging length of the pendant lights to achieve the desired height and illumination level.
  • Ensure that the lights are suspended at a comfortable height for the occupants of the room and that they provide adequate lighting without casting shadows or glare.

3. Consider Dimming Options

  • Install dimmer switches for your pendant lights to provide greater control over the ambiance and lighting levels in the room.
  • Dimming options allow you to adjust the brightness of the lights to suit different activities and moods throughout the day.

4. Hire a Professional Electrician

  • If you’re unsure about installing pendant lights in cathedral ceiling, or if the installation requires complex electrical work, it’s best to hire a professional electrician.
  • A licensed electrician can ensure that the lights are installed safely and correctly, minimizing the risk of electrical hazards or damage to your home.

Read too: Discovering the Charm of Nautical Outdoor Ceiling Fans for Your Coastal Retreat: Sail into Style

Conclusion

Pendant lights for cathedral ceiling offer a stylish and practical lighting solution that can transform your space. Whether you’re looking to enhance the ambiance of your living room, illuminate your kitchen island, or add drama to your entryway, pendant lights provide endless possibilities for creativity and customization.

Ultimate Guide to Insulate Garage Ceiling With Foam Board: Save Energy and Enhance Comfort

Insulate Garage Ceiling With Foam Board. Insulating your garage ceiling with foam board is a smart investment that can help you save energy, improve comfort, and reduce noise transmission. In this comprehensive guide, we’ll explore the benefits of insulating your garage ceiling with foam board and provide you with step-by-step instructions and expert tips to ensure a successful insulation project.

Insulate Garage Ceiling With Foam Board

Why Insulate Garage Ceiling With Foam Board?

Insulating your garage ceiling with foam board offers several advantages:

  1. Energy Efficiency: Insulation helps to regulate the temperature in your garage, reducing heat loss in the winter and heat gain in the summer. This can lead to lower energy bills and increased energy efficiency.
  2. Improved Comfort: By maintaining more consistent temperatures, insulation can make your garage more comfortable to work in, especially during extreme weather conditions.
  3. Noise Reduction: Foam board insulation can also help reduce noise transmission from the garage to the rest of your home, creating a quieter living environment.
  4. Moisture Resistance: Foam board insulation is resistant to moisture, which can help prevent mold and mildew growth in your garage.

Insulate Garage Ceiling With Foam Board: Step-by-Step Guide

Follow these steps to insulate your garage ceiling with foam board effectively:

1. Measure and Plan

  • Measure the area of your garage ceiling to determine how much foam board insulation you’ll need.
  • Plan the layout of the insulation, taking into account any obstacles such as light fixtures or garage door openers.

Read too: Discovering the Charm of Nautical Outdoor Ceiling Fans for Your Coastal Retreat: Sail into Style

2. Prepare the Surface

  • Clean the surface of the garage ceiling to remove any dust, dirt, or debris.
  • Repair any cracks or holes in the ceiling before installing the insulation.

3. Cut the Foam Board

  • Use a utility knife or foam board cutter to cut the foam board insulation to fit the dimensions of your garage ceiling.
  • Cut the insulation slightly smaller than the space to allow for expansion.

4. Install the Foam Board

  • Apply construction adhesive to the back of the foam board panels.
  • Press the panels firmly against the garage ceiling, starting from one corner and working your way across.
  • Use screws or nails to secure the insulation in place, if necessary.

5. Seal the Joints

  • Use foam board tape or caulking to seal any gaps or joints between the foam board panels.
  • This will help prevent air leakage and maximize the insulation’s effectiveness.

6. Finish the Ceiling

  • Once the foam board insulation is installed, you can finish the garage ceiling with drywall or other materials as desired.

Expert Tips for Insulating Garage Ceiling With Foam Board

Consider the following tips to ensure a successful insulation project:

  • Wear protective gear, such as gloves and safety goggles, when handling foam board insulation.
  • Choose high-density foam board insulation for maximum insulation value and durability.
  • Consider adding a vapor barrier to further protect against moisture infiltration.

Conclusion

Insulating your garage ceiling with foam board is a cost-effective way to improve energy efficiency, comfort, and noise reduction in your home. By following the steps outlined in this guide and implementing expert tips, you can enjoy the benefits of a well-insulated garage for years to come.

36 Outdoor Ceiling Fan: Upgrade Your Outdoor Space with a Stylish and Functional

Transform your outdoor living space into a cool and inviting oasis with the addition of a stylish and functional 36 outdoor ceiling fan. Whether you’re looking to beat the heat during summer gatherings or create a cozy ambiance on mild evenings, a ceiling fan designed for outdoor use can enhance both the comfort and aesthetics of your patio, deck, or porch. In this comprehensive guide, we’ll explore everything you need to know about 36 outdoor ceiling fans, from their features and benefits to installation tips and design options.

36 Outdoor Ceiling Fan

Understanding the Benefits of 36 Outdoor Ceiling Fans

Efficient Air Circulation

A 36 outdoor ceiling fan provides efficient air circulation, helping to create a comfortable breeze and alleviate heat and humidity during warmer months. By circulating air downward, these fans can also help deter insects and pests, making your outdoor space more enjoyable.

Exploring the Features of 36 Outdoor Ceiling Fans

Durable Construction

Outdoor ceiling fans are built to withstand the elements, with durable materials such as weather-resistant blades, rust-resistant finishes, and sturdy housings designed to withstand exposure to sunlight, rain, and humidity.

Installation Tips

Proper Mounting and Wiring

When installing a 36 outdoor ceiling fan, follow these tips for a successful installation:

  1. Choose the Right Location: Select a suitable location on your patio or deck for mounting the fan, ensuring proper clearance from walls, beams, and other obstacles.
  2. Secure Mounting: Use a sturdy mounting bracket or support system to secure the fan to the ceiling, ensuring stability and safety during operation.

Read too: How To Extend Kitchen Cabinets To The Ceiling: A Complete Guide for Maximizing Space and Style

Design Options for 36 Outdoor Ceiling Fans

Style and Finish Choices

36 outdoor ceiling fans are available in a variety of styles, finishes, and designs to complement any outdoor decor scheme. Whether you prefer a classic, traditional look or a more modern aesthetic, there’s a fan to suit your taste and preferences.

Expert Recommendations for 36 Outdoor Ceiling Fans

Consideration for Size and Space

When selecting a 36 outdoor ceiling fan for your outdoor space, consider factors such as the size of the area, ceiling height, and desired airflow to ensure optimal performance and comfort.

Conclusion

Elevate your outdoor living experience with the addition of a 36 outdoor ceiling fan. Whether you’re hosting gatherings, enjoying quiet moments with family, or simply unwinding after a long day, these fans provide a refreshing breeze and stylish accent to your patio, deck, or porch. Follow the installation tips and expert recommendations outlined in this guide to select and install the perfect 36 outdoor ceiling fan for your outdoor oasis.

Water Leaking From Vent In Ceiling During Rain: Troubleshooting Guide

Are you experiencing the frustrating problem of water leaking from the vent in your ceiling during rainstorms? This unexpected issue can lead to water damage, mold growth, and other costly repairs if not addressed promptly. In this comprehensive troubleshooting guide, we’ll delve into the possible causes of water leaks from ceiling vent during rain weather and provide practical solutions to help you resolve the problem effectively.

Water Leaking From Vent In Ceiling During Rain

Understanding Water Leaking From Vent In Ceiling During Rain

Common Causes of Ceiling Vent Leakage

Water leaks from ceiling vents during rainstorms can be caused by various factors, including:

  • Damaged Roofing: Cracked or missing shingles, deteriorated flashing, or roof damage can allow water to infiltrate the attic space and leak through the vents into the ceiling below.
  • Clogged Gutters: Blocked or overflowing gutters can cause water to back up and seep into the roof structure, eventually finding its way into the ceiling vents during heavy rainfall.

Read too: How To Extend Kitchen Cabinets To The Ceiling: A Complete Guide for Maximizing Space and Style

Water Leaking From Vent In Ceiling During Rain: Identification and Diagnosis

Signs of Ceiling Vent Leakage

If you suspect water is leaking from the vent in your ceiling during rainstorms, watch out for the following signs:

  • Water Stains: Discoloration or water stains on the ceiling or walls near the vents indicate water intrusion and potential leakage.
  • Dampness or Mold Growth: Moisture buildup or mold growth around the vents can signal ongoing water leaks and the risk of structural damage.

Addressing Water Leaks From Vent In Ceiling During Rain

Effective Solutions and Prevention Techniques

To address water leaks from ceiling vents during rainstorms, consider the following steps:

  1. Inspect and Repair Roof: Conduct a thorough inspection of your roof to identify any damage or vulnerabilities. Repair or replace damaged shingles, flashing, or roof vents as needed to prevent water infiltration.
  2. Clear Gutters and Downspouts: Regularly clean and maintain gutters and downspouts to ensure proper drainage and prevent water backup onto the roof.
  3. Seal Vent Openings: Apply weatherproof sealant or flashing around the base of ceiling vents to create a watertight seal and prevent water intrusion during heavy rain.

Expert Recommendations

Professional Inspection and Repair

If you’re unable to identify or address the source of the water leaks, consider hiring a qualified roofing contractor or water damage restoration specialist to conduct a thorough inspection and provide professional repairs.

Conclusion

Don’t let water leaks from ceiling vents during rainstorms dampen your spirits or damage your home. By identifying the causes of the leaks and taking proactive measures to address them, you can safeguard your home against water damage and maintain a dry, comfortable living environment. Follow the troubleshooting tips and expert recommendations outlined in this guide to resolve the issue of water leaking from the vent in your ceiling during rainy weather effectively.

Rain Shower Ceiling Mount: Elevate Your Shower Experience with a Luxurious

Imagine stepping into your shower and being enveloped by a gentle cascade of water, reminiscent of a tropical rainstorm. With a rain shower ceiling mount, you can turn this dream into a reality and elevate your daily shower routine to new heights of luxury and relaxation. In this comprehensive guide, we’ll explore everything you need to know about rain shower ceiling mounts, from their installation process to the benefits they bring to your bathroom oasis.

Rain Shower Ceiling Mount

Understanding the Luxury of Rain Shower Ceiling Mounts

Immersive Shower Experience

Rain shower ceiling mounts offer a spa-like shower experience, providing a wide, gentle stream of water that mimics the soothing sensation of rainfall. With their overhead placement, these showers envelop your entire body, offering a truly immersive and luxurious bathing experience.

Exploring the Features of Rain Shower Ceiling Mounts

Stylish Design Options

Rain shower ceiling mounts come in a variety of styles, finishes, and sizes to complement any bathroom decor and personal preference. Whether you prefer a sleek and modern design or a more traditional aesthetic, there’s a rain shower ceiling mount to suit your taste.

Read too: How To Extend Kitchen Cabinets To The Ceiling: A Complete Guide for Maximizing Space and Style

Installation Tips

Proper Placement and Plumbing

Follow these tips for a successful installation of your rain shower ceiling mount:

  1. Choose the Right Location: Determine the optimal placement for the shower head on the ceiling, taking into account factors such as shower size, water pressure, and aesthetic preferences.
  2. Ensure Proper Plumbing: Make sure that your bathroom’s plumbing system is compatible with a ceiling-mounted shower head and can provide adequate water flow and pressure for a satisfying shower experience.

Benefits of Rain Shower Ceiling Mounts

Relaxation and Stress Relief

The gentle, cascading water from a rain shower ceiling mount has a soothing effect on the body and mind, helping to relieve stress and promote relaxation. Whether you’re starting your day on a calm note or winding down in the evening, a rain shower provides a rejuvenating escape from the stresses of daily life.

Expert Recommendations for Rain Shower Ceiling Mounts

Consideration for Ceiling Height and Space

When installing a rain shower ceiling mount, consider factors such as ceiling height and available space to ensure optimal performance and functionality. Choose a shower head size and placement that allows for comfortable showering without feeling cramped or constrained.

Conclusion

Enhance your daily shower routine with the luxurious comfort of a rain shower ceiling mount. Whether you’re renovating your bathroom or simply looking to upgrade your shower experience, a ceiling-mounted rain shower adds a touch of elegance and indulgence to any space. Follow the installation tips and expert recommendations outlined in this guide to create your own private oasis of relaxation and rejuvenation.

Ceiling Mounted Patio Heater Solution: Extend Your Outdoor Enjoyment

As the sun sets and temperatures begin to drop, there’s no need to retreat indoors and end your outdoor gatherings prematurely. With a ceiling mounted patio heater, you can extend your time spent on the patio, enjoying the fresh air and company of friends and family long into the evening. In this comprehensive guide, we’ll explore everything you need to know about ceiling mounted patio heaters, from their installation process to the benefits they bring to your outdoor space.

Ceiling Mounted Patio Heater

Understanding the Convenience of Ceiling Mounted Patio Heaters

Efficient Heating Solution

Ceiling mounted patio heaters offer an efficient and effective way to warm your outdoor space, providing targeted heat distribution and comfortable temperatures even on chilly evenings. By mounting the heater to the ceiling, you can maximize floor space and ensure even coverage across the entire patio area.

Exploring the Features of Ceiling Mounted Patio Heaters

Versatile Design Options

Ceiling mounted patio heaters come in a variety of styles, sizes, and fuel options to suit any outdoor space and heating requirements. Whether you prefer the convenience of electric heaters or the ambiance of propane or natural gas models, there’s a ceiling mounted heater to meet your needs.

Read too: How To Extend Kitchen Cabinets To The Ceiling: A Complete Guide for Maximizing Space and Style

Installation Tips for Ceiling Mounted Patio Heaters

Proper Mounting and Placement

Follow these tips for a successful installation of your ceiling mounted patio heater:

  1. Select the Right Location: Choose a central location on the patio ceiling for optimal heat distribution and coverage. Ensure that the mounting surface is sturdy and capable of supporting the weight of the heater.
  2. Secure Mounting Hardware: Use appropriate mounting hardware and follow manufacturer guidelines to securely attach the heater to the ceiling. Double-check the stability of the installation to prevent accidents or damage.

Benefits of Ceiling Mounted Patio Heaters

Extended Outdoor Season

By installing a ceiling mounted patio heater, you can enjoy your outdoor space year-round, even during cooler weather conditions. Whether you’re hosting a dinner party, relaxing with a book, or simply unwinding after a long day, a patio heater ensures that you can make the most of your outdoor oasis.

Expert Recommendations

Consideration for Safety and Maintenance

When using a ceiling mounted patio heater, prioritize safety and proper maintenance to ensure optimal performance and longevity. Regularly inspect the heater for any signs of wear or damage, and follow manufacturer guidelines for cleaning and maintenance tasks.

Conclusion

Enhance your outdoor living experience with the convenience and comfort of a ceiling mounted patio heater. Whether you’re entertaining guests, enjoying a quiet evening under the stars, or simply looking to make the most of your outdoor space, a patio heater provides the warmth and ambiance you need to create unforgettable moments. Follow the installation tips and expert recommendations outlined in this guide to select and install the perfect ceiling mounted patio heater for your outdoor oasis.

2X4 Fiberglass Ceiling Tiles: Elevate Your Space with Stylish and Functional

When it comes to transforming the look and feel of a room, few elements have as significant an impact as the ceiling. Often overlooked, the ceiling plays a crucial role in defining the ambiance and style of a space. 2X4 fiberglass ceiling tiles offer a versatile and practical solution for upgrading your ceiling with ease. In this comprehensive guide, we’ll explore everything you need to know about 2X4 fiberglass ceiling tiles, from their installation process to the benefits they bring to your home or office environment.

2X4 Fiberglass Ceiling Tiles

Understanding the Versatility of 2X4 Fiberglass Ceiling Tiles

Stylish Design Options

2X4 fiberglass ceiling tiles come in a wide range of styles, patterns, and finishes to suit any aesthetic preference. Whether you prefer a classic look with smooth, white tiles or a more contemporary vibe with textured designs, there’s a fiberglass tile to complement every decor style.

Exploring the Features of 2X4 Fiberglass Ceiling Tiles

Durable and Lightweight Construction

Fiberglass ceiling tiles are known for their durability and lightweight construction, making them easy to handle and install. Unlike traditional ceiling materials like plaster or wood, fiberglass tiles are resistant to moisture, mold, and mildew, making them ideal for use in high-humidity environments such as bathrooms or basements.

Read too: How To Extend Kitchen Cabinets To The Ceiling: A Complete Guide for Maximizing Space and Style

Installation Tips

Simple and Straightforward Installation

Installing 2X4 fiberglass ceiling tiles is a straightforward process that can be completed in just a few simple steps:

  1. Prepare the Surface: Ensure that the ceiling surface is clean, smooth, and free of any debris or imperfections before beginning the installation process.
  2. Measure and Cut Tiles: Measure the dimensions of the ceiling and cut the fiberglass tiles to fit using a utility knife or a specialized tile cutter.
  3. Apply Adhesive: Apply a suitable adhesive to the back of each tile and press it firmly onto the ceiling surface, ensuring proper alignment and spacing between tiles.
  4. Secure Edges and Corners: Use molding or trim pieces to secure the edges and corners of the ceiling tiles, providing a finished and polished look to the installation.

Benefits of 2X4 Fiberglass Ceiling Tiles

Enhanced Acoustic Properties

In addition to their visual appeal, fiberglass ceiling tiles offer excellent sound-absorbing properties, helping to reduce echo and noise levels in a room. This makes them an ideal choice for spaces where acoustic comfort is a priority, such as offices, classrooms, or recording studios.

Expert Recommendations

Consideration for Lighting and Fixtures

When selecting fiberglass ceiling tiles for your space, consider factors such as lighting and fixture placement to ensure optimal performance and aesthetics. Choose tiles with built-in light reflectivity or compatibility with recessed lighting fixtures to enhance brightness and visibility in the room.

Conclusion

Upgrade your ceiling space with the stylish and functional versatility of 2X4 fiberglass ceiling tile. Whether you’re renovating your home, office, or commercial space, these durable and easy-to-install tiles offer a cost-effective solution for enhancing the aesthetic appeal and acoustic comfort of any room. Follow the installation tips and expert recommendations outlined in this guide to transform your ceiling into a focal point of beauty and functionality.

Short Throw Projector Ceiling Mount Solution: Enhance Your Viewing Experience

In the realm of home entertainment, a high-quality projector can transform any room into a captivating theater experience. However, to fully maximize the potential of your projector, choosing the right mounting solution is essential. Short throw projector ceiling mounts offer a convenient and space-saving option for achieving optimal projection quality and viewing angles. In this comprehensive guide, we’ll delve into everything you need to know about short throw projector ceiling mounts, from their benefits to installation tips and more.

Short Throw Projector Ceiling Mount

Understanding the Importance of Short Throw Projector Ceiling Mount

Space-Saving Solution

Short throw projector ceiling mounts are designed to position the projector closer to the screen, allowing for larger image sizes and minimizing the risk of shadows or obstructions. By mounting the projector on the ceiling, you can free up valuable floor space and create a cleaner, more streamlined home theater setup.

Read too: How To Extend Kitchen Cabinets To The Ceiling: A Complete Guide for Maximizing Space and Style

Exploring the Features of Short Throw Projector Ceiling Mount

Flexibility and Adjustability

Short throw projector ceiling mounts offer a range of features to accommodate different projector models and installation preferences. These may include adjustable arms, swivel capabilities, and quick-release mechanisms for easy installation and maintenance.

Installation Tips

Proper Positioning

Follow these tips for a successful installation of your short throw projector ceiling mount:

  1. Locate the Ideal Position: Determine the optimal placement for the projector screen and mount, taking into account factors such as viewing angle, screen size, and distance from the seating area.
  2. Secure Mounting Surface: Ensure that the ceiling surface where the mount will be installed is sturdy and capable of supporting the weight of the projector and mount. Use appropriate hardware and anchors to secure the mount in place.

Benefits of Short Throw Projector Ceiling Mount

Enhanced Viewing Experience

Mounting your projector on the ceiling with a short throw mount offers several benefits, including:

  • Improved Image Quality: By minimizing the distance between the projector and the screen, short throw mounts help reduce image distortion and enhance clarity and sharpness.
  • Space Optimization: Ceiling-mounted projectors free up floor space, allowing for more flexible seating arrangements and a cleaner, clutter-free home theater environment.

Expert Recommendations

Choosing the Right Mount

When selecting a short throw projector ceilings mount, consider factors such as:

  • Compatibility: Ensure that the mount is compatible with your projector model and weight requirements.
  • Adjustability: Look for mounts with adjustable arms and tilt angles to achieve the perfect projection setup for your space.

Conclusion

Elevate your home theater experience to new heights with a short throw projector ceiling mount. Mounting your projector on the ceiling offers larger screen sizes, improved image quality, and a streamlined setup. Follow the installation tips and expert recommendations in this guide to select the perfect mount and create the ultimate viewing environment at home.