Armstrong Prelude Ceilings Grid Systems: Exploring the Versatility

When it comes to creating stylish and functional ceilings, Armstrong Prelude Ceiling Grid systems stand out as a versatile solution. Whether you’re renovating an office space, commercial building, or residential property, Armstrong Prelude Ceiling Grid offers a wide range of benefits and customization options. In this comprehensive guide, we’ll delve into the features, installation process, and applications of Armstrong Prelude Ceilings Grid, providing you with valuable insights to enhance your next ceiling project.

Armstrong Prelude Ceiling Grid

Introducing Armstrong Prelude Ceiling Grid

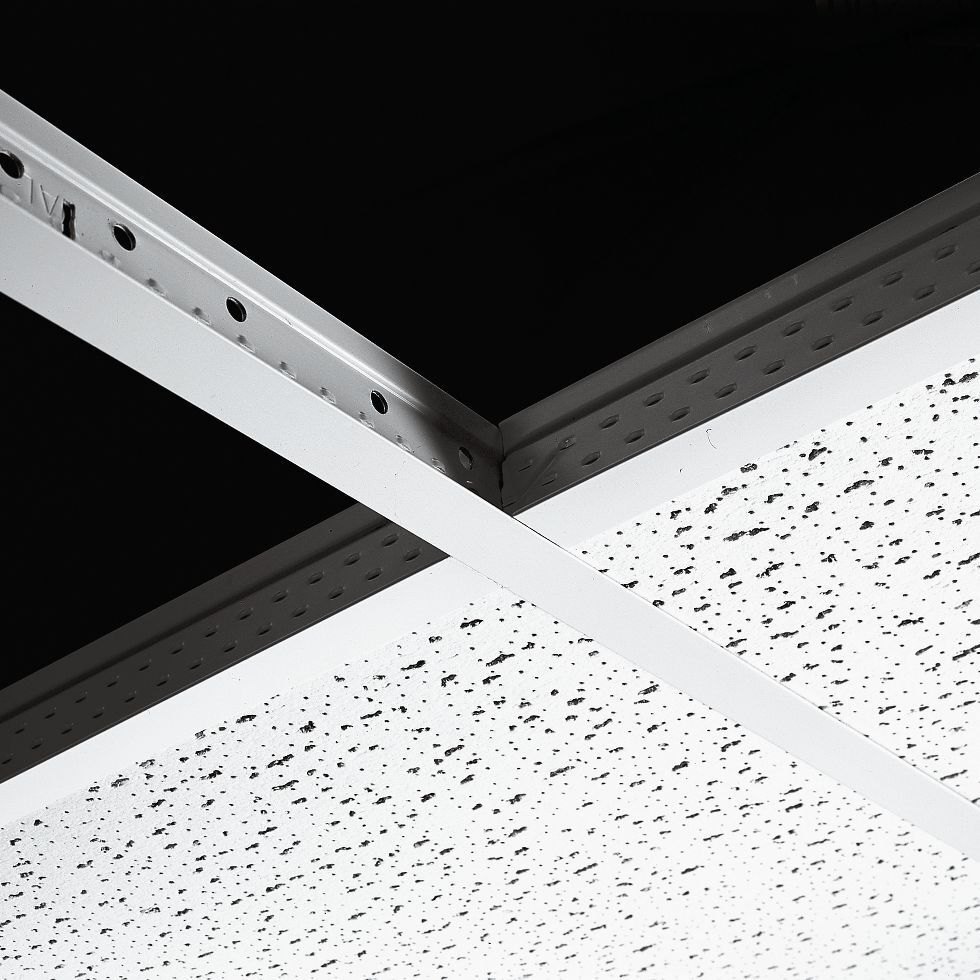
Armstrong Prelude Ceiling Grid is a popular choice among architects, contractors, and homeowners due to its durability, flexibility, and ease of installation. Designed to support various ceiling panel types, including acoustical panels, wood planks, and metal tiles, Prelude Ceiling Grid provides a stable foundation for creating visually stunning ceilings in any environment.

Features and Benefits

  • Durable Construction: Made from high-quality galvanized steel, Armstrong Prelude Ceiling Grid offers exceptional strength and longevity, ensuring long-lasting performance.
  • Versatile Design: With a wide range of profiles, colors, and finishes available, Prelude Ceiling Grid allows for endless design possibilities, from traditional to contemporary styles.
  • Easy Installation: The innovative clip-and-hook system of Armstrong Prelude Ceiling Grid simplifies the installation process, reducing labor time and costs.
  • Seismic Performance: Armstrong Prelude Ceiling Grid systems are engineered to withstand seismic movements, making them suitable for use in earthquake-prone regions.
  • Integrated Solutions: Prelude Ceiling Grid is compatible with Armstrong’s extensive range of ceiling panels and accessories, providing a complete ceiling solution for any project.

Applications

Armstrong Prelude Ceiling Grid systems are suitable for various applications, including:

  1. Commercial Spaces: Offices, retail stores, restaurants, and healthcare facilities benefit from the aesthetic appeal and functionality of Armstrong Prelude Ceiling Grid.
  2. Educational Institutions: Schools, colleges, and universities can create conducive learning environments with the acoustic performance of Prelude Ceiling Grid.
  3. Residential Properties: Homeowners appreciate the versatility and customizable options of Armstrong Prelude Ceiling Grid for enhancing living spaces.

Installation Process

Installing Armstrong Prelude Ceiling Grid is a straightforward process that can be completed in a few simple steps:

  1. Planning and Measurement: Determine the layout of the ceiling grid and measure the space accurately.
  2. Assembly: Connect the main runners and cross tees to form the grid framework, ensuring proper alignment and spacing.
  3. Panel Installation: Install ceiling panels within the grid framework, securing them in place according to manufacturer guidelines.
  4. Finishing Touches: Add trim components, lighting fixtures, and other accessories to complete the ceiling design.

Conclusion

Armstrong Prelude Ceilings Grid offers a versatile, durable, and visually appealing solution for a wide range of ceiling applications. Whether you’re renovating a commercial space or upgrading your home, Prelude Ceiling Grid provides the flexibility and performance you need to achieve stunning results.

Read too: Exploring the Benefits and How-Tos of DIY Ceiling Cassette Mini Split Installation: Revolutionizing Comfort

Installing a Ceiling Fan on a Vaulted Ceiling for Enhanced Comfort: Elevate Your Space

Installing a ceiling fan on a vaulted ceiling can significantly enhance comfort and airflow in your home, providing efficient cooling and ventilation in high-ceilinged rooms. In this comprehensive guide, we’ll explore the process of installing a ceiling fan on a vaulted ceiling, along with design considerations and benefits to help you make the most of your elevated living space.

Ceiling Fan On Vaulted Ceiling

Understanding Ceiling Fans on Vaulted Ceilings

Ceiling fans are popular additions to homes with vaulted ceilings, as they help circulate air and maintain a comfortable temperature throughout the room. However, installing a ceiling fans on a vaulted ceiling requires careful planning and consideration to ensure proper functionality and aesthetics.

Read too: Discovering the Charm of Nautical Outdoor Ceiling Fans for Your Coastal Retreat: Sail into Style

Installation Guide

Follow these steps to install a ceiling fans on a vaulted ceiling:

1. Determine Mounting Method

  • Choose between a standard downrod mount or an angled mount adapter, depending on the slope and height of your vaulted ceiling.
  • Measure the angle of the ceiling slope to determine the appropriate mounting method for your ceiling fan.

2. Select the Right Size Fan

  • Choose a ceiling fans size that complements the scale of your room and the height of your vaulted ceiling.
  • Consider the blade span and motor size to ensure optimal airflow and performance.

3. Locate Ceiling Joists

  • Use a stud finder to locate ceiling joists or support beams in the vaulted ceiling where you plan to install the ceiling fan.
  • Ensure that the mounting location provides sufficient support for the weight of the fan and minimizes vibration.

4. Install Mounting Bracket

  • Attach the mounting bracket to the ceiling joist using heavy-duty screws or bolts, following the manufacturer’s instructions.
  • Use a level to ensure that the mounting bracket is installed evenly and securely.

5. Assemble and Install the Fan

  • Assemble the ceiling fan according to the manufacturer’s instructions, attaching the blades, motor housing, and light fixture (if applicable).
  • Carefully lift the assembled fan onto the mounting bracket and secure it in place using the provided hardware.

Design Considerations for Ceiling Fans on Vaulted Ceilings

When choosing a ceiling fans for a vaulted ceiling, consider the following design factors:

  • Blade Pitch: Opt for a ceiling fan with a steeper blade pitch to maximize airflow efficiency on a vaulted ceiling.
  • Style and Finish: Select a fan style and finish that complements the decor and architectural features of your room.
  • Remote Control or Wall Switch: Choose a ceiling fan with remote control or wall switch capabilities for convenient operation on a vaulted ceiling.

Benefits of Ceiling Fans on Vaulted Ceilings

Installing a ceiling fan on a vaulted ceiling offers several benefits, including:

  • Improved Air Circulation: Ceiling fans help distribute air evenly throughout the room, promoting better ventilation and comfort.
  • Energy Efficiency: By circulating air and reducing reliance on air conditioning, ceiling fans can help lower energy costs and consumption.
  • Enhanced Aesthetics: A well-chosen ceiling fan can serve as a stylish focal point in a room with a vaulted ceiling, enhancing its overall aesthetic appeal.

Conclusion

Installing a ceiling fan on a vaulted ceiling is a practical and stylish way to enhance comfort and airflow in your home. By following the installation tips and design considerations outlined in this guide, you can enjoy the benefits of efficient ventilation and cooling while adding a touch of elegance to your elevated living space.

Expert Guide to Hassle-Free Ceiling Fan Installation in Charlotte: Everything You Need to Know

Are you considering upgrading your home with a new ceiling fan in Charlotte? Whether you’re looking to enhance comfort, improve air circulation, or add a stylish focal point to your space, proper installation is key to maximizing the benefits of your new fixture. In this guide, we’ll walk you through everything you need to know about ceiling fan installation in Charlotte, from planning and preparation to execution and troubleshooting.

Ceiling Fan Installation Charlotte

Understanding Ceiling Fan Installation in Charlotte

Installing a ceiling fan may seem like a daunting task, but with the right knowledge and preparation, it can be a straightforward DIY project or a job for a professional installer. In Charlotte, where hot summers and humid conditions are common, ceiling fans play a crucial role in maintaining comfort and energy efficiency year-round.

Planning Your Installation: Ceiling Fan Installation Charlotte

Before diving into the installation process, it’s essential to plan carefully to ensure a successful outcome. Start by selecting the right fan for your space based on factors such as size, style, and functionality. Consider the height of your ceiling, the location of electrical wiring, and any additional features you may want, such as remote control or lighting.

Read too: How To Extend Kitchen Cabinets To The Ceiling: A Complete Guide for Maximizing Space and Style

Preparing for Installation: Ceiling Fan Installation Charlotte

Gather all the necessary tools and materials, including a ladder, screwdriver, wire cutter, and electrical tape. Turn off the power to the existing ceiling fixture at the circuit breaker to prevent accidents. If you’re not comfortable working with electrical wiring, it’s best to hire a licensed electrician for safety and peace of mind.

Step-by-Step Installation Process

1. Remove the Old Fixture

Carefully remove the existing ceiling fixture, exposing the electrical wiring and mounting bracket. Disconnect the wires and remove the mounting bracket from the ceiling.

2. Install the Mounting Bracket

Follow the manufacturer’s instructions to install the mounting bracket for your new ceiling fan. Ensure that it is securely attached to the ceiling and can support the weight of the fan.

3. Assemble the Fan

Assemble the fan components according to the provided instructions, including attaching the blades, motor housing, and downrod. Double-check all connections to ensure they are tight and secure.

4. Wiring and Electrical Connections

Carefully connect the electrical wires from the fan to the corresponding wires in the ceiling, following proper color-coding and insulation techniques. Use wire nuts to secure the connections and electrical tape to cover exposed wires.

5. Mount the Fan

Lift the assembled fan into position and attach it to the mounting bracket on the ceiling. Ensure that the fan is balanced and level before tightening the screws.

6. Test and Adjust

Once the fan is securely mounted, restore power at the circuit breaker and test its operation. Make any necessary adjustments to the fan speed, direction, and lighting function as needed.

Troubleshooting Tips

If you encounter any issues during the installation process, such as wobbling or noisy operation, refer to the troubleshooting section of the manufacturer’s instructions or consult with a professional installer for assistance.

Conclusion

With the right tools, knowledge, and preparation, ceiling fan installation in Charlotte can be a rewarding and straightforward project. Whether you choose to tackle it yourself or enlist the help of a professional, a properly installed ceiling fan can enhance comfort, improve air circulation, and add value to your home for years to come.

Ceiling Fan Installation in Las Vegas: Tips and Tricks

Are you considering installing a ceiling fan in your Las Vegas home to beat the scorching desert heat? Look no further! In this guide, we’ll explore everything you need to know about ceiling fan installation in Las Vegas, from choosing the right fan to hiring professional installers.

Ceiling Fan Installation Las Vegas

Ceiling Fan Installation Las Vegas: What You Need to Know

Choosing the Right Ceiling Fan

Before diving into the installation process, it’s essential to select the right ceiling fan for your space. Consider factors such as:

  • Size: Opt for a fan size that complements the room’s dimensions.
  • Style: Choose a fan style that matches your home’s décor and aesthetic.
  • Features: Look for features like remote control operation, adjustable speeds, and integrated lighting.

Read too: Discovering the Charm of Nautical Outdoor Ceiling Fans for Your Coastal Retreat: Sail into Style

Gathering the Necessary Tools and Supplies

Once you’ve selected your ceiling fan, gather the tools and supplies needed for installation. Common items include:

  • Screwdriver set
  • Wire stripper
  • Voltage tester
  • Ladder
  • Mounting hardware
  • Electrical tape

Preparing the Installation Site

Before installing the ceiling fan, ensure the installation site is properly prepared. This includes:

  • Turning off the power: Locate the circuit breaker for the room and switch off the power to prevent electrical accidents.
  • Assembling the fan: Follow the manufacturer’s instructions to assemble the fan components before installation.
  • Preparing the mounting bracket: Install the mounting bracket securely to the ceiling, ensuring it can support the weight of the fan.

Ceiling Fan Installation Process

Step 1: Wiring Preparation

Carefully follow the manufacturer’s instructions to connect the fan’s wiring to the electrical supply. Use a voltage tester to verify that the power is off before proceeding.

Step 2: Mounting the Fan

Securely mount the fan to the ceiling using the provided mounting bracket and hardware. Double-check that the fan is level and balanced to prevent wobbling during operation.

Step 3: Attaching the Blades and Light Fixture

Attach the fan blades and light fixture according to the manufacturer’s instructions. Ensure all screws and fasteners are tightened securely.

Hiring Professional Ceiling Fan Installers in Las Vegas

While DIY installation is an option, hiring professional ceiling fan installers in Las Vegas can ensure a safe and efficient installation process. Consider reputable companies with experience in ceiling fan installation to handle the job with expertise.

Conclusion

Installing a ceiling fan in your Las Vegas home can enhance comfort and energy efficiency, especially during the sweltering summer months. By following the steps outlined in this guide and considering professional installation services, you can enjoy the cooling benefits of a ceiling fan while adding style to your living space.

Ceiling Tile Hold Down Clip: Installation, Types, and Benefits

Discover the essential information about ceiling tile hold down clip, including their installation process, different types available, and the benefits they offer for various applications.

Ceiling Tile Hold Down Clip

Introduction

Ceiling tile hold down clips play a crucial role in securing ceiling tiles in place, preventing them from shifting or falling. Whether you’re installing new ceiling tiles or replacing existing ones, understanding the importance of hold down clips and how to use them effectively is essential for achieving a professional-looking and durable ceiling installation. In this comprehensive guide, we’ll explore everything you need to know about ceiling tile hold down clips, from their installation process to the benefits they provide.

Understanding Ceiling Tile Hold Down Clips

Ceiling tile hold down clips are small devices designed to secure ceiling tiles in place, preventing them from lifting or shifting due to factors such as air movement, temperature fluctuations, or vibrations. These clips are typically made of durable materials such as metal or plastic and are installed at strategic intervals along the edges of ceiling tiles to provide stability and support.

Types of Ceiling Tile Hold Down Clips

There are several types of ceiling tile hold down clips available, each designed for specific ceiling tile materials and installation methods. Some common types include:

  1. Spring Clips: Spring clips feature a spring-loaded design that allows them to grip the edges of ceiling tiles securely. These clips are easy to install and provide strong hold-down force to keep tiles in place.
  2. Twist Clips: Twist clips consist of a threaded rod and a metal bracket that are twisted together to secure the ceiling tile in place. These clips offer adjustable tension, making them suitable for various tile thicknesses and installation preferences.
  3. Snap Clips: Snap clips feature a snap-on design that allows them to be quickly and easily attached to the edges of ceiling tiles. These clips provide a secure hold and are ideal for use with lightweight or thin tiles.
  4. Adhesive Clips: Adhesive clips utilize strong adhesive backing to attach to the ceiling tile edges, providing a secure hold without the need for screws or fasteners. These clips are ideal for use with delicate or decorative ceiling tiles.

Installation Process for Ceiling Tile Hold Down Clips

Installing ceiling tile hold down clips is a straightforward process that requires basic tools and a systematic approach. Here’s a step-by-step guide to installing hold down clips:

  1. Prepare the Ceiling Surface: Ensure that the ceiling surface is clean, dry, and free of debris before beginning the installation process.
  2. Determine Clip Placement: Determine the appropriate spacing and placement for the hold down clips based on the size and weight of the ceiling tiles, as well as the manufacturer’s recommendations.
  3. Attach the Clips: Use screws, adhesive, or other fasteners provided with the clips to attach them securely to the ceiling surface. Ensure proper alignment and firm attachment of the clips to prevent movement or dislodging.
  4. Secure the Ceiling Tiles: After installing the clips, carefully position the ceiling tiles over them and firmly press them into place. Ensure you securely and evenly seat the tiles to achieve a uniform appearance.
  5. Test for Stability: After installing the ceiling tiles, gently test them to ensure they are securely held in place by the clips. Make any necessary adjustments or additional installations as needed to achieve the desired stability.

Benefits of Using Ceiling Tile Hold Down Clips

Using ceiling tile hold down clips offers several benefits, including:

  1. Enhanced Stability: Hold down clips provide additional support and stability for ceiling tiles, reducing the risk of sagging, shifting, or falling.
  2. Improved Aesthetic Appearance: By securing ceiling tiles in place, hold down clips help maintain a smooth and uniform ceiling surface, enhancing the overall aesthetic appearance of the space.
  3. Prevention of Damage: Hold down clips help prevent damage to ceiling tiles caused by movement, vibrations, or environmental factors, prolonging the lifespan of the ceiling installation.
  4. Ease of Maintenance: Securely held ceiling tiles are easier to clean and maintain, as they are less likely to become dislodged or damaged during routine maintenance activities.

Conclusion

Ceiling tile hold down clip play a vital role in ensuring the stability, durability, and aesthetic appearance of ceiling installations. By understanding the different types of hold down clips available, the installation process, and the benefits they offer, you can achieve a professional-looking and long-lasting ceiling that enhances the overall functionality and appeal of any space.

Read too: Exploring the Efficiency of Radiant Ceiling Heater Electric: A Comprehensive Guide