Introduction
Ceiling design plays a significant role in enhancing the overall look and feel of a home. One of the most popular choices for homeowners and builders alike is the Poplar Tongue And Groove Ceiling. This type of ceiling not only provides a beautiful and seamless finish but also offers durability, ease of installation, and versatility in design.
Whether you’re considering adding a Poplar Tongue And Groove Ceiling to your living room, porch, or any other part of your home, this article will provide you with a comprehensive guide. We will discuss the benefits, installation process, maintenance tips, and design ideas to help you make an informed decision.
Why Choose a Poplar Tongue And Groove Ceiling?
The Poplar Tongue And Groove Ceiling is a top choice for many homeowners due to its aesthetic appeal and functional benefits. Here are some reasons why you should consider this ceiling option:
1. Natural Beauty and Versatility
Poplar wood has a smooth and even grain, making it an excellent material for creating a polished and refined ceiling look. It also takes stains and finishes well, allowing you to customize it to match your home’s decor.
2. Easy Installation with Tongue and Groove Design
The tongue and groove system ensures that each board fits together seamlessly. This interlocking mechanism provides a tight and secure fit, making installation quicker and more efficient.
3. Durability and Strength
Poplar is known for its durability and resistance to warping, making it a great choice for ceilings. With proper maintenance, a Poplar Tongue And Groove Ceiling can last for decades.
4. Suitable for Interior and Exterior Use
One of the biggest advantages of using poplar wood is its versatility. It works well for both indoor ceilings and outdoor covered spaces, such as porches and patios.
5. Adds Value to Your Home
A well-installed wood ceiling can increase the resale value of your home. The timeless charm of a Poplar Tongue And Groove Ceiling makes it an attractive feature for potential buyers.
How to Install a Poplar Tongue And Groove Ceiling
Installing a Poplar Tongue And Groove Ceiling can be a rewarding DIY project if you have the right tools and some basic woodworking skills. Follow these steps to ensure a smooth installation process:
1: Gather Your Materials and Tools
Before starting, make sure you have the following:
- Poplar tongue and groove boards
- Measuring tape and level
- Saw (miter saw or circular saw)
- Nail gun and finishing nails
- Wood glue (optional for extra hold)
- Ladder or scaffolding
- Protective gear (gloves and safety goggles)
2: Prepare the Ceiling Surface
- Ensure that the ceiling is clean, dry, and level before installing the boards.
- If necessary, install wood furring strips perpendicular to the direction of the boards for added support.
3: Measure and Cut the Boards
- Measure the width and length of the ceiling to determine the required board sizes.
- Cut the poplar boards accordingly, making sure to stagger the seams for a more natural appearance.
4: Begin Installation
- Start in one corner of the room and place the first board with the tongue side facing out.
- Secure the board using a nail gun, driving nails at an angle through the tongue into the furring strips or ceiling joists.
- Slide the next board into place, ensuring a tight fit between the tongue and groove.
- Continue across the entire ceiling, repeating this process until all boards are installed.
5: Finishing Touches
- Fill any nail holes with wood filler for a polished look.
- Sand the surface if needed and apply a stain or clear sealant to enhance the natural beauty of the poplar wood.
Maintenance Tips for a Poplar Tongue And Groove Ceiling
To ensure the longevity and beauty of your Poplar Tongue And Groove Ceiling, follow these maintenance tips:
1. Regular Dusting and Cleaning
- Use a soft cloth or vacuum attachment to remove dust and debris.
- Avoid using excessive moisture, as wood can absorb water and expand.
2. Inspect for Damage Periodically
- Check for signs of warping, cracking, or loose boards.
- If any boards become damaged, replace them promptly to prevent further issues.
3. Reapply Sealant or Finish as Needed
- If your ceiling is exposed to moisture or high humidity, consider reapplying a protective finish every few years.
- This helps to preserve the wood and prevent discoloration.
4. Control Humidity Levels
- Wood naturally expands and contracts with changes in humidity.
- Use a humidifier or dehumidifier to maintain stable indoor moisture levels.
Design Ideas for a Poplar Tongue And Groove Ceiling
A Poplar Tongue And Groove Ceiling can be used in various ways to enhance the ambiance and style of your home. Here are some popular design ideas:
1. Rustic Farmhouse Style
- Use a natural stain or light whitewash to create a cozy, rustic feel.
- Pair it with exposed wooden beams for a traditional farmhouse look.
2. Modern Minimalist Aesthetic
- Opt for a smooth, painted finish in white or neutral tones.
- Complement it with recessed lighting for a clean and modern appeal.
3. Outdoor Porch or Patio Ceiling
- Install a Poplar Tongue And Groove Ceiling on your covered porch or patio for a charming outdoor retreat.
- Choose a weather-resistant stain to protect against moisture and temperature changes.
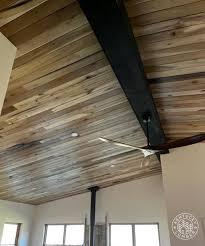
4. Vaulted Ceiling with Wood Accents
- A vaulted ceiling with poplar wood panels creates a sense of spaciousness and elegance.
- Add chandeliers or pendant lighting for a dramatic effect.
Final Thoughts on the Poplar Tongue And Groove Ceiling
A Poplar Tongue And Groove Ceiling is an excellent investment for homeowners looking to enhance the beauty and value of their homes. With its durability, easy installation, and timeless appeal, this ceiling option is perfect for a variety of settings, from cozy living rooms to elegant outdoor spaces.
By following the proper installation and maintenance guidelines, you can enjoy the natural beauty and charm of a Poplar Tongue And Groove Ceiling for many years to come. Whether you prefer a rustic, modern, or classic design, this ceiling style offers endless possibilities to suit your aesthetic preferences.