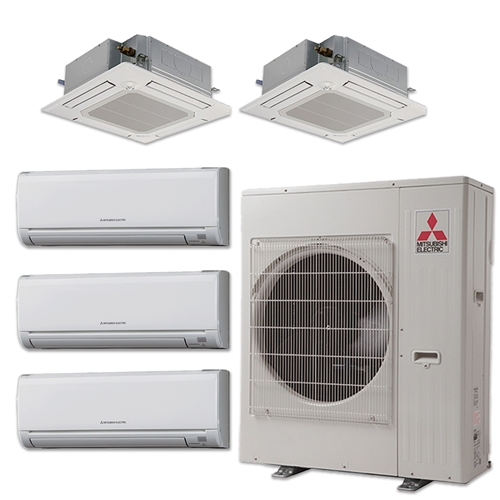
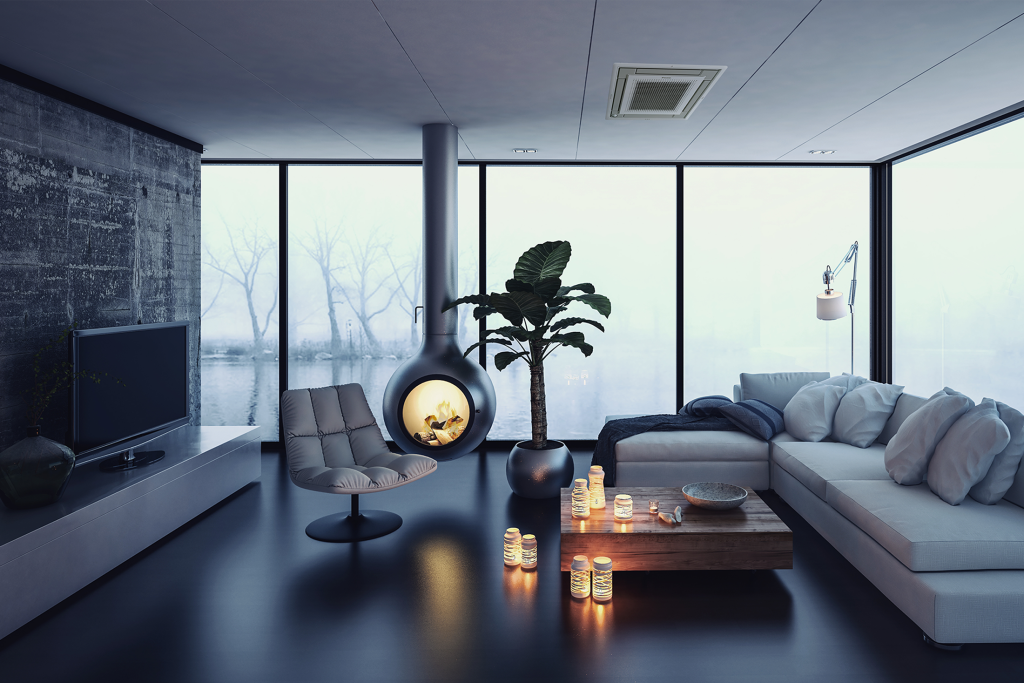
Dealing with Unwanted Guests: Tiny Black Bugs on Walls and Ceiling

Discovering tiny black bugs on your walls and ceiling can be a perplexing and frustrating experience. You might wonder where they came from, what they are, and, most importantly, how to get rid of them. In this article, we will explore the common types of tiny black bugs that infest homes, identify the potential causes of their presence, and discuss effective methods to eliminate and prevent them from returning.

Tiny Black Bugs On Walls And Ceiling

Types of Tiny Black Bugs

To effectively deal with these tiny black intruders, it’s important to identify them. There are several common types of small black bugs that you might encounter:

  1. Black Carpet Beetles: Small oval-shaped insects actively infest carpets and other fabric materials. They can also be discovered on walls and ceilings, especially when actively hunting for food.
  2. Fungus Gnats: These tiny, black insects are often found near houseplants and in damp areas. They can be especially pesky if you have overwatered your plants.
  3. Booklice: Despite their name, booklice are not actual lice and do not bite humans. They are tiny, grayish-black insects that feed on mold and mildew and can be found on walls and ceilings, particularly in humid environments.
  4. Tiny Flies: Small black flies, such as fruit flies and drain flies, are common indoor pests that can be found on walls and ceilings, particularly around food sources and drains.

Read too: How Expensive Are Floor To Ceiling Windows

Identifying the Causes

To address the issue of tiny black bugs on your walls and ceiling, you need to understand the underlying causes:

  1. Food Sources: Many of these insects are attracted to food sources, whether it’s crumbs, spilled liquids, or decaying organic matter.
  2. Humidity and Moisture: High humidity or moisture in your home can create ideal conditions for certain insects, such as fungus gnats and booklice, to thrive.
  3. Plants: If you have indoor plants, the potting soil can provide a breeding ground for pests like fungus gnats.
  4. Leaky Pipes: Leaky pipes or drains can create a damp environment that attracts tiny flies like drain flies.

Effective Methods for Elimination

Once you’ve identified the type of tiny black bugs and the potential causes of their presence, it’s time to take action:

  1. Clean Thoroughly: The first step in eliminating these bugs is to clean your home meticulously. Pay special attention to areas where you’ve seen the bugs and remove any potential food sources.
  2. Inspect Plants: If you have houseplants, inspect the soil for signs of fungus gnats. Allow the soil to dry out between waterings to deter these pests.
  3. Fix Leaks: Address any plumbing leaks or drainage issues in your home to eliminate sources of excess moisture that may attract tiny flies.
  4. Use Traps: For flying insects like fruit flies and drain flies, use traps that can help capture and reduce their numbers.
  5. Insecticides: In severe infestations, you may need to use insecticides specifically designed for the type of bug you’re dealing with. Be sure to follow all safety instructions and consider seeking professional pest control services.

Preventing Future Infestations

To prevent the return of tiny black bugs on your walls and ceiling, consider the following measures:

  1. Maintain Cleanliness: Regularly clean your home to remove potential food sources and reduce the likelihood of infestations.
  2. Monitor Indoor Plants: Be mindful of your houseplants’ moisture levels and ensure proper drainage.
  3. Seal Entry Points: Inspect and seal any cracks or gaps that might allow pests to enter your home.
  4. Ventilation: Ensure good ventilation in areas prone to humidity and moisture to reduce favorable conditions for pests.

Conclusion

Tiny black bugs on your walls and ceiling can be a nuisance, but with proper identification and the right approach, you can eliminate and prevent their presence in your home. Understanding the type of bug and its preferred habitat is key to effective elimination. Keep your home clean, address humidity issues, and take preventive measures to ensure a bug-free living space.

Dealing with Drips: Water Leaking From AC Vent in Ceiling

The sound of water dripping in your home can be concerning, and when it’s coming from an AC vent in your ceiling, it’s a clear sign that something is amiss. This article will guide you through the common causes of water leaking from an AC vent in the ceiling, how to identify the issue, and steps to remedy it.

Water Leaking From Ac Vent In Ceiling

Understanding the Causes

Water leaking from an AC vent is not only annoying but also potentially damaging to your home. To address the issue, you first need to understand what might be causing it:

  1. Condensation Buildup: One of the primary causes of water dripping from AC vents is condensation. When warm, moist air meets the cold air inside your air conditioning system, condensation can form and lead to dripping.
  2. Clogged Drain Line: The AC unit has a drain line that removes excess condensation. If this drain line becomes clogged or damaged, it can lead to water backing up and dripping from the vent.
  3. Refrigerant Leak: A refrigerant leak can cause your AC unit to freeze over, resulting in excess water when it thaws. This water may find its way into the vent.

Identifying the Issue

If you notice water dripping from an AC vent in your ceiling, it’s crucial to identify the root cause. Here are some steps to help you pinpoint the problem:

  1. Inspect the Condensation: Check if the water dripping is clear and cold. If it is, the issue is likely condensation. This usually happens in hot and humid weather.
  2. Examine the Vent Grille: Look at the vent grille and its surroundings. If you see water stains, it can indicate a recurring issue.
  3. Check the AC Unit: Inspect the AC unit, specifically the drain line. Ensure it is not clogged, disconnected, or damaged.
  4. Schedule Professional Inspection: If you’re unable to determine the cause or it involves complex internal components, it’s best to call a professional HVAC technician to inspect your system.

Read too: What To Do About Mice In Ceiling

Remedying the Issue

Once you’ve identified the cause of the water leakage, you can take appropriate steps to remedy it:

  1. Condensation Buildup: If condensation is the problem, you can reduce it by lowering the thermostat temperature or installing a dehumidifier in your home. Proper insulation and sealing ductwork can also help.
  2. Clogged Drain Line: If the drain line is clogged, you can try flushing it with a mixture of water and vinegar or by using a wet/dry vacuum. However, it’s advisable to have a professional handle this to avoid further damage.
  3. Refrigerant Leak: If the issue is a refrigerant leak, you’ll need a professional HVAC technician to locate and repair the leak, then recharge the system with the appropriate refrigerant.

Preventing Future Leaks

To avoid water leaking from your AC vent in the ceiling in the future, consider these preventive measures:

  1. Regular Maintenance: Schedule regular maintenance for your AC system, which should include cleaning the drain line and ensuring proper insulation.
  2. Change Filters: Replace or clean your air filters regularly to ensure the air flows freely through the system, reducing the likelihood of condensation.
  3. Seal Ductwork: Properly seal and insulate ductwork to minimize temperature differences that can lead to condensation.
  4. Monitor the Thermostat: Be mindful of your thermostat settings and make sure they are appropriate for the weather conditions.

Conclusion

Water leaking from an AC vent in your ceiling can be a sign of various issues, from condensation to more severe problems like a refrigerant leak. Identifying the cause is the first step in addressing the issue effectively. While some problems can be resolved with simple maintenance, others may require professional assistance. By taking preventive measures, you can reduce the risk of future leaks and keep your home comfortable and dry.

Dealing with Unwanted Guests: What To Do About Mice In Ceiling

Discovering mice in your ceiling can be a distressing experience for any homeowner. The incessant scratching, scurrying, and gnawing noises they make can keep you up at night, not to mention the potential health hazards they pose. In this article, we’ll explore the various steps you can take to address a mouse infestation in your ceiling, from identifying the problem to effectively eliminating these unwanted guests.

What To Do About Mice In Ceiling

Identifying the Signs of a Mouse Infestation

Before you can address the issue of mice in your ceiling, it’s important to confirm their presence. Here are some common signs that may indicate a mouse infestation:

  1. Audible Noises: Mice are nocturnal creatures, so you may hear them making scratching or squeaking sounds in the ceiling during the night.
  2. Droppings: Mice leave behind small, pellet-like droppings. These can often be found near their nesting areas or along their travel paths.
  3. Gnaw Marks: Mice have a constant need to gnaw on things to keep their teeth from overgrowing. Look for chewed wires, insulation, or other materials in your ceiling.
  4. Nesting Materials: If you find materials like shredded paper, fabric, or insulation in your ceiling, it’s likely that mice are nesting there.

Steps to Address Mice in Ceiling

Once you’ve identified the signs of a mouse infestation in your ceiling, it’s essential to take prompt action. Here’s what you can do:

  1. Seal Entry Points: Mice can enter your home through tiny gaps and holes. Inspect the exterior of your house for any openings and seal them with steel wool or caulk. Focus on areas around pipes, vents, and cables that lead into your ceiling.
  2. Set Traps: Traps are an effective way to catch mice in your ceiling. You can use snap traps, glue traps, or humane live traps, depending on your preference. Place traps in areas where you’ve noticed mouse activity, like near the sounds or droppings.
  3. Use Bait Stations: Bait stations are another option for trapping mice. These stations contain poison baits that can eliminate the mice, but they should be used with caution, especially if you have pets or children.
  4. Monitor and Remove Trapped Mice: Check your traps or bait stations daily, and remove any trapped mice promptly to prevent odors and further infestation. Be sure to wear gloves and dispose of the mice properly.
  5. Professional Pest Control: If the infestation is severe or persists despite your efforts, it’s advisable to seek the assistance of professional pest control services. They have the expertise and tools to address more complex infestations.

Read too: How Expensive Are Floor To Ceiling Windows

Preventing Future Mouse Infestations

To ensure that mice do not return to your ceiling, consider these preventive measures:

  1. Maintain Cleanliness: Keep your home clean and free of food debris. Store food in airtight containers, and clean up crumbs and spills promptly.
  2. Secure Trash: Make sure your trash cans have tight-fitting lids and empty them regularly.
  3. Trim Trees and Bushes: Keep branches and vegetation near your home trimmed to eliminate potential entry points for mice.
  4. Inspect Your Home Regularly: Periodically inspect your home for any potential entry points and seal them to prevent mice from getting in.
  5. Use Peppermint Oil: Mice are known to dislike the smell of peppermint. Placing cotton balls soaked in peppermint oil in your ceiling or around your home may deter them from nesting there.

Conclusion

Mice in your ceiling can be a nuisance and a health hazard. Identifying the signs of an infestation and taking swift action is crucial to address the problem effectively. Use traps, bait stations, or professional pest control services as needed to eliminate the mice, and take preventive measures to ensure they don’t return. With persistence and vigilance, you can regain control of your home and enjoy a mouse-free living space.

Troubleshooting a Water Leak in Ceiling from Washing Machine

Discovering a water leak in your ceiling can be a homeowner’s nightmare. If this leak originates from your washing machine, it’s essential to address it promptly to prevent further damage. In this article, we’ll explore the common causes of a water leak in the ceiling from a washing machine, how to identify the issue, and the steps to remedy it.

Water Leak In Ceiling From Washing Machine

Understanding the Causes

  1. Faulty Hoses
    • One of the most frequent culprits for a water leak from a washing machine is a damaged or loose hose. The hoses that connect your washing machine to the water supply can degrade over time, leading to leaks.
  2. Clogged Drainage
    • If your washing machine’s drainage system is blocked, excess water may not be able to escape, resulting in a backup and potential leakage.
  3. Worn Out Seals
    • Over time, the seals and gaskets in your washing machine can wear out. This can cause water to seep out during the wash or spin cycles.
  4. Overloading
    • Overloading the washing machine can lead to excessive vibration and movement, potentially causing water to spill over the sides and onto the floor, eventually seeping into the ceiling.

Identifying the Issue

If you notice water stains or bulging spots on your ceiling, you’ll want to investigate the problem promptly:

  1. Check the Washing Machine Area
    • Begin by examining the area around your washing machine. Look for puddles of water, dampness, or visible leaks. If you find any of these, follow the water’s path to identify the source.
  2. Inspect Hoses
    • Examine the hoses that connect your washing machine to the water supply and the drainage system. Tighten any loose connections and replace damaged hoses.
  3. Examine the Drainage System
    • Inspect the drainage system, including the drain hose and the standpipe or sink where the water drains. Ensure there are no clogs or blockages.
  4. Run a Test Cycle
    • To test if your washing machine is the source of the leak, run a small load of laundry. Observe the machine closely during the wash and spin cycles to identify any leakage.
  5. Check for Ceiling Damage
    • Finally, inspect your ceiling for signs of water damage. Look for water stains, discoloration, sagging, or peeling paint.

Remedying the Water Leak

Once you’ve identified the cause of the water leak in the ceiling from your washing machine, it’s time to take action:

  1. Replace Damaged Hoses
    • If the hoses are the problem, replace them with new ones. It’s a good practice to use stainless steel braided hoses, as they are more durable and less prone to leaks.
  2. Clear Drainage Blockages
    • If a clogged drainage system is to blame, clear the blockage by disconnecting the drain hose and removing any debris or buildup. You may need a plumber’s snake or a similar tool to clear obstructions in the pipes.
  3. Inspect and Replace Seals
    • For worn-out seals and gaskets, you may need to disassemble parts of your washing machine to access and replace them. Consult your washing machine’s manual for guidance, or consider seeking professional assistance.
  4. Proper Loading
    • To prevent leaks caused by overloading, make sure you’re not exceeding the recommended capacity of your washing machine. Distribute the load evenly inside the drum to minimize vibration.
  5. Ceiling Repairs
    • If your ceiling has sustained damage from the water leak, you’ll need to address it promptly. This might involve cutting out damaged sections, replacing insulation, and repainting. It’s advisable to consult a professional for ceiling repairs.

Preventing Future Leaks

To avoid a water leak in the ceiling from your washing machine in the future, consider the following preventive measures:

  1. Regular Maintenance
    • Perform routine maintenance on your washing machine, including checking hoses, seals, and drainage components. Replace any worn or damaged parts promptly.
  2. Use a Drain Pan
    • Placing a drain pan beneath your washing machine can help contain any potential leaks, preventing water from reaching the ceiling.
  3. Monitor Loads
    • Be mindful of the size and weight of your laundry loads. Overloading the machine can lead to excessive wear and tear.

Conclusion

A water leak in the ceiling from your washing machine can be a source of stress, but with the right knowledge and actions, you can address the issue and prevent future leaks. Regular maintenance, prompt identification of problems, and proper loading practices are essential for keeping your washing machine and your home in top condition. If you encounter a significant issue or are unsure about repairs, it’s always a good idea to consult with a professional for assistance.

Demystifying Garage Door Dimensions: Minimum Ceiling Height for a 7′ Garage Door

When it comes to garage doors, one of the critical considerations is the available headroom or the ceiling height. If you’re thinking about installing a 7-foot garage door, you may be wondering about the minimum ceiling height required. In this article, we’ll delve into the dimensions, the importance of the ceiling height, and factors to consider when planning for your garage door.

Minimum Ceiling Height For 7' Garage Door

Understanding Garage Door Dimensions

Garage doors come in various dimensions, and the height is a crucial factor. A 7-foot garage door, often known as a standard 7′ door, is a popular choice for residential garages. It provides adequate clearance for most vehicles and is considered the standard for single-car garage doors.

Minimum Ceiling Height for a 7′ Garage Door

The minimum ceiling height required for a 7-foot garage door is typically 8 feet. This measurement includes the space needed for the door’s installation and operation. Here’s the breakdown:

  1. 7 Feet for the Door: The garage door itself is 7 feet in height.
  2. Additional Clearance: To ensure smooth and safe operation, an additional foot of clearance is necessary. This accounts for the door’s track, opener mechanism, and space for the door to open and close without obstruction.
  3. Header Space: The header space, which is the structural support above the garage door, also requires space. This space accommodates the torsion or extension springs, which are essential for counterbalancing the weight of the door.
  4. Opener Mechanism: If you plan to install a garage door opener, you’ll need extra clearance for this equipment, as well as for the garage door’s operation.

Factors to Consider

When determining if your garage has the minimum required ceiling height for a 7′ door, keep the following factors in mind:

  1. Existing Ceiling Height: Measure the existing ceiling height in your garage. If it’s at least 8 feet, you should have sufficient space for a 7′ garage door. However, it’s always a good idea to consult with a professional for an accurate assessment.
  2. Ceiling Obstructions: Be aware of any obstructions in your garage’s ceiling space, such as ductwork, beams, or storage platforms. These obstructions may affect the clearance needed for the door and opener.
  3. Torsion Springs vs. Extension Springs: The type of springs used for your garage door can impact the required headroom. Torsion springs are typically installed horizontally above the door, while extension springs run vertically on both sides of the door. Torsion springs often require less vertical space.
  4. Low-Headroom Kits: In cases where your garage ceiling height is limited, low-headroom kits are available. These kits modify the track and spring system to reduce the required clearance. However, they may not be suitable for all situations and can affect the door’s performance.

Read too: Why Is My Ceiling Fan Leaking Water

Conclusion:

Ensuring the minimum ceiling height for a 7′ garage door is essential for the safe and efficient operation of your garage door system. Adequate headroom allows for the door to open and close smoothly, accommodating your vehicle and any additional equipment you choose to install. Before proceeding with a 7′ garage door installation, it’s advisable to consult with a professional to assess your specific garage and ceiling height to guarantee a successful and hassle-free setup.

Dealing with a Water Stain on the Ceiling But No Leak in Sight

Discovering a water stain on your ceiling can be a cause for concern. However, what’s perplexing is when you notice a water stain on the ceiling but no leak seems to be evident. In this article, we will explore the potential causes of such stains, the importance of addressing them, and how to tackle this puzzling issue.

Water Stain On Ceiling But No Leak

Understanding the Mysterious Water Stain

Water stains on the ceiling can be a distressing sight, prompting homeowners to fear the worst – a leaky roof or plumbing issue. However, when there’s no visible sign of water infiltration from the ceiling or above, it can be challenging to identify the source of the problem.

Potential Causes of Water Stains on the Ceiling

Several factors can lead to water stains on your ceiling, even when there’s no visible leak:

  1. Previous Leaks: Sometimes, a water stain may be a lingering effect of a past leak that has since been repaired. Stains can persist even after the source of the issue has been addressed.
  2. Condensation: Moisture in the air can condense on the ceiling’s surface, leading to water stains. This often occurs in areas with poor ventilation or during extreme temperature fluctuations.
  3. Roofing Issues: Roof problems, such as inadequate flashing or damaged shingles, can allow water to seep in, travel through the structure, and surface as a stain in an unexpected location.
  4. Plumbing Condensation: If there are water pipes running through the ceiling, condensation can form on the pipes’ surface, causing water stains on the ceiling below.
  5. Exterior Wall Leaks: Leaks in the exterior walls, such as from windows or siding, can allow water to enter and travel within the wall, ultimately appearing as stains on the ceiling.

Importance of Addressing Water Stains

Ignoring water stains on the ceiling is not advisable, even if there is no visible leak. Here’s why addressing them is crucial:

  1. Structural Damage: Water stains can indicate underlying structural damage, including rotting wood, deteriorating drywall, or compromised insulation.
  2. Mold and Mildew Growth: Moisture from the stain can encourage the growth of mold and mildew. These microorganisms can be harmful to your health and difficult to eradicate once they take hold.
  3. Aesthetic Concerns: Even if there’s no active leak, water stains can be unsightly and negatively impact the appearance of your home.

Read too: Why Is My Ceiling Fan Leaking Water

Dealing with Water Stains on the Ceiling

To address water stains on the ceiling with no apparent leak, follow these steps:

  1. Identify the Source: Begin by ruling out any possible sources of water infiltration, such as plumbing or roof issues. Consult with professionals if needed.
  2. Inspect Attic or Crawlspace: Check the attic or crawlspace above the affected area. Look for signs of past or ongoing leaks.
  3. Ventilation Improvement: Ensure that the room is adequately ventilated to minimize condensation. Use exhaust fans in areas prone to moisture, like bathrooms and kitchens.
  4. Address Exterior Issues: If the stain is near an exterior wall, inspect the area for potential leaks from windows, doors, or siding. Seal any gaps or leaks.
  5. Repainting or Repairing: Once you’ve identified and resolved the source of the issue, you can consider repainting or repairing the stained ceiling.

Conclusion:

Water stains on the ceiling, even when no leak is visible, require attention. They can indicate underlying problems that, if left unaddressed, may lead to structural damage and health concerns. By identifying the source of the stain and taking necessary steps to resolve it, you can maintain the integrity and appearance of your home.

A Clear View to Luxury: How Expensive Are Floor To Ceiling Windows?

How Expensive Are Floor To Ceiling Windows? When it comes to architectural aesthetics and maximizing natural light, floor-to-ceiling windows are an attractive choice for homeowners and designers alike. But with their undeniable allure, there’s a question that often comes to mind: just how expensive are floor-to-ceiling windows? In this article, we’ll explore the factors that impact the cost of these stunning window designs and help you understand what to expect when considering them for your home.

How Expensive Are Floor To Ceiling Windows

Understanding Floor-to-Ceiling Windows

Floor-to-ceiling windows, as the name suggests, are expansive windows that stretch from the floor to the ceiling of a room. These windows offer several benefits:

  1. Abundant Natural Light: The primary advantage is the abundant natural light they bring into a space. This not only enhances the overall ambiance but can also reduce energy costs by minimizing the need for artificial lighting during the day.
  2. Stunning Views: Floor-to-ceiling windows often provide stunning panoramic views, making them a popular choice in homes with scenic surroundings.
  3. Architectural Statement: They serve as an architectural statement, adding a modern, spacious, and luxurious feel to any room.

Now, let’s delve into the factors that impact the cost of floor-to-ceiling windows.

Factors Affecting the Cost

The cost of floor-to-ceiling windows can vary widely based on several key factors:

  1. Size: The size of the windows is one of the most significant factors influencing the cost. Larger windows require more materials and labor, which drives up the price.
  2. Materials: The choice of materials for the frames and glass affects the cost. High-quality, energy-efficient glass and durable frame materials will come at a premium.
  3. Installation: The complexity of the installation can affect the cost. If significant structural modifications are necessary, such as removing walls or reinforcing the structure, the installation cost will increase.
  4. Location: The location of your home can also impact the cost. Homes in urban areas with high living costs may see higher installation prices.
  5. Energy Efficiency: If you opt for energy-efficient glass that helps regulate indoor temperature, you may incur additional expenses. However, this can lead to long-term energy savings.

Average Cost Ranges

On average, the cost of floor-to-ceiling windows can range from $700 to $1,600 per linear foot. This cost includes both the materials and labor. For a standard-sized room with an 8-foot ceiling height, you can expect to pay between $5,600 and $12,800 for floor-to-ceiling windows.

It’s important to note that this is a general range, and the final cost may differ significantly based on the factors mentioned earlier. To get an accurate estimate, it’s advisable to consult with window professionals or contractors who can assess your specific requirements.

Read too: How To Fix Water Bubble In Ceiling

Additional Considerations

When considering floor-to-ceiling windows, keep these additional considerations in mind:

  1. Maintenance Costs: High-quality materials often require less maintenance, but it’s important to budget for occasional cleaning and upkeep.
  2. Window Coverings: You may need window coverings for privacy, light control, and energy efficiency. Consider these costs when budgeting.
  3. Local Regulations: Check local building codes and regulations, as they may impact the design and cost of your windows.

Conclusion:

Floor-to-ceiling windows bring luxury, style, and natural light to your home, but they come at a cost. By understanding the factors that influence the price and carefully budgeting for the installation, you can make an informed decision about incorporating these stunning windows into your living space. While they may be an investment, the aesthetic and functional benefits they offer can be well worth the expense, adding value and sophistication to your home.

Unveiling the Costs: How Much To Skim Coat A Ceiling?

How Much To Skim Coat A Ceiling? A well-maintained ceiling adds elegance to any room, and one of the ways to achieve a smooth, flawless ceiling surface is through skim coating. If you’re considering this process, it’s important to understand the costs involved. In this article, we’ll explore the factors that influence the cost of skim coating a ceiling and provide you with valuable insights into budgeting for this home improvement project.

How Much To Skim Coat A Ceiling

Understanding the Skim Coating Process

Skim coating is a technique used to create a smooth and even surface on a ceiling or wall. It involves applying a thin layer of joint compound or plaster to the existing surface, filling imperfections, and creating a blank canvas for painting or further finishing. Skim coating is typically required when the ceiling has imperfections such as cracks, texture, or unevenness, or when you want to achieve a modern, smooth finish.

Factors That Influence Skim Coating Costs

The cost of skim coating a ceiling can vary depending on several factors:

  1. Ceiling Size: The larger the ceiling, the more materials and labor will be required. Ceiling area is a significant factor in determining the cost.
  2. Ceiling Condition: The existing condition of the ceiling plays a crucial role. If the ceiling has significant damage or texture that needs removal, it will require more effort and material, increasing the cost.
  3. Labor Costs: Skim coating is a labor-intensive process. Labor costs can vary based on location and the complexity of the job.
  4. Materials: The type of joint compound or plaster used can affect costs. Higher-quality materials may cost more but can result in a smoother finish.
  5. Additional Repairs: If additional repairs are needed, such as fixing cracks, holes, or water damage, these will add to the overall cost.
  6. Ceiling Height: High ceilings can be more challenging to work on and may require specialized equipment, which can increase costs.

Read too: Why Is My Ceiling Fan Leaking Water

Estimating the Cost

To get an accurate estimate for skim coating your ceiling, consider the following steps:

  1. Measure the Ceiling: Measure the length and width of the ceiling to determine the square footage.
  2. Assess Ceiling Condition: Evaluate the condition of the ceiling. Take note of any imperfections that need to be addressed.
  3. Request Multiple Quotes: Contact several contractors or professionals for quotes. Be sure to provide them with accurate measurements and details about the ceiling’s condition.
  4. Ask for a Breakdown: Request a breakdown of the quote to understand how the costs are distributed, including labor, materials, and any additional repairs.

Average Cost Ranges

On average, the cost of skim coating a ceiling can range from $1 to $2 per square foot. For a 200-square-foot ceiling, this translates to a cost of $200 to $400. However, keep in mind that prices can vary significantly based on the factors mentioned earlier.

Additional Considerations

When budgeting for skim coating, consider the following:

  1. Painting Costs: Skim coating is typically done before painting, so budget for painting costs as well.
  2. Quality vs. Price: Don’t always choose the lowest price. The quality of work and materials can make a significant difference in the final result.
  3. DIY vs. Professional: While some homeowners attempt to skim coat ceilings themselves, it can be a challenging and time-consuming task. Hiring a professional can ensure a smoother finish.

Conclusion:

Skim coating your ceiling can transform the look of a room, but it’s important to budget for this project properly. Understanding the factors that influence the cost and getting multiple quotes from professionals will help you make an informed decision. With the right investment, you can enjoy a beautifully smooth and flawless ceiling that enhances your home’s aesthetics.

Why Is My Ceiling Fan Leaking Water – Causes and Solutions

Ceiling fans are a popular addition to homes for their cooling effects, energy efficiency, and aesthetic appeal. However, encountering a ceiling fan leaking water can be puzzling and concerning. In this article, we will explore the various reasons why your ceiling fan might be leaking water and provide practical solutions to address this issue effectively. Let’s dive into the world of ceiling fan leaks.

Why Is My Ceiling Fan Leaking Water

Understanding Ceiling Fan Leaks

A ceiling fan leaking water is a manifestation of an underlying problem. It’s not a common occurrence, but when it happens, it requires immediate attention. Here are some common causes of water leaks from ceiling fans:

  1. Roof Leaks One of the primary reasons for water leaks from a ceiling fan is a roof leak. When it rains, water can infiltrate through damaged shingles, cracked flashing, or deteriorated roof sealant. This water can travel through the ceiling and end up dripping from the ceiling fan. If left unattended, it can lead to more significant issues, including ceiling and electrical damage.
  2. Condensation In some cases, ceiling fan leaks are a result of condensation. When warm, moist air contacts the blades of a ceiling fan, it can create condensation. If this moisture isn’t properly managed, it may accumulate and eventually drip down from the fan. This is more common in humid climates or poorly ventilated spaces.
  3. Plumbing Issues Ceiling fans located near plumbing fixtures, like bathrooms, may experience leaks due to plumbing issues. A leaky pipe or a poorly sealed connection can cause water to seep into the ceiling, eventually making its way to the fan.

Solving the Ceiling Fan Leaking Water Problem

Now that we’ve identified potential causes of ceiling fan leaks, let’s explore how to address and resolve this issue.

  1. Inspect the Roof If you suspect a roof leak is the culprit, the first step is to inspect your roof. Look for missing or damaged shingles, deteriorated flashing, or signs of water damage in your attic. If you find any issues, it’s essential to repair them promptly. This may require the expertise of a professional roofer, especially if the problem is extensive.
  2. Manage Condensation To address condensation-related ceiling fan leaks, ensure proper ventilation in your home. Use exhaust fans in bathrooms and kitchens to remove excess moisture. Additionally, you can consider installing a dehumidifier to maintain the humidity at an acceptable level.
  3. Check Plumbing If you suspect plumbing issues, examine the pipes and connections near the ceiling fan. Look for signs of water damage, such as water stains or wet spots. If you find any leaks, repair or replace the damaged plumbing components.
  4. Ceiling Fan Inspection Inspect the ceiling fan itself for any damage or signs of water infiltration. If the fan’s motor or electrical components have been exposed to water, it may need replacement or professional repair. Ensure the fan is properly installed and balanced to prevent further issues.

Preventing Future Ceiling Fan Leaks

Prevention is often the best strategy to avoid ceiling fan leaks:

  1. Regular Roof Maintenance Schedule regular roof inspections and maintenance to catch and repair issues before they lead to leaks.
  2. Good Ventilation Properly ventilate your home to manage humidity and condensation. This can help prevent water accumulation on your ceiling fan.
  3. Prompt Repairs Address any signs of water damage or leaks promptly. Delaying repairs can lead to more extensive problems and costly repairs.

Read too: Why Is My Ceiling Leaking Brown Water

Conclusion

A ceiling fan leaking water is a situation that requires your immediate attention. By understanding the potential causes and implementing the appropriate solutions, you can resolve the issue effectively. Regular maintenance, prompt repairs, and proper ventilation are key to preventing future ceiling fan leaks. Remember that safety should always be a priority, and if you’re uncertain about the cause or how to fix the issue, consult with a professional for guidance and assistance.

Water Spot On Ceiling After Heavy Rain – Causes and Solutions

A water spot on your ceiling after heavy rain can be a cause for concern, and it’s not something you should ignore. While it may seem like a minor issue, it can lead to more significant problems if left unaddressed. In this article, we will explore the common causes of water spots on ceilings after heavy rain and provide practical solutions to tackle this issue effectively.

Water Spot On Ceiling After Heavy Rain

Understanding Water Spots on Ceiling

Water spots on the ceiling are often telltale signs of a leak or water infiltration. These spots can vary in size, from small discolored patches to larger, more noticeable marks. When they appear after heavy rain, it’s a clear indication that water from the rain has made its way into your home. Here are the common reasons behind these water spots:

  • Roof Leaks Heavy rain can expose weaknesses in your roof, leading to leaks. This is particularly true if your roof is old or hasn’t been properly maintained. Water can find its way through damaged shingles, gaps in the flashing, or compromised sealant around roof penetrations like chimneys and vents.
  • Damaged Gutters and Downspouts Faulty gutters and downspouts can exacerbate the problem. If they are clogged, broken, or improperly installed, rainwater may overflow or spill close to your home’s foundation. This excess water can seep into the walls and find its way to your ceiling.
  • Attic Condensation Sometimes, water spots on the ceiling aren’t related to external leaks. Poor attic ventilation and insulation can lead to condensation issues. When warm, moist air from inside your home rises into a cold attic, it can condense and cause water spots on the ceiling.

Dealing with Water Spots on Ceiling

Now that we understand the potential causes of water spots on the ceiling, it’s time to explore how to address and prevent this issue.

  1. Identify the Source of the Leak The first step in addressing water spots on the ceiling is to identify the source of the leak. This may involve inspecting your attic or crawl space, checking the roof, and examining your gutters and downspouts. Look for signs of water damage, such as wet insulation, stained rafters, or mold growth. Once you’ve pinpointed the source, you can take appropriate action to fix it.
  2. Repair Roof Leaks If your roof is the source of the problem, it’s essential to repair it promptly. Depending on the severity of the damage, you may need to replace missing or damaged shingles, repair flashing, or reseal vulnerable areas. Consider hiring a professional roofer to ensure the job is done correctly.
  3. Maintain Gutters and Downspouts Regular maintenance of your gutters and downspouts is crucial. Clean them at least twice a year to remove debris and ensure proper water flow. Inspect for any damage and repair or replace damaged sections. Ensure that downspouts direct water away from your home’s foundation.
  4. Improve Attic Ventilation and Insulation To prevent attic condensation, ensure your attic is properly ventilated and insulated. This will help regulate temperature and humidity, reducing the likelihood of moisture buildup. Installing ridge and soffit vents and adding more insulation can make a significant difference.

Read too: What To Do With Ceiling After Removing Popcorn

Conclusion

A water spot on the ceiling after heavy rain is not something to be taken lightly. It’s a clear sign of water infiltration and potential damage to your home. By identifying the source of the leak and taking appropriate steps to address it, you can prevent further issues and maintain the integrity of your home. Regular maintenance of your roof, gutters, and attic is key to preventing water spots and the problems they represent. Don’t wait; tackle this issue promptly to keep your home in top condition.

How To Fix Water Bubble In Ceiling – A DIY Guide

A water bubble in the ceiling can be an alarming sight. It not only compromises the aesthetics of your home but also indicates a potential water leak or damage that needs immediate attention. Fixing a water bubble in the ceiling can be a DIY project if the problem is caught early and the damage is not extensive. In this article, we’ll guide you through the steps to address this issue effectively, from identifying the root cause to repairing the damage. Let’s get started.

How To Fix Water Bubble In Ceiling

Identifying the Problem

Before you can fix a water bubble in your ceiling, you need to identify the root cause. Water bubbles occur when water accumulates between the paint or drywall and the ceiling surface. This can happen due to various reasons, including:

  1. Leaky Roof: One of the most common reasons for water bubbles in the ceiling is a leaky roof. When your roof is compromised, rainwater can seep into the attic and then make its way down to the ceiling.
  2. Plumbing Issues: Faulty plumbing, such as a burst pipe or a leaky connection, can also lead to water bubbles in the ceiling. In this case, the water might come from above or adjacent to the ceiling.
  3. Condensation: In some cases, condensation can accumulate and create bubbles in the ceiling. This is more common in high-humidity environments or bathrooms without proper ventilation.

Locating the Source of the Leak

To effectively fix the water bubble in your ceiling, you need to find the source of the leak. Here’s how you can do it:

  1. Inspect the Attic: If you suspect a leaky roof, start by inspecting your attic. Look for wet spots or signs of water infiltration on the attic floor or the rafters. This can help you pinpoint the area where the water is entering.
  2. Check Plumbing: If you suspect a plumbing issue, turn off the water supply to your home and check for any dampness or leaks near the plumbing fixtures. This can help you identify the source of the problem.
  3. Look for Stains: Water stains on your ceiling can also provide clues about the source of the leak. The stain will typically be located close to the water bubble.

Repairing the Water Bubble

Once you’ve identified the source of the leak, it’s time to fix the water bubble in your ceiling. Here’s a step-by-step guide to repairing the damage:

  1. Gather Your Supplies: You’ll need a utility knife, a bucket, a plastic drop cloth, a putty knife, sandpaper, primer, paint, and a paint roller. Make sure to wear safety goggles and gloves during the process.
  2. Protect the Area: Lay the plastic drop cloth on the floor beneath the water bubble. This will catch any falling debris and water, making cleanup easier.
  3. Drain the Water: Use the utility knife to puncture the water bubble gently. Allow the water to drain into the bucket. If the bubble is large, be prepared for a significant amount of water.
  4. Let it Dry: After draining the water, allow the area to dry completely. This might take a few hours or even a day, depending on the extent of the damage.
  5. Scrape and Sand: Once the area is dry, use the putty knife to scrape away any loose or damaged drywall or paint. Then, sand the area to create a smooth surface for repairs.
  6. Apply Primer: Apply a layer of primer to the damaged area. This will help seal the surface and prepare it for painting.
  7. Paint the Ceiling: After the primer has dried, use a paint roller to apply a matching paint color to the ceiling. Make sure to blend the new paint with the surrounding area to create a seamless finish.
  8. Inspect for Additional Leaks: After the repair is complete, closely monitor the area for signs of additional leaks. If the problem persists, it’s crucial to address the underlying issue.

Preventing Future Water Bubbles

To prevent future water bubbles in your ceiling, consider these preventative measures:

  1. Regular Roof Inspections: Schedule regular inspections of your roof to catch and fix any issues early.
  2. Maintain Plumbing: Check and maintain your plumbing regularly to prevent leaks.
  3. Improve Ventilation: If condensation is a recurring issue, consider improving ventilation in the affected area.

Read too: What Does Water Damage Look Like On Ceiling

Conclusion

Fixing a water bubble in your ceiling is a manageable DIY project if you act promptly and address the underlying issue. Identifying the source of the leak, repairing the damage, and taking preventative measures can help maintain the integrity and appearance of your ceiling. By following the steps outlined in this article, you can resolve the issue and ensure a dry and beautiful home.

Mystery Solved: The Brown Stain on the Ceiling but No Leak

Discovering a brown stain on your ceiling can be a cause for concern. You might naturally assume it’s a sign of a roof leak, but what if there’s no visible water source above it? In this article, we’ll delve into the perplexing issue of a brown stain on the ceiling but no leak, exploring the possible causes and solutions to this common homeowner’s dilemma.

Brown Stain On Ceiling But No Leak
Water leaking from ceiling make damaged lamp

The Puzzle of the Unexplained Stain

It’s not uncommon for homeowners to find mysterious brown stains on their ceilings. While these stains often suggest water damage, there are instances where no apparent leak is present. When you’re faced with such a situation, it’s essential to investigate the potential causes and address the issue promptly to prevent further damage to your home.

Understanding the Possible Causes

There are several factors that can lead to a brown stain on the ceiling without an obvious leak. Let’s explore some of the most common culprits:

1. Condensation Issues:

Condensation can occur when warm, moist air meets a cooler surface, such as a cold ceiling. This moisture can lead to discoloration of the ceiling paint or drywall, creating a brown stain. The presence of condensation can be a sign of poor ventilation in your home, particularly in areas like bathrooms or kitchens.

2. Roofing Nail Bleed-Through:

In some cases, the brown stain might be related to the construction of your home. If roofing nails were used in the ceiling framing, over time, the metal can rust, causing the stain to seep through the ceiling material. This is a cosmetic issue rather than a structural one.

3. HVAC System Problems:

Your home’s heating, ventilation, and air conditioning (HVAC) system can sometimes be the source of the problem. Ductwork or pipes near the ceiling may develop condensation or minor leaks, which can result in brown stains on the ceiling below.

4. Old Water Damage:

The stain might be the result of a historical water leak that occurred in the past. Even if the leak was repaired, the residual effects can appear as a brown stain on the ceiling. This can happen if the ceiling material was not adequately repaired or replaced after the initial water damage.

Diagnosing the Issue

1. Check for Active Leaks:

The first step is to rule out any potential sources of water leakage. Inspect the area above the stain, such as the attic or roof, during or after rain to ensure there is no active leak. Also, examine plumbing fixtures and HVAC components for any signs of water escape.

2. Monitor Weather Conditions:

Keep an eye on the stain’s appearance in different weather conditions. If it only appears during certain weather conditions, it’s more likely to be condensation-related.

3. Assess Your Home’s Ventilation:

Consider the ventilation in your home, especially in areas with frequent moisture, like bathrooms and kitchens. Improving ventilation, such as using exhaust fans, can help reduce condensation-related stains.

Addressing the Issue

1. Repaint or Repair the Ceiling:

In cases where the stain is caused by nail bleed-through or old water damage, you can opt to repaint the affected area. Use a stain-blocking primer to prevent the stain from bleeding through the new paint.

2. Improve Ventilation:

Enhance ventilation in moisture-prone areas to reduce condensation issues. Installing exhaust fans, dehumidifiers, or increasing airflow can help alleviate the problem.

3. Seek Professional Help:

If the issue persists or you’re unsure of the cause, it’s advisable to consult a professional contractor or home inspector. They can assess the situation, identify the cause, and recommend appropriate repairs.

Read too: Why Is My Ceiling Leaking Brown Water

Conclusion

A brown stain on the ceiling without an apparent leak can be a puzzling situation for homeowners. While it may not always be a sign of an active water leak, it’s crucial to investigate the cause and take appropriate action. By understanding the potential culprits and addressing the issue promptly, you can maintain the integrity and appearance of your home while ensuring a safe and comfortable living environment.

Decoding the Mystery: Why Is My Ceiling Leaking Brown Water?

When you discover your ceiling leaking brown water, it’s not only concerning but also puzzling. What causes this unusual occurrence, and what should you do about it? In this article, we will unravel the mystery behind the brown water dripping from your ceiling. We’ll explore the potential causes and guide you on how to address this issue effectively.

Why Is My Ceiling Leaking Brown Water

Understanding the Issue: Brown Water Leakage

The sight of brown water dripping from your ceiling can be alarming. To understand why this happens, we need to explore the possible causes and implications.

The Role of Water Stains

Water stains are often the first sign of a ceiling leak. They appear as discolored patches on the ceiling and can vary in color, from pale yellow to dark brown. Brown water stains are particularly concerning, as they may indicate a long-standing issue that requires immediate attention.

Common Causes of Brown Water Leakage

Roof Damage: A damaged or aging roof is a common cause of water leakage. Over time, shingles may deteriorate, leading to water infiltration during rain or snow.

  1. Leaking Pipes: Faulty or burst pipes within the ceiling or walls can also cause brown water to seep through. The water’s interaction with materials can lead to the brown coloration.
  2. Attic Condensation: Excessive moisture in your attic, often due to poor ventilation, can condense on the ceiling, creating brown water stains.
  3. Water Damage: Previous water damage that was not adequately repaired can resurface, leading to brown water leakage.

Consequences of Brown Water Leakage

Brown water leakage can have various consequences, making it a problem that should be addressed promptly:

  1. Structural Damage: Prolonged leakage can weaken the structural integrity of your ceiling and the surrounding areas, potentially leading to costly repairs.
  2. Mold and Mildew: Excess moisture from brown water leakage can foster the growth of mold and mildew, posing health risks and requiring thorough remediation.
  3. Aesthetics: The unsightly brown water stains can significantly affect the visual appeal of your home, reducing its value.

Addressing Brown Water Leakage

Now that we’ve examined the causes and potential consequences of brown water leakage, it’s crucial to know how to address the issue effectively.

  1. Identify the Source: Begin by identifying the source of the leak. Is it coming from the roof, a damaged pipe, or the attic? Accurately pinpointing the origin is essential for effective repairs.
  2. Temporary Measures: While awaiting professional assistance, consider placing buckets or containers to collect the dripping water. This can prevent further damage to your ceiling and property.
  3. Roof Inspection: If the issue is related to your roof, have it inspected and repaired by a professional roofer. They can assess the damage and recommend appropriate solutions.
  4. Plumbing Repairs: In the case of leaking pipes, a plumber should be called to address the issue and replace or repair damaged sections.
  5. Attic Ventilation: If attic condensation is the problem, improve ventilation to reduce moisture buildup. Proper insulation and ventilation can prevent future issues.

Conclusion

Brown water leaking from your ceiling is a situation that demands immediate attention. It can have serious consequences for your home’s structural integrity, aesthetics, and even your health. Understanding the potential causes and taking swift action to address the issue is crucial. Remember that prevention and early intervention are key to keeping your home free from brown water leaks and ensuring the safety and comfort of your living space.

Dealing with Water Dripping From Ceiling Vent in Winter: Causes and Solutions

As the winter months settle in, homeowners often encounter unexpected challenges. One such issue that can be perplexing and alarming is water dripping from the ceiling vent in winter. This article will delve into the reasons behind this phenomenon, potential consequences, and most importantly, how to address it effectively. Let’s explore the causes and solutions for water dripping from your ceiling vent during the cold season.

Water Dripping From Ceiling Vent In Winter

Understanding the Issue: Water Dripping from Ceiling Vents

During winter, seeing water dripping from your ceiling vent can be an unsettling experience. To understand why this occurs, we need to look at the various factors that contribute to this situation.

The Role of Condensation

Condensation plays a significant role in the water dripping from your ceiling vent. During winter, the contrast between the cold outdoor temperatures and the warm indoor air can lead to condensation. This moisture can accumulate within your ventilation system and eventually find its way to the ceiling vents.

Common Causes of Water Dripping from Ceiling Vents

  1. Inadequate Insulation: Poor insulation in your attic or ceiling can allow warm, moist air to escape into the attic space. When this warm air meets the cold surfaces of the vent and ductwork, condensation occurs.
  2. Blocked Vents: Another potential cause is blocked or restricted vents. This can hinder the proper airflow in your ventilation system, leading to condensation and water dripping.
  3. Inadequate Ventilation: Improper attic ventilation can also contribute to the problem. When moist air is trapped in the attic due to insufficient ventilation, it can lead to condensation and, ultimately, water dripping from the ceiling vent.

Consequences of Water Dripping from Ceiling Vents

Water dripping from the ceiling vent can have several consequences, some of which can be quite concerning:

  1. Damage to Your Ceiling: The constant dripping of water can lead to unsightly water stains and damage to your ceiling’s paint and structure.
  2. Mold and Mildew Growth: Excess moisture can create the perfect environment for mold and mildew to thrive, potentially leading to health issues and the need for costly remediation.
  3. Reduced Insulation Effectiveness: If your attic insulation gets wet, it loses its effectiveness, making your home less energy-efficient and potentially resulting in higher heating costs.

Solutions to Address Water Dripping from Ceiling Vents

Now that we’ve explored the causes and potential consequences of water dripping from ceiling vents, it’s essential to know how to address the issue effectively.

  1. Improve Insulation: Enhance the insulation in your attic or ceiling to prevent warm air from escaping into the attic space. Proper insulation helps maintain a temperature barrier and reduces the likelihood of condensation.
  2. Clear Blocked Vents: Ensure that all vents in your home are free from obstructions. Blocked vents can disrupt the airflow, leading to condensation. Regularly check and clear any debris or obstacles.
  3. Enhance Attic Ventilation: Proper attic ventilation is crucial to allow moist air to escape, preventing condensation. Consider installing or improving attic vents to promote better airflow.

Conclusion

Water dripping from the ceiling vent in winter can be a concerning issue, but understanding the causes and implementing effective solutions can help you address the problem and prevent further damage. Regular maintenance, insulation checks, and ensuring proper ventilation are essential steps in keeping your home comfortable and moisture-free during the cold season. By taking action to mitigate the issue, you can enjoy a warm and dry winter indoors.

Why Do I Have Mold On My Ceiling: Causes and Solutions

Mold on the ceiling can be a common and frustrating issue for many homeowners. It’s not only unsightly but can also be a health hazard if left unaddressed. In this article, we will explore the reasons behind the presence of mold on your ceiling, the potential health risks associated with it, and most importantly, how to get rid of it. Let’s dive into the world of ceiling mold and find out what causes it and how to prevent it.

Why Do I Have Mold On My Ceiling

Understanding Mold: The Silent Intruder

Mold, a type of fungi, thrives in moist and humid environments. It’s not always easy to spot, as it often grows in hidden or less frequently visited areas of the home. Ceiling mold, in particular, can be perplexing. You might be wondering, “Why is there mold on my ceiling?” To understand the root of the issue, it’s essential to explore the potential causes.

Common Causes of Mold on the Ceiling

  1. Leaking Roof: One of the most common reasons for mold growth on your ceiling is a leaking roof. Even a small leak can lead to water seeping into the ceiling, creating the perfect environment for mold to thrive.
  2. Poor Ventilation: Inadequate ventilation can trap moisture in your home, leading to condensation and elevated humidity levels. When warm, moist air comes into contact with a cooler surface like your ceiling, it can result in mold growth.
  3. Plumbing Issues: Leaking pipes or plumbing problems in the floors or walls above can also cause water damage to the ceiling, providing mold with the necessary conditions to grow.
  4. Excessive Humidity: High humidity levels, especially in areas like bathrooms or kitchens, can contribute to mold growth. The steam and moisture produced during activities like cooking and showering can accumulate on the ceiling.
  5. Improper Insulation: Inadequate insulation in the ceiling can cause temperature differences between the indoor and outdoor air, leading to condensation and mold formation.
  6. Previous Water Damage: If your ceiling has experienced water damage in the past and wasn’t properly remediated, mold can continue to grow even after the surface appears to be dry.

The Health Risks of Ceiling Mold

Mold on the ceiling isn’t just a cosmetic issue; it can have adverse effects on your health. Mold spores, when released into the air, can be inhaled, leading to various health problems, including:

  1. Respiratory Issues: Mold spores can trigger or exacerbate respiratory problems like asthma and allergies.
  2. Skin Irritations: Contact with mold can cause skin rashes, itchiness, and irritation.
  3. Sinus Infections: Inhaling mold spores can lead to sinus infections, congestion, and other sinus-related problems.
  4. Eye Irritation: Mold exposure can cause eye redness, itchiness, and irritation.
  5. Headaches and Fatigue: Prolonged exposure to mold can lead to persistent headaches and a general feeling of fatigue.

Getting Rid of Mold on Your Ceiling

Now that we’ve explored the causes and potential health risks of ceiling mold, it’s crucial to understand how to address the issue effectively.

  1. Identify and Address the Source: The first step is to identify and fix the source of moisture or water that’s allowing mold to grow. This may involve repairing a leaking roof, resolving plumbing issues, or improving ventilation.
  2. Protective Measures: Before attempting any cleanup, make sure to take necessary precautions. Wear protective gear, including gloves, a mask, and eye protection, to minimize exposure to mold spores.
  3. Clean the Area: Remove the mold by scrubbing the affected area with a mixture of water and detergent. For stubborn mold, a mixture of water and vinegar can be effective. Be sure to thoroughly dry the area after cleaning.
  4. Painting with Mold-Resistant Paint: Consider repainting your ceiling with a mold-resistant paint to prevent future growth.
  5. Ventilation Improvement: Enhance ventilation in the affected area by installing exhaust fans or improving air circulation. Use a dehumidifier to control indoor humidity levels.

Read too: Drywall Early Stage Signs Of Termites In Ceiling

Conclusion

The sight of mold on your ceiling can be alarming, but understanding the causes and taking appropriate action can help you address the issue effectively. It’s not just about aesthetics; it’s also about your health and the well-being of your home. Remember that prevention is key when dealing with this damage. Regular maintenance, prompt repairs, and proper ventilation can go a long way in keeping your home mold-free. So, if you’ve ever asked yourself, “Why do I have mold on my ceiling?” you now have the knowledge and tools to tackle the problem head-on, ensuring a healthier and mold-free living space for you and your family.

Decoding Water Damage: What Does Water Damage Look Like on a Ceiling?

Water damage is a homeowner’s nightmare, and one of the common signs that you might encounter is water damage on your ceiling. Recognizing the signs of water damage early is crucial, as it can save you from costly repairs and potential health hazards. In this article, we will explore what water damage look like on a ceiling, helping you identify the issue and take prompt action.

What Does Water Damage Look Like On Ceiling

Understanding Water Damage on Ceilings

Water damage on ceilings can manifest in various ways, and it’s important to be vigilant in spotting the signs. The appearance of water damage may vary depending on the cause and severity of the issue. Below are some common indicators of water damage on a ceiling:

1. Discoloration and Stains

One of the most apparent signs of water damage on a ceiling is discoloration or staining. You may notice brown, yellow, or grayish patches on the ceiling, which are typically a result of water infiltrating the surface. These stains are often irregularly shaped and may spread over time if the water damage persists.

2. Bubbling or Peeling Paint

If you observe areas of your ceiling where the paint is bubbling or peeling, it could be a clear indication of water damage. The moisture from water infiltration can cause the paint to lose adhesion to the ceiling surface, resulting in these visible imperfections.

3. Sagging or Drooping Ceiling

In more severe cases of water damage, the affected area of the ceiling may begin to sag or droop. This is a clear sign that there is a significant amount of moisture or water accumulating within the ceiling structure. A sagging ceiling is a serious issue and should be addressed immediately to prevent further damage or even a collapse.

4. Mold and Mildew Growth

Another concerning sign of water damage is the growth of mold and mildew on the ceiling. These fungi thrive in damp, humid environments and can develop on ceilings that have sustained water damage. Mold and mildew growth not only indicate the presence of water damage but also pose health risks to occupants.

5. Musty Odor

Water damage on a ceiling can lead to a distinct musty odor. If you notice a persistent, unpleasant smell in a room, it might be a sign of water damage. The odor is often a result of mold or mildew growth in areas affected by moisture.

Read too: What To Do With Water Bubble In Ceiling

Causes of Water Damage on Ceilings

To address water damage effectively, it’s important to understand the potential causes. Some common reasons for water damage on ceilings include:

  • Roof Leaks: Damaged or missing shingles, compromised flashing, or clogged gutters can lead to roof leaks, which allow water to penetrate the ceiling.
  • Plumbing Issues: Leaking pipes, faulty plumbing fixtures, or burst water supply lines can result in water damage on ceilings, particularly in areas directly beneath the plumbing.
  • Condensation: Poor ventilation and high humidity levels can cause condensation to accumulate on the ceiling, leading to water damage over time.
  • Structural Issues: In some cases, water damage may be the result of structural problems in the building, such as cracks or gaps that allow water to seep in.

Addressing Water Damage

Promptly addressing water damage is essential to prevent further deterioration and more extensive repairs. Here are steps to take when you suspect water damage on your ceiling:

  1. Identify the Source: The first step is to determine the source of the water damage. Inspect your roof, plumbing, and the area above the affected ceiling for leaks or other issues.
  2. Temporary Mitigation: If there is active leaking or the ceiling is sagging, place containers or buckets to catch the water and prevent further damage.
  3. Consult a Professional: For extensive or recurring water damage, it’s advisable to consult a professional contractor who specializes in water damage restoration. They can accurately assess the damage, provide necessary repairs, and address any mold or mildew issues.
  4. Repair and Restoration: After the source of the water damage has been resolved, repair and restore the affected ceiling. This may involve patching, repainting, or even replacing damaged sections.

Preventing Water Damage

Prevention is always better than cure. To avoid water damage on your ceiling, consider the following preventive measures:

  • Regular roof maintenance to address potential leaks.
  • Inspection and maintenance of plumbing systems.
  • Proper ventilation to reduce condensation in your home.
  • Addressing structural issues that could lead to water intrusion.

Conclusion

Recognizing the signs of water damage look like on a ceiling is crucial for maintaining the integrity and safety of your home. Water damage can lead to not only costly repairs but also health hazards. By understanding what water damage looks like on a ceiling and taking timely action to address the issue, you can protect your home from further damage and enjoy a safe and comfortable living space.

Demystifying Tongue and Groove Ceiling Cost Per Square Foot

When it comes to upgrading the look of your interior, installing a tongue and groove ceiling is an elegant choice. However, it’s essential to consider the cost, specifically the tongue and groove ceiling cost per square foot. In this article, we’ll break down the factors that influence this cost, helping you make an informed decision for your home improvement project.

Tongue And Groove Ceiling Cost Per Square Foot

Understanding Tongue and Groove Ceilings

Before we dive into the details of cost, let’s establish what a tongue and groove ceiling is. This type of ceiling features individual planks with an interlocking system, where the “tongue” of one plank fits into the “groove” of the adjacent plank. This creates a seamless, visually appealing surface that is often used to add a touch of warmth and character to a room.

Material Costs

The first and most significant factor in determining the tongue and groove ceiling cost per square foot is the cost of materials. Tongue and groove ceiling planks come in various materials, with different price points. The most common materials include:

  • Pine: Pine is a popular and budget-friendly choice for tongue and groove ceilings. It offers a warm, rustic look and is relatively affordable.
  • Cedar: Cedar is a durable and aromatic wood that can be used for tongue and groove ceilings. It’s typically more expensive than pine but offers unique benefits.
  • Redwood: Redwood is a premium option for a tongue and groove ceiling, known for its durability and rich color. It is one of the more expensive choices.
  • MDF (Medium Density Fiberboard): For a more budget-friendly option, some homeowners choose MDF planks. These engineered wood planks are typically lower in cost but may not have the same natural wood appeal.

The choice of material can significantly affect the overall cost. Keep in mind that the quality and finish of the material will also influence pricing.

Labor Costs

The installation of a tongue and groove ceiling is labor-intensive and will incur costs. Labor costs can vary widely depending on factors such as your location, the complexity of the project, and the expertise of the professionals you hire.

  • Complexity: The complexity of the project can influence labor costs. If your ceiling has intricate details, is uneven, or requires additional structural work, expect higher labor costs.
  • Experience: Experienced contractors may charge more for their expertise, but their skills and precision can result in a more polished finished product.
  • Location: Labor rates can vary based on the cost of living in your area. In regions with a higher cost of living, you can expect higher labor costs.

Finishing and Detailing

The level of finishing and detailing you desire for your tongue and groove ceiling will impact the cost per square foot. For example, if you plan to have the planks stained or painted, this will require additional time and effort, leading to increased costs. Additionally, if you want to incorporate intricate patterns or other decorative features, this will also affect the overall price.

Ceiling Height and Size

The dimensions of your ceiling directly affect the cost. Ceilings with greater height or larger surface areas will naturally require more material and labor, resulting in a higher cost per square foot.

Installation Method

The method used to install the tongue and groove ceiling can also impact the cost. Two common installation methods are:

  • Blind Nailing: In this method, nails are driven through the tongue of each plank, hiding the nail heads from view. This technique is more time-consuming but creates a seamless appearance.
  • Face Nailing: With face nailing, nails are driven through the face of each plank, which is visible after installation. This method is faster but may not be as aesthetically pleasing.

Your choice of installation method will influence both labor costs and the final look of your ceiling.

Additional Costs

When budgeting for your tongue and groove ceiling, remember to account for additional costs, such as insulation, underlayment, and any structural modifications needed to support the new ceiling.

Conclusion

A tongue and groove ceiling can be a beautiful addition to your interior space, adding warmth and character. The cost per square foot for this project is influenced by several factors, including material costs, labor costs, finishing and detailing, ceiling height and size, installation method, and additional costs. To obtain an accurate estimate for your project, it’s advisable to consult with experienced contractors and obtain multiple quotes. By considering these factors and planning accordingly, you can enjoy the elegance of a tongue and groove ceiling while staying within your budget.

Breaking Down the Labor Cost to Install Tongue and Groove Ceiling

Transforming your space with a beautiful tongue and groove ceiling is an excellent way to add character and charm to your home. However, beyond the cost of materials, you must also consider the labor cost to install a tongue and groove ceiling. In this article, we’ll explore the various factors that influence the labor cost and provide insights into what to expect when undertaking this home improvement project.

Labor Cost To Install Tongue And Groove Ceiling

Understanding Tongue and Groove Ceilings

Before delving into labor costs, let’s clarify what a tongue and groove ceiling is. This type of ceiling features planks that have a unique interlocking system, with one side (the “tongue”) fitting into the groove of the adjacent plank. This design creates a seamless, visually appealing surface that’s often used to give a room a cozy and rustic ambiance.

1. Project Complexity

The complexity of your tongue and groove ceiling project is a significant factor in determining labor costs. Factors like the ceiling’s height, slope, and any irregularities in the existing ceiling can all impact the complexity of the installation. Additionally, if you plan to incorporate decorative features or incorporate lighting fixtures, these factors will also affect labor costs.

2. Preparation Work

Preparing the space for installation is a crucial step in the process. This may involve removing an existing ceiling, such as a drop ceiling or drywall, or making necessary repairs to the current ceiling. The condition of your existing ceiling will dictate the amount of preparation work required, and this, in turn, will influence labor costs.

3. Labor Rates

Labor costs can vary significantly based on your location and the experience of the contractors you hire. In areas with a higher cost of living, you can expect higher labor rates. Experienced contractors typically charge more for their expertise, but their skill and precision can result in a more polished finished product.

4. Installation Method

There are various installation methods for tongue and groove ceilings, each with its own labor cost. The two most common methods are:

  1. Blind Nailing: In this method, nails are driven through the tongue of each plank, hiding the nail heads from view. This technique is more time-consuming but creates a seamless appearance.
  2. Face Nailing: With face nailing, nails are driven through the face of each plank, which is visible after installation. This method is faster but may not be as aesthetically pleasing.

Your choice of installation method will impact both labor costs and the final look of your ceiling.

5. Finish and Detailing

The type of finish you desire for your tongue and groove ceiling will also affect labor costs. For instance, if you want a stained or painted finish, this will require additional time and effort for the application. Similarly, if you plan to include intricate details or patterns in the ceiling, expect labor costs to increase.

6. Team Size and Duration

The size of the installation team and the estimated duration of the project will contribute to labor costs. More extensive projects that require larger teams and longer timelines will naturally have higher labor expenses.

Read too: What To Do With Water Bubble In Ceiling

Conclusion

Installing a tongue and groove ceiling can be a visually stunning addition to your home, but it’s essential to understand the labor costs involved. The total labor cost to install a tongue and groove ceiling is influenced by various factors, including project complexity, preparation work, labor rates, installation method, finish and detailing, and the size and duration of the team. To ensure an accurate estimate, it’s advisable to consult with experienced contractors and obtain multiple quotes. By doing so, you can plan your project effectively and enjoy the beauty and elegance of your new tongue and groove ceiling.

Demystifying the Cost of Removing Popcorn Ceiling with Asbestos

If you’re considering home renovation or concerned about potential health hazards, you might find yourself wondering, “How much does it cost to remove popcorn ceiling with asbestos?” This article aims to provide you with a comprehensive understanding of the factors influencing the cost of asbestos-containing popcorn ceiling removal and what you can expect from the process.

How Much To Remove Popcorn Ceiling With Asbestos

Understanding Asbestos in Popcorn Ceilings

Before diving into the cost factors, let’s clarify the importance of addressing asbestos in popcorn ceilings. Asbestos is a naturally occurring mineral known for its fire-resistant and insulating properties. In the past, it was commonly used in various building materials, including popcorn ceilings, for these attributes. However, it was later discovered that asbestos exposure could lead to serious health issues, such as lung cancer and mesothelioma.

1. Popcorn Ceiling Testing

The first step in determining the cost of asbestos-containing popcorn ceiling removal is to have the ceiling tested for asbestos. This crucial initial step will help you identify whether your ceiling contains asbestos and, if so, the extent of the contamination. It’s essential to hire a certified asbestos inspector to collect samples and perform the necessary tests. The cost of testing can vary but typically falls within a few hundred dollars.

2. Labor Costs

The primary expense in popcorn ceiling removal is the cost of labor. Removing asbestos-containing materials is a delicate and hazardous process that requires trained professionals. The complexity of the task and the level of protective measures needed will influence the labor cost. On average, asbestos popcorn ceiling removal can cost anywhere from $2 to $7 per square foot.

3. Protective Measures

When dealing with asbestos, safety is paramount. Professionals will take extensive precautions to protect themselves and your home. This includes wearing specialized clothing, using high-efficiency particulate air (HEPA) filters, and sealing off the work area to prevent asbestos fibers from spreading. These protective measures contribute to the overall cost but are necessary to ensure safety.

4. Disposal Fees

Asbestos-containing materials must be disposed of properly to prevent contamination. Disposal fees can vary depending on your location, the quantity of asbestos, and local regulations. Be prepared for these fees to be part of the overall cost.

5. Repair and Restoration

After the removal of the popcorn ceiling, your ceiling will likely need repair and restoration. This can include drywall repair, retexturing the ceiling, and repainting. The extent of these additional costs will depend on the condition of your ceiling and your aesthetic preferences.

6. Contractor’s Experience

The experience and reputation of the contractor you hire can also affect the cost. Highly experienced professionals may charge more for their services, but their expertise is invaluable when it comes to safely and efficiently removing asbestos-containing materials.

7. Local Regulations

Local regulations can impact the cost of asbestos-containing popcorn ceiling removal. Some areas may have stricter regulations and permitting requirements, which can increase the overall cost. It’s essential to be aware of these regulations and ensure compliance.

Conclusion

Remove popcorn ceiling with asbestos is a task that should not be taken lightly. While the cost of asbestos-containing popcorn ceiling removal can vary based on several factors, safety and proper procedures are non-negotiable. It’s crucial to prioritize your health and the health of your family by entrusting this task to qualified professionals. By understanding the cost factors and seeking reputable contractors, you can ensure the safe removal of asbestos and the restoration of a healthier and more beautiful living space.

Dealing with Water Bubbles in the Ceiling: A Comprehensive Guide

What To Do With Water Bubble In Ceiling? Water damage can be a homeowner’s worst nightmare, and one of the common signs of water intrusion is the appearance of water bubbles in the ceiling. When you spot these unsightly and worrisome bubbles, it’s essential to address them promptly to prevent further damage to your home. In this article, we will explore the causes of water bubbles in the ceiling, what to do when you encounter them, and how to prevent such issues from happening in the first place.

What To Do With Water Bubble In Ceiling

Understanding Water Bubbles in the Ceiling

Water bubble in the ceiling are often the result of leaks or moisture accumulation. These bubbles can appear in various sizes and may be accompanied by discoloration or sagging of the affected area. To effectively address this issue, it’s crucial to understand their root causes:

  1. Roof Leaks: One of the primary culprits of water bubbles in the ceiling is a leaking roof. Roof leaks can occur due to damaged shingles, clogged gutters, or poor flashing. When rainwater penetrates through your roof, it can accumulate in your ceiling, leading to bubbles and water stains.
  2. Plumbing Issues: Faulty or damaged plumbing can also result in water bubbles in the ceiling. Leaking pipes, water supply lines, or drain lines may allow water to seep into your ceiling, causing visible damage over time.
  3. Condensation: In some cases, water bubbles may form due to condensation issues in your home. This often happens in areas with high humidity levels, such as bathrooms. The moisture in the air can accumulate in the ceiling, creating bubbles.

Dealing with Water Bubbles

When you discover water bubbles in your ceiling, it’s crucial to take immediate action to prevent further damage and potential safety hazards:

  1. Identify the Source: The first step in addressing water bubbles is to identify the source of the water intrusion. Check your roof for missing shingles, damaged flashing, or clogged gutters. Inspect your plumbing for any visible leaks. If condensation is the issue, consider improving ventilation in the affected area.
  2. Temporary Drainage: If the water bubbles are large and threatening to burst, carefully puncture them with a sharp object, such as a screwdriver. Be sure to place a bucket or container beneath to catch the water and prevent it from causing more damage to your ceiling.
  3. Consult a Professional: For significant or recurring water bubble issues, it’s best to consult a professional. A roofing contractor or a plumber can accurately diagnose the problem and provide the necessary repairs. Ignoring the issue could lead to more extensive and costly repairs down the road.
  4. Repair and Restoration: Once the source of the problem has been addressed, it’s time to repair and restore the damaged ceiling. This may involve patching, repainting, or even replacing the affected area. It’s essential to address the cosmetic damage to maintain the aesthetics and structural integrity of your home.

Preventing Water Bubbles in the Ceiling

Prevention is always better than cure. To avoid dealing with water bubbles in your ceiling, consider these preventative measures:

  1. Regular Roof Maintenance: Schedule regular inspections of your roof to check for damaged shingles, flashing issues, or clogged gutters. Maintaining your roof can help prevent leaks that lead to water bubbles in the ceiling.
  2. Plumbing Inspections: Periodically inspect your plumbing system for leaks or signs of wear and tear. Fix any issues promptly to prevent water damage.
  3. Proper Ventilation: Ensure proper ventilation in areas prone to condensation, such as bathrooms and kitchens. Properly venting moisture outside can help reduce the risk of water bubbles forming in your ceiling.
  4. Keep Gutters Clean: Maintain clean and debris-free gutters to ensure that rainwater flows away from your home rather than seeping into your ceiling.

Conclusion

Water bubbles in the ceiling are not only unsightly but also a sign of potential water damage and structural issues. Promptly identifying and addressing the root causes of these bubbles is crucial to prevent further damage to your home. By taking preventative measures and seeking professional help when needed, you can protect your home from the effects of water intrusion and keep your ceiling bubble-free for years to come. Remember, a well-maintained home is a happy home.