In the realm of interior design and space optimization, few elements offer the versatility and functionality of floor to ceiling pocket doors. These innovative architectural features seamlessly integrate into modern living spaces, providing not only aesthetic appeal but also practical benefits in terms of space utilization and room flow. In this comprehensive guide, we’ll explore the myriad possibilities and advantages of incorporating floor to ceiling pocket door into your home or commercial environment.
Understanding Floor to Ceiling Pocket Doors
What Are Floor to Ceiling Pocket Doors?
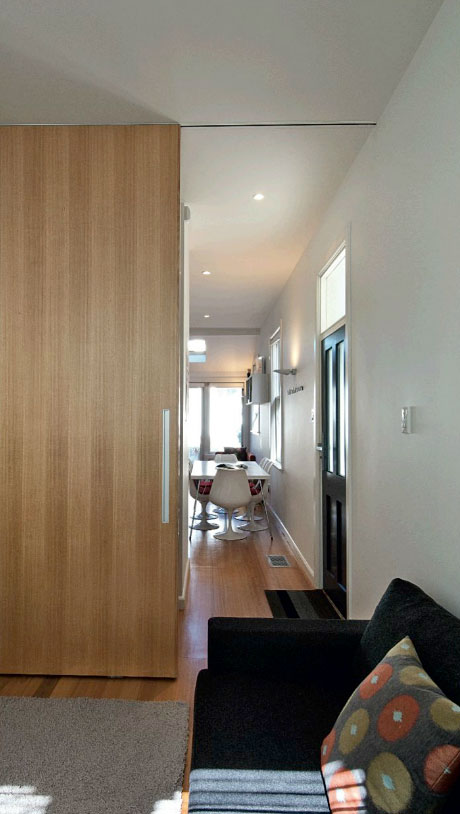
Floor to ceiling pocket door, also known as full-height pocket doors, are sliding doors that extend from the floor to the ceiling, disappearing into a concealed pocket within the wall when fully opened. Unlike traditional doors that swing open on hinges, pocket doors slide horizontally along a track, offering a space-saving solution for areas where swing clearance is limited or where a seamless transition between rooms is desired.
Features and Benefits
- Space Optimization: By eliminating the need for swing clearance, floor to ceiling pocket doors maximize usable floor space, making them ideal for small rooms, tight hallways, or areas with limited square footage.
- Aesthetic Appeal: Floor to ceiling pocket doors create a sleek and streamlined look, enhancing the visual continuity of interior spaces and allowing for unobstructed sightlines when open.
- Flexibility in Room Layout: With their ability to slide completely out of view, floor to ceiling pocket doors offer greater flexibility in room layout and furniture placement, allowing for more efficient use of available space.
- Enhanced Privacy: When closed, floor to ceiling pocket doors provide effective sound insulation and privacy, making them suitable for bedrooms, home offices, or other areas where acoustic separation is desired.
- Smooth Operation: Modern floor to ceiling pocket door systems feature smooth-glide tracks and concealed hardware, ensuring effortless operation and a seamless user experience.
Installing Floor to Ceiling Pocket Doors
Installing floor to ceiling pocket doors requires careful planning and precision to ensure proper fit and functionality. Here’s an overview of the typical installation process:
- Assessing Structural Considerations: Determine the structural feasibility of installing floor to ceiling pocket doors, taking into account factors such as wall thickness, stud spacing, and existing electrical or plumbing fixtures.
- Preparing the Opening: Create a rough opening in the wall that is wide enough to accommodate the door panels and tall enough to accommodate the full height of the door system.
- Installing the Track System: Mount the track system at the top of the opening, ensuring it is level and securely anchored to the wall framing.
- Hanging the Door Panels: Attach the door panels to the track system, ensuring they slide smoothly and align properly with the surrounding wall surfaces.
- Adding Finishing Touches: Install trim and casing around the door opening to conceal the track system and create a polished, finished look.
Applications of Floor to Ceiling Pocket Doors
- Open-Plan Living Spaces: Floor to ceiling pocket doors are perfect for creating flexible living spaces that can be easily transformed from open-concept layouts to more private or intimate settings.
- Room Dividers: In larger rooms or multi-functional spaces, floor to ceiling pocket doors can be used as room dividers to delineate different areas while maintaining visual continuity and flow.
- Closet Doors: In bedrooms or dressing areas, floor to ceiling pocket doors can be used as closet doors, providing easy access to clothing and storage while maximizing floor space.
- Office Partitions: Floor to ceiling pocket doors are ideal for creating private workspaces within open-plan office environments, offering employees a quiet retreat for focused work or meetings.
Read too: Exploring the Efficiency of Radiant Ceiling Heater Electric: A Comprehensive Guide
Conclusion
Floor to ceiling pocket doors offer a seamless blend of form and function, providing an elegant solution for space optimization and room transition in both residential and commercial settings. Whether used to maximize floor space, enhance privacy, or create flexible living environments, these versatile architectural features add value and sophistication to any interior design scheme. Consider incorporating floor to ceiling pocket doors into your next renovation or construction project to unlock the full potential of your space.