A well-organized wine rack can be a focal point in your home, elevating both the aesthetic of the space and the practicality of wine storage. If you’re a wine enthusiast or just someone looking to display your collection in a stylish way, a floor to ceiling wine rack is an ideal solution. This type of wine storage system not only maximizes vertical space but also brings an elegant, sophisticated touch to any room. Whether you have a small apartment or a large home, a floor-to-ceiling wine rack can be a functional and visually appealing choice.
In this article, we’ll explore the benefits of having a floor to ceiling wine rack, the different types of racks available, installation tips, and design ideas to help you choose the perfect wine storage system for your home.
Read too: Shiplap Ceiling in Kitchen: A Timeless Trend for a Stylish and Cozy Space
Why Choose a Floor To Ceiling Wine Rack?
A floor to ceiling wine rack offers a combination of practicality and beauty. Let’s take a look at some of the main reasons why this style of wine rack is so popular:
1. Maximizing Space
If you’re dealing with limited space but want to keep your wine collection close at hand, a floor-to-ceiling wine rack makes the most of your vertical space. It allows you to store many bottles without taking up valuable floor space. This is particularly useful for people living in apartments or homes with small kitchens or dining areas where counter space and cabinetry are limited.
2. Aesthetic Appeal
A floor to ceiling wine rack isn’t just functional; it’s also a stunning piece of decor. These racks add an element of sophistication to your home, whether it’s a modern, industrial, or rustic design. A large wine rack can act as a statement piece in your living room, dining area, or even in a dedicated wine cellar. The towering display of wine bottles creates a visually striking effect and can become the centerpiece of your interior design.
3. Organization and Easy Access
Having a wine rack that reaches from floor to ceiling offers an excellent way to organize your collection. Bottles are arranged neatly, allowing you to keep track of what you have and ensuring that your wine is stored properly. With easy access to your collection, there’s no need to shuffle through cabinets or drawers to find the perfect bottle for dinner. Many floor-to-ceiling wine racks are designed with a horizontal layout that lets you store bottles in a way that preserves the wine’s quality.
4. Increased Value
A well-designed floor to ceiling wine rack can increase the perceived value of your home. If you’re considering putting your house on the market in the future, having a beautiful wine rack can add a touch of luxury that attracts potential buyers. Wine storage, especially a custom floor-to-ceiling rack, can help set your home apart from others and leave a lasting impression on visitors.
Types of Floor To Ceiling Wine Racks
A floor to ceiling wine rack comes in a variety of styles and materials, allowing you to choose one that suits your home’s aesthetic and your wine storage needs. Here are some popular types of wine racks you can consider:
1. Freestanding Wine Racks
Freestanding floor-to-ceiling wine racks are standalone units that do not require any wall installation. These racks typically feature sturdy frames that can be placed against a wall or in the center of a room. They are perfect for people who want a movable storage solution without committing to a permanent installation.
These racks come in a variety of materials, including metal, wood, or a combination of both. Some freestanding wine racks have elegant designs with curves and ornamental details, while others feature a more minimalist, industrial look.
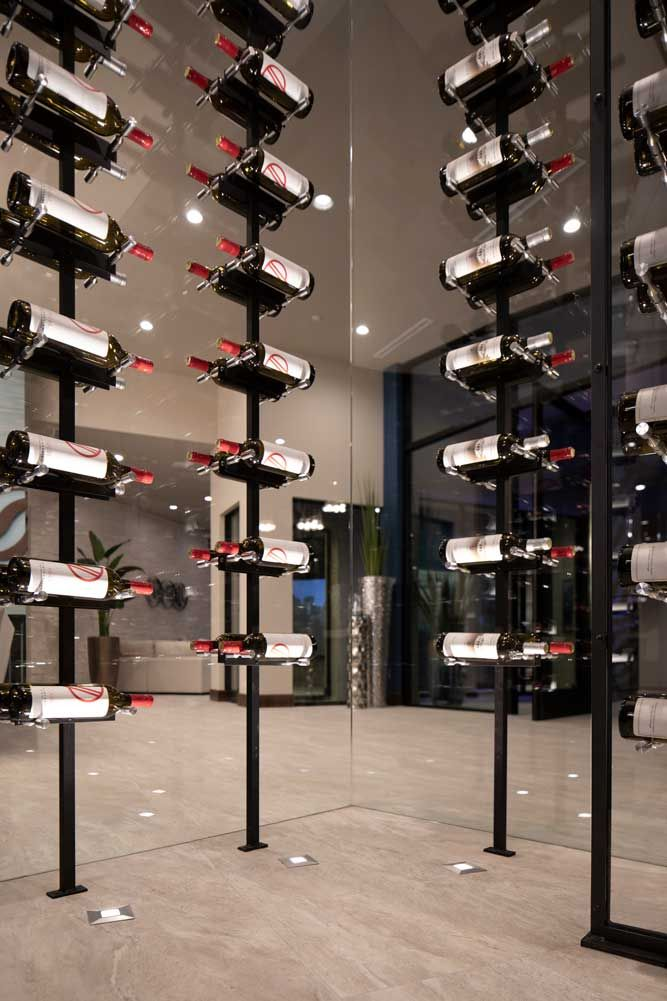
2. Wall-Mounted Wine Racks
A wall-mounted floor to ceiling wine rack is attached directly to the wall, extending from the floor to the ceiling. These types of racks are ideal for saving space and creating a sleek, modern look. Wall-mounted racks can be found in various designs, from open shelving units to more structured, grid-like setups.
The benefit of wall-mounted wine racks is that they can be customized to fit the exact dimensions of your space. You can design your rack to fit into a niche or corner, maximizing storage without taking up unnecessary space. Wall-mounted racks also provide a more clean, streamlined appearance, with no bulky structure taking up room.
3. Modular Wine Racks
Modular floor to ceiling wine racks are customizable and offer flexibility in design. These racks consist of individual units that can be stacked or connected to form a larger wine storage system. Modular racks are perfect for wine collectors who may want to expand their collection over time or who need a rack that can fit into a specific, unique space.
Modular racks are often available in a variety of materials, including wood, metal, and acrylic. They can be tailored to accommodate different bottle sizes and storage preferences. These racks can also be expanded or reconfigured to suit your needs as your collection grows.
4. Custom Wine Racks
For a truly unique design, a custom floor to ceiling wine rack is the best option. Custom wine racks are designed specifically for your space, ensuring that every inch is maximized for storage and style. Custom racks can be made from a variety of materials, such as metal, wood, or glass, and can include features like built-in lighting or adjustable shelves.
A custom wine rack allows you to incorporate personalized elements like your favorite finishes, colors, and designs. If you have a large wine collection or a specific vision for your home, a custom wine rack can be tailored to meet your exact needs.
Key Considerations for Choosing the Right Wine Rack
When selecting a floor to ceiling wine rack, there are several factors to keep in mind to ensure it fits both your space and your wine storage requirements:
1. Capacity
Before purchasing a wine rack, it’s essential to determine how many bottles you need to store. A floor to ceiling wine rack can hold anywhere from a few bottles to several hundred, depending on the size and configuration of the rack. Make sure to choose a rack that suits your current collection and allows for some expansion if necessary.
2. Material
The material of the wine rack plays a significant role in its overall aesthetic and durability. Wood racks provide a warm, traditional feel and are often used in rustic or classic designs. Metal racks, on the other hand, offer a more modern and industrial look, perfect for contemporary spaces. Acrylic or glass racks are sleek and minimalist, often favored in minimalist or urban-style homes.
3. Design and Style
The design and style of the wine rack should match the rest of your home’s decor. Whether you want a rustic wooden rack, a sleek metal frame, or a high-tech custom design, there are many options available to suit various tastes. Consider whether you prefer an open design where the wine bottles are visible or a more enclosed style that protects your collection.
4. Ease of Access
Wine should be stored on its side to keep the cork moist and preserve its flavor. Ensure that the floor to ceiling wine rack you choose allows easy access to bottles without the risk of tipping or damaging them. Horizontal racks are often preferred for their ability to keep bottles stable and organized, but vertical racks can work if they are designed correctly.
How to Install a Floor To Ceiling Wine Rack
Installing a floor to ceiling wine rack can be a DIY project, but it requires careful planning. Here are some basic installation steps to follow:
- Measure Your Space: Take precise measurements of the area where you want to install the wine rack. Ensure that the rack will fit comfortably in the space and that the ceiling height is sufficient for a full-size floor-to-ceiling rack.
- Choose the Right Mounting Hardware: Depending on the type of wine rack you’ve selected (freestanding, wall-mounted, or modular), you’ll need appropriate mounting hardware. For wall-mounted racks, use heavy-duty anchors to secure the rack to the wall studs.
- Install and Secure the Rack: Once you’ve gathered the necessary tools and materials, follow the manufacturer’s instructions to install the rack. Ensure that all components are properly aligned and securely fastened before placing your wine bottles on the rack.
- Organize Your Collection: After installation, arrange your wine bottles by type, age, or region to keep your collection organized and easily accessible.
Conclusion: Transform Your Space with a Floor To Ceiling Wine Rack
A floor to ceiling wine rack can be a beautiful and functional addition to your home, offering plenty of storage space while enhancing your interior design. With various styles and materials available, you can find the perfect rack to match your aesthetic and storage needs. Whether you’re a wine enthusiast looking for a stylish way to store your collection or simply want to add a touch of elegance to your space, a floor-to-ceiling wine rack is an investment that will pay off in both form and function.