Ceiling mounted accordion room dividers offer a versatile and space-saving solution for dividing large areas into separate zones while maintaining an open and airy feel. Whether you’re looking to create privacy in a shared living space, divide a large room into functional areas, or add flexibility to your workspace, a ceiling mounted accordion room divider provides a stylish and practical solution. In this comprehensive guide, we’ll delve into the features, benefits, installation process, and design considerations of ceiling mounted accordion room dividers, empowering you to optimize your space with ease and style.
Understanding Ceiling Mounted Accordion Room Dividers
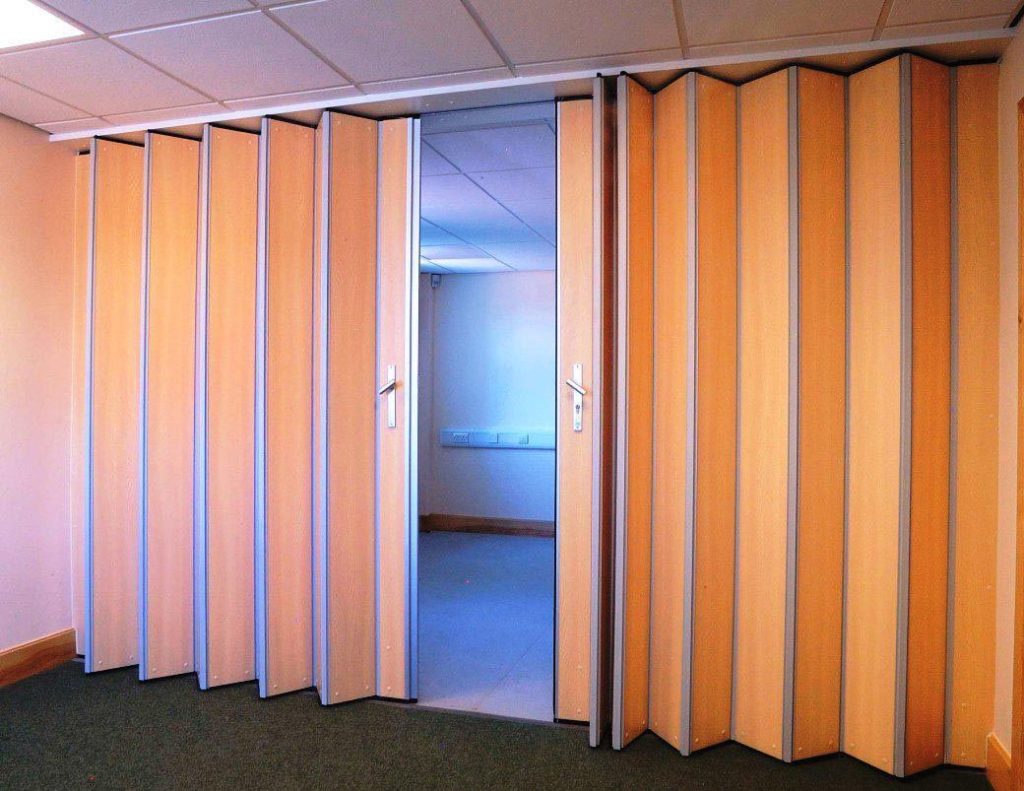
Ceiling mounted accordion room dividers consist of a series of interconnected panels that fold neatly together when not in use and expand accordion-style to create a partition when needed. These dividers are mounted from the ceiling, allowing them to be easily retracted and extended as needed, making them ideal for both residential and commercial applications.
Read too: How To Extend Kitchen Cabinets To The Ceiling: A Complete Guide for Maximizing Space and Style
Benefits of Ceiling Mounted Accordion Room Dividers
- Space-saving Design: Ceiling mounted accordion room dividers eliminate the need for floor tracks or support structures, maximizing floor space and maintaining a clean and uncluttered look.
- Flexibility: With their accordion-style design, these room dividers can be easily adjusted to create custom configurations, allowing you to adapt your space to suit your changing needs.
- Privacy and Division: Accordion room dividers provide privacy and separation between different areas of a room, making them ideal for creating separate living, dining, or work areas in open-concept spaces.
- Aesthetic Appeal: Available in a variety of materials, colors, and finishes, ceiling mounted accordion room dividers can enhance the aesthetic appeal of any space, adding visual interest and architectural detail.
Installation Process
Installing a ceiling mounted accordion room divider requires careful planning and precise execution to ensure optimal functionality and appearance:
- Determine Placement: Identify the desired location for the room divider and measure the width and height of the space to determine the size of the divider needed.
- Mounting: Securely mount the track or rail system to the ceiling using appropriate hardware and anchors, ensuring that it is level and securely anchored to support the weight of the divider.
- Hang Panels: Hang the accordion-style panels from the track or rail system, ensuring that they are evenly spaced and aligned for smooth operation.
- Test and Adjust: Test the operation of the room divider to ensure that it opens and closes smoothly and adjust as needed for optimal performance.
Design Considerations
When choosing a ceiling mounted accordion room divider, consider the following design factors:
- Material: Select a material that complements your existing décor and architectural style, such as wood, glass, or fabric.
- Color and Finish: Choose a color and finish that coordinate with your space, whether you prefer a sleek modern look or a more traditional aesthetic.
- Soundproofing: For added privacy and noise reduction, consider selecting a room divider with soundproofing features to minimize sound transmission between divided areas.
Maintenance and Care
To keep your ceiling mounted accordion room divider looking and functioning its best, follow these maintenance tips:
- Regular Cleaning: Wipe down the panels and tracks regularly with a soft cloth or mild detergent to remove dust and debris.
- Lubrication: Periodically lubricate the moving parts of the room divider to ensure smooth operation and prevent sticking or binding.
- Inspect for Damage: Regularly inspect the room divider for any signs of damage or wear and tear, such as loose hardware or damaged panels, and address any issues promptly to prevent further damage.
Conclusion
Ceiling mounted accordion room dividers offer a versatile and stylish solution for dividing and organizing interior spaces. Whether you’re looking to create privacy, maximize space, or enhance the aesthetic appeal of your home or workspace, a ceiling mounted accordion room divider provides the flexibility and functionality you need. By understanding the features, benefits, installation process, and design considerations of ceiling mounted accordion room dividers, you can make informed decisions about incorporating this innovative solution into your space and enjoy the benefits of a more versatile and organized environment.