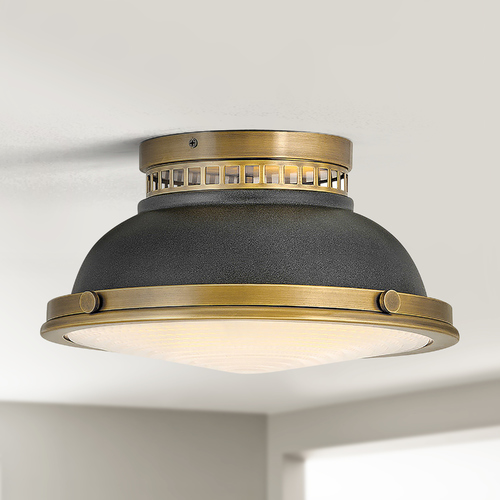
Lighting plays a significant role in defining the ambiance of any room, and choosing the right fixture can transform the look and feel of your home. Among the wide range of lighting options available today, the Milk Glass Flush Mount Ceiling Lights stands out as an elegant and timeless choice. Whether you’re revamping a modern living room or updating the lighting in a vintage-inspired space, the Milk Glass Flush Mount Ceiling Light offers both style and functionality.
This article will explore the features, benefits, and design options of the Milk Glass Flush Mount Ceiling Light, and why it should be a key consideration for your next home lighting upgrade. We’ll also look at the versatility of this fixture and how it can complement different interior styles, making it an ideal choice for virtually any room in your house.
Read too: Discovering the Charm of Nautical Outdoor Ceiling Fans for Your Coastal Retreat: Sail into Style
What Makes a Milk Glass Flush Mount Ceiling Light Unique?
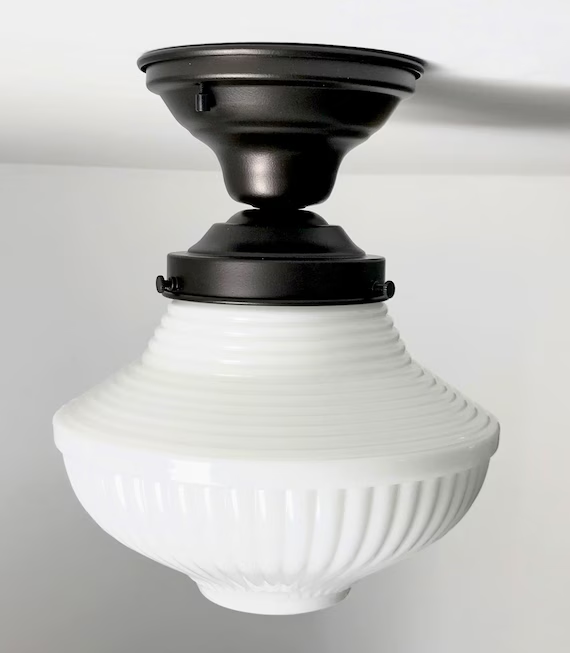
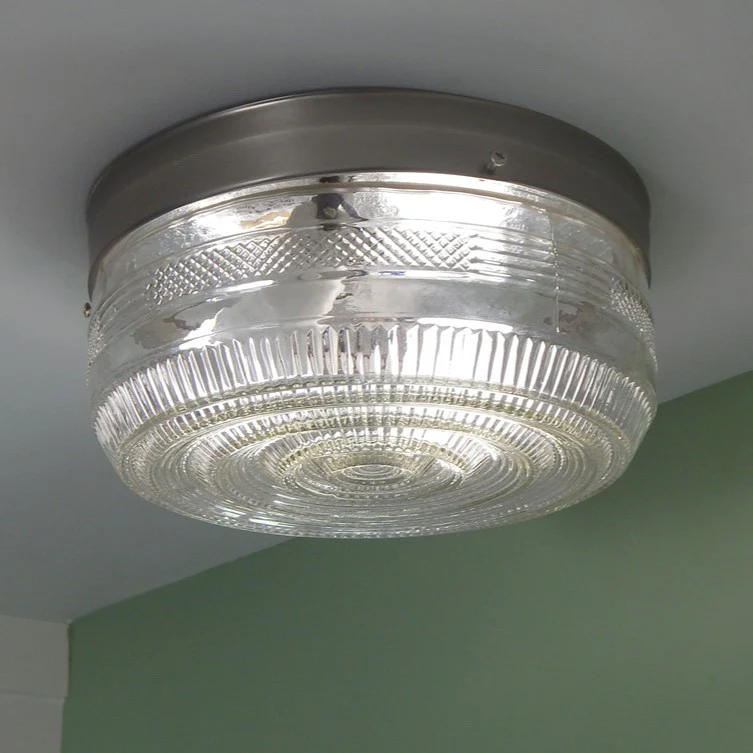
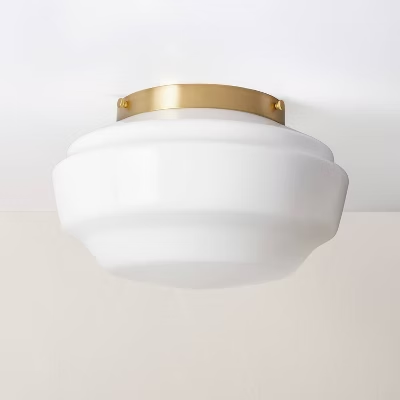
The Milk Glass Flush Mount Ceiling Light is defined by its beautiful frosted glass shade, which produces a soft, diffused light. Unlike traditional clear glass fixtures, milk glass has a translucent quality that creates a gentle, calming glow. This feature makes it an excellent choice for bedrooms, living rooms, hallways, and even bathrooms where you want ambient lighting without the harshness of exposed bulbs.
The Timeless Appeal of Milk Glass
Milk glass has been used in lighting fixtures for centuries, and its popularity has only grown in recent years due to its vintage charm and unique aesthetic. The soft, creamy hue of the glass gives off a warm glow, which can instantly add elegance and sophistication to any room. The Milk Glass Flush Mount Ceiling Light is the perfect blend of classic style and modern functionality, making it a highly sought-after choice for contemporary homes that appreciate traditional design elements.
Whether you’re drawn to its vintage vibe or its ability to complement more modern spaces, a Milk Glass Flush Mount Ceiling Light can seamlessly fit into various décor styles, from retro to industrial, mid-century modern to farmhouse.
The Benefits of Choosing a Milk Glass Flush Mount Ceiling Light
1. Soft, Ambient Lighting
One of the main reasons people opt for a Milk Glass Flush Mount Ceiling Light is the quality of light it produces. The frosted milk glass shade softens the light, creating a warm and inviting atmosphere. This diffused glow is ideal for areas where you want general lighting that is neither too bright nor too dim. Whether you need a light fixture for your hallway, bedroom, or kitchen, this style of lighting helps create a cozy and inviting ambiance.
2. Space-Saving Design
The flush mount design of the Milk Glass Flush Mount Ceiling Light makes it an excellent option for rooms with low ceilings or spaces where you want to maximize headroom. Unlike pendant lights or chandeliers that hang down and can take up space, a flush mount light sits directly against the ceiling, providing adequate lighting while keeping the room feeling open and airy.
This makes it a great option for smaller rooms, apartments, or areas where a more compact lighting solution is needed.
3. Versatility in Design and Style
The Milk Glass Flush Mount Ceiling Light is incredibly versatile and can complement various interior styles. From a more traditional aesthetic to a sleek and modern design, this fixture can fit seamlessly into many décor themes. Whether you’re designing a rustic farmhouse kitchen or an industrial-style living room, the classic appeal of milk glass adds a touch of sophistication that can elevate any space.
These lights come in a range of styles, from minimalist designs to those with intricate detailing. Some feature decorative brass or chrome accents, while others have a more streamlined look. With so many design options available, you’re sure to find a Milk Glass Flush Mount Ceiling Light that fits perfectly with your unique style.
4. Durability and Long-Lasting Quality
Milk glass is known for its durability, and a Milk Glass Flush Mount Ceiling Light can last for many years with proper care. Unlike delicate glass fixtures that can easily break, milk glass is relatively sturdy and resistant to cracking. Additionally, many modern versions of these lights use LED bulbs, which are energy-efficient and have a longer lifespan than traditional incandescent bulbs.
How to Choose the Right Milk Glass Flush Mount Ceiling Light for Your Home
When selecting a Milk Glass Flush Mount Ceiling Light for your space, there are a few important factors to keep in mind. Here are some tips to help you make the best choice:
1. Consider the Size of the Room
The size of the light fixture is an important consideration. For larger rooms or open spaces, you may want to choose a slightly bigger fixture to ensure the light is evenly distributed. Smaller rooms, such as bathrooms or entryways, may require a more compact design to avoid overwhelming the space.
2. Match the Style to Your Décor
As mentioned earlier, the Milk Glass Flush Mount Ceiling Light comes in a variety of styles. To ensure that the fixture complements your existing décor, choose one that aligns with your room’s design theme. For a vintage or retro-inspired look, opt for a fixture with classic brass or antique finishes. For a more modern space, go for a sleek design with clean lines and minimalist accents.
3. Consider the Brightness
While milk glass provides a soft and diffused light, you should still take into account the wattage of the bulb used in the fixture. If the room requires brighter light, look for a fixture that allows for a higher-wattage bulb or offers multiple bulb options. Alternatively, if the space needs more ambient lighting, a lower-wattage bulb will suffice.
4. Pay Attention to Installation Requirements
Most Milk Glass Flush Mount Ceiling Light fixtures are relatively easy to install, but it’s important to consider any specific requirements for your ceiling type. Some may require additional hardware or specialized installation, so be sure to check the manufacturer’s instructions or consult with a professional if needed.
Installation Tips
The Milk Glass Flush Mount Ceiling Light is a versatile lighting solution that works well in various rooms throughout your home. Here are some ideas for where to install this elegant fixture:
1. Living Room
In the living room, a Milk Glass Flush Mount Ceiling Light can provide soft, even illumination that enhances the cozy atmosphere. Pair it with other light sources, such as table lamps or floor lamps, to create layered lighting and accentuate the room’s décor. The frosted milk glass will help eliminate harsh shadows, giving the room a warm, welcoming glow.
2. Bedroom
For the bedroom, a Milk Glass Flush Mount Ceiling Light is a great choice for general lighting. It creates a calming, soothing ambiance that promotes relaxation. Consider placing it near the center of the room to ensure even distribution of light, or install it above your bedside tables for a more intimate setting.
3. Kitchen and Dining Areas
In the kitchen, a Milk Glass Flush Mount Ceiling Light can provide functional lighting without taking up too much space. If you have a smaller kitchen, the flush mount design will ensure that the space doesn’t feel overcrowded. In the dining area, it can also create a gentle, inviting light that complements your meal and dining experience.
4. Hallways and Entryways
A Milk Glass Flush Mount Ceiling Light is ideal for hallways and entryways, where you may need consistent, soft light without making the space feel cramped. The flush mount design ensures that the fixture doesn’t get in the way, while still offering bright, even illumination.
Conclusion
The Milk Glass Flush Mount Ceiling Lights is a timeless and versatile lighting solution that can enhance any room in your home. Its soft, ambient light, elegant design, and practical benefits make it an ideal choice for various interior styles, whether you are aiming for a vintage-inspired look or a more modern aesthetic. With its durability, energy efficiency, and wide range of design options, this lighting fixture offers both form and function.
When shopping for a Milk Glass Flush Mount Ceiling Lights, keep in mind the size of the room, your existing décor, and your lighting needs. Whether you’re illuminating your living room, bedroom, kitchen, or hallway, this fixture will undoubtedly add a touch of sophistication and warmth to your space.