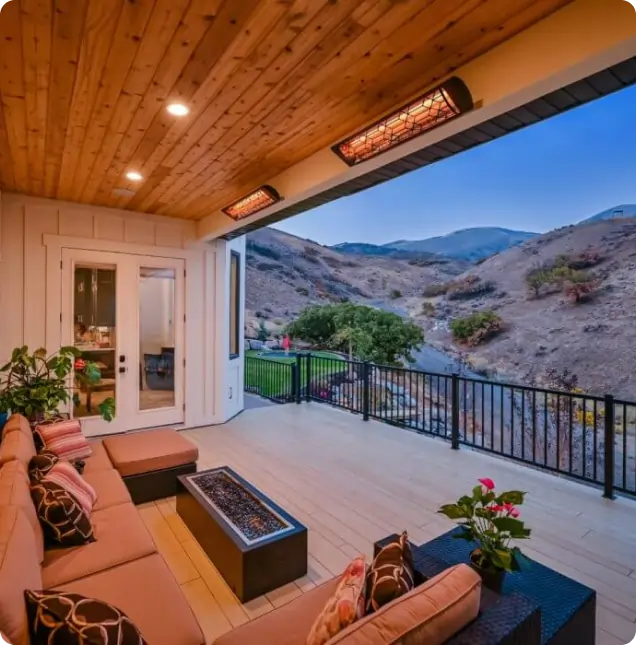
Aluminum Under Deck Ceiling: Benefits, Installation, and Design Ideas

Creating an inviting and functional outdoor space can greatly enhance the enjoyment of your home. One way to elevate your outdoor living area is by installing an Aluminum Under Deck Ceiling. This innovative solution not only improves the aesthetics of your deck but also adds practical benefits. In this comprehensive guide, we’ll explore the advantages of an aluminum under deck ceiling, provide tips on installation, and offer design ideas to help you make the most of this upgrade.

Aluminum Under Deck Ceiling

What Is an Aluminum Under Deck Ceiling?

An Aluminum Under Deck Ceiling is a system designed to cover and protect the underside of a deck, creating a finished ceiling that enhances both the appearance and functionality of the space beneath. Made from durable aluminum, this ceiling system offers a sleek and modern look while providing several practical benefits.

Read too: Exploring the Innovation and Efficiency of Ceiling Mounted Surgical Light Solutions: Illuminating Precision

Key Features of Aluminum Under Deck Ceiling

  1. Durable Material: Aluminum is known for its durability and resistance to weather conditions. It does not rust, warp, or rot, making it an excellent choice for outdoor applications.
  2. Low Maintenance: Unlike wood or other materials, aluminum requires minimal maintenance. It is easy to clean and does not need regular sealing or painting.
  3. Waterproofing: The system effectively channels water away from the deck area, preventing leaks and protecting the space below from moisture damage.
  4. Aesthetic Appeal: With a sleek and modern finish, aluminum under deck ceilings enhance the visual appeal of your outdoor area, adding a polished look to the underside of your deck.
  5. Customizable: Available in various colors and styles, aluminum under deck ceilings can be customized to complement your home’s exterior design.

Benefits of Installing an Aluminum Under Deck Ceiling

Installing an aluminum under deck ceiling offers several advantages that can significantly improve your outdoor space. Here’s why you should consider this upgrade:

1. Enhanced Outdoor Living

By creating a finished ceiling under your deck, you can transform the space into a more comfortable and usable area. This space can be used for outdoor dining, relaxing, or entertaining guests, regardless of the weather conditions.

2. Improved Aesthetic Appeal

An aluminum under deck ceiling provides a clean and modern look that enhances the overall appearance of your outdoor area. It hides unsightly structural elements and creates a seamless transition between your deck and the space below.

3. Protection from the Elements

The system is designed to channel water away from the deck, protecting the area underneath from rain, snow, and other weather conditions. This helps prevent damage to furniture, flooring, and other items stored below the deck.

4. Increased Property Value

Upgrading to an aluminum under deck ceiling can add value to your home. It improves the functionality and aesthetics of your outdoor space, making it more appealing to potential buyers.

5. Easy Maintenance

Aluminum is a low-maintenance material that does not require frequent upkeep. It is resistant to staining and fading, making it easy to maintain its appearance over time.

Choosing the Right Aluminum Under Deck Ceiling System

Selecting the right aluminum under deck ceiling system involves considering several factors to ensure it meets your needs and preferences. Here’s what to look for:

1. Material Quality

Choose a high-quality aluminum system that is designed for outdoor use. Look for products that are coated or treated to resist weathering and maintain their appearance over time.

2. Design and Style

Consider the design and style of the ceiling panels. Aluminum under deck ceilings are available in various patterns, colors, and finishes. Choose a style that complements the look of your home and deck.

3. Installation Requirements

Evaluate the installation requirements of the system. Some aluminum under deck ceilings are designed for DIY installation, while others may require professional assistance. Ensure that you have the necessary tools and skills for installation.

4. Budget

Set a budget for your project and choose a system that fits within your financial constraints. Keep in mind that higher-quality materials and professional installation may come at a higher cost but can offer better long-term value.

5. Warranty

Check the warranty offered by the manufacturer. A good warranty provides peace of mind and protection against potential defects or issues with the system.

Installation Process for Aluminum Under Deck Ceiling

Proper installation is crucial for ensuring the effectiveness and longevity of your aluminum under deck ceiling. Here’s a general guide to the installation process:

1. Prepare the Area

Before installing the ceiling, clean the area beneath the deck and remove any debris. Ensure that the deck is structurally sound and that there are no obstructions that could interfere with the installation.

2. Measure and Plan

Measure the dimensions of the area where the ceiling will be installed. Plan the layout of the ceiling panels and make any necessary adjustments to ensure a proper fit.

3. Install the Framework

Begin by installing the framework or support structure for the ceiling panels. This may involve attaching tracks or channels to the underside of the deck. Follow the manufacturer’s instructions for proper placement and alignment.

4. Attach the Ceiling Panels

Once the framework is in place, begin attaching the aluminum ceiling panels. Secure the panels to the framework using the recommended fasteners or clips. Ensure that the panels are level and properly aligned.

5. Seal and Finish

After the panels are installed, check for any gaps or seams that need to be sealed. Apply any necessary sealants or finishing touches to complete the installation.

Design Ideas for Aluminum Under Deck Ceilings

To make the most of your aluminum under deck ceiling, consider these design ideas:

1. Create a Cozy Outdoor Room

Use the space beneath your deck to create a cozy outdoor room. Add comfortable furniture, decorative lighting, and outdoor rugs to create a relaxing and inviting area.

2. Incorporate LED Lighting

Install LED lighting in the ceiling panels to enhance the ambiance of the space. LED lights provide a modern and energy-efficient lighting solution that can be customized to suit your needs.

3. Add Ceiling Fans

Consider adding ceiling fans to improve airflow and comfort in the space below your deck. Choose fans that complement the design of the aluminum ceiling and provide effective cooling.

4. Use Color and Texture

Play with color and texture to enhance the visual appeal of your under deck ceiling. Choose panels with different finishes or colors to create a unique and stylish look.

5. Integrate Outdoor Heating

If you plan to use the space year-round, consider integrating outdoor heating elements. Patio heaters or built-in heating systems can help keep the area comfortable even in cooler weather.

Maintenance Tips for Aluminum Under Deck Ceilings

To ensure the longevity and performance of your aluminum under deck ceiling, follow these maintenance tips:

1. Regular Cleaning

Clean the ceiling panels regularly to remove dust and debris. Use a soft cloth or sponge with mild soap and water. Avoid abrasive cleaners that could damage the surface.

2. Inspect for Damage

Periodically inspect the ceiling for any signs of damage or wear. Address any issues promptly to prevent further damage and maintain the system’s functionality.

3. Check Seals and Fasteners

Ensure that all seals and fasteners are secure and functioning properly. Tighten any loose fasteners and replace damaged seals as needed.

4. Address Water Issues

If you notice any water leaks or drainage issues, address them promptly to prevent damage to the ceiling and the space below.

Conclusion

An Aluminum Under Deck Ceiling is a practical and stylish solution for enhancing your outdoor space. With its durability, low maintenance requirements, and modern aesthetic, it provides a functional and attractive addition to any deck. By understanding its benefits, choosing the right system, and following proper installation and maintenance procedures, you can create a comfortable and inviting outdoor area that you can enjoy year-round.

72 Industrial Ceiling Fan: Benefits, Features, and Installation Tips

When it comes to cooling large spaces effectively, the 72 Industrial Ceiling Fan stands out as a top choice. Combining powerful performance with a sleek industrial design, these fans are ideal for commercial spaces, large warehouses, and expansive living areas. This comprehensive guide explores the benefits, features, and installation tips for the 72 Industrial Ceiling Fan, helping you make an informed decision and maximize its potential in your space.

72 Industrial Ceiling Fan

Understanding the 72 Industrial Ceiling Fan

The 72 Industrial Ceiling Fan is a robust and stylish cooling solution designed to handle large areas with ease. Here’s a closer look at what makes these fans a popular choice:

What Is a 72 Industrial Ceiling Fan?

A 72 Industrial Ceiling Fan is characterized by its large blade span of 72 inches, which allows it to move a significant volume of air efficiently. These fans are specifically designed for industrial and commercial environments but are also suitable for large residential spaces. The industrial design often includes durable materials, heavy-duty motors, and a minimalist aesthetic that complements various décor styles.

Key Features

  1. Large Blade Span: With a blade span of 72 inches, these fans are capable of covering expansive areas, making them ideal for spaces with high ceilings or large open areas.
  2. Powerful Motor: The fan is equipped with a high-performance motor that ensures efficient airflow and cooling. The robust motor can handle continuous operation and high-speed settings.
  3. Durable Construction: Made from sturdy materials such as metal and high-quality composites, the 72 Industrial Ceiling Fan is built to withstand the demands of commercial and industrial environments.
  4. Energy Efficiency: Many models are designed to be energy-efficient, providing powerful airflow while minimizing energy consumption. This can lead to cost savings on electricity bills.
  5. Minimalist Design: The industrial design typically features clean lines and a functional appearance that fits well with modern and contemporary interior styles.

Read too: Exploring the Innovation and Efficiency of Ceiling Mounted Surgical Light Solutions: Illuminating Precision

Benefits of Installing a 72 Industrial Ceiling Fan

Opting for a 72 Industrial Ceiling Fan offers several advantages, especially for large spaces. Here’s why these fans are worth considering:

1. Enhanced Airflow

The primary benefit of a 72 Industrial Ceiling Fan is its ability to move a substantial amount of air. This results in improved air circulation and a more comfortable environment, especially in large spaces where traditional fans may fall short.

2. Effective Cooling

By distributing air evenly throughout the space, these fans help to maintain a consistent temperature. This can reduce the reliance on air conditioning systems, leading to lower energy costs and improved overall comfort.

3. Versatile Use

While ideal for industrial and commercial spaces, the 72 Industrial Ceiling Fan can also be used in large residential areas such as open-plan living rooms, vaulted ceilings, or large outdoor patios.

4. Aesthetic Appeal

The sleek, industrial design of these fans adds a modern and stylish touch to any space. Their minimalist appearance blends seamlessly with contemporary décor, making them both functional and visually appealing.

5. Durability and Longevity

Built with high-quality materials and robust construction, the 72 Industrial Ceiling Fan is designed for long-term use. It can withstand the wear and tear of frequent operation and maintain its performance over time.

Choosing the Right 72 Industrial Ceiling Fan

Selecting the ideal 72 Industrial Ceiling Fan involves several considerations to ensure it meets your needs and preferences. Here’s what to look for:

1. Blade Material and Design

The material and design of the blades affect the fan’s performance and appearance. Common blade materials include metal, wood, and composite materials. Choose a design that complements your space and provides the airflow you need.

2. Motor Type and Performance

Ensure that the fan’s motor is powerful enough to handle the size of your space. Look for high-performance motors with variable speed settings to customize airflow according to your requirements.

3. Energy Efficiency

Consider models that are designed to be energy-efficient. Look for fans with energy-saving features or certifications to minimize energy consumption and reduce operating costs.

4. Installation Requirements

Check the installation requirements for the fan, including ceiling height and mounting options. Some models may require professional installation, especially if you need to install a ceiling mount or additional support.

5. Additional Features

Modern 72 Industrial Ceiling Fans may come with additional features such as remote controls, LED lighting, or smart home integration. Evaluate these features based on your preferences and needs.

Installation Tips for the 72 Industrial Ceiling Fan

Proper installation is crucial for ensuring the fan operates efficiently and safely. Follow these tips for a successful installation:

1. Assess Ceiling Height

Ensure that the ceiling height is suitable for the fan. The fan should be installed at least 8 to 10 feet above the floor for optimal performance and safety.

2. Secure Mounting

Use appropriate mounting hardware and ensure that the fan is securely attached to the ceiling joists or structural supports. This will prevent wobbling or movement during operation.

3. Follow Manufacturer Instructions

Carefully follow the manufacturer’s installation instructions to ensure proper assembly and wiring. If you’re unsure about any aspect of the installation, consider hiring a professional.

4. Test the Fan

After installation, test the fan to ensure it operates smoothly and efficiently. Check for any unusual noises or vibrations and make any necessary adjustments.

5. Regular Maintenance

Regular maintenance is important to keep your fan in good working condition. Clean the blades and motor periodically, and inspect the fan for any signs of wear or damage.

Maintenance and Care

To ensure the longevity and performance of your 72 Industrial Ceiling Fan, follow these maintenance tips:

1. Regular Cleaning

Dust and debris can accumulate on the blades and motor, affecting performance. Clean the blades with a soft cloth or duster and remove any accumulated dust from the motor and housing.

2. Check for Loose Parts

Periodically inspect the fan for loose screws, bolts, or other components. Tighten any loose parts to prevent wobbling or operational issues.

3. Inspect the Motor

Check the motor for any signs of wear or unusual noises. If you notice any issues, consult a professional for repair or maintenance.

4. Lubricate Moving Parts

If your fan has a lubrication system, ensure that the moving parts are properly lubricated to reduce friction and wear.

Conclusion

The 72 Industrial Ceiling Fans is an excellent choice for anyone needing effective and stylish air circulation in large spaces. Its powerful performance, durable construction, and modern design make it a versatile option for both commercial and residential settings. By understanding its features, choosing the right model, and following proper installation and maintenance procedures, you can enjoy the benefits of enhanced airflow and a comfortable environment for years to come.

Wood Stove Ceiling Support Box: Essential Guide for Safe and Effective Installation

When installing a wood stove in your home, ensuring the proper support and ventilation is crucial for safety and efficiency. One essential component of this installation process is the Wood Stove Ceiling Support Box. This guide provides an in-depth look at what a Wood Stove Ceiling Support Box is, its importance, and how to choose and install it correctly to ensure optimal performance and safety.

Wood Stove Ceiling Support Box

What Is a Wood Stove Ceiling Support Box?

A Wood Stove Ceiling Support Box is a critical component in the installation of a wood stove or fireplace. It is designed to support and stabilize the stovepipe or chimney as it passes through the ceiling. This support box helps to secure the stovepipe or chimney in place, ensuring it remains properly aligned and stable, which is essential for both safety and efficiency.

Key Functions of a Wood Stove Ceiling Support Box

  1. Structural Support: The primary function of the ceiling support box is to provide structural support for the stovepipe or chimney. By securing the pipe to the ceiling, it helps prevent movement and potential damage.
  2. Ventilation: Proper ventilation is crucial for a wood stove to operate efficiently and safely. The support box helps ensure that the stovepipe or chimney is correctly aligned for optimal airflow and exhaust.
  3. Safety: A well-installed support box minimizes the risk of fire hazards. It prevents the stovepipe from coming loose or shifting, which could lead to overheating or dangerous fumes entering your home.
  4. Aesthetic Integration: The support box can also contribute to the overall look of your installation. It is often designed to blend with the ceiling and room decor, providing a neat and finished appearance.

Why Is a Wood Stove Ceiling Support Box Important?

Installing a wood stove involves more than just placing the stove itself; it requires proper handling of the stovepipe or chimney to ensure safety and efficiency. Here’s why a Wood Stove Ceiling Support Box is crucial:

1. Prevents Pipe Movement

Without proper support, stovepipes can shift or move, which can lead to misalignment, increased wear, and potential damage. The support box ensures that the pipe remains in place, reducing the risk of leaks and improving performance.

Read too: Exploring the Innovation and Efficiency of Ceiling Mounted Surgical Light Solutions: Illuminating Precision

2. Reduces Fire Risk

A poorly supported stovepipe can create gaps and areas where heat can escape, increasing the risk of fire. The support box helps maintain a secure connection between the pipe and the ceiling, reducing the risk of overheating and fire hazards.

3. Ensures Proper Ventilation

Correct ventilation is essential for efficient wood stove operation. The support box helps maintain the proper alignment of the stovepipe, ensuring that smoke and fumes are effectively vented out of your home, preventing indoor air pollution.

4. Provides Structural Integrity

A well-installed support box adds structural integrity to the entire stovepipe system. It helps distribute the weight of the pipe evenly and reduces stress on the ceiling, preventing potential damage over time.

Choosing the Right Wood Stove Ceiling Support Box

Selecting the right Wood Stove Ceiling Support Box involves several considerations to ensure it meets your needs and complies with safety standards. Here’s what to look for:

1. Size and Compatibility

Ensure that the support box you choose is compatible with the diameter and type of stovepipe or chimney you are using. Measure the dimensions of your stovepipe and ceiling opening to select a support box that fits correctly.

2. Material Quality

The support box should be made from durable, heat-resistant materials to withstand the high temperatures generated by the wood stove. Common materials include steel and heavy-duty aluminum. Check for fire-resistant coatings or insulation to enhance safety.

3. Installation Requirements

Consider the installation requirements of the support box. Some models may require professional installation, while others are designed for DIY projects. Ensure you follow the manufacturer’s instructions and local building codes for proper installation.

4. Aesthetic Considerations

While functionality is paramount, you may also want to consider the appearance of the support box. Choose a design that complements the look of your ceiling and room decor for a seamless integration.

Installation of a Wood Stove Ceiling Support Box

Proper installation of the Wood Stove Ceiling Support Box is essential for ensuring safety and efficiency. Here’s a general guide on how to install it:

1. Prepare the Ceiling

Before installing the support box, ensure that the ceiling area where it will be mounted is clean and free of debris. If necessary, cut an appropriate-sized hole in the ceiling to accommodate the support box and stovepipe.

2. Install the Support Box

Follow the manufacturer’s instructions for installing the support box. This typically involves securing the box to the ceiling joists or beams using screws or bolts. Ensure that the box is level and properly aligned with the stovepipe.

3. Attach the Stovepipe

Once the support box is securely installed, attach the stovepipe or chimney to the box. Ensure that all connections are tight and that there are no gaps. Use high-temperature sealant or gaskets as needed to prevent leaks.

4. Inspect and Test

After installation, inspect the entire system to ensure that everything is properly secured and aligned. Test the wood stove to ensure that it operates efficiently and that there are no issues with ventilation or airflow.

Maintenance and Inspection

Regular maintenance and inspection of your Wood Stove Ceiling Support Box are essential for long-term safety and performance. Here are some tips:

1. Regular Checks

Periodically inspect the support box and stovepipe connections for any signs of wear, damage, or loose fittings. Tighten any loose screws or bolts and replace any damaged components as needed.

2. Clean the System

Keep the stovepipe and support box clean from soot and debris. Regular cleaning helps maintain proper airflow and reduces the risk of chimney fires.

3. Professional Inspections

Consider having a professional inspect your wood stove installation periodically. A certified technician can check for any potential issues and ensure that everything is operating safely and efficiently.

Conclusion

A Wood Stove Ceiling Support Box is a vital component in the installation and maintenance of a wood stove system. It provides essential support, enhances safety, and ensures proper ventilation. By understanding its importance, choosing the right box, and following proper installation and maintenance procedures, you can enjoy the benefits of your wood stove while keeping your home safe and comfortable.

Western Ceiling Fans With Lights: Enhance Your Space with Style and Functionality

When it comes to home décor, ceiling fans with lights offer both practical benefits and aesthetic appeal. Western ceiling fans with lights, in particular, bring a distinctive charm and functionality to various interior styles, from rustic to contemporary. In this comprehensive guide, we’ll explore the features, benefits, and considerations of Western ceiling fans with lights, helping you choose the perfect option to elevate your living space.

Western Ceiling Fans With Lights

Understanding Western Ceiling Fans With Lights

Western ceiling fans with lights blend functionality with design, making them a popular choice for many homeowners. These fans not only provide essential cooling and air circulation but also integrate lighting to enhance the ambiance of your room. Let’s delve into the key aspects of Western ceiling fans with lights:

What Are Western Ceiling Fans With Lights?

Western ceiling fans with lights are designed to reflect the aesthetics and themes associated with Western-style décor. They often feature rustic, vintage, or rugged elements that resonate with the charm of the American West. These fans come equipped with integrated lighting, providing both illumination and cooling benefits in one elegant fixture.

Key Features

  1. Design Elements: Western ceiling fans with lights often incorporate design elements such as wooden blades, wrought iron details, and weathered finishes. These features contribute to the rugged, charming look characteristic of Western décor.
  2. Integrated Lighting: These fans come with built-in light fixtures, which can vary from simple, functional bulbs to more elaborate chandeliers or sconces. The lighting aspect not only brightens the room but also adds to the overall aesthetic.
  3. Durability: Built to withstand the demands of everyday use, Western ceiling fans with lights are typically made from high-quality materials such as metal and wood. Their durable construction ensures long-lasting performance.
  4. Versatility: Available in various sizes and styles, these fans can be used in different rooms, including living rooms, bedrooms, and even outdoor spaces like patios or porches.

Benefits of Installing Western Ceiling Fans With Lights

Installing Western ceiling fans with lights in your home offers several advantages. Here are some key benefits:

1. Enhanced Lighting

The integrated lighting feature of Western ceiling fans provides effective illumination for your room. Whether you need bright light for tasks or a softer glow for ambiance, these fans offer versatile lighting options. Many models allow you to adjust the brightness and color temperature to suit different needs and moods.

Read too: Exploring the Innovation and Efficiency of Ceiling Mounted Surgical Light Solutions: Illuminating Precision

2. Improved Air Circulation

Western ceiling fans with lights are designed to improve air circulation in your space. By circulating air efficiently, these fans help maintain a comfortable temperature, reduce humidity, and enhance overall comfort. This can be especially beneficial in rooms where cooling is needed in addition to lighting.

3. Stylish Design

The Western aesthetic brings a unique and charming look to your home. The rugged and rustic design elements of these fans complement various interior styles, including farmhouse, country, and ranch-themed décor. By incorporating Western ceiling fans with lights, you can enhance the visual appeal of your space.

4. Energy Efficiency

Ceiling fans are known for their energy-saving benefits. By improving air circulation, they can help reduce the need for air conditioning, leading to lower energy bills. The addition of integrated lighting means you have an all-in-one solution for both cooling and illumination, which can be more energy-efficient than using separate fixtures.

Choosing the Right Western Ceiling Fans With Lights

Selecting the perfect Western ceiling fan with lights involves considering several factors to ensure it fits your needs and preferences. Here are some tips to help you make an informed decision:

1. Room Size and Ceiling Height

The size of your room and the height of your ceiling are crucial factors in choosing the right ceiling fan. Larger rooms may require bigger fans with wider blade spans, while smaller rooms can benefit from more compact models. Additionally, if you have high ceilings, consider fans with adjustable downrods to ensure proper airflow.

2. Design and Style

Western ceiling fans with lights come in various designs, from traditional wooden blades to more modern interpretations. Consider the existing décor of your room and choose a fan that complements your style. Look for fans with features like distressed finishes, metal accents, or ornate details to enhance the Western aesthetic.

3. Light Options

Different models offer various lighting options, including adjustable brightness, dimmable features, and different types of bulbs. Decide on the type of lighting that best suits your needs. If you want flexibility, opt for a fan with adjustable lighting settings to create the desired ambiance.

4. Installation and Maintenance

Consider the installation process and whether you need professional help. Some fans are easier to install than others, and professional installation might be required for more complex models. Additionally, check for maintenance requirements, such as cleaning and replacing bulbs, to ensure long-term performance.

5. Energy Efficiency and Features

Look for fans with energy-efficient lighting options, such as LED bulbs, which consume less power and have a longer lifespan. Some fans also come with remote controls or smart features, allowing you to adjust settings conveniently.

Popular Styles

Western ceiling fans with lights are available in various styles, each offering a unique look and functionality. Here are some popular styles to consider:

1. Rustic Lodge Style

This style features fans with wooden blades, metal accents, and a rugged appearance. The rustic lodge style often includes elements like antler motifs or vintage finishes, making it ideal for cabins or country homes.

2. Western Farmhouse Style

Fans in the Western farmhouse style typically feature a blend of wood and metal with a distressed finish. This style complements farmhouse décor and adds a touch of charm to any room.

3. Vintage Western Style

Vintage Western fans often include classic design elements such as ornate metalwork, antique finishes, and traditional blade shapes. These fans evoke a nostalgic feel and fit well in historic or period-themed homes.

4. Contemporary Western Style

Contemporary Western fans offer a modern twist on traditional Western design. These fans may feature sleek lines, minimalist designs, and a combination of materials such as wood and brushed metal.

Maintenance and Care for Western Ceiling Fans With Lights

Proper maintenance ensures that your Western ceiling fan with lights remains in good working condition. Here are some tips for keeping your fan in top shape:

1. Regular Cleaning

Dust and dirt can accumulate on the blades and light fixtures, affecting the performance and appearance of your fan. Clean the blades regularly with a soft cloth or duster, and wipe down the light fixtures as needed. Ensure the power is turned off before cleaning.

2. Check for Loose Parts

Periodically check for loose screws, bolts, or other components. Tighten any loose parts to prevent wobbling or rattling, which can affect the fan’s operation and longevity.

3. Replace Bulbs as Needed

If the lighting in your fan dims or goes out, replace the bulbs promptly. Consider using energy-efficient LED bulbs to reduce energy consumption and extend the life of the lighting.

4. Inspect the Motor and Blades

Regularly inspect the motor and blades for signs of wear or damage. If you notice any issues with the motor or unusual noises, contact a professional for repair or maintenance.

Conclusion

Western ceiling fans with lights offer a stylish and functional addition to your home décor. With their blend of rustic charm and modern convenience, these fans enhance both the aesthetic appeal and comfort of your living space. By understanding the benefits, choosing the right style, and maintaining your fan properly, you can enjoy the perfect combination of lighting and cooling for years to come.

TV Mount for Sloped Ceiling: Optimizing Your Space

Mounting a TV on a wall is a common solution for maximizing space and enhancing the viewing experience, but what happens when your ceiling is sloped? A sloped ceiling presents unique challenges when it comes to installing a TV mount, but with the right tools and techniques, you can achieve a professional and aesthetically pleasing result. This article will explore everything you need to know about choosing and installing the perfect TV mount for sloped ceiling.

Tv Mount For Sloped Ceiling

Understanding the Challenges of Sloped Ceilings

Sloped ceilings add architectural interest and charm to a space, but they can complicate certain installations, like mounting a TV. The angle of the ceiling, the height, and the position of the studs all play crucial roles in determining the best way to secure your television.

1. Angle Considerations

The slope of your ceiling will affect the angle at which the TV mount needs to be installed. If the mount isn’t adjustable, the TV might end up tilted too far upward or downward, leading to an uncomfortable viewing experience.

Read too: Discovering the Charm of Nautical Outdoor Ceiling Fans for Your Coastal Retreat: Sail into Style

2. Height and Viewing Distance

The height of the ceiling and the distance from the seating area to the TV must be considered. Sloped ceilings often lead to higher mounting points, so it’s essential to calculate the optimal height for comfortable viewing.

3. Stud Placement

Finding studs on a sloped ceiling can be tricky, but it’s crucial for a secure installation. The angle may cause the studs to be positioned differently than on a flat ceiling, so locating them accurately is key to a stable mount.

Choosing the Right TV Mount for a Sloped Ceiling

Not all TV mounts are created equal, especially when it comes to mounting on a sloped ceiling. Here’s what to look for in a TV mount for sloped ceilings:

1. Adjustable Angle Mounts

One of the most critical features to look for is adjustability. A mount that allows you to tilt and swivel the TV will give you the flexibility to find the perfect viewing angle, regardless of the ceiling’s slope.

2. Ceiling Mounts vs. Wall Mounts

While wall mounts are common, ceiling mounts might be a better option for sloped ceilings. Ceiling mounts often provide more flexibility in positioning and can be angled to match the slope, ensuring the TV is perfectly aligned with the viewer’s line of sight.

3. Weight Capacity

Ensure the mount you choose can support the weight of your TV. Sloped ceilings might require extra reinforcement, so always check the weight ratings and, if in doubt, opt for a mount with a higher capacity than you think you’ll need.

4. Cable Management

A good TV mount should also offer some form of cable management, especially on a sloped ceiling where cables can be more visible. Look for mounts that allow you to route cables neatly and out of sight.

Top TV Mount Options for Sloped Ceilings

When it comes to finding the best TV mount for sloped ceilings, certain models stand out for their versatility, ease of installation, and ability to accommodate different ceiling angles. Here are a few top picks:

1. VIVO Ceiling TV Mount

The VIVO Ceiling TV Mount is a popular choice for sloped ceilings due to its robust design and wide range of motion. It offers a 360-degree swivel and a 15-degree tilt, making it easy to adjust the TV to the perfect angle. This mount is also height-adjustable, which is ideal for high or vaulted ceilings.

2. VideoSecu TV Ceiling Mount

Another excellent option is the VideoSecu TV Ceiling Mount, which is known for its durability and flexibility. It supports a variety of TV sizes and weights, and it features an adjustable tilt and swivel mechanism to accommodate sloped ceilings. Its integrated cable management system helps keep wires organized and out of sight.

3. Loctek CM2 Adjustable TV Ceiling Mount

The Loctek CM2 is a versatile mount that works well on sloped ceilings. It offers extensive adjustability with tilt, swivel, and rotation features, making it easy to position the TV at the perfect viewing angle. Its sturdy construction ensures your TV stays securely in place, even on the most angled ceilings.

Installation Guide for Mounting a TV on a Sloped Ceiling

Mounting a TV on a sloped ceiling might seem daunting, but with the right approach, you can achieve a professional result. Here’s a step-by-step guide to help you through the process:

1. Measure and Mark the Spot

Start by determining the optimal height and position for the TV. Consider the viewing angle and distance from the seating area. Use a stud finder to locate the studs in the ceiling and mark the spot where the mount will be attached.

2. Pre-Drill Holes

Once you’ve marked the spots, pre-drill holes into the studs. This will make it easier to install the mounting bracket and ensure that the screws are securely anchored.

3. Attach the Mounting Bracket

Secure the mounting bracket to the ceiling using heavy-duty screws. Make sure the bracket is level, even if the ceiling is sloped. Most adjustable mounts will allow you to make slight adjustments to ensure the TV hangs straight.

4. Attach the TV to the Bracket

Carefully lift the TV and attach it to the mounting bracket. Depending on the size and weight of the TV, you might need an extra set of hands to help with this step. Ensure the TV is securely fastened to the bracket and that all connections are tight.

5. Adjust the Viewing Angle

Once the TV is mounted, adjust the tilt and swivel settings to achieve the desired viewing angle. Sit in different spots in the room to ensure the TV is visible from all intended viewing positions.

6. Organize the Cables

Use the mount’s cable management system to hide and organize the cables. This will give your installation a clean, professional look.

7. Test the Setup

Finally, turn on the TV and test the setup. Make sure the picture is clear from all angles and that the mount is holding the TV securely. Make any necessary adjustments to the angle or height.

Enhancing the Viewing Experience

Mounting a TV on a sloped ceiling opens up new possibilities for room design and viewing comfort. Here are some tips to enhance the viewing experience:

1. Consider the Lighting

Sloped ceilings can affect how light is distributed in a room. Make sure there is no glare on the TV screen by adjusting the angle or using curtains to block out sunlight.

2. Sound Setup

Ensure your sound system is configured to complement the TV’s position. Sloped ceilings can sometimes cause sound to bounce differently, so you may need to adjust speaker placement.

3. Use a Soundbar

A soundbar mounted just below the TV can improve audio quality and keep the setup sleek and simple.

Conclusion

Choosing the right TV mount for sloped ceilings involves careful consideration of the ceiling’s angle, height, and the weight of the TV. By selecting a mount with adjustable features and following proper installation techniques, you can create a comfortable and aesthetically pleasing viewing experience in any room with a sloped ceiling. Whether you’re looking to save space or add a modern touch to your home, the right TV mount can make all the difference.

Metallic Gold Ceiling Paint: A Complete Guide

When it comes to home decor, ceilings are often overlooked. However, they provide an excellent canvas for creativity and can dramatically enhance the ambiance of a room. One of the most luxurious and eye-catching options for ceiling paint is metallic gold ceiling paint. This guide will explore the benefits, application techniques, and design ideas for using metallic gold on your ceiling, helping you achieve a stunning and sophisticated look.

Metallic Gold Ceiling Paint

Why Choose Metallic Gold Ceiling Paint?

Metallic gold ceiling paint can elevate the look of any room by adding a touch of glamour and sophistication. Here’s why you should consider this option:

1. Adds Elegance and Luxury

Gold is synonymous with opulence and elegance. A metallic gold ceiling can make a room feel more luxurious and create a focal point that catches the eye. It’s a bold choice that can transform an ordinary space into an extraordinary one.

2. Reflects Light

Metallic finishes reflect light, making rooms appear brighter and more open. This is particularly beneficial in spaces with limited natural light or in rooms that you want to feel more expansive.

3. Versatile Design Option

Metallic gold works well with various design styles, from modern and contemporary to classic and traditional. It complements a wide range of color schemes and can be paired with different textures and materials to create a unique look.

Read too: Discovering the Charm of Nautical Outdoor Ceiling Fans for Your Coastal Retreat: Sail into Style

4. Creates Visual Interest

A metallic finish adds depth and dimension to your ceiling, making it more than just a background element. It can draw attention and create a dramatic effect, enhancing the overall aesthetics of the room.

How to Choose the Right Metallic Gold Ceiling Paint

When selecting metallic gold ceiling paint, consider the following factors to ensure you achieve the desired effect:

1. Finish Type

Metallic gold paints come in various finishes, including high gloss, satin, and matte. The finish you choose will affect how the light reflects and how the paint interacts with other elements in the room. High gloss offers the most reflective quality, while satin provides a softer sheen.

2. Shade of Gold

Gold paints come in different shades, from bright yellow gold to deeper, more muted tones. Consider the existing color palette of your room and choose a shade that complements your decor. Lighter shades can brighten up a space, while darker shades add warmth and richness.

3. Quality of Paint

Invest in high-quality metallic paint to ensure a smooth application and long-lasting finish. High-quality paints provide better coverage and a more consistent color, reducing the need for multiple coats.

4. Brand and Product Reviews

Research different brands and read product reviews to find a paint that meets your needs. Look for paints that are specifically designed for ceilings and have good reviews for coverage and durability.

How to Apply Metallic Gold Ceiling Paint

Applying metallic gold ceiling paint requires careful preparation and technique to achieve a flawless finish. Follow these steps for the best results:

1. Preparation

  • Clean the Ceiling: Remove dust, cobwebs, and dirt from the ceiling. Use a mild detergent and water if necessary.
  • Repair Any Imperfections: Fill any cracks or holes with a ceiling repair compound and sand the area smooth once it’s dry.
  • Prime the Ceiling: Apply a primer to the ceiling to ensure better adhesion of the metallic paint. Choose a primer that is suitable for the type of ceiling paint you are using.

2. Gather Your Supplies

  • Paint: Choose a high-quality metallic gold ceiling paint.
  • Brushes and Rollers: Use a high-quality roller with a smooth nap for an even application. A brush may be needed for edges and corners.
  • Drop Cloths: Protect your floors and furniture from paint splatters and drips.
  • Painter’s Tape: Use tape to mask off areas you don’t want to paint, such as trim and walls.

3. Application

  • Apply the First Coat: Start by applying the paint with a roller. Use long, even strokes to ensure a smooth finish. Avoid overloading the roller with paint to prevent drips and streaks.
  • Blend the Edges: When rolling, blend the edges to avoid visible lines or overlap marks.
  • Allow to Dry: Let the first coat dry completely before applying the second coat. Follow the manufacturer’s drying time recommendations.
  • Apply the Second Coat: Once the first coat is dry, apply a second coat to achieve full coverage and depth.

4. Finishing Touches

  • Remove Painter’s Tape: Carefully remove the painter’s tape while the paint is still slightly wet to prevent peeling.
  • Touch Up: Inspect the ceiling for any missed spots or imperfections and touch up as needed.

Design Ideas with Metallic Gold Ceiling Paint

Here are some design ideas to inspire you when using metallic gold ceiling paint:

1. Accent Ceilings

Use metallic gold paint to create an accent ceiling in a dining room, living room, or bedroom. Pair it with neutral walls and furnishings to let the ceiling shine as a focal point.

2. Coffered Ceilings

Enhance the architectural features of a coffered ceiling by painting the recessed panels with metallic gold. This adds a touch of luxury and highlights the ceiling’s design.

3. Gilded Borders

Apply metallic gold paint to create gilded borders or patterns on the ceiling. This technique works well in rooms with intricate moldings or as part of a custom design.

4. Complementary Décor

Coordinate metallic gold ceiling paint with other gold or metallic accents in the room, such as light fixtures, frames, and accessories, to create a cohesive and elegant look.

Maintenance and Care

To keep your metallic gold ceiling paint looking its best, follow these maintenance tips:

1. Regular Cleaning

Dust the ceiling regularly to prevent the buildup of dirt and grime. Use a soft, dry cloth or a dusting tool to avoid damaging the paint.

2. Avoid Harsh Cleaners

Avoid using harsh cleaners or abrasive scrubbing tools on the ceiling, as these can damage the metallic finish. If needed, use a mild detergent and a soft sponge.

3. Address Issues Promptly

Address any stains, marks, or damage promptly to prevent further issues. Touch up paint as needed to maintain a fresh and clean appearance.

Conclusion

Metallic gold ceiling paint offers a unique and luxurious way to enhance the beauty of your space. By carefully selecting the right shade, finish, and application technique, you can achieve a stunning and sophisticated ceiling that adds elegance and drama to any room. Whether used as an accent or a bold statement, metallic gold paint can transform your ceiling into a captivating feature of your home decor.

Light for Vaulted Ceiling: Illuminating Your Space

Light for Vaulted Ceiling. Vaulted ceilings are a stunning architectural feature that can transform a room, creating a sense of openness and grandeur. However, lighting these high, angled ceilings can pose a unique challenge. Selecting the right lighting fixtures is crucial to enhance both the beauty and functionality of your space. In this article, we’ll explore the best options for lighting a vaulted ceiling, discuss various types of fixtures, and provide tips to achieve the perfect ambiance.

Light For Vaulted Ceiling

Why Proper Lighting Matters for Vaulted Ceilings

Vaulted ceilings can make a room feel expansive and airy, but they also present specific lighting challenges:

1. Height and Angle Challenges

The height and slope of a vaulted ceiling can make it difficult to illuminate the entire space evenly. Traditional lighting fixtures may not provide sufficient coverage or might look out of place against the architectural features.

Read too: Discovering the Charm of Nautical Outdoor Ceiling Fans for Your Coastal Retreat: Sail into Style

2. Creating Ambiance

Proper lighting can enhance the architectural beauty of a vaulted ceiling while also creating a comfortable and inviting atmosphere. Choosing the right fixtures can highlight structural elements and add warmth to the room.

3. Functionality

Effective lighting is essential for both practical tasks and aesthetic purposes. For example, bright task lighting is necessary for activities such as reading or cooking, while softer ambient lighting sets the mood.

Types of Lighting for Vaulted Ceilings

When selecting lighting for a vaulted ceiling, consider a combination of fixtures to achieve both functional and aesthetic goals:

1. Chandeliers

Chandeliers are a classic choice for vaulted ceilings, adding a touch of elegance and sophistication. Here’s why they work well:

  • Scale and Drama: Chandeliers are often large and make a bold statement, fitting well with the height of vaulted ceilings.
  • Variety of Styles: From modern to traditional, chandeliers come in various designs to match your décor.

Installation Tips:

  • Height Consideration: Ensure the chandelier is hung at an appropriate height to avoid obstructions and to maintain visual balance.
  • Scale: Choose a chandelier that complements the size of the room and the ceiling height.

2. Pendant Lights

Pendant lights can be used alone or in clusters to provide focused lighting in specific areas. They are versatile and come in a wide range of designs:

  • Adjustable Lengths: Many pendant lights have adjustable lengths, making them ideal for high ceilings.
  • Design Flexibility: Available in numerous styles, sizes, and materials, pendant lights can be customized to fit your room’s aesthetic.

Installation Tips:

  • Spacing: If using multiple pendants, space them evenly to avoid visual clutter.
  • Height Adjustment: Ensure pendants are hung at a height that provides adequate light without overwhelming the space.

3. Recessed Lighting

Recessed lighting or can lights are installed into the ceiling, providing a sleek, unobtrusive look:

  • Even Illumination: Recessed lights can be placed strategically to provide even lighting throughout the room.
  • Highlighting Features: They can be used to highlight architectural details or artwork on the walls.

Installation Tips:

  • Placement: Space the lights evenly to avoid shadows and ensure comprehensive coverage.
  • Dimming Options: Consider installing dimmable recessed lights to adjust the ambiance as needed.

4. Track Lighting

Track lighting is flexible and allows you to direct light where it’s needed:

  • Adjustable Heads: Track lights come with adjustable heads that can be aimed to highlight specific areas or features.
  • Customization: You can add or remove light fixtures on the track, making it adaptable to changing needs.

Installation Tips:

  • Directionality: Position the track so that the light can be directed towards focal points or work areas.
  • Design Integration: Choose a track style that complements the overall design of the room.

5. Wall Sconces

Wall sconces are mounted on the walls and can add both functional and decorative lighting:

  • Accent Lighting: They can provide accent or task lighting without cluttering the ceiling space.
  • Complementary Design: Wall sconces come in various designs to enhance the room’s décor.

Installation Tips:

  • Height and Placement: Mount sconces at eye level for the best effect and ensure they are placed to provide adequate illumination for tasks or decoration.

Tips for Choosing the Right Light for Vaulted Ceilings

When selecting lighting for a vaulted ceiling, consider these key factors:

1. Scale and Proportion

Choose lighting fixtures that are proportionate to the size and height of the room. Large fixtures like chandeliers or pendant lights work well in spacious rooms, while smaller fixtures can be used in more compact areas.

2. Layered Lighting

Combine different types of lighting to create a balanced and versatile lighting scheme. For example, use a chandelier for ambient lighting, recessed lights for general illumination, and wall sconces for accent lighting.

3. Light Temperature

Consider the color temperature of the bulbs. Warm white lights create a cozy atmosphere, while cool white lights are better for task lighting. Use a combination of light temperatures to achieve the desired effect.

4. Energy Efficiency

Opt for energy-efficient lighting options like LED bulbs. They not only save on electricity costs but also have a longer lifespan compared to traditional incandescent bulbs.

5. Ease of Maintenance

Choose fixtures that are easy to clean and maintain, especially since vaulted ceilings can be challenging to access. Consider fixtures with removable parts or those that require minimal upkeep.

Cost Considerations

The cost of lighting for vaulted ceiling can vary widely depending on the type and style of fixtures:

1. Fixture Costs

  • Chandeliers: Prices can range from $200 to $2000 or more, depending on size, design, and material.
  • Pendant Lights: Typically cost between $100 and $500, though custom designs can be more expensive.
  • Recessed Lighting: Installation costs can range from $150 to $400 per fixture, including labor.
  • Track Lighting: Costs can vary from $100 to $600, depending on the system and number of fixtures.
  • Wall Sconces: Generally priced between $50 and $300 each.

2. Installation Costs

Professional installation costs can range from $50 to $150 per hour, depending on the complexity of the job and local rates. Some fixtures may require additional structural modifications or electrical work, which can impact the overall cost.

Conclusion

Choosing the right light for vaulted ceiling can significantly enhance the beauty and functionality of your space. By understanding the various lighting options and considering factors such as scale, placement, and energy efficiency, you can create a well-lit and inviting environment. Whether you opt for a dramatic chandelier, versatile pendant lights, or sleek recessed lighting, the right choice will help you make the most of your vaulted ceiling and add a touch of elegance to your home.

Hardwood Flooring on Ceiling: Elevating Your Space

In interior design, creative and unconventional choices often result in standout features that enhance the aesthetic appeal of a home. One such bold and sophisticated option is using hardwood flooring on ceiling. This technique, though less common than traditional ceiling treatments, offers a unique way to bring warmth and texture to any room. In this article, we will explore the benefits, installation process, cost considerations, and design ideas for incorporating hardwood flooring on your ceiling.

Hardwood Flooring On Ceiling

Why Choose Hardwood Flooring on Ceiling?

Hardwood flooring on the ceiling is not just about aesthetics; it offers several practical benefits as well:

1. Enhanced Aesthetics

Hardwood ceilings add a touch of elegance and natural beauty that’s hard to match with other materials. The grain patterns and rich textures of wood create a visually striking contrast against traditional ceiling materials like drywall or plaster.

2. Warmth and Acoustics

Wood has natural insulating properties that can help regulate temperature and improve acoustics in a room. By installing hardwood on the ceiling, you not only enhance the room’s visual appeal but also contribute to a more comfortable and acoustically balanced environment.

3. Durability

High-quality hardwood is known for its durability and longevity. Unlike some ceiling materials that may require frequent repairs or replacements, a hardwood ceiling, if properly maintained, can last for many years.

Read too: Discovering the Charm of Nautical Outdoor Ceiling Fans for Your Coastal Retreat: Sail into Style

Types of Hardwood Flooring for Ceilings

When choosing hardwood for your ceiling, consider the following types:

1. Solid Hardwood

Solid hardwood planks are made from a single piece of wood. They offer a classic look and are available in various species, such as oak, maple, and walnut. Solid hardwood is robust and can add significant character to a room.

2. Engineered Hardwood

Engineered hardwood consists of multiple layers of wood veneers bonded together. This type of wood is more stable and less prone to warping compared to solid hardwood, making it a practical choice for ceiling applications.

3. Reclaimed Wood

For a rustic and unique appearance, reclaimed wood is an excellent option. It’s often salvaged from old buildings and can bring a sense of history and charm to your ceiling.

Installation Process for Hardwood Flooring on Ceiling

Installing hardwood flooring on a ceiling is a specialized task that requires careful planning and execution. Here’s a step-by-step guide to the process:

1. Preparation

  • Assess the Structure: Ensure that your ceiling can support the weight of hardwood flooring. Consult with a structural engineer if necessary.
  • Choose the Wood: Select the type of hardwood that suits your design preferences and budget. Make sure to account for the wood’s expansion and contraction properties.

2. Preparation of the Ceiling

  • Remove Existing Ceiling Material: If there’s an existing ceiling material, such as drywall, it may need to be removed to ensure proper adhesion of the hardwood.
  • Install Support Beams: Depending on the type of wood and the weight, you might need to install additional support beams to secure the hardwood planks.

3. Acclimation

  • Acclimate the Wood: Before installation, let the hardwood acclimate to the room’s temperature and humidity. This helps prevent warping or expansion after installation.

4. Installation

  • Lay Out the Planks: Plan the layout of the planks. Start from one corner of the ceiling and work your way across. Use a chalk line to ensure straight rows.
  • Adhere the Planks: Depending on the type of installation, you may use nails, screws, or adhesive to attach the planks. Ensure each plank is securely fixed and there are no gaps.
  • Finishing Touches: Once all the planks are installed, sand the surface if needed and apply a finish to protect the wood and enhance its appearance.

Cost Considerations

The cost of installing hardwood flooring on a ceiling varies based on several factors:

1. Material Costs

  • Hardwood Type: The type of hardwood you choose impacts the cost. Solid hardwood is generally more expensive than engineered or reclaimed wood.
  • Finish and Treatment: Additional costs for finishing, sealing, or treating the wood should be considered. High-quality finishes can add to the overall expense.

2. Labor Costs

  • Professional Installation: Hiring a professional for installation can cost between $3 to $7 per square foot, depending on the complexity of the job and the local labor rates.
  • DIY Costs: If you choose to install the hardwood yourself, you’ll save on labor costs but need to invest in tools and materials. Factor in the cost of tools, adhesive, and any additional materials required.

3. Additional Costs

  • Structural Modifications: If structural modifications are needed to support the hardwood ceiling, this can add to the total cost. Consult with a contractor to get an accurate estimate.

Design Ideas for Hardwood Ceilings

Incorporating hardwood flooring on your ceiling opens up a range of design possibilities:

1. Wood Slat Ceilings

Create a modern and sleek look with thin wood slats arranged in parallel. This design adds visual interest and can make a room feel more expansive.

2. Exposed Beams

For a rustic or industrial feel, combine hardwood ceiling planks with exposed beams. This design highlights the natural beauty of the wood and adds architectural interest.

3. Contrasting Colors

Use contrasting wood finishes or colors to create a dynamic ceiling. For example, dark wood planks can be paired with lighter wall colors for a striking effect.

4. Patterns and Designs

Experiment with different patterns, such as herringbone or chevron, to add a unique touch to your ceiling. These patterns can create visual depth and make your ceiling a focal point of the room.

Maintenance and Care

To keep your hardwood ceiling looking its best, follow these maintenance tips:

1. Regular Dusting

Dust the ceiling regularly to prevent buildup. Use a soft cloth or duster to avoid scratching the wood.

2. Cleaning

Clean the ceiling with a damp cloth and mild wood cleaner. Avoid using excessive water, as it can damage the wood.

3. Check for Damage

Inspect the ceiling periodically for any signs of damage, such as cracks or warping. Address any issues promptly to maintain the integrity of the wood.

Conclusion

Incorporating hardwood flooring on ceiling is a bold and stylish choice that can transform the look and feel of a room. While the installation process requires careful planning and consideration, the results can be stunning. By understanding the costs, installation steps, and design possibilities, you can make an informed decision and enjoy the timeless beauty of hardwood in a new and exciting way.

Cost to Paint Garage Walls and Ceiling: A Comprehensive Guide

Painting your garage walls and ceiling can significantly improve the appearance and functionality of the space. Whether you’re preparing your garage for a new use, improving its aesthetics, or simply looking to refresh the existing paint job, understanding the costs involved is essential. In this guide, we’ll explore the factors that influence the cost to paint garage walls and ceiling, provide a detailed breakdown of expenses, and offer tips for budgeting your painting project.

Cost To Paint Garage Walls And Ceiling

Factors Influencing the Cost to Paint Garage Walls and Ceiling

When calculating the cost to paint garage walls and ceiling, several factors come into play:

1. Size of the Garage

The size of your garage is one of the most significant factors affecting the overall cost. Larger garages will require more paint, additional labor, and possibly more prep work. To estimate the cost, measure the total square footage of the walls and ceiling that need painting.

2. Condition of the Walls and Ceiling

The condition of your garage walls and ceiling can impact the cost. If the surfaces are in poor condition with cracks, stains, or peeling paint, additional preparation work will be needed. This may include cleaning, sanding, and patching holes, which can increase the overall cost.

Read too: Discovering the Charm of Nautical Outdoor Ceiling Fans for Your Coastal Retreat: Sail into Style

3. Type of Paint

The type of paint you choose affects the cost. There are various options available, including:

  • Latex Paint: Commonly used for interior walls and ceilings, latex paint is easy to apply and clean up. It’s typically less expensive but may require multiple coats for complete coverage.
  • Oil-Based Paint: More durable and suitable for surfaces that experience heavy wear. Oil-based paints are usually more expensive and require special cleaning solvents.
  • Specialty Paints: For garages, you might opt for specialty paints such as mildew-resistant or stain-blocking paints, which can be more costly.

4. Color and Finish

The color and finish of the paint also impact the cost. Lighter colors generally require fewer coats to achieve full coverage compared to darker colors. Additionally, finishes such as gloss or semi-gloss are typically more expensive than flat or matte finishes.

5. Preparation and Cleanup

Proper preparation and cleanup are crucial for a successful paint job. This includes moving furniture, covering floors, taping edges, and cleaning the area. If you hire professionals, these tasks will be included in their quote. DIY projects will require you to factor in the cost of supplies and your time.

6. Labor Costs

Labor costs vary depending on whether you hire professional painters or choose to tackle the project yourself. Professional painters generally charge by the hour or by the square foot. The complexity of the job, including the need for primer or multiple coats, can affect labor costs.

Cost Breakdown for Painting Garage Walls and Ceiling

Here’s a general breakdown of costs associated with painting garage walls and ceiling:

1. Material Costs

  • Paint: On average, paint costs between $20 to $50 per gallon. One gallon typically covers about 350 to 400 square feet. For a standard two-car garage, you might need 2-3 gallons of paint for walls and 1-2 gallons for the ceiling, depending on the surface and number of coats required.
  • Supplies: Additional supplies include brushes, rollers, trays, painter’s tape, drop cloths, and cleaning materials. These can add an extra $50 to $100 to your total cost.

2. Preparation Costs

  • Surface Prep: If the walls and ceiling require extensive preparation, such as sanding or patching, the cost can range from $100 to $300. This includes filling holes, repairing cracks, and applying primer if needed.

3. Labor Costs

  • Professional Painters: Hiring professional painters can cost between $2 to $6 per square foot. For a typical two-car garage, this can amount to $800 to $2,000, depending on the complexity of the job and the local labor rates.
  • DIY Costs: If you choose to paint the garage yourself, you’ll save on labor costs but will need to account for your time and the cost of renting or purchasing equipment.

Tips for Budgeting Your Garage Painting Project

To ensure you stay within budget, consider the following tips:

1. Obtain Multiple Quotes

If you’re hiring professionals, obtain quotes from several painters to compare prices and services. Ensure each quote includes the same scope of work to make a fair comparison.

2. Choose Paint Wisely

Select a paint that fits your budget but doesn’t compromise on quality. Mid-range latex paints are usually a good choice for most garage painting projects, offering a balance between cost and durability.

3. Do It Yourself

If you have the time and inclination, doing the painting yourself can save you a significant amount on labor costs. Ensure you have the necessary tools and follow best practices for preparation and application to achieve a professional-looking finish.

4. Plan for Extra Costs

Always budget for unexpected expenses. This might include additional supplies, touch-ups, or unforeseen repairs. Setting aside an extra 10-20% of your total budget can help cover these costs.

Conclusion

Understanding the cost to paint garage walls and ceiling involves considering various factors such as size, condition, type of paint, and labor. By carefully evaluating these aspects, you can make informed decisions that align with your budget and achieve the desired results.

Whether you choose to hire professionals or tackle the project yourself, proper planning and budgeting will ensure a successful and satisfying painting experience. With the right approach, you can transform your garage into a more functional and appealing space.

Clean Room Ceiling Tile: Enhancing Hygiene and Functionality

When it comes to designing and maintaining a clean room, every detail matters—especially the ceiling tiles. Clean room ceiling tiles are not just another building material; they play a crucial role in maintaining the sterile environment required in various industries, such as pharmaceuticals, biotechnology, electronics, and healthcare. In this comprehensive guide, we will explore everything you need to know about clean room ceiling tile, from their importance and types to installation and maintenance tips.

Clean Room Ceiling Tiles

Understanding

Clean room environments are highly controlled spaces where the presence of airborne particles, microorganisms, and other contaminants must be minimized. The ceiling in a clean room is a critical component that directly impacts the room’s ability to maintain strict cleanliness standards. Here’s why clean room ceiling tiles are so important:

1. Contamination Control

One of the primary purposes of clean room ceiling tiles is to control contamination. These tiles are designed to prevent the shedding of particles, which can introduce contaminants into the clean room environment. The tiles are typically made from non-porous materials that do not harbor dust, microbes, or other particulates, ensuring a sterile environment.

2. Airflow Management

Clean room ceiling tiles play a vital role in the proper distribution of air within the clean room. Many clean rooms use ceiling-mounted HEPA (High-Efficiency Particulate Air) filters to provide a constant flow of clean air. The design and installation of the ceiling tiles must support this airflow, ensuring that clean air circulates effectively while maintaining the room’s pressurization.

3. Durability and Chemical Resistance

In clean room settings, the ceiling tiles must withstand regular cleaning with strong disinfectants and chemicals without degrading or losing their structural integrity. Clean room ceiling tiles are engineered to resist corrosion, staining, and chemical reactions, ensuring long-lasting performance.

4. Ease of Maintenance

Because clean rooms require frequent cleaning and maintenance, the ceiling tiles must be easy to clean and maintain. Tiles that are resistant to stains and chemical damage can significantly reduce the time and effort required to maintain a clean room, helping to minimize downtime and maintain high productivity.

Types of Clean Room Ceiling Tiles

There are several types of clean room ceiling tiles available, each designed to meet specific requirements depending on the level of cleanliness needed. Understanding these different types will help you choose the right tiles for your clean room environment.

1. Vinyl-Faced Gypsum Ceiling Tiles

Vinyl-faced gypsum tiles are among the most common types of clean room ceiling tiles. These tiles consist of a gypsum core covered with a durable vinyl surface, which is non-porous and easy to clean. The vinyl surface prevents dust and particles from accumulating, making it ideal for environments where cleanliness is critical. These tiles are often used in pharmaceutical and biotechnology clean rooms.

Read too: Bathroom Flooded Through the Ceiling: A Comprehensive Guide

2. Aluminum Ceiling Tiles

Aluminum clean room ceiling tiles are known for their durability and resistance to corrosion. They are lightweight, easy to install, and can be used in environments where chemical resistance is a priority. Aluminum tiles are also non-porous and do not support the growth of mold or bacteria, making them suitable for clean rooms in industries such as electronics and healthcare.

3. Fiberglass Ceiling Tiles

Fiberglass tiles are designed for clean rooms where superior sound absorption is required, in addition to cleanliness. These tiles have a fiberglass core that provides excellent acoustic performance, reducing noise levels in the clean room. The tiles are typically covered with a smooth, cleanable surface that resists dust and particles. Fiberglass tiles are commonly used in laboratories and research facilities.

4. PVC Ceiling Tiles

PVC (Polyvinyl Chloride) ceiling tiles are another popular choice for clean rooms. These tiles are completely non-porous, resistant to chemicals, and easy to clean, making them ideal for environments where frequent sanitization is required. PVC tiles are also lightweight and can be installed quickly, making them a cost-effective option for many clean room applications.

Choosing the Right Clean Room Ceiling Tiles

Selecting the right clean room ceiling tiles involves considering several factors, including the specific requirements of your clean room, the level of cleanliness needed, and the environmental conditions. Here are some key factors to consider:

1. Clean Room Classification

Clean rooms are classified based on the number of particles per cubic meter of air, with different industries requiring different levels of cleanliness. For example, an ISO Class 5 clean room requires fewer than 3,520 particles per cubic meter, while an ISO Class 8 clean room allows up to 3,520,000 particles. The classification of your clean room will determine the type of ceiling tiles you need. Higher classifications require more stringent contamination controls, meaning you will need tiles that are highly resistant to particle shedding and easy to sanitize.

2. Environmental Conditions

Consider the environmental conditions within the clean room, such as temperature, humidity, and chemical exposure. If your clean room operates in a high-humidity environment, you’ll need ceiling tiles that are resistant to moisture and mold. In environments where harsh chemicals are used, select tiles that can withstand frequent exposure to these substances without degrading.

3. Ease of Installation

The installation process for clean room ceiling tiles should be straightforward and efficient. Look for tiles that are easy to handle and can be installed with minimal disruption to the clean room environment. Some tiles are designed with interlocking edges or other features that simplify installation and ensure a tight, secure fit.

4. Maintenance Requirements

Clean room ceiling tiles should be low-maintenance, requiring only routine cleaning to maintain their appearance and functionality. Consider tiles that are resistant to staining and easy to wipe down, as this will reduce the time and effort needed for maintenance.

Installation Tips for Clean Room Ceiling Tiles

Proper installation of clean room ceiling tiles is essential for maintaining the integrity of the clean room environment. Here are some tips to ensure a successful installation:

1. Prepare the Space

Before installing clean room ceiling tiles, make sure the space is properly prepared. This includes cleaning the existing ceiling structure, ensuring that the air filtration system is functioning correctly, and verifying that all other construction activities are complete to avoid introducing contaminants.

2. Follow Manufacturer Guidelines

Always follow the manufacturer’s guidelines for installing clean room ceiling tiles. These guidelines will provide specific instructions on handling, cutting, and installing the tiles to ensure they meet the clean room’s contamination control requirements.

3. Seal All Gaps

Gaps between ceiling tiles can allow contaminants to enter the clean room. Use appropriate sealing materials to fill any gaps and ensure a tight, secure fit. This is particularly important in areas around light fixtures, air vents, and other penetrations in the ceiling.

4. Test for Integrity

After installation, it’s important to test the integrity of the ceiling to ensure it meets clean room standards. This may involve testing for air leaks, particle counts, and other factors that could compromise the clean room environment.

Maintaining Clean Room Ceiling Tiles

Maintaining clean room ceiling tiles is crucial for ensuring the ongoing cleanliness and functionality of the clean room. Here are some maintenance tips:

1. Regular Cleaning

Clean room ceiling tiles should be cleaned regularly using appropriate cleaning agents that do not damage the surface. Avoid abrasive cleaners that can scratch or degrade the tiles. Instead, use soft cloths or sponges with mild disinfectants to wipe down the tiles.

2. Routine Inspections

Conduct routine inspections of the ceiling tiles to check for any signs of damage, such as cracks, discoloration, or loose tiles. Address any issues immediately to prevent contaminants from entering the clean room.

3. Replace Damaged Tiles

If any ceiling tiles become damaged or compromised, replace them promptly. Damaged tiles can become a source of contamination, so it’s important to maintain the integrity of the clean room ceiling at all times.

Conclusion

Clean room ceiling tile are a vital component of any clean room, playing a key role in controlling contamination, managing airflow, and ensuring a sterile environment. By understanding the different types of clean room ceiling tiles, considering your clean room’s specific needs, and following best practices for installation and maintenance, you can ensure that your clean room remains a safe, clean, and efficient space for your operations. Whether you’re working in pharmaceuticals, electronics, or any other industry requiring a controlled environment, investing in high-quality clean room ceiling tiles is essential for maintaining the highest standards of cleanliness and safety.

Cathedral Ceiling Kitchen Cabinets: Maximizing Your Space

In the world of kitchen design, cathedral ceiling kitchen cabinets stand out for their ability to enhance both the functionality and aesthetic appeal of a space. Cathedral ceilings, known for their high, vaulted structure, offer a unique architectural element that can dramatically transform a kitchen. When paired with the right cabinetry, this design choice not only maximizes space but also elevates the overall look of your kitchen. This article will explore the benefits, design considerations, and practical tips for incorporating cathedral ceiling kitchen cabinets into your home.

Cathedral Ceiling Kitchen Cabinets

What Are Cathedral Ceiling Kitchen Cabinets?

Cathedral ceiling kitchen cabinets are specifically designed to complement kitchens with vaulted or cathedral ceilings. These ceilings typically feature a high, sloped design that creates a spacious and airy feel. Cathedral ceiling cabinets are often taller than standard cabinets and are crafted to fit the unique angles and heights of a cathedral ceiling. This type of cabinetry can help you make the most of the vertical space in your kitchen, offering both aesthetic appeal and additional storage.

The Benefits of Cathedral Ceiling Kitchen Cabinets

Cathedral ceiling kitchen cabinets offer numerous benefits that make them a popular choice for homeowners with high ceilings. Here are some key advantages:

1. Maximizing Vertical Space

One of the most significant benefits of cathedral ceiling kitchen cabinets is their ability to maximize vertical space. In kitchens with high ceilings, standard cabinets often leave a large gap between the top of the cabinet and the ceiling, which can make the space feel unfinished. Cathedral ceiling cabinets, however, are designed to extend higher, filling this gap and providing additional storage space.

Read too: Bathroom Flooded Through the Ceiling: A Comprehensive Guide

2. Enhanced Aesthetic Appeal

Cathedral ceiling kitchen cabinets contribute to the grandeur and elegance of a kitchen. The tall, vertical lines of the cabinets draw the eye upward, emphasizing the height and openness of the space. This design choice can make your kitchen feel larger and more luxurious.

3. Increased Storage Capacity

By extending the height of the cabinets, cathedral ceiling kitchen cabinets offer increased storage capacity. This additional space is perfect for storing items that are not used daily, such as seasonal dishes, large cookware, or rarely-used appliances. The extra storage helps keep your kitchen organized and clutter-free.

4. Customizable Design

Cathedral ceiling kitchen cabinets can be customized to fit your specific needs and preferences. Whether you prefer a traditional look with intricate woodwork or a modern, minimalist design, these cabinets can be tailored to suit your style. You can also choose from a variety of finishes, hardware, and shelving options to create a look that is uniquely yours.

Design Considerations for Cathedral Ceiling Kitchen Cabinets

While cathedral ceiling kitchen cabinets offer numerous benefits, there are several design considerations to keep in mind to ensure that they work harmoniously with your space.

1. Proportions and Scale

When designing a kitchen with cathedral ceiling cabinets, it’s essential to consider the proportions and scale of the cabinetry in relation to the ceiling height. Cabinets that are too tall can overwhelm the space, while those that are too short may not take full advantage of the available height. Work with a designer to find the right balance that complements the overall design of your kitchen.

2. Lighting

Proper lighting is crucial in a kitchen with cathedral ceiling cabinets. The high ceilings and tall cabinets can create shadows, making it essential to incorporate adequate lighting. Consider installing under-cabinet lighting to illuminate countertops and work areas, as well as pendant lights or chandeliers that draw attention to the height of the space. Recessed lighting can also be used to ensure even illumination throughout the kitchen.

3. Access to Upper Cabinets

While the extra storage space provided by cathedral ceiling cabinets is a significant advantage, it’s important to consider how you will access items stored in the upper cabinets. If the cabinets are too high, it may be challenging to reach items without a step stool or ladder. To address this, you can incorporate features such as pull-down shelves or install a built-in ladder system for easier access.

4. Material and Finish

The material and finish of your cathedral ceiling kitchen cabinet play a crucial role in the overall aesthetic of your kitchen. Wood is a popular choice for its warmth and versatility, but you can also opt for painted cabinets for a more modern look. When selecting the finish, consider how it will complement other elements in the kitchen, such as the countertops, backsplash, and flooring. A cohesive color scheme and material palette will help create a harmonious and visually appealing space.

How to Incorporate Cathedral Ceiling Kitchen Cabinets into Different Kitchen Styles

Cathedral ceiling kitchen cabinet can be adapted to suit a variety of kitchen styles. Here’s how you can incorporate them into different design themes:

1. Traditional Kitchens

In traditional kitchens, cathedral ceiling cabinets can be designed with ornate details, such as raised panel doors, crown molding, and decorative hardware. Opt for rich wood tones like cherry or mahogany to enhance the classic feel of the space. Pair the cabinets with a stone or granite countertop and a tile backsplash to complete the traditional look.

2. Modern Kitchens

For a modern kitchen, cathedral ceiling cabinets can be streamlined and minimalist. Choose flat-panel doors with sleek hardware for a clean and contemporary look. White or gray cabinets with a glossy finish can create a sense of openness and lightness in the space. To add contrast, consider using a darker countertop material, such as black quartz or concrete.

3. Rustic or Farmhouse Kitchens

Cathedral ceiling cabinets are a natural fit for rustic or farmhouse-style kitchens. Consider using reclaimed wood or distressed finishes to create a warm, lived-in feel. Open shelving or glass-front cabinets can also add to the rustic charm. Pair the cabinets with a farmhouse sink, butcher block countertops, and vintage-inspired lighting to complete the look.

4. Transitional Kitchens

In transitional kitchens, which blend elements of traditional and contemporary design, cathedral ceiling cabinets can offer the best of both worlds. Choose cabinets with simple, clean lines, but incorporate traditional touches like crown molding or decorative glass inserts. Neutral tones like beige, taupe, or soft gray work well in transitional spaces, allowing you to mix and match styles seamlessly.

Practical Tips for Maintaining

Once you’ve installed your cathedral ceiling kitchen cabinet, proper maintenance is key to keeping them looking their best. Here are some tips to help you care for your cabinets:

1. Regular Cleaning

Dust and grease can accumulate on kitchen cabinets, especially those that are higher up. Regularly dust the cabinets with a microfiber cloth, and use a gentle cleaner to wipe down the surfaces. Avoid using harsh chemicals that can damage the finish.

2. Inspect for Damage

Periodically inspect your cabinets for signs of wear and tear, such as scratches, dents, or loose hardware. Address any issues promptly to prevent further damage. If you notice any loose hinges or handles, tighten them to ensure that the cabinets remain secure.

3. Protect the Finish

To protect the finish of your cathedral ceiling kitchen cabinet, avoid placing hot items directly on the cabinet surfaces, and use coasters or placemats to prevent scratches. If your cabinets are made of wood, consider applying a wood conditioner periodically to keep the wood looking vibrant and to prevent drying out or cracking.

Conclusion

Cathedral ceiling kitchen cabinets are a stylish and functional addition to any kitchen with high ceilings. They maximize vertical space, enhance the aesthetic appeal of the room, and offer increased storage capacity. By considering factors such as proportions, lighting, access, and material, you can create a kitchen that is both beautiful and practical. Whether your style is traditional, modern, rustic, or transitional, cathedral ceiling kitchen cabinets can be customized to suit your design preferences, making them a versatile choice for any home. With proper maintenance, these cabinets will remain a stunning feature in your kitchen for years to come.

Brass Semi Flush Mount Ceiling Light: A Timeless Lighting Solution for Your Home

When it comes to interior design, lighting plays a crucial role in setting the tone and ambiance of a space. One popular lighting option that has gained significant attention for its elegance and versatility is the brass semi flush mount ceiling light. This article explores everything you need to know about brass semi flush mount ceiling lights, from their aesthetic appeal to practical considerations for choosing the right one for your home.

Brass Semi Flush Mount Ceiling Light

Why Choose a Brass Semi Flush Mount Ceiling Light?

Lighting is more than just a functional necessity; it’s a key design element that can transform any room. The brass semi flush mount ceiling light is a prime example of how lighting can elevate your home’s style. Here’s why this type of fixture is worth considering:

  1. Timeless Aesthetic: Brass has been a favored material in interior design for centuries due to its warm, golden hue and its ability to blend with various design styles. Whether your home decor leans towards traditional, modern, or eclectic, a brass semi flush mount ceiling light can seamlessly integrate into your space.
  2. Versatility: Semi flush mount lights are a perfect middle ground between flush mount lights (which sit close to the ceiling) and chandeliers (which hang lower). This makes them ideal for rooms with moderate ceiling heights. A brass semi flush mount light offers the versatility to work in various settings, from living rooms to bedrooms and even entryways.
  3. Functional Design: These lights are not only stylish but also practical. They provide ample illumination without overwhelming the space. The semi-flush design allows for better light diffusion compared to flush mounts, making them a great option for ambient lighting.
  4. Durability: Brass is known for its durability. A brass semi flush mount ceiling light is not just a beautiful addition to your home; it’s also a long-lasting investment. Brass fixtures are resistant to tarnishing and corrosion, ensuring that your light fixture will look stunning for years to come.

Choosing the Right Brass Semi Flush Mount Ceiling Light

Selecting the perfect brass semi flush mount ceiling light involves more than just picking a style you like. Here are some key factors to consider:

1. Room Size and Ceiling Height

Before purchasing a brass semi flush mount ceiling light, measure the dimensions of the room and consider the ceiling height. Semi flush mount lights are designed to hang slightly below the ceiling, so they’re ideal for rooms with standard to slightly lower ceiling heights (8 to 10 feet). For rooms with higher ceilings, you might want to consider fixtures with a more extended drop or even a chandelier.

2. Light Output

Consider the type of bulbs the fixture uses and the overall light output. If the room requires bright lighting, choose a fixture that accommodates multiple bulbs or opt for LED bulbs, which offer high luminosity while being energy-efficient. For softer, ambient lighting, look for fixtures with a single bulb or those that allow for dimmable options.

Read too: Bathroom Flooded Through the Ceiling: A Comprehensive Guide

3. Style and Finish

Brass semi flush mount ceiling lights come in various styles, from vintage to modern. The finish can range from polished brass to antique brass, and even brushed or matte options. Choose a style and finish that complements your existing decor. For a cohesive look, consider matching the brass finish with other hardware or fixtures in the room, such as door handles, faucets, or cabinet pulls.

4. Installation and Maintenance

While brass is a durable material, it requires proper care to maintain its luster. Consider the ease of installation and whether you’ll need professional help. Additionally, think about the maintenance required to keep the brass looking its best. Regular cleaning with a soft cloth and a gentle brass cleaner will help preserve the fixture’s shine.

Incorporating Brass Semi Flush Mount Ceiling Lights into Different Rooms

One of the greatest advantages of brass semi flush mount ceiling lights is their versatility. Here’s how you can incorporate them into various rooms in your home:

1. Living Room

In the living room, a brass semi flush mount ceiling light can serve as the main source of lighting or as an accent piece. If you have a smaller living room or a space with a lower ceiling, this type of fixture provides sufficient illumination without making the room feel cramped. Choose a design with intricate detailing or crystal accents for a touch of elegance.

2. Bedroom

In the bedroom, lighting should create a relaxing and cozy atmosphere. A brass semi flush mount ceiling light with a soft glow can enhance the room’s warmth and comfort. Consider a fixture with a fabric or frosted glass shade to diffuse the light gently, creating a soothing ambiance perfect for winding down.

3. Entryway or Hallway

The entryway is the first impression of your home, so lighting in this area should be both functional and welcoming. A brass semi flush mount ceiling light can add a touch of sophistication to your entryway, making a statement without overwhelming the space. In a hallway, these fixtures can be spaced evenly to ensure consistent lighting throughout the area.

4. Kitchen

While the kitchen often requires bright, task-oriented lighting, a brass semi flush mount ceiling light can be a stylish addition to the overall design. Consider placing one over the dining area or kitchen island for a warm, inviting glow. Pair it with under-cabinet lighting or pendant lights to create a layered lighting effect that is both functional and aesthetically pleasing.

The Benefits of Using Brass in Lighting Fixtures

Brass has been a popular choice in lighting fixtures for many reasons. Here’s why brass continues to be a preferred material:

  1. Aesthetic Appeal: Brass offers a timeless appeal that can enhance any interior space. Its warm tones complement a wide range of color palettes and design styles.
  2. Durability: Brass is a strong, long-lasting material that can withstand wear and tear, making it ideal for lighting fixtures that see daily use.
  3. Corrosion Resistance: Unlike other metals, brass does not rust, making it a durable choice for humid areas like bathrooms and kitchens.
  4. Low Maintenance: Brass fixtures are relatively easy to maintain. With occasional polishing, brass can retain its beautiful shine for years.
  5. Eco-Friendly: Brass is a recyclable material, making it an environmentally friendly choice for those looking to reduce their carbon footprint.

Conclusion

A brass semi flush mount ceiling lights is more than just a lighting fixture; it’s a versatile design element that can enhance the aesthetic and functionality of your home. Whether you’re looking to add a touch of elegance to your living room, create a cozy atmosphere in your bedroom, or make a statement in your entryway, a brass semi flush mount ceiling lights is a timeless choice that offers both style and substance. With its durability, versatility, and classic appeal, it’s a lighting solution that will continue to shine in your home for years to come.

Are Ceiling Fan Downrods Universal? Understanding Compatibility and Selection

When installing a ceiling fan, one crucial component that often gets overlooked is the downrod. This simple piece of hardware plays a vital role in determining the fan’s stability and performance, especially in rooms with high ceilings. But one common question many homeowners ask is: “Are Ceiling Fan Downrods Universal?” In this comprehensive article, we will explore this question in depth, providing the information you need to select the right downrod for your ceiling fan.

Are Ceiling Fan Downrods Universal

What Is a Ceiling Fan Downrod?

Before diving into the universality of ceiling fan downrods, it’s essential to understand what a downrod is and its purpose. A ceiling fan downrod is a metal tube that connects the fan motor to the ceiling mount, effectively lowering the fan to the appropriate height in a room. The downrod ensures that the fan blades have enough clearance to circulate air effectively and safely.

Downrods come in various lengths, typically ranging from 3 inches to 72 inches or more, depending on the height of the ceiling and the desired fan height. The length of the downrod you choose depends on several factors, including ceiling height, room size, and personal preference.

Are Ceiling Fan Downrods Universal?

Understanding Compatibility

The short answer to the question “Are Ceiling Fan Downrods Universal?” is no, they are not universally compatible across all ceiling fan brands and models. However, there are standard sizes and thread types that can make many downrods interchangeable with certain limitations. Let’s break down the factors that determine whether a downrod is compatible with your ceiling fan:

1. Threading and Diameter

One of the primary factors in downrod compatibility is the threading and diameter. Most ceiling fans use downrods with a standard threading size, typically 1/2 inch or 3/4 inch in diameter. However, some brands may have proprietary threading that only fits their specific downrods. It is crucial to check the threading specifications of both your fan and the downrod before making a purchase. Using a downrod with the incorrect threading can lead to an unstable installation and potential safety hazards.

Read too: Bathroom Flooded Through the Ceiling: A Comprehensive Guide

2. Length and Room Height

While downrods themselves are not universal, the length you choose should be based on the height of your room’s ceiling. Here’s a general guideline for selecting the appropriate downrod length:

  • 8-foot ceilings: A standard flush mount or a downrod of 3-6 inches is typically sufficient.
  • 9-foot ceilings: A downrod of 6-12 inches will usually work well.
  • 10-foot ceilings: A downrod of 12-18 inches is recommended.
  • 11-foot ceilings: Consider a downrod of 18-24 inches.
  • 12-foot ceilings or higher: Downrods of 24 inches or more are appropriate.

Choosing the correct downrod length ensures optimal airflow and prevents the fan blades from being too close to the ceiling or too low, where they could pose a safety risk.

3. Brand Compatibility

Another factor affecting the universality of downrods is brand compatibility. Many ceiling fan manufacturers design their downrods to fit their specific models, meaning a downrod from one brand may not fit a fan from another. While some brands offer cross-compatibility, it’s always best to use a downrod made by the same manufacturer as your fan. This not only ensures proper fit and performance but also maintains any warranties or guarantees provided by the manufacturer.

4. Aesthetic Considerations

Aesthetic consistency is another reason downrods are not entirely universal. Downrods come in various finishes—such as brushed nickel, bronze, or antique brass—designed to match the finish of the fan. Using a downrod from a different manufacturer may result in a mismatch in finish, affecting the overall look of your installation.

How to Choose the Right Downrod for Your Ceiling Fan

Given that downrods are not universally compatible, how do you choose the right one for your ceiling fan? Here are some steps to ensure you make the best choice:

1. Check the Manufacturer’s Specifications

The first step in selecting the correct downrod is to consult your ceiling fan’s user manual or the manufacturer’s website. This will provide you with specific information about compatible downrod sizes, threading types, and lengths. Many manufacturers also sell downrods designed to match their ceiling fans, which simplifies the selection process.

2. Measure Your Ceiling Height

Accurately measuring your ceiling height is crucial for selecting the appropriate downrod length. As mentioned earlier, the downrod length should correspond to the height of your ceiling to ensure proper airflow and safety. Use a tape measure to determine the exact height from the ceiling to the floor, and refer to the general guidelines provided above.

3. Consider the Room’s Functionality

The room’s purpose can also influence the downrod length. For example, in a dining room, you may want the fan slightly lower to provide better air circulation over the dining table, whereas in a living room with high ceilings, a longer downrod may be necessary to ensure the fan isn’t too high up.

4. Match the Finish

When selecting a downrod, it’s essential to match the finish with your ceiling fan to maintain a cohesive look. If your fan has a brushed nickel finish, choose a downrod with the same finish to ensure a seamless appearance. Many fan manufacturers offer downrods in various finishes specifically designed to match their fans, making it easier to find a perfect match.

5. Consult with a Professional

If you’re unsure about the correct downrod for your ceiling fan, it’s always a good idea to consult with a professional. An electrician or ceiling fan specialist can provide expert advice on the best downrod length and ensure that the installation is safe and secure.

Installation Tips for Ceiling Fan Downrods

Proper installation of a ceiling fan downrod is essential for the fan’s stability and performance. Here are some tips to ensure a successful installation:

1. Turn Off the Power

Before beginning any installation, turn off the power to the room where the fan will be installed. This step is crucial for safety to prevent electrical shocks.

2. Use the Correct Tools

Ensure you have all the necessary tools on hand, including a screwdriver, pliers, wire strippers, and a ladder. Having the right tools will make the installation process smoother and more efficient.

3. Follow the Manufacturer’s Instructions

Always follow the manufacturer’s instructions when installing a ceiling fan downrod. The instructions will guide you through the process step-by-step, ensuring that the fan is installed correctly and safely.

4. Secure the Downrod to the Fan

Attach the downrod to the fan motor securely, making sure that all screws and bolts are tightened properly. A loose connection can cause the fan to wobble or become unstable.

5. Ensure Proper Wiring

Connect the wiring from the ceiling to the fan according to the manufacturer’s instructions. If you’re unfamiliar with electrical work, it’s best to hire a licensed electrician to complete the wiring process.

6. Check for Stability

Once the fan and downrod are installed, check the stability of the fan by turning it on at different speeds. The fan should run smoothly without any wobbling or unusual noises.

Common Myths About Ceiling Fan Downrods

When it comes to ceiling fan downrods, there are several myths and misconceptions. Let’s debunk a few of the most common ones:

Myth 1: All Downrods Are the Same

As discussed earlier, downrods are not universal. They vary in size, threading, and finish, and compatibility depends on the fan manufacturer and model.

Myth 2: You Don’t Need a Downrod for High Ceilings

In rooms with high ceilings, a downrod is essential for ensuring that the fan operates effectively. Without a downrod, the fan may be too close to the ceiling, resulting in poor air circulation.

Myth 3: Longer Downrods Are Less Stable

While it might seem logical to think that longer downrods could lead to instability, when installed correctly, longer downrods are just as stable as shorter ones. The key is proper installation and securing the downrod to the ceiling mount and fan motor.

Myth 4: Downrods Affect Fan Speed

The length of the downrod does not impact the fan’s speed or performance. However, it does affect the fan’s ability to circulate air effectively, which is why selecting the correct length is important.

Conclusion: Understanding Ceiling Fan Downrods and Their Compatibility

So, are ceiling fan downrods universal? While they are not universally compatible, understanding the factors that influence downrod selection—such as threading, diameter, length, and brand compatibility—can help you choose the right downrod for your ceiling fan. By following the guidelines provided in this article, you can ensure that your ceiling fan is installed at the correct height, operates efficiently, and complements your room’s décor.

Antique Brass Ceiling Fan Light Kit: A Timeless Addition to Any Room

When it comes to home décor, few things blend functionality with style quite like an Antique Brass Ceiling Fan Light Kit. This classic piece not only helps circulate air throughout a room, making it more comfortable, but also provides a unique and elegant lighting solution that can enhance the ambiance of any space. Whether you’re looking to add a touch of vintage charm to your living room, bedroom, or dining area, an antique brass ceiling fan light kit can be the perfect finishing touch.

Antique Brass Ceiling Fan Light Kit

In this comprehensive guide, we’ll explore everything you need to know about antique brass ceiling fan light kits—from the benefits of incorporating them into your home to tips on choosing the right kit and installing it properly. Let’s dive into how this timeless fixture can elevate your home décor.

Why Choose an Antique Brass Ceiling Fan Light Kit?

1. Timeless Elegance

One of the most compelling reasons to choose an Antique Brass Ceiling Fan Light Kit is its timeless appeal. Antique brass finishes have been a staple in interior design for centuries, valued for their warm, rich tones and ability to complement a wide range of décor styles. Whether your home is decorated in a traditional, rustic, or even modern style, an antique brass ceiling fan can add a touch of elegance and sophistication.

2. Dual Functionality

A ceiling fan with an integrated light kit serves a dual purpose. It provides both cooling comfort and illumination in a single fixture, saving space and reducing the need for multiple electrical outlets. This is particularly beneficial in rooms where space is at a premium, as it combines two essential functions into one stylish piece.

Read too: Bathroom Flooded Through the Ceiling: A Comprehensive Guide

3. Energy Efficiency

Modern Antique Brass Ceiling Fan Light Kits are designed to be energy efficient. Ceiling fans help reduce reliance on air conditioning by circulating air to create a cooling breeze, potentially lowering your energy bills. Additionally, many light kits are now compatible with LED bulbs, which consume less electricity and last longer than traditional incandescent bulbs.

4. Versatility in Design

Antique brass ceiling fan light kits come in various designs, from simple and understated to ornate and decorative. This versatility allows homeowners to choose a fan that not only matches their aesthetic preferences but also meets their functional needs. Whether you want a fan with a vintage look to complement your Victorian-style home or a sleek, minimalist design for a more modern space, there’s an option out there for you.

5. Increased Home Value

Adding high-quality fixtures like an antique brass ceiling fan light kit can increase the value of your home. Potential buyers often appreciate well-chosen lighting and ceiling fans as they enhance the overall appeal of a property. This investment in both style and functionality can pay off if you decide to sell your home in the future.

Choosing the Right Antique Brass Ceiling Fan Light Kit

When selecting an Antique Brass Ceiling Fan Light Kit, several factors should be considered to ensure that it fits your space and meets your needs. Here are some key considerations:

1. Size of the Room

The size of the room where the fan will be installed is a crucial factor in choosing the right ceiling fan. A fan that is too large can overwhelm a small room, while a fan that is too small may not effectively circulate air in a larger space. Here’s a general guideline:

  • Small rooms (up to 75 sq. ft.): Opt for a fan with a blade span of 29 to 36 inches.
  • Medium rooms (76 to 144 sq. ft.): Choose a fan with a blade span of 36 to 42 inches.
  • Large rooms (145 to 225 sq. ft.): A blade span of 44 to 50 inches is ideal.
  • Extra-large rooms (over 225 sq. ft.): Consider a fan with a blade span of 50 to 54 inches or more.

2. Ceiling Height

The height of your ceiling will determine the type of mounting you need for your ceiling fan. For standard ceilings, a fan with a standard downrod is typically sufficient. However, if you have high ceilings, you may need a longer downrod to ensure the fan hangs at the appropriate height. For low ceilings, consider a flush-mount or low-profile fan that sits closer to the ceiling.

3. Lighting Requirements

Consider the lighting needs of the room where the fan will be installed. Antique brass ceiling fan light kits come with various lighting configurations, including multiple bulbs, dimmable options, and different types of light shades. Ensure that the light output is sufficient for the room’s size and function. Additionally, think about whether you want a warm or cool light, as this can affect the room’s ambiance.

4. Blade Design and Material

The design and material of the fan blades can significantly impact the overall look and performance of the fan. Antique brass fans often feature wooden or wood-like blades that complement the vintage aesthetic. However, you can also find blades made of other materials, such as metal or plastic, which may offer a more modern twist. Choose a blade design that fits with the room’s décor and consider the blade pitch (angle) for optimal air circulation.

5. Additional Features

Modern ceiling fans come with a variety of additional features that enhance their functionality and convenience. These might include remote controls, reversible motors for year-round use, energy-efficient DC motors, and smart technology integration that allows you to control the fan via your smartphone or home automation system.

Installation Tips for Your Antique Brass Ceiling Fan Light Kit

Once you’ve selected the perfect Antique Brass Ceiling Fan Light Kit, proper installation is key to ensuring that it functions efficiently and safely. Here are some installation tips to keep in mind:

1. Gather the Necessary Tools

Before you start the installation process, make sure you have all the necessary tools on hand. Common tools required include a screwdriver, pliers, wire strippers, a ladder, a voltage tester, and a drill. Most ceiling fan kits come with detailed instructions, so follow them carefully.

2. Turn Off the Power

Safety is paramount when working with electrical components. Before you begin installation, turn off the power at the circuit breaker to avoid electrical shocks. Use a voltage tester to ensure that the power is completely off.

3. Assemble the Fan and Light Kit

It’s usually easier to assemble the fan and light kit on the ground before attaching it to the ceiling. Follow the manufacturer’s instructions to attach the blades, light fixtures, and any decorative elements. Be sure to secure all screws and connections tightly.

4. Secure the Mounting Bracket

The mounting bracket is what holds the fan to the ceiling, so it’s important to install it securely. Attach the bracket to the ceiling’s electrical box, ensuring that it is rated to support the weight of the fan. If the box is not secure, consider installing a new one that can handle the load.

5. Wire the Fan and Light Kit

Connect the fan’s wiring to the house wiring, matching the colors as indicated in the installation manual. Typically, the black wire is for the fan, the blue wire is for the light kit, and the white wire is the neutral wire. Secure all connections with wire nuts and tuck the wires neatly into the electrical box.

6. Attach the Fan to the Bracket

Lift the fan and attach it to the mounting bracket. Depending on the fan design, this may involve sliding the fan onto a hook or securing it with screws. Once the fan is in place, attach the canopy to cover the wiring and bracket.

7. Install the Light Bulbs and Shades

Install the light bulbs recommended by the manufacturer, and attach the light shades or covers. Make sure all connections are secure and that the bulbs are properly seated in their sockets.

8. Test the Fan and Light

After everything is in place, restore power to the circuit and test the fan and light kit. Check that the fan operates smoothly at all speeds, the light functions correctly, and there are no unusual noises or vibrations.

Maintaining Your Antique Brass Ceiling Fan Light Kit

Regular maintenance is essential to keep your Antique Brass Ceiling Fan Light Kit looking beautiful and functioning efficiently. Here are some tips for maintaining your fan:

1. Dust Regularly

Dust the fan blades, motor housing, and light fixtures regularly to prevent the build-up of dirt and debris. Use a microfiber cloth or a duster designed for ceiling fans. For more stubborn grime, use a damp cloth and mild detergent, but be sure to dry the surfaces thoroughly afterward.

2. Check for Loose Screws

Over time, the screws and bolts that hold the fan together can loosen due to the fan’s vibrations. Periodically check all screws and tighten them as needed to prevent wobbling or rattling.

3. Lubricate Moving Parts

If your fan has an older motor that requires lubrication, follow the manufacturer’s instructions for applying oil to keep the motor running smoothly. Most modern fans have sealed bearings that do not require lubrication, but it’s good to check the manual to be sure.

4. Inspect the Wiring

Periodically inspect the wiring connections in the fan and light kit. Look for signs of wear, such as frayed wires or loose connections, and address any issues immediately to avoid electrical hazards.

5. Replace Worn Parts

If any part of the fan or light kit becomes worn or damaged, replace it promptly. This could include light bulbs, pull chains, or fan blades. Using replacement parts recommended by the manufacturer ensures compatibility and safety.

Oversized Flush Mount Ceiling Light: A Comprehensive Guide

When it comes to enhancing the aesthetic appeal and functionality of your home, an oversized flush mount ceiling light can make a dramatic impact. This lighting fixture combines style and practicality, offering both abundant illumination and a sleek, modern look. In this comprehensive guide, we’ll explore the features, benefits, and considerations of oversized flush mount ceiling lights, and provide tips for selecting and installing the perfect fixture for your space.

Oversized Flush Mount Ceiling Light

What Is an Oversized Flush Mount Ceiling Light?

An oversized flush mount ceiling light is a type of ceiling fixture that is mounted directly against the ceiling without any gap. It is typically larger than standard flush mount lights and is designed to provide broad and even illumination across a room. Here’s a closer look at its defining characteristics:

Key Features

  • Size: As the name suggests, oversized flush mount ceiling lights are larger in diameter compared to traditional flush mounts. This allows them to illuminate a larger area effectively.
  • Design: These fixtures often feature contemporary designs with clean lines and modern aesthetics, making them a stylish choice for various interior styles.
  • Installation: They are mounted flush to the ceiling, which makes them suitable for rooms with low ceilings or where space is limited.

Benefits

  • Even Illumination: The larger size of these fixtures helps in distributing light more evenly across the room, reducing shadows and dark spots.
  • Aesthetic Appeal: An oversized fixture can act as a statement piece, adding a touch of elegance and sophistication to any space.
  • Space-Saving: Since they are mounted flush to the ceiling, they don’t protrude into the room, making them ideal for rooms with low ceilings or limited headroom.

Read too: Bathroom Flooded Through the Ceiling: A Comprehensive Guide

Choosing the Right Oversized Flush Mount Ceiling Light

Selecting the perfect oversized flush mount ceiling light involves considering several factors to ensure it complements your space and meets your lighting needs. Here’s a guide to help you make an informed decision:

1. Determine the Size and Scale

  • Room Size: Consider the size of the room where the fixture will be installed. A larger light fixture works best in spacious areas such as living rooms or dining rooms.
  • Ceiling Height: Ensure that the fixture is proportionate to the height of your ceiling. Oversized fixtures are generally more suitable for rooms with higher ceilings, but modern designs are also available for lower ceilings.

2. Style and Design

  • Interior Decor: Choose a fixture that matches the overall decor of your room. Oversized flush mount ceiling lights come in various styles, including contemporary, industrial, and traditional.
  • Material and Finish: Consider materials like glass, metal, or acrylic, and finishes such as chrome, brass, or matte black, depending on your aesthetic preferences.

3. Lighting Needs

  • Brightness: Evaluate the amount of light you need for the room. Oversized fixtures can provide ample illumination, but it’s important to choose one with appropriate wattage or lumens for your space.
  • Light Temperature: Decide on the color temperature of the light. Options include warm white, cool white, or daylight, depending on the ambiance you want to create.

4. Energy Efficiency

  • Bulb Type: Look for fixtures that use energy-efficient bulbs, such as LED or CFL, to reduce energy consumption and lower utility bills.
  • Dimmability: Some fixtures offer dimming options, allowing you to adjust the light intensity based on your needs.

Installation Tips for Oversized Flush Mount Ceiling Lights

Proper installation is crucial for ensuring that your oversized flush mount ceiling light functions effectively and safely. Follow these tips to achieve a successful installation:

1. Hire a Professional

  • Electrical Expertise: If you’re not comfortable with electrical work, it’s best to hire a licensed electrician to handle the installation. They will ensure that the fixture is wired correctly and securely.

2. Check the Weight

  • Support Structure: Verify that your ceiling can support the weight of the oversized fixture. Heavier fixtures may require additional support or reinforcement.

3. Prepare the Area

  • Turn Off Power: Before installation, turn off the power at the circuit breaker to prevent electrical hazards.
  • Remove Existing Fixture: If replacing an old fixture, carefully remove it and disconnect the wiring.

4. Follow Manufacturer Instructions

  • Installation Manual: Read and follow the manufacturer’s instructions provided with the fixture. This will guide you through the installation process and ensure proper assembly.

5. Test the Fixture

  • Functionality Check: Once installed, turn the power back on and test the fixture to ensure it operates correctly and provides the desired level of illumination.

Maintaining Your Oversized Flush Mount Ceiling Light

Proper maintenance will keep your oversized flush mount ceiling light looking and functioning like new. Here’s how to care for your fixture:

1. Regular Cleaning

  • Dusting: Dust the fixture regularly to prevent the buildup of dirt and debris. Use a soft cloth or duster to clean the surface.
  • Cleaning Glass: If the fixture has glass components, clean them with a glass cleaner or a mild soap solution to maintain clarity and brightness.

2. Check for Issues

  • Bulb Replacement: Replace burnt-out bulbs promptly to ensure consistent lighting.
  • Inspect Wiring: Periodically check the wiring and connections to ensure they are secure and free from damage.

3. Professional Servicing

  • Electrical Maintenance: If you notice any issues with the fixture, such as flickering lights or unusual noises, contact a professional for servicing or repairs.

Design Ideas for Using Oversized Flush Mount Ceiling Lights

Oversized flush mount ceiling lights can enhance various areas of your home. Here are some design ideas to inspire you:

1. Living Room

  • Statement Piece: Use an oversized flush mount ceiling light as a focal point in your living room. Choose a design that complements your furniture and decor.
  • Layered Lighting: Combine the flush mount light with other lighting sources, such as floor lamps and table lamps, to create a well-lit and inviting space.

2. Dining Room

  • Elegant Dining: An oversized fixture can add elegance to your dining area, making it the perfect centerpiece for meals and gatherings.
  • Ambient Lighting: Opt for a fixture with a dimmable feature to adjust the lighting according to the occasion.

3. Entryway

  • Welcoming Entrance: Install an oversized flush mount ceiling light in your entryway to create a warm and welcoming atmosphere for guests.
  • Bright Illumination: Choose a fixture that provides ample light to illuminate the entire entryway.

4. Bedroom

  • Modern Touch: Incorporate an oversized flush mount ceiling light in the bedroom to add a modern touch and enhance overall lighting.
  • Soft Lighting: Select a fixture with a soft light temperature to create a relaxing and comfortable ambiance.

Conclusion

Oversized flush mount ceiling lights are a stylish and functional addition to any home. With their ability to provide ample illumination and make a statement in any room, they offer both practical and aesthetic benefits. By understanding the features, benefits, and installation tips, you can select and maintain the perfect fixture for your space.

Whether you’re enhancing your living room, dining area, entryway, or bedroom, an oversized flush mount ceiling light can transform your space and provide the perfect lighting solution. Consider your needs, style preferences, and maintenance requirements to make an informed decision and enjoy the benefits of this versatile lighting option.

Outdoor Ceiling Fans With Misters: Stay Cool and Comfortable

When it comes to enhancing outdoor comfort during hot summer months, outdoor ceiling fans with misters offer a perfect blend of style and functionality. These innovative cooling solutions not only provide a refreshing breeze but also include a misting system that adds an extra layer of coolness. In this comprehensive guide, we’ll delve into the benefits of outdoor ceiling fans with misters, their features, and how to choose the right one for your space.

Outdoor Ceiling Fans With Misters

What Are Outdoor Ceiling Fans With Misters?

Outdoor ceiling fans with misters are designed to provide both air circulation and cooling through a built-in misting system. These fans are ideal for patios, decks, and other outdoor areas where you want to enjoy a comfortable environment despite high temperatures. Here’s how they work:

How They Function

  1. Air Circulation: The fan blades create a breeze that helps to evaporate sweat and cool the air.
  2. Misting System: Integrated misters release a fine spray of water into the air, which evaporates quickly and provides a cooling effect.

Read too: Bathroom Flooded Through the Ceiling: A Comprehensive Guide

Key Benefits

  • Enhanced Comfort: By combining air circulation with misting, these fans offer a more significant cooling effect than traditional fans alone.
  • Versatility: Ideal for a variety of outdoor settings, from patios and porches to poolside areas.
  • Energy Efficiency: Compared to air conditioners, fans with misters are more energy-efficient and environmentally friendly.

Features of Outdoor Ceiling Fans With Misters

When choosing an outdoor ceiling fan with a misting system, it’s essential to consider several features to ensure it meets your needs:

1. Misting System

The quality of the misting system affects the fan’s performance. Look for features such as:

  • Adjustable Mist Levels: Some fans allow you to control the intensity of the mist.
  • Nozzle Design: High-quality nozzles provide a fine mist and prevent clogging.

2. Durability

Outdoor ceiling fans are exposed to the elements, so they must be durable:

  • Weather-Resistant Materials: Fans should be made from materials like stainless steel or powder-coated aluminum to resist rust and corrosion.
  • UV Protection: Ensure the fan is UV-resistant to prevent damage from sunlight.

3. Blades and Motor

The fan blades and motor are crucial for effective air circulation:

  • Blade Material: Choose blades made from weather-resistant materials like plastic or metal.
  • Motor Performance: A powerful motor ensures the fan operates efficiently, even on hot days.

4. Control Options

Different control options offer convenience:

  • Remote Control: Allows you to adjust the fan speed and misting level from a distance.
  • Wall Switch: Some models come with a wall-mounted switch for easy operation.

5. Design and Aesthetics

Outdoor ceiling fans with misters come in various designs and finishes:

  • Style: Choose a style that complements your outdoor decor.
  • Finish: Options include matte black, brushed nickel, and oil-rubbed bronze.

Benefits of Installing Outdoor Ceiling Fans With Misters

1. Effective Cooling

The combination of a fan and misting system provides enhanced cooling compared to traditional fans. The mist helps lower the ambient temperature, making it more comfortable to spend time outdoors.

2. Reduced Humidity

Misting systems help reduce the humidity in the air, which can make the environment feel cooler and more comfortable.

3. Improved Air Quality

Fans with misters can help disperse dust and other particles, contributing to better air quality in outdoor spaces.

4. Versatile Use

These fans are versatile and can be used in various outdoor settings, including:

  • Patios: Keep your patio area cool and enjoyable for gatherings.
  • Decks: Enhance the comfort of your deck during hot weather.
  • Poolside: Create a refreshing environment by the pool.

Installation Tips for Outdoor Ceiling Fans With Misters

Proper installation is key to ensuring the fan operates effectively and lasts for years. Follow these tips:

1. Choose the Right Location

  • Placement: Install the fan in a central location where it can provide optimal airflow and mist coverage.
  • Clearance: Ensure there is sufficient clearance around the fan to avoid obstruction of airflow.

2. Professional Installation

  • Electrician: Hire a qualified electrician to handle the electrical wiring and ensure the fan is installed safely and according to code.
  • Plumbing: For fans with built-in misting systems, ensure that the water supply is correctly connected and tested.

3. Maintenance

  • Regular Cleaning: Clean the fan blades and misting nozzles regularly to prevent buildup and ensure proper function.
  • Inspect Components: Check the fan and misting system for any signs of wear or damage and address issues promptly.

Maintenance and Care

Maintaining your outdoor ceiling fan with a misting system is essential for its longevity and performance:

1. Cleaning

  • Blades: Dust and clean the blades regularly with a soft cloth. Avoid using abrasive cleaners.
  • Misting System: Clean the nozzles periodically to prevent clogging. Use a small brush or a vinegar solution to remove any mineral deposits.

2. Inspection

  • Check Connections: Ensure all electrical and water connections are secure and functioning correctly.
  • Look for Wear: Inspect the fan and misting system for signs of wear or damage, such as rust or leaks.

3. Seasonal Maintenance

  • Winter Storage: If you live in an area with harsh winters, consider removing the fan for storage or covering it to protect it from the elements.
  • Pre-Summer Check: Before the start of the hot season, check the fan’s operation and clean it to ensure it’s ready for use.

Choosing the Right Outdoor Ceiling Fan With Misters

When selecting an outdoor ceiling fan with a misting system, consider the following factors:

1. Size of the Area

  • Small Areas: For smaller spaces, a fan with a lower mist output may be sufficient.
  • Large Areas: Larger spaces may require a fan with a higher mist output and a more powerful motor.

2. Climate Considerations

  • Dry Climates: In dry climates, a misting fan can provide significant cooling and comfort.
  • Humid Climates: In already humid climates, ensure the fan’s misting system can handle additional moisture without causing discomfort.

3. Budget

  • Price Range: Outdoor ceiling fans with misters come in a range of prices. Consider your budget and choose a model that offers the best value for your money.

Conclusion

Outdoor ceiling fans with misters are an excellent addition to any outdoor space, providing effective cooling and comfort during hot weather. By understanding the features, benefits, and maintenance requirements of these fans, you can make an informed decision and enhance your outdoor living experience.

Whether you’re looking to upgrade your patio, deck, or poolside area, investing in an outdoor ceiling fan with a misting system will help you stay cool and comfortable throughout the summer months. With proper installation and care, these fans can offer years of refreshing relief and enjoyable outdoor living.

Minka Aire Orb Ceiling Fan: Discover the Elegance and Functionality

When it comes to blending style and functionality in your home’s cooling solutions, the Minka Aire Orb Ceiling Fan stands out as a top choice. This modern ceiling fan not only enhances your room’s aesthetics but also provides efficient airflow and cooling. In this comprehensive guide, we’ll explore the features, benefits, installation tips, and maintenance of the Minka Aire Orb Ceiling Fan, helping you make an informed decision for your space.

Minka Aire Orb Ceiling Fan

What Makes the Minka Aire Orb Ceiling Fan a Top Choice?

The Minka Aire Orb Ceiling Fan is renowned for its innovative design and advanced functionality. Here’s why it’s an excellent choice for modern homes:

1. Sleek, Modern Design

The Minka Aire Orb Ceiling Fan features a contemporary design that seamlessly integrates with various interior styles. Its sleek, spherical shape and minimalistic design make it a perfect fit for both modern and transitional decor.

  • Unique Aesthetic: The fan’s circular design and clean lines offer a unique aesthetic that stands out in any room.
  • Color Options: Available in several finishes, including matte black, brushed nickel, and oil-rubbed bronze, the Minka Aire Orb can complement a wide range of color schemes and furnishings.

2. Efficient Airflow

Equipped with powerful motor technology, the Minka Aire Orb Ceiling Fan delivers excellent airflow and cooling performance. The fan blades are designed to circulate air efficiently, providing consistent comfort throughout the room.

  • Adjustable Speeds: The fan offers multiple speed settings, allowing you to customize airflow according to your needs.
  • Reversible Motor: The reversible motor feature enables you to switch between cooling and heating modes, enhancing year-round comfort.

3. Quiet Operation

One of the standout features of the Minka Aire Orb Ceiling Fan is its quiet operation. The fan’s motor is designed to minimize noise, ensuring a peaceful environment without the distracting hum often associated with ceiling fans.

  • Whisper-Quiet Performance: Ideal for bedrooms, living rooms, and home offices where noise levels are a concern.
  • Smooth Operation: The fan operates smoothly at all speed settings, providing a serene and relaxing atmosphere.

4. Energy Efficiency

The Minka Aire Orb Ceiling Fan is designed with energy efficiency in mind. By improving airflow and reducing the need for air conditioning, it helps lower energy bills and reduce your home’s carbon footprint.

  • LED Lighting: Some models come with integrated LED lighting, which is energy-efficient and long-lasting.
  • Eco-Friendly Design: The fan’s design promotes better air circulation, reducing the need for additional cooling or heating.

Read too: Bathroom Flooded Through the Ceiling: A Comprehensive Guide

Features of the Minka Aire Orb Ceiling Fan

To fully appreciate the Minka Aire Orb Ceiling Fan, it’s essential to understand its key features:

1. Stylish Design

The Minka Aire Orb Ceiling Fan boasts a minimalist design that adds a touch of elegance to any room. Its spherical shape and sleek finish create a modern look that enhances the overall decor.

  • Finish Options: Choose from finishes like matte black, brushed nickel, and oil-rubbed bronze to match your room’s decor.
  • Blade Design: The fan features clean, streamlined blades that complement its modern aesthetic.

2. Advanced Motor Technology

The fan is equipped with a high-performance motor that ensures efficient operation and reliability. The motor’s advanced technology contributes to the fan’s quiet performance and effective airflow.

  • DC Motor: Many models use a DC motor, which is known for its energy efficiency and quiet operation.
  • Reversible Function: The reversible motor allows for both summer and winter use, providing versatile climate control.

3. Remote Control

The Minka Aire Orb Ceiling Fan often includes a remote control for added convenience. With the remote, you can easily adjust the fan’s speed, lighting, and direction without needing to reach the pull chains.

  • Easy Operation: The remote control simplifies operation and allows for easy adjustments from anywhere in the room.
  • Convenient Features: Some remotes come with additional features like a timer function or dimming options for integrated lighting.

4. Integrated Lighting

Many models of the Minka Aire Orb Ceiling Fan come with integrated LED lighting, adding both functionality and style to your space.

  • Energy-Efficient Lighting: LED lights are long-lasting and consume less energy compared to traditional bulbs.
  • Adjustable Brightness: The lighting can often be dimmed to create the perfect ambiance.

Installation Tips for the Minka Aire Orb Ceiling Fan

Proper installation is crucial for the performance and longevity of your ceiling fan. Here are some tips to ensure a successful installation:

1. Choose the Right Location

Select a location that provides ample space for the fan to operate efficiently. Ensure there are no obstructions above or around the fan that could interfere with its performance.

  • Clearance: The fan should be installed at least 7-8 feet above the floor for optimal airflow and safety.
  • Positioning: Center the fan in the room for balanced airflow and aesthetic appeal.

2. Use the Correct Mounting Hardware

Ensure you use the appropriate mounting hardware and follow the manufacturer’s instructions for installation. The fan should be securely mounted to a ceiling joist or support beam.

  • Support: For heavy or large fans, additional support may be required to ensure stability.
  • Electrical Wiring: Make sure the electrical wiring is properly connected and meets local code requirements.

3. Follow Installation Instructions

Carefully follow the installation instructions provided with the fan. If you’re unsure about any aspect of the installation process, consider hiring a professional electrician.

  • Step-by-Step Guide: The instructions typically include detailed steps for assembling and installing the fan.
  • Safety First: Always turn off the power before beginning installation and double-check all connections.

Maintenance Tips for the Minka Aire Orb Ceiling Fan

Regular maintenance is key to keeping your Minka Aire Orb Ceiling Fan in top condition. Here are some maintenance tips:

1. Clean Regularly

Dust and clean the fan blades and motor regularly to prevent buildup that can affect performance. Use a soft, dry cloth or a duster to remove dust from the blades and other components.

  • Blade Cleaning: Gently wipe the blades with a damp cloth if needed, but avoid using harsh chemicals.
  • Motor Maintenance: Ensure that the motor is free of dust and debris to maintain smooth operation.

2. Check for Loose Parts

Periodically check for any loose screws or components. Tighten any loose parts to ensure the fan operates smoothly and safely.

  • Screw Check: Inspect the fan’s mounting bracket and blade attachments regularly.
  • Balance: If you notice any wobbling or noise, check the fan blades for proper alignment and balance.

3. Replace Bulbs as Needed

If your fan has integrated lighting, replace any burnt-out bulbs promptly to maintain optimal lighting and performance.

  • LED Bulbs: Use the recommended LED bulbs for replacements to ensure compatibility and efficiency.
  • Bulb Lifespan: LED bulbs generally have a long lifespan, but it’s still important to monitor their performance.

4. Schedule Professional Servicing

For any issues that can’t be resolved with basic maintenance, or if you need a thorough inspection, consider scheduling professional servicing.

  • Inspection: A professional can perform a comprehensive checkup and address any underlying issues.
  • Repairs: For complex repairs or adjustments, professional expertise ensures the fan remains in good working order.

Conclusion

The Minka Aire Orb Ceiling Fans combines modern design with efficient performance, making it an excellent choice for enhancing any room with high ceilings or contemporary decor. With its sleek design, advanced motor technology, and integrated lighting options, this fan offers both style and functionality.

By understanding its features, following installation tips, and performing regular maintenance, you can enjoy the benefits of your Minka Aire Orb Ceiling Fans for years to come. Whether you’re looking to upgrade your home’s cooling system or add a touch of elegance to your space, the Minka Aire Orb Ceiling Fans is a stylish and practical solution.

Large Modern Chandeliers for High Ceilings: Elevate Your Space with Style and Elegance

When it comes to lighting up a room with high ceilings, few fixtures make a statement quite like large modern chandeliers for high ceilings. These impressive lighting pieces not only illuminate your space but also serve as a focal point that can enhance the overall design of your room. In this guide, we’ll explore the different styles and benefits of large modern chandeliers, how to choose the right one for your high-ceilinged space, and tips for installation and maintenance.

Why Choose Large Modern Chandeliers for High Ceilings?

Large modern chandeliers for high ceilings are designed to complement and accentuate the grandeur of rooms with elevated ceilings. Here’s why they are an excellent choice:

1. Visual Impact

A large chandelier adds a dramatic focal point to a room, making it the centerpiece of your décor. Its size and design can enhance the room’s architectural features, creating a striking visual impact that draws attention.

Read too: Bathroom Flooded Through the Ceiling: A Comprehensive Guide

2. Proportional Balance

In a room with high ceilings, a small light fixture can look out of place. Large chandeliers provide proportional balance, ensuring that the lighting fixture matches the scale of the room and complements its spaciousness.

3. Enhanced Lighting

Modern chandeliers often come with advanced lighting technology that can provide both ambient and task lighting. This ensures that the room is well-lit, making it both functional and aesthetically pleasing.

4. Design Versatility

Large modern chandeliers come in various styles, from sleek and minimalistic to intricate and ornate. This versatility allows you to choose a chandelier that aligns with your personal taste and complements your interior design.

Choosing the Right Large Modern Chandelier for High Ceilings

Selecting the perfect chandelier for high ceilings involves considering several factors to ensure that it meets your needs and complements your space. Here’s what to keep in mind:

1. Room Dimensions

Before purchasing a chandelier, measure the dimensions of the room, including the height of the ceiling. A general rule of thumb is that the chandelier should hang 30 to 34 inches above the floor in a dining room or foyer. For rooms with very high ceilings, you may need to adjust this height to maintain a balanced look.

2. Chandelier Size

The size of the chandelier should be proportional to the room’s dimensions. For large rooms, opt for a chandelier with a substantial diameter to ensure that it makes a significant impact. As a guideline, the diameter of the chandelier should be about half the width of the room.

3. Ceiling Height and Mounting

High ceilings often require chandeliers to be mounted at a height that maximizes their visual impact without interfering with the room’s functionality. Consider installing a chandelier with an adjustable downrod or chain to customize the hanging length according to your space.

4. Style and Design

Choose a chandelier style that complements the room’s decor. Modern chandeliers come in various designs, including:

  • Minimalistic: Sleek, simple designs with clean lines and understated elegance.
  • Industrial: Features exposed bulbs and raw materials like metal and glass for an edgy, contemporary look.
  • Crystal: Adds a touch of luxury with sparkling crystal elements that reflect and refract light.
  • Geometric: Incorporates bold shapes and patterns for a modern, artistic flair.

5. Lighting Features

Consider the type of lighting your chandelier provides. Some modern chandeliers come with dimming capabilities, adjustable light settings, or LED technology for energy efficiency. Choose a chandelier that offers the lighting features you need for your space.

Installation Tips for Large Modern Chandeliers

Proper installation is crucial to ensure that your chandelier is safe, functional, and visually appealing. Here are some tips for installing large modern chandeliers:

1. Hire a Professional

For heavy or complex chandeliers, it’s advisable to hire a professional electrician or installer. They can ensure that the chandelier is securely mounted and properly wired, minimizing the risk of accidents or electrical issues.

2. Check Electrical Capacity

Ensure that your home’s electrical system can handle the additional load of the chandelier. Verify that the circuit is equipped to support the chandelier’s wattage and that all wiring is up to code.

3. Use the Right Mounting Hardware

Use appropriate mounting hardware and ensure that it is securely attached to a ceiling joist or support beam. This is especially important for large chandeliers, which can be heavy and require robust support.

4. Adjust the Hanging Height

Adjust the chandelier’s hanging height to ensure that it is positioned correctly within the room. For high ceilings, use an adjustable downrod or chain to achieve the desired height.

5. Ensure Proper Alignment

Ensure that the chandelier is centered in the room and properly aligned. This helps maintain visual balance and ensures that the chandelier enhances the room’s overall aesthetic.

Maintenance Tips for Large Modern Chandeliers

To keep your large modern chandelier looking its best and functioning properly, follow these maintenance tips:

1. Regular Cleaning

Dust and clean your chandelier regularly to prevent buildup that can dull its appearance. Use a soft, lint-free cloth to wipe down the fixture and avoid harsh chemicals that could damage the finish.

2. Check and Replace Bulbs

Regularly check the chandelier’s bulbs to ensure they are functioning properly. Replace any burnt-out bulbs promptly to maintain consistent lighting and avoid uneven illumination.

3. Inspect Wiring and Mounting

Periodically inspect the chandelier’s wiring and mounting to ensure that everything is secure and in good condition. Address any issues promptly to prevent potential safety hazards.

4. Professional Servicing

For complex chandeliers or those with intricate components, consider scheduling professional servicing to address any issues or perform thorough cleaning and maintenance.

Popular Large Modern Chandeliers for High Ceilings

Here are some popular styles of large modern chandeliers for high ceilings that can enhance your space:

1. The Crystal Chandelier

Featuring sparkling crystal elements, this chandelier adds a touch of elegance and luxury to any room. Ideal for grand foyers or dining rooms, its reflective qualities create a dazzling effect.

2. The Geometric Chandelier

Bold and contemporary, the geometric chandelier incorporates unique shapes and patterns to create a striking visual impact. Perfect for modern living rooms or loft spaces.

3. The Industrial Chandelier

With exposed bulbs and raw metal components, the industrial chandelier brings an edgy, modern look to high-ceilinged spaces. It’s a great choice for urban lofts or contemporary homes.

4. The Minimalistic Chandelier

Sleek and understated, the minimalistic chandelier focuses on clean lines and simplicity. It complements modern and minimalist interiors, adding a touch of sophistication without overwhelming the space.

Conclusion: Elevate Your Space with Large Modern Chandeliers

Large modern chandeliers for high ceilings are a fantastic way to enhance the beauty and functionality of your space. By choosing the right size, style, and lighting features, you can create a stunning focal point that complements your room’s design and makes a lasting impression. Whether you opt for a crystal chandelier for a touch of luxury or a geometric design for a modern twist, the right chandelier will elevate your space and bring a sense of grandeur to your high-ceilinged room.

If you’re considering installing a large modern chandelier, consult with a professional to ensure proper installation and maintenance. With the right care, your chandelier will remain a captivating feature of your home for years to come.

Faux Wood Beams for Vaulted Ceiling: Transform Your Space with Stylish and Affordable Solutions

If you’re looking to elevate the aesthetics of your home with a touch of rustic charm or classic elegance, Faux Wood Beams for Vaulted Ceiling offer an excellent solution. These beams can enhance the architectural appeal of your space without the cost and hassle associated with real wood. This comprehensive guide will explore the benefits, installation process, design ideas, and maintenance tips for faux wood beams, helping you make an informed decision for your vaulted ceilings.

Faux Wood Beams Vaulted Ceiling

Why Choose Faux Wood Beams for Vaulted Ceilings?

Faux Wood Beams for Vaulted Ceilings provide a range of advantages over traditional wood beams, making them a popular choice for homeowners looking to enhance their interior design.

Read too: Bathroom Flooded Through the Ceiling: A Comprehensive Guide

Benefits of Faux Wood Beams for Vaulted Ceilings

  1. Cost-Effective: Faux wood beams are typically more affordable than real wood beams. They mimic the look of natural wood while avoiding the higher costs associated with genuine timber.
  2. Lightweight and Easy to Install: Made from materials like polyurethane or lightweight MDF, faux wood beams are much easier to handle and install compared to heavy wooden beams. This makes the installation process simpler and less labor-intensive.
  3. Variety of Styles and Finishes: Faux wood beams come in a wide range of styles, finishes, and colors. Whether you prefer a weathered look, a smooth finish, or a specific wood grain pattern, you can find faux beams that match your aesthetic preferences.
  4. Durability and Maintenance: Faux wood beams are resistant to pests, rot, and warping, which can be issues with real wood. They require minimal maintenance, often just a simple dusting or cleaning to keep them looking their best.
  5. Enhanced Aesthetics: Installing faux wood beams in a vaulted ceiling can add visual interest and architectural detail to your space. They can make a room feel more grounded and cozy, providing a striking contrast to the open space of a vaulted ceiling.

Types of Faux Wood Beams

When selecting faux wood beams for your vaulted ceiling, you’ll encounter various types designed to suit different needs and preferences:

1. Polyurethane Beams

Polyurethane beams are a popular choice due to their durability and versatility. They can be molded to mimic various wood types and textures, providing a realistic look without the weight of real wood.

2. MDF Beams

Medium-density fiberboard (MDF) beams are another option. They are often used for their smooth surface and paintability, allowing for a custom finish that can match any décor.

3. Fiberglass Beams

Fiberglass faux wood beams are highly durable and lightweight. They offer the flexibility of being shaped into various styles and are resistant to environmental factors.

Installing Faux Wood Beams in a Vaulted Ceiling

Proper installation is key to achieving the best results with faux wood beams. Here’s a step-by-step guide to help you through the process:

1. Plan the Layout

Begin by planning the layout of your faux wood beams. Consider the placement, spacing, and number of beams needed to achieve the desired look. Use a tape measure and a pencil to mark the locations on the ceiling where the beams will be installed.

2. Prepare the Ceiling

Ensure that the ceiling is clean and free of debris before installation. If necessary, patch any holes or imperfections in the ceiling to create a smooth surface for the beams.

3. Cut the Beams

Measure and cut the faux wood beams to the required lengths. Most faux wood beams come in standard lengths and can be cut to fit your space using a saw. Follow the manufacturer’s instructions for cutting and fitting the beams.

4. Attach the Beams

For installation, use adhesive specifically designed for faux wood beams or follow the manufacturer’s recommended method. Apply the adhesive to the back of the beams and press them firmly against the ceiling. Use a level to ensure that the beams are straight and aligned.

5. Secure the Beams

In addition to adhesive, you may need to use nails or screws to secure the beams in place, especially if you are installing them in a high-traffic area. Ensure that all fasteners are properly concealed or covered with beam caps.

6. Finish the Installation

Once the beams are securely installed, check for any gaps or seams that may need filling. Apply touch-up paint or stain as needed to achieve a seamless look. Clean up any excess adhesive or debris from the installation process.

Design Ideas for Faux Wood Beams in Vaulted Ceilings

Faux wood beams offer a range of design possibilities for vaulted ceilings. Here are some ideas to inspire your project:

1. Rustic Charm

Embrace a rustic look by choosing faux wood beams with a distressed or weathered finish. This style works well in country or farmhouse-inspired interiors, adding warmth and character to the space.

2. Modern Elegance

Opt for sleek, smooth faux wood beams in a dark or rich wood tone for a modern, sophisticated look. This style complements contemporary décor and creates a striking visual contrast with the openness of a vaulted ceiling.

3. Cozy Cottage

For a cozy cottage feel, select faux wood beams with a lighter finish and incorporate them into a room with warm, inviting colors and textures. This design adds a charming, homely touch to your vaulted ceiling.

4. Architectural Detail

Use faux wood beams to highlight architectural details or create a focal point in the room. Consider installing them in a grid pattern or along the length of the ceiling to draw attention to specific features or design elements.

Maintenance and Care for Faux Wood Beams

To keep your faux wood beams looking their best, follow these maintenance tips:

1. Regular Cleaning

Dust the beams regularly to prevent the buildup of dirt and grime. Use a soft cloth or a duster to clean the surface, avoiding harsh chemicals or abrasive materials that could damage the finish.

2. Inspect for Damage

Periodically check the beams for any signs of damage or wear. Address any issues promptly to prevent further deterioration. Repair minor scratches or blemishes with touch-up paint or stain as needed.

3. Avoid Excess Moisture

Faux wood beams are designed to be resistant to moisture, but it’s still important to avoid exposing them to excessive dampness. Ensure that the area around the beams is well-ventilated and free of moisture.

When to Seek Professional Help

While installing faux wood beams can be a DIY project, there are situations where professional assistance may be beneficial:

  • Complex Installations: If your installation involves complex angles or custom fitting, a professional can ensure precise and accurate results.
  • Structural Concerns: If you have concerns about the structural integrity of your ceiling or the suitability of faux beams for your space, consult a contractor or structural engineer.
  • Design Expertise: For guidance on selecting the right style and finish to match your décor, consider working with an interior designer who can offer expert advice and design solutions.

Conclusion

Faux Wood Beams for Vaulted Ceiling provide a stylish and practical way to enhance the look of your space. By understanding the benefits, types, installation process, and design ideas, you can make an informed decision and create a visually stunning and functional environment. With minimal maintenance, faux wood beams will continue to add charm and elegance to your vaulted ceiling for years to come.

Extra Large Flush Mount Ceiling Light: Elevate Your Space with Stunning Illumination

An Extra Large Flush Mount Ceiling Light can be a game-changer in home and office lighting, offering both functionality and style. These fixtures are designed to provide ample illumination while making a bold statement in any room. Whether you’re looking to enhance a large space or add a touch of elegance to your interior, understanding the benefits, installation process, and design options of extra large flush mount ceiling lights can help you make an informed choice.

Extra Large Flush Mount Ceiling Light

Why Choose an Extra Large Flush Mount Ceiling Light?

An Extra Large Flush Mount Ceiling Light is an excellent choice for a variety of reasons. Here’s why you might consider adding one to your space:

Benefits of Extra Large Flush Mount Ceiling Lights

  1. Ample Illumination: These lights are designed to provide extensive coverage, making them ideal for large rooms or open spaces. They ensure that the entire area is well-lit without the need for additional fixtures.
  2. Space Efficiency: Unlike pendant or chandelier lighting, flush mount ceiling lights are mounted directly against the ceiling, making them perfect for rooms with low ceilings or limited vertical space.
  3. Modern Aesthetic: Extra large flush mount lights often feature sleek, contemporary designs that can enhance the overall look of your space. They offer a clean and polished appearance that complements modern décor.
  4. Even Lighting Distribution: The design of flush mount ceiling lights helps distribute light evenly across the room, reducing shadows and providing balanced illumination.
  5. Versatile Design Options: These lights come in various styles, from minimalist to elaborate, allowing you to choose a design that fits your personal taste and complements your interior design.

Read too: Bathroom Flooded Through the Ceiling: A Comprehensive Guide

Types of Extra Large Flush Mount Ceiling Lights

When selecting an extra large flush mount ceiling light, consider the different types available:

1. Chandeliers with Flush Mount Design

Some extra large flush mount lights incorporate chandelier elements, combining the elegance of traditional chandeliers with the space-saving benefits of flush mount designs. These fixtures often feature multiple arms or tiers of lights.

2. Sleek Modern Designs

Modern extra large flush mount ceiling lights often feature clean lines, geometric shapes, and minimalistic designs. They use materials like polished metal, glass, or acrylic to create a contemporary look.

3. Crystal Flush Mount Lights

For a touch of luxury, consider crystal flush mount lights. These fixtures use crystals to refract and scatter light, creating a dazzling effect and adding a touch of glamour to your space.

4. Retro and Vintage Styles

If you prefer a more classic look, there are extra large flush mount lights available in retro and vintage styles. These often feature ornate details and traditional designs that can add character to your room.

Installing an Extra Large Flush Mount Ceiling Light

Proper installation is crucial for ensuring that your extra large flush mount ceiling light functions correctly and safely. Follow these steps for a successful installation:

1. Plan the Installation

Before starting, plan the placement of your light fixture. Ensure it’s centered and provides even illumination across the room. Consider any existing fixtures, furniture, or architectural features that might affect the installation.

2. Turn Off Power

Always turn off the power at the circuit breaker before beginning any electrical work. This ensures your safety during installation.

3. Remove the Old Fixture

If you’re replacing an existing fixture, carefully remove it by unscrewing it from the ceiling and disconnecting the wiring. Follow the manufacturer’s instructions for removing the old fixture.

4. Prepare the Mounting Bracket

Install the mounting bracket that comes with your new flush mount light fixture. Secure it to the ceiling using the provided screws and ensure it is level and firmly attached.

5. Connect the Wiring

Connect the wiring of your new fixture to the existing ceiling wires. Typically, this involves matching the colors of the wires (black to black, white to white, and green or copper to the ground). Use wire nuts to secure the connections and ensure they are well-insulated.

6. Attach the Fixture

Once the wiring is connected, attach the fixture to the mounting bracket. Ensure it is securely fastened and flush against the ceiling.

7. Install Bulbs

Insert the appropriate bulbs into the fixture, following the manufacturer’s recommendations for wattage and type. Ensure the bulbs are properly seated and secure.

8. Test the Light

Turn the power back on at the circuit breaker and test your new flush mount light to ensure it’s working correctly. Check for any issues with wiring or fixture alignment and make any necessary adjustments.

Design Ideas for Extra Large Flush Mount Ceiling Lights

Extra large flush mount ceiling lights offer a range of design possibilities. Here are some ideas to inspire your choice:

1. Statement Piece

Choose a bold and stylish flush mount light to serve as a focal point in the room. Opt for intricate designs, unique shapes, or luxurious materials to make a statement.

2. Matching Fixtures

Coordinate your flush mount light with other fixtures in the room, such as wall sconces or table lamps, to create a cohesive lighting scheme. Ensure that the style and finish complement each other.

3. Color and Finish

Select a finish that matches or contrasts with your room’s décor. Polished chrome or brass can add a touch of elegance, while matte black or white finishes offer a sleek, modern look.

4. Layered Lighting

Combine your flush mount ceiling light with other types of lighting, such as recessed lights or floor lamps, to create layered illumination. This approach enhances the ambiance and provides functional lighting for different activities.

Maintaining Your Extra Large Flush Mount Ceiling Light

To keep your extra large flush mount ceiling light in excellent condition, follow these maintenance tips:

1. Regular Cleaning

Dust and clean the fixture regularly to prevent buildup that can affect its performance and appearance. Use a soft cloth or a duster to clean the outer surfaces, and gently wipe any glass or crystal components.

2. Check for Bulb Replacement

Monitor the performance of your light bulbs and replace them as needed. Ensure you use the correct type and wattage as specified by the fixture’s manufacturer.

3. Inspect Wiring and Mounting

Periodically check the wiring and mounting of the fixture to ensure everything remains secure and in good condition. Address any signs of wear or damage promptly to prevent electrical issues.

4. Avoid Overheating

Ensure that the fixture has adequate ventilation to prevent overheating. If you notice any excessive heat, check the installation and make sure the fixture is suitable for your ceiling type.

When to Seek Professional Help

While installing and maintaining extra large flush mount ceiling lights can often be a DIY project, there are situations where professional assistance is recommended:

  • Complex Installations: If your installation involves complicated wiring or unusual ceiling conditions, a licensed electrician can ensure a safe and accurate setup.
  • Existing Electrical Issues: If you encounter any problems with your electrical system or fixture, consult a professional to diagnose and address the issue.
  • Design and Layout Expertise: For help with choosing the right fixture and placement for your space, a lighting designer can offer valuable guidance and expertise.

Conclusion

An Extra Large Flush Mount Ceiling Light can significantly enhance the look and functionality of your space. By understanding the benefits, types, installation process, and design options, you can make an informed decision and enjoy a well-lit, stylish environment. With proper care and maintenance, your flush mount ceiling light will continue to provide elegant and effective illumination for years to come.