Explore the potential hazards and solutions associated with “Water In Ceiling Light” to safeguard your home and ensure the longevity of your lighting fixtures.
Water In Ceiling Light: A Subtle Threat to Your Home
Introduction: Shedding Light on the Issue
Recognizing the Signs: How to Identify Water Infiltration in Ceiling LightsBegin your journey by understanding the subtle indicators of water infiltration in ceiling light fixtures. Discover the early warning signs that can save you from extensive damage.
The Risks Unveiled: Understanding the Consequences of Water Infiltration
1. Electrical Hazards: The Silent Danger Within
Delve into the potential electrical hazards associated with water in ceiling lights. Learn about the risks of electrical shock and fire, emphasizing the importance of prompt intervention.
2. Fixture Deterioration: Impact on Aesthetics and Longevity
Explore the aesthetic and functional consequences of water damage on ceiling light fixtures. Understand how deterioration can compromise both the appearance and lifespan of your lighting.
Tracing the Source: Investigating and Addressing Water Infiltration
1. Roof Leaks: The Primary Culprit Revealed
Uncover the common source of water infiltration – roof leaks. Learn to identify and address roof issues to prevent water from seeping into your ceiling lights.
Explore the potential plumbing-related causes of water in ceiling lights. Understand how leaks or condensation from pipes can pose a threat and implement preventive measures.
Preventive Measures: Safeguarding Your Ceiling Lights
1. Regular Maintenance: A Proactive Approach to Avoiding Water Infiltration
Emphasize the importance of routine maintenance in preventing water-related issues. Discover simple yet effective steps to keep your ceiling lights in optimal condition.
2. Sealing and Waterproofing: Adding an Extra Layer of Protection
Learn about the importance of sealing and waterproofing your ceiling to create a barrier against water infiltration. Explore various sealing methods for enhanced protection.
Conclusion: A Well-Lit and Protected Home
As we conclude our exploration of “Water In Ceiling Light,” equip yourself with the knowledge to detect, address, and prevent water-related issues in your lighting fixtures. Safeguard your home, ensuring a secure and well-lit environment for years to come.
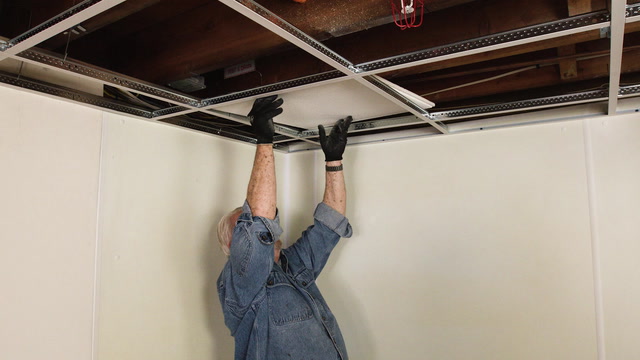
Embark on a journey of refinement as we unveil the art of “Suspended Ceiling Installation.” Discover the intricacies, benefits, and step-by-step process for achieving a sophisticated and functional suspended ceiling.
Suspended Ceiling Installation: Elevating Spaces with Elegance
Defining Elegance: Understanding the Appeal of Suspended CeilingsBegin your exploration by delving into the aesthetic and functional appeal of suspended ceilings. Uncover how these installations contribute to the overall ambiance of a space.
Versatility Unleashed: Where and Why to Opt for Suspended CeilingsExplore the diverse environments where suspended ceilings excel. From commercial spaces to residential interiors, understand the versatility that makes them a popular choice.
Navigating the Installation Process: Mastering the Art
Essential Steps: A Blueprint for Success
Preparation Phase: Setting the Foundation for a Flawless InstallationDive into the initial steps of preparation, including assessing the space and gathering the necessary tools and materials. Lay the foundation for a seamless installation process.
Grid Installation: Constructing the Framework for EleganceLearn the art of installing the grid system, the backbone of a suspended ceiling. Understand the precision required to create a sturdy framework that enhances the overall structure.
Panel Placement: Achieving Symmetry and Visual HarmonyExplore techniques for placing panels with precision. From ensuring symmetry to optimizing visual appeal, grasp the finer details that contribute to a visually stunning suspended ceiling.
Finishing Touches: Edging and Trim for a Polished LookDelve into the finishing touches that elevate the aesthetics of your suspended ceiling. Master the art of edging and trim installation to achieve a polished and refined appearance.
Practical Considerations: Maximizing the Benefits
1. Acoustic Enhancement: Harnessing the Power of Suspended Ceilings
Uncover the acoustic benefits of suspended ceilings. Understand how these installations contribute to sound control and create environments conducive to focused work or relaxation.
2. Lighting Integration: Illuminating Spaces with Grace
Explore strategies for seamlessly integrating lighting fixtures into suspended ceilings. Discover how strategic placement enhances both functionality and visual appeal.
Conclusion: Elevate Your Space with a Flawless Suspended Ceiling Installation
As we conclude our journey into the world of “Suspended Ceiling Installation,” you’ve gained insights into the art and science behind creating elegant and functional ceilings. Empower yourself with the knowledge to transform spaces with sophistication, making every installation a masterpiece.
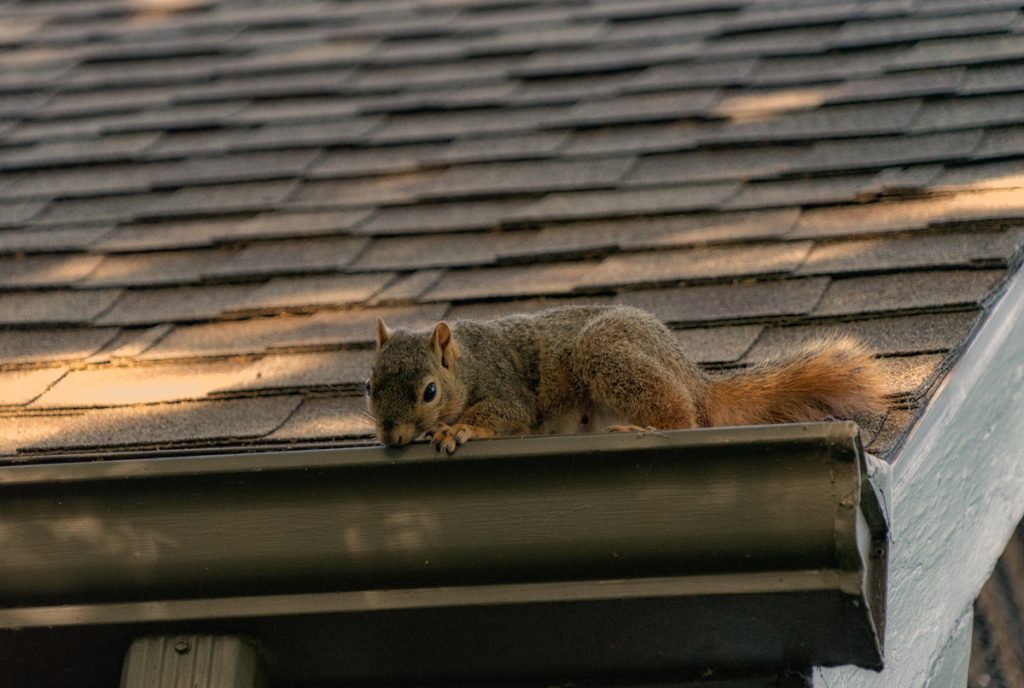
Embark on a journey of exploration as we delve into the peculiar world of “Squirrel In Ceiling Sounds.” Unravel the mystery behind the noises and discover practical solutions for a peaceful home environment.
Squirrel In Ceiling Sounds: Navigating the Intricacies
Introduction: The Unsettling Symphony Above
The Enigma of Nocturnal Disturbances: Deciphering Squirrel SoundsBegin your quest by understanding the distinctive sounds squirrels create within your ceiling. Explore the nuances of these sounds and their potential impact on your living space.
Identifying the Culprit: Signs of a Squirrel InfestationDelve into the signs that indicate a squirrel presence in your ceiling. From scratching sounds to occasional thumps, learn to recognize the subtle signals of a furry visitor.
Squirrel In Ceiling Sounds: Causes and Solutions
Understanding the Dynamics: Causes of Squirrel Sounds
Nesting Behavior: Exploring Squirrel Habits in CeilingsUncover the reasons behind squirrels choosing ceilings as nesting spots. Gain insights into their nesting behavior and how it contributes to the sounds you may hear.
Seasonal Considerations: Squirrel Activity Throughout the YearExplore the seasonal patterns of squirrel activity. Understand when squirrels are most active and how these patterns correlate with the sounds emanating from your ceiling.
Solutions for a Tranquil Home: Addressing Squirrel Disturbances
Humane Removal Strategies: Ethical Approaches to Squirrel ManagementDiscover humane methods for removing squirrels from your ceiling. From repellents to exclusion techniques, explore options that prioritize the well-being of these creatures.
Sealing Entry Points: Preventing Future IntrusionsImplement proactive measures to seal entry points and prevent future squirrel intrusions. Learn about effective sealing techniques to fortify your home against unwelcome guests.
Professional Assistance: When to Seek Expert InterventionRecognize scenarios that warrant professional assistance. Whether it’s a complex infestation or challenging structural issues, understand when to call in experts for a thorough assessment.
Conclusion: Restoring Harmony to Your Home
As we conclude our exploration of “Squirrel In Ceiling Sounds,” you’re now equipped with knowledge to identify, understand, and address the disturbances caused by these furry neighbors. By implementing humane removal strategies and fortifying your home, you can restore tranquility and enjoy a peaceful living space.
Empower yourself as a homeowner, navigate the intricacies of wildlife encounters, and create a harmonious environment within your home.
Are you tired of the outdated and dull appearance of your ceiling? If so, it might be time to consider the transformative effects of Canec Ceiling Removal. Say goodbye to the mundane and welcome a fresh, modern look to your space. In this article, we’ll delve into the world of Canec Ceiling, exploring its benefits, the removal process, and why it’s become a popular choice for those seeking a stylish and contemporary upgrade.
Elevating Your Space
Understanding Canec Ceiling and Its Appeal
Canec Ceiling, with its distinctive texture, was once a popular choice in interior design. However, as trends evolve, many homeowners are now opting for a more streamlined and contemporary look. Canec Ceiling has emerged as a sought-after solution to transform and revitalize living spaces.
Benefits of Canec Ceiling
Modern Aesthetics: One of the primary reasons homeowners choose Canec Ceiling Removal is the desire for a more modern and sleek appearance. Removing the textured ceiling opens up the space and provides a clean canvas for a variety of design options.
Increased Property Value: A home with a dated interior may not be as appealing to potential buyers. Canec Ceiling Removal can enhance the overall aesthetics of your home, potentially increasing its market value.
Improved Lighting: Canec Ceiling tends to absorb light, making rooms appear darker. By removing this texture, you allow light to bounce off the ceiling, creating a brighter and more inviting atmosphere.
The Canec Ceiling Removal Process
Thinking about taking on the Canec Ceiling project? Understanding the process is crucial for a successful and hassle-free experience.
Assessment: Begin by assessing the condition of your current ceiling. Ensure there are no structural issues that need addressing before proceeding with the removal.
Preparation: Cover furniture and floors to protect them from dust and debris. It’s also advisable to turn off the electricity in the room to ensure safety during the removal process.
Removal: The removal process involves scraping off the Canec Ceiling texture. This can be a labor-intensive task, and it’s recommended to seek professional assistance to ensure a smooth and efficient removal.
Repairs and Finishing: After the texture is removed, any imperfections in the ceiling will be addressed. This may include patching holes or cracks and smoothing the surface. The finishing touches, such as painting, will complete the transformation.
Canec Ceiling Removal: A Wise Investment
Investing in Canec Ceiling is not just about aesthetics; it’s a practical decision with long-term benefits. As trends continue to shift towards cleaner and more contemporary designs, removing outdated textures becomes a key element in home improvement.
Why Choose Canec Ceiling Removal?
Versatility: Once the Canec Ceiling texture is removed, you have the freedom to choose from a wide range of finishes. Whether you prefer a classic white ceiling or a bold statement color, the possibilities are endless.
Health Benefits: Older Canec Ceiling textures may contain asbestos, posing potential health risks. Removing it not only improves the visual appeal of your space but also ensures a healthier living environment.
Enhanced Acoustics: If your current ceiling texture affects the acoustics in the room, Canec Ceiling can be a game-changer. The smooth surface allows for better sound distribution and absorption.
Conclusion: Elevate Your Space with Canec Ceiling Removal
In conclusion, opting for Canec Ceiling Removal is a strategic move towards a more contemporary and visually appealing living space. The process may require some effort, but the results are well worth it. From modern aesthetics to improved lighting and increased property value, the benefits are plentiful.
If you’re considering a home improvement project that will make a significant impact, Canec Ceiling should be at the top of your list. Embrace the transformation and unveil the hidden beauty of your space with this innovative and stylish upgrade.
Experiencing a pipe burst in the ceiling can be a homeowner’s nightmare. In this comprehensive guide, we’ll explore the intricacies of dealing with a “Pipe Burst In Ceiling,” unraveling the potential causes, immediate actions, and long-term solutions to navigate through this water-related crisis. Let’s delve into the world of pipe bursts and empower you with the knowledge to minimize damage and restore your home.
Pipe Burst In Ceiling: Decoding Causes and Consequences
Unveiling the Culprit: What Triggers a Pipe Burst in Ceiling
Freezing Temperatures: The Winter MenaceIn colder climates, frozen pipes are a common cause of bursts. When water freezes within a pipe, it expands, exerting immense pressure. The force can lead to pipe rupture, particularly in unheated or poorly insulated areas.
Corrosion and Aging: The Silent ErosionOver time, pipes can deteriorate due to corrosion, especially in older homes with aging plumbing systems. The gradual weakening of the pipe material can result in vulnerability, making it susceptible to bursting.
High Water Pressure: The Pressure PredicamentExcessively high water pressure is another culprit behind pipe bursts. Constant high pressure can strain the pipes, causing them to weaken and eventually rupture. Installing a pressure regulator can mitigate this risk.
Managing the Crisis: Immediate Actions for a Pipe Burst in Ceiling
In this section, we’ll discuss crucial immediate actions to take when facing a pipe burst in the ceiling. Quick response is key to minimizing damage and potential long-term consequences.
1. Shut Off the Water Supply: Halting the Onslaught
The first and most urgent step is to shut off the water supply to the affected area. Locate the main water shut-off valve and turn it off to prevent further water from entering the burst pipe.
2. Drain Faucets: Reducing Pressure
Open faucets in the affected area to drain any remaining water and reduce pressure within the pipes. This helps alleviate stress on the burst section and minimizes the extent of water damage.
Use buckets, towels, or a wet/dry vacuum to remove standing water from the affected area. Quick water extraction is crucial to prevent additional damage to the ceiling, walls, and flooring.
Long-Term Solutions: Addressing Repairs and Restoration
1. Professional Assessment: Diagnosing the Extent
Engage the services of a professional plumber to assess the extent of the damage and identify the specific location of the pipe burst. Their expertise is crucial in determining the best course of action for repairs.
In cases where the burst pipe is severely damaged, replacement may be necessary. Modern materials, such as PEX or copper, offer durability and resistance to corrosion, providing a long-term solution to prevent future bursts.
3. Ceiling Repairs: Restoring Aesthetics
Once the plumbing repairs are complete, focus on restoring the damaged ceiling. Patching, repainting, and addressing any structural issues are essential to bring the affected area back to its pre-damage condition.
Preventive Measures: Safeguarding Against Future Pipe Bursts
Insulate pipes in unheated or vulnerable areas to prevent freezing. Adding insulation sleeves or wrapping pipes with heat tape can provide a protective barrier against the cold.
2. Regular Inspections: Staying Proactive
Conduct regular inspections of your plumbing system to identify signs of corrosion, wear, or potential weaknesses. Early detection allows for timely repairs or replacements, reducing the risk of future pipe bursts.
3. Maintain Proper Water Pressure: Balancing Act
Install a pressure regulator if your water pressure is consistently high. Maintaining optimal water pressure not only protects your pipes but also contributes to the longevity of your plumbing system.
Conclusion: Bouncing Back from a Pipe Burst in Ceiling
While a pipe burst in the ceiling is undoubtedly a stressful situation, timely and informed actions can help you navigate through the crisis. By understanding the causes, taking immediate actions, and implementing long-term solutions, homeowners can minimize damage and restore their homes to a state of normalcy.
Remember, preparation and proactive measures are your allies in safeguarding against future pipe bursts. With the right knowledge and a swift response, you can bounce back from a pipe burst in the ceiling and fortify your home against similar incidents in the future.
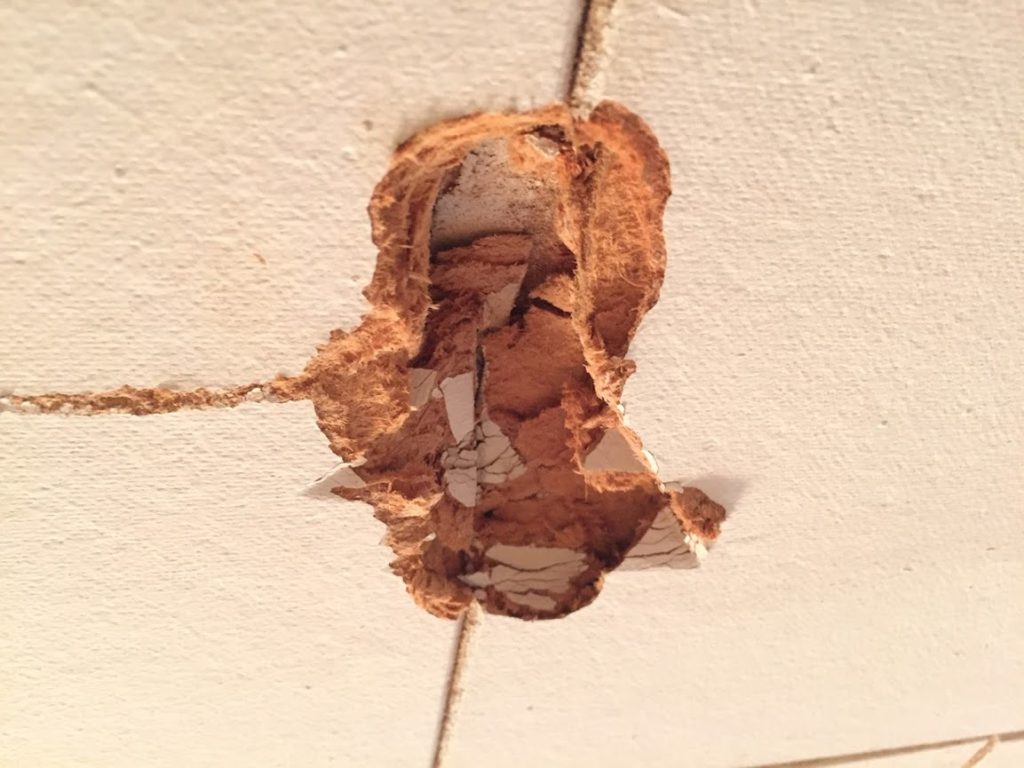
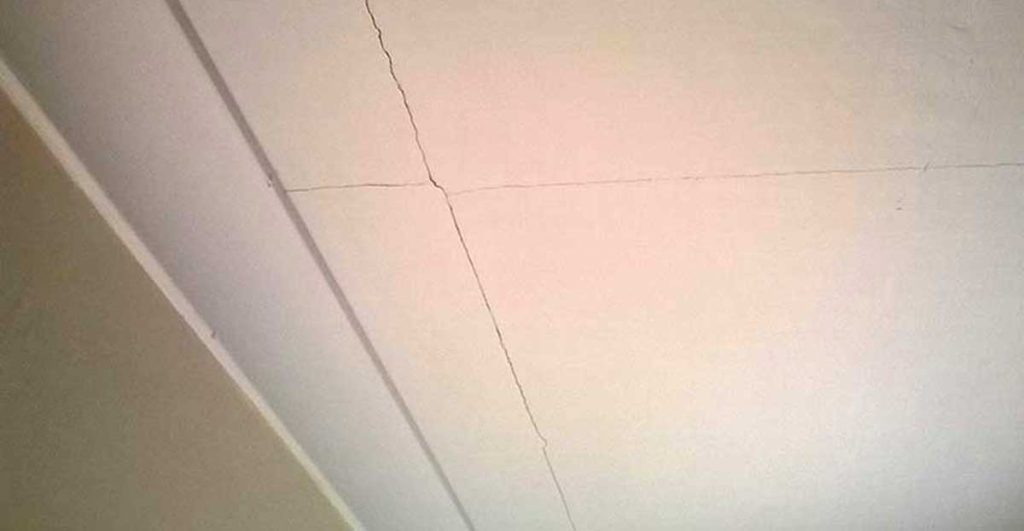
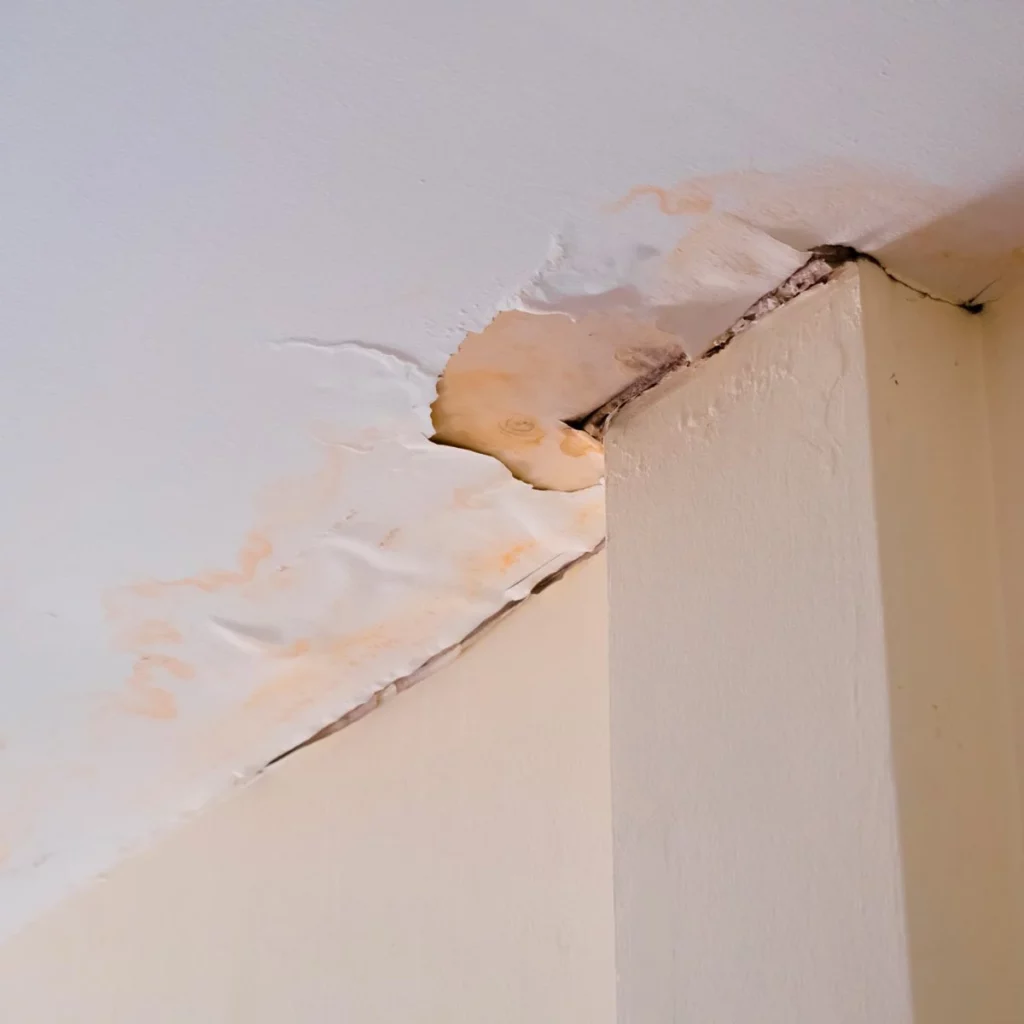
The presence of a drywall crack in the ceiling can be a cause for concern among homeowners. In this comprehensive guide, we will unravel the mysteries surrounding “Drywall Crack In Ceiling,” exploring the potential causes, implications, and effective solutions to restore both aesthetics and structural integrity. Let’s delve into the world of ceiling cracks and empower you with the knowledge to address this common issue.
Drywall Crack In Ceiling: Unveiling the Causes and Concerns
The Enigma of Ceiling Cracks: What Triggers the Issue
Settling of the House: The Foundation FactorOne of the common causes of a drywall crack in the ceiling is the natural settling of the house over time. As the foundation adjusts, stress can be exerted on the drywall, leading to cracks. Understanding the difference between normal settling and structural issues is crucial.
Temperature and Humidity Fluctuations: The Climate ConnectionExtreme temperature and humidity changes can impact the materials in the ceiling, causing expansion and contraction. Over time, this cyclical stress can manifest as a crack in the drywall. Proper insulation and climate control measures can help minimize this risk.
Water Damage: The Silent CulpritWater damage, whether from leaks or floods, can compromise the integrity of the drywall. A weakened structure is more prone to cracking. Identifying and addressing the source of water intrusion is essential to prevent further damage.
Exploring Solutions: Addressing a Drywall Crack in Ceiling
In this section, we will discuss practical solutions for addressing a drywall crack in the ceiling, emphasizing both cosmetic repairs and measures to prevent recurrence.
Cosmetic Repairs: Restoring Aesthetics
Patch and Paint: A Seamless SolutionFor small and superficial cracks, a simple patching and painting job can often restore the ceiling’s appearance. Use a high-quality joint compound and paint that matches the existing color for a seamless finish.
Texture Matching: Blending InAchieving a consistent texture is crucial when repairing a drywall crack. Techniques such as stippling or using a textured spray can help match the repaired area with the surrounding ceiling, making the crack less noticeable.
Preventive Measures: Mitigating Future Cracks
Address Underlying Issues: Tackling the Root CauseBefore repairing the visible crack, it’s essential to address any underlying issues. If settling or structural problems are suspected, consulting with a structural engineer or contractor is advisable for a comprehensive assessment.
Improve Ventilation: Controlling Climate ImpactEnhance ventilation to minimize temperature and humidity fluctuations. Properly insulated and ventilated spaces are less susceptible to the stressors that can lead to drywall cracks. Consider installing vents, fans, or a dehumidifier as needed.
Regular Maintenance: A Proactive ApproachImplement a routine maintenance schedule to catch potential issues early. Regular inspections allow you to identify and address concerns before they escalate, preserving the integrity of your ceiling.
Addressing Structural Concerns: When to Seek Professional Help
1. Large or Worsening Cracks: Signs of Structural Issues
If the drywall crack is substantial or continues to widen despite cosmetic repairs, it may indicate underlying structural problems. In such cases, consulting with a structural engineer or contractor is crucial to assess the severity and recommend appropriate solutions.
If the drywall crack is associated with water damage or leaks, addressing the source promptly is essential. Ignoring water-related issues can lead to further deterioration of the drywall and potential structural damage.
Conclusion: Navigating the Terrain of Drywall Cracks in the Ceiling
A drywall crack in the ceiling may be a common issue, but understanding its causes and implementing effective solutions is key to maintaining the structural and aesthetic integrity of your home. By addressing the root cause, performing cosmetic repairs, and adopting preventive measures, homeowners can navigate the terrain of drywall cracks with confidence.
Remember, timely intervention and regular maintenance are your allies in preserving the beauty and stability of your ceiling. Don’t let a crack overshadow the charm of your home—empower yourself with the knowledge to address the issue head-on.
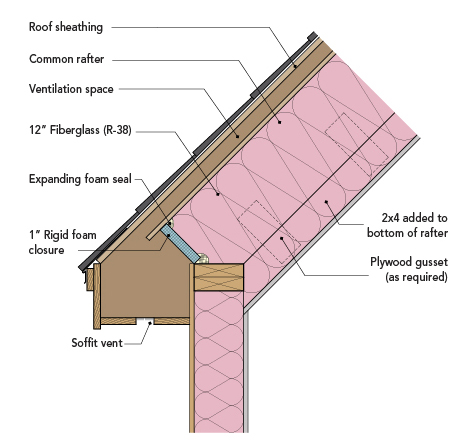
Vaulted ceilings add a touch of grandeur to any home, but ensuring proper insulation is essential for comfort and energy efficiency. Delve into the world of “Vaulted Ceiling Insulation Requirements” as we explore the necessary guidelines to enhance your living space. Discover the benefits, materials, and expert recommendations for creating a well-insulated vaulted ceiling that strikes the perfect balance between aesthetics and functionality.
Vaulted Ceiling Insulation Requirements: A Closer Look at the Basics
Energy Efficiency: Beyond AestheticsVaulted ceilings contribute to the visual appeal of a home, but without proper insulation, they can lead to significant energy loss. Effective insulation helps maintain a comfortable temperature and reduces heating and cooling costs.
Temperature Regulation: Year-Round Comfort Insulating a vaulted ceiling ensures consistent indoor temperatures throughout the year. Whether it’s hot summer days or chilly winter nights, proper insulation helps regulate the temperature, creating a comfortable living environment.
Condensation Prevention: Protecting Your Home Inadequate insulation can lead to condensation issues, potentially causing damage to the ceiling structure and promoting the growth of mold and mildew. Proper insulation acts as a barrier, preventing moisture-related problems.
Meeting the Standards: Vaulted Ceiling Insulation Requirements
In this section, we will outline the essential requirements for insulating a vaulted ceiling, focusing on materials, techniques, and expert recommendations.
Materials for Vaulted Ceiling Insulation: Choosing Wisely
Fiberglass Insulation:Fiberglass insulation is a popular choice for vaulted ceilings. It comes in batts or rolls and is known for its effectiveness in providing thermal resistance. Proper installation ensures a seamless fit within the vaulted ceiling structure.
Spray Foam Insulation:For irregular or challenging ceiling structures, spray foam insulation offers a versatile solution. It expands to fill gaps and crevices, creating a continuous barrier against heat transfer. Professional installation is recommended for optimal results.
Reflective Foil Insulation:Reflective foil insulation, often installed in the roof assembly, reflects radiant heat away from the ceiling. This type of insulation is particularly effective in regions with hot climates, providing a barrier against excessive heat absorption.
Installation Techniques: Ensuring Effectiveness
Continuous Insulation:Maintaining continuity in insulation is crucial for preventing thermal bridging. Ensure that insulation is continuous and covers the entire vaulted ceiling without gaps or breaks.
Vapor Barrier Considerations:Depending on climate conditions, the inclusion of a vapor barrier may be necessary to prevent moisture infiltration. Consultation with a professional will help determine the appropriate vapor barrier strategy for your specific circumstances.
Professional Assessment:Seek the expertise of insulation professionals to assess your vaulted ceiling’s unique requirements. Their insights can guide you in choosing the right materials and techniques tailored to your home’s design.
Expert Recommendations: Creating the Perfectly Insulated Vaulted Ceiling
1. R-Value Guidelines:
The recommended R-value for vaulted ceiling insulation depends on factors such as climate, local building codes, and the presence of additional insulation in the roof. Consult local guidelines or insulation professionals to determine the appropriate R-value for your specific situation.
2. Balanced Ventilation:
Proper ventilation is essential to prevent moisture buildup in the insulated space. Incorporate balanced ventilation systems to ensure a healthy and moisture-free environment within the vaulted ceiling.
3. Regular Maintenance:
Periodic inspection and maintenance of the vaulted ceiling insulation are crucial for its long-term effectiveness. Check for signs of wear, damage, or settling, and address any issues promptly to preserve the insulation’s performance.
Conclusion: Elevating Comfort and Efficiency with Vaulted Ceiling Insulation
Vaulted ceilings can be a stunning architectural feature, but their insulation requirements are critical for achieving a harmonious blend of aesthetics and functionality. By understanding the essentials of “Vaulted Ceiling Insulation Requirements,” homeowners can create spaces that not only captivate the eye but also provide year-round comfort and energy efficiency.
Investing in quality insulation materials, following recommended installation techniques, and seeking professional guidance are key steps in ensuring your vaulted ceiling becomes a testament to both style and sustainability. Make the most of your architectural masterpiece by embracing the art and science of vaulted ceiling insulation.
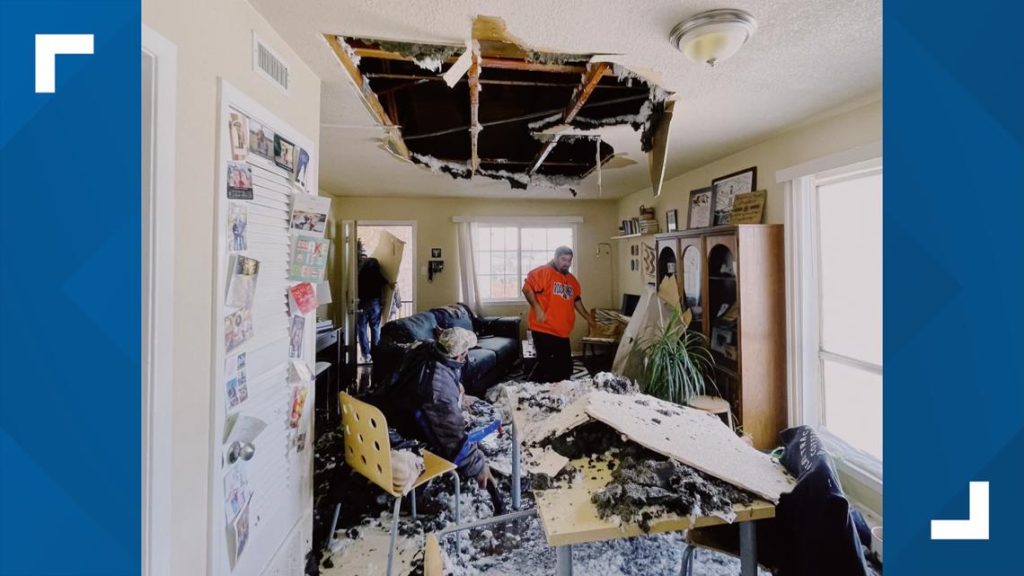
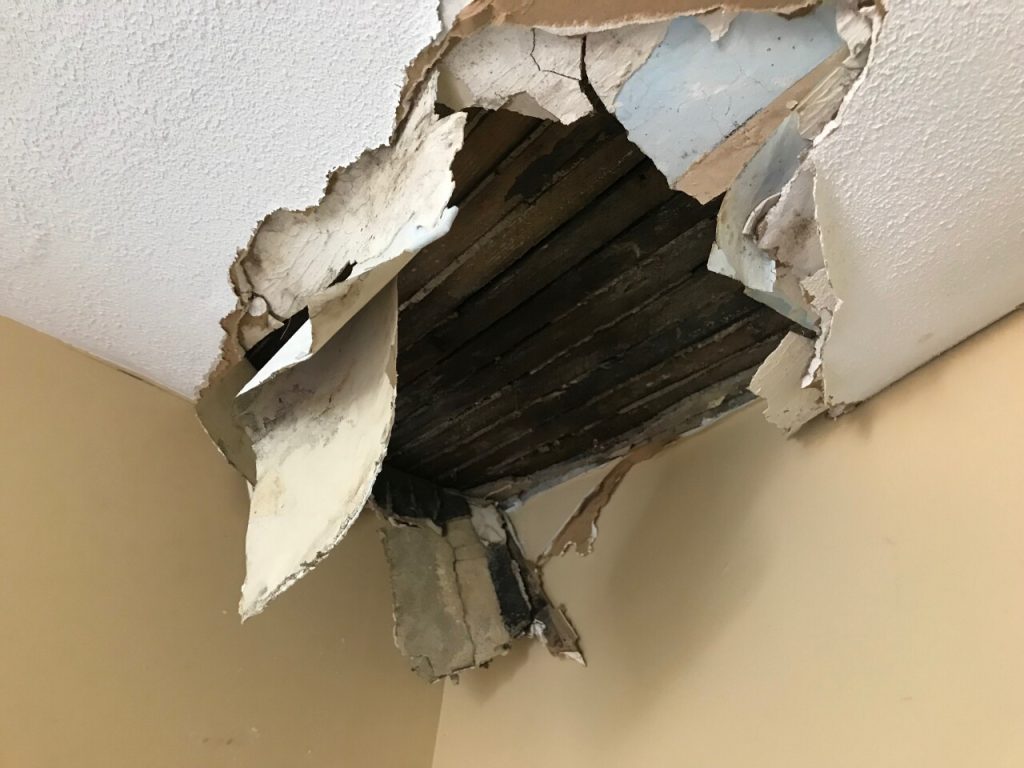
A leaking ceiling can be more than just an inconvenience; it can pose serious risks to the structural integrity of your home. In this comprehensive guide, we will delve into the potential dangers of a leaking ceiling, addressing the critical question: “Can Leaking Ceiling Collapse?” Gain insights into the causes, signs, and proactive measures to safeguard your home from potential disasters.
Can Leaking Ceiling Collapse: Unraveling the Threats
The Silent Threat: Understanding the Dangers of a Leaking Ceiling
Compromised Structural Integrity: The Domino Effect: A leaking ceiling is indicative of water intrusion, which, if left unaddressed, can compromise the structural integrity of your home. Over time, water weakens the building materials, including drywall, wood, and insulation. The cumulative effect can lead to a catastrophic collapse.
Mold and Mildew Infestation: A Health Hazard: Persistent leaks create a conducive environment for mold and mildew growth. Beyond structural concerns, these fungi pose health risks, triggering respiratory issues and allergies. The combination of compromised structural elements and health hazards makes a leaking ceiling a multi-faceted threat.
Electrical Hazards: Sparks of Danger: Water and electricity are a dangerous combination. A leaking ceiling can result in water seeping into electrical systems, leading to short circuits, electrical fires, or shocks. The potential for electrical hazards adds another layer of risk associated with ceiling leaks.
Can Leaking Ceiling Collapse: Assessing the Risks
In this section, we will explore the specific risks associated with a leaking ceiling and the signs that indicate a potential collapse.
Signs of Impending Collapse: Identifying Red Flags
Sagging Ceiling:A visibly sagging ceiling is a clear indication of structural damage. The weight of accumulated water weakens the ceiling materials, causing it to bow or sag. If left unattended, this can progress to a complete collapse.
Visible Water Stains:Water stains on the ceiling are not just aesthetic concerns; they signify ongoing leaks. The presence of water stains indicates that water has penetrated the ceiling material, potentially compromising its structural integrity.
Cracks and Peeling Paint:Structural stress from water damage can manifest as cracks or peeling paint on the ceiling. These physical signs suggest that the ceiling is no longer able to support its weight and may be at risk of collapse.
The Immediate Danger: Addressing a Leaking Ceiling
Identify and Stop the Source:The first step in addressing a leaking ceiling is to identify and stop the source of the water intrusion. Whether it’s a leaky roof, burst pipes, or plumbing issues, prompt action is crucial to prevent further damage.
Professional Assessment:Engage the services of a qualified professional to assess the extent of the damage. Structural engineers and contractors can provide insights into the severity of the issue and recommend appropriate remediation measures.
Ceiling Repairs and Reinforcement:Depending on the extent of the damage, repairs may range from patching and repainting to more extensive measures such as reinforcing or replacing weakened structural components. Timely and thorough repairs are essential to prevent a potential collapse.
Prevention Measures: Safeguarding Your Home
1. Regular Inspections:
Conduct routine inspections of your home’s roof, plumbing, and ceilings. Early detection of leaks allows for prompt intervention before significant damage occurs.
2. Adequate Ventilation:
Ensure proper ventilation in areas prone to moisture, such as bathrooms and kitchens. Adequate airflow helps prevent the conditions conducive to mold and mildew growth.
3. Immediate Repairs:
Address any leaks or water damage promptly. Ignoring small issues can lead to more significant problems over time, increasing the risk of a ceiling collapse.
Conclusion: Taking Action Against the Threat of a Collapsing Ceiling
A leaking ceiling is not just a cosmetic concern; it poses real and immediate risks to your home and the safety of its occupants. By understanding the potential dangers and taking proactive measures, you can mitigate the risks associated with a leaking ceiling and safeguard your home from the threat of collapse.
Remember, swift action and regular maintenance are your allies in preventing structural issues and ensuring the long-term stability of your home.
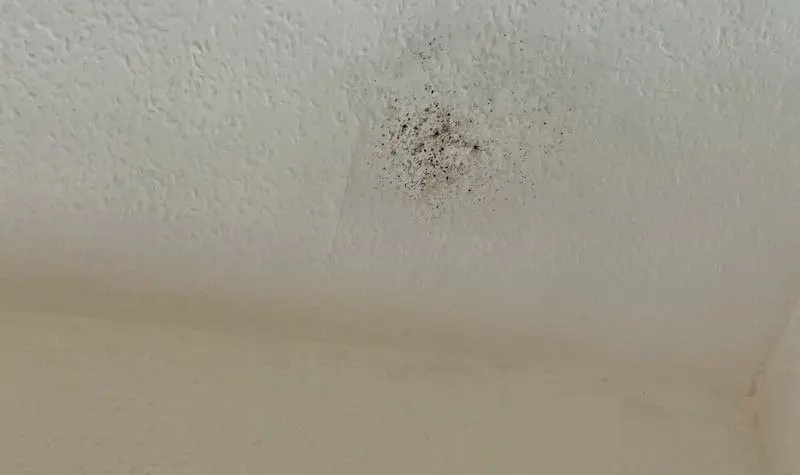
The ambiance of a room can quickly turn from inviting to concerning when an unexpected black spot appears on the ceiling. Homeowners and tenants alike may find themselves puzzled by this unwelcome addition to their living space. In this comprehensive guide, we will explore the phenomenon of the “Black Spot on Ceiling,” unraveling its potential causes, implications, and the steps to address and prevent it.
Black Spot On Ceiling: Decoding the Enigma
The Appearance of the Intruder: What Causes a Black Spot on Ceiling?
The sudden emergence of a black spot on the ceiling can be disconcerting, prompting a series of questions about its origin. Understanding the various causes is crucial for effective identification and resolution.
Water Damage: The Silent CulpritOne of the primary culprits behind black spots on the ceiling is water damage. Leaky roofs, burst pipes, or condensation issues can lead to the growth of mold and mildew. These fungi manifest as dark spots on the ceiling and often accompany a musty odor. It’s essential to address the water source promptly to prevent further damage.
Smoke Stains: Lingering RemnantsIn homes with a history of smoking or insufficient ventilation, smoke stains can accumulate on the ceiling. Over time, these stains may darken, resulting in noticeable black spots. Proper ventilation and cleaning are essential to prevent the recurrence of these spots.
Mold and Mildew: The Menace WithinMoisture-rich environments, such as bathrooms and kitchens, are breeding grounds for mold and mildew. These fungi thrive in damp conditions and can lead to the development of black spots on the ceiling. Regular cleaning and adequate ventilation can help keep these unwelcome guests at bay.
Soot Accumulation: Fireplace FalloutHomes with fireplaces may experience black spots on the ceiling due to soot accumulation. While the aesthetic impact is immediate, prolonged exposure can pose respiratory risks. Regular chimney maintenance and cleaning are vital to preventing soot-related issues.
Identifying Water Damage
Understanding the specific cause of the black spot is crucial for effective remediation. In this section, we will delve deeper into the identification and resolution of black spots resulting from water damage.
Recognizing Water Damage: Signs and Symptoms
Discoloration and Staining:Water-damaged areas often exhibit discoloration and staining. The black spot on the ceiling may be accompanied by water rings or streaks, indicating a persistent leak.
Peeling Paint or Wallpaper:Moisture intrusion can compromise the integrity of paint or wallpaper. If the black spot is surrounded by peeling paint or wallpaper, it is likely a result of water damage.
Musty Odor:A distinctive musty odor accompanies mold growth. If the black spot emits a musty smell, it’s a clear indicator of fungal presence, necessitating prompt attention.
Addressing Water Damage: Steps to Remediation
Locate and Fix the Source:Identifying and repairing the source of water intrusion is paramount. Whether it’s a leaky roof, malfunctioning plumbing, or poor ventilation, addressing the root cause is crucial for preventing recurrence.
Mold Removal:If mold is present, professional remediation may be necessary. DIY efforts may exacerbate the issue, leading to spore dispersion. Consultation with a mold remediation specialist ensures thorough and safe removal.
Ceiling Repair:Once the water source and mold issues are resolved, repairing the damaged ceiling becomes the final step. This may involve patching, repainting, or, in severe cases, replacing portions of the ceiling.
Preventing the Return of the Black Spot: Maintenance Tips
Prevention is key when it comes to avoiding the reappearance of the black spot on the ceiling. Implementing proactive measures can safeguard your home from potential water damage and associated issues.
Regular Roof Inspections:Schedule periodic roof inspections to identify and address potential vulnerabilities. Damaged shingles, flashing, or seals can contribute to water infiltration.
Prompt Plumbing Repairs:Attend to plumbing issues promptly, addressing leaks and ensuring proper drainage. Regular maintenance can prevent water-related damage to ceilings and walls.
Proper Ventilation:Enhance ventilation in moisture-prone areas such as bathrooms and kitchens. Vent fans, dehumidifiers, and open windows contribute to a drier environment, inhibiting mold and mildew growth.
Chimney Maintenance:If your home features a fireplace, adhere to a regular chimney maintenance schedule. This includes professional cleaning to prevent the accumulation of soot and potential black spot formation.
Conclusion: Banishing the Black Spot and Embracing Home Wellness
The black spot on the ceiling may initially evoke concern, but armed with knowledge, homeowners can tackle the issue effectively. By identifying the root cause, implementing remediation measures, and adopting preventative strategies, the menace of the black spot can be banished, leaving behind a home environment that promotes health, safety, and aesthetic appeal.
In your journey to a spot-free ceiling, remember that early detection and proactive maintenance are your strongest allies. Stay vigilant, address issues promptly, and enjoy a home free from the unwelcome presence of black spots.
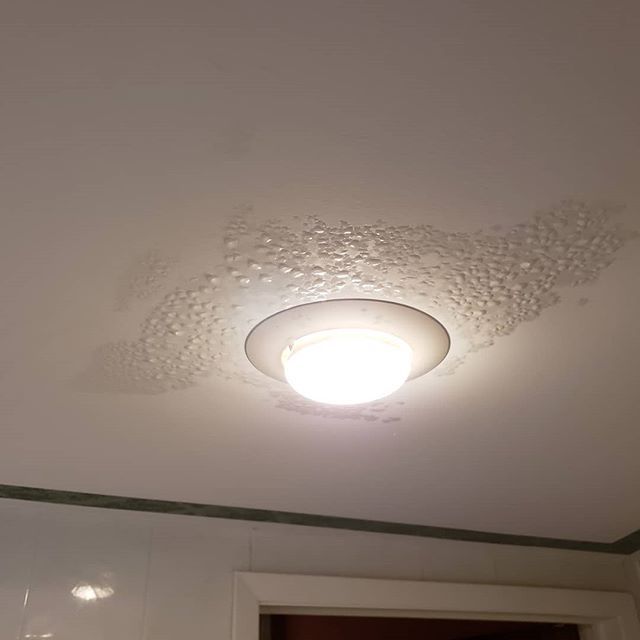
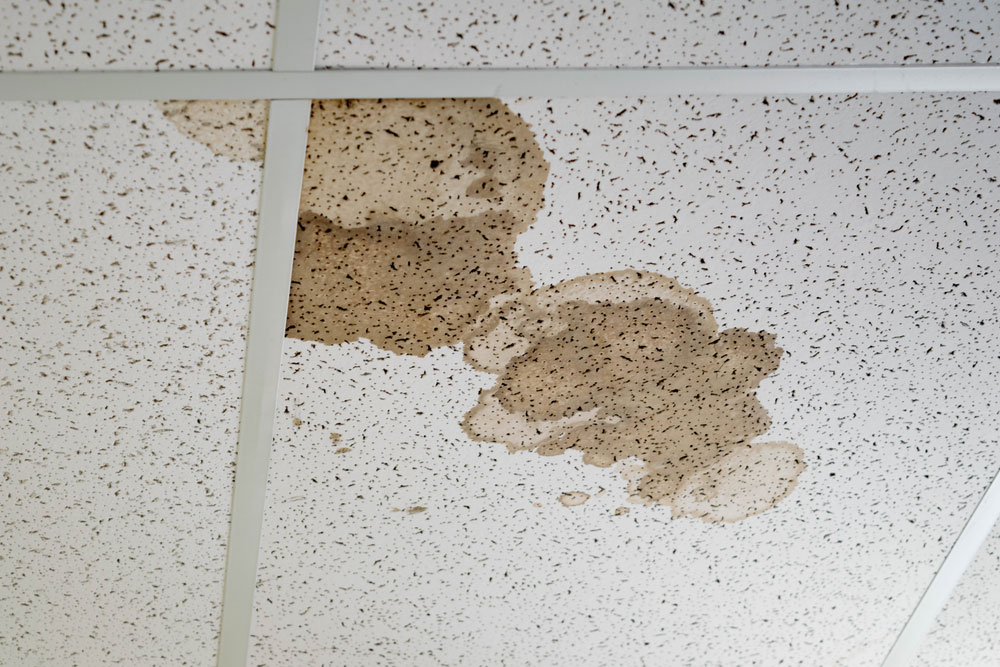
Discovering a “Water Bulge In Ceiling” can be a homeowner’s worst nightmare, signaling potential issues that require immediate attention. In this comprehensive guide, we will delve into the causes, consequences, and effective solutions for addressing this unsettling phenomenon. Gain insights on how to safeguard your home from the perils associated with water bulges in ceilings and why timely intervention is crucial for maintaining a safe and sound living space.
Water Bulge In Ceiling: Understanding the Signs and Causes
A water bulge in the ceiling is not just an unsightly blemish; it is a red flag indicating an underlying problem that demands prompt investigation. Before we explore the solutions, let’s delve into the common signs and causes associated with a water bulge in the ceiling.
Recognizing the Signs: Water Bulge In Ceiling
Visible Stains and Discoloration: One of the initial indicators of a water bulge is the presence of visible stains or discoloration on the ceiling. These marks often spread outward from the source of the water, providing a visual cue of the issue.
Sagging or Bulging: As water infiltrates the ceiling material, it weakens the structure, leading to sagging or bulging in the affected area. This can create an uneven surface that is easily noticeable.
Dripping Sounds: In some cases, water bulges may be accompanied by the sound of dripping water. This audible clue can help pinpoint the location of the leak and facilitate timely repairs.
Common Causes of Water Bulges in Ceilings
Roof Leaks: Damaged or aging roofs are a common culprit behind water bulges in ceilings. Leaks can occur due to missing shingles, cracked flashing, or compromised roof seals.
Plumbing Issues: Faulty plumbing, including burst pipes, leaking joints, or damaged water supply lines, can lead to water seepage into ceilings. Identifying and addressing plumbing issues promptly is crucial.
Condensation: In humid climates, condensation can accumulate within ceiling spaces, leading to water bulges over time. Inadequate ventilation exacerbates this issue.
Leaking Appliances: Malfunctioning appliances, such as water heaters, air conditioners, or washing machines, can be sources of water leaks that affect ceilings.
Addressing the Issue: Effective Solutions for Water Bulges in Ceilings
Now that we’ve identified the signs and causes, let’s explore practical solutions for addressing water bulges in ceilings. Timely intervention is essential to prevent further damage to your home.
Locate and Repair the Source: Begin by identifying the source of the water intrusion. Inspect the roof, plumbing, and appliances for any visible signs of leaks. Once identified, initiate repairs promptly to stop the influx of water.
Ceiling Repair and Restoration: Address the cosmetic damage caused by the water bulge by repairing and restoring the affected ceiling. This may involve removing damaged portions, applying sealants, and repainting to match the existing decor.
Improve Ventilation: In cases where condensation is a recurring issue, improving ventilation within the home can mitigate the formation of water bulges. Proper airflow helps reduce humidity levels and prevents moisture buildup.
Regular Maintenance: Implementing a routine maintenance schedule for your roof, plumbing, and appliances can preemptively identify and address potential issues before they escalate. Regular inspections can save you from costly repairs in the long run.
Preventing Future Water Bulges: Proactive Measures for Homeowners
Routine Inspections: Conduct regular inspections of your home’s exterior, roof, and plumbing. Look for signs of wear, damage, or potential weak points that may lead to water intrusion.
Prompt Repairs: Address any identified issues promptly. Whether it’s a small roof repair, fixing a leaky pipe, or replacing a malfunctioning appliance, swift action can prevent water bulges from developing.
Invest in Quality Materials: When undertaking home improvement projects or repairs, invest in high-quality materials that enhance the durability and longevity of your home’s structure.
Conclusion: Safeguarding Your Home from Water Bulges
In conclusion, a water bulge in the ceiling is more than a cosmetic concern—it’s a symptom of potential structural damage that requires immediate attention. By understanding the signs, causes, and effective solutions, homeowners can take proactive measures to safeguard their homes from the detrimental effects of water intrusion.
Remember, early detection and intervention are the keys to preserving the integrity of your home and ensuring a safe and comfortable living environment.
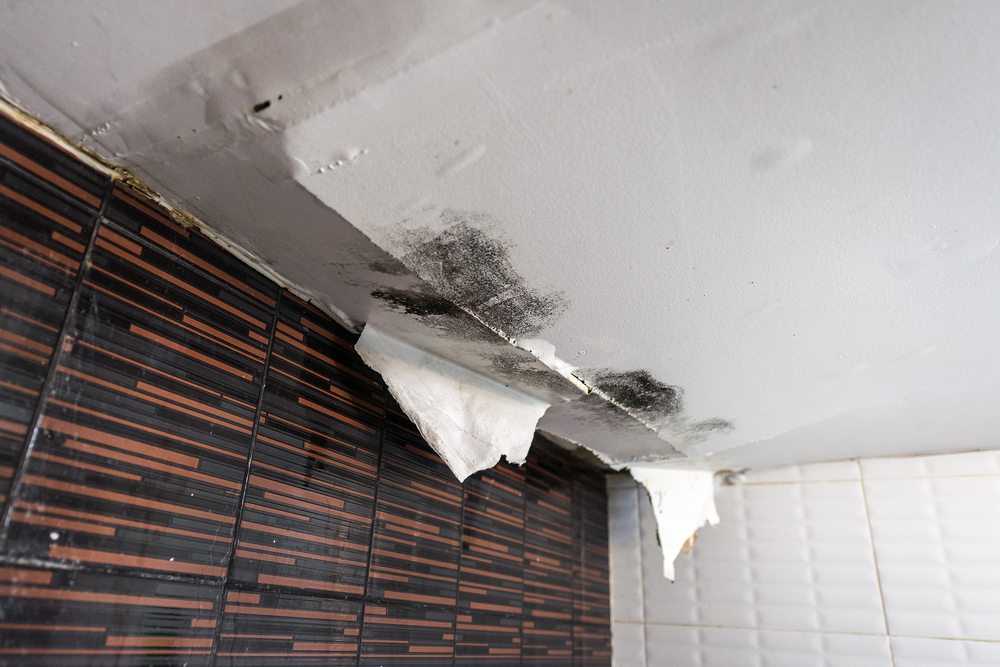
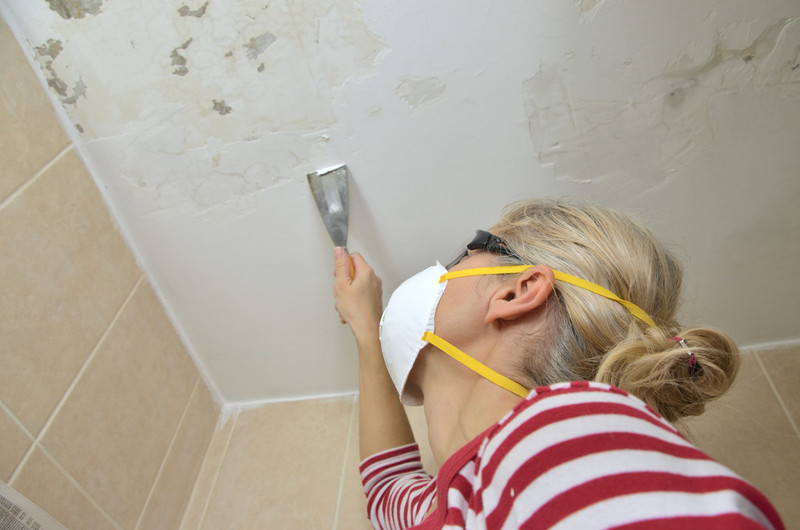
Discover the ins and outs of managing and preventing the consequences of “Bathroom Ceiling Water Damage.” Learn how to safeguard your home from potential issues and restore your bathroom to its former glory.
Understanding the Impact of Bathroom Ceiling Water Damage
Identifying the Signs
Spotting early signs of bathroom ceiling damage is crucial for prompt intervention. Stains, discoloration, sagging, or peeling paint on your bathroom ceiling are indicators that water damage may be present. Investigate the source promptly to prevent further deterioration.
The Causes Behind Bathroom Ceiling Water Damage
Leaky Fixtures
Leaky faucets, showerheads, or pipes within the walls can lead to water accumulation in the ceiling. Regularly inspect and repair any leaks to mitigate the risk of water damage.
Poor Ventilation
Inadequate ventilation in the bathroom can result in moisture buildup, contributing to water damage. Ensure proper ventilation through exhaust fans or windows to promote air circulation and prevent condensation.
Dealing with the Consequences
Immediate Action
When faced with bathroom ceiling damage swift action is essential. Begin by identifying and fixing the source of the leak. Then, address the damaged area promptly to prevent the spread of mold and further structural issues.
Repairing Water-Damaged Ceilings
For minor damage, you can use a joint compound or patching plaster to repair water-damaged areas. However, extensive damage may require the expertise of a professional contractor to ensure a thorough and lasting repair.
Preventive Measures for a Water-Resistant Bathroom
Regular Maintenance
Stay proactive by routinely checking for leaks, inspecting caulking, and ensuring proper ventilation. Timely maintenance reduces the likelihood of bathroom ceiling damage and prolongs the life of your bathroom.
Waterproofing
Consider waterproofing your bathroom surfaces, including the ceiling. Waterproof paints, sealants, and membranes can create a protective barrier against moisture, preventing water damage.
Adequate Insulation
Proper insulation in your bathroom helps regulate temperature and reduce condensation, minimizing the risk of water damage. Insulate walls, ceilings, and pipes to create a more resilient and water-resistant environment.
Repairing and Restoring Your Bathroom Ceiling After Water Damage
Professional Restoration
In cases of severe water damage, seeking professional restoration services is advisable. Professionals have the expertise and equipment to assess the extent of the damage, conduct thorough repairs, and restore your bathroom to its pre-damaged condition.
Conclusion: Safeguarding Your Bathroom Against Water Damage
In conclusion, understanding the causes and consequences of “Bathroom Ceiling Water Damage” empowers homeowners to take proactive measures. Regular maintenance, immediate action in the face of damage, and preventive strategies are key elements in safeguarding your bathroom and home from the potentially costly and hazardous effects of water damage.
As winter sets in, homeowners often encounter the unwelcome surprise of “Ceiling Cracks In Winter.” Learn why this phenomenon occurs and discover effective strategies to protect your home from the challenges brought by the cold season.
The Intricacies of Ceiling Cracks in Winter
Understanding Temperature Fluctuations
“Cold and Cracked: Ceiling Cracks In Winter” often stem from the natural expansion and contraction of building materials in response to temperature changes. As outdoor temperatures drop, building materials contract, potentially leading to the formation of cracks in ceilings.
Factors Contributing to Ceiling Cracks In Winter
Age of the Building
Older homes are more susceptible to “Ceiling Cracks In Winter.” Over time, the structure may have experienced wear and tear, making it prone to cracks. Regular inspections become essential for identifying and addressing potential vulnerabilities.
Insufficient Insulation
Inadequate insulation allows cold air to infiltrate your home, leading to temperature variations that contribute to ceiling cracks. Addressing insulation issues is a proactive step toward minimizing the impact of winter weather on your home’s structural integrity.
Identifying and Repairing Ceiling Cracks
Visual Inspection
Perform a thorough visual inspection of your ceilings to identify any existing cracks. Hairline cracks may seem minor, but they can develop into more significant issues over time. Prompt identification allows for timely repairs.
DIY Repairs
For minor cracks, DIY repairs may suffice. Use high-quality caulk or joint compound to fill the cracks, ensuring a smooth and seamless finish. However, it’s crucial to monitor the repaired areas and address any recurring issues promptly.
Professional Intervention
Extensive or recurring ceiling cracks may necessitate professional intervention. A qualified contractor can assess the structural integrity of your home, identify underlying issues, and implement effective solutions to prevent further damage.
Preventive Measures for a Crack-Free Winter
Humidity Control
Maintaining optimal indoor humidity levels helps minimize the impact of temperature fluctuations on building materials. Use humidifiers or dehumidifiers as needed to create a stable environment within your home.
Proper Ventilation
Adequate ventilation is key to preventing “Ceiling Cracks In Winter.” Ensure that your home is well-ventilated to regulate moisture levels and reduce the likelihood of temperature-related structural issues.
Regular Maintenance
Consistent home maintenance, especially before the onset of winter, is essential. Address any existing cracks, inspect insulation, and seal gaps to fortify your home against the challenges of the colder months.
In conclusion, understanding the dynamics of “Ceiling Cracks In Winter” empowers homeowners to take proactive measures. From identifying vulnerabilities to implementing preventive strategies, a well-maintained home can withstand the challenges posed by temperature fluctuations. By embracing a crack-free winter approach, you ensure the longevity and structural integrity of your living space.
Asbestos, once a popular building material due to its fire-resistant properties, is now recognized as a serious health hazard. In this comprehensive guide, we delve into the potential risks associated with “Asbestos In Ceiling Plaster” and explore the necessary steps to ensure a safe living environment for you and your loved ones.
The Silent Threat: Asbestos in Ceiling Plaster
Asbestos was widely used in construction materials, including ceiling plaster, until its dangers became apparent. Asbestos in ceiling poses a particular concern as it can release tiny fibers into the air, which, when inhaled, may lead to severe health issues. Understanding the presence of asbestos in your home is crucial for proactive safety measures.
Knowing the signs of asbestos in ceiling is the first step in safeguarding your home. Older homes, typically constructed before the 1980s, are more likely to contain asbestos. If your ceiling plaster has a textured, stippled appearance, there’s a possibility it contains asbestos. Professional inspection is recommended for accurate identification.
The Health Risks of Asbestos Exposure: Asbestos in Ceiling Plaster
Respiratory Issues
Asbestos in ceiling can become hazardous when disturbed, releasing microscopic fibers into the air. Inhalation of these fibers can lead to respiratory issues, including shortness of breath, persistent coughing, and in severe cases, conditions such as asbestosis.
Mesothelioma
Exposure to asbestos is strongly linked to the development of mesothelioma, a rare but aggressive form of cancer. This disease primarily affects the lining of the lungs, abdomen, or heart and has a long latency period, often manifesting decades after initial exposure.
Safeguarding Your Home: Asbestos in Ceiling Plaster
Professional Inspection and Removal
If your home was built before the 1980s, it’s advisable to seek professional inspection for asbestos. Certified asbestos removal specialists can assess the situation and, if necessary, safely remove asbestos-containing materials like ceiling plaster. DIY removal is strongly discouraged due to the associated health risks.
Encapsulation
In some cases, encapsulation may be a viable option. This involves applying a sealant to asbestos-containing materials, preventing the release of fibers. However, encapsulation is not a permanent solution and may require periodic monitoring.
Safe Renovation Practices
If you plan to renovate a home with potential asbestos-containing materials, take precautions. Ensure proper containment measures, use protective equipment, and consider professional assistance to minimize the risk of asbestos exposure during the renovation process.
Conclusion: Prioritizing Health and Safety
In conclusion, awareness of the presence of “Asbestos In Ceiling Plaster” is crucial for maintaining a healthy living space. Whether you’re buying an older home or considering renovations, understanding the risks associated with asbestos exposure is paramount. Prioritize professional inspection, safe removal practices, and vigilant monitoring to ensure a home that is free from the dangers of asbestos.
Popcorn ceilings were once a popular choice for homeowners, adding texture and hiding imperfections. However, trends evolve, and many now find themselves wanting a more modern and sleek look for their living spaces. If you’ve decided to join the ranks of those bidding farewell to popcorn ceilings, you’re in for a transformative journey. In this guide, we’ll explore the process and the stunning results you can achieve “After Removing Popcorn Ceiling.”
The Decision to Say Goodbye: After Removing Popcorn Ceiling
The decision to remove popcorn ceilings is often prompted by a desire for a cleaner, updated aesthetic. Whether you’re preparing to sell your home or simply want to enhance your living space, this decision opens the door to a range of design possibilities. “After Removing Popcorn Ceiling,” you gain a blank canvas to experiment with various styles and decor themes.
The Removal Process
Removing popcorn ceilings can be a messy undertaking, but the results are well worth it. To start, cover your floors and furniture to protect them from the impending dust. Then, using a combination of water and a scraper, carefully remove the popcorn texture. This process requires patience, as thorough removal ensures a smooth surface for your next design steps.
After Removing Popcorn Ceiling: The Transformation
Embracing Minimalism
One of the immediate benefits “After Removing Popcorn Ceiling” is the ability to embrace minimalism. Smooth ceilings offer a clean and contemporary look that complements a wide range of design styles. Whether you prefer a Scandinavian-inspired aesthetic or a more traditional vibe, the absence of popcorn texture allows your chosen decor to shine.
Painting Possibilities
Once the popcorn texture is gone, you have the freedom to explore various painting options. Lighter colors can make a room feel more spacious, while darker hues create a cozy and intimate atmosphere. Consider your overall design goals and experiment with different color palettes.
Lighting Enhancements
Smooth ceilings also provide an opportunity to enhance your lighting fixtures. Pendant lights, chandeliers, or recessed lighting can now take center stage without competing with the textured backdrop. “After Removing Popcorn Ceiling,” your lighting choices become integral to the overall ambiance of the room.
Tips for a Seamless Transition
Repair and Smooth
After popcorn removal, it’s crucial to repair any imperfections in the ceiling. Smooth out any uneven areas and address any dings or dents. A flawless surface sets the stage for a polished and sophisticated look “After Removing Popcorn Ceiling.”
Professional Assistance
While some homeowners embark on popcorn ceiling removal as a DIY project, it’s worth considering professional assistance. Experienced contractors can streamline the process, ensuring efficient removal and a high-quality finish. Their expertise can be especially valuable if your home has asbestos-containing popcorn ceilings, as proper removal is crucial for safety.
Conclusion: Revel in Your New Space “After Removing Popcorn Ceiling”
In conclusion, the decision to bid farewell to popcorn ceilings opens the door to a world of design possibilities. “After Removing Popcorn Ceiling,” your space becomes a canvas for your creative vision. Embrace the clean lines, experiment with colors, and let your lighting choices shine. Whether you choose to tackle the removal yourself or enlist professional help, the end result is a transformed space that reflects your style and enhances the overall aesthetic of your home.
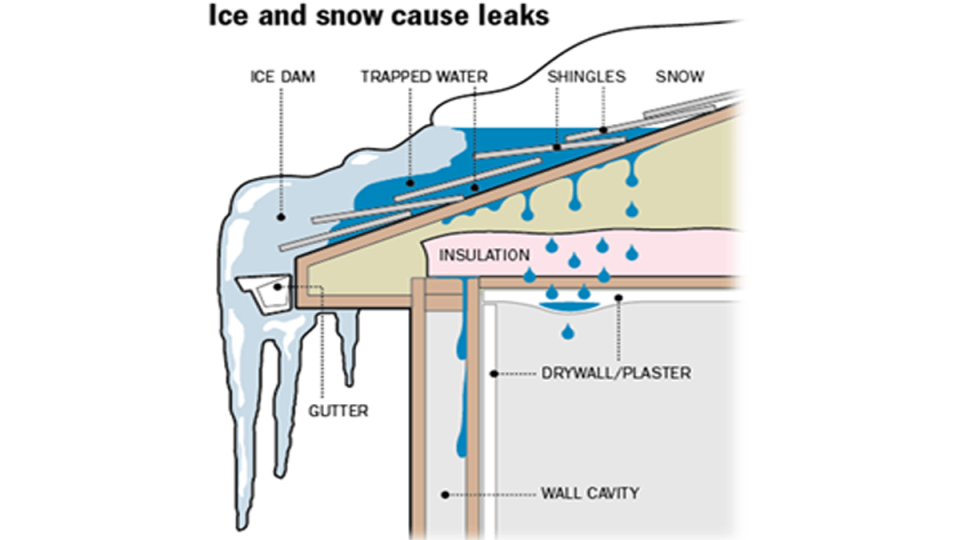
Uncover the complexities surrounding an “Ice Dam Ceiling Leak” and explore proactive measures to safeguard your home. Learn about the causes, consequences, and effective solutions to prevent and address ice dam-related ceiling leaks.
Ice Dam Ceiling Leak: An Unwelcome Intruder
Ice Dam Ceiling Leak: Navigating the Winter Menace
Delve into the challenge of an ice dam ceiling leak and understand why it becomes a winter menace for homeowners. Gain insights into the potential causes and consequences, setting the stage for effective prevention and resolution.
Decoding the Signs: Recognizing an Ice Dam Ceiling Leak
Learn to recognize the signs of an ice dam ceiling leak. From visible water stains to dripping water, understand the indicators that signal potential damage and the need for immediate attention during the winter months.
Understanding the Causes of an Ice Dam Ceiling Leak
1. Formation of Ice Dams
Explore the role of ice dams in causing ceiling leaks. Understand how ice dams form on roofs, creating barriers that trap melting snow and lead to water infiltration into your home.
2. Roofing Material and Insulation Issues
Delve into the consequences of roofing material and insulation issues contributing to ice dam-related leaks. Learn how inadequate insulation and roofing materials can exacerbate the formation of ice dams and compromise your ceiling’s integrity.
3. Temperature Fluctuations
Understand the impact of temperature fluctuations on ice dam formation. Explore how the freeze-thaw cycle can contribute to the creation of ice dams, leading to potential leaks and water damage to your ceiling.
The Consequences of Neglected Ice Dam Ceiling Leaks
1. Structural Compromises
Uncover the potential structural compromises resulting from prolonged ice dam-related leaks. Learn how untreated issues can weaken the integrity of your ceiling and the overall structure of your home.
2. Mold and Mildew Growth
Explore the risk of mold and mildew growth associated with ice dam ceiling leaks. Understand the health hazards and the importance of addressing water leaks promptly to prevent these issues.
3. Aesthetic Deterioration
Beyond structural concerns, ice dam-related leaks affect the aesthetics of your home. Learn about the impact on the appearance of your ceiling, including discoloration, peeling paint, and potential damage to decorative elements.
Dealing with Ice Dam Ceiling Leaks: Effective Solutions
1. Immediate Action: Emergency Measures
In the event of an ice dam ceiling leak, take immediate action to contain the issue. Explore emergency measures, including identifying and addressing the source of water infiltration, drying the affected area, and preventing further damage.
2. Professional Assessment: Seeking Expert Advice
Consult with professionals for a thorough assessment of the damage. Learn about the importance of seeking expert advice to identify the extent of the ice dam-related leaks and determine the most effective resolution methods.
3. Roof and Insulation Upgrades: Long-term Solutions
Explore roof and insulation upgrades as long-term solutions to prevent ice dam-related leaks. Learn about the benefits of enhancing your roof’s insulation, improving ventilation, and upgrading roofing materials to minimize the risk of ice dams.
Preventive Measures: Safeguarding Your Home
1. Adequate Insulation and Ventilation
Implement adequate insulation and ventilation to prevent ice dam formation. Explore the significance of maintaining proper attic temperatures and air circulation to reduce the risk of ice dams on your roof.
2. Snow Removal Strategies
Consider effective snow removal strategies to mitigate ice dam formation. Explore safe methods for removing snow from your roof, preventing the buildup that contributes to the creation of ice dams.
3. Professional Roof Inspection
Prioritize professional roof inspections to identify vulnerabilities. Learn about the importance of regular inspections to detect potential issues and address them before they lead to ice dam-related ceiling leaks.
In conclusion, dealing with an “Ice Dam Ceiling Leak” requires a combination of vigilance, immediate action, and professional expertise. By understanding the causes, consequences, and effective resolution methods, you can safeguard your home from the challenges of ice dam-related leaks. Remember, early intervention is key to minimizing damage and ensuring the longevity and safety of your home during the winter months.
Embark on a journey of discovery as we unravel the mystery behind a “Ceiling Wet After Rain.” Explore the potential causes, consequences, and effective solutions to ensure a dry and secure home environment.
Ceiling Wet After Rain: The Unsettling Dilemma
Ceiling Wet After Rain: A Cause for Concern
Delve into the unexpected issue of finding your ceiling wet after rain and understand why it’s a cause for concern. Uncover the potential reasons behind this dilemma and the steps you can take to address it.
Decoding the Signs: Recognizing a Wet Ceiling After Rain
Learn to recognize the signs of a wet ceiling after rain. From visible water stains to dampness and discoloration, understand the indicators that suggest water infiltration and potential damage to your ceiling.
Understanding the Causes of a Wet Ceiling After Rain
1. Roof Leaks: The Primary Culprit
Explore the role of roof leaks in causing a wet ceiling. Understand how compromised roofing materials, damaged shingles, or improper installation can lead to water intrusion and affect your ceiling.
2. Poorly Sealed Windows and Doors
Delve into the consequences of poorly sealed windows and doors contributing to a wet ceiling. Learn how gaps or deteriorating seals can allow rainwater to enter, posing a threat to the integrity of your ceiling.
3. Faulty Gutters and Downspouts
Understand the impact of faulty gutters and downspouts on your ceiling’s condition. Explore how clogged or misaligned gutters can lead to water overflow, resulting in rainwater finding its way into your home.
The Consequences of a Neglected Wet Ceiling
1. Structural Compromises
Uncover the potential structural compromises resulting from a persistently wet ceiling. Learn how untreated issues can weaken the integrity of your ceiling and the overall structure of your home.
2. Mold and Mildew Growth
Explore the risk of mold and mildew growth associated with a consistently wet ceiling. Understand the health hazards and the importance of addressing water leaks promptly to prevent these issues.
3. Aesthetic Deterioration
Beyond structural concerns, a wet ceiling can affect the aesthetics of your home. Learn about the impact on the appearance of your ceiling, including discoloration, peeling paint, and potential damage to decorative elements.
Dealing with a Wet Ceiling After Rain: Effective Solutions
1. Immediate Action: Emergency Measures
In the event of a wet ceiling after rain, take immediate action to contain the issue. Explore emergency measures, including identifying and addressing the source of water infiltration, drying the affected area, and preventing further damage.
2. Professional Assessment: Seeking Expert Advice
Consult with professionals for a thorough assessment of the damage. Learn about the importance of seeking expert advice to identify the extent of the water damage and determine the most effective resolution methods.
3. Repair Techniques: Preserving Your Ceiling
Explore repair techniques to preserve the integrity of your ceiling. From fixing roof leaks to addressing window and door seals, discover the steps involved in restoring a ceiling affected by water after rain.
Preventive Measures: Safeguarding Your Ceiling
1. Regular Roof Inspections
Implement regular roof inspections to prevent water infiltration. Explore the significance of proactive measures in identifying and addressing potential issues before they lead to a wet ceiling after rain.
2. Properly Sealed Openings
Consider the importance of properly sealed windows and doors. Explore the role of effective seals and weather stripping in preventing rainwater from entering your home and causing damage to your ceiling.
3. Gutter Maintenance
Prioritize gutter maintenance for a functional drainage system. Learn about the importance of keeping gutters and downspouts clear of debris to prevent water overflow and protect your ceiling.
Conclusion: Ensuring a Dry and Secure Home Environment
In conclusion, dealing with a “Ceiling Wet After Rain” requires a combination of vigilance, immediate action, and professional expertise. By understanding the causes, consequences, and effective resolution methods, you can safeguard your home from the challenges of a wet ceiling. Remember, early intervention is key to minimizing damage and ensuring the longevity and safety of your home environment.
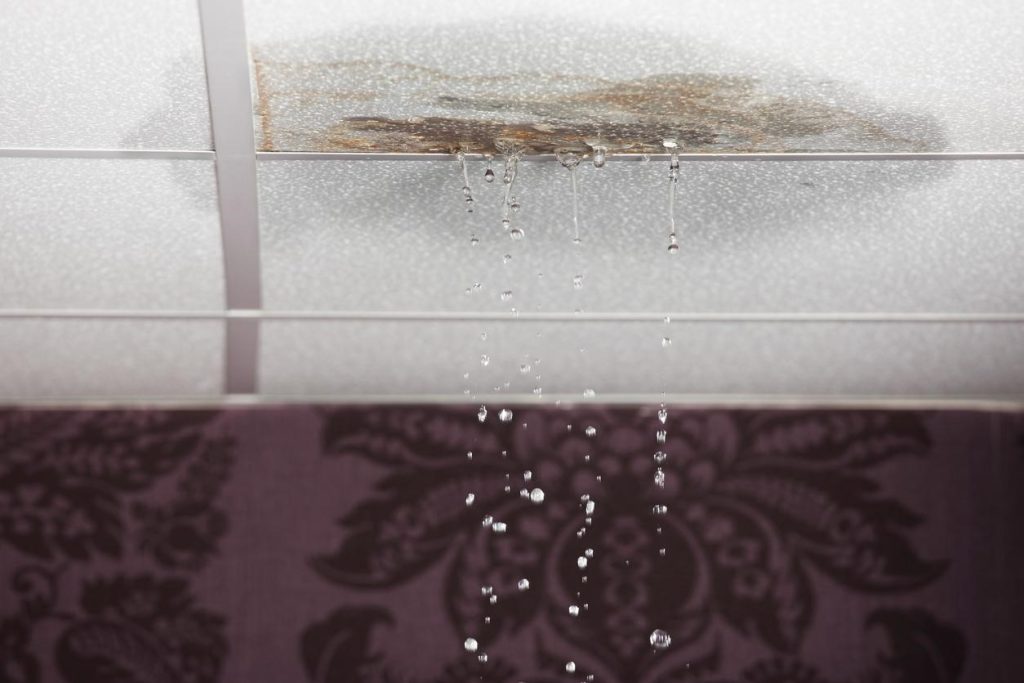
Embark on a journey of understanding and resolving the perplexing issue of a “Bathroom Ceiling Dripping Water.” Uncover the reasons behind this concern and explore effective solutions for a dry and secure bathroom space.
Bathroom Ceiling Dripping Water: A Dilemma Explored
Bathroom Ceiling Dripping Water: Unveiling the Mystery
Discover the unsettling sight of water dripping from your bathroom ceiling and its potential causes. Delve into the complexities of identifying and addressing this issue to ensure a safe and dry environment.
Decoding the Signs: Recognizing Bathroom Ceiling Water Drips
Learn to recognize the signs of water dripping from your bathroom ceiling. From visible water stains to the sound of dripping water, understand the indicators that signal potential leaks and the need for immediate attention.
Understanding the Causes of Bathroom Ceiling Water Drips
1. Plumbing Issues: Leaks and Bursts
Explore the role of plumbing issues in causing water drips from the bathroom ceiling. Understand how leaks, burst pipes, or faulty plumbing connections can lead to water infiltration and subsequent ceiling damage.
2. Roof Leaks and Seepage
Delve into the consequences of roof leaks and seepage affecting your bathroom ceiling. Learn about the potential sources of water intrusion from the roof and how it can manifest as dripping water in your bathroom.
3. Condensation and Humidity
Understand the impact of condensation and high humidity levels on your bathroom ceiling. Explore how these environmental factors can contribute to water accumulation and dripping, leading to potential structural damage.
The Consequences of Neglected Bathroom Ceiling Water Drips
1. Structural Compromises
Uncover the potential structural compromises resulting from prolonged water drips. Learn how untreated issues can weaken the integrity of your bathroom ceiling and the overall structure of your home.
2. Mold and Mildew Growth
Explore the risk of mold and mildew growth associated with persistent water drips. Understand the health hazards and the importance of addressing water leaks promptly to prevent these issues.
3. Aesthetic Deterioration
Beyond structural concerns, water drips affect the aesthetics of your bathroom. Learn about the impact on the appearance of your ceiling, including discoloration, peeling paint, and potential damage to decorative elements.
Dealing with Bathroom Ceiling Water Drips: Effective Solutions
1. Immediate Action: Emergency Measures
In the event of water drips, take immediate action to contain the issue. Explore emergency measures, including identifying and addressing the source of water infiltration, drying the affected area, and preventing further damage.
2. Professional Assessment: Seeking Expert Advice
Consult with professionals for a thorough assessment of the damage. Learn about the importance of seeking expert advice to identify the extent of the water drips and determine the most effective resolution methods.
3. Repair Techniques: Preserving Your Bathroom Space
Explore repair techniques to preserve the integrity of your bathroom ceiling. From fixing plumbing issues to repairing roof leaks, discover the steps involved in restoring a bathroom with water drips.
Preventive Measures: Safeguarding Your Bathroom
1. Regular Maintenance and Inspections
Implement regular maintenance and inspections to prevent water drips. Explore the significance of inspecting plumbing, checking the roof for leaks, and ensuring proper ventilation to protect your bathroom from potential issues.
2. Waterproofing Solutions
Consider waterproofing solutions for vulnerable areas prone to water infiltration. Explore options such as sealants, coatings, and other preventive measures to create a protective barrier against water drips.
3. Prompt Repairs
Address any signs of potential issues promptly. Learn about the importance of prompt repairs to plumbing problems, roof leaks, or other sources of water infiltration to prevent water drips in your bathroom.
Conclusion: Ensuring a Dry and Secure Bathroom Environment
In conclusion, dealing with “Bathroom Ceiling Dripping Water” requires a combination of vigilance, immediate action, and professional expertise. By understanding the causes, consequences, and effective resolution methods, you can safeguard your bathroom from the challenges of water drips. Remember, early intervention is key to minimizing damage and ensuring the longevity and safety of your bathroom space.
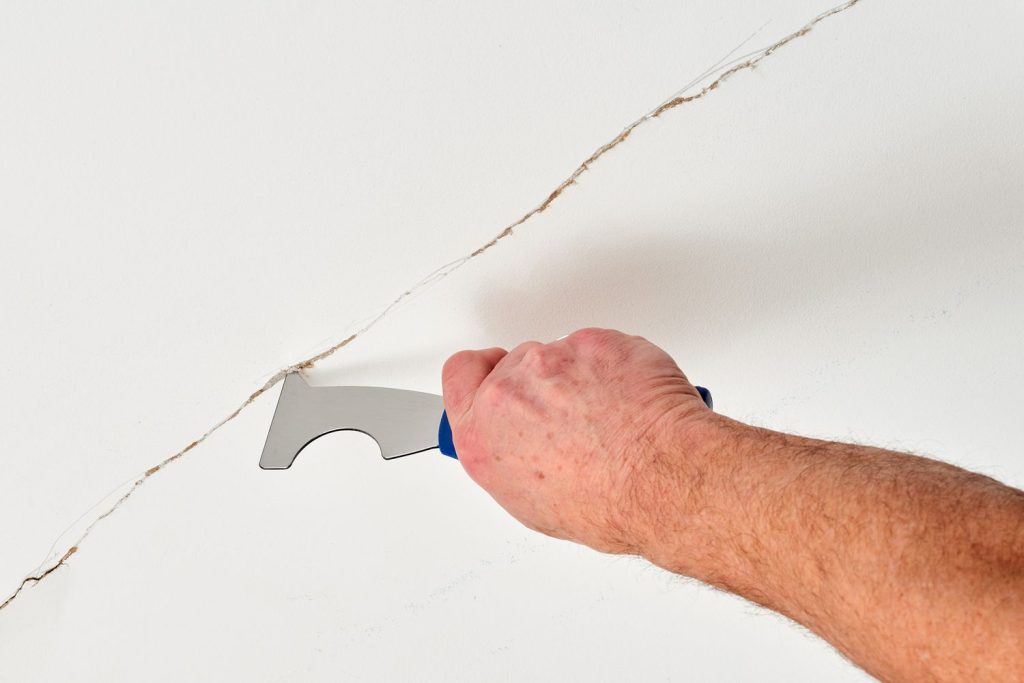
Discover the nuances of dealing with “Stress Cracks in Ceiling” as we unravel the causes, consequences, and effective solutions for maintaining a structurally sound and visually appealing home.
Stress Cracks in Ceiling: An Unwelcome Sight
Stress Cracks in Ceiling: Navigating the Visual Disarray
Explore the visual impact of stress cracks in your ceiling and understand the potential underlying issues causing these unwelcome fissures. Delve into the complexities of identifying and addressing stress cracks for a resilient home.
Recognizing the Signs: Unveiling Stress Cracks in Ceiling
Learn to recognize the signs of stress cracks in your ceiling. From subtle hairline fractures to more prominent openings, understanding these indicators is crucial for early intervention and effective resolution.
Understanding the Causes of Stress Cracks
1. Structural Settling and Movement
Explore how structural settling and movement contribute to stress cracks in the ceiling. Understand the impact of the natural shifting of a building over time and its influence on the integrity of your ceiling.
2. Temperature and Humidity Fluctuations
Delve into the consequences of temperature and humidity fluctuations on your ceiling. Learn how these environmental factors can lead to stress cracks and impact the overall stability of your home.
3. Poor Construction Practices
Uncover the role of poor construction practices in the formation of stress cracks. Explore how inadequate materials, subpar workmanship, and insufficient support structures can contribute to ceiling fissures.
The Consequences of Neglected Stress Cracks
1. Compromised Structural Integrity
Understand the potential compromise to the structural integrity of your home when stress cracks are left unaddressed. Explore the risks associated with neglecting these fissures and their impact on overall stability.
2. Aesthetic Deterioration
Beyond structural concerns, stress cracks affect the aesthetics of your home. Learn about the impact on the appearance of your ceiling, including discoloration, peeling paint, and potential damage to decorative elements.
3. Risk of Water Infiltration
Explore the risk of water infiltration associated with stress cracks. Understand how these openings can become pathways for water to enter, leading to additional issues such as mold growth and water damage.
Dealing with Stress Cracks in Ceiling: Effective Solutions
1. Immediate Action: Emergency Measures
In the event of stress cracks, take immediate action to contain the issue. Explore emergency measures, including identifying and addressing the source of structural stress, stabilizing the affected area, and preventing further damage.
2. Professional Assessment: Seeking Expert Advice
Consult with professionals for a thorough assessment of the damage. Learn about the importance of seeking expert advice to identify the extent of the stress cracks and determine the most effective resolution methods.
3. Repair Techniques: Preserving Your Home
Explore repair techniques to preserve the integrity of your ceiling. From filling and sealing cracks to reinforcing structural components, discover the steps involved in restoring a ceiling with stress cracks.
Implement regular structural inspections to identify potential stress points. Explore the significance of proactive measures in identifying and addressing structural issues before they lead to stress cracks.
2. Temperature and Humidity Control
Consider temperature and humidity control measures to minimize environmental stress on your ceiling. Explore solutions such as proper ventilation, insulation, and climate control systems to maintain stable conditions.
3. Quality Construction Practices
Prioritize quality construction practices for new projects or renovations. Explore the importance of using reliable materials, adhering to construction standards, and employing skilled craftsmen to minimize the risk of stress cracks.
Conclusion: Ensuring a Stable and Appealing Home Environment
In conclusion, addressing “Stress Cracks in Ceiling” requires a holistic approach that combines vigilance, immediate action, and professional expertise. By understanding the causes, consequences, and effective resolution methods, you can safeguard your home from the challenges of stress crack formation. Remember, early intervention is key to minimizing damage and ensuring the longevity and stability of your ceiling.
Embarking on a home improvement journey? Explore the intricacies of enhancing your living space by discovering the “Cost to Paint Ceilings” and the transformative impact it can have on your home’s aesthetics.
Cost to Paint Ceilings: The Gateway to a Revitalized Space
Cost to Paint Ceilings: Aesthetic Upgrade for Your Living Space
Uncover the transformative potential of painting ceilings. Delve into the factors influencing the cost and the impact a professionally painted ceiling can have on the overall look and feel of your home.
Navigating the Decision: Is It Time to Paint Your Ceilings?
Before diving into costs, assess the signs indicating your ceilings are due for a fresh coat of paint. Explore the visual cues, such as discoloration, peeling, or stains, that suggest it’s time to revitalize your ceilings.
Cost Factors: What Influences the Cost to Paint Ceilings
1. Ceiling Size and Height
Understand how the size and height of your ceilings contribute to the overall cost. Explore the intricacies of calculating paint quantities for standard and vaulted ceilings, considering the added complexities that height can introduce.
2. Ceiling Condition and Repairs
Assess the condition of your ceilings and the need for repairs before painting. Learn how addressing issues like cracks, water damage, or surface imperfections can impact the overall cost and longevity of the paint job.
3. Ceiling Type and Texture
Explore the nuances associated with different ceiling types and textures. From smooth surfaces to textured finishes, understand how these factors influence the complexity of the painting process and subsequently affect the overall cost.
Hiring Professionals vs. DIY: Cost to Paint Ceilings
1. Professional Painters: What Justifies the Cost?
Delve into the benefits of hiring professional painters. Explore the expertise, efficiency, and quality assurance they bring to the table, justifying the cost and ensuring a seamless and visually appealing result.
2. DIY Painting: Considerations and Challenges
For the budget-conscious homeowner, consider the challenges and considerations of the DIY approach. From equipment costs to the time and effort required, weigh the pros and cons before deciding to paint your ceilings yourself.
Cost Breakdown: Estimating the Investment
1. Paint and Materials
Explore the cost breakdown, starting with paint and materials. Understand the types of paints available, their quality, and how factors like primer, brushes, and drop cloths contribute to the overall cost.
2. Labor Costs
Break down the labor costs involved in painting ceilings. Consider factors such as prep work, repairs, and the intricacies of applying paint to ceilings, recognizing the value professional painters bring to the process.
3. Additional Costs and Contingencies
Anticipate additional costs and contingencies that may arise during the painting process. From unexpected repairs to color changes, be prepared for potential variations that can influence the final cost.
The Return on Investment: Enhancing Your Home’s Value
1. Aesthetic Appeal and Atmosphere
Explore how a freshly painted ceiling enhances the overall aesthetic appeal and atmosphere of your home. Learn about the visual impact and the positive impressions it can create for both residents and visitors.
2. Longevity and Maintenance Savings
Consider the longevity of a professionally painted ceiling and the potential savings on maintenance costs in the long run. Understand how a quality paint job can withstand wear and tear, providing value over time.
3. Market Value and Resale Potential
Explore the impact of a well-painted ceiling on your home’s market value and resale potential. Understand the market appeal and buyer perceptions, recognizing the role a refreshed ceiling plays in the overall property value.
Making Informed Decisions: Your Guide to Painting Ceilings
1. Getting Accurate Quotes
Navigate the process of obtaining accurate quotes for your ceiling painting project. Understand the importance of detailed assessments, clear communication, and transparency in the quoting process.
2. Budgeting Tips and Considerations
Receive practical budgeting tips for your ceiling painting project. Explore considerations such as allocating contingency funds, prioritizing essential repairs, and balancing cost-effectiveness with quality.
3. Selecting Colors and Finishes
Discover the impact of color and finish choices on the overall cost and aesthetic outcome. Learn how to make informed decisions that align with your preferences, style, and the ambiance you wish to create in your home.
Conclusion: Elevating Your Living Space with a Fresh Ceiling Palette
In conclusion, understanding the “Cost to Paint Ceilings” involves a thoughtful evaluation of factors, considerations, and the desired outcomes for your living space. Whether opting for professional services or taking the DIY route, the investment in a beautifully painted ceiling can have a lasting impact on your home’s aesthetics and value. Remember, it’s not just about the cost; it’s about the transformation and the enhanced quality of living that a fresh ceiling palette brings.
Discovering “Wet Stains on Ceiling” can be a homeowner’s concern. Uncover the causes, consequences, and effective solutions to address this issue and safeguard your home.
Wet Stains on Ceiling: A Troublesome Scenario
Wet Stains on Ceiling: A Clue to Potential Problems
Witnessing wet stains on your ceiling can be alarming, signifying potential water damage and structural issues. Explore the intricacies of this issue, understanding the causes and potential consequences that can affect the aesthetics and integrity of your home.
Identifying the Signs: Recognizing Wet Stains on Ceiling
Learn to identify the signs of wet stains on your ceiling. From subtle discoloration and watermarks to more apparent bulges and sagging, understanding these indicators is crucial for early intervention and effective resolution.
Understanding the Causes of Wet Stains
1. Roof Leaks and Seepage
Explore the impact of roof leaks and seepage on the formation of wet stains. Understand how water infiltration from the roof can lead to structural damage, compromising the integrity of your ceiling.
2. Plumbing Issues
Delve into the consequences of plumbing issues, such as leaks or burst pipes, contributing to the formation of wet stains. Recognize the importance of promptly addressing plumbing problems to prevent extensive water damage.
3. Condensation and Humidity
Understand the role of condensation and humidity in creating wet stains on ceilings. Explore preventive measures to control indoor humidity levels and protect your ceilings from moisture-related issues.
The Consequences of Neglected Wet Stains
1. Structural Compromises
Uncover the potential structural compromises resulting from prolonged wet stains. Learn how untreated issues can weaken the integrity of your ceiling and the overall structure of your home.
2. Mold and Mildew Growth
Explore the risk of mold and mildew growth associated with wet stains. Understand the health hazards and the importance of addressing wet stains promptly to prevent these issues.
3. Aesthetic Deterioration
Beyond structural concerns, wet stains affect the aesthetics of your home. Learn about the impact on the appearance of your ceiling, including discoloration, peeling paint, and potential damage to decorative elements.
Dealing with Wet Stains on Ceiling: Effective Solutions
1. Immediate Action: Emergency Measures
In the event of wet stains, take immediate action to contain the issue. Explore emergency measures, including identifying and addressing the source of water infiltration, drying the affected area, and preventing further damage.
2. Professional Assessment: Seeking Expert Advice
Consult with professionals for a thorough assessment of the damage. Learn about the importance of seeking expert advice to identify the extent of the wet stains and determine the most effective resolution methods.
3. Resolution Techniques: Preserving Your Home
Explore resolution techniques to preserve the integrity of your ceiling. From repairing damaged sections to repainting and addressing the root cause, discover the steps involved in restoring a ceiling with wet stains.
Preventive Measures: Safeguarding Your Ceiling
1. Regular Maintenance
Implement a routine maintenance schedule to prevent wet stains. Explore the significance of inspecting your roof, plumbing, and ensuring proper ventilation to protect your ceiling from potential issues.
2. Waterproofing Solutions
Consider waterproofing solutions for vulnerable areas prone to water infiltration. Explore options such as sealants, coatings, and other preventive measures to create a protective barrier against wet stains.
3. Prompt Repairs
Address any signs of potential issues promptly. Learn about the importance of prompt repairs to roof leaks, plumbing problems, or other sources of water infiltration to prevent the formation of wet stains on your ceiling.
Conclusion: Safeguarding Your Home from Wet Stain Challenges
In conclusion, dealing with “Wet Stains on Ceiling” requires a combination of vigilance, immediate action, and professional expertise. By understanding the causes, consequences, and effective resolution methods, you can safeguard your home from the challenges of wet stain formation. Remember, early intervention is key to minimizing damage and ensuring the longevity and safety of your ceiling.