When planning a ceiling upgrade, drop ceilings, also known as suspended ceilings, are popular for their versatility, cost-effectiveness, and easy installation. A crucial factor in creating a visually appealing and functional drop ceiling is choosing the correct tile size. Drop ceiling tile sizes vary, and selecting the right size can impact the room’s aesthetics, acoustics, and even lighting. This article will walk you through the different drop ceiling tile sizes available, factors to consider when choosing, and the advantages of each size for different types of spaces.
What are Drop Ceiling Tiles?
Drop ceiling tiles are panels suspended below the actual ceiling using a grid framework. These tiles offer a range of benefits, including easy access to electrical wiring, HVAC systems, and other overhead fixtures, while also allowing for quick tile replacements if damaged. They come in a variety of sizes, patterns, and materials to suit aesthetic preferences and functional needs.
Drop ceilings are often used in commercial spaces, but they are also becoming popular in residential areas like basements, kitchens, and home offices. To create the right look and functionality, it’s essential to choose drop ceiling tile sizes that fit both the space and your practical needs.
Read too: Kitchen Lighting For A Vaulted Ceiling: Illuminating Your Space with Style and Functionality
Drop Ceiling Tile Sizes Overview
The most common drop ceiling tile sizes are:
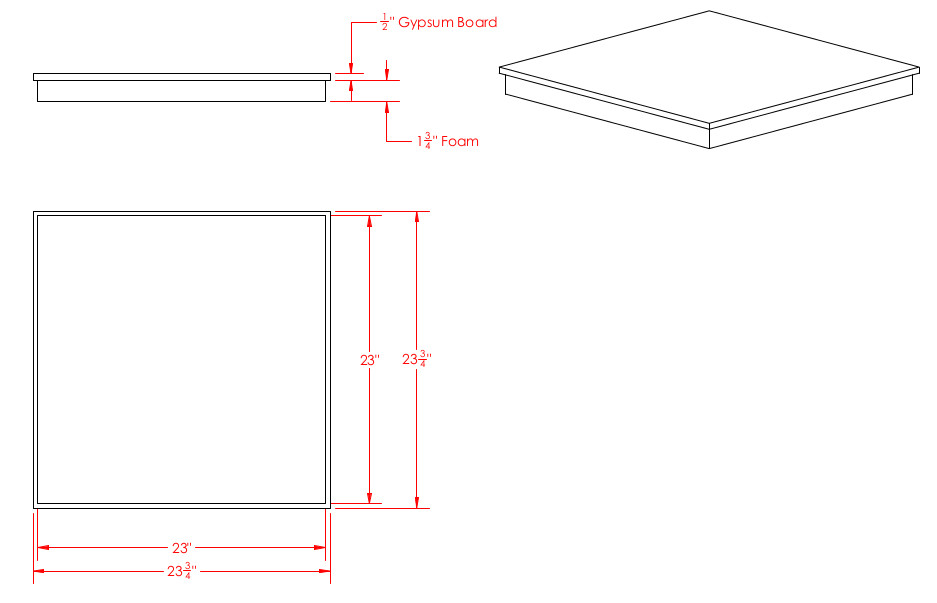
- 24 x 24 inches (2 x 2 feet)
- 24 x 48 inches (2 x 4 feet)
These two sizes are widely used because they fit standard grid systems and offer flexibility in design. Other custom sizes are available, but the above dimensions are the most prevalent and easiest to source.
Each of these tile sizes has distinct benefits and is suitable for different spaces. Let’s explore each option in more detail.
Common Drop Ceiling Tile Sizes and Their Applications
Understanding the most popular drop ceiling tile sizes and how they perform in different environments is crucial for a successful installation.
1. 24 x 24 Inch Tiles
Tiles with dimensions of 24 x 24 inches are widely popular because they provide a balanced look in both small and large spaces. This size is ideal for offices, hallways, kitchens, and smaller rooms where a compact and symmetrical appearance is desired.
- Benefits:
- Versatility: Due to their smaller size, they can fit in almost any room without overwhelming the space.
- Easy to Replace: The 24 x 24-inch tiles are generally easier to remove and replace than larger tiles, making maintenance convenient.
- Improved Sound Absorption: Smaller tiles offer better sound-dampening properties, making them a good choice for offices or study rooms where reducing noise is essential.
2. 24 x 48 Inch Tiles
For larger spaces like auditoriums, conference rooms, and commercial spaces, 24 x 48-inch tiles are a popular choice. Their larger surface area means fewer tiles are needed, resulting in faster installation.
- Benefits:
- Enhanced Aesthetic Flow: These tiles create a continuous look and reduce the appearance of gridlines, which can be distracting in larger rooms.
- Cost-Effective Installation: With fewer tiles to install, the labor cost is often lower, especially in expansive spaces.
- Good for High Ceilings: In rooms with higher ceilings, 24 x 48-inch tiles provide a seamless look that’s hard to achieve with smaller tiles.
Factors to Consider When Choosing Drop Ceiling Tile Sizes
When choosing the right drop ceiling tile size, it’s important to consider factors such as room dimensions, function, aesthetic preferences, and acoustic needs. Here are some points to keep in mind:
Room Size and Shape
For smaller rooms, smaller tiles (like 24 x 24 inches) often work best, while larger tiles (24 x 48 inches) can be more effective in larger, open spaces. The tile size should complement the room’s layout without overwhelming it.
Aesthetic Preferences
The appearance of your drop ceiling can dramatically impact the feel of a space. Smaller tiles create a more intricate look, while larger tiles give a streamlined, modern feel. Decide whether you want the ceiling tiles to stand out as a design feature or to blend seamlessly with the room’s decor.
Acoustic Needs
If sound control is a priority, like in an office or study room, smaller tiles may offer better sound absorption. Many 24 x 24-inch tiles are made with noise-reducing materials, making them ideal for creating a quieter environment.
Lighting Requirements
Incorporating lighting into drop ceilings is another key factor. Smaller tiles allow for more grid options to place recessed lighting. For larger tiles, ensure that lighting placement aligns with your functional needs.
Maintenance and Accessibility
If you anticipate regular maintenance or access to overhead wiring, smaller tiles may be more convenient for easier removal and replacement. Larger tiles, however, reduce the number of access points, which can simplify the grid structure.
Materials and Styles for Drop Ceiling Tiles
Drop ceiling tiles are available in various materials, each offering different benefits in terms of appearance, sound control, and durability. Here are a few popular options:
Acoustic Tiles
Acoustic ceiling tiles are usually made from fiberglass or mineral fiber, both excellent for sound absorption. They’re ideal in settings where noise control is essential, like offices or classrooms.
Metal Tiles
Metal tiles are durable and give a modern, industrial aesthetic. Often available in both 24 x 24 and 24 x 48-inch sizes, metal tiles are more popular in commercial and industrial spaces due to their sleek look and durability.
Wood-Look Tiles
For a warmer, more natural feel, wood-look tiles are available. These tiles offer a rustic look suitable for cafes, residential basements, or home offices. They may not have the same acoustic properties but can enhance the ambiance.
Drop Ceiling Tile Sizes: Making the Right Choice
When choosing between 24 x 24-inch and 24 x 48-inch tiles, consider both practical and aesthetic factors:
- For small rooms or spaces with frequent maintenance, 24 x 24-inch tiles are often better.
- For large rooms where a continuous aesthetic is preferred, 24 x 48-inch tiles offer a more streamlined look.
Ultimately, the tile size should enhance the room’s function, acoustic needs, and design style.
Drop Ceiling Tile Installation Tips
Proper installation ensures that your ceiling is stable and visually appealing. Here are some basic tips for installing drop ceiling tiles:
- Measure the Room Accurately: Determine the total area and grid size needed for a precise fit.
- Choose the Right Grid System: Ensure the grid you choose is compatible with your tile size.
- Install Supports Properly: Use support wires to secure the grid and tiles in place.
- Cut Tiles Carefully: For edges or areas around fixtures, use a sharp utility knife for clean cuts.
Following these steps can ensure your drop ceiling looks professional and functions as intended.
Conclusion
Selecting the correct drop ceiling tile size is an essential part of creating a functional, aesthetically pleasing space. By understanding the benefits and applications of 24 x 24-inch and 24 x 48-inch tiles, you can make an informed choice that aligns with your needs. Consider factors like room size, aesthetics, acoustics, and accessibility to determine the best fit for your space.
Whether for a home office, commercial space, or a school classroom, the right drop ceiling tile size can elevate your interior while addressing practical considerations. With a bit of planning, you can achieve a drop ceiling that not only looks great but also enhances the room’s functionality and comfort.