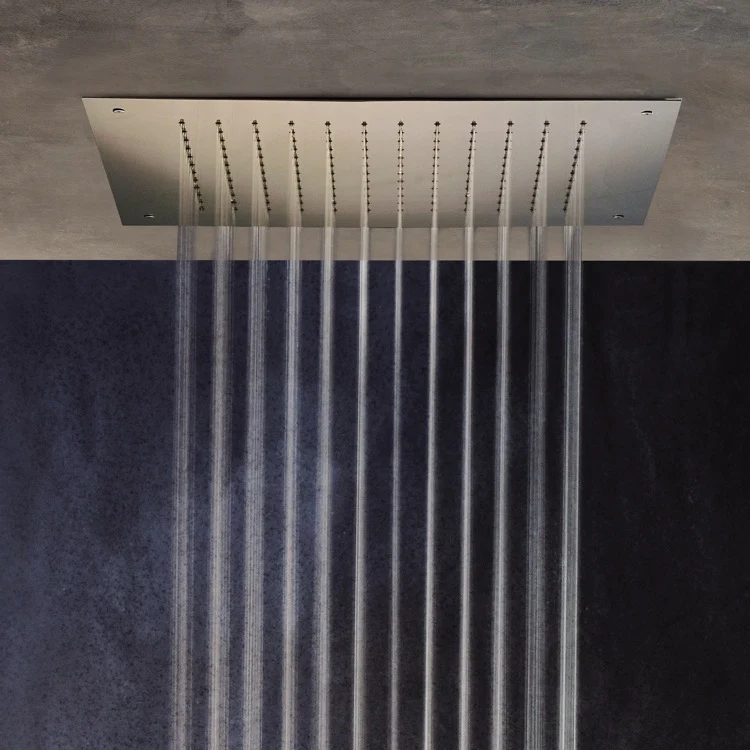
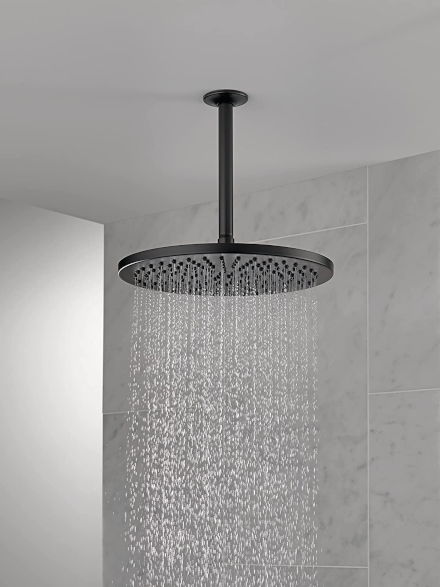
Troubleshooting Woes: What to Do When You See Water Coming From Ceiling Light Fixtures

Experiencing water coming from your ceiling light can be alarming. In this comprehensive guide, we’ll explore the causes, implications, and effective solutions to address the perplexing issue of “Water Coming From Ceiling Light.”

Water Coming From Ceiling Light

Unveiling the Issue: Understanding Water Coming From Ceiling Light Fixtures

Before we delve into solutions, let’s unravel the mystery behind water making its way through your ceiling light fixtures. Recognizing the causes is the first step toward effective resolution.

Investigating the Culprit

When water infiltrates your ceiling light fixtures, pinpointing the root cause is crucial for preventing further damage and ensuring the safety of your home.

Potential Causes of Water Coming From Ceiling Light Fixtures

  1. Roof Leaks: Damaged or deteriorating roofs can allow water to seep through, finding its way to your light fixtures. Inspect your roof for missing shingles, cracks, or compromised flashing.
  2. Condensation Issues: In areas with high humidity, condensation can form inside light fixtures. Insufficient ventilation or insulation may contribute to this problem.
  3. Plumbing Leaks: Leaking pipes or plumbing fixtures in the ceiling can be a common source of water infiltration. Check for dampness around pipes, especially those running above light fixtures.
  4. Attic Condensation: Improper attic ventilation can lead to condensation buildup, causing water to drip onto ceiling light fixtures. Adequate insulation and ventilation are essential.

Diagnosing and Confirming

Once you’ve identified potential causes, confirming the source of the water is vital to implement the most appropriate solution.

Steps to Diagnose and Confirm the Source

  1. Visual Inspection: Carefully examine the area around the ceiling light fixture for visible signs of leaks, discoloration, or dampness.
  2. Use of Instruments: Moisture meters and infrared thermography can aid in identifying hidden sources of water. These tools help detect moisture levels and temperature variations in building materials.
  3. Professional Assessment: If the source remains elusive or if the issue persists, consult a professional. Experienced technicians can conduct a thorough inspection using specialized equipment.

Read too: Cost To Skim Coat Ceiling

Addressing the Issue: Solutions for Water Coming From Ceiling Light Fixtures

Once the source is confirmed, taking prompt and effective action is crucial to prevent further damage and ensure the safety of your home.

Strategies for Addressing Water Coming From Ceiling Fixtures

  1. Roof Repairs: If the water source is a leaky roof, address the issue promptly. Repair or replace damaged shingles, flashing, or seals to prevent further water intrusion.
  2. Plumbing Repairs: Fix any leaking pipes or plumbing fixtures in the ceiling. Tighten connections, replace faulty components, and ensure proper drainage.
  3. Improved Ventilation: Enhance ventilation in the affected area to reduce condensation. Install exhaust fans, use dehumidifiers, and consider insulating the ceiling to minimize temperature variations.
  4. Fixture Replacement: If the light fixture is damaged, consider replacing it to prevent electrical hazards. Ensure that replacements are installed with proper sealing to prevent future leaks.

Conclusion: Ensuring a Dry and Safe Home

In conclusion, witnessing water coming from your ceiling light fixtures is a cause for immediate attention. By understanding the potential causes, confirming the source, and implementing effective solutions, homeowners can safeguard their homes from further damage. Timely interventions not only protect the structural integrity of the property but also contribute to a safer living environment. Remember, addressing water infiltration promptly can save you from more extensive and costly repairs down the line.

Decoding the Drip: Understanding and Addressing a Small Water Spot on Ceiling

Discovering a small water spot on your ceiling can be concerning. In this comprehensive guide, we’ll delve into the causes, implications, and effective solutions for a “Small Water Spot On Ceiling,” empowering homeowners to take proactive measures and safeguard their homes.

Small Water Spot On Ceiling

Unveiling the Mystery: What Causes a Small Water Spot On Ceiling?

Before we explore the solutions, let’s unravel the mystery behind the appearance of a small water spot. Such spots are often indicative of underlying issues that require prompt attention.

Investigating the Culprit: Small Water Spot On Ceiling

When it comes to addressing a small water spot, understanding the potential causes is the first step towards resolution.

Possible Causes of a Small Water Spot

  1. Leaky Roof: A damaged or aging roof can allow water to penetrate, leading to small water spots on the ceiling. Inspect your roof for missing shingles, damaged flashing, or compromised seals.
  2. Plumbing Issues: Leaking pipes, whether from plumbing fixtures in the ceiling or water supply lines, can be a common cause of water spots. Check for dampness around pipes and fixtures.
  3. Condensation: In humid climates, condensation can form on the ceiling, resulting in small water spots. Proper ventilation and insulation are key to mitigating this issue.
  4. Leaking HVAC System: Air conditioning units or heating systems in the ceiling can develop leaks, causing water spots. Regular maintenance and inspections can prevent such issues.

Detecting and Confirming

Once you’ve identified the potential causes, it’s essential to confirm the source of the water spot on the ceiling to implement the appropriate solution.

Steps to Detect and Confirm the Source

  1. Visual Inspection: Carefully examine the area around the water spot. Look for visible signs of leaks, discoloration, or dampness.
  2. Use of Instruments: Moisture meters and infrared thermography can aid in identifying hidden sources of water. These tools help detect moisture levels and temperature variations in building materials.
  3. Professional Assessment: If you’re unable to pinpoint the source or if the issue persists, consult a professional. Experienced technicians can conduct a thorough inspection using specialized equipment.

Read too: Signs Of Termites In Ceiling

Addressing the Issue: Solutions for Small Water Spot On Ceiling

Once the source is confirmed, taking timely and effective action is crucial to prevent further damage and potential health hazards.

Strategies for Addressing a Small Water Spot On Ceiling

  1. Roof Repair: If the water spot is linked to a leaky roof, promptly address the issue. Repair or replace damaged shingles, flashing, or seals to prevent further water intrusion.
  2. Plumbing Repairs: Fix any leaking pipes or plumbing fixtures in the ceiling. Tighten connections, replace faulty components, and ensure proper drainage.
  3. Improved Ventilation: Enhance ventilation in the affected area to reduce condensation. Install exhaust fans, use dehumidifiers, and consider insulating the ceiling to minimize temperature variations.
  4. Ceiling Stain Blocking: Once the source is resolved, treat the water spot with a stain-blocking primer and repaint the ceiling to restore its appearance.

Conclusion: Proactive Measures for a Dry and Secure Home

In conclusion, discovering a small water spot on the ceiling is a call to action. By understanding the potential causes, confirming the source, and implementing effective solutions, homeowners can safeguard their homes from further damage. Timely interventions not only protect the structural integrity of the property but also contribute to a healthier living environment. Remember, addressing a small water spot promptly can save you from more extensive and costly repairs down the line.

Unveiling the Silent Invaders: Recognizing Signs of Termites in Ceiling Spaces

Discovering signs of termite infestation in your ceiling can be a homeowner’s nightmare. In this comprehensive guide, we’ll delve into the subtle yet crucial indicators of termite activity in ceilings, empowering you to take prompt action and safeguard your home.

Signs Of Termites In Ceiling

Deciphering the Clues: Signs of Termites in Ceiling Spaces Unveiled

Before we explore the intricacies of signs of termites in ceilings, let’s understand the gravity of termite infestations. Termites are notorious for their silent and destructive nature, often causing extensive damage before homeowners even realize their presence. Identifying signs early is key to mitigating the potential harm they can inflict on your home.

Spotlight on Infestation: Signs of Termites in Ceiling Spaces

Spotting signs of termites in your ceiling requires a keen eye and awareness of the subtle indicators that may go unnoticed by the untrained observer.

Unearthing the Indicators: Signs of Termites in Ceiling Spaces

  1. Hollow Sounds: Tap on your ceiling with a solid object. If you hear a hollow or papery sound, it could indicate termite damage. Termites consume wood from the inside, leaving a thin layer that creates this distinctive sound.
  2. Visible Tubes or Tunnels: Subterranean termites often create mud tubes for protection as they travel between their nest and a food source. Check for these pencil-sized tubes along walls, ceilings, or even hanging from the ceiling itself.
  3. Discarded Wings: Reproductive termites, known as swarmers, shed their wings after mating. If you find discarded wings on the floor or windowsills, it could signify a termite swarm, and their presence in ceilings is plausible.
  4. Wood Damage: Termites feast on wood, and ceilings are not exempt. Look for small holes, sagging, or buckling in the ceiling material, indicating potential termite activity.
  5. Frass or Termite Droppings: Termites produce tiny fecal pellets called frass. If you notice small piles of what looks like sawdust on the floor or surfaces beneath the ceiling, it may be a sign of termite presence.

Taking Action: Dealing with Signs of Termites in Ceiling Spaces

Once you’ve identified signs of termites in your ceiling, prompt and strategic action is crucial to prevent further damage and protect your home.

Strategies for Dealing with Termite Infestations in Ceilings

  1. Professional Inspection: Engage a licensed pest control professional to conduct a thorough inspection. Their expertise allows them to accurately assess the extent of the infestation and formulate an effective treatment plan.
  2. Localized Treatments: Depending on the severity of the infestation, localized treatments such as spot treatments or foam applications may be recommended. These aim to target specific areas of termite activity.
  3. Fumigation: In cases of extensive infestations, fumigation may be necessary. This involves treating the entire structure to eliminate termites comprehensively.
  4. Preventive Measures: Implement preventive measures to avoid future infestations. These may include regular inspections, addressing moisture issues, and applying termite-resistant treatments to vulnerable areas.

Read too: Cost To Skim Coat Ceiling

Conclusion: Safeguarding Your Home from the Silent Invaders

In conclusion, being vigilant and recognizing signs of termites in ceiling spaces is crucial for early intervention. Termites are relentless, and swift action is necessary to mitigate potential damage. By understanding the subtle indicators and taking decisive steps, homeowners can protect their homes from the silent invaders. Remember, seeking professional assistance is the most effective way to address termite infestations comprehensively and safeguard the structural integrity of your home.

Demystifying the Makeover: Understanding the Cost to Skim Coat Ceiling

Embarking on a renovation journey? Dive into the intricacies of the “Cost to Skim Coat Ceiling” and uncover insights on expenses, benefits, and what to expect from this transformative project.

Cost To Skim Coat Ceiling

Cost to Skim Coat Ceiling: Evaluating the Investment

Understanding the factors that contribute to the cost of skim coating your ceiling is essential for planning and budgeting. Let’s explore the dynamics of this process and what influences the overall expenditure.

Factors Influencing the Cost to Skim Coat Ceiling

  1. Ceiling Size and Complexity:
    • Larger ceilings or those with intricate designs may require more time and effort, impacting the overall cost of the skim coating project.
  2. Ceiling Height:
    • Higher ceilings can be more challenging to access and may necessitate additional equipment or labor, contributing to increased costs.
  3. Ceiling Condition:
    • The existing condition of the ceiling plays a role. If repairs or extensive preparation are needed, it can affect both time and cost.

Cost Breakdown: Understanding What’s Included

  1. Material Costs:
    • Skim coating typically involves using joint compound or plaster. The type and quality of materials chosen will influence the overall cost.
  2. Labor Costs:
    • Skim coating is a skilled job that requires expertise. Labor costs cover the time and effort of skilled professionals carrying out the skim coating process.
  3. Equipment Costs:
    • Depending on the size and complexity of the project, additional equipment such as scaffolding or specialized tools may be required, impacting the overall cost.

Average Costs and Estimates: What to Expect

  1. Per Square Foot Pricing:
    • Many contractors charge per square foot for skim coating. On average, prices can range from $1 to $3 per square foot, but this may vary based on location and project specifics.
  2. Total Project Estimates:
    • For an accurate estimate, consider factors like labor rates in your area, the size and condition of your ceiling, and any additional materials or equipment needed.

DIY vs. Professional: Weighing the Options

  1. DIY Considerations:
    • While some homeowners may attempt a DIY skim coating project, it’s essential to weigh the complexity and potential pitfalls against the cost savings.
  2. Professional Expertise:
    • Hiring a professional ensures a high-quality finish and minimizes the risk of errors. Consider the value of professional expertise when assessing the cost.

Additional Considerations

  1. Timeline:
    • Skim coating can be time-intensive. Consider the timeframe for completion, as this may influence the overall cost.
  2. Choosing the Right Professional:
    • Research and select a reputable contractor. While costs are a factor, prioritize experience and quality of work for a successful outcome.

Read too: How To Fix Ceiling Condensation

Conclusion: Investing in a Smooth Transformation

In conclusion, the “Cost to Skim Coat Ceiling” is a worthwhile investment for those seeking a smooth and refreshed ceiling surface. By understanding the contributing factors, exploring estimates, and considering DIY versus professional options, homeowners can make informed decisions for a successful and cost-effective skim coating project.

Addressing the Drip Dilemma: Water Leak Through Ceiling Light Solutions Unveiled

Experiencing a “Water Leak Through Ceiling Light”? Dive into this comprehensive guide to understand the causes, potential damages, and effective remedies for a dry and secure home.

Water Leak Through Ceiling Light

Water Leak Through Ceiling Light: Diagnosing the Drip Source

Discovering water dripping through your ceiling light can be alarming. To effectively tackle this issue, understanding the potential sources and implementing appropriate solutions is crucial.

Common Causes of Water Leak Through Ceiling Light

  1. Roof Damage:
    • Damaged or missing roof shingles can allow rainwater to infiltrate the roof structure and eventually find its way into the home, including through ceiling lights.
  2. Faulty Flashing:
    • Flashing around chimneys, vents, or skylights may degrade over time, creating gaps where water can enter and cause leaks.
  3. Condensation Issues:
    • In colder climates, condensation can form on plumbing pipes or HVAC units in the attic. This moisture may drip onto ceiling lights, creating the illusion of a leak.

Assessing the Severity: Recognizing Water Leak Through Ceiling Light

Understanding the severity of the leak is vital for determining the appropriate course of action.

  1. Minor Drips:
    • Occasional, minor drips may be indicative of a small issue that can be addressed with simple repairs or maintenance.
  2. Consistent Flow:
    • A steady flow of water signals a more severe problem, potentially requiring professional intervention to prevent extensive damage.

Water Leak Through Ceiling Light Solutions: Taking Action

  1. Immediate Shutdown:
    • Turn off the power to the affected light fixture immediately to avoid electrical hazards. Do not attempt to fix the issue with the power on.
  2. Temporary Leak Diversion:
    • Place a bucket or basin beneath the leak to catch water and prevent further damage to the ceiling or flooring.
  3. Professional Inspection:
    • Engage a qualified professional, such as a roofer or a licensed contractor, to conduct a thorough inspection and identify the root cause of the leak.

Preventive Measures: Avoiding Future Leaks

  1. Regular Roof Inspections:
    • Schedule routine roof inspections to identify and address potential issues before they escalate.
  2. Flashing Maintenance:
    • Regularly inspect and maintain flashing around key areas like chimneys and vents to ensure a watertight seal.
  3. Attic Ventilation:
    • Ensure proper attic ventilation to reduce the likelihood of condensation forming on surfaces and dripping onto lights.

Read too: Why Is My Ceiling Wet

Conclusion: Safeguarding Your Home from Water Intrusion

In conclusion, a “Water Leak Through Ceiling Light” demands prompt attention and appropriate action. By understanding the causes, assessing the severity, and implementing effective solutions, homeowners can protect their homes from water damage. Remember, early intervention is key to preserving the integrity of your home’s structure and electrical systems.

Transforming Challenges into Charm: How to Finish Basement With Low Ceiling for a Stylish Space

Embarking on the journey to “Finish Basement With Low Ceiling”? Explore creative solutions and design tips to maximize your space and create an inviting ambiance.

Finish Basement With Low Ceiling

Finish Basement With Low Ceiling: Embracing Limitations for Maximum Appeal

Transforming a basement with a low ceiling into a functional and stylish space requires a strategic approach. In this guide, we’ll delve into the nuances of finishing a basement with limited height, providing insights, ideas, and inspiration for a successful project.

Read too: Yellow Spots On Bathroom Ceiling

Finish Basement With Low Ceiling: Overcoming Design Challenges

  1. Optical Illusions with Colors:
    • Choose light and neutral colors for walls and ceilings to create the illusion of height. Light hues reflect more light, making the space feel more open and airy.
  2. Strategic Lighting Solutions:
    • Incorporate recessed lighting or flush-mount fixtures to avoid protruding elements that can further reduce the perceived height of the space.
  3. Low Furniture Selection:
    • Opt for low-profile furniture to maintain a sense of openness. Avoid tall bookshelves or bulky cabinets that can make the space feel cramped.

Creating Visual Interest:

  1. Accent Walls and Vertical Patterns:
    • Introduce an accent wall with vertical patterns or stripes to draw the eyes upward. This adds visual interest and can create the illusion of higher ceilings.
  2. Use of Mirrors:
    • Strategically place mirrors to reflect light and give the impression of a more expansive space. Mirrored furniture or decor can also contribute to this effect.
  3. Floor-to-Ceiling Curtains:
    • Install curtains or drapes that extend from the ceiling to the floor. This elongates the appearance of the walls and adds a touch of elegance to the space.

Functional Layouts for Low Ceilings

  1. Open Concept Design:
    • Embrace an open concept layout to avoid dividing the space with unnecessary walls. This creates a seamless flow and prevents the basement from feeling confined.
  2. Multi-Purpose Furniture:
    • Invest in furniture that serves multiple purposes, such as a sofa bed or a coffee table with storage. This maximizes functionality without overcrowding the space.
  3. Built-In Storage Solutions:
    • Utilize built-in shelves and storage solutions that blend seamlessly with the walls. This minimizes clutter and maintains a clean, streamlined look.

Maintaining Comfort in the Low Ceiling Basement

  1. Proper Insulation and Ventilation:
    • Ensure proper insulation and ventilation to prevent the space from feeling stuffy. Adequate airflow can contribute to a comfortable atmosphere.
  2. Strategically Placed Area Rugs:
    • Define different functional zones with area rugs. This not only adds warmth to the space but also creates visual separation.

Conclusion: A Stylish Haven Despite Low Ceilings

In conclusion, finishing a basement with a low ceiling comes with its challenges, but with creative solutions and thoughtful design choices, you can turn limitations into charm. Embrace a blend of visual tricks, functional layouts, and strategic decor to create a stylish haven that feels anything but confined. Whether it’s a cozy entertainment area or a multifunctional space, your finished basement with a low ceiling can become a unique and inviting extension of your home.

Unveiling the Dilemma: Understanding and Addressing a Crack in the Ceiling Under the Bathroom

Discovering a “Crack in the Ceiling Under the Bathroom” can be concerning. Learn about the potential causes, effective solutions, and preventive measures to ensure the structural integrity of your home.

Crack In Ceiling Under Bathroom

Crack in Ceiling Under Bathroom: A Structural Challenge

A crack in the ceiling, particularly beneath the bathroom, can be a sign of underlying issues that require prompt attention. In this comprehensive guide, we will explore the various factors contributing to a crack in the ceiling and delve into actionable steps to rectify the situation.

Crack in Ceiling Under Bathroom: Investigating the Causes

  1. Water Damage:
    • Leaks from plumbing fixtures, such as the bathtub, shower, or toilet, can lead to water damage, compromising the ceiling’s integrity and causing cracks.
  2. Structural Settling:
    • Over time, buildings undergo settling, and this natural process can manifest as cracks in the ceiling. However, if the settling is uneven, it may lead to more pronounced cracks.
  3. Improper Ventilation:
    • Inadequate ventilation in the bathroom can result in high humidity levels. Excessive moisture can weaken the ceiling material, leading to cracks.

Assessing the Severity: H2 Heading – Crack in Ceiling Under Bathroom

Understanding the severity of the crack is crucial for determining the appropriate course of action.

  1. Minor Hairline Cracks:
    • Hairline cracks may be superficial and not indicative of a significant issue. Monitoring these cracks over time can help assess if they are stable or expanding.
  2. Wider or Jagged Cracks:
    • Cracks that are wider or have a jagged pattern may signal more significant structural issues. Consulting with a professional is advisable to conduct a thorough assessment.

Addressing a Crack in Ceiling Under Bathroom: Practical Solutions

  1. Repairing Water Damage:
    • Identify and fix any leaks promptly. Repair damaged pipes, seals, or fixtures contributing to water intrusion.
  2. Ceiling Patching:
    • For minor cracks, use a suitable ceiling patching material to fill and conceal the imperfections.
  3. Structural Reinforcement:
    • In cases of settling, consult with a structural engineer to assess the foundation and determine if any reinforcement is needed.

Preventive Measures: Avoiding Future Cracks

  1. Regular Maintenance:
    • Conduct routine checks for leaks and address them immediately. Keep the bathroom well-ventilated to prevent moisture buildup.
  2. Foundation Inspection:
    • Periodically inspect the foundation of your home for signs of settling. Early detection can prevent more severe structural issues.
  3. Professional Assessment:
    • Engage a professional for regular home inspections. Their expertise can uncover potential problems before they escalate.

Read too: Why Is My Ceiling Wet

Conclusion: Safeguarding Your Home

In conclusion, a “Crack in the Ceiling Under the Bathroom” is a cause for concern, but with proactive measures, it can be addressed effectively. By understanding the potential causes, assessing the severity, and implementing practical solutions, homeowners can safeguard the structural integrity of their homes. Remember, when in doubt, seeking professional advice ensures a comprehensive and accurate assessment of the situation.

Elevate Your Space: Discover the Allure of a Finished Basement With Black Ceiling

Transforming your basement into a stylish retreat? Explore the unique charm and design possibilities of a “Finished Basement With Black Ceiling” for a sophisticated and contemporary ambiance.

Finished Basement With Black Ceiling

Unveiling the Elegance: Finished Basement With Black Ceiling

A finished basement provides an excellent opportunity to add value and personality to your home. When considering design elements, the ceiling often plays a pivotal role. Let’s delve into the captivating world of finished basements adorned with a black ceiling, exploring the aesthetic appeal and practical considerations.

A Design Marvel

  1. Bold Contrast and Visual Impact:
    • A black ceiling creates a dramatic contrast, allowing other design elements to pop. This bold choice can add a touch of elegance and modernity to your basement space.
  2. Enhanced Ambiance and Coziness:
    • Black ceilings have a unique ability to create a cozy and intimate atmosphere. In a basement setting, where natural light may be limited, the dark ceiling can contribute to a warm and inviting environment.
  3. Concealing Imperfections:
    • Black is known for its ability to conceal imperfections and flaws. Choosing a black ceiling can be a practical solution to hide structural elements, wiring, or plumbing that may be less appealing.

Implementing a Finished Basement With Black Ceiling: Key Considerations

  1. Lighting Strategies:
    • Since black absorbs light, thoughtful lighting strategies are essential. Incorporate ample lighting fixtures, such as recessed lights, pendant lights, or wall sconces, to ensure the space remains well-lit and inviting.
  2. Choosing the Right Paint Finish:
    • Opt for a matte finish to minimize glare and create a sleek, modern look. Matte finishes also tend to better hide any imperfections in the ceiling.
  3. Balancing with Other Elements:
    • Balance the darkness of the black ceiling with lighter hues in the overall design. Light-colored walls, furnishings, and accessories can create harmony and prevent the space from feeling too enclosed.

Practical Benefits of a Finished Basement With Black Ceiling

  1. Energy Efficiency:
    • A black ceiling can contribute to better energy efficiency, especially in regions with colder climates. The dark color absorbs and retains heat, potentially reducing heating costs.
  2. Acoustic Enhancement:
    • Black ceilings can enhance acoustics by absorbing sound, making the space more enjoyable for activities like movie nights or music sessions.

Maintaining and Cleaning a Black Ceiling: Tips and Tricks

  1. Regular Dusting:
    • Black surfaces may show dust more prominently. Regular dusting with a soft cloth or duster can help maintain the ceiling’s pristine appearance.
  2. Gentle Cleaning Solutions:
    • When cleaning is necessary, use a gentle cleaning solution and a soft sponge or cloth. Avoid abrasive materials that could damage the finish.

Read too: How To Fix Ceiling Condensation

Conclusion: Elevate Your Basement Design With a Black Ceiling

In conclusion, a “Finished Basement With Black Ceiling” offers a captivating blend of aesthetics and practicality. Whether you’re aiming for a sleek modern look or seeking to create a cozy retreat, the black ceiling can be a versatile design choice. Embrace the boldness, experiment with lighting, and strike the perfect balance to enjoy a finished basement that is both stylish and functional.

Resolving the Damp Dilemma: How to Fix Ceiling Condensation and Prevent Future Issues

Ceiling condensation can be a persistent issue, but fret not – this guide will equip you with effective solutions on “How to Fix Ceiling Condensation” and strategies to keep it at bay.

How To Fix Ceiling Condensation

Understanding the Challenge: How to Fix Ceiling Condensation

Ceiling condensation is not only unsightly but can also lead to more severe problems like mold growth and compromised structural integrity. Let’s delve into practical steps to tackle and eliminate this common household woe.

How to Fix Ceiling Condensation: Identifying the Root Causes

  1. Poor Ventilation: Inadequate ventilation is a common culprit for ceiling condensation. Stagnant air allows moisture to accumulate, leading to damp ceilings. Evaluate and improve ventilation in affected areas.
  2. Temperature Discrepancies: Drastic temperature differences between indoor and outdoor environments can contribute to condensation. Adjusting thermostat settings or using insulation can help regulate temperatures.
  3. Leaking Roof or Pipes: Ceiling condensation may result from roof leaks or faulty plumbing. Inspect your roof and plumbing for any signs of leakage, addressing these issues promptly.

How to Fix Ceiling Condensation: Practical Solutions

Note: Before attempting any repairs, ensure safety by turning off electricity and identifying the root cause.

  1. Improve Ventilation:
    • Install exhaust fans in kitchens and bathrooms to enhance airflow.
    • Consider adding ceiling fans or increasing their usage to promote air circulation.
  2. Use Dehumidifiers:
    • Place dehumidifiers in areas prone to condensation to extract excess moisture from the air.
  3. Insulate Your Ceiling:
    • Add insulation to your ceiling to create a barrier between warm and cold surfaces, reducing the likelihood of condensation.
  4. Seal Gaps and Cracks:
    • Inspect your ceiling for any gaps or cracks and seal them using caulk or weatherstripping.

Preventive Measures: How to Avoid Ceiling Condensation in the Future

  1. Regular Maintenance:
    • Conduct routine inspections of your roof, plumbing, and ventilation systems to identify and address issues before they escalate.
  2. Monitor Indoor Humidity:
    • Use hygrometers to monitor indoor humidity levels. Ideally, aim for humidity levels between 30-50%.
  3. Install Vapor Barriers:
    • Consider installing vapor barriers during construction or renovation to prevent moisture from penetrating ceilings.

Seeking Professional Assistance: When to Call in the Experts

If your attempts to fix ceiling condensation prove unsuccessful, it might be time to consult professionals. Experienced contractors or HVAC specialists can conduct a thorough assessment and provide tailored solutions for your specific situation.

Read too: Why Is My Ceiling Wet

Conclusion: Enjoy a Dry and Comfortable Home

In conclusion, learning “How to Fix Ceiling Condensation” involves addressing the root causes, implementing practical solutions, and adopting preventive measures. By taking proactive steps and maintaining a vigilant eye on your home’s condition, you can create a comfortable, dry living space free from the bothersome effects of ceiling condensation.

Unlocking Safety: Understanding the Importance and Components of a 1 Hour Rated Ceiling Assembly

In the construction realm, safety is paramount, especially when it comes to fire protection. Dive into the intricacies of building safety with a focus on the crucial keyword, “1 Hour Rated Ceiling Assembly.” Learn why this assembly is a cornerstone in fire-resistance and explore its components for enhanced structural protection.

1 Hour Rated Ceiling Assembly

Decoding Durability: The Significance of a 1 Hour Rated Ceiling Assembly

When it comes to fire safety in buildings, a 1 Hour Rated Ceiling Assembly stands as a robust shield against the rapid spread of flames. This article delves into the importance of this assembly, shedding light on its role in safeguarding lives and property during a fire emergency.

An In-Depth Look

Understanding the components and features of a 1 Hour Rated Ceiling Assembly is crucial for architects, builders, and homeowners. Let’s explore the key elements that contribute to the one-hour fire-resistance rating.

  1. Fire-Resistant Materials: The core of a ceiling assembly lies in the use of fire-resistant materials. Gypsum board, mineral wool insulation, and other specially designed materials are incorporated to slow down the spread of fire.
  2. Multiple Layers of Protection: Achieving a one-hour fire-resistance rating often involves incorporating multiple layers of fire-rated materials. This layered approach provides additional barriers, impeding the progress of flames and heat.
  3. Sealing Penetrations: Any openings or penetrations in the ceiling assembly, such as pipes or electrical conduits, are sealed with fire-resistant materials. This prevents the easy passage of fire from one compartment to another.
  4. Fire-Resistant Coatings: Some ceiling assemblies utilize fire-resistant coatings to enhance their ability to withstand flames. These coatings create a protective barrier that delays the impact of heat and fire on the structural components.

Advantages of a 1 Hour Rated Ceiling Assembly

  1. Life Safety: The primary advantage is the potential to save lives. A 1 Hour Rated Ceiling Assembly slows down the progress of fire, providing occupants with more time to evacuate the building safely.
  2. Property Protection: Beyond life safety, these assemblies protect property by limiting the extent of fire damage. Containing the fire to its point of origin can prevent widespread destruction.
  3. Code Compliance: Many building codes and regulations mandate the use of 1 Hour Rated Ceiling Assemblies in specific structures. Adhering to these standards ensures legal compliance and promotes a safer built environment.

Read too: Why Is My Ceiling Wet

Challenges and Considerations

While the benefits are significant, there are challenges associated with the implementation of 1 Hour Rated Ceiling Assemblies. These may include increased construction costs, the need for careful planning, and coordination to ensure proper installation.

Conclusion: Prioritizing Safety with 1 Hour Rated Ceiling Assemblies

In conclusion, a 1 Hour Rated Ceiling Assembly is a critical component in ensuring fire safety within buildings. From the use of fire-resistant materials to sealing penetrations and incorporating multiple layers, every aspect is carefully designed to provide occupants with a valuable window of time in the event of a fire emergency. As architects and builders continue to prioritize safety, understanding and implementing these assemblies contribute significantly to creating secure and resilient structures.

Unveiling the Threat: Understanding and Addressing Termite Exit Holes in Ceiling

Discovering termite exit holes in your ceiling can be alarming. In this comprehensive guide, we will delve into the intricacies of termite damage, specifically focusing on “Termite Exit Holes in Ceiling.” Learn how to identify, address, and prevent this silent threat to your home.

Termite Exit Holes In Ceiling

Understanding the Menace:

Termites are notorious for causing structural damage, and when they make their way to your ceiling, the consequences can be severe. Termite exit holes in the ceiling are indicative of an infestation that has progressed significantly. Let’s explore the reasons behind these exit holes and effective measures to combat the issue.

Termite Exit Holes in Ceiling: Signs and Identification

  1. Small Holes and Tunnels: Termite exit holes are typically small, about the size of a pinhead. They may be accompanied by intricate tunnels, indicating the termites’ passage through the wood.
  2. Frass Accumulation: Look for the presence of frass, which is a powdery substance resembling sawdust. Termites push this frass out of exit holes as they burrow through the wood.
  3. Weakened Wood: Tap on the affected wood. If it sounds hollow or papery, it could be an indication of termite damage. Termites consume the wood from the inside, leaving a weakened structure.

Causes of Termite Exit Holes in Ceiling

  1. Subterranean Termite Infestation: Subterranean termites often build mud tubes to access above-ground structures, including ceilings. Exit holes may appear as they exit the wood after causing damage.
  2. Drywood Termite Activity: Drywood termites, on the other hand, create exit holes directly in the wood as they expel frass and debris. These holes are usually more visible than the subtle tunnels left by subterranean termites.

Read too: Leaking Shower Into Ceiling Below

Addressing Termite Exit Holes: A Step-by-Step Guide

  1. Professional Inspection: At the first sign of termite exit holes, seek the services of a licensed pest control professional. They can conduct a thorough inspection to assess the extent of the infestation.
  2. Localized Treatment: Depending on the severity of the infestation, localized treatment methods may be employed. This could include injecting termiticides into affected areas or using targeted baiting systems.
  3. Repair and Restoration: After eliminating the termites, it’s crucial to repair and restore the damaged areas. Replace compromised wood, addressing any structural issues to prevent future infestations.

Preventive Measures to Safeguard Your Home

  1. Regular Inspections: Schedule routine termite inspections to detect early signs of infestation. Early intervention can prevent extensive damage and costly repairs.
  2. Moisture Control: Termites thrive in moist environments. Address any leaks or moisture issues promptly to make your home less attractive to these destructive pests.
  3. Wood Treatment: Consider treating susceptible wooden structures with termite-resistant chemicals. This proactive measure can act as a deterrent against termite infestations.

Conclusion: Safeguarding Your Home from Termite Exit Holes in the Ceiling

In conclusion, termite exit holes in the ceiling are a clear indication of a termite infestation that requires immediate attention. By understanding the signs, causes, and effective measures for addressing termite damage, homeowners can safeguard their homes from the destructive impact of these silent invaders. Remember, early detection and professional intervention are key to minimizing the damage and ensuring the long-term integrity of your home’s structure.

Uncover the Mystery: Why Is My Ceiling Wet and What You Can Do About It

A wet ceiling can be an alarming sight, leaving homeowners puzzled and concerned about the potential causes behind this issue. In this comprehensive guide, we will delve into the common reasons for a wet ceiling, explore the implications, and offer practical solutions to address the problem. If you’ve ever asked yourself, “Why is my ceiling wet?” you’re not alone. Let’s unravel the mystery together.

Why Is My Ceiling Wet

Understanding the Signs: Why Is My Ceiling Wet?

Have you noticed water stains on your ceiling? Perhaps there’s a damp or spongy texture when you touch it? These are clear indicators that something is amiss. To address the issue effectively, we first need to identify the root cause.

Common Culprits Behind a Wet Ceiling

  1. Roof Leaks: The Silent InvaderA damaged or aging roof is a leading cause of water intrusion into your home. Missing shingles, cracked flashing, or compromised seals can allow rainwater to seep through, leading to a wet ceiling. Regular roof inspections and timely repairs are crucial in preventing this issue.
  2. Leaky Pipes: Concealed DangersUndetected leaks in plumbing pipes can wreak havoc on your ceiling. Whether it’s a slow drip or a sudden burst, water damage can accumulate over time, leading to a wet and discolored ceiling. Regular plumbing maintenance and inspections are vital to catch these issues early.
  3. Condensation Woes: Humidity Takes Its TollHigh humidity levels within your home can result in condensation forming on the ceiling. This moisture buildup can eventually lead to a wet ceiling. Adequate ventilation, proper insulation, and the use of dehumidifiers can help control indoor humidity and prevent this issue.
  4. Faulty HVAC Systems: Cooling Down, Dripping UpAir conditioning units generate condensate as they cool the air. If the condensate drainage system is faulty or clogged, it can lead to water dripping onto your ceiling. Regular HVAC maintenance, including cleaning and inspecting drainage lines, can prevent this from happening.

Addressing the Issue: What to Do When Your Ceiling is Wet

Now that we’ve explored the possible culprits, it’s time to take action. Depending on the cause, there are several steps you can take to remedy a wet ceiling.

1. Roof Repairs

If the issue lies with your roof, consult a professional roofer to assess and repair any damage. Prompt action can prevent further water damage to your ceiling and the structural integrity of your home.

2. Plumbing Fixes

For plumbing-related issues, enlist the services of a qualified plumber. They can identify and repair leaks, ensuring your plumbing system is in top condition and preventing future ceiling wetness.

3. Humidity Control

Invest in proper ventilation and insulation to control indoor humidity levels. Additionally, consider using dehumidifiers in areas prone to excess moisture, such as basements or bathrooms.

4. HVAC Maintenance

Schedule regular maintenance for your HVAC system to prevent condensate-related issues. This includes cleaning or replacing filters and ensuring proper drainage from the unit.

Conclusion: A Dry and Secure Home Awaits

Understanding the causes of a wet ceiling empowers homeowners to take proactive steps in preventing and addressing this issue. Whether it’s a leaking roof, faulty plumbing, condensation, or HVAC-related problems, early detection and timely action are key.

Remember, if you ever find yourself wondering, “Why is my ceiling wet?” it’s crucial to investigate and address the root cause promptly. By doing so, you not only protect the structural integrity of your home but also ensure a dry and comfortable living space for you and your family.

Troubleshooting and Fixing Washing Machine Leak Through Ceiling: A Comprehensive Guide

In every household, a washing machine is an indispensable appliance that simplifies the tedious task of laundry. However, when confronted with issues such as a “Washing Machine Leak Through Ceiling,” it can turn into a homeowner’s nightmare. This article aims to provide a comprehensive guide on troubleshooting and fixing this particular problem, ensuring that you can address the issue effectively.

Washing Machine Leak Through Ceiling

Understanding the Issue: Washing Machine Leak Through Ceiling

The first sign of a washing machine leak through the ceiling is often water stains or dripping water, causing damage to the ceiling and potentially other areas of your home. This issue can arise due to various reasons, including faulty hoses, damaged water inlet valves, or even improper installation.

Identifying the Source of the Leak

If you notice water stains on the ceiling, it’s crucial to identify the source of the leak promptly. Begin by inspecting the hoses connected to your washing machine. Over time, hoses can wear out, develop cracks, or even become disconnected. Tightening or replacing the hoses might resolve the issue in such cases.

Checking Water Inlet Valves

Faulty water inlet valves can also contribute to a washing machine leak through the ceiling. These valves control the flow of water into the machine, and if they malfunction, water may leak and cause damage. Inspect the valves for any visible signs of damage or corrosion. Replacing a faulty water inlet valve can be a relatively simple and cost-effective solution.

Ensuring Proper Installation

Sometimes, a leak through the ceiling is a result of improper installation. Ensure that the washing machine is level and that all hoses are securely connected. Any misalignment or loose connections can lead to water leakage. Regularly inspect the installation to prevent potential issues.

Addressing Common Issues: Washing Machine Leak Through Ceiling

  1. Hoses: Check the hoses for any visible damage, cracks, or leaks. If identified, replace the hoses promptly. Consider upgrading to high-quality, reinforced hoses for better durability.
  2. Water Inlet Valves: Inspect the water inlet valves for signs of wear or damage. Replace any faulty valves to prevent further leaks. Regular maintenance of these valves can prolong the life of your washing machine.
  3. Installation: Double-check the installation of the washing machine, ensuring it is level and all connections are tight. Address any misalignments or loose connections promptly to prevent future leaks.

Read too: Black Mold On Ceiling Tile

Preventive Measures to Avoid Future Leaks

To prevent recurring issues with a washing machine leak through the ceiling, consider implementing the following preventive measures:

  1. Regular Maintenance: Schedule routine maintenance checks for your washing machine, focusing on hoses, water inlet valves, and overall installation.
  2. Quality Hoses: Invest in high-quality, reinforced hoses for your washing machine. These hoses are more durable and less prone to wear and tear.
  3. Professional Installation: If unsure about the installation process, consider hiring a professional to ensure proper setup and alignment.

Conclusion

Dealing with a washing machine leak through the ceiling can be a stressful experience for any homeowner. By understanding the potential causes and following the troubleshooting steps outlined in this guide, you can effectively address the issue and prevent future leaks. Remember to prioritize regular maintenance to keep your washing machine in optimal condition, ensuring a hassle-free laundry experience for years to come.

Troubleshooting Guide: Dealing with a Leaking Shower Into Ceiling Below – Causes and Solutions

Leaking Shower Into Ceiling Below – a predicament many homeowners dread. Imagine stepping into your shower, only to find out that water is making its way into the ceiling below, causing potential damage and inconvenience. In this comprehensive guide, we will explore the causes behind a leaking shower, its implications on the ceiling below, and effective solutions to rectify the issue.

Leaking Shower Into Ceiling Below

Understanding the Menace: Leaking Shower Into Ceiling Below

A leaking shower can wreak havoc not only on your bathroom but also on the structural integrity of the ceiling below. This problem, if left unaddressed, can lead to mold growth, compromised ceilings, and even pose a threat to the overall safety of your home.

Identifying the Culprits:

  1. Faulty Grout and Caulking: One of the primary culprits behind water infiltrating your ceiling is often found in the shower itself. Cracked or deteriorated grout and caulking can allow water to seep through, finding its way to the space below.
  2. Damaged Shower Pan: A damaged or improperly installed shower pan can result in water leakage. Over time, wear and tear can cause cracks or holes, permitting water to escape and cause damage to the ceiling below.
  3. Faulty Shower Valve: A malfunctioning shower valve may cause water to leak behind the shower wall, eventually reaching the ceiling below. Regular inspection and maintenance of the shower valve can prevent such issues.
  4. Blocked Drainage: Clogged shower drains can lead to water pooling in the shower, increasing the chances of leakage. Clearing the drainage regularly can mitigate this risk.

The Telltale Signs: How to Recognize a Leaking Shower Into Ceiling Below

  1. Water Stains: Discoloration or water stains on the ceiling below the shower are clear indicators of a leakage issue.
  2. Sagging Ceiling: Excessive water accumulation can lead to the sagging of the ceiling below, a sign that immediate action is required.
  3. Mold Growth: Mold thrives in damp environments. If you notice mold on the ceiling, it’s a red flag for a leaking shower.

Addressing the Issue

  1. Regrouting and Recaulking: Repairing or replacing damaged grout and caulking is a cost-effective solution to prevent water seepage.
  2. Shower Pan Replacement: If the shower pan is the culprit, consider replacing it to ensure a watertight seal.
  3. Shower Valve Inspection and Repair: Regularly inspect and maintain the shower valve to prevent leaks. Replace any faulty components promptly.
  4. Clearing Drainage: Prevent water buildup by routinely clearing the shower drain of hair and soap scum.

Preventive Measures: Avoiding Future Leaks

  1. Regular Maintenance: Regularly inspect your shower, checking grout, caulking, and the shower pan for potential issues to prevent escalation.
  2. Waterproofing: Consider applying a waterproofing membrane during renovations to add an extra layer of protection against leaks.
  3. Professional Inspections: Periodically hire professionals to inspect your plumbing and shower components, ensuring early detection of any potential problems.

Read too: Black Mold On Ceiling Tile

Conclusion: Safeguarding Your Home from a Leaking Shower Into Ceiling Below

In conclusion, a leaking shower into the ceiling below is a serious issue that demands immediate attention. Understand the causes, recognize signs, and implement effective solutions to protect your home from water infiltration damage. Regular maintenance and proactive measures are key to ensuring a watertight and secure shower, providing peace of mind for homeowners.

Unveiling Comfort: Discovering the Best SUV With Ceiling Air Vents for Ultimate Driving Pleasure

When it comes to driving comfort, the right ventilation plays a pivotal role. In this comprehensive guide, explore the world of SUVs with ceiling air vents, enhancing your driving experience in ways you never imagined. Discover the top choices and the unparalleled comfort they bring to your journeys.

Suv With Ceiling Air Vents

Ventilation Elevation:

Driving in comfort is not just about the performance of the vehicle but also the ambiance within. SUVs with ceiling air vents elevate the driving experience by providing optimal ventilation and temperature control for both the driver and passengers.

What Are Ceiling Air Vents?

Ceiling air vents, also known as overhead air vents, are strategically positioned vents on the ceiling of the vehicle. They allow for efficient distribution of cool or warm air throughout the cabin, ensuring a balanced and comfortable interior climate.

Why Opt for SUVs With Ceiling Air Vents?

1. Enhanced Comfort for All Passengers

  • Informational: Ceiling air vents ensure that every passenger in the SUV experiences consistent and personalized airflow, enhancing overall comfort.

2. Temperature Control Flexibility

  • Informational: SUVs equipped with ceiling air vents offer precise temperature control, allowing occupants to customize the climate to their liking.

3. Improved Air Circulation

  • Informational: Ceiling air vents promote better air circulation within the vehicle, preventing stagnant air and ensuring a fresh and pleasant driving environment.

Top SUVs Featuring Ceiling Air Vents

1. Tesla Model X

  • Semantically Related: Suv With Ceiling Air Vents
  • Informational: The Tesla Model X boasts an advanced climate control system with ceiling air vents, providing efficient and customizable airflow for all passengers.

2. BMW X5

  • Semantically Related: Suv With Ceiling Air Vents
  • Informational: The BMW X5 features a sophisticated ventilation system with ceiling air vents, contributing to a luxurious and comfortable driving experience.

3. Toyota Highlander

  • Semantically Related: Suv With Ceiling Air Vents
  • Informational: The Toyota Highlander is praised for its spacious interior and thoughtful features, including ceiling air vents for improved passenger comfort.

Benefits Beyond Comfort:

1. Noise Reduction

  • Informational: Ceiling air vents in SUVs often contribute to noise reduction, creating a quieter and more serene driving atmosphere.

2. Enhanced Air Quality

  • Informational: The improved air circulation facilitated by ceiling air vents can positively impact air quality within the vehicle, reducing the presence of dust and allergens.

Read too: Ceiling Height Needed For Treadmill

Conclusion: Elevate Your Driving Experience with SUVs Featuring Ceiling Air Vents

In conclusion, opting for an SUV with ceiling air vents is a decision that goes beyond mere luxury; it’s about transforming your driving experience. The enhanced comfort, precise temperature control, and additional features make these vehicles stand out in the crowded SUV market. Whether you prioritize spacious interiors or advanced climate control, choosing an SUV ensures that every journey is a delight for both the driver and passengers.

Demystifying the Circuit: Understanding Wire Colors for Ceiling Fan Installation

Embarking on a ceiling fan installation project? Dive into the world of “Wire Colors for Ceiling Fan” to unravel the complexities of wiring and ensure a seamless installation experience for a cool and comfortable living space.

Wire Colors For Ceiling Fan

Navigating the Maze

Explore the importance of wire colors and their role in the installation process, guiding you through a successful ceiling fan setup.

Understanding Wire Colors For Ceiling Fan Installation:

Gain insights into the significance of different wire colors and their functions in the context of ceiling fan wiring.

  1. Black Wire: The black wire is typically the hot wire, providing power from the electrical panel to the fan. It is crucial for the fan’s operation and should be connected to the corresponding black wire in your ceiling.
  2. White Wire: White wires are neutral and carry the current back to the electrical panel. Connect the white wire from the fan to the white wire in the ceiling, ensuring a proper return path for electricity.
  3. Green or Bare Copper Wire: The green or bare copper wire is the ground wire, essential for safety. Connect this wire to the grounding system in your home to prevent electrical shock.
  4. Blue or Red Wire: Some ceiling fans come with an additional wire, often blue or red. This wire is for the fan’s light kit or other optional features. Connect it to the corresponding wire in your ceiling if applicable.

H2: Decoding Wire Colors For Ceiling Fan Installation

Delve deeper into the intricacies of wire colors, addressing common questions and potential challenges.

  1. Identifying Existing Wires: Before starting the installation, identify the wires in your ceiling. Use a voltage tester to ensure that the power is turned off, then locate the black, white, and ground wires.
  2. Matching Wires: Match the wires from your ceiling fan to the corresponding wires in your ceiling. Ensure a secure connection by using wire nuts and following the manufacturer’s instructions.
  3. Dealing with Additional Features: If your ceiling fan includes additional features, such as a light kit, pay attention to the corresponding wires. Follow the provided instructions to connect these wires correctly.

Common Questions About Wire Colors For Ceiling Fan:

Addressing frequently asked questions to enhance your understanding of ceiling fan wiring.

  1. What if Wire Colors Don’t Match? In some cases, wire colors may not match exactly. Consult the fan’s manual and the ceiling’s wiring diagram to ensure correct connections.
  2. What if There’s No Ground Wire? If your ceiling lacks a ground wire, consult a qualified electrician to discuss proper grounding solutions for your ceiling fan.
  3. Can I Use a Dimmer Switch? Not all ceiling fans are compatible with dimmer switches. Check the fan’s specifications to determine if a dimmer switch is suitable.

Conclusion: A Breeze of Comfort with Proper Wiring

In conclusion, understanding wire colors for ceiling fan installation is fundamental for a safe and efficient setup. Whether you’re a seasoned DIY enthusiast or a first-time installer, decoding the colors ensures a smooth installation process. Follow the provided guidelines, consult the fan’s manual, and, if needed, seek professional assistance for a well-wired and fully functional ceiling fan. Enjoy the cool breeze and well-lit ambiance in your living space, courtesy of a successfully installed ceiling fan.

Unveiling the Mystery: Causes and Solutions for Small Water Bubbles on Ceiling Surfaces

Are you noticing small water bubbles on your ceiling? Dive into the intricacies of “Small Water Bubbles on Ceiling” to understand the underlying issues and discover effective solutions for a dry and intact ceiling.

Small Water Bubbles On Ceiling

Unmasking the Culprits

Explore the various factors contributing to the appearance of small water bubbles and gain insights into their origins.

Common Causes of Small Water Bubbles On Ceiling:

  1. Roof Leaks: Roof leaks are a frequent culprit. Water seeping through the roof can accumulate in the ceiling, forming bubbles as it disrupts the surface.
  2. Plumbing Issues: Faulty plumbing, such as leaking pipes or water buildup in the ceiling, can manifest as small water bubbles. Regular plumbing inspections are essential.
  3. Condensation: Excessive moisture in the air can lead to condensation on the ceiling, resulting in small water bubbles. This is common in areas with poor ventilation.

Understanding the Impact

Grasp the potential consequences of small water bubbles and why immediate action is crucial.

  1. Structural Damage: Small water bubbles, if left unattended, can lead to structural damage. This includes compromised drywall, weakened ceiling materials, and even potential hazards like mold growth.
  2. Aesthetic Issues: Beyond structural concerns, water bubbles on the ceiling affect the aesthetic appeal of your space. Stains, discoloration, and peeling paint are common consequences.

Dealing with Small Water Bubbles On Ceiling

Discover practical solutions to address existing water bubbles and prevent their recurrence in the future.

Identifying and Fixing the Source: Small Water Bubbles

Learn the step-by-step process to identify the source of the issue and implement effective fixes.

  1. Inspecting the Roof: Begin with a thorough inspection of your roof. Look for missing or damaged shingles, cracks, or any signs of water entry. Addressing roof issues can prevent further water damage to your ceiling.
  2. Checking Plumbing Systems: Enlist the help of a professional plumber to inspect your plumbing systems. Identify and fix any leaks promptly, preventing water from accumulating in the ceiling.
  3. Improving Ventilation: Enhance ventilation in your home to minimize condensation-related issues. Use exhaust fans, ensure proper attic ventilation, and consider a dehumidifier in humid climates.

Preventive Measures

Implement proactive measures to prevent the recurrence of small water bubbles.

  1. Regular Inspections: Conduct regular inspections of your roof and plumbing systems. Early detection and intervention can prevent small issues from evolving into major problems.
  2. Maintaining Indoor Humidity: Control indoor humidity levels to reduce the likelihood of condensation. Proper insulation and ventilation contribute to a balanced indoor environment.
  3. Prompt Repairs: Address any water damage or leaks promptly. Quick repairs can prevent the formation of small water bubbles and mitigate potential structural damage.

Read too: How To Dry Wet Ceiling

Conclusion: A Dry and Pristine Ceiling Awaits

In conclusion, addressing small water bubbles on your ceiling requires a combination of identifying the root cause, implementing effective solutions, and adopting preventive measures. By understanding the common causes and consequences, you can take proactive steps to ensure a dry, intact, and aesthetically pleasing ceiling in your home. Remember, early intervention is key to preserving the structural integrity and visual appeal of your living space.

Navigating Tenant Woes: Understanding and Addressing a Leaking Ceiling in a Rented Property

Dealing with a leaking ceiling in your rented space? Explore the complexities of “Leaking Ceiling in Rented Property” and learn how to navigate this common issue to ensure a prompt and effective resolution.

Leaking Ceiling In Rented Property

The Unwelcomed Drip: Leaking Ceiling In Rented Property

Uncover the causes, responsibilities, and steps to take when faced with a leaking ceiling in a rented property.

Identifying the Signs: Leaking Ceiling In Rented Property

Recognize the early indicators of a leaking ceiling and take proactive measures to address the issue.

  1. Water Stains and Discoloration: Water stains or discoloration on the ceiling are telltale signs of a leak. Pay attention to any changes in the ceiling’s appearance.
  2. Dripping Sounds: Audible dripping sounds or the sensation of water droplets falling are clear indications of an active leak. Investigate the source promptly.
  3. Mold or Mildew Growth: Moisture from a leaking ceiling can lead to mold or mildew growth. If you notice these signs, it’s crucial to address the leak promptly to prevent further damage.

Understanding Responsibilities: Leaking Ceiling In Rented Property

Clarify the responsibilities of tenants and landlords when it comes to addressing a leaking ceiling in a rented property.

  1. Landlord’s Responsibilities: Landlords are typically responsible for structural repairs, including fixing leaks in the roof or ceiling. Contact your landlord immediately to report the issue and request repairs.
  2. Tenant’s Responsibilities: Tenants are responsible for notifying the landlord promptly about any signs of a leaking ceiling. Timely reporting helps prevent further damage and demonstrates a commitment to maintaining the property.
  3. Temporary Mitigation: In the interim, tenants can take steps to mitigate potential damage. Place buckets under active leaks, move belongings away from affected areas, and document the damage with photos for reference.

Resolving the Issue

Explore the steps to take when addressing a leaking ceiling, ensuring a swift and effective resolution.

  1. Report the Issue Promptly: As soon as you notice a leaking ceiling, report the issue to your landlord or property management. Provide detailed information about the location and severity of the leak.
  2. Document the Damage: Document the damage with photos and written descriptions. This documentation may be crucial for insurance claims or future discussions with your landlord.
  3. Allow Access for Repairs: Cooperate with your landlord or maintenance personnel to facilitate prompt repairs. Timely access to the property allows for a quicker resolution of the issue.

Preventing Future Leaks

Implement preventative measures to minimize the risk of future leaks and protect your rented property.

  1. Regular Inspections: Conduct regular inspections of your rented property to identify potential issues early on. This proactive approach can prevent minor leaks from escalating into significant problems.
  2. Communicate Effectively: Maintain open communication with your landlord. Report any signs of water damage promptly and work together to address and resolve issues in a timely manner.
  3. Tenant Insurance: Consider obtaining renter’s insurance to protect your personal belongings in the event of water damage. While it may not cover structural repairs, it can provide financial assistance for damaged personal property.

Conclusion: Resolving Leaking Ceiling Woes in Rented Properties

In conclusion, addressing a leaking ceiling in a rented property requires prompt action, effective communication with your landlord, and collaboration to facilitate repairs. By understanding the signs, responsibilities, and preventative measures, tenants can navigate this common issue and ensure a safe and well-maintained living environment. Remember, a leaking ceiling is not just a nuisance but a potential threat to the integrity of the property, making timely resolution essential for both tenants and landlords.

Finding the Right Fit: Understanding the Ideal Ceiling Height Needed for Treadmill Workouts

Embarking on a fitness journey with a treadmill at home? Uncover the essential considerations for your workout space by exploring the optimal “Ceiling Height Needed for Treadmill” and discover how to create a conducive environment for effective and enjoyable treadmill workouts.

Ceiling Height Needed For Treadmill

Exploring the Vertical Dimension

Delve into the importance of ceiling height in your workout space and how it impacts your treadmill exercise routine.

Determining the Ideal Ceiling Height for Treadmill Use:

Understanding the appropriate vertical space ensures a comfortable and safe treadmill experience. Consider the following factors:

  1. Treadmill Dimensions: Different treadmills come with varying dimensions, especially in terms of height. Take note of your treadmill’s height specifications, and add a margin for your own height and any potential incline during workouts.
  2. User Height and Arm Reach: Your height and arm reach matter. Ensure that the ceiling height allows you to maintain proper posture and arm movement without any restrictions during your treadmill sessions.
  3. Incline Capability: If your treadmill allows for incline adjustments, factor in the additional height needed when the treadmill is elevated. This is crucial for preventing any accidental contact with the ceiling.

Calculating the Minimum Ceiling Height Needed for Treadmill Use:

Follow a simple formula to determine the minimum ceiling height required for your treadmill workouts.

  • Treadmill Height + User Height + Arm Reach + Incline Height = Minimum Ceiling Height
  • Creating an Optimal Workout Environment: Ceiling Height Needed for Treadmill

Explore practical tips to enhance your workout space and ensure an enjoyable treadmill experience.

  1. Choose a Suitable Room: Select a room with a high ceiling or enough vertical space to accommodate your treadmill comfortably. Avoid spaces with low-hanging fixtures or obstructions.
  2. Consider Basement Installations: If you plan to set up your treadmill in the basement, be mindful of any ductwork, beams, or low ceilings. Measure the space carefully to ensure sufficient headroom.
  3. Mirrors and Lighting: Enhance your workout space with mirrors and proper lighting. Mirrors create an illusion of space, while adequate lighting contributes to a more open and inviting atmosphere.

Addressing Common Concerns and Alternatives

Explore solutions for low-ceiling spaces and potential alternatives to accommodate your treadmill.

  1. Low-Ceiling Solutions: In rooms with lower ceilings, consider installing a drop ceiling to create additional vertical space. Ensure the structural integrity and safety of any modifications.
  2. Outdoor Treadmill Spaces: If indoor space limitations persist, explore the option of setting up your treadmill in an outdoor space. Ensure the area is well-protected from the elements and provides ample room for your workout.

Read too: How To Dry Wet Ceiling

Conclusion: Elevate Your Treadmill Experience with Adequate Ceiling Height

In conclusion, understanding the importance of ceiling height for treadmill workouts is key to creating a safe and enjoyable exercise environment. By calculating the minimum ceiling height needed, considering room characteristics, and exploring alternatives for low-ceiling spaces, you can optimize your treadmill experience at home. Elevate your fitness journey by ensuring that your workout space is tailored to accommodate the dimensions and requirements of your treadmill, allowing you to reap the maximum benefits of your exercise routine.

Unveiling the Drip Dilemma: AC Condensation Leaking Through Ceiling Solutions

Picture this: you’re enjoying a cool, comfortable space thanks to your trusty air conditioner, but suddenly, you notice water dripping from your ceiling. The culprit? AC condensation. In this comprehensive guide, we’ll explore the reasons behind AC condensation leaking through the ceiling and provide practical solutions to address this common issue.

Ac Condensation Leaking Through Ceiling

Understanding the Puddle Predicament: AC Condensation Leaking Through Ceiling

Delve into the details of why your AC might be causing an unwanted indoor rain and discover effective ways to put a stop to it.

Common Causes of AC Condensation Leaks:

  1. Clogged Drain Line: One of the primary reasons for AC condensation leaks is a clogged drain line. Over time, dirt, algae, and debris can accumulate, obstructing the drainage system and causing water to back up.
  2. Faulty Condensate Pan: The condensate pan is designed to collect water droplets formed during the cooling process. If the pan is damaged or improperly installed, it can lead to leaks as water escapes instead of draining away.
  3. Dirty Air Filters: Dirty or clogged air filters restrict airflow, causing the evaporator coil to freeze. When the coil subsequently thaws, excess water is produced, overwhelming the system and potentially leaking through the ceiling.

Solutions to Halt the Ceiling Seepage: AC Condensation Leaking Through Ceiling

Now that we’ve identified the reasons behind AC condensation leaks, let’s explore practical steps to resolve the issue and prevent further damage.

  1. Clearing the Drain Line: Regularly clean the AC drain line to prevent clogs. A mixture of vinegar and water is an effective DIY solution. If the blockage persists, consider professional maintenance.
  2. Inspecting the Condensate Pan: Ensure the condensate pan is intact and correctly positioned. If it shows signs of damage, such as cracks or rust, replace it promptly. Regular inspections can prevent leaks caused by pan issues.
  3. Changing Air Filters: Make it a habit to check and replace air filters regularly. This simple maintenance task not only improves indoor air quality but also prevents issues like frozen coils and subsequent leaks.
  4. Professional AC Maintenance: Schedule regular professional maintenance for your AC unit. Certified technicians can identify and address potential problems before they escalate, saving you from unexpected leaks and costly repairs.

Preventing Future Leaks: AC Condensation Leaking Through Ceiling

Proactive measures to ensure a dry and trouble-free environment.

  1. Regular Inspections: Conduct routine inspections of your AC unit, especially before the summer season. Look for signs of wear, corrosion, or leaks and address any issues promptly.
  2. Proper Insulation: Ensure your home is adequately insulated. Proper insulation helps regulate indoor humidity levels, reducing the workload on your AC unit and minimizing the risk of condensation leaks.
  3. Humidity Control: Invest in a dehumidifier to control indoor humidity. Maintaining optimal humidity levels not only enhances comfort but also reduces the likelihood of condensation-related problems.

Read too: How To Dry Wet Ceiling

Conclusion: Nipping AC Condensation Leaks in the Bud

In conclusion, addressing AC condensation leaking through the ceiling requires a combination of regular maintenance, proactive measures, and timely solutions to identified issues. By understanding the common causes and implementing the suggested solutions, you can enjoy the benefits of a cool, comfortable home without the worry of unexpected indoor rainfall. Remember, a dry and leak-free ceiling starts with a well-maintained air conditioning system.