Ceiling Flush Mount Vents Hood: Upgrade Your Kitchen with the Sleek and Efficient

When it comes to kitchen ventilation, functionality and aesthetics are equally important. The ceiling flush mount vent hood offers a sleek and efficient solution to remove smoke, grease, and odors from your kitchen while seamlessly blending into your decor. In this comprehensive guide, we’ll explore everything you need to know about the ceiling flush mount vents hood, from its features and installation process to its benefits and why it’s the perfect choice for modern kitchens.

Ceiling Flush Mount Vent Hood

Understanding the Ceiling Flush Mount Vent Hood

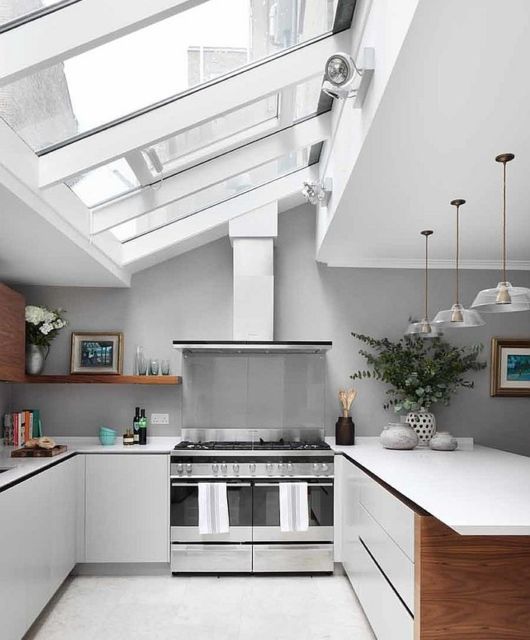
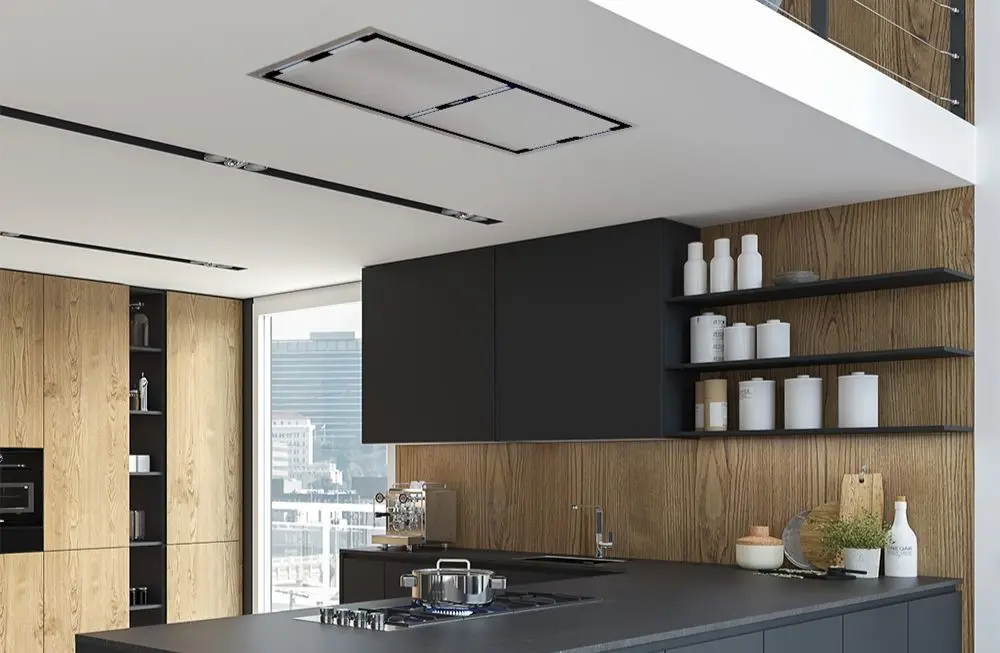
The ceiling flush mount vent hood is a stylish and space-saving ventilation solution designed to be installed flush with the ceiling. Unlike traditional range hoods that protrude from the wall or hang above the cooktop, this innovative hood offers a streamlined look that enhances the overall aesthetic of your kitchen.

Key Features

  1. Space-Saving Design: The flush mount design allows the vent hood to blend seamlessly into the ceiling, maximizing space and creating a clean, uncluttered look.
  2. Powerful Ventilation: Despite its low-profile design, the ceiling flush mount vent hood delivers powerful ventilation, effectively removing smoke, steam, and cooking odors from your kitchen.
  3. Adjustable Speed Settings: Many models come with multiple speed settings, allowing you to adjust the ventilation intensity to suit your cooking needs.
  4. Energy-Efficient LED Lighting: Built-in LED lighting illuminates your cooktop, providing ample task lighting while reducing energy consumption and heat output.
  5. Easy-to-Clean Filters: The hood is equipped with durable and easy-to-clean filters that capture grease and debris, ensuring optimal ventilation performance.

Installation Process

Installing a ceiling flush mount vent hood requires careful planning and attention to detail. Here’s an overview of the installation process:

  1. Select the Right Location: Choose a central location above your cooktop or range for optimal ventilation performance.
  2. Prepare the Ceiling: Cut an opening in the ceiling according to the dimensions specified in the vent hood’s installation instructions.
  3. Mount the Hood: Securely mount the hood in the ceiling opening using the provided hardware and brackets.
  4. Connect Ductwork: Connect the ductwork from the vent hood to the exterior of your home to ensure proper ventilation.
  5. Test and Adjust: Once the installation is complete, test the hood to ensure it’s functioning correctly, and make any necessary adjustments to the speed settings or ductwork.

Benefits of Choosing a Ceiling Flush Mount Vent Hood

  1. Sleek Aesthetic: The flush mount design creates a seamless integration with your kitchen ceiling, enhancing the overall aesthetic of your space.
  2. Space-Saving: Ideal for kitchens with limited space or low ceilings, the flush mount design maximizes headroom and minimizes visual clutter.
  3. Efficient Ventilation: Despite its discreet appearance, the ceiling flush mount vent hood provides powerful and efficient ventilation, keeping your kitchen air clean and fresh.
  4. Easy to Clean: The hood’s removable filters and smooth surfaces make cleaning and maintenance a breeze, ensuring optimal performance and longevity.

Read too: How To Extend Kitchen Cabinets To The Ceiling: A Complete Guide for Maximizing Space and Style

Why Choose a Ceiling Flush Mount Vent Hood?

The ceiling flush mount vent hood offers a winning combination of style, functionality, and efficiency, making it an ideal choice for modern kitchens. Whether you’re renovating your existing kitchen or building a new home, this innovative ventilation solution provides the perfect blend of form and function.

In conclusion, the ceiling flush mount vents hood is a stylish and practical addition to any kitchen, offering powerful ventilation in a sleek and space-saving design. With its adjustable speed settings, energy-efficient LED lighting, and easy-to-clean filters, this innovative hood is sure to enhance your cooking experience while complementing your kitchen decor.

Ceiling Fans for Covered Porches: Enhance Your Outdoor Living Space with the Best

When it comes to creating a comfortable and inviting outdoor living space, a covered porch is the perfect addition to any home. Whether you enjoy sipping your morning coffee or hosting gatherings with friends and family, a well-designed porch provides the ideal setting for relaxation and entertainment. And to make the most of your covered porch, investing in high-quality ceiling fans specifically designed for outdoor use is essential. In this comprehensive guide, we’ll explore everything you need to know about ceiling fans for covered porches, from features and benefits to installation tips and maintenance.

Ceiling Fans For Covered Porches

Why Choose Ceiling Fans for Covered Porches?

Ceiling fans are more than just decorative elements; they serve a practical purpose in enhancing comfort and airflow in outdoor spaces. Here are some compelling reasons to choose ceiling fans for your covered porch:

  1. Air Circulation: Ceiling fans help circulate air, creating a gentle breeze that keeps the porch cool and comfortable, even on hot summer days.
  2. Mosquito Repellent: The airflow generated by ceiling fans can help deter mosquitoes and other flying insects, allowing you to enjoy your porch without worrying about pesky bites.
  3. Enhanced Aesthetic: Ceiling fans add visual interest and charm to your porch, enhancing its overall aesthetic appeal and creating a cohesive design scheme.
  4. Energy Efficiency: By promoting air circulation and reducing the need for air conditioning, ceiling fans help lower energy consumption and utility costs.
  5. Year-Round Use: Many ceiling fans for covered porches come with reversible motors, allowing you to switch between clockwise and counterclockwise rotation to stay comfortable in both warm and cool weather.

Read too: How To Extend Kitchen Cabinets To The Ceiling: A Complete Guide for Maximizing Space and Style

Key Features to Look for in Ceiling Fans for Covered Porches

When shopping for ceiling fans for your covered porch, consider the following features to ensure optimal performance and durability:

  1. Weather-Resistant Construction: Choose ceiling fans specifically designed for outdoor use, with materials and finishes that can withstand exposure to the elements.
  2. Damp or Wet-Rated: Look for ceiling fans with damp or wet ratings, indicating their suitability for use in covered outdoor areas where they may be exposed to moisture.
  3. High-Quality Motor: Opt for fans with powerful, efficient motors that provide reliable performance and quiet operation, even at high speeds.
  4. Blade Design: Select blades made from durable materials such as ABS plastic or weather-resistant wood, with a design optimized for efficient airflow and minimal noise.
  5. Integrated Lighting: Consider fans with integrated lighting options, such as LED light kits or compatible fixtures, to enhance visibility and ambiance on your porch during evening hours.

Installation and Maintenance Tips

When installing ceiling fans for covered porches, follow these tips to ensure proper installation and maintenance:

  1. Choose the Right Size: Select ceiling fans appropriate for the size and height of your porch, ensuring adequate clearance between the blades and surrounding walls or fixtures.
  2. Secure Mounting: Install the fan using a sturdy mounting bracket and secure hardware to prevent wobbling or shaking during operation.
  3. Regular Cleaning: Clean the fan blades, motor housing, and light fixtures regularly to remove dust, dirt, and debris that can affect performance and appearance.
  4. Check for Damage: Inspect the fan blades, motor, and wiring periodically for signs of wear, damage, or corrosion, and repair or replace any damaged components promptly.

Conclusion

Ceiling fans for covered porches are essential additions to any outdoor living space, providing comfort, style, and functionality year-round. By choosing high-quality fans with weather-resistant construction, powerful motors, and integrated lighting options, you can create a welcoming and enjoyable environment on your porch for years to come.

Casablanca Mission Ceiling Fans: Elevate Your Space with the Elegant

When it comes to enhancing the ambiance and comfort of your living space, few additions are as impactful as a ceiling fan. And if you’re looking for a perfect combination of style, functionality, and durability, the Casablanca Mission Ceiling Fans stands out as an excellent choice. In this comprehensive review, we’ll delve into the features, benefits, and why the Casablanca Mission Ceiling Fan is the ideal addition to any home decor.

Casablanca Mission Ceiling Fan

Understanding the Casablanca Mission Ceiling Fan

The Casablanca Mission Ceiling Fan embodies timeless elegance and exceptional performance, making it a standout fixture in any room. Inspired by classic Mission-style architecture, this ceiling fan features clean lines, rich finishes, and superior craftsmanship, creating a striking focal point that complements a variety of interior design styles.

Key Features of the Casablanca Mission Ceiling Fan

  1. Premium Materials: Crafted from high-quality materials such as solid wood, brushed nickel, and stained glass, the Casablanca Mission Ceiling Fan exudes luxury and sophistication.
  2. Powerful Motor: Equipped with a powerful, whisper-quiet motor, this ceiling fan delivers optimal airflow and cooling comfort without compromising on performance.
  3. Versatile Design Options: Available in a range of sizes, finishes, and blade configurations, the Casablanca Mission Ceiling Fan offers versatility to suit any room size and decor theme.
  4. Integrated Lighting: Some models feature integrated lighting options, including energy-efficient LED bulbs or customizable light kits, adding both beauty and functionality to your space.
  5. Remote Control Compatibility: Enjoy convenient operation and customization with optional remote control functionality, allowing you to adjust fan speed, direction, and lighting from anywhere in the room.

Read too: How To Extend Kitchen Cabinets To The Ceiling: A Complete Guide for Maximizing Space and Style

Benefits of Choosing the Casablanca Mission Ceiling Fan

  1. Enhanced Comfort: Experience year-round comfort with the Casablanca Mission Ceiling Fan’s powerful airflow and reversible motor, which helps maintain optimal temperatures in any season.
  2. Energy Efficiency: With its energy-efficient design and optional LED lighting, this ceiling fan helps reduce energy consumption and lower utility bills while providing reliable performance.
  3. Quiet Operation: Say goodbye to noisy fans disrupting your peace and quiet. The Casablanca Mission Ceiling Fan operates quietly, allowing you to enjoy its benefits without unwanted noise.
  4. Long-Term Durability: Built to last, the Casablanca Mission Ceiling Fan is designed with durability and longevity in mind, ensuring years of reliable performance and enjoyment.
  5. Aesthetic Appeal: Elevate the aesthetic appeal of your home with the timeless elegance and sophistication of the Casablanca Mission Ceiling Fan, adding a touch of luxury to any room.

Why Choose the Casablanca Mission Ceiling Fan?

The Casablanca Mission Ceiling Fan stands out as a superior choice for homeowners seeking a perfect blend of style, performance, and quality. Whether you’re looking to upgrade your living room, bedroom, or outdoor space, this ceiling fan offers unmatched versatility, comfort, and durability that will elevate your home decor to new heights.

In conclusion, the Casablanca Mission Ceiling Fans is more than just a functional fixture; it’s a statement piece that enhances the beauty, comfort, and ambiance of any space. With its timeless design, powerful performance, and long-lasting durability, this ceiling fan is an investment in both style and functionality that you’ll enjoy for years to come.

Dealing with Pesky Ants on My Ceiling: Effective Solutions and Prevention Tips

Are you noticing a trail of tiny invaders marching across your ceiling? Dealing with ants on my ceiling can be a frustrating and unsightly issue for homeowners. In this guide, we’ll explore effective solutions and prevention tips to address this common household problem and maintain a pest-free environment.

Ants On My Ceiling

Understanding the Presence of Ants on My Ceiling

Ants are social insects known for their ability to infiltrate homes in search of food, water, and shelter. While they typically nest outdoors, certain species may find their way indoors, including onto ceilings, attracted by crumbs, spills, or moisture. Common species that may invade ceilings include carpenter ants, odorous house ants, and pavement ants.

Identifying Ants on My Ceiling

Before implementing any control measures, it’s essential to confirm that the insects on your ceiling are indeed ants. Look for the following characteristics to identify ants:

  1. Body Shape: Ants have three distinct body segments: head, thorax, and abdomen, with a narrow waist between the thorax and abdomen.
  2. Antennae: Ants have elbowed antennae, which may be bent or curved.
  3. Legs: Ants have six legs attached to their thorax.
  4. Color: Ants come in various colors, including black, brown, red, or a combination thereof.

If you’re unsure whether the insects on your ceiling are ants, consider contacting a pest control professional for identification and assistance.

Read too: How To Extend Kitchen Cabinets To The Ceiling: A Complete Guide for Maximizing Space and Style

Causes of Ant Infestation on My Ceiling

Several factors can contribute to ants finding their way onto your ceiling:

  1. Food Sources: Crumbs, spills, and food residue left unattended can attract ants searching for sustenance.
  2. Moisture: Leaks, condensation, or damp areas in the ceiling provide ants with a water source, making them more likely to inhabit the area.
  3. Access Points: Gaps, cracks, or openings in walls, ceilings, or windows serve as entry points for ants to infiltrate your home.
  4. Nesting Sites: Certain species of ants, such as carpenter ants, may establish satellite colonies within the structure of your home, including ceilings and walls.

Effective Solutions for Ants on My Ceiling

Once you’ve confirmed the presence of ants on your ceiling, it’s essential to take prompt action to address the infestation. Here are some effective solutions:

  1. Cleanliness: Maintain a clean and tidy home by promptly wiping up spills, storing food in airtight containers, and regularly vacuuming or sweeping to eliminate crumbs and food residue.
  2. Seal Entry Points: Inspect your home for gaps, cracks, or openings that may serve as entry points for ants, especially around windows, doors, pipes, and utility lines. Seal any openings with caulk or weatherstripping to prevent ants from gaining access.
  3. Eliminate Moisture: Repair any leaks, fix plumbing issues, and reduce humidity levels in your home to eliminate moisture sources that attract ants. Ensure proper ventilation in bathrooms, kitchens, and basements to discourage ant infestations.
  4. Use Ant Baits: Place ant baits or traps near areas where ants are active, such as along baseboards, near entry points, or on countertops. Ant baits contain slow-acting insecticides that ants carry back to the colony, effectively eliminating the entire nest.

Preventing Ant Infestations on My Ceiling

Taking proactive measures to prevent ant infestations can help safeguard your home against future invasions. Here are some prevention tips:

  1. Regular Maintenance: Conduct routine inspections of your home’s exterior and interior to identify and address potential entry points, moisture issues, and nesting sites.
  2. Landscaping: Keep vegetation trimmed and away from the perimeter of your home to prevent ants from using branches or foliage as a bridge to access your property.
  3. Storage: Store firewood, mulch, and organic debris away from the foundation of your home to reduce harborage areas for ants and other pests.
  4. Professional Pest Control: Consider scheduling regular pest control treatments with a licensed exterminator to proactively manage ant populations and prevent infestations.

Conclusion

Dealing with ants on your ceiling can be a challenging task, but with the right strategies and preventative measures, you can effectively eliminate these pesky invaders and keep your home pest-free. By maintaining cleanliness, sealing entry points, using ant baits, and implementing preventive measures, you can enjoy a comfortable and ant-free living environment.

3 Arm Ceiling Light: Illuminate Your Space in Style with Elegant

Upgrade the lighting in your home with the timeless elegance of 3 Arm Ceiling Light. In this article, we’ll delve into the versatility, design, and functionality of these stunning lighting fixtures, perfect for adding both illumination and style to any room.

3 Arm Ceiling Lights

Exploring 3 Arm Ceiling Lights

3 Arm Ceiling Lights are more than just functional lighting fixtures—they’re statement pieces that can enhance the aesthetic appeal of any space. With their classic design featuring three arms extending from a central base, these ceiling lights offer a perfect blend of elegance and functionality.

Key Features

  1. Classic Design: The hallmark feature of 3 Arm Ceiling Lights is their classic design, which adds a touch of sophistication and timeless charm to any room. Whether installed in a traditional or contemporary setting, these lights serve as focal points that draw the eye and elevate the overall ambiance.
  2. Versatile Lighting: With three arms and multiple light sockets, 3 Arm Ceiling Lights provide ample illumination for a variety of purposes. Whether used as ambient lighting in a living room or as task lighting in a study or office, these fixtures offer versatility to suit different lighting needs.
  3. Enhanced Style: Beyond their practical function, 3 Arm Ceiling Lights serve as decorative elements that contribute to the overall style and aesthetic of a space. Available in a range of finishes and designs, from sleek and modern to ornate and vintage-inspired, there’s a 3 Arm Ceiling Light to complement any decor theme.
  4. Customizable Options: Many manufacturers offer customizable options for 3 Arm Ceiling Lights, allowing homeowners to tailor the fixtures to their specific preferences. From choosing the finish and style of the arms to selecting the type and color of shades, customization options abound to create a truly personalized lighting solution.

Installing and Using 3 Arm Ceiling Lights

Installing 3 Arm Ceiling Lights is a relatively straightforward process that can be completed by DIY enthusiasts with basic electrical knowledge. However, if you’re unsure or uncomfortable with electrical work, it’s always best to hire a professional electrician for installation to ensure safety and proper functionality.

Once installed, using 3 Arm Ceiling Lights is simple. Depending on the specific design of the fixture, you may have the option to adjust the direction of each arm or control the brightness of the lights using a dimmer switch for added convenience and flexibility.

Benefits of Choosing 3 Arm Ceiling Lights

  1. Elegant Design: 3 Arm Ceiling Lights add a touch of elegance and sophistication to any space, making them ideal for enhancing the overall aesthetic appeal of your home.
  2. Versatile Illumination: With multiple light sockets and adjustable arms, 3 Arm Ceiling Lights provide versatile illumination options suitable for various tasks and activities.
  3. Customization: The ability to customize aspects of the fixture allows homeowners to create lighting solutions that perfectly suit their style and preferences, ensuring a cohesive look throughout their space.

Read too: Exploring the Efficiency of Radiant Ceiling Heater Electric: A Comprehensive Guide

Conclusion

Elevate the style and functionality of your home with the addition of 3 Arm Ceiling Light. With their timeless design, versatile lighting options, and customizable features, these fixtures are sure to enhance the ambiance of any room while providing ample illumination for everyday tasks and activities.

2X2 Black Ceiling Tile: A Modern Twist to Interior Design

Upgrade the look of your space with the contemporary elegance of 2X2 Black Ceiling Tile. In this article, we’ll explore the versatility, functionality, and aesthetic appeal of these sleek ceiling tiles, perfect for adding a touch of sophistication to any room.

2X2 Black Ceiling Tile

Discovering 2X2 Black Ceiling Tiles

2X2 Black Ceiling Tiles offer a modern and stylish solution for enhancing the appearance of residential and commercial interiors. These tiles, with their sleek black finish and versatile size, provide an effortless way to create a sophisticated and upscale ambiance in any space.

Key Features of 2X2 Black Ceiling Tiles

  1. Sleek Design: The black color and clean lines of 2X2 Black Ceiling Tiles add a contemporary touch to any room, making them suitable for a variety of design styles, from modern and minimalist to industrial and urban.
  2. Versatile Size: The 2X2 size of these ceiling tiles makes them easy to install and compatible with standard grid systems, allowing for seamless integration into both new construction and renovation projects.
  3. Durable Construction: Constructed from high-quality materials, 2X2 Black Ceiling Tiles are built to withstand the rigors of daily use while maintaining their appearance and structural integrity over time.
  4. Sound Absorption: In addition to their aesthetic appeal, 2X2 Black Ceiling Tiles also offer acoustic benefits, helping to reduce noise levels and improve sound quality in interior spaces.

Installing 2X2 Black Ceiling Tiles

DIY enthusiasts or professionals alike can easily complete the straightforward process of installing 2X2 Black Ceiling Tiles. Designed to fit seamlessly into standard grid systems, these tiles make installation quick and hassle-free.

Before installation, ensure that the ceiling surface is clean, flat, and free of any debris. Begin by placing the tiles into the grid system, starting from one corner and working your way across the ceiling. Use a utility knife to trim any tiles as needed to fit around light fixtures, vents, or other obstacles.

Once all the tiles are in place, step back and admire the sleek and sophisticated look of your new black ceiling.

Benefits

  1. Enhanced Aesthetics: 2X2 Black Ceiling Tiles add a touch of modern elegance to any space, instantly elevating its appearance and making a bold design statement.
  2. Versatility: Whether used in residential homes, offices, restaurants, or retail spaces, 2X2 Black Ceiling Tiles offer endless design possibilities and can be customized to suit any aesthetic preference.
  3. Durability: Built to last, 2X2 Black Ceiling Tiles are resistant to moisture, stains, and scratches, ensuring long-lasting beauty and performance even in high-traffic areas.

Read too: Exploring the Efficiency of Radiant Ceiling Heater Electric: A Comprehensive Guide

Conclusion

Elevate the look of your space with the contemporary style of 2X2 Black Ceiling Tile. With their sleek design, versatility, and durability, these tiles offer a sophisticated solution for enhancing any interior environment.

White Palm Leaf Ceiling Fans: Enhance Your Space with a Tropical Touch

Transform your home into a tropical oasis with the refreshing addition of a White Palm Leaf Ceiling Fans. In this article, we’ll explore the beauty and functionality of this stylish ceiling fan, perfect for bringing a touch of paradise into any room.

White Palm Leaf Ceiling Fan

Discovering the White Palm Leaf Ceiling Fan

The White Palm Leaf Ceiling Fan is more than just a cooling appliance—it’s a statement piece that adds a touch of elegance and sophistication to any space. With its distinctive design featuring palm leaf blades in a crisp white finish, this ceiling fan evokes a sense of relaxation and tranquility reminiscent of a tropical getaway.

Key Features

  1. Tropical Design: The palm leaf blades of the White Palm Leaf Ceiling Fan are designed to mimic the natural beauty of palm fronds, creating a serene and inviting atmosphere reminiscent of a tropical paradise.
  2. Versatile Style: Despite its tropical-inspired design, the White Palm Leaf Ceiling Fan complements a wide range of interior styles, from coastal and beachy to modern and minimalist. Whether used in a bedroom, living room, or outdoor patio, this fan adds a touch of style and sophistication to any space.
  3. Efficient Cooling: In addition to its aesthetic appeal, the White Palm Leaf Ceiling Fan is equipped with a powerful motor and wide blades that provide optimal airflow and cooling performance. Whether you’re relaxing indoors or entertaining guests outdoors, this fan ensures a comfortable environment year-round.
  4. Quiet Operation: Despite its powerful motor, the White Palm Leaf Ceiling Fan operates quietly, allowing you to enjoy the gentle breeze and soothing ambiance without any distracting noise.

Installing and Using the White Palm Leaf Ceiling Fan

Most homeowners with basic tools and DIY skills can easily install the White Palm Leaf Ceiling Fan, as it involves a straightforward process. However, if you’re unsure or uncomfortable with electrical work, it’s always best to hire a professional electrician for installation.

Once installed, using the White Palm Leaf Ceiling Fan is a breeze. Simply use the included remote control to adjust the fan speed and direction to your liking, ensuring optimal comfort and airflow in any season.

Benefits of Choosing a White Palm Leaf Ceiling Fan

  1. Enhanced Aesthetics: The White Palm Leaf Ceiling Fan serves as a striking focal point in any room, adding visual interest and elevating the overall aesthetics of your space.
  2. Year-Round Comfort: Whether used to cool down during the hot summer months or to improve air circulation in the winter, the White Palm Leaf Ceiling Fan provides year-round comfort and energy savings.
  3. Tropical Vibes: With its palm leaf blades and serene white finish, the White Palm Leaf Ceiling Fan brings a touch of tropical paradise into your home, creating a relaxing and inviting atmosphere.

Read too: Exploring the Efficiency of Radiant Ceiling Heater Electric: A Comprehensive Guide

Conclusion

Bring the beauty of the tropics into your home with a White Palm Leaf Ceiling Fans. With its stylish design, efficient cooling performance, and versatile style, this ceiling fan is the perfect addition to any space seeking a touch of coastal charm and relaxation.

Vaulted Ceiling Kitchen Hood: Elevate Your Culinary Space with a Stylish

A vaulted ceiling adds architectural interest and spaciousness to any room, especially in the kitchen where functionality meets design. Pairing this architectural feature with a stylish kitchen hood not only enhances ventilation but also serves as a striking focal point. In this article, we’ll delve into the world of vaulted ceiling kitchen hoods, exploring their features, benefits, and how they can transform your culinary space.

Vaulted Ceiling Kitchen Hood

Understanding Vaulted Ceiling Kitchen Hoods

A vaulted ceiling kitchen hood is a specialized ventilation system designed to fit seamlessly into kitchens with high or sloped ceilings. Unlike traditional range hoods, which are typically mounted against flat ceilings, vaulted ceiling kitchen hoods are customized to accommodate the unique angles and dimensions of vaulted ceilings, ensuring efficient airflow and aesthetic harmony.

Key Features of Vaulted Ceiling Kitchen Hoods

  1. Customized Design: Vaulted ceiling kitchen hoods are available in a variety of designs and configurations to suit your kitchen’s layout and style. From sleek and modern stainless steel models to rustic and charming copper hoods, there’s a wide range of options to choose from to complement your decor.
  2. Optimal Ventilation: One of the primary functions of a kitchen hood is to remove smoke, steam, grease, and odors from the cooking area, promoting a healthier and more comfortable environment. Vaulted ceiling kitchen hoods feature powerful ventilation systems that efficiently capture and exhaust cooking byproducts, ensuring clean air and minimal buildup of grease and moisture.
  3. Enhanced Lighting: Many vaulted ceiling kitchen hoods come with built-in lighting features, illuminating the cooking surface below and adding ambiance to the kitchen space. LED lights are a popular choice for their energy efficiency and bright, even illumination, making cooking tasks easier and more enjoyable.
  4. Statement Piece: Beyond their practical function, vaulted ceiling kitchen hoods serve as striking visual elements that contribute to the overall design aesthetic of the kitchen. Whether you prefer a minimalist hood that blends seamlessly into the ceiling or a bold, decorative hood that makes a statement, there’s a hood style to suit every taste and preference.

Installing and Maintaining

Installing a vaulted ceiling kitchen hood requires careful planning and precise measurements to ensure a proper fit and optimal performance. It’s essential to consult with a qualified contractor or kitchen designer to determine the best placement and configuration for your specific kitchen layout.

Once installed, maintaining your vaulted ceiling kitchen hood is relatively straightforward. Regular cleaning of the hood filters and surfaces is essential to prevent the buildup of grease and debris and maintain optimal airflow and ventilation efficiency.

Benefits of Vaulted Ceiling Kitchen Hoods

  1. Improved Air Quality: By removing smoke, steam, and odors from the kitchen, vaulted ceiling kitchen hoods help maintain a cleaner and healthier indoor environment, free from cooking-related pollutants.
  2. Enhanced Design: Vaulted ceiling kitchen hoods add visual interest and elegance to the kitchen space, serving as both functional appliances and stylish design elements that elevate the overall aesthetic appeal of the room.
  3. Increased Home Value: A well-designed and properly installed vaulted ceiling kitchen hood can enhance the value of your home, making it more attractive to potential buyers and adding to its resale value.

Conclusion

A vaulted ceiling kitchen hood is more than just a ventilation appliance—it’s a design statement that enhances the beauty and functionality of your kitchen. With customizable designs, powerful ventilation capabilities, and aesthetic appeal, vaulted ceiling kitchen hoods are an essential addition to any culinary space.

Read too: Exploring the Efficiency of Radiant Ceiling Heater Electric: A Comprehensive Guide

Spitfire Ceiling Fan With Lights: A Perfect Blend of Style and Functionality

The Spitfire Ceiling Fan With Lights is more than just a cooling solution—it’s a stylish addition to any room that enhances both comfort and aesthetics. In this article, we’ll explore the features and benefits of the Spitfire Ceiling Fan With Light, and why it’s the perfect choice for your home.

Spitfire Ceiling Fan With Light

Introducing the Spitfire Ceiling Fan With Light

The Spitfire Ceiling Fan With Light is a versatile and elegant fixture designed to provide optimal airflow and illumination while adding a touch of sophistication to your living space. With its sleek design and advanced features, this ceiling fan offers the perfect blend of style and functionality.

Key Features

  1. Sleek Design: The Spitfire Ceiling Fan With Light features a modern and streamlined design that complements a variety of interior styles. Its clean lines and understated elegance make it a focal point in any room.
  2. Efficient Cooling: Equipped with high-quality blades and a powerful motor, the Spitfire Ceiling Fan With Light delivers exceptional airflow to keep your space cool and comfortable, even on the hottest days.
  3. Integrated Light Fixture: Unlike traditional ceiling fans, the Spitfire comes with an integrated light fixture, providing both illumination and airflow in one sleek package. This feature makes it ideal for rooms where space is limited or where additional lighting is desired.
  4. Remote Control Operation: With the included remote control, you can easily adjust the fan speed and light settings from anywhere in the room, providing convenience and ease of use.

Installing and Using the Spitfire Ceiling Fan With Light

Installing the Spitfire Ceiling Fan With Light is a straightforward process that can be completed by most homeowners with basic tools and DIY skills. However, if you’re not comfortable with electrical work, it’s always best to hire a professional.

Once installed, using the Spitfire Ceiling Fan With Light is a breeze. Simply use the remote control to adjust the fan speed and light settings to your liking, ensuring optimal comfort and ambiance in any room.

Benefits of Choosing the Spitfire Ceiling Fan With Light

  1. Enhanced Comfort: With its powerful airflow and integrated light fixture, the Spitfire Ceiling Fan With Light enhances comfort and convenience in any room of your home.
  2. Energy Efficiency: Compared to traditional lighting and cooling solutions, the Spitfire Ceiling Fan With Light is highly energy-efficient, helping you save on utility bills while reducing your environmental footprint.
  3. Versatile Design: Whether you’re looking to add a touch of elegance to your living room, bedroom, or outdoor space, the Spitfire Ceiling Fan With Light is a versatile fixture that complements any decor.

Conclusion

The Spitfire Ceiling Fan With Lights is more than just a practical appliance—it’s a statement piece that elevates the style and functionality of any room. With its sleek design, efficient cooling, and integrated lighting, this ceiling fan is the perfect choice for homeowners looking to enhance their living spaces.

Read too: Exploring the Efficiency of Radiant Ceiling Heater Electric: A Comprehensive Guide

Spitfire 48 Ceiling Fans: Enhance Your Home Comfort

In the realm of home comfort solutions, the Spitfire 48 Ceiling Fans stands out as a versatile and efficient option. Whether you’re seeking relief from sweltering summers or looking to circulate warm air during colder months, this fan proves to be a reliable companion. Let’s delve into the features, installation process, and benefits of integrating the Spitfire 48 Ceiling Fan into your living space.

Spitfire 48 Ceiling Fan

Understanding Spitfire 48 Ceiling Fan

The Spitfire 48 Ceiling Fan is more than just a cooling device; it’s a blend of functionality and aesthetics. Crafted with precision engineering, this fan boasts a sleek design that complements various interior styles. Its 48-inch blades provide optimal air circulation, ensuring consistent comfort throughout your room.

Features of Spitfire 48 Ceiling Fan

Superior Airflow Performance

Equipped with advanced motor technology, the Spitfire 48 Ceiling Fan delivers exceptional airflow efficiency. Its three-speed settings allow you to customize the airflow according to your preference, whether you seek a gentle breeze or a brisk airflow.

Read too: Striped Schoolhouse Ceiling Light Fixtures: Unveiling the Timeless Charm

Whisper-Quiet Operation

Say goodbye to disruptive fan noise with the Spitfire 48 Ceiling Fan. Engineered to operate silently, this fan enables you to enjoy a peaceful environment without compromising on performance. It’s an ideal addition to bedrooms, living rooms, and study spaces where tranquility is paramount.

Remote Control Convenience

Experience convenience at your fingertips with the included remote control feature. Adjusting fan settings has never been easier; simply sit back, relax, and control the Spitfire 48 Ceiling Fan from anywhere in the room.

Installation Guide for Spitfire 48 Ceiling Fan

Installing the Spitfire 48 Ceiling Fan is a straightforward process that can be completed with basic tools and minimal expertise. Follow these steps for seamless installation:

  1. Preparation: Turn off the power supply to the existing ceiling fixture and gather the necessary tools, including a screwdriver and wire stripper.
  2. Mounting: Secure the fan bracket to the ceiling junction box using screws, ensuring it is firmly in place.
  3. Wiring: Connect the fan’s wires to the corresponding wires in the ceiling junction box, following the provided instructions carefully.
  4. Blade Attachment: Attach the fan blades to the motor housing using the provided screws, ensuring they are evenly spaced for balanced operation.
  5. Testing: Once installation is complete, turn on the power supply and test the fan to ensure it operates smoothly and quietly.

Benefits of Spitfire 48 Ceiling Fan

Energy Efficiency

With its energy-efficient design, the Spitfire 48 Ceiling Fan helps reduce electricity consumption without compromising on performance. By circulating air effectively, it lessens the reliance on air conditioning systems, resulting in lower energy bills and a smaller carbon footprint.

Year-Round Comfort

Unlike traditional ceiling fans, the Spitfire 48 Ceiling Fan is designed for year-round use. In warmer months, it provides a refreshing breeze to keep you cool, while in colder months, it helps distribute warm air evenly throughout the room, reducing heating costs and enhancing comfort.

Enhanced Décor

Elevate the aesthetic appeal of your living space with the Spitfire 48 Ceiling Fan’s modern design. Whether you prefer a minimalist or contemporary style, this fan seamlessly integrates into any décor scheme, adding a touch of sophistication to your home.

Conclusion

In conclusion, the Spitfire 48 Ceiling Fans emerges as a reliable and stylish solution for enhancing home comfort. Its innovative features, ease of installation, and energy-efficient performance make it a worthwhile investment for any homeowner. Whether you’re seeking relief from the heat or looking to optimize airflow year-round, the Spitfire 48 Ceiling Fan delivers on both functionality and style.

Semi Flush Globe Ceiling Light Guide: Illuminate Your Space with Style

In today’s dynamic world of interior design, lighting plays a pivotal role in enhancing the ambiance of any space. Among the myriad lighting options available, Semi Flush Globe Ceiling Light stand out for their elegant design and functional versatility. Whether you’re revamping your living room, sprucing up your kitchen, or redesigning your office space, Semi Flush Globe Ceiling Lights offer a perfect blend of style and functionality.

Semi Flush Globe Ceiling Light

Exploring Semi Flush Globe Ceiling Lights

Semi Flush Globe Ceiling Lights are characterized by their unique design that combines the sleekness of flush mount fixtures with the elegance of globe-shaped shades. These lights are typically mounted directly to the ceiling, with the globe-shaped shade partially extending downward, creating a visually appealing aesthetic. The semi flush design allows for ample illumination while maintaining a streamlined look, making them ideal for various settings, from modern apartments to traditional homes.

The Versatility of Semi Flush Globe Ceiling Lights

One of the key advantages of Semi Flush Globe Ceiling Lights is their versatility. Available in a wide range of styles, sizes, and finishes, these lights can complement any interior decor theme. Whether you prefer a minimalist look with a sleek metal finish or a more traditional vibe with a brass or bronze frame, there’s a Semi Flush Globe Ceiling Light to suit your taste.

Enhancing Your Space with Semi Flush Globe Ceiling Lights

Living Room Illumination

In the living room, Semi Flush Globe Ceiling Lights serve as both functional fixtures and statement pieces. Install a single large globe light for a dramatic focal point or opt for multiple smaller fixtures to evenly distribute light throughout the space. Pairing these lights with a dimmer switch allows you to adjust the ambiance to suit various activities, from cozy movie nights to lively gatherings with friends.

Kitchen Elegance

In the kitchen, lighting is essential for creating a bright and inviting atmosphere conducive to cooking and entertaining. Semi Flush Globe Ceiling Lights are an excellent choice for kitchen spaces, providing ample illumination without obstructing sightlines or overwhelming the room. Install them above the kitchen island or dining area to add a touch of sophistication while ensuring functional task lighting for meal preparation.

Office Sophistication

In the workplace, lighting plays a crucial role in productivity and comfort. Semi Flush Globe Ceiling Lights offer an elegant solution for office spaces, providing adequate illumination for tasks while contributing to a professional and welcoming environment. Whether you’re outfitting a corporate office, a creative studio, or a home workspace, these lights enhance productivity while elevating the aesthetic appeal of the space.

Choosing the Right Semi Flush Globe Ceiling Light

When selecting Semi Flush Globe Ceiling Lights for your space, consider factors such as size, style, and bulb type. Measure the height and width of the area where the light will be installed to ensure proper fit and proportion. Additionally, choose a style that complements your existing decor while adding visual interest.

Read too: Striped Schoolhouse Ceiling Light Fixtures: Unveiling the Timeless Charm

Conclusion

Semi Flush Globe Ceiling Lights are more than just practical lighting fixtures – they’re design elements that enhance the ambiance and style of any space. Whether you’re illuminating your living room, kitchen, or office, these versatile lights offer a perfect blend of form and function. With their sleek design and ample illumination, Semi Flush Globe Ceiling Lights are sure to elevate your space with elegance and sophistication.

Semi Flush Drum Ceiling Light for Modern Interiors: Elevate Your Space

Illuminate your home with style and sophistication using semi flush drum ceiling light. Discover the versatility and elegance of these lighting fixtures for a contemporary touch to any room.

Semi Flush Drum Ceiling Lights

Introduction

Lighting plays a crucial role in enhancing the ambiance and functionality of any space. Semi flush drum ceiling lights offer a perfect blend of form and function, providing ample illumination while adding a touch of modern elegance to your interior decor. In this comprehensive guide, we will delve into the features, benefits, and design possibilities of semi flush drum ceiling lights to help you elevate your home lighting experience.

Understanding Semi Flush Drum Ceiling Lights

Semi flush drum ceiling lights are versatile fixtures characterized by their drum-shaped design and semi-flush mount, which means they are positioned close to the ceiling with a small gap between the fixture and the ceiling surface. Here are some key features and benefits of these lighting fixtures:

  1. Sleek and Modern Design: Semi flush drum ceiling lights feature clean lines and a minimalist design, making them suitable for contemporary and transitional interiors.
  2. Diffused Lighting: The drum-shaped shade of these fixtures helps to diffuse light evenly, creating a soft and inviting glow that illuminates the entire room without harsh shadows.
  3. Variety of Styles and Finishes: From sleek metal finishes to fabric shades, semi flush drum ceiling lights are available in a wide range of styles and finishes to complement any decor scheme.
  4. Space-Saving Solution: With their semi-flush mount design, these ceiling lights are ideal for rooms with low ceilings or limited overhead space where a traditional chandelier or pendant may not be suitable.

Designing with Semi Flush Drum Ceiling Lights

Semi flush drum ceiling lights offer endless design possibilities for various rooms in your home, including the living room, bedroom, kitchen, and hallway. Here are some creative ways to incorporate these lighting fixtures into your interior design:

  1. Living Room Ambiance: Install a large semi flush drum ceiling light in the living room to serve as the focal point of the space while providing ample ambient lighting for entertaining or relaxing.
  2. Bedroom Serenity: Create a tranquil atmosphere in the bedroom with a semi flush drum ceiling light featuring a fabric shade in soothing neutral tones. This soft, diffused light is perfect for unwinding at the end of the day.
  3. Kitchen Illumination: Brighten up your kitchen workspace with semi flush drum ceiling lights installed above the island or dining area. Opt for fixtures with metallic finishes for a modern touch.
  4. Hallway Elegance: Add style and sophistication to your hallway or entryway with a row of semi flush drum ceiling lights. Choose fixtures with decorative details or intricate patterns to make a statement.

Installation and Maintenance Tips

Installing semi flush drum ceiling lights is relatively straightforward, but it’s essential to follow manufacturer instructions and safety guidelines. Here are some tips for installation and maintenance:

  1. Secure Mounting: Ensure the fixture is securely mounted to the ceiling using the provided hardware and follow recommended weight limits.
  2. Proper Wiring: If you’re not confident in your electrical skills, hire a licensed electrician to install the fixture and connect the wiring safely.
  3. Regular Cleaning: Dust the fixture and clean the shade regularly to maintain its appearance and prevent the buildup of dirt and debris.
  4. Bulb Replacement: When replacing bulbs, make sure to use the correct wattage and type recommended by the manufacturer to avoid damage to the fixture.

Read too: Striped Schoolhouse Ceiling Light Fixtures: Unveiling the Timeless Charm

Conclusion

Semi flush drum ceiling light are stylish, versatile, and functional lighting fixtures that can enhance the ambiance of any room in your home. Whether you’re looking to add a modern touch to your living space or create a serene atmosphere in the bedroom, these fixtures offer a perfect lighting solution. Explore the myriad of design options available and elevate your home with semi flush drum ceiling lights.

Installing a Range Hood in a Vaulted Ceiling: Maximizing Kitchen Ventilation

Upgrade your kitchen’s ventilation system with a range hood designed for vaulted ceiling. Learn how to effectively install and optimize airflow in your kitchen space.

Range Hood In Vaulted Ceiling

Introduction

A well-functioning range hood is essential for maintaining a clean and comfortable kitchen environment by removing cooking odors, smoke, and grease from the air. However, installing a range hood in a vaulted ceilings presents unique challenges and considerations. In this guide, we’ll explore the benefits of installing a range hood in a vaulted ceiling, discuss installation methods, and provide tips for optimizing airflow in your kitchen space.

Understanding: Range Hood In Vaulted Ceiling

Range hoods are essential kitchen appliances that help to improve indoor air quality by venting out pollutants generated during cooking. In vaulted ceiling kitchens, where the ceiling slopes upward, installing a range hood requires careful planning and consideration. Here’s why:

  1. Improved Ventilation: A range hood mounted in a vaulted ceiling can effectively capture and remove airborne contaminants, ensuring that your kitchen remains fresh and odor-free.
  2. Enhanced Aesthetic Appeal: By integrating a range hood into the design of your vaulted ceiling, you can create a seamless and visually appealing kitchen space that blends style with functionality.
  3. Optimized Cooking Experience: Proper ventilation provided by a range hood helps to prevent the buildup of heat, steam, and grease, creating a more comfortable and enjoyable cooking environment.

Installing a Range Hood in a Vaulted Ceiling

Installing a range hood in a vaulted ceiling requires careful planning and execution to ensure optimal performance and aesthetics. Follow these steps for a successful installation:

  1. Choose the Right Range Hood: Select a range hood model that is suitable for vaulted ceilings and compatible with your kitchen layout and cooking needs.
  2. Determine Mounting Location: Identify the ideal location for mounting the range hood, considering factors such as the stove’s placement, ceiling slope, and available space for ductwork.
  3. Prepare the Installation Site: Clear the area where the range hood will be installed, ensuring that it is free from obstructions and obstacles. If necessary, consult with a professional contractor to assess any structural modifications required.
  4. Install the Ductwork: Depending on the configuration of your kitchen and the range hood model, you may need to install ductwork to vent the exhaust air to the exterior of your home. Ensure that the ductwork is properly sized and installed to minimize airflow resistance and maximize efficiency.
  5. Mount the Range Hood: Carefully follow the manufacturer’s instructions to mount the range hood securely to the ceiling, ensuring that it is level and properly anchored.
  6. Connect Electrical Wiring: If your range hood requires electrical power, hire a licensed electrician to safely connect the wiring and install any necessary switches or controls.
  7. Test and Adjust: Once the range hood is installed, test its operation to ensure that it is effectively capturing and venting out cooking fumes. Make any necessary adjustments to the fan speed or airflow direction to optimize performance.

Optimizing Airflow in Your Kitchen

To maximize the effectiveness of your range hood in a vaulted ceilings kitchen, consider the following tips:

  1. Use the Correct Fan Speed: Adjust the fan speed of your range hood based on the type and intensity of cooking you’re doing. Use higher speeds for frying or grilling and lower speeds for simmering or light cooking.
  2. Clean and Maintain Regularly: Keep your range hood and filters clean to ensure optimal airflow and ventilation efficiency. Remove grease buildup and debris regularly to prevent clogs and maintain peak performance.
  3. Consider Additional Ventilation Options: In addition to a range hood, consider installing additional ventilation solutions such as ceiling fans or skylights to further improve airflow and circulation in your kitchen space.
  4. Consult a Professional: If you’re unsure about installing or optimizing your range hood in a vaulted ceiling, consult with a professional contractor or kitchen designer for expert advice and assistance.

Read too: Striped Schoolhouse Ceiling Light Fixtures: Unveiling the Timeless Charm

Conclusion

Installing a range hood in a vaulted ceiling can significantly enhance the functionality and aesthetics of your kitchen while improving indoor air quality and ventilation. By following the steps outlined in this guide and implementing effective airflow optimization strategies, you can create a comfortable and enjoyable cooking environment that meets your needs and enhances your culinary experience.

Pacific Ceiling Fan Hawaii: Enhancing Tropical Living

Transform your living space into a tropical paradise with Pacific Ceiling Fan Hawaii. Discover how these stylish and efficient fans can enhance airflow and ambiance in your home.

Pacific Ceiling Fans Hawaii

Introduction

Pacific Ceiling Fans Hawaii offers a unique blend of style and functionality, perfect for homes in the tropical paradise of Hawaii. With their sleek designs and powerful performance, these fans are designed to complement the natural beauty of the islands while keeping your living spaces cool and comfortable. In this guide, we’ll explore the features, benefits, and installation options of Pacific Ceiling Fans Hawaii, helping you create the ultimate island retreat in your home.

Exploring Pacific Ceiling Fans Hawaii

Pacific Ceiling Fans Hawaii offers a wide range of ceiling fan options to suit any home décor style and personal preference. From traditional to contemporary designs, these fans are crafted with quality materials and advanced technology to provide optimal performance and durability. Let’s take a closer look at what sets Pacific Ceiling Fans Hawaii apart:

  1. Tropical-Inspired Designs: Pacific Ceiling Fans Hawaii features designs inspired by the natural beauty of the islands, incorporating elements such as palm leaf blades, bamboo accents, and tropical motifs to create a sense of island living in your home.
  2. High-Performance Motors: Equipped with powerful yet energy-efficient motors, these fans deliver superior airflow and cooling performance, ensuring maximum comfort even in the warmest Hawaiian climates.
  3. Quiet Operation: Designed for quiet operation, Pacific Ceiling Fans Hawaii provide you with the opportunity to enjoy the gentle breeze and soothing ambiance without the distraction of noisy fan motors.
  4. Customization Options: With a variety of finishes, blade styles, and lighting options available, you can customize your Pacific Ceiling Fan Hawaii to perfectly complement your home’s interior design and lighting needs.

Benefits of Pacific Ceiling Fans Hawaii

  1. Enhanced Air Circulation: Pacific Ceiling Fans Hawaii specifically designs their fans to optimize airflow, aiding in circulating cool air throughout your living spaces and maintaining a comfortable temperature year-round.
  2. Energy Efficiency: By reducing the need for air conditioning and promoting natural ventilation, Pacific Ceiling Fans Hawaii can help lower your energy consumption and utility bills, making them an environmentally friendly and cost-effective cooling solution.
  3. Aesthetic Appeal: Beyond their functional benefits, Pacific Ceiling Fans Hawaii add a touch of tropical charm and sophistication to any room, serving as both a practical appliance and a stylish décor accent.
  4. Year-Round Comfort: Whether you’re lounging in the living room, dining alfresco on the lanai, or unwinding in the bedroom, Pacific Ceiling Fans Hawaii provide consistent and reliable cooling comfort for every space in your home.

Installation Options for Pacific Ceiling Fans Hawaii

Installing a Pacific Ceiling Fan Hawaii is a straightforward process, but it’s essential to follow the manufacturer’s instructions carefully to ensure safe and proper installation. Here are some key considerations:

  1. Ceiling Height: Determine the appropriate mounting height for your ceiling fan, ensuring that it is installed at least 7 feet above the floor for optimal performance and safety.
  2. Location: Choose the ideal location for your Pacific Ceiling Fan Hawaii, taking into account factors such as room size, ceiling slope, and existing lighting fixtures.
  3. Electrical Wiring: Make sure you have the necessary electrical wiring and support structures in place to support the weight and operation of the ceiling fan. If you’re unsure, consult a licensed electrician for assistance.
  4. Accessories: Consider adding accessories such as remote controls, wall-mounted switches, or light kits to enhance the functionality and convenience of your Pacific Ceiling Fan Hawaii.

Conclusion

Pacific Ceiling Fan Hawaii offers a perfect blend of style, performance, and functionality, making them an ideal choice for homeowners looking to enhance their living spaces in the tropical paradise of Hawaii. With their tropical-inspired designs, quiet operation, and energy-efficient performance, these fans provide both aesthetic appeal and practical cooling comfort for every room in your home. Invest in Pacific Ceiling Fans Hawaii and transform your home into an island oasis where you can relax, unwind, and enjoy the beauty of Hawaiian living.

Read too: Striped Schoolhouse Ceiling Light Fixtures: Unveiling the Timeless Charm

Minka Aire Sloped Ceilings Adapter: A Practical Solution for Angled Ceilings

Upgrade your ceiling fan installation with the versatile Minka Aire Sloped Ceilings Adapter. Learn how this innovative accessory can make your fan installation on angled ceilings a breeze, ensuring both functionality and aesthetics.

Minka Aire Sloped Ceiling Adapter

Introduction

The Minka Aire Sloped Ceiling Adapter is a game-changer for homeowners looking to install ceiling fans on sloped or angled ceilings. This practical accessory allows for easy mounting of ceiling fans on surfaces with inclines, ensuring optimal airflow and stability. In this comprehensive guide, we’ll explore the features, benefits, and installation process of the Minka Aire Sloped Ceiling Adapter, helping you achieve the perfect fan setup for your home.

Understanding the Minka Aire Sloped Ceiling Adapter

The Minka Aire Sloped Ceiling Adapter is designed to accommodate ceiling fans on slopes ranging from 0 to 45 degrees, making it suitable for a wide range of angled ceiling configurations. This adapter ensures that your ceiling fan is securely mounted, providing reliable performance and peace of mind.

Features of the Minka Aire Sloped Ceiling Adapter

  1. Durable Construction: Crafting the Minka Aire Sloped Ceiling Adapter from high-quality materials ensures it withstands the rigors of everyday use, delivering long-lasting durability and reliability.
  2. Adjustable Design: The adapter features an adjustable design that allows for precise alignment and positioning of the ceiling fan, ensuring optimal airflow and performance.
  3. Easy Installation: Thanks to its user-friendly design and comprehensive instructions, homeowners with basic DIY skills can effortlessly install the Minka Aire Sloped Ceiling Adapter, saving time and effort.
  4. Versatile Compatibility: Compatible with a wide range of Minka Aire ceiling fans, this adapter seamlessly integrates with your existing fan setup, providing a cohesive and polished look.

Benefits of Using the Minka Aire Sloped Ceiling Adapter

  1. Optimal Air Circulation: By allowing for proper fan installation on angled ceilings, the Minka Aire Sloped Ceiling Adapter ensures optimal air circulation and distribution throughout the room, keeping your space comfortable and well-ventilated.
  2. Enhanced Aesthetics: With its sleek and discreet design, the adapter seamlessly blends into the ceiling, creating a polished and cohesive appearance that complements any décor style.
  3. Improved Functionality: By securely mounting the ceiling fan on sloped surfaces, the adapter prevents wobbling or instability, ensuring smooth and efficient operation even at higher speeds.
  4. Expanded Installation Options: The Minka Aire Sloped Ceiling Adapter opens up new possibilities for fan placement and installation, allowing you to maximize the use of your space and create the perfect cooling solution for any room.

Read too: Striped Schoolhouse Ceiling Light Fixtures: Unveiling the Timeless Charm

Installation Process of the Minka Aire Sloped Ceiling Adapter

  1. Prepare the Ceiling: Ensure that the ceiling surface is clean, dry, and free from any obstructions or obstacles that may interfere with the installation process.
  2. Attach the Adapter: Securely attach the Minka Aire Sloped Ceiling Adapter to the mounting bracket of the ceiling fan, following the manufacturer’s instructions and guidelines.
  3. Adjust the Angle: Use the adjustable components of the adapter to align the fan properly with the slope of the ceiling, ensuring a secure and stable installation.
  4. Test for Stability: After installing the adapter, conduct a test to evaluate the stability and functionality of the ceiling fan, ensuring it operates smoothly and efficiently on the angled ceiling.

Conclusion

The Minka Aire Sloped Ceilings Adapter is a must-have accessory for homeowners looking to install ceiling fans on angled ceilings. With its durable construction, adjustable design, and easy installation process, this adapter provides a practical solution for maximizing airflow and comfort in any room. Invest in the Minka Aire Sloped Ceiling Adapter and enjoy the perfect fan setup for your home.

Hunter Crescent Falls Ceiling Fan: A Stylish and Functional Cooling Solution

Upgrade your home’s ambiance and comfort with the Hunter Crescent Falls Ceiling Fan. Discover why this stylish and efficient cooling fixture is a must-have addition to any modern living space.

Hunter Crescent Falls Ceiling Fan

Introduction

The Hunter Crescent Falls Ceiling Fan combines innovative design, superior performance, and exceptional quality to provide homeowners with a stylish and functional cooling solution. With its sleek aesthetic and advanced features, this ceiling fan offers more than just air circulation—it enhances the overall ambiance of any room. In this comprehensive guide, we’ll delve into the features, benefits, and installation considerations of the Hunter Crescent Falls Ceiling Fan, helping you make an informed decision for your home.

Exploring the Hunter Crescent Falls Ceiling Fan

The Hunter Crescent Falls Ceiling Fan is more than just a cooling fixture—it’s a statement piece that elevates the look and feel of any room. Designed with precision engineering and attention to detail, this fan boasts a range of features that set it apart from the competition:

  1. Modern Design: The Crescent Falls Ceiling Fan features a contemporary design with clean lines, brushed nickel finishes, and reversible wood-finished blades, making it a versatile addition to any interior décor scheme.
  2. Quiet Operation: Equipped with Hunter’s exclusive WhisperWind motor technology, this fan operates quietly and efficiently, ensuring a peaceful and comfortable environment without disruptive noise.
  3. Integrated Light Kit: The Crescent Falls Ceiling Fan comes with an integrated light kit, allowing for customizable illumination options to suit your lighting preferences and needs.
  4. Remote Control Accessibility: With a handheld remote control included, you can easily adjust the fan speed, direction, and lighting settings from anywhere in the room for added convenience and comfort.

Benefits of the Hunter Crescent Falls Ceiling Fan

  1. Energy Efficiency: With its Energy Star certification and efficient motor design, the Crescent Falls Ceiling Fan helps reduce energy consumption and lower utility bills while keeping your home cool and comfortable.
  2. Year-Round Comfort: In addition to cooling in the summer months, this fan can be reversed to circulate warm air during the winter, providing year-round comfort and energy savings.
  3. Improved Air Circulation: The Crescent Falls Ceiling Fan promotes better air circulation throughout the room, helping to regulate temperature, reduce humidity, and eliminate stagnant air.
  4. Enhanced Décor: With its sleek and stylish design, this fan serves as a focal point in any room, adding visual interest and sophistication to your home’s interior.

Read too: Striped Schoolhouse Ceiling Light Fixtures: Unveiling the Timeless Charm

Installation Considerations

Installing the Hunter Crescent Falls Ceiling Fan is a straightforward process, but there are a few key considerations to keep in mind:

  1. Ceiling Height: Ensure that your ceiling is tall enough to accommodate the fan and provide sufficient clearance for safe operation.
  2. Sturdy Mounting Surface: Install the fan on a sturdy mounting surface, such as a reinforced ceiling joist or support bracket, to ensure stability and safety.
  3. Electrical Wiring: Follow the manufacturer’s instructions and local building codes when wiring the fan to ensure proper installation and compliance with safety standards.
  4. Professional Assistance: If you’re unsure about installing the fan yourself, it’s always best to seek professional assistance from a licensed electrician or experienced installer.

Conclusion

The Hunter Crescent Falls Ceiling Fans is more than just a cooling fixture—it’s a stylish and functional addition to any home. With its modern design, quiet operation, energy-efficient performance, and convenient features, this fan enhances both comfort and aesthetics in any room. Invest in the Hunter Crescent Falls Ceiling Fans to elevate your home’s ambiance and enjoy year-round comfort with ease.

Hanging Lights From Drop Ceiling: Creative Ideas

Discover innovative ways to brighten up your space with Hanging Lights From Drop Ceiling. Explore design tips, installation techniques, and creative inspiration for incorporating suspended lighting into your home or commercial environment!

Hanging Lights From Drop Ceiling

Introduction

Hanging lights from a drop ceiling can add a touch of elegance, warmth, and ambiance to any room. Whether you’re looking to illuminate a kitchen island, dining area, or office space, suspended lighting fixtures offer versatility and style. In this guide, we’ll explore creative ideas for hanging lights from drop ceilings, providing you with inspiration and practical tips for transforming your space into a well-lit and inviting environment.

Understanding Hanging Lights From Drop Ceiling

Hanging lights from a drop ceiling involves suspending lighting fixtures from the ceiling grid, creating a striking visual effect and providing ample illumination to the space below. These fixtures come in a variety of styles, shapes, and sizes, allowing for endless design possibilities to suit any aesthetic preference or functional requirement.

Hanging Lights From Drop Ceiling: Design Ideas

  1. Pendant Lights: Pendant lights are versatile fixtures that can be hung individually or in clusters to create a focal point in any room. Choose from a wide range of shapes, materials, and finishes to complement your decor style.
  2. Chandeliers: Chandeliers add a touch of sophistication and glamour to any space, making them ideal for dining rooms, entryways, or living areas. Opt for a statement chandelier with cascading crystals or a sleek, modern design for a contemporary look.
  3. Track Lighting: Track lighting systems allow for adjustable and directional lighting, making them perfect for highlighting artwork, architectural features, or task areas in kitchens and offices.
  4. Linear Suspended Lights: Linear suspended lights provide even illumination across a space, making them suitable for long countertops, conference tables, or office workstations.

Installation Techniques for Hanging Lights From Drop Ceiling

  1. Anchor Points: Identify suitable anchor points in the ceiling grid to support the weight of the lighting fixtures. Use sturdy hooks, cables, or mounting brackets to secure the fixtures in place.
  2. Electrical Wiring: Ensure that the electrical wiring is safely routed through the ceiling grid and connected to a suitable power source. Consult a licensed electrician for professional installation.
  3. Adjustable Heights: Consider installing adjustable suspension systems to customize the height of the lighting fixtures according to your preferences and the specific requirements of the space.
  4. Safety Measures: Follow manufacturer instructions and safety guidelines when installing hanging lights from drop ceilings to prevent accidents or damage to the fixtures and the ceiling grid.

Read too: Striped Schoolhouse Ceiling Light Fixtures: Unveiling the Timeless Charm

Creative Inspiration for Hanging Lights From Drop Ceiling

  1. Industrial Chic: Embrace an industrial aesthetic with exposed bulbs, metal shades, and raw materials for a contemporary look.
  2. Bohemian Vibes: Create a cozy and eclectic atmosphere with Moroccan-inspired lanterns, colorful glass pendants, and woven rattan shades.
  3. Minimalist Elegance: Opt for sleek and streamlined designs in neutral tones for a minimalist aesthetic that complements modern interiors.
  4. Vintage Glamour: Add a touch of vintage charm with ornate brass chandeliers, crystal accents, and frosted glass shades reminiscent of old-world glamour.

Conclusion

Hanging light from a drop ceiling offers a versatile and stylish lighting solution for any space. By exploring design ideas, installation techniques, and creative inspiration, you can enhance the ambiance and functionality of your home or commercial environment with suspended lighting fixtures that illuminate and elevate your surroundings.

Floor To Ceiling Office Partitions Solutions: Enhancing Workplace Privacy and Productivity

Elevate your office space with Floor To Ceiling Office Partitions, providing stylish privacy solutions for modern workplaces. Explore the benefits, design options, and installation considerations of these versatile partitions!

Floor To Ceiling Office Partitions

Introduction

In today’s open office environments, creating functional and private workspaces is essential for maintaining productivity and employee satisfaction. Floor to ceiling office partition offer a versatile solution for dividing space, providing privacy, and enhancing the overall aesthetic appeal of the workplace. In this comprehensive guide, we’ll explore the benefits, design options, and installation considerations of floor to ceiling office partitions, empowering you to optimize your office layout for maximum efficiency and comfort.

Understanding Floor To Ceiling Office Partitions

Floor to ceiling office partitions, also known as full-height partitions, are modular panels that extend from the floor to the ceiling, dividing office space into separate areas. These partitions come in various materials, styles, and configurations, allowing for customizable solutions to suit the specific needs and aesthetic preferences of any workplace.

Benefits of Floor To Ceiling Office Partitions

  1. Privacy Enhancement: By creating defined workspaces, floor to ceiling office partition provide employees with privacy and concentration, reducing distractions and improving focus.
  2. Noise Reduction: Full-height partitions help absorb sound and minimize noise pollution, fostering a quieter and more conducive work environment.
  3. Flexibility and Adaptability: Modular design allows for easy reconfiguration and adaptation to changing office layouts and requirements, ensuring long-term versatility.
  4. Aesthetic Enhancement: Floor to ceiling office partition come in a variety of finishes, textures, and colors, allowing for customization to match the overall design scheme and branding of the office space.

Design Options for Floor To Ceiling Office Partitions

  1. Glass Partitions: Transparent or frosted glass partitions offer a sleek and modern aesthetic while allowing natural light to flow freely throughout the office space.
  2. Fabric Panels: Fabric-covered partitions provide acoustic insulation and visual warmth, enhancing comfort and aesthetics in the workplace.
  3. Solid Panels: Solid panels offer maximum privacy and soundproofing, ideal for confidential meetings or focused work tasks.
  4. Combination Solutions: Mix and match different materials and finishes to create custom partition designs that meet the functional and aesthetic needs of your office environment.

Installation Considerations

When installing floor to ceiling office partition, consider the following factors:

  1. Structural Integrity: Ensure that the building’s structure can support the weight of the partitions, especially if they are made of heavy materials such as glass or solid panels.
  2. Electrical and HVAC Integration: Plan for integration with electrical outlets, lighting fixtures, and HVAC systems to ensure seamless functionality and accessibility.
  3. Code Compliance: Familiarize yourself with local building codes and regulations regarding partition installation, including fire safety and accessibility requirements.
  4. Professional Installation: Hire experienced contractors or installation specialists to ensure proper alignment, stability, and safety of the partitions.

Conclusion

Floor to ceiling office partition offer a versatile and customizable solution for enhancing privacy, productivity, and aesthetics in the workplace. By understanding the benefits, design options, and installation considerations of these partitions, you can create a functional and inviting office environment that meets the needs of your employees and promotes success.

Read too: Striped Schoolhouse Ceiling Light Fixtures: Unveiling the Timeless Charm

Floor To Ceiling Sliding Door: A Modern Design Solution

Discover the allure of Floor To Ceiling Sliding Door and how they can transform your living space into a contemporary masterpiece. Explore design ideas, benefits, and installation tips for incorporating these stylish doors into your home!

Floor To Ceiling Doors Sliding Doors

Introduction

Floor to ceiling sliding doors have become a popular choice for homeowners and interior designers looking to create a modern and seamless living environment. These sleek and stylish doors offer a range of benefits, from maximizing natural light to optimizing space efficiency. In this guide, we’ll delve into the world of floor to ceiling sliding doors, exploring their design versatility, functional advantages, and installation considerations.

Exploring Floor To Ceiling Doors Sliding Doors

Floor to ceiling sliding doors, also known as full-height sliding doors or tall sliding doors, are characterized by their expansive height, reaching from the floor to the ceiling of a room. They typically feature large glass panels that slide horizontally along tracks, providing unobstructed views and easy access to outdoor spaces.

Benefits of Floor To Ceiling Sliding Doors

  1. Maximized Natural Light: Floor to ceiling sliding doors allow ample natural light to flood into interior spaces, creating a bright and airy ambiance.
  2. Seamless Indoor-Outdoor Connection: By seamlessly integrating indoor and outdoor living spaces, these doors enhance the flow and connectivity of a home.
  3. Space Optimization: Unlike traditional hinged doors, sliding doors do not require swing clearance, making them ideal for rooms with limited space.
  4. Modern Aesthetic: The sleek and minimalist design of floor to ceiling sliding doors adds a contemporary touch to any interior, enhancing the overall aesthetic appeal of a space.

Design Ideas for Floor To Ceiling Sliding Doors

  1. Room Dividers: Use floor to ceiling sliding doors to partition open-concept spaces, such as living rooms and dining areas, while maintaining a sense of openness and flexibility.
  2. Outdoor Access: Install sliding doors in bedrooms or living areas to provide direct access to outdoor patios, decks, or gardens, blurring the boundaries between indoor and outdoor living.
  3. Closet Doors: Opt for floor to ceiling sliding doors as closet doors to maximize storage space and streamline the visual appeal of a room.
  4. Office Partitions: Create private workspaces or meeting rooms within open office environments using sliding doors, allowing for greater privacy without sacrificing natural light.

Installation Considerations

When installing floor to ceiling sliding doors, consider the following factors:

  1. Structural Support: Ensure that your walls can support the weight of the doors, as floor to ceiling sliding doors require robust structural support.
  2. Track System: Choose a high-quality track system that can support the weight of the doors and provide smooth and effortless operation.
  3. Weatherproofing: If installing sliding doors in exterior applications, ensure proper weatherproofing to prevent air and water infiltration.
  4. Professional Installation: For optimal results, hire a professional contractor experienced in installing floor to ceiling sliding doors to ensure proper alignment, operation, and weather sealing.

Read too: Striped Schoolhouse Ceiling Light Fixtures: Unveiling the Timeless Charm

Conclusion

Floor to ceiling sliding door offer a perfect blend of style, functionality, and versatility, making them an ideal choice for modern homes and commercial spaces. Whether used as room dividers, patio doors, closet doors, or office partitions, these sleek doors can elevate the aesthetic appeal and functionality of any interior environment.

DC Ceiling Fan vs AC Ceiling Fan – Which One Should You Choose?

Choosing between a DC ceiling fan vs an AC ceiling fan can be a daunting task for homeowners. Dive into the comparison of these two popular types of ceiling fans to help you make an informed decision for your home.

Dc Ceiling Fan Vs Ac Ceiling Fan

Introduction

When it comes to selecting a ceiling fan for your home, there are two main types to consider: DC ceiling fans and AC ceiling fans. Each type has its own set of advantages and considerations. In this article, we’ll explore the differences between DC and AC ceiling fans to help you determine which one is the right choice for your needs.

Understanding DC Ceiling Fan

DC ceiling fans, or direct current ceiling fans, are known for their energy efficiency and quiet operation. Here are some key features of DC ceiling fans:

  • Energy Efficiency: DC ceiling fans consume less energy compared to AC ceiling fans, making them more cost-effective in the long run. They are ideal for homeowners looking to reduce their energy bills and minimize their environmental footprint.
  • Variable Speed Control: DC ceiling fans typically come with variable speed settings, allowing you to adjust the fan speed to your desired level of comfort. This feature provides greater flexibility and customization compared to traditional AC fans.
  • Quiet Operation: Due to their brushless motor design, DC ceiling fans operate quietly, making them suitable for bedrooms, living rooms, and other quiet spaces where noise is a concern.
  • Remote Control Options: Many DC ceiling fans come with remote control options, allowing you to conveniently adjust the fan speed and direction from anywhere in the room.

Understanding AC Ceiling Fan

AC ceiling fans, or alternating current ceiling fans, are the traditional type of ceiling fans found in most homes. Here are some key features of AC ceiling fans:

  • Affordability: AC ceiling fans are typically more affordable upfront compared to DC ceiling fans, making them a popular choice for budget-conscious homeowners.
  • Simple Installation: AC ceiling fans are easy to install and compatible with standard electrical wiring systems found in most homes. They are available in a wide range of styles, sizes, and designs to suit any decor.
  • Reliability: AC ceiling fans have been around for decades and are known for their reliability and durability. With proper maintenance, an AC ceiling fan can last for many years without any issues.
  • Limited Speed Options: Unlike DC ceiling fans, AC ceiling fans usually have limited speed options, typically controlled by a pull chain or wall switch.

Comparing DC Ceiling Fans vs AC Ceiling Fans

Now, let’s compare DC ceiling fans and AC ceiling fans across various factors:

  • Energy Efficiency: DC ceiling fans are more energy-efficient than AC ceiling fans, consuming up to 70% less energy. This can result in significant cost savings on your electricity bills over time.
  • Cost: While DC ceiling fans may have a higher upfront cost compared to AC ceiling fans, their energy efficiency can offset this initial investment in the long term.
  • Noise Level: DC ceiling fans operate more quietly than AC ceiling fans, making them a better choice for bedrooms, nurseries, and other quiet spaces.
  • Control Options: DC ceiling fans typically offer more control options, including remote control, wall control, and smartphone integration, compared to AC ceiling fans.
  • Installation: Both DC and AC ceiling fans are relatively easy to install, but AC ceiling fans may be more familiar to electricians and homeowners due to their widespread use.

Read too: Striped Schoolhouse Ceiling Light Fixtures: Unveiling the Timeless Charm

Conclusion

In conclusion, both DC ceiling fan vs AC ceiling fan have their own set of advantages and considerations. When choosing between the two, consider factors such as energy efficiency, cost, noise level, control options, and installation requirements. Ultimately, the right choice depends on your specific needs, preferences, and budget.