Laundry is a routine task that can often be cumbersome, especially when space is limited. A ceiling mounted laundry drying rack offers an innovative solution, maximizing your home’s efficiency while saving valuable floor space. This article will explore the benefits of ceiling mounted laundry drying racks, factors to consider when choosing one, and tips on integrating it into your home.
The Advantages of a Ceiling Mounted Laundry Drying Rack
Ceiling mounted laundry drying racks provide numerous benefits, making them an excellent addition to any home. Here’s why they are increasingly popular:
Space Saving
- Maximized Floor Space: By utilizing ceiling space, these racks free up valuable floor space, making your laundry room or living area less cluttered.
- Ideal for Small Homes: Perfect for apartments or houses with limited space, ceiling mounted drying racks ensure you have ample room for other activities.
Efficiency and Convenience
- Air Circulation: Elevated drying racks benefit from better air circulation, speeding up the drying process compared to traditional floor racks.
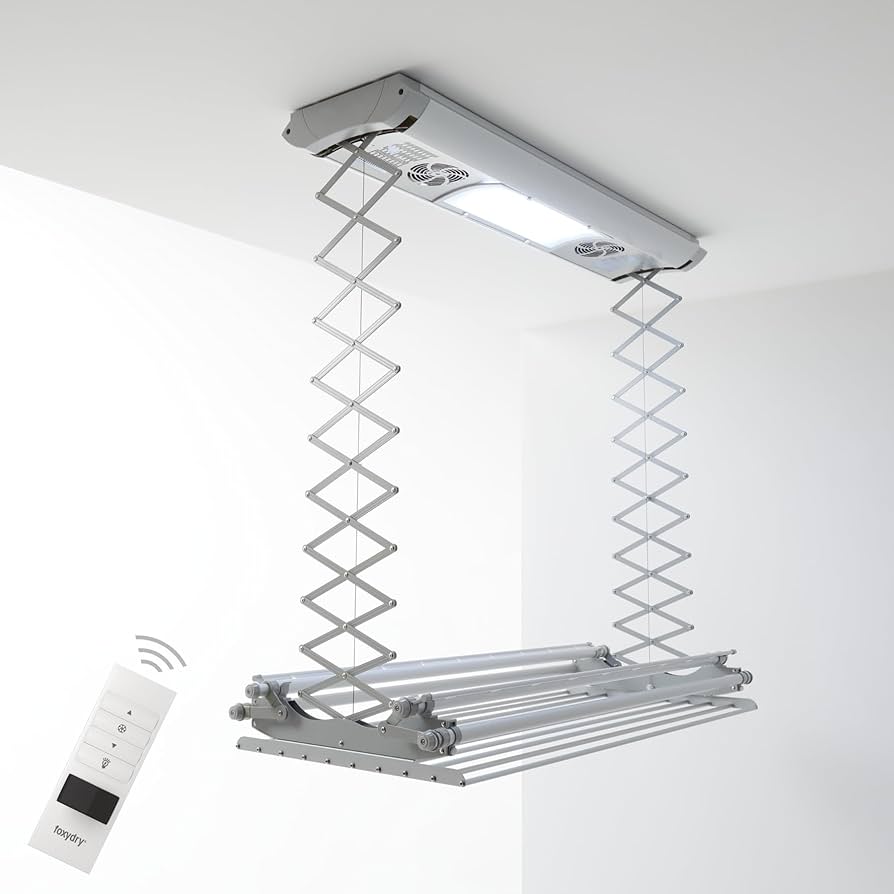
- Accessibility: Many models come with pulley systems, making it easy to raise and lower the rack to your desired height for loading and unloading laundry.
Energy Saving
- Eco-Friendly: Drying clothes on a rack reduces reliance on electric dryers, saving energy and lowering utility bills.
- Gentle on Clothes: Air drying is gentler on fabrics, helping extend the life of your clothes by reducing wear and tear caused by machine drying.
Versatility
- Multiple Uses: Ceiling mounted drying racks are not just for clothes. They can be used to dry towels, linens, and even delicate items that require air drying.
- Indoor and Outdoor Use: These racks can be installed in various locations, including laundry rooms, bathrooms, or even outside on covered patios.
Choosing the Right Ceiling Mounted Laundry Drying Rack
Selecting the right ceiling mounted laundry drying rack involves considering several factors to ensure it meets your needs and fits your space. Here are some key considerations:
Size and Capacity
- Load Capacity: Determine the maximum weight the rack can hold. Ensure it can accommodate your typical laundry load without sagging or breaking.
- Dimensions: Measure the available ceiling space to choose a rack that fits comfortably without obstructing movement or other fixtures.
Material and Durability
- Material Quality: Look for racks made from sturdy materials like stainless steel, aluminum, or high-quality wood. These materials are durable and resistant to rust and moisture.
- Build Quality: Ensure the rack’s construction is robust, with secure joints and a reliable pulley system or other mechanisms for raising and lowering the rack.
Installation Requirements
- Ease of Installation: Some models come with detailed installation instructions and all necessary hardware, making it easy for DIY installation. Others might require professional installation, especially if ceiling reinforcement is needed.
- Ceiling Type: Check if your ceiling type can support the rack’s installation. Some ceilings may require additional reinforcement to hold the rack securely.
Design and Aesthetics
- Style: Choose a design that complements your home decor. Ceiling mounted drying racks come in various styles, from modern and minimalist to classic and rustic.
- Finish: Consider the finish of the rack, ensuring it matches or complements other fixtures in the room.
Integrating a Ceiling Mounted Laundry Drying Rack into Your Home
Integrating a ceiling mounted laundry drying rack into your home involves strategic planning and thoughtful placement to maximize its benefits. Here are some tips:
Laundry Room
- Central Location: Install the drying rack in a central location within your laundry room for easy access. Ensure it’s close to the washing machine for convenience.
- Height Adjustment: Use a pulley system or adjustable mechanism to easily raise and lower the rack, making it simple to load and unload laundry.
Bathroom
- Over the Bathtub: Install the drying rack over the bathtub to make use of otherwise unused space. This is particularly useful for air-drying delicates and hand-washed items.
- Moisture Consideration: Ensure the rack is made from moisture-resistant materials to withstand the humid bathroom environment.
Outdoor Spaces
- Covered Patios: Install the drying rack on a covered patio to take advantage of outdoor air circulation while protecting your laundry from direct sunlight and rain.
- Weatherproof Materials: Choose racks made from weather-resistant materials like stainless steel or treated wood for outdoor use.
Multi-Functional Areas
- Utility Rooms: If you have a multi-functional utility room, consider installing the drying rack in a corner or above a sink to maximize space efficiency.
- Hideaway Options: Some ceiling mounted racks can be retracted or folded away when not in use, making them ideal for multi-purpose rooms.
Maintenance Tips for Ceiling Mounted Laundry Drying Racks
To ensure the longevity and functionality of your ceiling mounted laundry drying rack, regular maintenance is essential. Here are some tips:
Regular Cleaning
- Dust and Dirt Removal: Regularly wipe down the rack with a damp cloth to remove dust and dirt. For stainless steel and aluminum racks, use a non-abrasive cleaner to maintain the finish.
- Mildew Prevention: In humid environments, ensure the rack is dry after use to prevent mildew. Consider using a dehumidifier in areas prone to moisture.
Inspecting Mechanisms
- Pulley System Check: Periodically inspect the pulley system for any signs of wear or damage. Lubricate moving parts as needed to ensure smooth operation.
- Structural Integrity: Check for loose screws or weakened joints. Tighten any loose components and replace worn-out parts to maintain stability.
Material Care
- Wood Maintenance: For wooden racks, apply a protective sealant or polish to maintain the wood’s appearance and durability.
- Metal Care: For metal racks, ensure they are free from rust. If rust appears, gently sand it off and apply a protective coating.
Benefits of Ceiling Mounted Laundry Drying Racks
Ceiling mounted laundry drying racks offer a perfect blend of functionality, space-saving, and energy efficiency. Here’s a detailed look at their key benefits:
Space Efficiency
- Utilizing Vertical Space: By utilizing vertical space, ceiling mounted racks free up floor space, making them ideal for small homes and apartments.
- Clutter Reduction: These racks help reduce clutter in laundry rooms and other areas, creating a more organized and efficient space.
Eco-Friendly Drying
- Energy Savings: Air drying clothes reduces the reliance on electric dryers, saving energy and reducing utility bills.
- Environmental Impact: Lower energy consumption reduces the overall environmental impact, contributing to a greener home.
Gentle on Fabrics
- Fabric Preservation: Air drying is gentler on fabrics compared to machine drying, helping to extend the lifespan of your clothes.
- Avoiding Heat Damage: Delicate items and fabrics prone to shrinkage benefit from the gentle drying process, avoiding heat damage.
Versatility in Use
- Multi-Purpose: Ceiling mounted drying racks can be used for various items, including clothes, towels, linens, and delicate fabrics.
- Seasonal Flexibility: These racks are useful year-round, providing indoor drying solutions during winter months and rainy seasons.
Read too: Kitchen Lighting For A Vaulted Ceiling: Illuminating Your Space with Style and Functionality
Conclusion
A ceiling mounted laundry drying rack is a practical and efficient solution for modern homes, offering numerous benefits in terms of space-saving, energy efficiency, and gentle fabric care. By choosing the right materials, ensuring proper installation, and integrating the rack into your home thoughtfully, you can enhance your laundry routine and create a more organized and functional living space. Whether you live in a small apartment or a spacious house, a ceiling mounted laundry drying rack can significantly improve your home’s efficiency and convenience.