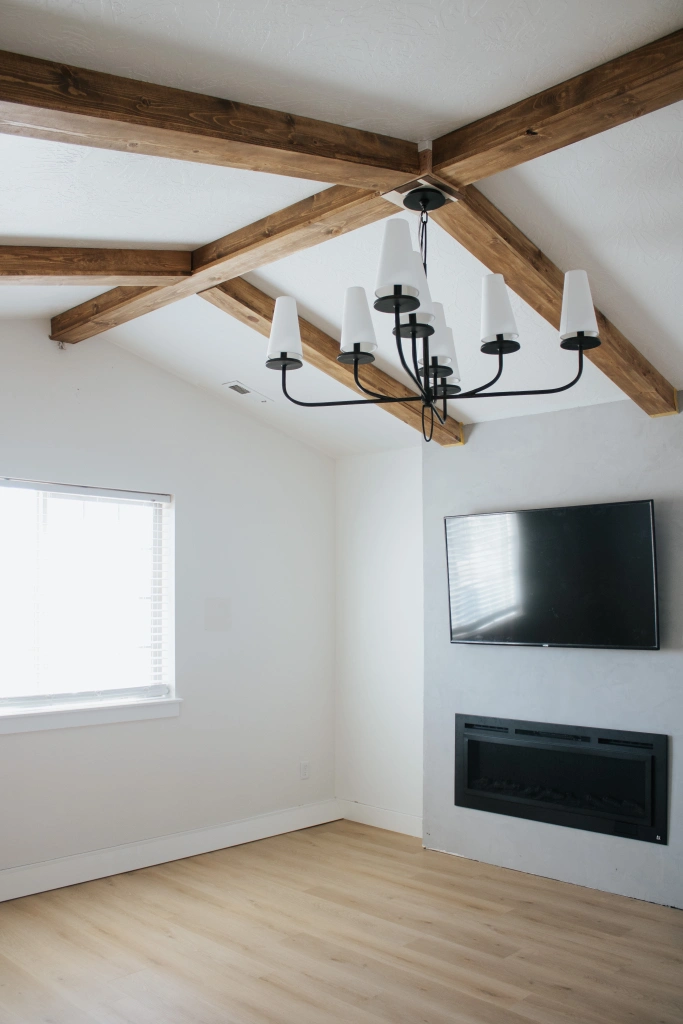
Fanimation Torto Ceiling Fan: Discover the Elegance and Efficiency

Choosing the right ceiling fan for your home is crucial for both functionality and aesthetic appeal. The Fanimation Torto Ceiling Fan stands out in the market due to its unique design and high performance. This article will provide an in-depth look at the features, benefits, and installation process of the Fanimation Torto Ceiling Fan, helping you decide if it’s the perfect addition to your home.

Fanimation Torto Ceiling Fan

Why Choose the Fanimation Torto Ceiling Fan?

The Fanimation Torto Ceiling Fan is a popular choice for many homeowners due to its blend of style, efficiency, and innovative design. Here are some reasons why this fan is worth considering:

  1. Unique Design: The Torto fan features a distinctive twisted blade design that not only looks modern and sophisticated but also enhances air circulation.
  2. Energy Efficiency: Equipped with an efficient motor, the Fanimation Torto helps reduce energy consumption, making it an eco-friendly option for your home.
  3. Versatile Functionality: With various speed settings and a reverse function, this ceiling fan is versatile enough to provide comfort in both summer and winter.
  4. Quiet Operation: Designed for quiet performance, the Fanimation Torto ensures that you enjoy a peaceful environment without the constant hum of a traditional ceiling fan.

Features of the Fanimation Torto Ceiling Fan

The Fanimation Torto Ceiling Fan is packed with features that make it a standout option. Let’s explore some of its key characteristics:

1. Stylish Aesthetic

The Torto fan’s design is one of its most striking features. The fan blades are curved and twisted, creating a contemporary look that complements modern home decor. Available in multiple finishes, including black, white, and brushed nickel, you can choose a style that best fits your interior design.

2. Efficient DC Motor

At the heart of the Fanimation Torto is its powerful DC motor, which is more efficient than traditional AC motors. This motor consumes less electricity, reducing your energy bills while providing powerful air circulation.

3. Multi-Speed Control

The fan offers multiple speed settings, allowing you to customize the airflow according to your needs. Whether you want a gentle breeze or a strong gust, the Fanimation Torto can deliver.

4. Reversible Motor

The reversible motor is another practical feature. In summer, the fan blades rotate counterclockwise to create a cooling effect. In winter, you can reverse the direction to circulate warm air trapped near the ceiling, enhancing your home’s heating efficiency.

5. Integrated Light Kit

Some models of the Fanimation Torto come with an integrated light kit, providing both lighting and cooling solutions in one elegant fixture. The light kits are often LED, adding to the fan’s energy efficiency.

6. Remote Control

For added convenience, the Fanimation Torto often includes a remote control, allowing you to adjust the fan speed and light settings from anywhere in the room.

Installing the Fanimation Torto Ceiling Fan

Installing the Fanimation Torto Ceiling Fan is a straightforward process, but it’s important to follow the manufacturer’s instructions carefully to ensure proper setup and safety. Here’s a step-by-step guide:

1. Gather Your Tools

Before you begin, make sure you have all the necessary tools, including a screwdriver, wire strippers, a ladder, and the fan’s instruction manual.

2. Turn Off the Power

For safety, turn off the power to the circuit where you will be installing the fan. Use a voltage tester to ensure that there is no electrical current.

3. Prepare the Ceiling

If you are replacing an existing light fixture with the fan, remove the old fixture and check the ceiling box to ensure it can support the weight of the new fan. If not, you may need to install a fan-rated ceiling box.

4. Assemble the Fan

Follow the instructions to assemble the fan components. This typically involves attaching the blades to the motor housing and connecting any light kit components.

5. Mount the Fan

Secure the mounting bracket to the ceiling box, then lift the fan into place and secure it to the bracket. Make sure all screws and bolts are tightened properly.

6. Connect the Wiring

Carefully connect the fan’s wiring to the house wiring according to the instruction manual. Typically, this involves matching wire colors: black to black, white to white, and green or bare copper to the ground wire.

7. Attach the Blades and Light Kit

Once the wiring is connected, attach the fan blades and light kit, if included. Ensure everything is securely fastened.

8. Test the Fan

Turn the power back on and test the fan to make sure it operates correctly. Test all speed settings and the light to ensure everything is functioning as expected.

Benefits of the Fanimation Torto Ceiling Fan

Investing in the Fanimation Torto Ceiling Fan brings several benefits to your home:

1. Enhanced Comfort

The fan’s powerful motor and efficient design ensure consistent air circulation, keeping your home comfortable year-round.

2. Energy Savings

With its energy-efficient motor and LED lighting, the Fanimation Torto can help reduce your energy consumption, leading to lower utility bills.

3. Stylish Addition

The unique design of the Torto fan adds a touch of elegance to any room, enhancing your home’s overall aesthetic appeal.

4. Versatile Usage

Whether you need cooling in the summer or improved heating circulation in the winter, the Fanimation Torto is a versatile solution for all seasons.

Maintenance Tips

To ensure the longevity and optimal performance of your Fanimation Torto Ceiling Fan, regular maintenance is key. Here are some tips to keep your fan in top condition:

1. Regular Cleaning

Dust the fan blades regularly to prevent the buildup of dirt and grime. Use a soft cloth or a vacuum with a brush attachment to clean the blades and motor housing.

2. Tighten Screws and Bolts

Periodically check and tighten any screws and bolts that may have loosened over time. This ensures the fan remains stable and operates smoothly.

3. Lubricate Moving Parts

Some ceiling fans may require occasional lubrication of moving parts. Check the manufacturer’s instructions for specific maintenance requirements.

Read too: Striped Schoolhouse Ceiling Light Fixtures: Unveiling the Timeless Charm

4. Inspect the Wiring

Periodically inspect the wiring connections to ensure they remain secure and free of damage. If you notice any frayed wires or loose connections, address them immediately.

Conclusion

The Fanimation Torto Ceiling Fan is a stylish and efficient choice for any home. With its unique design, energy-efficient motor, and versatile functionality, it provides both aesthetic appeal and practical benefits. Whether you’re looking to upgrade your current ceiling fan or install a new one, the Fanimation Torto is an excellent option that combines form and function seamlessly. By following the installation and maintenance tips outlined in this guide, you can enjoy the comfort and elegance of this exceptional ceiling fan for years to come.

DC Outdoor Ceiling Fan for Your Space: The Ultimate Guide to Choosing the Best

When it comes to enhancing the comfort and aesthetic of your outdoor space, a DC outdoor ceiling fan is an excellent investment. These fans are not only energy-efficient but also designed to withstand the elements, making them perfect for porches, patios, and other outdoor areas. In this comprehensive guide, we will explore everything you need to know about DC outdoor ceiling fans, including their benefits, features to look for, and tips for installation and maintenance.

Dc Outdoor Ceiling Fan

Why Choose a DC Outdoor Ceiling Fan?

Before diving into the specifics, it’s essential to understand why a DC outdoor ceiling fan stands out compared to its traditional AC counterparts. Here are some key reasons:

Energy Efficiency

DC motors are known for their energy efficiency. They use up to 70% less power than AC motors, which translates to significant savings on your electricity bill over time. This efficiency is particularly beneficial in outdoor settings where fans may run for extended periods.

Quiet Operation

One of the most appreciated features of DC outdoor ceiling fans is their quiet operation. DC motors produce less noise, making them ideal for creating a peaceful and relaxing outdoor environment. Whether you’re hosting a backyard gathering or enjoying a quiet evening, a DC fan won’t disrupt the ambiance.

Variable Speed Options

DC outdoor ceiling fans typically offer a wider range of speed settings compared to AC fans. This variability allows you to customize the airflow to your exact preferences, from a gentle breeze to a more powerful cooling effect.

Modern Design and Smart Features

Many DC outdoor ceiling fans come with modern designs that complement contemporary outdoor decor. Additionally, some models are equipped with smart features such as remote controls, smartphone compatibility, and even voice control via smart home systems.

Key Features to Look for in a DC Outdoor Ceiling Fan

When shopping for a DC outdoor ceiling fan, several features should be considered to ensure you select the best model for your needs.

Weather Resistance

Outdoor ceiling fans must be able to withstand various weather conditions. Look for fans with ratings such as UL (Underwriters Laboratories) or ETL (Intertek) that certify the fan is safe for outdoor use. These ratings ensure the fan components are protected against moisture, dust, and corrosion.

Blade Material and Design

The blades of outdoor ceiling fans are typically made from materials like ABS plastic, aluminum, or treated wood. Each material has its benefits: ABS plastic is durable and resistant to warping, aluminum is lightweight and rust-resistant, and treated wood adds a natural aesthetic but requires more maintenance.

Airflow Efficiency

Airflow efficiency, measured in cubic feet per minute (CFM), is a critical factor in choosing a fan. Higher CFM ratings indicate better airflow performance. For outdoor spaces, aim for a fan with a CFM of at least 5,000 to ensure adequate cooling.

Lighting Options

Some DC outdoor ceiling fans come with integrated lighting. This feature can be particularly useful for illuminating your outdoor space at night. Look for energy-efficient LED lighting options that provide bright, long-lasting illumination without significantly increasing energy consumption.

Control Options

Consider how you want to control your fan. Many modern DC outdoor ceiling fans offer multiple control options, including remote controls, wall switches, and smartphone apps. Some advanced models are compatible with smart home systems, allowing for voice control via devices like Amazon Alexa or Google Assistant.

Installation and Maintenance Tips

Proper installation and maintenance are crucial for maximizing the performance and lifespan of your DC outdoor ceiling fan.

Installation Tips

  • Location: Ensure the fan is installed in a well-ventilated area with sufficient clearance from walls and other obstructions. This placement helps optimize airflow and prevents the fan from becoming a safety hazard.
  • Mounting: Use a sturdy mounting bracket specifically designed for outdoor use. Ensure the bracket is securely attached to a solid structure, such as a beam or joist, to support the fan’s weight and prevent wobbling.
  • Electrical Connections: If you’re not experienced with electrical work, it’s advisable to hire a licensed electrician to handle the wiring and connections. This step ensures safety and compliance with local building codes.

Maintenance Tips

  • Regular Cleaning: Dust and debris can accumulate on the fan blades and motor housing over time. Regularly clean the fan with a damp cloth to maintain optimal performance and appearance.
  • Blade Balancing: Check the fan blades periodically for balance. Unbalanced blades can cause wobbling and reduce efficiency. Most fans come with a balancing kit to help address this issue.
  • Motor Maintenance: Although DC motors require less maintenance than AC motors, it’s still important to check for any signs of wear or damage. If the fan starts making unusual noises or performance declines, consult the manufacturer’s instructions for troubleshooting or contact a professional.

Top DC Outdoor Ceiling Fan Models on the Market

To help you get started with your search, here are some top-rated DC outdoor ceiling fan models known for their performance, durability, and design.

1. Hunter Fans: WeatherMax Collection

Hunter’s WeatherMax fans are specifically designed for outdoor use, featuring corrosion-resistant finishes and durable materials. They offer a range of styles and sizes to fit various outdoor spaces, and their DC motors ensure quiet, efficient operation.

2. Minka-Aire: Concept II Wet

The Minka-Aire Concept II Wet fan is a sleek and modern option suitable for any outdoor setting. It features three ABS blades, a high CFM rating for powerful airflow, and an integrated LED light. The fan is also wet-rated, making it safe for exposed outdoor areas.

3. Emerson: Loft Outdoor Ceiling Fan

The Emerson Loft fan boasts a unique industrial design with aluminum blades that provide excellent airflow. Its DC motor ensures energy efficiency, and it’s available in multiple finishes to match your outdoor decor.

4. Casablanca: Ainsworth Gallery

The Casablanca Ainsworth Gallery fan combines traditional aesthetics with modern performance. It features a high-efficiency DC motor, weather-resistant blades, and a variety of finish options. This fan is also compatible with smart home systems for added convenience.

Enhancing Your Outdoor Space with a DC Outdoor Ceiling Fan

A DC outdoor ceiling fan is more than just a functional addition to your outdoor space; it can significantly enhance the overall ambiance and comfort of the area. Here are some tips to make the most of your fan:

Create a Cozy Seating Area

Place your outdoor ceiling fan above a seating area to create a cool, comfortable spot for relaxation and socializing. Add comfortable furniture, outdoor rugs, and decorative elements to make the space inviting.

Incorporate Lighting

If your fan includes integrated lighting, use it to illuminate your outdoor area at night. Consider additional lighting options such as string lights, lanterns, or pathway lights to create a warm, welcoming atmosphere.

Add Greenery

Enhance the natural feel of your outdoor space by incorporating plants and greenery. Potted plants, hanging baskets, and vertical gardens can add color and life to your patio or porch.

Utilize Smart Controls

Take advantage of the smart features offered by many DC outdoor ceiling fans. Use remote controls or smartphone apps to adjust the fan speed and lighting easily. Integrate your fan with smart home systems for voice control and automation, adding convenience and modernity to your outdoor living space.

Read too: Striped Schoolhouse Ceiling Light Fixtures: Unveiling the Timeless Charm

Conclusion

Investing in a DC outdoor ceiling fan is a smart decision for anyone looking to improve their outdoor living experience. With their energy efficiency, quiet operation, and modern features, these fans offer numerous benefits that make them superior to traditional AC fans. By considering the key features, following proper installation and maintenance practices, and choosing a fan that fits your style and needs, you can enjoy a comfortable and aesthetically pleasing outdoor space for years to come.

Effective Ways to Cover Insulation in Basement Ceiling for Improved Aesthetics and Efficiency

Cover Insulation in Basement Ceiling. Covering insulation in your basement ceiling not only enhances the visual appeal of the space but also improves energy efficiency and noise control. This guide explores various methods and considerations for effectively covering insulation in your basement ceiling.

Cover Insulation In Basement Ceiling

Why Cover Insulation in Basement Ceiling?

Covering insulation in the basement ceiling offers several benefits:

  • Aesthetic Improvement: Creates a finished look that enhances the overall appearance of the basement.
  • Energy Efficiency: Helps in maintaining consistent indoor temperatures by reducing heat loss.
  • Noise Reduction: Acts as a sound barrier between floors, minimizing sound transmission.

Methods to Cover Insulation In Basement Ceiling

Installing Drywall or Ceiling Panels

Installing drywall or ceiling panels is a popular method for covering basement insulation:

  • Preparation: Ensure insulation is properly installed and any gaps are sealed.
  • Installation: Secure drywall or panels to ceiling joists using appropriate fasteners.
  • Finishing: Apply joint compound, sand, and paint for a polished finish.

Using Drop Ceiling Tiles

Drop ceiling tiles offer a versatile and accessible option for covering basement insulation:

  • Installation: Install a grid system and insert tiles for easy access to utilities and plumbing.
  • Variety: Choose from different tile materials and designs to suit your basement decor.
  • Maintenance: Easily replace damaged tiles or access utilities above the ceiling.

Spray Foam Insulation

Spray foam insulation can be applied directly to basement ceiling insulation:

  • Sealing Gaps: Helps in sealing gaps and cracks, improving energy efficiency.
  • Application: Professional application ensures even coverage and effectiveness.
  • Cost Consideration: Evaluate upfront costs versus long-term energy savings.

Considerations Before Covering Insulation in Basement Ceiling

Before proceeding, consider these factors:

  • Moisture Control: Ensure basement moisture issues are addressed to prevent mold or mildew.
  • Access Needs: Consider access points for utilities or future repairs when choosing a covering method.
  • Fire Safety: Follow local building codes regarding fire-resistant materials if applicable.

Pros and Cons of Different Covering Methods

Each method has its advantages and considerations:

  • Drywall: Provides a seamless finish but may reduce access to utilities.
  • Drop Ceiling: Offers easy access but may not provide the same aesthetic as drywall.
  • Spray Foam: Excellent for sealing but may require professional application.

Maintaining Covered Basement Ceilings

Maintain your covered basement ceiling to ensure longevity and performance:

  • Regular Inspection: Check for signs of moisture or damage.
  • Cleaning: Dust or vacuum as needed to keep the area clean.
  • Repairs: Promptly address any issues such as water leaks or cracks.

Cost Considerations

Costs vary based on materials, labor, and the complexity of the project:

  • Budget Planning: Estimate costs for materials, labor if hiring professionals, and any additional tools or supplies.

Read too: Striped Schoolhouse Ceiling Light Fixtures: Unveiling the Timeless Charm

Conclusion

Covering insulation in your basement ceiling is a beneficial step toward improving both the aesthetics and efficiency of your home. By understanding different methods, considerations, and maintenance tips, you can choose the best approach to achieve a comfortable and attractive basement environment.

Ceiling Mounted Smoke Eaters: Everything You Need to Know

In modern indoor environments, maintaining air quality is paramount. Ceiling mounted smoke eaters are crucial solutions for ensuring clean and safe air, especially in spaces prone to smoke or pollutants. This guide dives deep into the world of ceiling mounted smoke eaters, exploring their benefits, installation, maintenance, and more.

Ceiling Mounted Smoke Eaters

What are Ceiling Mounted Smoke Eaters?

Ceiling mounted smoke eater, also known as smoke filtration systems, are specialized devices designed to remove smoke particles, odors, and other airborne contaminants from indoor air. These units are typically mounted on ceilings to optimize airflow and efficiency.

Understanding How Ceiling Mounted Smoke Eaters Work

Ceiling mounted smoke eaters employ advanced filtration technologies to purify air. These systems draw in contaminated air, pass it through filters that capture smoke particles and odors, and then release clean air back into the room. Some models utilize electrostatic precipitators or HEPA filters for enhanced filtration performance.

Benefits of Installing Ceiling Mounted Smoke Eaters

Installing a ceiling mounted smoke eater offers numerous benefits:

  • Smoke Removal: Effectively removes smoke from cigarettes, cooking, wildfires, etc.
  • Improved Air Quality: Reduces airborne pollutants, allergens, and odors.
  • Health Benefits: Helps in maintaining a healthier indoor environment, especially for individuals with respiratory conditions.
  • Odor Control: Eliminates unpleasant odors, creating a more pleasant living or working space.

Choosing the Right Ceiling Mounted Smoke Eater

When selecting a smoke eater for your space, consider:

  • Room Size: Choose a unit that matches the size of the room for optimal performance.
  • Filtration Type: Decide between electrostatic precipitators, HEPA filters, or other filtration technologies based on your specific needs.
  • Maintenance Requirements: Check ease of filter replacement and overall maintenance needs.
  • Noise Levels: Consider noise output, especially in quiet environments.

Installation Process

Installing a ceiling mounted smoke eater involves:

  1. Location: Choose a central location on the ceiling for efficient air circulation.
  2. Power Supply: Ensure proximity to a power source.
  3. Mounting: Follow manufacturer guidelines for proper installation to maximize effectiveness.

Maintenance Tips

To keep your ceiling mounted smoke eater functioning effectively:

  • Regular Cleaning: Clean or replace filters as recommended by the manufacturer.
  • Inspect and Test: Periodically check the unit’s operation and air quality readings.
  • Professional Servicing: Schedule professional maintenance to ensure long-term efficiency.

Cost Considerations

The cost of ceiling mounted smoke eater varies based on factors like brand, size, and filtration technology. While initial costs may vary, consider long-term savings from improved air quality and reduced health risks.

Conclusion

Ceiling mounted smoke eater are essential investments for maintaining clean indoor air quality. By understanding their benefits, installation process, and maintenance requirements, you can effectively enhance the air quality in residential, commercial, or industrial spaces prone to smoke and pollutants.

Brushed Nickel Outdoor Ceiling Fan for Your Patio: The Ultimate Guide

When it comes to enhancing the comfort and style of your outdoor living space, a brushed nickel outdoor ceiling fan can be a perfect addition. Not only do these fans provide much-needed air circulation to keep you cool during warm weather, but they also add a touch of elegance to your patio, deck, or gazebo. This comprehensive guide will walk you through everything you need to know about selecting the best brushed nickel outdoor ceiling fan for your needs, including the benefits, types, installation tips, and maintenance advice.

Brushed Nickel Outdoor Ceiling Fan

Why Choose a Brushed Nickel Outdoor Ceiling Fan?

Aesthetic Appeal

Brushed nickel is a popular finish for outdoor ceiling fans because of its sleek and modern appearance. This finish complements a variety of decor styles, from contemporary to traditional, making it a versatile choice for any outdoor space.

Read too: A Comprehensive Mr Cool Ceiling Cassette Review: Unveiling Excellence

Durability

Outdoor ceiling fans with a brushed nickel finish are not only stylish but also durable. Brushed nickel is resistant to tarnish and corrosion, which is particularly important for outdoor applications where the fan will be exposed to the elements.

Improved Air Circulation

An outdoor ceiling fan is essential for improving air circulation on your patio or deck. During hot summer days, a ceiling fan can create a cooling breeze, making your outdoor space more comfortable and enjoyable.

Energy Efficiency

Using a ceiling fan outdoors can help reduce your reliance on air conditioning, thereby saving energy and lowering your utility bills. By moving air more efficiently, ceiling fans can make you feel cooler even at higher temperatures.

Types of Brushed Nickel Outdoor Ceiling Fans

Standard Outdoor Ceiling Fans

These are the most common type of outdoor ceiling fans and are designed to withstand moisture and humidity. They come in various styles and sizes, allowing you to choose one that fits your aesthetic preferences and space requirements.

Damp-Rated Ceiling Fans

Damp-rated ceiling fans are suitable for covered outdoor areas where they will be exposed to moisture but not direct rain. These fans are ideal for porches, covered patios, and sunrooms.

Wet-Rated Ceiling Fans

Wet-rated ceiling fans are designed to withstand direct exposure to water, making them perfect for open patios, gazebos, and other areas where they may come into contact with rain. These fans are built with materials that resist rust and corrosion, ensuring long-lasting performance.

Key Features to Look for in a Brushed Nickel Outdoor Ceiling Fan

Blade Material and Design

The blades of your ceiling fan should be made from materials that can withstand outdoor conditions, such as ABS plastic, treated wood, or metal. Additionally, consider the blade design – aerodynamically shaped blades can enhance airflow and efficiency.

Motor Quality

A high-quality motor is essential for the performance and longevity of your ceiling fan. Look for fans with powerful, energy-efficient motors that operate quietly and can handle extended use in outdoor environments.

Lighting Options

Many outdoor ceiling fans come with integrated lighting fixtures, providing both air circulation and illumination. Choose a fan with LED lights for energy efficiency and long-lasting performance.

Control Mechanisms

Modern outdoor ceiling fans often come with various control options, including remote controls, wall switches, and even smart home compatibility. Consider how you prefer to operate your fan and choose a model that offers the desired level of convenience.

Size and Airflow

The size of your ceiling fan should be proportionate to the area you intend to cool. Larger fans are suitable for more extensive spaces, while smaller fans work well in compact areas. Additionally, check the fan’s airflow rating (measured in CFM – cubic feet per minute) to ensure it can effectively cool your space.

Installing Your Brushed Nickel Outdoor Ceiling Fan

Professional Installation vs. DIY

While some homeowners may feel confident installing a ceiling fan themselves, others may prefer to hire a professional electrician. Professional installation can ensure that the fan is mounted securely and wired correctly, which is particularly important for outdoor applications.

Choosing the Right Location

The location of your ceiling fan can significantly impact its performance. Ensure the fan is installed in a spot where it can provide optimal air circulation without obstructions. For covered areas, make sure the fan is damp-rated, and for open areas, choose a wet-rated fan.

Mounting Considerations

Outdoor ceiling fans often require specific mounting hardware to ensure they are securely attached to the ceiling. Make sure to use the appropriate mounting kit and follow the manufacturer’s instructions for a safe and stable installation.

Electrical Requirements

Outdoor ceiling fans need to be wired to a power source, which may involve running new electrical lines if none are currently available in the desired location. Ensure the wiring is suitable for outdoor use and protected from the elements.

Maintenance Tips for Your Brushed Nickel Outdoor Ceiling Fan

Regular Cleaning

To keep your ceiling fan looking and performing its best, clean it regularly. Wipe down the blades and motor housing with a damp cloth to remove dust and debris. For stubborn dirt, use a mild detergent and water solution.

Inspecting for Damage

Periodically inspect your ceiling fan for any signs of damage or wear. Check the blades for cracks or warping, and ensure all screws and connections are tight. Address any issues promptly to prevent further damage and ensure safe operation.

Lubricating the Motor

Some ceiling fans may require occasional lubrication to keep the motor running smoothly. Check the manufacturer’s instructions for guidance on how to lubricate your fan’s motor if necessary.

Protecting from the Elements

Even though brushed nickel outdoor ceiling fans are designed to withstand outdoor conditions, it’s still a good idea to protect them from extreme weather. If you live in an area with harsh winters or frequent storms, consider using a fan cover or removing the fan during the off-season.

Benefits of a Brushed Nickel Outdoor Ceiling Fan

Enhancing Outdoor Comfort

A brushed nickel outdoor ceiling fan can transform your patio or deck into a comfortable oasis, allowing you to enjoy the outdoors even on the hottest days. The cooling breeze created by the fan can make outdoor dining, entertaining, or relaxing much more pleasant.

Adding Visual Appeal

The sleek, modern look of brushed nickel adds a touch of sophistication to your outdoor space. Whether you have a contemporary or traditional decor style, a brushed nickel ceiling fan can complement your design and enhance the overall aesthetic.

Increasing Property Value

Investing in quality outdoor fixtures like a brushed nickel ceiling fan can increase the value of your home. Prospective buyers often appreciate well-appointed outdoor living spaces, and a stylish, functional ceiling fan can be a significant selling point.

Energy Savings

Ceiling fans are a cost-effective way to improve air circulation and maintain a comfortable temperature. By using a ceiling fan outdoors, you can reduce your reliance on air conditioning, leading to lower energy bills and a smaller carbon footprint.

Popular Brands and Models

Hunter Fans

Hunter is a well-known brand that offers a variety of high-quality outdoor ceiling fans. Their brushed nickel models are praised for their durability, performance, and stylish designs.

Minka-Aire

Minka-Aire produces a range of outdoor ceiling fans that are both functional and aesthetically pleasing. Their brushed nickel fans are particularly popular for their modern look and reliable performance.

Casablanca

Casablanca fans are known for their innovative designs and superior craftsmanship. Their outdoor ceiling fans in brushed nickel finishes are a great choice for those looking to combine style and functionality.

Emerson

Emerson offers a selection of outdoor ceiling fans with brushed nickel finishes that are designed to withstand the elements while providing excellent air circulation and energy efficiency.

Conclusion

A brushed nickel outdoor ceiling fan is an excellent investment for anyone looking to enhance their outdoor living space. With their stylish appearance, durability, and ability to improve air circulation, these fans offer numerous benefits that make them a valuable addition to any patio, deck, or gazebo. By considering the various types, features, and installation requirements discussed in this guide, you can choose the perfect brushed nickel outdoor ceiling fan to suit your needs and enjoy a more comfortable and stylish outdoor environment.

Batt Insulation Above Suspended Ceilings: Improving Energy Efficiency and Comfort

Installing Batt Insulation Above Suspended Ceilings is a smart choice for enhancing both energy efficiency and comfort in your home or commercial space. This comprehensive guide explores everything you need to know about this insulation method, from its benefits and installation process to considerations and maintenance tips.

Batt Insulation Above Suspended Ceilings

Understanding Batt Insulation Above Suspended Ceilings

Batt insulation is a type of insulation made from fiberglass or mineral wool, typically installed in rolls or batts. When placed above suspended ceilings, it serves multiple purposes:

  • Thermal Barrier: Batt insulation helps prevent heat transfer between spaces, keeping rooms cooler in summer and warmer in winter.
  • Sound Absorption: It reduces noise transmission between rooms, enhancing acoustic comfort.
  • Moisture Control: Insulation above ceilings can help manage moisture levels, preventing condensation and mold growth.

Benefits of Batt Insulation Above Suspended Ceilings

  1. Energy Efficiency: By reducing heat loss or gain through the ceiling, batt insulation lowers energy consumption and utility bills.
  2. Improved Comfort: It creates a more consistent indoor temperature, making living and working spaces more comfortable year-round.
  3. Noise Reduction: Enhanced sound absorption properties contribute to a quieter environment, especially in multi-level buildings or offices.
  4. Environmental Impact: Lower energy usage translates to reduced carbon footprint, promoting sustainability.

Installation Process for Batt Insulation Above Suspended Ceilings

Proper installation is crucial for maximizing the effectiveness of batt insulation:

  1. Assessment and Measurement: Assess the ceiling area and measure the dimensions accurately to determine the amount of insulation needed.
  2. Preparation: Clear the area of any debris or obstacles that could hinder installation. Ensure safety equipment like gloves, goggles, and masks are worn.
  3. Cutting and Fitting: Cut batts to fit snugly between ceiling joists or above the suspended grid. Avoid compressing insulation, which can reduce its effectiveness.
  4. Securing and Adjusting: Secure batts in place without leaving gaps or voids. Adjust around obstacles such as light fixtures or ductwork.
  5. Safety and Regulations: Follow local building codes and safety guidelines throughout the installation process, especially regarding fire safety and ventilation requirements.

Considerations for Batt Insulation Above Suspended Ceilings

Before proceeding with installation, consider these factors:

  • Ceiling Height: Ensure sufficient clearance between the insulation and any utilities or fixtures to maintain functionality and safety.
  • Moisture Management: Address any existing moisture issues before installing insulation to prevent future problems.
  • Accessibility: Plan for future access to utilities above the ceiling, such as plumbing or electrical systems, to avoid insulation obstruction.

Maintaining Batt Insulation Above Suspended Ceilings

To ensure longevity and efficiency:

  • Regular Inspection: Check for signs of damage or displacement and repair as needed.
  • Moisture Monitoring: Monitor moisture levels periodically to prevent mold or mildew growth.
  • Upgrading: Consider upgrading insulation if energy efficiency standards or building codes change.

Read too: A Comprehensive Mr Cool Ceiling Cassette Review: Unveiling Excellence

Conclusion

Batt Insulation Above Suspended Ceilings offers a practical solution to enhance energy efficiency, comfort, and soundproofing in residential and commercial buildings. By understanding its benefits, installation process, considerations, and maintenance tips, you can make informed decisions to optimize your indoor environment effectively.

Bathroom Exhaust Fan Drop Ceiling: Enhancing Ventilation Efficiency in Your Home

In modern home design, the efficiency and effectiveness of ventilation systems like the bathroom exhaust fan are crucial. One innovative solution gaining popularity is installing the Bathroom Exhaust Fan Drop Ceiling. This article explores the benefits, installation process, considerations, and maintenance tips for this setup.

Bathroom Exhaust Fan Drop Ceiling

Understanding the Importance of Bathroom Exhaust Fans

Bathroom exhaust fans play a pivotal role in maintaining indoor air quality by removing excess moisture, odors, and pollutants from the bathroom space. They help prevent mold growth, improve air circulation, and enhance the overall comfort of your home. Traditional installations involve mounting these fans directly on the ceiling or wall. However, the drop ceiling method offers distinct advantages worth exploring.

Benefits of Installing a Bathroom Exhaust Fan in a Drop Ceiling

Installing a Bathroom Exhaust Fan Drop Ceiling provides several benefits:

  1. Enhanced Aesthetic Appeal: Unlike surface-mounted fans, drop ceiling installations conceal the fan unit and ductwork, resulting in a cleaner and more streamlined appearance.
  2. Reduced Noise: The drop ceiling acts as a natural sound buffer, reducing operational noise from the exhaust fan, creating a quieter bathroom environment.
  3. Improved Airflow Efficiency: By positioning the fan closer to the source of moisture and odors, the system operates more efficiently, expelling unwanted air directly outside.
  4. Flexible Installation: Drop ceilings offer flexibility in positioning the fan, allowing for strategic placement that maximizes airflow and minimizes ductwork bends.

Installing a Bathroom Exhaust Fan in a Drop Ceiling

The installation process involves several key steps:

  1. Planning and Preparation: Measure the space and determine the optimal location for the fan unit. Ensure there is access to an external vent for proper air circulation.
  2. Cutting the Drop Ceiling Tiles: Use appropriate tools to cut an opening in the drop ceiling tiles to accommodate the exhaust fan unit and ductwork.
  3. Mounting the Fan Unit: Securely install the fan unit into the ceiling opening according to manufacturer instructions. Connect the ductwork to ensure proper ventilation.
  4. Electrical Connections: Hire a qualified electrician to connect the fan to the power source, following local building codes and safety guidelines.
  5. Testing and Adjustments: Test the fan for proper operation and adjust settings as needed to achieve optimal airflow and ventilation.

Considerations for Installing a Bathroom Exhaust Fan Drop Ceiling

Before embarking on this installation, consider the following:

  • Building Codes and Regulations: Ensure compliance with local building codes regarding ventilation requirements and electrical installations.
  • Maintenance: Regularly clean and inspect the fan unit and ductwork to prevent clogs and ensure efficient operation.
  • Professional Help: Seek assistance from professionals for electrical connections and complex installations to ensure safety and performance.

Maintaining Your Bathroom Exhaust Fan Drop Ceiling System

To prolong the lifespan and effectiveness of your Bathroom Exhaust Fans Drop Ceiling, adopt these maintenance practices:

  • Cleaning: Periodically clean the fan blades and grille to remove dust and debris that can hinder airflow.
  • Inspecting Ductwork: Check the ductwork for any signs of damage or blockages and clear them promptly.
  • Testing: Regularly test the fan to ensure it activates and operates smoothly when needed.

Read too: A Comprehensive Mr Cool Ceiling Cassette Review: Unveiling Excellence

Conclusion

Installing a Bathroom Exhaust Fans Drop Ceiling offers a practical and aesthetically pleasing solution to enhance ventilation in your home. By understanding its benefits, installation process, considerations, and maintenance tips, you can make an informed decision to improve indoor air quality and comfort. Whether you’re renovating your bathroom or planning new construction, consider the advantages of this innovative ventilation approach.

Art Nouveau Ceiling Lamp Designs and Inspiration: Discovering Elegance

Art Nouveau ceiling lamps encapsulate the essence of a bygone era, blending intricate craftsmanship with organic motifs to create stunning focal points in any space. These lamps not only illuminate but also serve as exquisite pieces of art, reflecting the artistic revolution of the late 19th and early 20th centuries. Dive into the world of Art Nouveau ceiling lamps to explore their unique characteristics, timeless appeal, and how to integrate them into modern interiors.

Art Nouveau Ceiling Lamp

Understanding Art Nouveau Ceiling Lamp Aesthetics

Art Nouveau ceiling lamps are characterized by flowing lines, botanical motifs, and asymmetrical forms inspired by nature. These lamps often feature materials like stained glass, wrought iron, or intricately patterned metals, showcasing craftsmanship that emphasizes both beauty and functionality. The design philosophy behind Art Nouveau emphasizes harmony between art and everyday life, making these lamps perfect for adding a touch of sophistication to contemporary homes.

Features of Art Nouveau Ceiling Lamps

When considering Art Nouveau ceiling lamps for your home, pay attention to:

Design Elements

Art Nouveau lamps typically incorporate floral patterns, curved lines, and naturalistic shapes. Whether it’s a Tiffany-style stained glass lampshade or a wrought iron fixture with vine-like embellishments, each piece exudes a sense of organic elegance that defines the Art Nouveau movement.

Read too: A Comprehensive Mr Cool Ceiling Cassette Review: Unveiling Excellence

Materials and Construction

Materials like stained glass, brass, copper, and even ceramics are common in Art Nouveau ceiling lamps. These materials not only enhance the aesthetic appeal but also contribute to the lamp’s durability and timeless charm. Handcrafted details and intricate metalwork are signatures of quality Art Nouveau pieces.

Lighting Effects

Art Nouveau lamps often create a soft, diffused glow that enhances the ambiance of any room. Whether through colored glass panels or delicately shaped lampshades, these lamps can transform spaces by casting intricate patterns of light and shadow.

Integrating Art Nouveau Ceiling Lamps into Modern Interiors

While Art Nouveau originated in the late 19th century, its timeless appeal continues to influence contemporary interior design. Here’s how you can incorporate Art Nouveau ceiling lamps into your modern living spaces:

Choosing the Right Space

Select rooms where the lamp can serve as a focal point, such as entryways, dining rooms, or living areas. Art Nouveau lamps can complement various interior styles, from traditional to eclectic and even minimalist, adding a unique artistic flair.

Pairing with Furniture and Decor

Balance the ornate nature of Art Nouveau lamps with furniture and decor that complements their style. For instance, pair a floral-patterned lamp with vintage-inspired furniture or juxtapose a sleek, modern sofa with an intricately designed Art Nouveau lamp to create visual interest.

Maintenance and Care

Due to their craftsmanship and materials, Art Nouveau ceiling lamps require gentle care to preserve their beauty. Regular dusting and occasional polishing of metal components or stained glass panels can prolong their lifespan and maintain their luster.

Where to Find Art Nouveau Ceiling Lamps

Exploring options for Art Nouveau ceiling lamps involves considering various sources:

Antique Shops and Auctions

Antique shops often feature original Art Nouveau lamps or faithful reproductions. Auctions and estate sales can also offer unique finds, allowing you to acquire a piece of history that adds character to your home.

Specialized Retailers

Online retailers and specialty stores cater to enthusiasts seeking authentic or reproduction Art Nouveau lamps. These platforms provide detailed descriptions, photographs, and customer reviews to help you make informed decisions.

Custom Craftsmanship

For those seeking bespoke designs or restoration services, artisans and craftsmen can create custom Art Nouveau ceiling lamps. This option allows for personalization to match specific aesthetic preferences or architectural requirements.

Conclusion

Art Nouveau ceiling lamp transcend mere illumination, embodying the artistic ideals of a transformative era. Whether you’re drawn to the organic forms of Hector Guimard or the intricate glasswork of Louis Comfort Tiffany, these lamps offer more than light—they offer a glimpse into a rich artistic heritage. By understanding their aesthetic principles, integrating them thoughtfully into modern interiors, and caring for them diligently, Art Nouveau ceiling lamps can enrich your home with timeless beauty and artistic expression.


Antique Outdoor Ceiling Fans: Adding Charm and Comfort to Your Outdoor Spaces

In the realm of outdoor decor, antique outdoor ceiling fans stand out as both functional fixtures and charming vintage accents. These unique pieces not only circulate air effectively but also evoke a sense of nostalgia and elegance, making them a desirable addition to any outdoor setting. Whether you’re looking to enhance a porch, patio, or veranda, antique outdoor ceiling fans blend style with practicality, offering a refreshing breeze while complementing your outdoor aesthetic.

Antique Outdoor Ceiling Fans

Why Choose Antique Outdoor Ceiling Fans?

Antique outdoor ceiling fans combine classic design elements with modern engineering, offering a timeless appeal that suits various architectural styles. Unlike their contemporary counterparts, these fans often feature intricate craftsmanship, durable materials like cast iron or brass, and ornate detailing that harkens back to bygone eras. Their sturdy construction makes them suitable for outdoor use, enduring the elements while maintaining their beauty and functionality.

Enhancing Outdoor Spaces with Antique Charm

When planning to incorporate antique outdoor ceiling fans into your outdoor spaces, consider the following factors:

Design and Aesthetics

Antique fans come in a range of designs, from Victorian-inspired filigree to Art Deco geometric patterns. Choose a style that complements your outdoor decor scheme while making a statement of its own. For instance, a brass-finished fan with wooden blades might enhance a rustic-themed patio, while a black wrought iron fan could add a touch of old-world charm to a garden gazebo.

Functionality and Performance

Beyond aesthetics, prioritize performance when selecting antique outdoor ceiling fans. Look for features such as multiple speed settings, reversible blades for seasonal comfort, and efficient motor operation. Modern advancements like energy-efficient motors ensure that your antique fan not only looks stunning but also operates quietly and effectively, providing optimal airflow in outdoor spaces.

Installation and Maintenance

Installing antique outdoor ceiling fans requires careful consideration of mounting options and electrical requirements. Ensure that the fan is rated for outdoor use to withstand humidity, rain, and temperature fluctuations. Regular maintenance, including cleaning blades and lubricating moving parts, will extend the life of your fan and preserve its antique allure.

Where to Find Antique Outdoor Ceiling Fans

Finding the perfect antique outdoor ceiling fan involves exploring various sources:

Antique Shops and Markets

Local antique shops or flea markets often showcase a variety of vintage ceiling fans. These venues offer the opportunity to examine fans up close, appreciate their craftsmanship, and negotiate prices directly with sellers.

Online Retailers and Auction Sites

Platforms like eBay or specialized antique retailers online provide access to a broader selection of antique outdoor ceiling fan. Detailed descriptions, photos, and customer reviews make it easier to evaluate options and find a fan that meets both aesthetic preferences and functional needs.

Restoration and Customization Services

For enthusiasts seeking unique pieces or needing restoration services, specialized shops offer customization options. They can refurbish vintage fans to restore functionality and aesthetic appeal, ensuring that your antique fan becomes a focal point of your outdoor space.

Read too: A Comprehensive Mr Cool Ceiling Cassette Review: Unveiling Excellence

Conclusion

Antique outdoor ceiling fan blend nostalgia with practicality, offering a distinctive way to enhance outdoor comfort and style. Whether you prefer the ornate details of a Victorian-era fan or the simplicity of Art Deco design, these fans add character to any outdoor setting. By choosing quality craftsmanship and considering factors like design, functionality, and maintenance, you can enjoy the timeless beauty and efficiency of antique outdoor ceiling fan for years to come.

Acoustic Ceiling Panels for Restaurants: Enhance Ambiance and Comfort

Restaurants are more than just places to eat; they are spaces where ambiance, comfort, and dining experience converge. One crucial element that contributes to this experience is the acoustic environment. The right acoustic ceiling panels for restaurants can significantly enhance sound quality, reduce noise levels, and create a more enjoyable atmosphere for diners.

Acoustic Ceiling Panels For Restaurants

Understanding the Benefits of Acoustic Ceiling Panels for Restaurants

In bustling restaurant settings, noise can quickly escalate, making it challenging for patrons to converse comfortably. Acoustic ceiling panels offer a solution by absorbing sound waves, thereby reducing reverberation and echoes. This improvement in acoustics allows for clearer speech perception, enhancing the overall dining experience. Moreover, acoustic panels contribute to a quieter environment, making it easier for diners to relax and enjoy their meals without distraction.

Choosing the Right Acoustic Ceiling Panels

When selecting acoustic ceiling panels for restaurants, several factors come into play:

  • Material Quality: Opt for panels made from high-quality acoustic materials that effectively absorb sound.
  • Aesthetic Appeal: Ensure that the panels complement the restaurant’s decor and ambiance.
  • Installation Flexibility: Choose panels that are easy to install and integrate seamlessly into the existing ceiling structure.
  • Fire Safety Standards: Verify that the panels meet necessary fire safety regulations for commercial spaces.

Design Considerations for Restaurant Acoustics

Each restaurant has its unique layout and design elements that influence its acoustic requirements. Factors such as ceiling height, seating arrangement, and interior materials impact sound propagation within the space. Acoustic consultants can assess these factors and recommend tailored solutions, including the placement and type of acoustic ceiling panels, to achieve optimal sound control.

Implementing Acoustic Solutions in Restaurants

Successful implementation of acoustic ceiling panels involves a systematic approach:

  1. Assessment: Conduct a thorough assessment of the restaurant’s acoustic needs, considering both customer areas and kitchen spaces.
  2. Customization: Customize panel selection based on the restaurant’s specific requirements, such as noise reduction goals and aesthetic preferences.
  3. Installation: Hire experienced professionals to install acoustic panels correctly, ensuring they perform as intended without disrupting daily operations.

Benefits Beyond Sound Control

Aside from enhancing sound quality, acoustic ceiling panels offer additional benefits to restaurants:

  • Improved Speech Intelligibility: Clearer communication among patrons and staff enhances customer satisfaction.
  • Enhanced Privacy: Panels can help create intimate dining areas by reducing noise transmission between tables.
  • Energy Efficiency: Some panels provide thermal insulation, contributing to energy savings by maintaining comfortable indoor temperatures.

Conclusion

Acoustic ceiling panels are indispensable for creating a pleasant dining atmosphere in restaurants. By effectively managing noise levels and improving sound quality, these panels contribute to customer comfort and satisfaction. Whether you manage a fine dining establishment, a casual eatery, or a vibrant café, investing in acoustic solutions demonstrates a commitment to enhancing the overall dining experience.

Read too: A Comprehensive Mr Cool Ceiling Cassette Review: Unveiling Excellence

Choosing the right acoustic ceiling panels involves careful consideration of acoustic performance, aesthetic appeal, and installation feasibility. By partnering with reputable suppliers and acoustic experts, restaurant owners can achieve optimal results tailored to their specific needs.

20 Flush Mount Ceiling Light Designs: Enhance Your Space with Style

When it comes to lighting up your living spaces, nothing combines functionality and aesthetics quite like the 20 Flush Mount Ceiling Light. Explore the top designs and considerations for integrating these stylish fixtures into your home.

20 Flush Mount Ceiling Light

Understanding 20 Flush Mount Ceiling Light Fixtures

20 Flush Mount Ceiling Lights refer to a specific category of lighting fixtures that are installed directly onto the ceiling without any gaps or spaces between the fixture and the ceiling surface. These lights are ideal for rooms with lower ceilings or where a sleek, minimalistic look is desired.

Features and Benefits

The appeal of 20 Flush Mount Ceiling Lights lies in their:

  • Space-saving Design: Perfect for rooms with limited ceiling height.
  • Versatility: Available in various styles to complement different décor themes.
  • Brightness: Effective illumination for the entire room without overwhelming glare.
  • Ease of Installation: Simple to install and maintain.

Choosing the Right 20 Flush Mount Ceiling Light

When selecting a 20 Flush Mount Ceiling Light, consider factors such as:

  • Size and Shape: Ensure it fits proportionally with the room size and ceiling height.
  • Lighting Technology: Options include LED, fluorescent, and incandescent lights.
  • Style and Finish: From modern to traditional, choose a design that suits your interior style.
  • Additional Features: Some lights offer dimming capabilities or adjustable color temperatures.

Popular Designs and Styles

Explore popular 20 Flush Mount Ceiling Light designs:

  • Modern Minimalist: Clean lines and simple shapes for contemporary interiors.
  • Vintage Inspired: Ornate details and antique finishes for a classic touch.
  • Industrial Chic: Exposed bulbs and metal accents for a trendy, urban look.
  • Crystal Flush Mounts: Elegant designs with crystal accents for a touch of luxury.

Installation Tips and Considerations

Installing 20 Flush Mount Ceiling Lights is typically straightforward:

  • Preparation: Turn off the power and gather necessary tools before starting.
  • Placement: Ensure the fixture is centered and securely attached to the ceiling.
  • Wiring: Follow manufacturer instructions for wiring connections.
  • Testing: After installation, test the light to ensure proper functionality.

Maintenance and Care

To keep your 20 Flush Mount Ceiling Lights in top condition:

  • Cleaning: Regularly dust the fixture and clean any glass or acrylic covers.
  • Bulb Replacement: Replace bulbs as needed to maintain optimal brightness.
  • Inspecting Connections: Periodically check wiring and connections for any signs of wear.

Energy Efficiency Considerations

Opt for 20 Flush Mount Ceiling Lights with energy-efficient features:

  • LED Technology: Energy-saving bulbs that last longer than traditional options.
  • Dimmers: Adjust light levels to reduce energy consumption based on needs.
  • Environmental Impact: Choose fixtures with eco-friendly materials and certifications.

Read too: Striped Schoolhouse Ceiling Light Fixtures: Unveiling the Timeless Charm

Conclusion

In conclusion, 20 Flush Mount Ceiling Lights are more than just functional lighting fixtures—they are essential elements in interior design that enhance the ambiance and functionality of any room. Whether you prefer a modern look or a classic style, there’s a wide range of options to suit every taste and budget. By understanding the features, installation process, and maintenance tips, you can confidently select and install the perfect 20 Flush Mount Ceiling Light for your home.

1 Hour Fire Rated Ceiling Assembly: Ensuring Safety and Compliance in Buildings

In the realm of building safety and compliance, the concept of a “1 Hour Fire Rated Ceiling Assembly” plays a crucial role. This assembly refers to a construction method designed to resist the spread of fire from one floor to another for at least one hour. Such assemblies are critical in maintaining compartmentation and preventing the rapid spread of fire within buildings, thereby safeguarding lives and property.

1 Hour Fire Rated Ceiling Assembly

Understanding 1 Hour Fire Rated Ceiling Assembly

A 1 Hour Fire Rated Ceiling Assembly typically consists of several components meticulously chosen to meet specific fire-resistance criteria. These components include fire-rated ceiling panels, structural supports, insulation materials, and sometimes additional fireproof coatings or barriers. The assembly’s effectiveness hinges on the combined performance of these elements under standardized fire testing protocols.

Components of a 1 Hour Fire Rated Ceiling Assembly

The core components include:

  • Ceiling Panels: These are typically gypsum boards or specially formulated fire-rated panels designed to withstand high temperatures.
  • Structural Elements: Such as steel or wooden joists that support the ceiling and maintain its integrity during a fire event.
  • Insulation: Fire-resistant insulation materials placed between the floors to hinder the transfer of heat and flames.
  • Firestop Systems: Intumescent seals or sprays around penetrations like pipes and ducts to prevent fire spread through openings.

Importance in Building Codes and Standards

Building codes universally mandate specific fire resistance ratings for various building components, including ceiling assemblies. A 1 Hour Fire Rated Ceiling Assembly aligns with these requirements, ensuring that buildings meet minimum safety standards. Compliance with such codes is non-negotiable in modern construction practices to enhance occupant safety and mitigate fire risks effectively.

Design Considerations for 1 Hour Fire Rated Ceiling Assemblies

Architects and engineers meticulously plan 1 Hour Fire Rated Ceiling Assemblies during the design phase of buildings. Factors such as building height, occupancy type, and fire protection goals influence the selection and installation of these assemblies. Moreover, the integration of fire alarm systems, sprinklers, and emergency egress routes further enhances overall fire safety measures.

Testing and Certification

Before implementation, manufacturers subject their 1 Hour Fire Rated Ceiling Assemblies to rigorous testing protocols. These tests simulate real-world fire conditions to verify the assembly’s ability to withstand fire for the specified duration. Certifications from recognized testing laboratories validate compliance with fire safety standards and provide assurance to stakeholders.

Maintenance and Upkeep

Ensuring ongoing functionality of 1 Hour Fire Rated Ceiling Assemblies requires regular inspections and maintenance. Any damage to ceiling panels, insulation, or firestops must be promptly addressed to uphold the assembly’s fire-resistance capabilities. Additionally, periodic inspections help identify potential hazards and ensure compliance with evolving building codes.

Advantages of 1 Hour Fire Rated Ceiling Assemblies

The primary advantages include:

  • Life Safety: Protecting occupants by containing fire and smoke within designated areas.
  • Property Protection: Minimizing structural damage and financial losses during fire incidents.
  • Legal Compliance: Meeting regulatory requirements and avoiding penalties or legal liabilities.
  • Insurance Benefits: Potentially reducing insurance premiums through enhanced fire protection measures.

Conclusion

In conclusion, a 1 Hour Fire Rated Ceiling Assembly is not just a building component but a critical safeguard against fire hazards. Its design, construction, and maintenance significantly contribute to overall building safety and regulatory compliance. By understanding its importance and adhering to best practices, stakeholders can effectively mitigate fire risks and create safer environments for all building occupants.

Read too: Striped Schoolhouse Ceiling Light Fixtures: Unveiling the Timeless Charm

Wind River Ceiling Fan: Exploring the Elegance

Discover the sophistication and functionality of Wind River ceiling fan, perfect for enhancing your living spaces with style and comfort.

Wind River Ceiling Fan

Introducing Wind River Ceiling Fan

The Wind River brand stands out in the realm of ceiling fans, known for its blend of aesthetic appeal and efficient performance. A Wind River ceiling fan not only circulates air effectively but also adds a touch of elegance to any room.

Why Choose a Wind River Ceiling Fan?

Wind River ceiling fans offer several compelling reasons for consideration:

  • Design Excellence: Crafted with attention to detail, these fans boast sleek designs that complement various interior styles.
  • Energy Efficiency: Many models are ENERGY STAR® certified, ensuring efficient energy use and cost savings.
  • Quiet Operation: Enjoy the breeze without the noise, thanks to advanced motor technology.
  • Remote Control Options: Conveniently adjust fan settings from anywhere in the room with included remote controls.
  • Lighting Integration: Some models feature integrated lighting options for added functionality.

Types of Wind River Ceiling Fans

Explore the diversity of Wind River ceiling fan options to find the perfect match for your space:

  • Traditional Ceiling Fans: Featuring classic designs with wood finishes and timeless appeal.
  • Contemporary Styles: Sleek, modern designs that blend seamlessly with minimalist and contemporary interiors.
  • Outdoor Ceiling Fans: Durable fans designed to withstand outdoor conditions while maintaining performance and style.
  • Dual Motor Fans: Unique designs with dual motors for increased airflow and visual impact.

Installation and Maintenance Tips

Ensure optimal performance and longevity with these installation and maintenance tips:

  • Installation Considerations: Follow manufacturer instructions carefully for safe and efficient installation.
  • Ceiling Height: Choose the appropriate downrod length for optimal airflow based on your ceiling height.
  • Balance and Stability: Use a balancing kit to ensure your fan operates smoothly and quietly.
  • Regular Maintenance: Clean fan blades regularly to prevent dust buildup and maintain performance.
  • Motor Care: Lubricate the motor as recommended to prolong its lifespan and ensure quiet operation.

Enhancing Your Home with Wind River Ceiling Fans

Discover creative ways to incorporate Wind River ceiling fans into your home decor:

  • Living Rooms: Create a focal point with a stylish ceiling fan that enhances comfort and aesthetics.
  • Bedrooms: Enjoy a peaceful night’s sleep with a silent-operating fan that circulates air effectively.
  • Outdoor Spaces: Extend your living area with an outdoor ceiling fan that keeps you cool on hot days.
  • Dining Areas: Enhance ambience and comfort during meals with a fan that complements your dining decor.

Read too: Striped Schoolhouse Ceiling Light Fixtures: Unveiling the Timeless Charm

White Suspended Ceiling Tiles: Enhance Your Space

Discover the versatility and benefits of using white suspended ceiling tiles in various settings. Learn about installation tips, design ideas, maintenance advice, and more to transform your ceilings effortlessly.

White Suspended Ceiling Tiles

Understanding White Suspended Ceiling Tiles

White suspended ceiling tiles are versatile components used to enhance the aesthetic appeal and functionality of interior spaces. These tiles are popular for their ability to create a clean, modern look while offering practical benefits.

Read too: Striped Schoolhouse Ceiling Light Fixtures: Unveiling the Timeless Charm

Benefits of White Suspended Ceiling Tiles

Explore the advantages of choosing white suspended ceiling tiles for your next renovation or construction project:

  • Light Reflection: White tiles reflect light, making spaces appear brighter and more spacious.
  • Aesthetic Versatility: Complements a wide range of interior design styles, from modern to traditional.
  • Acoustic Control: Some tiles offer acoustic properties, reducing noise levels in busy environments.
  • Ease of Installation: Quick and straightforward installation compared to traditional drywall ceilings.
  • Maintenance: Easy to clean and maintain, with options for stain-resistant finishes.

Types of White Suspended Ceiling Tiles

Dive into the different types of white suspended ceiling tiles available:

  • Mineral Fiber Tiles: Affordable and effective for controlling sound and enhancing insulation.
  • Vinyl-faced Gypsum Tiles: Durable and moisture-resistant, suitable for high-humidity areas like kitchens and bathrooms.
  • Metal Tiles: Provide a sleek, industrial look with options for enhanced durability and fire resistance.
  • Acoustic Tiles: Designed to absorb sound waves, improving acoustics in offices, classrooms, and studios.

Installation Tips for White Suspended Ceiling Tile

Ensure a successful installation with these practical tips:

  • Measurement and Planning: Measure the ceiling area accurately and plan the layout of tiles, ensuring symmetry and balance.
  • Choosing the Right Tiles: Select tiles based on ceiling height, room function, and desired aesthetic.
  • Tools and Materials: Gather necessary tools such as a level, tape measure, utility knife, and safety equipment.
  • Installation Technique: Follow manufacturer guidelines for tile installation, ensuring secure attachment and alignment.

Design Ideas

Discover creative ways to incorporate white suspended ceiling tile into your space:

  • Modern Office Spaces: Create a sleek, professional environment with clean lines and bright ceilings.
  • Retail Environments: Highlight merchandise with well-lit, visually appealing ceilings.
  • Residential Settings: Enhance living areas with an airy feel and improved light distribution.
  • Educational Facilities: Improve learning environments with acoustically optimized ceilings that reduce distractions.

Maintenance and Care Tips

Keep your white suspended ceiling tile looking their best with these maintenance tips:

  • Regular Cleaning: Dust tiles periodically to maintain their brightness and cleanliness.
  • Avoid Harsh Chemicals: Use mild cleaners and avoid abrasive materials that could damage the tile surface.
  • Inspect for Damage: Regularly inspect tiles for cracks, stains, or signs of water damage and replace as needed.
  • Professional Inspection: Consider scheduling professional inspections to assess the condition of your ceiling tiles.

Conclusion

White suspended ceiling tile offer a versatile and practical solution for enhancing interior spaces. Whether for improving aesthetics, controlling acoustics, or increasing light reflection, these tiles provide numerous benefits for various applications.

Vent Hood Vaulted Ceiling Installation Guide: Enhancing Your Kitchen

Upgrade your kitchen with a vent hood designed for vaulted ceiling. Discover the benefits, installation tips, design considerations, and more to maximize functionality and aesthetics in your culinary space.

Vent Hood Vaulted Ceiling

Vent Hood Vaulted Ceiling: What You Need to Know

Installing a vent hood in a kitchen with a vaulted ceilings requires specific considerations to ensure optimal performance and visual appeal. Here’s a comprehensive guide to help you navigate through the process.

Benefits of Vent Hood Vaulted Ceiling

Vent hoods tailored for vaulted ceilings offer several advantages:

  • Efficient Smoke and Odor Removal: Effectively eliminates cooking fumes, smoke, and odors, maintaining air quality in the kitchen.
  • Enhanced Kitchen Safety: Reduces grease buildup and minimizes the risk of fire hazards associated with cooking.
  • Aesthetic Appeal: Adds a stylish focal point to the kitchen while seamlessly integrating with the vaulted ceiling architecture.
  • Improved Ventilation: Provides adequate airflow, preventing condensation and moisture accumulation.

Design Considerations for Vent Hood Vaulted Ceiling

Key factors to consider before installing a vent hood:

  • Ceiling Height: Measure the height of your vaulted ceiling to determine the appropriate size and placement of the vent hood.
  • Ventilation Ductwork: Plan for efficient ductwork routing to ensure proper air circulation and venting to the exterior.
  • Aesthetic Integration: Choose a vent hood design that complements your kitchen style and enhances the overall décor.
  • Functional Features: Opt for features such as variable fan speeds, LED lighting, and easy-to-clean filters for convenience.

Installation Tips

Ensure a smooth installation process with these tips:

  • Professional Assessment: Consider hiring a professional installer or contractor to evaluate your kitchen layout and recommend suitable vent hood options.
  • Correct Sizing: Select a vent hood size that matches the dimensions of your cooktop or range to maximize efficiency.
  • Secure Mounting: Use sturdy mounting brackets and follow manufacturer instructions for secure attachment to the ceiling.
  • Electrical Requirements: Ensure proper electrical wiring and connection to power the vent hood effectively.

Practical Applications of Vent Hood Vaulted Ceiling

Explore how vent hoods for vaulted ceilings can enhance your kitchen functionality:

  • Open Concept Kitchens: Maintain air quality in expansive kitchen areas with vaulted ceilings.
  • Custom Home Designs: Integrate vent hoods seamlessly into custom-built homes with unique architectural features.
  • Renovation Projects: Upgrade older kitchens with vaulted ceilings to modern standards of ventilation and aesthetics.
  • Commercial Kitchens: Enhance ventilation efficiency in restaurant and catering kitchens with high ceilings.

Read too: Striped Schoolhouse Ceiling Light Fixtures: Unveiling the Timeless Charm

Conclusion:

Installing a vent hood designed for vaulted ceilings enhances both the functionality and aesthetic appeal of your kitchen. From efficient smoke removal to maintaining air quality, this addition ensures a safer and more enjoyable cooking environment.

Short Throw Projector Ceiling Solutions: Enhance Your Viewing Experience

Discover how short throw projector ceiling installations can revolutionize your home theater or presentation setup. Learn about the benefits, considerations, installation tips, and more in this comprehensive guide.

Short Throw Projector Ceiling

Understanding

A short throw projector ceiling setup refers to mounting a projector close to the screen or wall it projects onto, minimizing space requirements while maximizing image size and clarity. This configuration is ideal for smaller rooms or spaces where a traditional projector setup might be impractical.

Benefits of Short Throw Projector Ceiling

Investing in a short throw projector ceiling setup offers several advantages:

  • Space Efficiency: Requires less space between the projector and the screen, making it suitable for compact rooms.
  • Reduced Shadows: Minimizes shadows cast by presenters or viewers, enhancing visibility during presentations or movies.
  • Flexible Placement: Allows for flexible projector placement without obstructing walkways or seating areas.
  • Large Image Projection: Produces large screen sizes even in confined spaces, maintaining image quality and clarity.
  • Reduced Eye Strain: Provides comfortable viewing experiences with reduced glare and eye strain.

Considerations for Short Throw Projector Ceiling

Before installing a short throw projector on the ceiling, consider these factors:

  • Ceiling Height: Ensure adequate clearance and ceiling height for optimal projector placement and screen size.
  • Projection Surface: Use appropriate screens or surfaces optimized for short throw projection to maintain image quality.
  • Lighting Conditions: Consider ambient light levels in the room and choose projectors with appropriate brightness for clarity.
  • Wiring and Connectivity: Plan for proper wiring and connectivity options to ensure seamless integration with audiovisual equipment.

Installation Tips

Follow these tips for successful installation:

  • Mounting Location: Choose a stable mounting location on the ceiling that provides an unobstructed view of the screen.
  • Ceiling Mount Compatibility: Select ceiling mounts compatible with your projector model and weight specifications.
  • Adjustment and Calibration: Adjust projector settings for focus, keystone correction, and image alignment after installation.
  • Safety Considerations: Ensure secure installation to prevent accidents or damage due to falling projectors.

Design Ideas with Short Throw Projector Ceiling

Explore creative ways to integrate short throw projector ceilings setups into your spaces:

  • Home Theater Experience: Create immersive home theater experiences with large screen projections and surround sound.
  • Classroom and Training Rooms: Enhance educational environments with clear, engaging presentations visible from every angle.
  • Business Meetings: Facilitate effective communication and collaboration in boardrooms or conference spaces.
  • Gaming Enthusiasts: Enjoy larger-than-life gaming experiences with high-definition visuals and minimal input lag.

Conclusion

Short throw projector ceilings installations offer an innovative solution for maximizing space and enhancing viewing experiences in various settings. Whether for entertainment, education, or business, this setup provides flexibility, efficiency, and superior image quality.

Read too: Striped Schoolhouse Ceiling Light Fixtures: Unveiling the Timeless Charm

Rustic Outdoor Ceiling Lights: A Guide to Enhancing Your Outdoor Spaces

Illuminate your outdoor areas with style using rustic outdoor ceiling lights. Explore the variety, benefits, installation tips, and design ideas for these charming fixtures that add warmth and character to your exterior spaces.

Rustic Outdoor Ceiling Lights

Embracing Rustic Outdoor Ceiling Lights

Rustic outdoor ceiling lights are more than just lighting fixtures—they are statements of style and functionality that enhance the ambiance of porches, patios, gazebos, and entryways. Designed to blend seamlessly with natural surroundings while providing adequate illumination, these lights offer both aesthetic appeal and practicality.

Features of Rustic Outdoor Ceiling Lights

When choosing rustic outdoor ceiling lights, consider these key features:

  • Materials: Typically crafted from durable materials like wrought iron, bronze, or weather-resistant wood to withstand outdoor elements.
  • Design: Rustic styles often feature elements such as lantern shapes, distressed finishes, and intricate detailing.
  • Light Source: Options include LED bulbs for energy efficiency and integrated dimming capabilities for customizable lighting levels.
  • Weather Resistance: Designed to withstand exposure to rain, wind, and UV rays without compromising performance.

Benefits of Rustic Outdoor Ceiling Lights

Investing in rustic outdoor ceiling light offers several advantages:

  • Enhanced Aesthetics: Adds a touch of rustic charm and enhances the overall appeal of outdoor spaces.
  • Functional Lighting: Provides sufficient illumination for activities and enhances safety and security after dark.
  • Durability: Designed to withstand harsh outdoor conditions, ensuring longevity and minimal maintenance.
  • Versatility: Suitable for various outdoor settings, from rustic cabins to modern farmhouse exteriors.
  • Energy Efficiency: LED options offer energy savings and reduce electricity costs compared to traditional bulbs.

Installation Tips

Proper installation ensures optimal performance and safety:

  • Choose the Right Location: Select a suitable mounting location that complements the overall outdoor décor and provides adequate light coverage.
  • Secure Mounting: Use appropriate hardware and follow manufacturer instructions for secure installation to prevent movement or damage during inclement weather.
  • Electrical Considerations: Ensure wiring is properly installed and meets local building codes for outdoor use.
  • Height Placement: Install lights at a height that provides optimal illumination without obstruction.

Design Ideas

Explore creative ways to incorporate rustic outdoor ceiling light into your exterior design:

  • Front Porch Illumination: Install a lantern-style fixture above the front door to welcome guests with warm, inviting light.
  • Patio Ambiance: Hang pendant lights or chandeliers over outdoor dining areas or seating areas to create a cozy atmosphere.
  • Gazebo Elegance: Adorn gazebos or pergolas with rustic ceiling lights to enhance their architectural appeal and provide functional lighting.
  • Pathway Lighting: Use flush-mount ceiling lights along pathways or walkways to guide footsteps and enhance safety.

Read too: Striped Schoolhouse Ceiling Light Fixtures: Unveiling the Timeless Charm

Conclusion:

Rustic outdoor ceiling light offer a blend of aesthetics and functionality, making them an ideal choice for enhancing your outdoor living areas. Whether you’re aiming to create a cozy ambiance on a porch or illuminate a rustic garden retreat, these lights bring warmth and character to any outdoor setting.

Rozzen 44 Ceiling Fan: Enhance Your Space

Discover the features, benefits, installation tips, and design ideas for the Rozzen 44 ceiling fan in this detailed article. Learn how this fan can improve comfort and aesthetics in your home or office.

Rozzen 44 Ceiling Fan

Introducing

The Rozzen 44 ceiling fan is a stylish and functional addition to any room, offering a blend of modern design and efficient airflow capabilities. Designed to fit smaller spaces while providing effective cooling, this fan has gained popularity for its performance and aesthetic appeal.

Features of the Rozzen 44 Ceiling Fan

Key features that set the Rozzen 44 ceiling fans apart include:

  • Size: Designed specifically for smaller rooms with limited ceiling space.
  • Blade Design: Aerodynamically designed blades for efficient air circulation.
  • Motor Efficiency: Energy-efficient motor for cost savings on electricity bills.
  • Remote Control: Convenient remote control for ease of operation.
  • Light Kit Compatibility: Some models come with integrated light kits or are compatible with lighting attachments.
  • Style Options: Available in various finishes and blade colors to complement different room decors.

Read too: Striped Schoolhouse Ceiling Light Fixtures: Unveiling the Timeless Charm

Benefits of Choosing Rozzen 44 Ceiling Fan

Investing in a Rozzen 44 ceiling fans offers several advantages:

  • Improved Air Circulation: Enhances airflow in smaller rooms, providing comfort during hot weather.
  • Energy Efficiency: Helps reduce energy consumption compared to air conditioning.
  • Year-Round Use: Some models offer reversible blade options for both summer cooling and winter warmth.
  • Quiet Operation: Designed to operate quietly, suitable for bedrooms, nurseries, and offices.
  • Enhanced Aesthetics: Adds a modern touch to interiors while serving a functional purpose.

Installation Tips for Rozzen 44 Ceiling Fan

Proper installation ensures optimal performance and safety:

  • Check Ceiling Height: Ensure the fan is installed at the recommended height for efficient air circulation.
  • Stable Mounting: Use a ceiling fan mounting bracket suitable for the weight and size of the Rozzen 44 fan.
  • Secure Wiring: Follow manufacturer instructions for wiring to prevent electrical hazards.
  • Balance Blades: Use a balancing kit if necessary to minimize wobbling during operation.
  • Test Operation: After installation, test fan operation at different speeds to ensure functionality.

Design Ideas

Explore creative ways to incorporate the Rozzen 44 ceiling fans into your interior design:

  • Compact Spaces: Ideal for bedrooms, home offices, or smaller living rooms where space is limited.
  • Color Coordination: Choose a fan finish and blade color that complements existing furniture and decor.
  • Integrated Lighting: Opt for models with integrated LED lighting for dual functionality.
  • Multiple Fans: Install multiple Rozzen 44 fans in larger rooms or open-plan spaces for uniform air circulation.

Conclusion:

The Rozzen 44 ceiling fans offers a perfect blend of style, functionality, and efficiency for smaller spaces. Whether you’re looking to cool a bedroom, home office, or cozy living area, this fan provides reliable performance and aesthetic appeal.

PVC Planks for Ceiling: Enhance Your Space

PVC planks for ceiling are a versatile and practical choice for enhancing the aesthetics and functionality of any space. Discover the benefits, installation tips, design ideas, and maintenance guidelines in this comprehensive guide to PVC planks for ceiling.

Pvc Planks For Ceiling

Understanding

PVC (polyvinyl chloride) planks are engineered to mimic the appearance of traditional wood planks but with added benefits such as moisture resistance, durability, and easy maintenance. They are widely used in both residential and commercial settings to achieve a stylish and functional ceiling design.

Benefits of PVC Planks for Ceiling

PVC planks offer several advantages over other ceiling materials:

  • Moisture Resistance: Ideal for humid environments like bathrooms and kitchens.
  • Durability: Resistant to rotting, warping, and cracking.
  • Easy Installation: Lightweight and easy to install, reducing labor costs.
  • Low Maintenance: Simply wipe clean with a damp cloth.
  • Versatility: Available in various colors, textures, and styles to suit any décor.

Types of PVC Planks

PVC planks for ceilings come in different types, including:

  • Solid PVC Planks: Uniform throughout and highly durable.
  • Hollow Core PVC Planks: Lightweight and cost-effective.
  • Textured PVC Planks: Mimic the look of natural wood grain or other textures.

Applications of PVC Planks for Ceiling

PVC planks are suitable for various applications:

  • Residential: Living rooms, bedrooms, kitchens, and bathrooms.
  • Commercial: Offices, retail spaces, restaurants, and hotels.
  • Outdoor: Covered patios, porches, and sunrooms (if specified for outdoor use).

Installation Tips for PVC Planks for Ceiling

Proper installation ensures the longevity and aesthetic appeal of PVC planks. Follow these tips:

  • Prepare the Surface: Ensure the ceiling surface is clean, dry, and free of debris.
  • Measure and Plan: Measure the area accurately and plan the layout to minimize cutting.
  • Use Suitable Adhesive or Clips: Depending on the type of planks, use appropriate adhesive or clips for secure installation.
  • Allow for Expansion: Leave a small gap between planks and walls to accommodate expansion.
  • Follow Manufacturer Guidelines: Adhere to manufacturer instructions for installation methods and tools.

Maintenance of PVC Planks for Ceiling

Maintaining PVC planks is straightforward:

  • Regular Cleaning: Wipe with a damp cloth or mild soap solution to remove dust and dirt.
  • Avoid Harsh Chemicals: Do not use abrasive cleaners or solvents that can damage the surface.
  • Inspect for Damage: Periodically check for signs of wear, especially in high-traffic areas.

Design Ideas

Explore creative ways to incorporate PVC plank into your ceiling design:

  • Modern Minimalist: Install white or light-colored planks for a clean, contemporary look.
  • Rustic Charm: Opt for textured planks with a wood-like finish for a rustic ambiance.
  • Statement Ceiling: Use contrasting colors or patterns to create a focal point in the room.
  • Functional Spaces: Install PVC planks in areas prone to moisture or humidity for practicality.

Conclusion: Enhance Your Space with PVC Planks for Ceiling

PVC plank for ceiling offer a cost-effective, durable, and stylish solution for residential and commercial spaces alike. Whether you’re renovating your home or designing a new commercial environment, PVC planks provide versatility, easy maintenance, and aesthetic appeal that traditional materials may lack.

Read too: Striped Schoolhouse Ceiling Light Fixtures: Unveiling the Timeless Charm

Occupancy Sensor Ceiling Mount: Enhancing Efficiency and Comfort

Occupancy sensors are integral devices used in various settings to automate lighting and enhance energy efficiency. Learn all about occupancy sensor ceiling mounts, their benefits, installation tips, and applications in this comprehensive guide.

Occupancy Sensor Ceiling Mount

Understanding Occupancy Sensor Ceiling Mount

Occupancy sensors, particularly those mounted on ceilings, serve a critical role in modern building management systems. These sensors detect the presence or absence of people within a space and adjust lighting or HVAC systems accordingly. By eliminating the need for manual control, occupancy sensors contribute significantly to energy savings and convenience.

Benefits of Occupancy Sensor Ceiling Mount

Installing occupancy sensors on ceilings offers several advantages:

  • Energy Efficiency: Sensors ensure that lights are only on when needed, reducing unnecessary energy consumption.
  • Cost Savings: Lower energy bills due to reduced usage of lighting and HVAC systems.
  • Convenience: Automated control of lighting based on occupancy enhances user comfort and convenience.
  • Environmental Impact: Reduced carbon footprint by lowering energy usage.
  • Compliance: Many building codes and standards now require occupancy sensors to meet energy efficiency regulations.

Read too: Striped Schoolhouse Ceiling Light Fixtures: Unveiling the Timeless Charm

Types of Occupancy Sensors

Occupancy sensors come in various types, including passive infrared (PIR), ultrasonic, dual-technology (combination of PIR and ultrasonic), and microwave sensors. Each type has its strengths and is suitable for different environments and applications.

Applications of Occupancy Sensor Ceiling Mount

Occupancy sensor ceiling mounts find applications in:

  • Commercial Buildings: Offices, conference rooms, corridors, and restrooms.
  • Retail Stores: Aisles, storage rooms, and cashier areas.
  • Educational Institutions: Classrooms, libraries, and common areas.
  • Healthcare Facilities: Patient rooms, hallways, and waiting areas.
  • Residential Settings: Homes for enhanced convenience and energy savings.

Installation Tips for Occupancy Sensor Ceiling Mount

Proper installation is crucial for the effective operation of occupancy sensors. Follow these tips:

  • Placement: Install sensors in areas where they can detect motion effectively without obstruction.
  • Height: Position sensors according to manufacturer guidelines to optimize detection range.
  • Testing: Conduct thorough testing after installation to ensure sensors cover the intended area and operate correctly.
  • Compatibility: Ensure compatibility with existing lighting systems and control protocols.

Maintenance and Calibration

Regular maintenance and calibration of occupancy sensors are essential to maintain optimal performance. Factors such as dust accumulation or changes in environment can affect sensor accuracy over time. Follow manufacturer recommendations for cleaning and calibration intervals.

Choosing the Right Occupancy Sensor Ceiling Mount

When selecting an occupancy sensor ceiling mount, consider the following factors:

  • Detection Technology: Choose the technology (PIR, ultrasonic, dual-tech, microwave) based on the specific application and environment.
  • Coverage Area: Ensure the sensor covers the desired area effectively without blind spots.
  • Adjustability: Opt for sensors with adjustable settings for sensitivity and time delay to customize performance.
  • Integration: Check compatibility with existing building management systems or lighting controls.

Future Trends in Occupancy Sensor Technology

As technology advances, occupancy sensors continue to evolve with features such as:

  • Advanced Analytics: Sensors capable of collecting and analyzing occupancy data for space utilization and energy optimization.
  • Wireless Connectivity: Integration with IoT platforms for remote monitoring and control.
  • Smart Building Integration: Seamless integration with other building systems for holistic management.

Conclusion

Occupancy sensor ceiling mounts are indispensable tools for enhancing energy efficiency, convenience, and comfort in various settings. By understanding their benefits, applications, installation tips, and maintenance requirements, you can make informed decisions to optimize your building’s lighting and energy management systems.