Upgrading your bathroom to create a spa-like experience at home is becoming a popular trend. Among the many innovations in bathroom design, the Ceiling Mount Rainfall Shower Head stands out for its ability to transform your shower into a luxurious and relaxing experience. With its sleek, modern design and soothing water flow, a ceiling mount rainfall shower head can elevate any bathroom’s functionality and aesthetics.

In this article, we’ll dive deep into everything you need to know about ceiling mount rainfall shower heads. From understanding the benefits to installation tips, we will guide you through making this upgrade in your bathroom.
What is a Ceiling Mount Rainfall Shower Head?
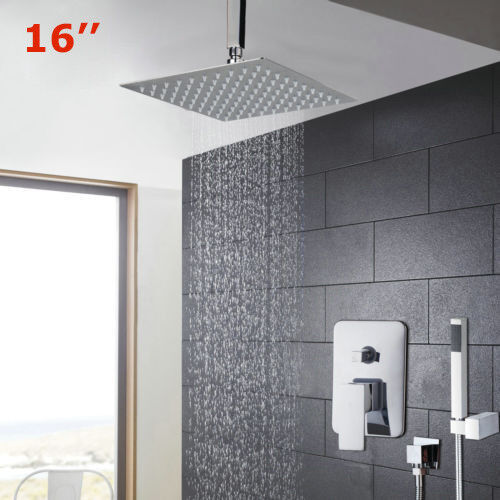
A ceiling mount rainfall shower head is a type of showerhead that is mounted directly on the ceiling, simulating the experience of rainfall as you shower. Unlike traditional wall-mounted showerheads, which direct water flow downwards from a fixed position, the ceiling-mounted design allows for water to fall straight down from above, creating a more immersive and relaxing experience.
Read too: Shiplap Ceiling in Kitchen: A Timeless Trend for a Stylish and Cozy Space
The water flow from a rainfall shower head mimics the natural sensation of rain, which many people find calming and soothing. The gentle cascade of water offers a luxurious and spa-like feel, making it a popular choice for homeowners looking to upgrade their bathrooms with a touch of elegance.
The Benefits of a Ceiling Mount Rainfall Shower Head
There are numerous benefits to installing a ceiling mount rainfall shower head in your bathroom. Let’s explore some of the key advantages that make this upgrade a top choice for many homeowners:
1. Luxurious Spa-Like Experience
One of the main reasons people opt for a ceiling mount rainfall shower head is the sense of luxury it provides. The gentle, even distribution of water from above creates an immersive, rainfall-like experience. This makes showers feel less like a routine task and more like a relaxing ritual. If you enjoy unwinding after a long day, a rainfall shower head can provide a tranquil, rejuvenating experience similar to a high-end spa.
2. Aesthetically Pleasing Design
A ceiling mount rainfall shower head not only enhances the functionality of your shower but also adds to the aesthetic appeal of your bathroom. The sleek, minimalistic design makes it an attractive addition to modern and contemporary bathrooms. Its clean and streamlined look creates a feeling of openness, as the showerhead blends seamlessly into the ceiling, leaving more space for the overall design of the bathroom.
3. Increased Water Coverage
One of the standout features of a ceiling mount rainfall shower head is the even distribution of water. This larger surface area ensures that water covers your entire body, providing a more thorough and comfortable shower experience. Whether you’re looking to enjoy a quick shower or a longer, more relaxing one, the rainfall showerhead ensures that every part of your body is evenly coated with water.
4. Minimalistic and Space-Saving
Since the ceiling mount rainfall shower head is installed directly on the ceiling, it saves space in the shower area. This makes it ideal for smaller bathrooms or for those who prefer a clutter-free design. It also eliminates the need for a bulky wall-mounted shower arm, helping to keep your bathroom looking neat and spacious.
Choosing the Right Ceiling Mount Rainfall Shower Head
Selecting the right ceiling mount rainfall shower head for your bathroom requires careful consideration of a few important factors. Here are some tips to help you make the best choice:
1. Water Pressure Compatibility
Rainfall shower heads are known for their wide, gentle flow of water. However, they may not perform as effectively if your home has low water pressure. Before purchasing a ceiling mount rainfall shower head, it’s important to ensure that your water pressure is sufficient to provide the experience you desire.
If you have low water pressure, consider choosing a showerhead that is designed to work with low-pressure systems or one that has a built-in pressure booster.
2. Size and Coverage Area
Ceiling mount rainfall shower heads come in various sizes, typically ranging from 8 inches to 16 inches or more in diameter. A larger showerhead will provide a broader coverage area, giving you a more immersive experience, but may also require higher water pressure to perform optimally.
Consider the size of your shower and how much coverage you want before selecting the size of your rainfall shower head. Larger showerheads work best in larger bathrooms, while smaller ones may be more suitable for compact shower spaces.
3. Material and Durability
When selecting a ceilings mount rainfall shower head, it’s important to choose a durable material that can withstand daily use and exposure to water. Common materials used for rainfall shower heads include stainless steel, brass, and chrome. Stainless steel is highly durable, corrosion-resistant, and easy to maintain, making it a popular choice.
Choose a material that suits your bathroom’s design, and consider long-term durability to ensure that your investment will last for many years.
4. Showerhead Features
Some ceiling mount rainfall shower heads come with additional features that enhance their functionality. These may include adjustable spray patterns, handheld attachments, and water-saving features. While the traditional rainfall effect is desirable for many users, features like adjustable water pressure and spray angles can add versatility to your shower experience.
When choosing a showerhead, think about what additional features would benefit your needs. For example, if you have children or prefer more targeted water pressure, a model with a handheld shower attachment might be a good option.
Installation Tips
Installing a ceiling mount rainfall shower head requires some plumbing work, but it can be done with the right tools and preparation. If you’re not comfortable with plumbing tasks, it’s recommended to hire a professional plumber to install the showerhead. However, if you’re handy with tools and have experience with home improvement projects, you may choose to install it yourself. Here’s a general guide on how to install a ceiling mount rainfall shower head:
Step 1: Shut Off the Water Supply
Before beginning any installation work, make sure to turn off the water supply to your bathroom to avoid accidents or leaks.
Step 2: Remove the Existing Showerhead
If you have an existing showerhead, use a wrench to unscrew it from the shower arm. Once removed, clean the area to prepare it for the new installation.
Step 3: Install the Shower Arm
Most ceiling mount rainfall shower heads require a shower arm that extends from the ceiling. Install the shower arm by following the manufacturer’s instructions. Make sure it is securely tightened and properly aligned.
Step 4: Attach the Rainfall Shower Head
Once the shower arm is in place, attach the rainfall showerhead to the arm. Again, use a wrench to tighten the connection, but be careful not to overtighten, as this could cause damage.
Step 5: Test the Showerhead
Turn on the water supply and test the showerhead for leaks and water pressure. Adjust the shower arm or showerhead if necessary.
Maintenance and Care
To keep your ceiling mount rainfall shower head in optimal condition, regular maintenance is essential. Here are a few tips to ensure its longevity:
- Clean Regularly: Mineral deposits from hard water can build up on your showerhead over time. Clean your rainfall showerhead by soaking it in a vinegar solution to remove buildup.
- Check for Leaks: Periodically inspect the connections for leaks or loose fittings. Tighten any parts that may have come undone.
- Avoid Harsh Chemicals: Use non-abrasive cleaners to avoid scratching the surface of the showerhead.
Conclusion
A ceiling mount rainfall shower head can significantly enhance your bathroom’s design and elevate your shower experience. With a luxurious rainfall-like effect, sleek design, and easy installation, it’s a perfect addition to any modern bathroom. By considering factors like water pressure, size, and material, you can choose the ideal showerhead for your needs. Whether you’re renovating your bathroom or just looking for an upgrade, a ceilings mount rainfall shower head is an investment that will provide years of comfort and relaxation.