Transform your daily shower routine into a luxurious spa-like experience with the addition of a rain ceiling shower head. Offering a cascade of water reminiscent of a gentle rainfall, these shower fixtures provide an unparalleled sensation of relaxation and indulgence. In this comprehensive guide, we’ll explore the features, benefits, and installation considerations of rain ceiling shower heads, helping you create the ultimate bathroom oasis in your home.
Understanding Rain Ceiling Shower Heads
What is a Rain Ceiling Shower Head?
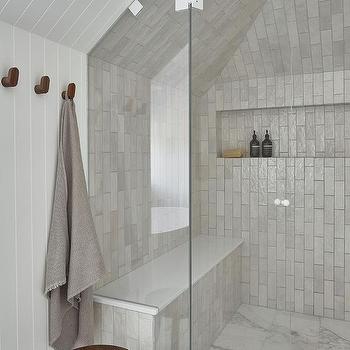
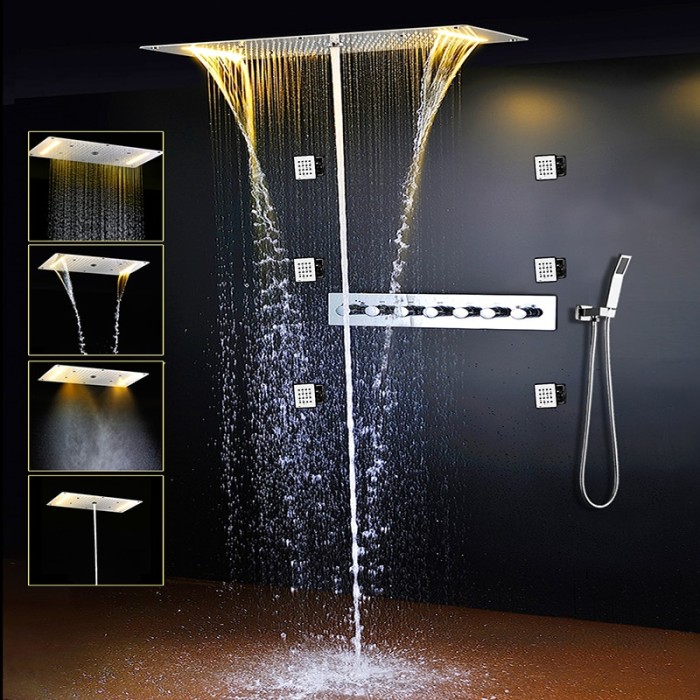
A rain ceiling shower head is a large, flat shower fixture that is typically installed flush with the ceiling of the shower enclosure. These shower heads feature numerous small nozzles that disperse water over a wide area, simulating the sensation of standing beneath a gentle rain shower. The result is a luxurious and immersive shower experience that provides complete coverage and relaxation.
Read too: Understanding and Dealing with Ants in the Ceiling Spaces: Navigating the Intrusion
How Do Rain Ceiling Shower Heads Work?
Rain ceiling shower heads work by channeling water through a network of nozzles positioned across the surface of the shower head. The water is distributed evenly and gently, creating a soothing cascade that envelops the bather in warmth and comfort. Many rain ceiling shower heads also feature adjustable settings, allowing users to customize the intensity and pattern of the water flow to suit their preferences.
Benefits of Rain Ceiling Shower Heads
1. Luxurious Shower Experience
The primary benefit of a rain ceiling shower head is the luxurious shower experience it provides. The gentle rainfall-like sensation of the water falling from above creates a feeling of relaxation and indulgence, allowing users to unwind and destress after a long day.
2. Complete Coverage
Unlike traditional shower heads that spray water from a single point, rain ceiling shower heads offer complete coverage of the body. The wide dispersal of water ensures that every inch of the bather’s skin is thoroughly cleansed and refreshed, providing a thorough and invigorating shower experience.
3. Aesthetic Appeal
In addition to their functional benefits, rain ceiling shower heads also add a touch of elegance and sophistication to any bathroom. Their sleek and modern design enhances the overall aesthetic of the space, creating a focal point that enhances the beauty and ambiance of the room.
Installation Considerations
When installing a rain ceiling shower head, there are several factors to consider:
- Ceiling Height: Ensure that the ceiling height in your shower enclosure is sufficient to accommodate the shower head without impeding movement or causing discomfort.
- Water Pressure: Check the water pressure in your home to ensure that it is adequate to support the flow of water from the shower head.
- Plumbing Compatibility: Confirm that your existing plumbing is compatible with the installation of a rain ceiling shower head, or consult with a professional plumber for assistance.
Conclusion
Rain ceiling shower heads offer a luxurious and immersive shower experience that transforms your bathroom into a tranquil oasis. With their gentle rainfall-like sensation, complete coverage, and aesthetic appeal, these shower fixtures provide the ultimate combination of relaxation and indulgence. Whether you’re renovating your bathroom or simply looking to upgrade your shower, consider the benefits of a rain ceilings shower head for an unparalleled bathing experience.