Discover the versatility and practicality of island hoods designed specifically for low-ceiling environments, ensuring both functionality and aesthetic appeal.
Island Hoods For Low Ceilings: The Perfect Kitchen Upgrade
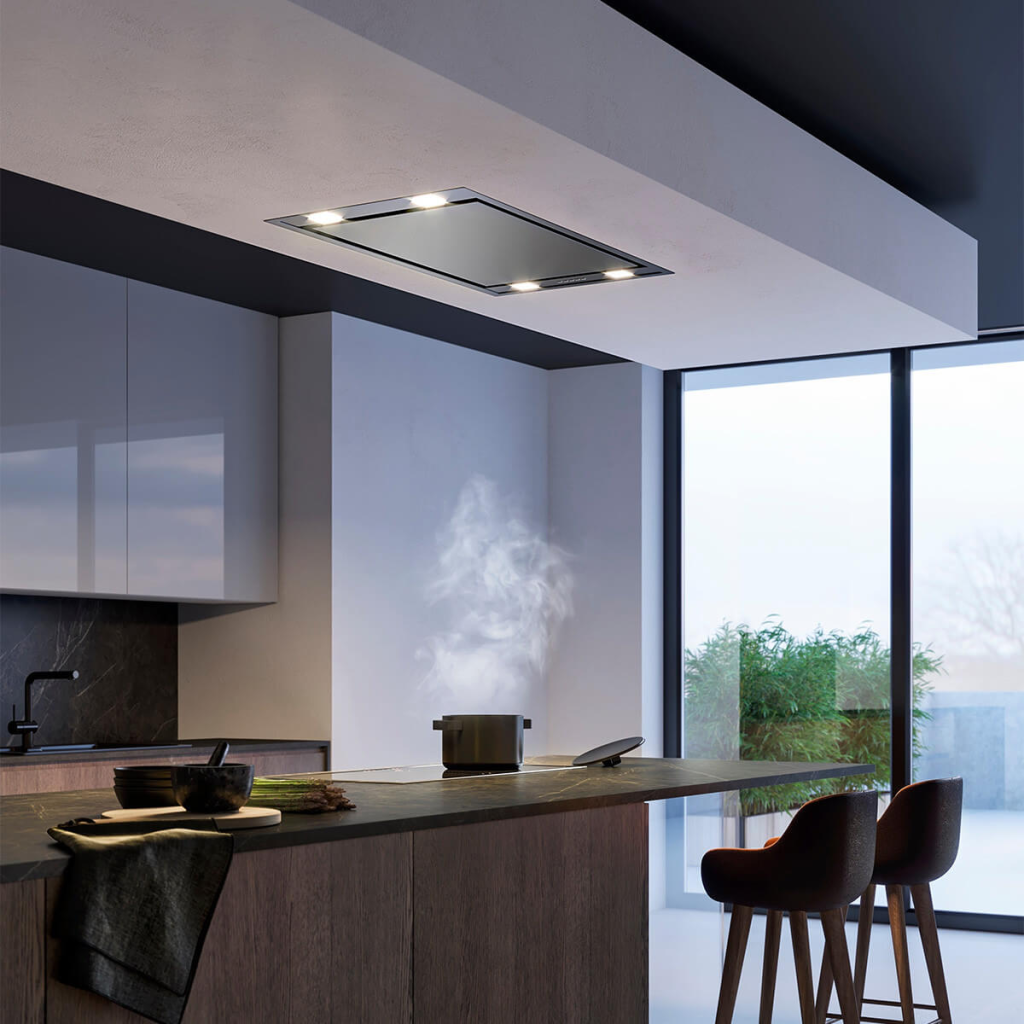
Island hoods are an essential part of modern kitchen design, offering ventilation solutions that also contribute to the overall style of the space. When dealing with low ceilings, choosing the right island hood becomes crucial to ensure effective air extraction without compromising headroom or visual harmony.
Understanding Island Hoods For Low Ceilings
Island hoods designed for low ceilings are characterized by their compact and streamlined profiles, offering efficient ventilation solutions while accommodating limited vertical space. Key features include:
Compact Design: Maximizes headroom while still providing effective ventilation.
Adjustable Height: Some models offer adjustable chimney lengths to fit various ceiling heights.
Powerful Extraction: Ensures rapid removal of cooking odors, grease, and smoke.
Aesthetic Appeal: Available in various finishes and styles to complement different kitchen aesthetics.
Benefits of Choosing Island Hoods For Low Ceilings
Improved Air Quality: Efficiently removes airborne particles and cooking odors from the kitchen.
Space-Saving Design: Ideal for kitchens where space is at a premium, offering effective ventilation without dominating the visual space.
Enhanced Kitchen Safety: Reduces the buildup of grease and moisture, promoting a safer cooking environment.
Design Versatility: Adds a focal point to the kitchen island while blending seamlessly with low-ceiling environments.
Design Considerations for Island Hoods
When selecting an island hood for low ceilings, consider the following factors to ensure optimal performance and aesthetic integration:
Ceiling Height: Measure the distance from the cooktop to the ceiling to determine the appropriate hood height.
Ventilation Power: Choose a hood with adequate CFM (Cubic Feet per Minute) rating based on your kitchen size and cooking habits.
Noise Levels: Opt for models with quiet operation to minimize disruption during cooking.
Style and Finish: Match the island hood finish with your kitchen decor, whether it’s stainless steel, black, white, or custom colors.
Installing and Maintaining Your Island Hood
Proper installation and regular maintenance are essential for maximizing the lifespan and efficiency of your island hood:
Installation: Follow manufacturer guidelines or hire a professional to ensure proper venting and electrical connections.
Ventilation Ducts: Ensure ducts are clear of debris and properly routed to vent outside the home.
Cleaning and Maintenance: Regularly clean the hood filters and exterior surfaces to maintain airflow and aesthetics.
Replace Filters: Replace or clean filters as recommended to prevent grease buildup and maintain efficiency.
Conclusion
Island hoods for low ceilings offer a practical solution for kitchens where space is limited but ventilation is essential. By choosing the right hood design and features, homeowners can enhance both functionality and style in their kitchen spaces. Explore the range of options available to find the perfect island hood that suits your culinary needs and complements your kitchen’s aesthetics.
Discover the functionality and style of the Industrial Caged Ceiling Fan, perfect for enhancing your space with a blend of modern aesthetics and efficient airflow.
Industrial Caged Ceiling Fan: Combining Style and Utility
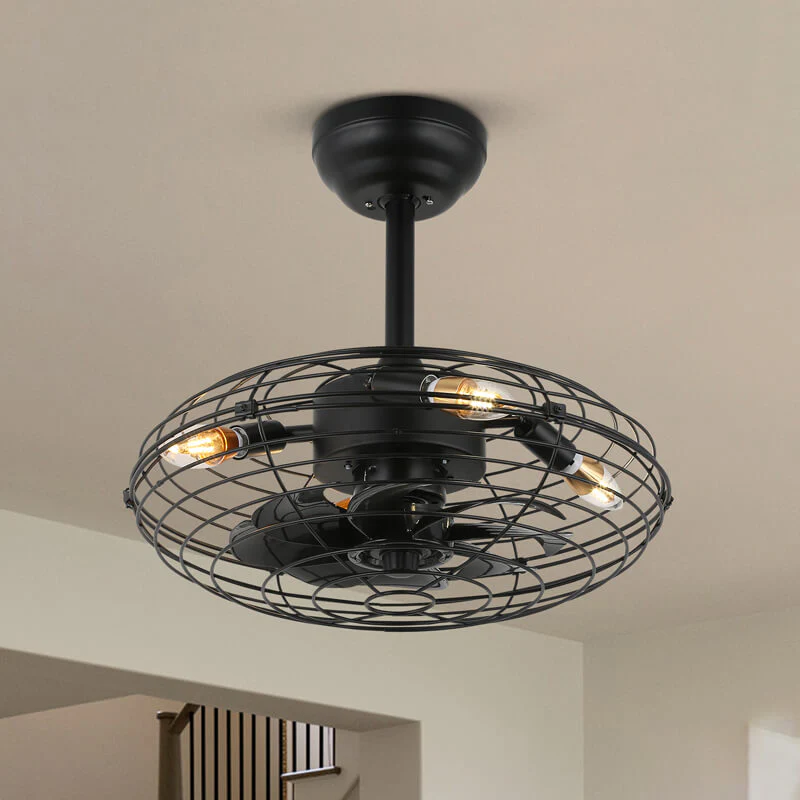
Industrial caged ceiling fans are more than just functional appliances; they serve as stylish additions to any space, offering both cooling and distinctive design elements. These fans are characterized by their robust build, often featuring metal cages that enclose the fan blades. Here’s a comprehensive look at what makes industrial caged ceiling fans a popular choice for various environments.
Design Features of Industrial Caged Ceiling Fans
The design of industrial caged ceiling fans focuses on durability and visual impact. Key features include:
Metal Cage: Protects the fan blades and adds an industrial aesthetic.
Exposed Bulbs: Enhance the vintage industrial look.
Wide Blades: Efficiently move air in larger spaces.
Variety of Finishes: Options like matte black, brushed nickel, or aged bronze cater to diverse interior styles.
Enhanced Air Circulation: The cage design directs airflow effectively, making these fans ideal for large rooms or high ceilings.
Durability: Built to withstand industrial environments, these fans are long-lasting and low-maintenance.
Visual Appeal: Adds a statement piece to industrial, modern, or eclectic decor themes.
Versatility: Suitable for both residential and commercial spaces, including warehouses, lofts, and offices.
Applications of Industrial Caged Ceiling Fans
Industrial caged ceiling fans find applications in various settings:
Home Interiors: Living rooms, bedrooms, and kitchens benefit from their functionality and style.
Commercial Spaces: Offices, restaurants, and retail stores utilize these fans for air circulation and design impact.
Outdoor Areas: Covered patios or porches where weather-resistant models can be installed.
Choosing the Right Industrial Caged Ceiling Fan
When selecting an industrial caged ceiling fan, consider these factors:
Size: Match the fan diameter to the room size for optimal air movement.
Mounting Options: Choose between standard, flush, or angled mounts depending on ceiling height.
Control Features: Options include remote controls, wall controls, or pull chains for convenience.
Energy Efficiency: Look for Energy Star-rated models to save on utility bills.
Installing and Maintaining Your Industrial Caged Ceiling Fan
Proper installation and maintenance ensure optimal performance and longevity:
Installation: Follow manufacturer instructions or hire a professional for safe installation.
Cleaning: Regularly dust fan blades and clean the cage to maintain airflow efficiency.
Lubrication: Apply lubricant to motor bearings as recommended to reduce noise and friction.
Safety Checks: Periodically check for loose screws, balance issues, and electrical connections.
Conclusion
Industrial caged ceiling fans are versatile additions to any space, combining functionality with striking design elements. Whether you’re looking to enhance air circulation or add an industrial vibe to your decor, these fans offer a compelling solution. Explore the variety of styles and features available to find the perfect industrial caged ceiling fan for your needs.
Modern kitchens are evolving, incorporating innovative solutions that enhance functionality and aesthetics. One such innovation is the in ceiling hood vent, a sleek and efficient alternative to traditional range hoods. This article will explore the benefits, features, and installation of in ceiling hood vents, providing you with all the information you need to make an informed decision for your kitchen upgrade.
What is an In Ceiling Hood Vent?
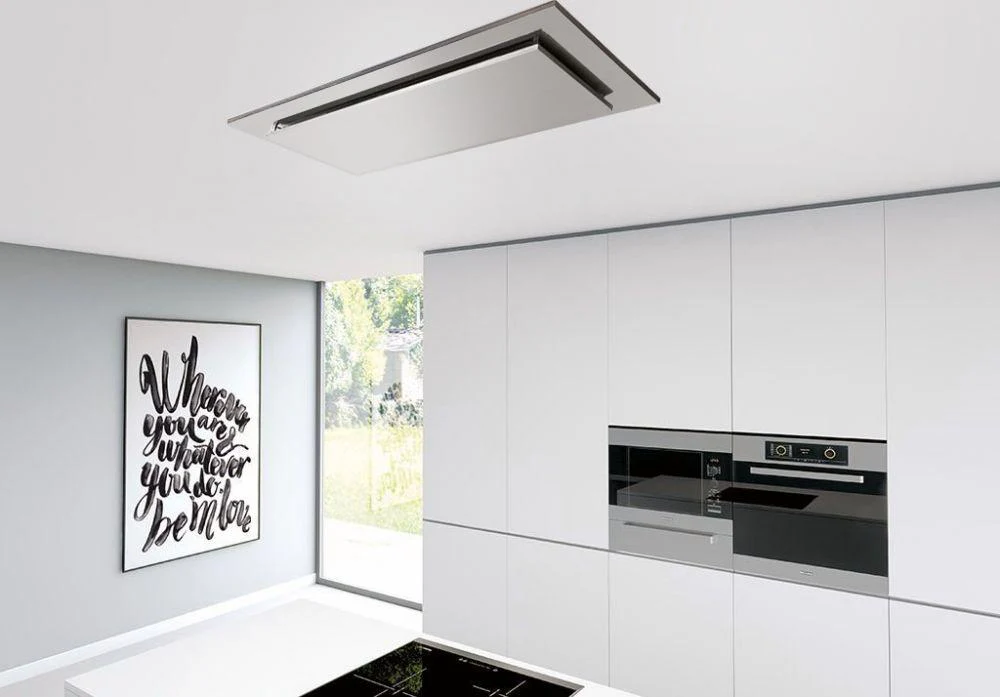
An in ceiling hood vent is a ventilation system designed to be installed directly into the ceiling above your cooking area. Unlike conventional range hoods that are mounted on the wall or above an island, these hoods are integrated into the ceiling, offering a minimalist and unobtrusive solution to kitchen ventilation. This design not only saves space but also enhances the overall look of your kitchen by providing a seamless and clean appearance.
Benefits of an In Ceiling Hood Vent
Space-Saving Design
One of the most significant advantages of an in ceiling hood vent is its space-saving design. By installing the hood in the ceiling, you free up valuable space above your stove or island, allowing for more storage or a more open and airy kitchen layout. This is particularly beneficial in smaller kitchens where every inch of space matters.
Enhanced Aesthetics
In ceiling hood vents offer a sleek and modern look that can enhance the aesthetics of any kitchen. Their unobtrusive design ensures that the focus remains on your kitchen’s decor and appliances, rather than a bulky range hood. This minimalist approach is perfect for contemporary and open-concept kitchens.
Despite their compact design, in ceiling hood vents are highly effective at removing smoke, odors, and grease from your kitchen. Advanced models come equipped with powerful fans and filtration systems that ensure your kitchen remains fresh and clean. Many in ceiling hood vents also offer multiple fan speeds and settings, allowing you to customize the ventilation to suit your cooking needs.
Quiet Operation
Traditional range hoods can be noisy, disrupting conversations and creating an unpleasant cooking environment. In ceiling hood vents, on the other hand, are designed for quiet operation. Their motors are often located further away from the cooking area, reducing noise levels and allowing you to enjoy a more peaceful kitchen experience.
Improved Lighting
Many in ceiling hood vents come with integrated lighting options that provide ample illumination for your cooking area. LED lights are commonly used, offering bright and energy-efficient lighting that enhances visibility while cooking. This added feature not only improves functionality but also contributes to the overall ambiance of your kitchen.
Features of an In Ceiling Hood Vent
Powerful Extraction
A key feature of any in ceiling hood vent is its extraction power. Look for models that offer high airflow rates (measured in cubic feet per minute, or CFM) to ensure efficient removal of smoke and odors. Some advanced models also come with automatic sensors that adjust the fan speed based on the level of smoke or steam detected.
Multi-Speed Settings
Different cooking activities generate varying levels of smoke and odors. An in ceiling hood vent with multiple fan speeds allows you to customize the ventilation to match your needs. Low speeds can be used for simmering and light cooking, while higher speeds are ideal for frying or grilling.
Remote Control Operation
Convenience is a significant factor in modern kitchen appliances. Many in ceiling hood vents come with remote controls, allowing you to operate the fan and lighting from anywhere in the kitchen. This feature adds a level of convenience and flexibility, making it easier to adjust settings without interrupting your cooking.
Filter Types
Effective filtration is essential for maintaining a clean and odor-free kitchen. In ceiling hood vents typically come with one or more types of filters, such as grease filters and charcoal filters. Grease filters trap grease and oil particles, while charcoal filters help to neutralize odors. Look for models with easy-to-clean and replaceable filters for hassle-free maintenance.
Smart Technology
Some in ceiling hood vents incorporate smart technology, allowing for integration with home automation systems. These models can be controlled via smartphone apps or voice commands, offering advanced features like automatic shut-off, air quality monitoring, and scheduled operation.
Installation of an In Ceiling Hood Vent
Pre-Installation Considerations
Before installing an in ceiling hood vent, it’s essential to consider a few factors. First, ensure that your kitchen layout and ceiling height are suitable for this type of installation. The vent should be positioned directly above your cooking area for optimal performance. Additionally, check the manufacturer’s specifications for the required ducting and electrical connections.
Professional Installation
While some homeowners may opt for a DIY installation, it’s generally recommended to hire a professional for this task. Installing an in ceiling hood vent involves electrical wiring, ductwork, and potentially cutting into the ceiling. A professional installer will ensure that the job is done correctly and safely, adhering to all local building codes and regulations.
Step-by-Step Installation Process
Prepare the Ceiling: Measure and mark the location where the hood vent will be installed. Use a stud finder to locate ceiling joists and ensure the chosen spot is free of obstructions.
Cut the Ceiling Opening: Carefully cut an opening in the ceiling according to the dimensions specified by the manufacturer. Use a drywall saw or a similar tool for this step.
Install the Mounting Bracket: Secure the mounting bracket to the ceiling joists. This bracket will support the weight of the hood vent, so it’s crucial to ensure it’s firmly attached.
Connect the Ductwork: Attach the ductwork to the vent’s outlet, ensuring a tight seal to prevent air leaks. Run the ductwork to an exterior vent or a dedicated ventilation system.
Wiring the Vent: Connect the electrical wiring according to the manufacturer’s instructions. This step may involve connecting the vent to a dedicated circuit breaker.
Mount the Hood Vent: Carefully lift and secure the hood vent to the mounting bracket. Ensure that all connections are secure and that the vent is level.
Test the Vent: Turn on the power and test the vent to ensure it’s operating correctly. Check the fan speeds, lighting, and any additional features to confirm proper installation.
Maintenance and Care for Your In Ceiling Hood Vent
Regular Cleaning
Regular cleaning is essential to maintain the performance and appearance of your in ceiling hood vent. Wipe down the exterior surfaces with a damp cloth and mild detergent to remove grease and dust. Clean the filters as recommended by the manufacturer to ensure optimal airflow and filtration.
Inspect for Damage
Periodically inspect your hood vent for any signs of damage or wear. Check the ductwork and electrical connections to ensure they are secure and free of obstructions. Address any issues promptly to prevent further damage and ensure continued performance.
Replace Filters
Depending on the model, you may need to replace the filters periodically. Grease filters should be cleaned regularly and replaced if they become damaged or clogged. Charcoal filters, if used, should be replaced according to the manufacturer’s recommendations to maintain effective odor control.
Conclusion
An in ceiling hood vent is an excellent addition to any modern kitchen, offering a sleek and efficient solution for ventilation. With their space-saving design, powerful performance, and advanced features, these vents provide both aesthetic and functional benefits. By understanding the features, installation process, and maintenance requirements, you can make an informed decision and enjoy the enhanced comfort and style that an in ceiling hood vent brings to your kitchen.
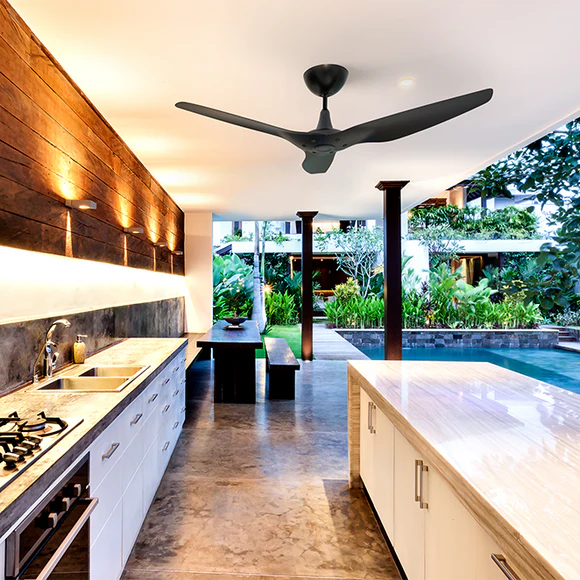
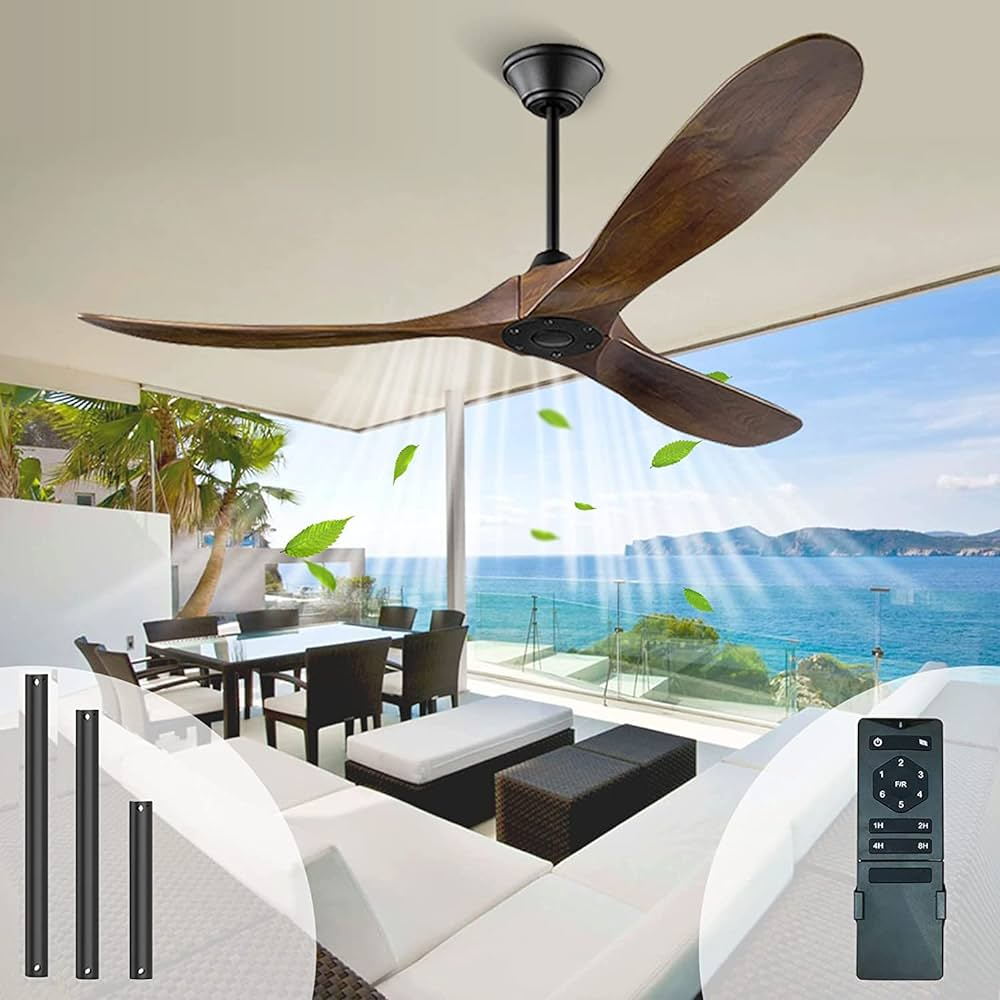
An outdoor ceiling fan can be a game-changer for your patio, deck, or porch, adding comfort and style while helping you stay cool during the warmer months. Among the many options available, the Haiku Outdoor Ceiling Fan stands out as a premium choice, combining advanced technology, sleek design, and superior performance. In this comprehensive guide, we will delve into the features, benefits, and installation of the Haiku Outdoor Ceiling Fan, making it easier for you to understand why this fan is an excellent addition to any outdoor space.
Why Choose a Haiku Outdoor Ceiling Fan?
Unmatched Design and Aesthetics
The Haiku Outdoor Ceiling Fan is known for its modern, minimalist design that enhances the look of any outdoor area. Its clean lines, sleek finishes, and elegant silhouette make it a statement piece that complements a wide range of architectural styles. Available in various finishes, such as black, white, and caramel, the Haiku Outdoor Ceiling Fan can seamlessly blend with your outdoor decor.
One of the standout features of the Haiku Outdoor Ceiling Fan is its integration of advanced technology to deliver exceptional performance. The fan is equipped with a powerful yet energy-efficient motor that ensures consistent airflow without excessive noise. Additionally, the fan includes smart technology features, such as SenseME, which uses temperature and humidity sensors to adjust the fan’s speed automatically, providing optimal comfort with minimal effort.
Energy Efficiency
Energy efficiency is a key consideration for any electrical appliance, and the Haiku Outdoor Ceiling Fan excels in this area. Its brushless DC motor consumes significantly less energy than traditional ceiling fans, making it an eco-friendly choice. The fan’s aerodynamic design also contributes to its energy efficiency by maximizing airflow with minimal power consumption.
Durability and Weather Resistance
Outdoor ceiling fans must withstand various weather conditions, and the Haiku Outdoor Ceiling Fan is built to last. Constructed from high-quality materials, such as aircraft-grade aluminum and durable plastic, this fan is designed to resist rust, corrosion, and UV damage. It is also rated for use in damp and wet locations, ensuring reliable performance in all kinds of outdoor environments.
Features of the Haiku Outdoor Ceiling Fan
Smart Controls
The Haiku Outdoor Ceiling Fan comes with a range of smart controls that make it easy to operate. It can be controlled via a mobile app, remote control, or voice commands through compatible smart home devices like Amazon Alexa or Google Assistant. This allows you to adjust the fan’s settings from anywhere, adding convenience and flexibility to your outdoor comfort.
LED Light Kit
Many models of the Haiku Outdoor Ceiling Fan include an integrated LED light kit, providing bright and energy-efficient illumination for your outdoor space. The LED lights are dimmable, allowing you to create the perfect ambiance for any occasion, whether it’s a lively gathering or a relaxing evening on the porch.
Quiet Operation
Noise can be a significant factor when choosing a ceiling fan, especially for outdoor spaces where you want to enjoy peace and tranquility. The Haiku Outdoor Ceiling Fan operates quietly, thanks to its precision-balanced blades and advanced motor technology. This ensures that you can enjoy the cooling breeze without any distracting noise.
Customizable Settings
The Haiku Outdoor Ceiling Fan offers a variety of customizable settings to suit your preferences. You can adjust the fan speed, set schedules, and even use the fan’s “Whoosh” mode to simulate natural breezes. These features allow you to tailor the fan’s operation to your specific needs and enjoy a personalized outdoor experience.
Eco-Friendly Features
In addition to its energy-efficient motor, the Haiku Outdoor Ceiling Fan is designed with eco-friendly features. The fan is made from sustainable materials and is designed to reduce energy consumption, making it a responsible choice for environmentally-conscious homeowners.
Installation of the Haiku Outdoor Ceiling Fan
Pre-Installation Preparation
Before installing your Haiku Outdoor Ceiling Fan, it’s essential to prepare adequately. Start by choosing the right location for the fan, ensuring it is centered in the space and has enough clearance from walls and other obstacles. Gather all necessary tools, such as a ladder, screwdriver, wire stripper, and voltage tester, and make sure you have the fan’s installation manual on hand.
Turn Off the Power
Safety is paramount when working with electrical appliances. Turn off the power to the area where you will be installing the fan at the circuit breaker. Use a voltage tester to confirm that the power is off before proceeding with the installation.
Install the Mounting Bracket
The first step in the installation process is to attach the mounting bracket to the ceiling. This bracket will support the weight of the fan, so it’s crucial to ensure it is securely fastened. Use the screws provided with the fan and a screwdriver to attach the bracket to the ceiling joist.
Assemble the Fan
Next, assemble the fan according to the manufacturer’s instructions. This typically involves attaching the fan blades to the motor housing and connecting the wiring. Make sure all connections are secure and that the fan blades are properly balanced to ensure smooth operation.
Attach the Fan to the Mounting Bracket
Once the fan is assembled, attach it to the mounting bracket. This step may require an extra pair of hands to help hold the fan in place while you secure it. Follow the instructions in the manual to ensure the fan is properly aligned and securely attached.
Connect the Wiring
Carefully connect the wiring from the fan to the wiring in your ceiling. Match the colors of the wires (usually black to black, white to white, and green to ground) and secure them with wire nuts. Ensure all connections are tight and insulated to prevent electrical shorts.
Test the Fan
After completing the installation, turn the power back on at the circuit breaker and test the fan to ensure it is working correctly. Use the remote control, mobile app, or wall switch to turn the fan on and off, adjust the speed, and test any additional features like the LED light kit.
Maintenance and Care for the Haiku Outdoor Ceiling Fan
Regular Cleaning
To keep your Haiku Outdoor Ceiling Fan in optimal condition, regular cleaning is essential. Dust and dirt can accumulate on the fan blades and motor housing, affecting performance. Regularly wipe the blades and housing with a soft cloth, avoiding harsh chemicals that could damage the finish.
Inspect for Wear and Tear
Periodically inspect your fan for signs of wear and tear. Check for loose screws, damaged blades, or any other issues that could affect performance. Address any problems promptly to ensure the fan continues to operate smoothly and efficiently.
Lubricate Moving Parts
While the Haiku Outdoor Ceiling Fans is designed for minimal maintenance, it’s a good idea to lubricate any moving parts occasionally. This can help prevent wear and reduce noise, ensuring the fan remains quiet and efficient.
Update Software
If your fan includes smart features, make sure to keep the software up to date. Check for updates regularly in the mobile app and install them as needed to take advantage of new features and improvements.
Conclusion
The Haiku Outdoor Ceiling Fans is a stylish, efficient, and durable option for enhancing your outdoor living spaces. With its sleek design, advanced technology, and energy-efficient performance, this fan offers a perfect blend of form and function. By following the installation and maintenance tips provided in this guide, you can enjoy the comfort and convenience of a Haiku Outdoor Ceiling Fans for years to come.
Lighting is an essential aspect of home design, influencing both the functionality and aesthetics of a space. One of the most versatile and stylish options available is the flush mount ceiling light low profile. This type of lighting fixture is perfect for rooms with low ceilings or for those who prefer a sleek, unobtrusive design. In this comprehensive guide, we’ll explore the benefits, design tips, and installation considerations for flush mount ceiling light with a low profile.
Why Choose a Flush Mount Ceiling Light Low Profile?
Space-Saving Design
Flush mount ceiling lights are designed to sit close to the ceiling, making them an excellent choice for rooms with limited headroom. Their low profile ensures that they do not take up valuable space, allowing for more open and airy environments. This is particularly beneficial in smaller rooms, hallways, or areas with low ceilings.
Versatile Aesthetic
Flush mount ceiling lights come in a wide variety of styles, finishes, and designs, making it easy to find a fixture that complements your existing decor. Whether you prefer modern, minimalist, traditional, or industrial designs, there is a flush mount ceiling light that will suit your taste. Their understated elegance can enhance any room without overwhelming the overall design.
These fixtures provide efficient and even lighting, making them ideal for general illumination in any room. Many flush mount ceiling lights are compatible with energy-efficient LED bulbs, helping you reduce energy consumption and lower your electricity bills. Additionally, the low profile design ensures that light is distributed evenly across the room, minimizing shadows and dark spots.
Easy Maintenance
Flush mount ceiling lights are relatively easy to clean and maintain. Their simple design means fewer nooks and crannies where dust can accumulate. Most fixtures can be easily wiped down with a damp cloth, and changing bulbs is typically straightforward. This makes them a practical choice for busy households or commercial spaces.
Designing Your Space with Flush Mount Ceiling Light Low Profile
When incorporating flush mount ceiling lights into your home, there are several design considerations to keep in mind. Here are some tips to help you make the most of these versatile lighting fixtures:
Choose the Right Size
The size of your flush mount ceiling light should be proportionate to the size of the room. In larger rooms, a bigger fixture can provide ample illumination and make a bold design statement. In smaller spaces, opt for a more compact light to maintain balance and prevent the fixture from overwhelming the room. Measure your space and consider the height of your ceilings to choose the appropriate size.
Consider the Style
Flush mount ceiling lights are available in a wide range of styles, from sleek and modern to ornate and traditional. Choose a style that complements the overall decor of your room. For a cohesive look, consider matching the finish of the light fixture with other hardware and accents in the room, such as door handles, cabinet knobs, or picture frames.
Think About Light Distribution
Consider the type of light distribution you need for each room. Some flush mount ceiling lights provide diffused light, which is ideal for creating a soft, ambient glow. Others offer more focused illumination, which is better for task lighting. Think about how you use each room and choose a fixture that provides the appropriate level of brightness and coverage.
Add Dimmer Switches
Installing dimmer switches with your flush mount ceiling lights allows you to adjust the brightness according to your needs and preferences. This is particularly useful in multi-functional spaces where different lighting levels are required for various activities. Dimming capabilities also enhance the ambiance of a room and can help save energy.
Installing Flush Mount Ceiling Light Low Profile
Gather Your Tools and Materials
Before you begin the installation process, gather all the necessary tools and materials. You will need a ladder, screwdriver, wire strippers, voltage tester, wire nuts, and the light fixture. Make sure to read the manufacturer’s instructions carefully and ensure you have all the components required for installation.
Turn Off the Power
Safety is paramount when working with electrical fixtures. Turn off the power to the circuit where you will be installing the light. Use a voltage tester to ensure that the power is completely off before you begin working. This will help prevent electrical shocks and ensure a safe installation process.
Remove the Old Fixture
If you are replacing an existing light fixture, start by removing it. Carefully unscrew and detach the old fixture from the ceiling, being mindful of the wiring. Once the fixture is removed, inspect the wiring and the ceiling box to ensure they are in good condition and suitable for the new fixture.
Install the Mounting Bracket
Most flush mount ceiling lights come with a mounting bracket that needs to be installed first. Attach the bracket to the ceiling box using the provided screws. Make sure the bracket is securely fastened and level. This will provide a stable base for your new light fixture.
Connect the Wires
Next, connect the wires from the light fixture to the wires in the ceiling box. Match the colors of the wires: typically, black to black (hot), white to white (neutral), and green or bare copper to the ground wire. Use wire nuts to secure the connections and ensure they are tight. Carefully tuck the wires into the ceiling box.
Attach the Light Fixture
Once the wiring is connected, attach the light fixture to the mounting bracket. Align the fixture with the bracket and use the provided screws to secure it in place. Make sure the fixture is flush against the ceiling and properly aligned. Double-check that all screws are tight and the fixture is securely mounted.
Install the Bulbs and Cover
Install the appropriate light bulbs as specified by the manufacturer. Once the bulbs are in place, attach the fixture’s cover or shade. This may involve screwing in a glass cover, snapping on a plastic diffuser, or securing a metal grate. Ensure the cover is securely attached and fits snugly.
Turn the Power Back On
After the fixture is installed, turn the power back on at the circuit breaker. Test the light to make sure it is working properly. If you have installed a dimmer switch, check that it functions correctly and adjusts the brightness as intended.
Maintaining Your Flush Mount Ceiling Light Low Profile
Regular Cleaning
To keep your flush mount ceiling light looking its best, regular cleaning is essential. Dust and dirt can accumulate on the surface and reduce the brightness of the light. Use a soft, damp cloth to wipe down the fixture, paying special attention to any intricate details or crevices. Avoid using harsh chemicals or abrasive cleaners, as they can damage the finish.
Inspect for Wear and Tear
Periodically inspect your light fixture for signs of wear and tear. Check for loose screws, damaged wires, or other issues that may need attention. Address any problems promptly to ensure the fixture remains safe and functional. Regular maintenance will help extend the lifespan of your light fixture and keep it looking and working its best.
Replace Bulbs as Needed
Over time, the light bulbs in your fixture may need to be replaced. Follow the manufacturer’s recommendations for the type and wattage of bulbs to use. When replacing bulbs, make sure the power is turned off and the fixture is cool to the touch. Properly dispose of old bulbs and install new ones according to the manufacturer’s instructions.
Update Your Decor
If you decide to update your room’s decor, consider how your flush mount ceiling light fits into the new design. You may want to change the fixture to match a new color scheme or style. Many flush mount ceiling lights are designed to be easily replaced, allowing you to update your lighting as your tastes and needs evolve.
Conclusion
Flush mount ceiling lights with a low profile offer a perfect blend of style, functionality, and space-saving design. They are an ideal solution for rooms with low ceilings or for those who prefer a sleek, modern look. By carefully selecting the right size, style, and light distribution, you can create a well-lit and visually appealing space. Proper installation and regular maintenance will ensure your light fixture remains a valuable addition to your home for years to come.
Closets are a crucial component of home organization, and nothing beats the efficiency and elegance of a floor-to-ceiling built-in closet. These versatile storage solutions offer maximum space utilization, a seamless aesthetic, and customized options that fit perfectly into your lifestyle. In this comprehensive guide, we’ll explore the many benefits of floor-to-ceiling built-in closets, design tips, and considerations for installation.
Why Choose a Floor To Ceiling Built In Closet?
Maximizing Storage Space
One of the primary advantages of a floor-to-ceiling built-in closet is its ability to maximize storage space. Traditional closets often leave unused space above and below the main storage area. By extending the closet from floor to ceiling, you can fully utilize every inch of available space. This is particularly beneficial in smaller rooms where efficient storage solutions are essential.
Customization Options
A floor-to-ceiling built-in closet can be tailored to meet your specific needs. Whether you require extra hanging space for clothes, dedicated shelves for shoes, or specialized compartments for accessories, a customized closet can accommodate all of your requirements. The customization options are endless, allowing you to design a storage solution that fits your lifestyle perfectly.
These closets also contribute to a clean and streamlined appearance in any room. Without the gaps and wasted space typical of standard closets, a floor-to-ceiling design offers a seamless look that can make your space appear larger and more organized. Additionally, built-in closets can be designed to match the existing decor of your room, ensuring a cohesive and stylish look.
Designing Your Floor To Ceiling Built In Closet
When it comes to designing a floor-to-ceiling built-in closet, there are several key factors to consider. Here are some tips to help you create the perfect closet for your needs:
Assess Your Storage Needs
Before you begin the design process, take inventory of what you need to store. Consider the types of clothing, shoes, and accessories you own and how you prefer to organize them. This will help you determine the types of storage solutions you need, such as hanging rods, shelves, drawers, and shoe racks.
Choose the Right Materials
The materials you choose for your closet will impact its durability, appearance, and cost. Common materials for built-in closets include wood, laminate, and metal. Wood offers a classic and durable option, while laminate can provide a more affordable and versatile choice. Metal elements can add a modern touch and provide additional strength for heavy items.
Incorporate Lighting
Proper lighting is essential for any closet. Consider incorporating built-in lighting solutions to ensure your items are easily visible and accessible. LED strip lights, recessed lighting, and motion-sensor lights are all excellent options that can enhance the functionality and aesthetics of your closet.
Utilize Vertical Space
One of the main benefits of a floor-to-ceiling closet is the ability to utilize vertical space. Install shelves and hanging rods at varying heights to accommodate different types of clothing and accessories. Consider using the uppermost shelves for items that are used less frequently, such as seasonal clothing or special occasion attire.
Add Functional Accessories
Incorporate functional accessories to enhance the usability of your closet. Pull-out baskets, tie racks, belt hooks, and jewelry drawers are just a few examples of accessories that can help keep your items organized and easily accessible.
Plan for Future Needs
When designing your closet, think about your future storage needs. Consider creating flexible storage solutions that can be adjusted as your needs change. Adjustable shelves, modular components, and versatile storage bins can help ensure your closet remains functional and organized for years to come.
Installation Considerations
Professional vs. DIY Installation
Deciding whether to hire a professional or tackle the installation yourself is an important consideration. Professional installation ensures a high-quality result and can save you time and effort. However, if you have experience with home improvement projects and are comfortable with the necessary tools and techniques, a DIY installation can be a rewarding and cost-effective option.
Measuring and Planning
Accurate measurements are crucial for a successful installation. Measure the height, width, and depth of your space to ensure your closet components will fit perfectly. Create a detailed plan that includes the layout and dimensions of each element. This will help you visualize the final result and identify any potential issues before you begin the installation.
Preparing the Space
Before installing your floor-to-ceiling built-in closet, prepare the space by removing any existing shelving, rods, or other obstructions. Repair any damage to the walls and ensure the area is clean and free of dust and debris. This will provide a solid foundation for your new closet and help ensure a smooth installation process.
Assembling and Installing Components
Follow the manufacturer’s instructions for assembling and installing each component of your closet. Start with the vertical supports and ensure they are securely attached to the wall. Next, install the horizontal shelves, rods, and other components. Use a level to ensure each element is properly aligned and adjust as necessary. Secure each piece with the appropriate hardware and double-check all connections for stability.
Finishing Touches
Once your closet is installed, add the finishing touches to complete the look. Install any additional accessories, such as drawer pulls, hooks, or decorative elements. Clean the surfaces and organize your items to create a functional and visually appealing space.
Maintaining Your Floor To Ceiling Built In Closet
To keep your closet looking and functioning its best, regular maintenance is essential. Here are some tips to help you maintain your floor-to-ceiling built-in closet:
Regular Cleaning
Dust and dirt can accumulate on the surfaces of your closet, so regular cleaning is important. Wipe down shelves, rods, and other components with a damp cloth to remove dust and debris. Use a vacuum or duster to clean hard-to-reach areas, such as the top shelves and corners.
Inspect for Wear and Tear
Regularly inspect your closet for signs of wear and tear. Check for loose hardware, damaged shelves, or other issues that may need attention. Address any problems promptly to prevent further damage and ensure your closet remains functional and safe.
Reorganize as Needed
Over time, your storage needs may change. Periodically reorganize your closet to ensure it continues to meet your needs. Donate or discard items you no longer use and adjust the layout as necessary to accommodate new items.
Protect Your Investment
If your closet includes wooden components, consider applying a protective finish to prevent damage from moisture and humidity. For metal components, use a rust-resistant coating to prevent corrosion. These steps can help protect your investment and extend the lifespan of your closet.
Conclusion
A floor-to-ceiling built-in closet is a valuable addition to any home, offering maximum storage space, customizable options, and a sleek, modern aesthetic. By carefully planning your design, choosing the right materials, and ensuring proper installation and maintenance, you can create a functional and beautiful closet that enhances your living space. Whether you’re looking to upgrade your current storage or design a new closet from scratch, this guide provides the information you need to create the perfect floor-to-ceiling built-in closet for your home.
Floor-to-ceiling apartments have become synonymous with luxury and modern living, offering expansive views, natural light, and a sense of openness that is hard to match. In a vibrant city like Atlanta, these apartments are particularly sought after for their stunning vistas of the skyline and their contribution to a contemporary lifestyle. In this article, we’ll delve into what makes floor-to-ceiling apartments in Atlanta so desirable, where you can find them, and what to expect when living in one.
The Appeal of Floor-To-Ceiling Apartments Atlanta
Atlanta, with its mix of Southern charm and urban sophistication, is a city that continues to attract new residents and businesses. The appeal of floor-to-ceiling apartments in this dynamic city is multi-faceted:
Unmatched Views: One of the primary attractions of floor-to-ceiling apartments is the panoramic views they offer. In Atlanta, these views can include the city skyline, lush green spaces, and even the distant Blue Ridge Mountains on a clear day.
Natural Light: Floor-to-ceiling windows allow for an abundance of natural light, creating a bright and welcoming living space. This can improve your mood, productivity, and overall well-being.
Modern Aesthetics: These apartments often feature sleek, contemporary designs with open floor plans, high-end finishes, and modern amenities that cater to a sophisticated lifestyle.
Connection with the Outdoors: The large windows provide a seamless connection with the outdoors, making the apartment feel larger and more integrated with the surrounding environment.
Atlanta offers a variety of neighborhoods where you can find floor-to-ceiling apartments. Here are some prime locations:
Midtown
Midtown is the heart of Atlanta’s arts and culture scene, making it a desirable location for those who want to be close to theaters, museums, and vibrant nightlife. Floor-to-ceiling apartments in Midtown often come with views of iconic landmarks like the Fox Theatre and Piedmont Park.
Buckhead
Known for its upscale shopping, dining, and business district, Buckhead is a prime location for luxury living. Apartments here offer spectacular views of the cityscape and are conveniently located near high-end boutiques and gourmet restaurants.
Downtown
Living in Downtown Atlanta puts you at the center of the city’s business and entertainment districts. Floor-to-ceiling apartments in this area provide stunning views of the bustling city below and are close to major attractions like the Georgia Aquarium and Centennial Olympic Park.
Old Fourth Ward
For those who appreciate a blend of historic charm and modern living, the Old Fourth Ward is an excellent choice. This neighborhood offers a mix of renovated historic buildings and new developments, all with easy access to the BeltLine and an array of dining and entertainment options.
Amenities in Floor-To-Ceiling Apartments
When choosing a floor-to-ceiling apartment in Atlanta, you’ll often find a host of amenities designed to enhance your living experience. Here are some common features:
State-of-the-Art Fitness Centers
Many luxury apartment buildings come equipped with modern fitness centers, allowing you to maintain your workout routine without leaving home. These gyms often feature the latest equipment, personal training services, and sometimes even yoga studios.
Rooftop Pools and Lounges
Rooftop amenities are a hallmark of luxury living in Atlanta. Many floor-to-ceiling apartment buildings offer rooftop pools and lounges where residents can relax, socialize, and enjoy breathtaking views of the city.
Concierge Services
High-end buildings often provide concierge services to assist with everything from receiving packages to making reservations at local restaurants. This adds a layer of convenience and luxury to your daily life.
Secure Parking and Storage
Secure parking is a crucial amenity for many residents, especially in a bustling city like Atlanta. Many buildings also offer additional storage options, which can be particularly useful for those living in apartments with limited space.
Pet-Friendly Facilities
Many Atlanta apartments recognize the importance of pets to their residents and offer pet-friendly facilities, including dog parks, pet washing stations, and even pet-sitting services.
The Cost of Living in Floor-To-Ceiling Apartments Atlanta
Living in a luxury apartment with floor-to-ceiling windows in Atlanta comes with a price tag. Here’s what you can expect in terms of costs:
Rent
The rent for these high-end apartments can vary significantly based on location, size, and amenities. On average, you can expect to pay between $2,000 and $5,000 per month for a one or two-bedroom apartment in desirable neighborhoods.
Utilities
Utilities can also be higher in apartments with large windows due to heating and cooling needs. However, many buildings are designed with energy efficiency in mind, which can help mitigate these costs.
Additional Fees
Other costs to consider include parking fees, amenity fees, and pet fees. Some buildings may also require a security deposit and move-in fees.
Tips for Choosing the Right Apartment
When searching for the perfect floor-to-ceiling apartment in Atlanta, keep the following tips in mind:
Set a Budget: Determine your budget before you start looking to ensure you find an apartment within your means.
Consider the Location: Think about your daily commute, nearby amenities, and the overall vibe of the neighborhood.
Visit Multiple Properties: Take the time to visit several apartments to compare layouts, views, and amenities.
Check Reviews: Look at online reviews and ask current residents about their experiences to get a sense of the building’s management and maintenance.
Read the Lease Carefully: Make sure you understand all the terms and conditions of the lease, including any additional fees and the policy on rent increases.
Conclusion
Floor-to-ceiling apartments in Atlanta offer a unique blend of luxury, modern design, and stunning views. Whether you’re drawn to the vibrant arts scene in Midtown, the upscale atmosphere of Buckhead, or the historic charm of the Old Fourth Ward, there’s a floor-to-ceiling apartment in Atlanta that can meet your needs. By understanding the costs, amenities, and locations, you can make an informed decision and find the perfect place to call home.
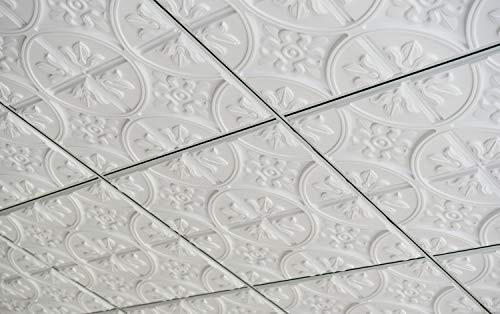
When renovating or designing a space, the ceiling is often overlooked despite its significant impact on the room’s aesthetics and functionality. Flexible drop ceiling tile offer a versatile solution that combines practicality with design flexibility. This article explores the benefits, features, and considerations of using flexible drop ceiling tiles in your home or office.
What Are Flexible Drop Ceiling Tiles?
Flexible drop ceiling tiles, also known as suspended ceiling tiles, are panels that hang below the structural ceiling using a metal grid. Unlike traditional ceiling tiles, flexible options are made from materials like PVC, vinyl, or fiberglass, which allow them to bend or adjust to irregular surfaces without cracking or breaking.
Flexible drop ceiling tiles come in various colors, patterns, and textures, allowing for a wide range of design possibilities. Whether you prefer a modern, sleek look or a more traditional style, there’s a flexible tile to suit your aesthetic needs.
2. Easy Installation
These tiles are lightweight and easy to handle, making installation straightforward even for DIY enthusiasts. Their flexibility allows for easy fitting around obstacles like pipes, ducts, or uneven surfaces.
3. Cost-Effective
Flexible drop ceiling tiles are generally more affordable than rigid alternatives. They can also reduce energy costs by providing an extra layer of insulation, helping to maintain a consistent temperature in your space.
4. Sound Absorption
Many flexible drop ceiling tiles have sound-absorbing properties, which can enhance acoustics in a room. This feature is particularly beneficial in offices, classrooms, and entertainment rooms where noise control is important.
5. Moisture Resistance
Materials used in flexible drop ceiling tiles are often resistant to moisture and mildew, making them ideal for use in basements, bathrooms, and kitchens where humidity levels are high.
Key Features of Flexible Drop Ceiling Tiles
Durability
Despite their flexibility, these tiles are designed to withstand wear and tear, maintaining their appearance and functionality over time.
Ease of Maintenance
Flexible drop ceiling tiles are easy to clean and maintain. Many options can be wiped down with a damp cloth or mild detergent, making them a practical choice for high-traffic areas.
Fire Resistance
Some flexible drop ceiling tiles are treated with fire-resistant coatings, enhancing the safety of your space by slowing the spread of flames in the event of a fire.
Customizability
With a wide range of finishes and designs, flexible drop ceiling tiles can be customized to match your specific design requirements, adding a personal touch to any room.
Installation Guide for Flexible Drop Ceiling Tiles
Measure Your Space: Begin by measuring the dimensions of your room to determine how many tiles and grid components you will need.
Prepare the Grid System: Install the metal grid framework, ensuring it is level and securely attached to the ceiling joists.
Cut the Tiles: If necessary, cut the flexible tiles to fit around obstacles or edges. The flexibility of the material makes this step easier than with rigid tiles.
Install the Tiles: Place the tiles into the grid, starting from one corner of the room and working your way across. Ensure each tile sits flush with the grid for a clean, professional finish.
Finishing Touches: Once all the tiles are in place, inspect the ceiling for any gaps or misalignments and make adjustments as needed.
Where to Use Flexible Drop Ceiling Tiles
Residential Spaces:
Basements: Moisture-resistant and easy to install around ductwork.
Kitchens: Provides a clean, sleek look with easy maintenance.
Living Rooms: Enhances the design with various styles and textures.
Commercial Spaces:
Offices: Improves acoustics and aesthetics while being cost-effective.
Retail Stores: Adds to the ambiance and can be customized to fit the store’s branding.
Healthcare Facilities: Easy to clean and maintain, promoting hygiene.
Maintenance Tips
Regular Cleaning: Wipe down the tiles with a damp cloth regularly to remove dust and grime.
Inspect for Damage: Periodically check for any signs of wear or damage and replace tiles as necessary.
Maintain the Grid: Ensure the metal grid remains secure and level to prevent tiles from sagging or shifting.
Conclusion
Flexible drop ceiling tile offer a practical and aesthetically pleasing solution for both residential and commercial spaces. Their versatility, ease of installation, and maintenance make them an ideal choice for anyone looking to enhance their ceiling design while maintaining functionality. By understanding the benefits and features of flexible drop ceiling tiles, you can confidently choose the best option for your next renovation project.
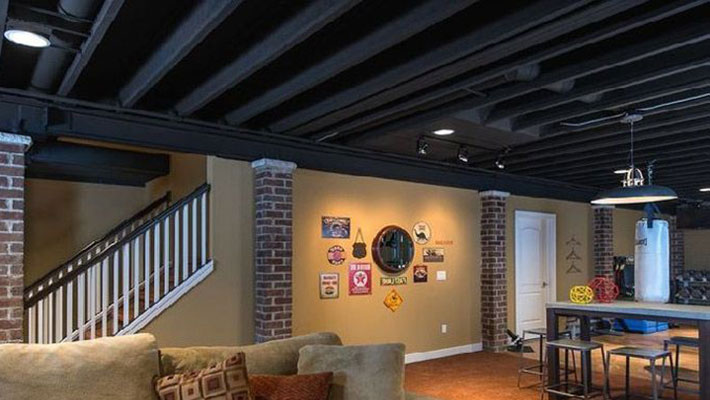
When it comes to basement renovations, safety and aesthetics are crucial. One way to achieve both is by using fire retardant fabric for basement ceiling. This article explores the benefits, features, and considerations of using fire retardant fabric, ensuring your basement is both stylish and safe.
Exploring Fire Retardant Fabric for Basement Ceiling Options
Fire retardant fabrics are specially treated to resist ignition and slow the spread of fire. These materials are ideal for basement ceilings, providing an additional layer of safety while enhancing the room’s overall appearance.
Features of Fire Retardant Fabric for Basement Ceiling
Fire Resistance: These fabrics are designed to withstand high temperatures, reducing the risk of fire spreading through the ceiling.
Durability: High-quality fire retardant fabrics are durable, ensuring long-lasting protection and aesthetic appeal.
Versatility: Available in various colors and textures, fire retardant fabrics can match any interior design style.
Benefits of Choosing Fire Retardant Fabric for Basement Ceiling
1. Enhanced Safety
The primary benefit of fire retardant fabric is its ability to prevent the spread of fire, providing crucial time for occupants to evacuate and for emergency responders to arrive.
2. Improved Aesthetics
These fabrics come in various designs and colors, allowing homeowners to create a visually appealing basement ceiling that complements the rest of the home.
Many fire retardant fabrics also offer sound insulation properties, helping to reduce noise from upper floors and creating a quieter basement environment.
Factors to Consider When Choosing Fire Retardant Fabric for Basement Ceiling
Certification: Ensure the fabric meets relevant fire safety standards and certifications, such as NFPA 701 or ASTM E84.
Installation: Consider the ease of installation and whether professional assistance is required.
Maintenance: Evaluate the cleaning and maintenance requirements of the fabric to ensure it remains effective and attractive over time.
Installation and Maintenance Tips
Professional Installation: For optimal safety and performance, consider hiring professionals to install the fire retardant fabric, ensuring it is properly secured and compliant with safety standards.
Regular Cleaning: Maintain the fabric by regularly dusting and spot cleaning as needed. Follow manufacturer instructions for cleaning to avoid damaging the fire retardant properties.
Inspection: Periodically inspect the fabric for any signs of wear or damage, and replace it if its fire retardant properties are compromised.
Where to Use Fire Retardant Fabric for Basement Ceiling
Fire retardant fabric is suitable for various basement applications, including:
Home Theaters: Enhance safety while improving acoustics and aesthetics.
Recreation Rooms: Create a stylish and safe environment for family activities and gatherings.
Home Offices: Ensure a professional and secure workspace in your basement.
Conclusion
Using fire retardant fabric for basement ceilings is a smart choice for homeowners looking to enhance both safety and aesthetics. These fabrics provide crucial fire resistance, durability, and design versatility, making them an ideal solution for various basement applications. By understanding the features, benefits, and considerations of fire retardant fabric, you can confidently choose the best option for your basement renovation project.
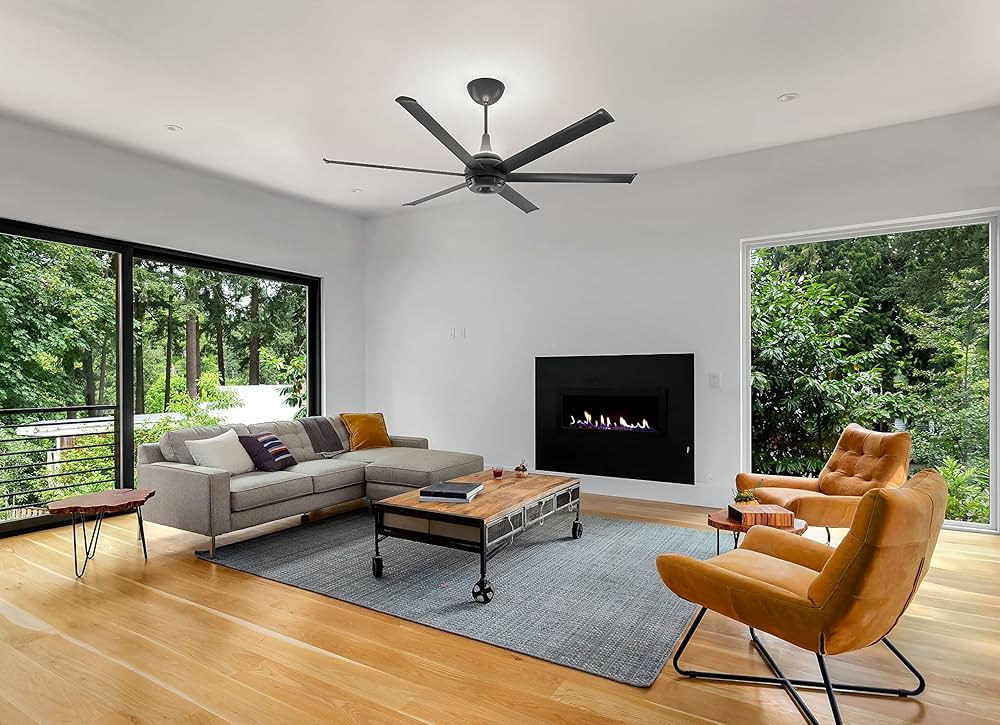
Discover the elegance and functionality of the Fanimation Palisade ceiling fan, a blend of timeless design and modern technology that enhances any living space.
Exploring Fanimation Palisade Ceiling Fan Options
The Fanimation Palisade ceiling fan stands out with its unique design and superior performance. Ideal for both residential and commercial settings, this fan offers a stylish solution to air circulation and comfort.
Features of Fanimation Palisade Ceiling Fan
Distinctive Design: The Palisade fan features twin blades that evoke a tropical or rustic aesthetic, making it a striking centerpiece in any room.
Efficient Airflow: Equipped with a powerful motor, the Palisade fan ensures optimal air circulation to keep rooms cool and comfortable.
Remote Control: Many models come with remote control options for convenient operation of fan speed and light settings.
Benefits of Choosing Fanimation Palisade Ceiling Fan
1. Aesthetic Appeal
The unique blade design and various finish options allow homeowners to customize the fan to complement their interior decor, whether traditional, contemporary, or eclectic.
2. Effective Air Circulation
The twin-blade configuration provides exceptional airflow, making the Palisade fan suitable for large rooms or spaces with high ceilings.
With reversible motor options, the fan can be used to promote air circulation in both summer and winter, enhancing comfort throughout the year.
Factors to Consider When Choosing Fanimation Palisade Ceiling Fan
Room Size: Select the appropriate fan size based on the dimensions of the room to ensure efficient air movement without overpowering the space.
Ceiling Height: Consider the fan’s installation requirements, especially in rooms with low ceilings where a low-profile mount may be necessary.
Control Options: Evaluate whether you prefer a wall-mounted control, remote control, or smart home integration options for operating the fan and adjusting settings.
Installation and Maintenance Tips
Professional Installation: For optimal performance and safety, consider professional installation, particularly if electrical wiring or ceiling reinforcement is required.
Regular Maintenance: Clean fan blades and motor housing regularly to prevent dust buildup and ensure smooth operation. Follow manufacturer instructions for maintenance guidelines.
Blade Care: Inspect blades periodically for any signs of wear or imbalance, and replace them as needed to maintain efficient airflow and minimize noise.
Where to Use Fanimation Palisade Ceiling Fan
The Fanimation Palisade ceiling fans is suitable for various indoor and outdoor spaces, including:
Living Rooms: Provide both functionality and a focal point in the room’s design.
Patios or Covered Decks: Enhance outdoor living spaces with the fan’s stylish appearance and effective air circulation.
Large Dining Areas: Ensure comfort for diners while adding an element of style to the dining environment.
Conclusion
The Fanimation Palisade ceiling fans offers a blend of aesthetic appeal, functionality, and efficiency, making it an excellent choice for homeowners seeking to enhance their indoor or outdoor living spaces. Whether you’re looking to cool a large room or add a decorative accent, the Palisade fan stands out with its distinctive design and reliable performance. By understanding its features, benefits, and installation considerations, you can make an informed decision to integrate the Fanimation Palisade ceiling fans into your home.
ES6 ceiling fans in black offer a blend of modern design and functionality, making them a perfect addition to any contemporary home. Explore the features, benefits, and considerations when choosing an ES6 ceiling fan in black to elevate your living spaces.
Exploring ES6 Ceiling Fan Black Options
ES6 ceiling fans are renowned for their efficiency and sleek design. When opting for a black finish, these fans not only circulate air effectively but also add a touch of sophistication to your interior decor.
Features of ES6 Ceiling Fan Black
Modern Design: ES6 ceiling fans boast a contemporary aesthetic with clean lines and a sleek profile, complementing various interior styles.
Efficient Air Circulation: Equipped with advanced motor technology, ES6 fans ensure powerful airflow while operating quietly, enhancing comfort in any room.
Energy Efficiency: Many ES6 ceiling fans are ENERGY STAR certified, offering energy savings without compromising performance.
Benefits of Choosing ES6 Ceiling Fan Black
1. Enhanced Style Statement
The black finish of ES6 ceiling fans adds a bold contrast or complements existing decor, making them a focal point in your room’s design.
With reversible blades and variable speed settings, ES6 fans provide comfort throughout the year by circulating air efficiently in both summer and winter.
3. Quiet Operation
Advanced blade and motor design ensure whisper-quiet operation, ideal for bedrooms, living rooms, or any space where noise levels matter.
Factors to Consider When Choosing ES6 Ceiling Fan Black
Room Size: Select a fan size appropriate for the room’s dimensions to optimize air circulation and aesthetic balance.
Ceiling Height: Ensure adequate clearance for installation and optimal performance. Low-profile or flush-mount options are available for rooms with lower ceilings.
Lighting Options: Some ES6 ceiling fans come with integrated lighting fixtures or are compatible with light kits, offering dual functionality in one fixture.
Installation and Maintenance Tips
Professional Installation: For safety and optimal performance, consider professional installation, especially for wiring and mounting tasks.
Regular Cleaning: Dust fan blades and motor housing regularly to maintain efficiency and prolong the lifespan of your ES6 ceiling fan.
Blade Reversal: Utilize the fan’s reversible blade feature to adjust airflow direction according to seasonal needs, enhancing comfort and energy savings.
Where to Use ES6 Ceiling Fan Black
ES6 ceiling fans in black are suitable for various indoor spaces, including:
Living Rooms: Provide efficient air circulation while enhancing the room’s aesthetic appeal.
Bedrooms: Offer quiet operation and comfort for restful sleep.
Dining Areas: Combine functionality with style to create a comfortable dining environment.
Conclusion
ES6 ceiling fans in black are not just practical additions but also stylish fixtures that elevate the ambiance of any room. Whether you’re looking to upgrade your home’s air circulation or enhance its aesthetic appeal, choosing an ES6 ceiling fan in black ensures both functionality and design sophistication. By understanding their features, benefits, and installation considerations, you can confidently select the ideal ES6 ceiling fan to complement your living spaces.
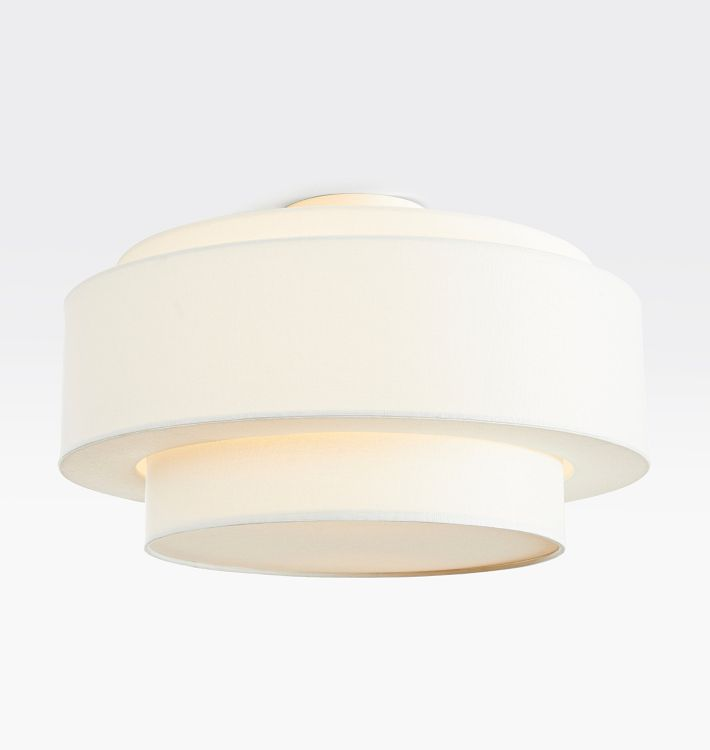
Drum semi flush ceiling light add a touch of elegance and functionality to any room. These versatile lighting fixtures blend modern aesthetics with practicality, making them popular choices for homeowners seeking stylish illumination solutions. This article explores the features, benefits, and considerations when choosing drum semi flush ceiling lights for your home.
Understanding Drum Semi Flush Ceiling Lights
Drum semi flush ceiling lights are characterized by their drum-shaped shades that are mounted close to the ceiling, offering a balance between ambient and direct lighting. They provide a sophisticated look while allowing sufficient illumination for various spaces, from bedrooms and living rooms to hallways and kitchens.
Key Features of Drum Semi Flush Ceiling Lights
Design Versatility: Available in a variety of styles, sizes, and materials, drum semi flush ceiling lights complement different interior themes, from contemporary and minimalist to traditional and eclectic.
Lighting Effects: The drum shade diffuses light evenly, creating a soft, ambient glow that enhances the atmosphere of any room without overpowering it.
Space Efficiency: Their compact design makes them ideal for rooms with low ceilings where a pendant or chandelier might be impractical.
Drum semi flush ceiling lights serve as focal points in room decor, blending seamlessly with existing furnishings and architectural elements. Their clean lines and understated elegance elevate the overall aesthetic appeal of your living spaces.
2. Functional Lighting
These fixtures provide functional illumination suitable for both task-oriented activities and ambient lighting needs. They are particularly effective in spaces where a combination of focused and general lighting is desired.
3. Space Optimization
Ideal for rooms with limited ceiling height, drum semi flush ceiling lights offer a compact lighting solution without sacrificing style or performance. They provide ample overhead lighting while maintaining an unobtrusive presence.
Choosing the Right Drum Semi Flush Ceiling Light
When selecting a drum semi flush ceiling light for your home, consider the following factors:
Room Size and Ceiling Height: Choose a size that complements the dimensions of the room without overwhelming the space. Measure the ceiling height to ensure adequate clearance for installation.
Light Output and Bulb Type: Determine the desired brightness level and choose bulbs that provide sufficient illumination for the room’s function. LED bulbs are energy-efficient and offer long-lasting performance.
Style and Finish: Match the fixture’s style and finish to your existing decor or use it as an opportunity to introduce a contrasting design element. Options range from sleek metal finishes to fabric-covered shades in various colors and patterns.
Installation and Maintenance Tips
Professional Installation: For safety and optimal performance, consider professional installation, especially if electrical work is required. Ensure the fixture is securely mounted to support its weight and minimize vibrations.
Regular Cleaning: Dust the fixture regularly to maintain its appearance and efficiency. Follow manufacturer guidelines for cleaning materials and avoid abrasive cleaners that could damage the finish.
Bulb Replacement: Replace bulbs as needed to maintain consistent lighting quality. Check the fixture’s specifications for compatible bulb types and wattages to prevent overheating or electrical issues.
Where to Use Drum Semi Flush Ceiling Lights
Drum semi flush ceiling lights are versatile and can enhance various areas of your home:
Living Room: Provide ambient lighting and complement lounge areas or seating arrangements.
Bedroom: Create a calming atmosphere conducive to relaxation and sleep.
Kitchen: Illuminate workspaces such as islands or dining areas while adding a decorative touch.
Conclusion
Drum semi flush ceiling lights offer a blend of style, functionality, and versatility that makes them ideal for modern homes. Whether you’re updating your existing decor or planning a new interior design scheme, these fixtures provide an elegant lighting solution that enhances any room’s ambiance. By understanding their features, benefits, and installation considerations, you can confidently choose the right drum semi flush ceiling light to illuminate and beautify your living spaces.
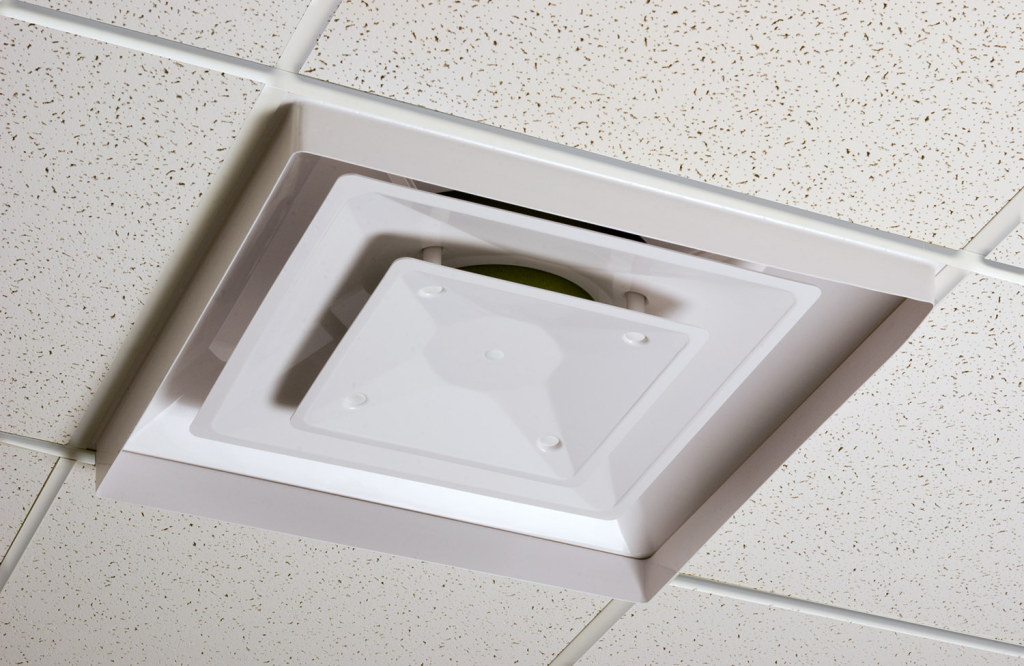
When it comes to creating a comfortable indoor environment, the importance of proper air distribution cannot be overstated. A drop ceiling air diffuser is a crucial component in modern HVAC systems, ensuring that air is evenly distributed throughout a room. This article explores the benefits, types, installation processes, and considerations for selecting the right drop ceiling air diffuser for your needs.
Why Choose a Drop Ceiling Air Diffuser?
Drop ceiling air diffusers are designed to integrate seamlessly with suspended ceiling systems. Here are several reasons why these diffusers are an excellent choice for maintaining optimal indoor air quality:
1. Efficient Air Distribution
A drop ceiling air diffuser ensures that air is evenly distributed across the entire room. This helps maintain consistent temperatures and prevents hot or cold spots, leading to improved comfort.
2. Improved Air Quality
By promoting better air circulation, diffusers help reduce the concentration of pollutants and allergens in the air. This is particularly important in environments such as offices, schools, and healthcare facilities.
Drop ceiling air diffusers are designed to blend in with the ceiling, maintaining the aesthetic appeal of the room. They are available in various styles and finishes to match the ceiling tiles.
4. Energy Efficiency
Proper air distribution can enhance the efficiency of your HVAC system, reducing energy consumption and lowering utility bills. This is because the system doesn’t have to work as hard to maintain the desired temperature.
5. Noise Reduction
High-quality diffusers are designed to operate quietly, minimizing noise levels and creating a more pleasant indoor environment. This is particularly beneficial in settings where noise can be a distraction, such as offices and classrooms.
Types of Drop Ceiling Air Diffusers
When selecting a drop ceiling air diffuser, it’s important to consider the different types available and their specific applications. Here are some common types of diffusers:
1. Square Ceiling Diffusers
These are the most common type of diffusers used in drop ceilings. They are typically designed with multiple directional slots to distribute air evenly across the room.
2. Round Ceiling Diffusers
Round diffusers are often used in spaces where a more even and 360-degree air distribution is required. They are ideal for larger rooms and open-plan areas.
3. Linear Slot Diffusers
Linear slot diffusers are used to create a sleek, modern look while providing effective air distribution. They are often used in commercial spaces and can be integrated into the architectural design.
4. Plaque Diffusers
Plaque diffusers feature a central plaque that directs air flow outward, providing a high level of air mixing and uniform temperature distribution. They are commonly used in offices and retail spaces.
How to Install a Drop Ceiling Air Diffuser
Installing a drop ceiling air diffuser is a straightforward process, but it requires careful planning and execution to ensure optimal performance. Here are the basic steps to guide you through the installation:
1. Preparation
Choose the Right Diffuser: Select the type and size of diffuser that best fits your needs and the layout of the room.
Gather Tools and Materials: You’ll need a ladder, measuring tape, cutting tools, ductwork, and screws or mounting brackets.
2. Mark the Location
Locate the HVAC Duct: Identify the location of the HVAC duct in the ceiling.
Measure and Mark: Measure the dimensions of the diffuser and mark the corresponding location on the ceiling tile.
3. Cut the Ceiling Tile
Remove the Tile: Carefully remove the ceiling tile where the diffuser will be installed.
Cut the Opening: Using a cutting tool, cut an opening in the tile according to the measurements. Make sure the cut is clean and precise.
4. Install the Diffuser
Attach the Diffuser: Secure the diffuser to the HVAC duct using screws or mounting brackets. Ensure it is firmly attached and aligned with the opening in the ceiling tile.
Replace the Tile: Place the modified ceiling tile back into the grid, ensuring the diffuser fits snugly into the opening.
5. Check for Airflow
Test the System: Turn on the HVAC system and check the airflow from the diffuser. Make any necessary adjustments to ensure optimal performance.
Tips for Choosing the Right Drop Ceiling Air Diffuser
Selecting the right diffuser can make a significant difference in the effectiveness of your HVAC system. Here are some tips to help you make the best choice:
1. Consider the Room Size
The size of the room will determine the type and number of diffusers needed. Larger rooms may require multiple diffusers to ensure even air distribution.
2. Match the Decor
Choose a diffuser that complements the aesthetic of the room. Consider the style, color, and finish to ensure it blends seamlessly with the ceiling tiles.
3. Evaluate Airflow Requirements
Consider the airflow requirements of the room. High-traffic areas or rooms with specific ventilation needs may require specialized diffusers.
4. Check for Noise Levels
Select a diffuser designed to minimize noise. This is particularly important in environments where quiet operation is essential.
5. Energy Efficiency
Look for energy-efficient diffusers that can help reduce energy consumption and lower utility bills. Proper air distribution can significantly improve the efficiency of your HVAC system.
Maintaining Your Drop Ceiling Air Diffuser
Regular maintenance is crucial to ensure the longevity and performance of your air diffusers. Here are some maintenance tips:
1. Regular Cleaning
Dust and clean the diffusers regularly to prevent the buildup of dust and debris. This can be done using a soft cloth or vacuum cleaner attachment.
2. Inspect for Damage
Periodically inspect the diffusers for any signs of damage or wear. Replace any damaged components promptly to maintain optimal performance.
3. Check Airflow
Regularly check the airflow from the diffusers to ensure they are functioning correctly. If you notice any issues, such as reduced airflow or unusual noises, investigate and address the problem immediately.
4. Adjust as Needed
Adjust the direction and flow of air from the diffusers as needed to maintain a comfortable indoor environment. This can be particularly important in changing seasons or varying room usage.
Enhancing Indoor Comfort with Additional Solutions
In addition to installing drop ceiling air diffusers, consider these additional solutions to enhance indoor comfort:
1. Thermostats
Install programmable thermostats to better control the temperature and energy usage in your space. This allows for more precise adjustments based on occupancy and time of day.
2. Air Purifiers
Consider using air purifiers to improve indoor air quality further. These devices can help remove pollutants and allergens, creating a healthier environment.
3. Ceiling Fans
Ceiling fans can work in conjunction with air diffusers to improve air circulation and maintain a consistent temperature throughout the room.
4. Insulation
Ensure your space is well-insulated to prevent energy loss and maintain a comfortable indoor environment. Proper insulation can work hand-in-hand with your HVAC system to enhance efficiency.
Conclusion
A drop ceiling air diffuser is a vital component for maintaining optimal indoor air quality and comfort. By selecting the right type, ensuring proper installation, and performing regular maintenance, you can significantly improve the performance of your HVAC system. Whether you’re upgrading an office, school, or healthcare facility, these diffusers provide an efficient and aesthetically pleasing solution for air distribution.
Ceiling tiles are an often overlooked aspect of interior design, yet they play a crucial role in the aesthetic and acoustic quality of a room. For those looking to upgrade their ceilings without breaking the bank, discount ceiling tiles 2X2 are an excellent option. These tiles provide a cost-effective solution to revamping any space, from homes to offices. This article delves into the benefits, types, installation processes, and tips for choosing the right discount ceiling tiles 2X2 for your needs.
Why Choose Discount Ceiling Tiles 2X2?
Ceiling tiles sized 2×2 feet are popular due to their versatility and ease of handling. Here are several reasons why you should consider these tiles for your next renovation project:
1. Cost-Effective
One of the primary advantages of discount ceiling tiles 2X2 is their affordability. They provide an economical way to improve the look and function of a ceiling without a significant financial investment.
2. Easy Installation
These tiles are designed for easy installation, making them suitable for DIY projects. They can be mounted directly onto existing ceilings or used with a grid system for drop ceilings.
3. Variety of Designs
Discount ceiling tiles 2X2 come in a wide range of designs, from classic to modern styles. Whether you want a sleek, minimalistic look or something more ornate, there’s a tile design to suit your taste.
4. Improved Acoustics
Ceiling tiles can help reduce noise levels in a room, creating a more comfortable and quieter environment. This is particularly beneficial in offices, schools, and commercial spaces.
5. Enhanced Aesthetics
Replacing old, stained, or damaged ceiling tiles with new ones can dramatically enhance the appearance of a room. They can cover up unsightly imperfections and give the space a fresh, clean look.
Types of Discount Ceiling Tiles 2X2
When selecting ceiling tiles, it’s essential to consider the material and design that best fits your needs. Here are some common types of discount ceiling tiles 2X2:
1. Acoustic Tiles
These tiles are designed to absorb sound, making them ideal for spaces where noise reduction is important. They are often used in offices, conference rooms, and classrooms.
2. Metal Tiles
Metal ceiling tiles offer a sleek, modern appearance and are highly durable. They are perfect for adding a touch of industrial chic to any space.
3. PVC Tiles
PVC tiles are lightweight, waterproof, and easy to clean, making them suitable for kitchens and bathrooms. They come in various patterns and colors to match any decor.
4. Styrofoam Tiles
These tiles are inexpensive, lightweight, and easy to install. They can be painted to match any color scheme and are great for DIY projects.
5. Tin Tiles
Tin ceiling tiles are known for their decorative, embossed designs and are often used to create a vintage or Victorian look. They are durable and resistant to moisture.
Installing ceiling tiles can be a straightforward process, especially with 2×2 tiles. Here are some basic steps to guide you through the installation:
1. Preparation
Measure the Area: Measure the dimensions of your ceiling to determine how many tiles you’ll need.
Choose Your Tiles: Select the type and design of tiles that best fit your aesthetic and functional needs.
Gather Tools: You’ll need a measuring tape, utility knife, straight edge, adhesive, and possibly a ladder.
2. Installation Methods
There are two primary methods for installing ceiling tiles: direct mount and drop ceiling (suspended grid system).
Direct Mount: This method involves attaching the tiles directly to the ceiling using adhesive. It’s ideal for flat ceilings without significant imperfections.
Apply adhesive to the back of each tile.
Press the tile firmly onto the ceiling, starting from one corner and working your way out.
Use a utility knife to cut tiles to fit around edges and fixtures.
Drop Ceiling: This involves suspending a grid system from the existing ceiling and laying the tiles into the grid. It’s perfect for covering up imperfections or accessing the space above the ceiling.
Install the grid system according to the manufacturer’s instructions.
Place the tiles into the grid, starting from the center and working outwards.
Cut tiles to fit into the perimeter and around any obstacles.
Tips for Choosing the Right Discount Ceiling Tiles 2X2
Selecting the right tiles can make a significant difference in the final look and functionality of your space. Here are some tips to help you make the best choice:
1. Consider the Room’s Function
Different rooms have different needs. For example, acoustic tiles are great for offices and media rooms, while moisture-resistant PVC tiles are better for bathrooms and kitchens.
2. Match Your Decor
Choose tiles that complement your existing decor. For a cohesive look, match the tile color and design with your furniture, walls, and flooring.
3. Check Durability
Consider the durability of the tile material, especially in high-traffic or moisture-prone areas. Metal and PVC tiles tend to be more durable than styrofoam or some acoustic tiles.
4. Look for Easy Maintenance
Opt for tiles that are easy to clean and maintain, especially in areas like kitchens where grease and grime can accumulate.
5. Budget Wisely
While discount tiles are more affordable, it’s still important to balance cost with quality. Look for tiles that offer the best value for your money.
Maintaining Your Ceiling Tiles
To keep your ceiling tiles looking their best, regular maintenance is essential. Here are some maintenance tips:
1. Regular Cleaning
Dust and clean your tiles regularly using a soft cloth or vacuum cleaner attachment. For tougher stains, use a mild detergent and water solution.
2. Inspect for Damage
Periodically check your ceiling tiles for any signs of damage, such as cracks, stains, or sagging. Replace any damaged tiles promptly to maintain the overall appearance.
3. Repaint as Needed
Some tiles, like styrofoam or metal, can be repainted to refresh their appearance. Use appropriate paint for the tile material and follow the manufacturer’s instructions.
Enhancing Your Space with Additional Decor
In addition to installing discount ceiling tiles 2X2, consider these additional decor tips to enhance your space:
1. Lighting
Good lighting can make a significant difference in any room. Consider adding stylish light fixtures or LED strips to complement your new ceiling tiles.
2. Wall Art
Decorate your walls with art that complements the style and color of your ceiling tiles. This can create a cohesive and visually appealing look.
3. Furniture Arrangement
Rearrange your furniture to make the most of your new ceiling design. Ensure that the layout allows for good airflow and lighting.
Conclusion
Discount ceiling tiles 2X2 offer an affordable and stylish way to transform your space. Whether you’re renovating a home, office, or commercial area, these tiles provide a versatile solution that can enhance both the aesthetics and functionality of your ceiling. By choosing the right type of tile, following proper installation techniques, and maintaining them well, you can enjoy a beautiful and functional ceiling for years to come.
Outdoor living spaces have become an extension of our homes, offering a place to relax, entertain, and enjoy the fresh air. One of the best ways to enhance these areas is by installing contemporary outdoor ceiling fans with lights. These versatile fixtures provide both comfort and style, making them a popular choice for modern homeowners. In this article, we will explore everything you need to know about selecting and installing contemporary outdoor ceiling fans with lights.
Why Choose Contemporary Outdoor Ceiling Fans with Lights?
Contemporary outdoor ceiling fans with lights are not just practical; they are also stylish additions that can transform your outdoor space. Here are some reasons why you should consider them:
1. Improved Comfort
Ceiling fans help circulate air, providing a cooling breeze on hot days. This can make your outdoor space more comfortable and enjoyable, especially during the summer months.
Many contemporary outdoor ceiling fans come equipped with integrated lights. This dual functionality means you can illuminate your space while also keeping it cool.
3. Stylish Design
Modern ceiling fans come in a variety of sleek designs and finishes, allowing you to find one that complements your outdoor décor. Whether you prefer minimalist designs or bold statement pieces, there are options to suit every taste.
4. Energy Efficiency
Ceiling fans use less energy than air conditioning units, making them an eco-friendly choice. Additionally, using a ceiling fan can help lower your overall energy costs by reducing the need for air conditioning.
Choosing the Right Contemporary Outdoor Ceiling Fan with Lights
Selecting the perfect ceiling fan for your outdoor space involves several considerations. Here are some key factors to keep in mind:
1. Size and Scale
The size of the fan should be proportional to the space. For larger patios or decks, opt for a fan with a larger blade span to ensure adequate air circulation. Smaller spaces can be equipped with more compact fans.
2. Weather Resistance
Outdoor ceiling fans need to withstand the elements. Look for fans rated for wet or damp locations, depending on whether your space is fully exposed to the elements or partially covered.
3. Lighting Options
Consider the type of lighting you need. Some fans come with dimmable LED lights, while others offer more traditional lighting options. Choose a fan with lighting that suits your needs and complements your outdoor aesthetic.
4. Style and Finish
Contemporary fans come in a range of styles and finishes, from brushed nickel to matte black. Select a fan that matches your outdoor décor and personal style.
Top Features to Look for in Contemporary Outdoor Ceiling Fans with Lights
When shopping for contemporary outdoor ceiling fans with lights, look for these key features to ensure you get the best performance and style:
1. Energy Efficiency
Choose fans with energy-efficient motors and LED lighting to save on energy costs. Look for Energy Star-rated models for optimal efficiency.
2. Remote Control
A remote control can make it easy to adjust fan speed and lighting without leaving your seat. Some models also offer smart home compatibility for added convenience.
3. Quiet Operation
Look for fans with quiet, efficient motors. This ensures that the fan provides a comfortable breeze without disturbing the peace of your outdoor space.
4. Reversible Motor
A reversible motor allows you to change the direction of the fan blades. In the summer, the fan should rotate counterclockwise to create a cooling breeze. In the winter, it can be reversed to push warm air down from the ceiling.
Installation Tips for Contemporary Outdoor Ceiling Fans with Lights
Proper installation is crucial for the safe and effective operation of your ceiling fan. Here are some tips to ensure a successful installation:
1. Hire a Professional
If you are not comfortable with electrical work, it’s best to hire a professional electrician to install your ceiling fan. This ensures that the fan is safely and correctly installed.
2. Use a Sturdy Mount
Make sure the fan is securely mounted to a ceiling joist or other structural support. Outdoor fans can be heavier than indoor models, so a sturdy mount is essential.
3. Follow Manufacturer Instructions
Always follow the manufacturer’s instructions for installation and maintenance. This ensures that the fan operates safely and efficiently.
Maintaining Your Contemporary Outdoor Ceiling Fan with Lights
Regular maintenance is important to keep your ceiling fan functioning properly and looking great. Here are some maintenance tips:
1. Clean the Fan Regularly
Dust and dirt can accumulate on the fan blades and motor housing. Clean the fan regularly with a soft cloth and mild detergent to keep it looking its best.
2. Check for Loose Parts
Periodically check for any loose screws or parts. Tighten them as needed to ensure the fan remains stable and safe.
3. Inspect the Wiring
If you notice any issues with the fan’s operation, inspect the wiring to ensure it is intact and secure. If you are unsure, consult a professional electrician.
4. Replace Bulbs as Needed
Replace any burned-out bulbs promptly to ensure adequate lighting. Consider using energy-efficient LED bulbs for long-lasting performance.
Enhancing Your Outdoor Space with Complementary Lighting
In addition to your ceiling fan, consider other lighting options to create a well-lit and inviting outdoor space:
1. String Lights
String lights add a touch of whimsy and charm to any outdoor space. They are perfect for creating a cozy atmosphere for evening gatherings.
2. Lanterns
Outdoor lanterns provide both functional and decorative lighting. Place them on tables or hang them around your space to enhance the ambiance.
3. Pathway Lights
Illuminate walkways and garden paths with pathway lights. This not only enhances the aesthetic appeal but also improves safety.
Conclusion
Contemporary outdoor ceiling fans with lights are a stylish and practical addition to any outdoor space. By considering factors such as size, weather resistance, lighting options, and style, you can find the perfect fan to enhance your patio, deck, or outdoor living area. Proper installation and regular maintenance ensure that your fan provides comfort and illumination for years to come. Complement your ceiling fan with additional lighting to create a beautiful and inviting outdoor space that you and your guests will love.
Choosing the right lighting for a home with high ceilings can transform a space, adding elegance, warmth, and a focal point that draws the eye upward. A chandelier for high ceilings not only provides necessary illumination but also enhances the architectural beauty of the room. In this comprehensive guide, we will explore everything you need to know about selecting and installing the perfect chandelier for your high ceilings.
Why Choose a Chandelier for High Ceilings?
Chandeliers are more than just light fixtures; they are statement pieces that can elevate the style of any room. High ceilings provide the perfect opportunity to install a chandelier that can be appreciated in its full glory. Here’s why you should consider a chandelier for your high ceilings:
1. Aesthetic Appeal
A chandelier adds a touch of elegance and sophistication to any room. For high ceilings, it creates a grand and dramatic effect that can significantly enhance the room’s ambiance.
High ceilings often require more light to adequately illuminate the space. Chandeliers can provide ample light, especially those designed with multiple bulbs or tiers, ensuring the room is well-lit.
3. Focal Point
A chandelier serves as a central focal point, drawing attention and adding visual interest to the room. It can anchor the space and tie together other design elements.
Selecting the Right Chandelier for High Ceilings
Choosing the right chandelier involves several considerations to ensure it complements the room and functions effectively.
1. Size and Scale
The size of the chandelier should be proportional to the room’s dimensions. For high ceilings, larger chandeliers with multiple tiers or extended designs are ideal. A general rule of thumb is to add the room’s length and width (in feet) and convert that total to inches. For example, a room that is 20 feet by 15 feet would require a chandelier that is approximately 35 inches in diameter.
2. Style and Design
The style of the chandelier should match the room’s decor. Whether you prefer a modern, minimalist design or a classic, ornate piece, there are chandeliers available to suit every taste. Consider materials like crystal, metal, and glass, as well as the overall design to ensure it fits with your room’s aesthetic.
3. Hanging Height
The height at which the chandelier hangs is crucial. For rooms with high ceilings, it’s important to ensure the chandelier is low enough to be visually connected with the space but high enough to allow for adequate clearance. A good starting point is to hang the chandelier about 8 feet above the floor, but this can vary based on personal preference and room height.
Types of Chandeliers for High Ceilings
There are various types of chandeliers that work well for high ceilings, each offering a unique look and feel:
1. Crystal Chandeliers
Crystal chandeliers are timeless and elegant, perfect for adding a touch of luxury to any room. They are especially effective in formal settings such as dining rooms and entryways.
2. Modern Chandeliers
Modern chandeliers often feature sleek lines, minimalist designs, and innovative materials. They are ideal for contemporary spaces and can provide a striking contrast in rooms with traditional architecture.
3. Rustic Chandeliers
Rustic chandeliers, made from wood, wrought iron, or other natural materials, add a cozy and inviting feel to the room. They are perfect for homes with a farmhouse or cabin aesthetic.
4. Candle Chandeliers
Candle chandeliers mimic the look of traditional candlelight, providing a warm and romantic glow. They are suitable for a variety of settings, from rustic to classical.
Installation Tips for Chandeliers on High Ceilings
Installing a chandelier on high ceilings can be challenging. Here are some tips to ensure a safe and effective installation:
1. Hire a Professional
Due to the height and complexity of the installation, it’s often best to hire a professional electrician. They can ensure the chandelier is securely mounted and properly wired.
2. Use an Adjustable Chain or Rod
Many chandeliers come with adjustable chains or rods, allowing you to customize the hanging height. This feature is particularly useful for high ceilings, providing flexibility during installation.
3. Consider a Winch System
For very high ceilings, a winch system can be installed to raise and lower the chandelier for cleaning and bulb replacement. This system can save time and effort in the long run.
Maintaining Your Chandelier
Regular maintenance is essential to keep your chandelier looking its best and functioning properly:
1. Cleaning
Dust and clean your chandelier regularly to maintain its sparkle. Use a soft cloth and a gentle cleaner to avoid damaging the materials. For crystal chandeliers, consider using a special crystal cleaner.
2. Bulb Replacement
Replace bulbs as needed to ensure adequate lighting. Opt for LED bulbs for energy efficiency and longevity.
3. Check for Stability
Periodically check that the chandelier is securely mounted and that all components are stable. This ensures safety and prevents damage.
Enhancing Your Room with Complementary Lighting
While a chandelier can be the centerpiece, complementary lighting enhances the overall effect:
1. Wall Sconces
Wall sconces provide additional lighting and can complement the chandelier. They are especially useful in larger rooms where more light is needed.
2. Recessed Lighting
Recessed lighting provides ambient light and can help to highlight the chandelier. It also ensures that the room is evenly lit.
3. Floor and Table Lamps
Floor and table lamps add task lighting and create a layered lighting effect. They can be used to highlight specific areas or provide additional light for reading and other activities.
Conclusion
Choosing the right chandelier for high ceilings can transform a space, adding elegance and functionality. By considering factors such as size, style, and hanging height, you can find the perfect chandelier to complement your room. Regular maintenance and complementary lighting ensure that your chandelier remains a stunning focal point for years to come. Whether you prefer a modern, rustic, or classic look, there is a chandelier that will enhance your high-ceilinged space beautifully.
If you are in the business of ceiling installations or a DIY enthusiast looking to achieve a professional finish, a Ceiling Tile Reveal Edge Cutter is an essential tool. This article explores everything you need to know about the Ceiling TileReveal Edge Cutter, from its importance to how to use it effectively, and the benefits it offers for ceiling tile projects.
Understanding the Importance of a Ceiling Tile Reveal Edge Cutter
Ceiling tiles are a popular choice for both commercial and residential buildings due to their aesthetic appeal and functional benefits. However, achieving a clean, professional edge can be challenging without the right tools. The Ceiling Tile Reveal Edge Cutter is designed to help you create precise, clean cuts on ceiling tiles, ensuring a seamless and professional finish.
What is a Ceiling Tile Reveal Edge Cutter?
A Ceiling Tile Reveal Edge Cutter is a specialized tool used to cut and trim the edges of ceiling tiles to fit perfectly within a suspended ceiling grid system. This tool is particularly useful for creating reveal edges, which are a specific type of edge profile that provides a recessed look, giving ceilings a more refined and finished appearance.
Benefits of Using a Ceiling Tile Reveal Edge Cutter
1. Precision and Accuracy
One of the primary benefits of using a Ceiling Tile Reveal Edge Cutter is the precision and accuracy it provides. This tool allows you to make exact cuts, ensuring that each tile fits perfectly within the ceiling grid. This precision is crucial for achieving a professional finish and avoiding gaps or uneven edges.
Using a specialized cutter designed for ceiling tiles significantly reduces the time required to complete a project. The tool is designed for efficiency, allowing you to quickly and easily cut multiple tiles without the need for constant adjustments or re-measurements.
3. Enhanced Aesthetics
A clean, precise edge enhances the overall appearance of the ceiling. The reveal edge profile created by the cutter adds depth and dimension to the ceiling, providing a high-end, professional look that is difficult to achieve with standard cutting tools.
4. Versatility
Ceiling Tile Reveal Edge Cutters are versatile and can be used with various types of ceiling tiles, including acoustic tiles, mineral fiber tiles, and even metal tiles. This versatility makes them an invaluable tool for a wide range of ceiling installation projects.
How to Use a Ceiling Tile Reveal Edge Cutter
Using a Ceiling Tiles Reveal Edge Cutter is relatively straightforward, but it’s important to follow the correct steps to ensure the best results. Here’s a step-by-step guide:
1. Measure and Mark
Before cutting, measure the tile and mark the cutting line using a straight edge and a pencil. Ensure the measurements are accurate to avoid errors.
2. Set the Cutter
Adjust the Ceiling Tiles Reveal Edge Cutter to the desired cutting depth. Most cutters have adjustable blades to accommodate different tile thicknesses.
3. Cut the Tile
Place the tile on a stable surface and align the cutter with the marked line. Apply steady pressure and move the cutter along the line to create a clean, precise cut.
4. Trim and Smooth Edges
After cutting, use a utility knife or sanding block to trim any rough edges and ensure a smooth finish. This step is crucial for achieving a professional look.
5. Install the Tile
Once the tile is cut and trimmed, it’s ready for installation. Place the tile into the ceiling grid and ensure it fits snugly and evenly.
Tips for Maintaining
Proper maintenance of your Ceiling Tile Reveal Edge Cutter is essential for ensuring its longevity and performance. Here are some tips:
1. Keep the Blades Sharp
Regularly check and replace the blades to ensure clean, precise cuts. Dull blades can cause jagged edges and reduce the quality of the cut.
2. Clean the Tool
After each use, clean the cutter to remove any debris or residue. This helps maintain its performance and prevents build-up that can affect the cutting action.
3. Store Properly
Store the cutter in a dry, cool place to prevent rust and damage. Use a protective case if available to keep the tool in good condition.
Choosing the Right Ceiling Tile Reveal Edge Cutter
When selecting a Ceiling Tiles Reveal Edge Cutter, consider the following factors:
1. Blade Quality
Look for a cutter with high-quality, durable blades that can handle different types of ceiling tiles. Tungsten carbide blades are a good choice for their strength and longevity.
2. Adjustability
Choose a cutter with adjustable blades to accommodate various tile thicknesses. This feature adds versatility and allows you to use the tool for multiple projects.
3. Ergonomics
An ergonomic design with a comfortable grip reduces hand fatigue and improves control during cutting. This is especially important for large projects or prolonged use.
4. Brand Reputation
Opt for a reputable brand known for producing high-quality tools. Reading reviews and seeking recommendations can help you choose a reliable cutter.
Conclusion
A Ceiling Tiles Reveal Edge Cutter is an invaluable tool for anyone involved in ceiling tiles installation. Its precision, efficiency, and ability to create professional-grade edges make it a must-have for achieving high-quality results. Whether you’re a professional installer or a DIY enthusiast, investing in a good quality Ceiling Tiles Reveal Edge Cutter will greatly enhance your projects, saving you time and ensuring a polished, professional finish.
Creating an efficient and stylish kitchen involves thoughtful consideration of its various components, and ventilation is one crucial element that often gets overlooked. A Ceiling Mounted Range Vent can significantly enhance the functionality and aesthetics of your kitchen. In this article, we will explore the benefits, types, installation tips, and maintenance of ceiling mounted range vents, helping you make an informed decision for your kitchen needs.
The Benefits of Ceiling Mounted Range Vents
Space-Saving Design
One of the primary advantages of a Ceiling Mounted Range Vent is its space-saving design. By being mounted on the ceiling, these vents free up valuable wall or cabinet space, allowing for a more open and uncluttered kitchen layout. This design is especially beneficial in smaller kitchens where space is at a premium.
Ceiling mounted range vents provide effective ventilation by capturing and removing smoke, steam, and cooking odors directly from the source. This ensures that your kitchen air remains fresh and clean, improving the overall indoor air quality and creating a more pleasant cooking environment.
Sleek and Modern Aesthetics
With their sleek and unobtrusive design, ceiling mounted range vents can enhance the modern aesthetics of your kitchen. They blend seamlessly into the ceiling, providing a clean and minimalist look that complements contemporary kitchen designs.
Enhanced Safety
By effectively removing grease, smoke, and heat from the cooking area, ceiling mounted range vents contribute to a safer kitchen environment. This helps prevent the buildup of grease and reduces the risk of fire hazards, making your kitchen safer for everyday use.
Types of Ceiling Mounted Range Vents
When choosing a Ceiling Mounted Range Vent, it’s essential to understand the different types available to find one that best suits your needs and preferences.
Recirculating Vents
Recirculating ceiling mounted range vents filter the air through charcoal or carbon filters before recirculating it back into the kitchen. These vents are ideal for kitchens where external ducting is not feasible. They are relatively easy to install and maintain but require regular filter replacement to ensure optimal performance.
Ducted Vents
Ducted ceiling mounted range vents expel the air outside the home through a duct system. These vents are highly effective at removing smoke, odors, and grease, making them a preferred choice for serious cooks and larger kitchens. While installation can be more complex and costly, ducted vents provide superior ventilation performance.
Convertible Vents
Convertible ceiling mounted range vents offer the best of both worlds, allowing you to switch between recirculating and ducted modes. This flexibility makes them a versatile option for homeowners who may change their kitchen layout or ventilation needs in the future.
Choosing the Right Ceiling Mounted Range Vent
Selecting the perfect Ceiling Mounted Range Vent involves considering various factors to ensure it meets your ventilation needs and complements your kitchen design.
Ventilation Capacity
Evaluate the size of your kitchen and the type of cooking you do to determine the appropriate ventilation capacity. Range vents are typically rated by their cubic feet per minute (CFM) of airflow. A larger kitchen or one with heavy cooking activities will require a vent with a higher CFM rating to ensure adequate ventilation.
Noise Level
Consider the noise level of the vent, especially if you have an open kitchen layout or frequently entertain guests. Look for vents with lower decibel (dB) ratings or models with adjustable fan speeds that allow you to control the noise level while cooking.
Material and Durability
Opt for range vents made from durable materials such as stainless steel, which can withstand the rigors of daily cooking and is easy to clean. High-quality materials also ensure the longevity of the vent and maintain its aesthetic appeal over time.
Additional Features
Some ceiling mounted range vents come with additional features such as integrated lighting, remote controls, and smart technology. These features can enhance the functionality and convenience of the vent, making your cooking experience more enjoyable.
Installing Your Ceiling Mounted Range Vent
Proper installation of your Ceiling Mounted Range Vent is crucial for optimal performance and safety. Follow these steps to ensure a successful installation:
Preparation
Turn Off Power: Before starting the installation, turn off the power supply to the area where the vent will be installed to prevent any accidents.
Gather Tools and Materials: You will need a ladder, drill, screwdriver, adjustable wrench, ductwork (if installing a ducted vent), and any specific hardware included with the vent.
Install the Mounting Bracket
Locate Ceiling Joists: Use a stud finder to locate the ceiling joists where the mounting bracket will be secured.
Attach the Bracket: Secure the mounting bracket to the ceiling joists using screws. Ensure it is firmly in place to support the weight of the vent.
Connect the Vent
Wiring/Electrical Connection: If the vent is electric, connect the wiring according to the manufacturer’s instructions. Ensure all electrical connections are secure and insulated.
Ductwork Connection: For ducted vents, connect the ductwork to the vent and secure it with duct tape or clamps. Ensure there are no leaks or obstructions in the ductwork.
Mount the Vent
Attach the Vent: Secure the vent to the mounting bracket and ensure it is firmly in place. Double-check all connections and screws to ensure the vent is securely mounted.
Test the System: Restore the power supply and test the vent to ensure it is functioning correctly. Check for any issues with airflow or noise.
Maintaining Your Ceiling Mounted Range Vent
Regular maintenance is essential to keep your Ceiling Mounted Range Vent functioning properly and looking great. Here are some maintenance tips:
Regular Cleaning
Clean the Filters: Depending on the type of vent, clean or replace the filters regularly to ensure optimal performance. Charcoal or carbon filters should be replaced as recommended by the manufacturer.
Wipe Down the Surface: Clean the vent surface with a soft cloth and mild detergent to remove grease and dust buildup.
Inspect for Wear and Tear
Check for Leaks: Periodically check the ductwork (for ducted vents) and connections for any signs of leaks or damage. Repair or replace any damaged parts as needed.
Inspect the Fan: Ensure the fan is functioning correctly and is free from obstructions. Clean the fan blades if necessary to maintain optimal airflow.
Annual Servicing
Professional Inspection: Have a professional inspect and service your vent annually to ensure it is in good working condition and to address any potential issues.
Replace Worn Parts: Replace any worn or damaged parts during the annual servicing to maintain the vent’s efficiency and safety.
Design Inspirations: Incorporating a Ceiling Mounted Range Vent
A Ceiling Mounted Range Vent can seamlessly blend into your kitchen design, enhancing both functionality and aesthetics. Here are some design inspirations to help you incorporate this fixture into your kitchen:
Modern Minimalist
Pair a sleek, stainless steel ceiling mounted vent with contemporary kitchen cabinets and minimalist décor. Use neutral tones and clean lines to create a modern and sophisticated kitchen.
Industrial Chic
Choose a vent with an industrial finish, such as brushed metal or black, and combine it with exposed brick walls, open shelving, and metal accents. This style creates a trendy, urban kitchen vibe.
Rustic Charm
Opt for a vent with a rustic finish, such as copper or bronze, and pair it with wooden cabinets, farmhouse sinks, and vintage-inspired fixtures. Add warm lighting to enhance the cozy, rustic charm.
Coastal Retreat
Select a white or brushed nickel ceiling mounted vent and combine it with light-colored cabinets, nautical accents, and natural textures. Use blues, whites, and greens to create a breezy coastal kitchen.
Conclusion
A Ceiling Mounted Range Vent is a stylish and practical addition to any kitchen, providing efficient ventilation while saving valuable space. By understanding the different types available and considering factors such as ventilation capacity, noise level, and material, you can choose the perfect vent to enhance your kitchen. With proper installation and maintenance, your ceiling mounted range vent will provide years of reliable performance, helping you create a comfortable and inviting kitchen environment.
Creating a comfortable and inviting outdoor space is essential for enjoying your patio year-round. One of the best ways to achieve this is by installing Ceiling Mounted Patio Heaters. These innovative heating solutions provide warmth without taking up valuable floor space, making them perfect for any patio setup. In this article, we will explore the benefits, types, installation tips, and maintenance of ceiling mounted patio heaters, helping you make an informed decision for your outdoor comfort needs.
The Benefits of Ceiling Mounted Patio Heaters
Efficient Space Utilization
One of the primary advantages of Ceiling Mounted Patio Heaters is their ability to save space. By being mounted on the ceiling, they free up floor space, allowing you to arrange your patio furniture and décor without obstructions. This is particularly beneficial for smaller patios where space is at a premium.
Even Heat Distribution
Ceiling mounted patio heaters provide uniform heat distribution, ensuring that the warmth is evenly spread across the entire patio area. This eliminates cold spots and provides consistent comfort, making your outdoor space more enjoyable.
By mounting the heaters on the ceiling, you reduce the risk of accidental burns or tipping over, which can be a concern with portable heaters. This makes ceiling mounted patio heaters a safer option, especially if you have children or pets.
Aesthetic Appeal
Ceiling mounted patio heaters come in various designs and finishes that can complement the aesthetic of your patio. Whether you prefer a sleek, modern look or a more rustic feel, there is a ceiling mounted heater that will blend seamlessly with your outdoor décor.
Types of Ceiling Mounted Patio Heaters
When choosing a Ceiling Mounted Patio Heater, it’s essential to understand the different types available to find one that best suits your needs and preferences.
Electric Heaters
Electric ceiling mounted patio heaters are popular due to their ease of installation and use. They can be connected to a standard electrical outlet and typically come with adjustable heat settings. These heaters are energy-efficient and provide instant heat, making them ideal for quick and convenient warmth.
Gas Heaters
Gas-powered ceiling mounted patio heaters are known for their powerful heat output. They use either natural gas or propane and are suitable for larger patio areas. These heaters require proper ventilation and a gas line, so professional installation is recommended. Gas heaters are excellent for those who need a high level of heat for extended periods.
Infrared Heaters
Infrared ceiling mounted patio heaters work by emitting infrared radiation, which directly heats objects and people rather than the surrounding air. This makes them highly efficient and effective, especially in outdoor environments where heat can easily dissipate. Infrared heaters provide instant warmth and are ideal for focused heating.
Choosing the Right Ceiling Mounted Patio Heater
Selecting the perfect Ceiling Mounted Patio Heater involves considering various factors to ensure it meets your heating needs and complements your outdoor space.
Heating Capacity
Evaluate the size of your patio and choose a heater with the appropriate heating capacity. Heaters are typically rated by their British Thermal Units (BTUs) or wattage. A larger patio will require a heater with a higher BTU or wattage rating to ensure adequate warmth.
Material and Durability
Opt for heaters made from durable materials such as stainless steel or aluminum, which can withstand outdoor conditions. Weather-resistant finishes and protective coatings can also enhance the longevity of your heater.
Control Options
Consider the control options available with the heater. Some models come with remote controls, adjustable thermostats, and timers, allowing you to customize the heat output and operating time for optimal comfort and energy efficiency.
Installation Requirements
Ensure you have the necessary infrastructure for the heater you choose. Electric heaters require a power source, while gas heaters need a gas line and proper ventilation. Infrared heaters may need specific mounting brackets or clearance space.
Installing Your Ceiling Mounted Patio Heater
Proper installation of your Ceiling Mounted Patio Heater is crucial for optimal performance and safety. Follow these steps to ensure a successful installation:
Preparation
Turn Off Power/Gas Supply: Before starting the installation, turn off the power or gas supply to prevent any accidents.
Gather Tools and Materials: You will need a ladder, drill, screwdriver, adjustable wrench, and any specific hardware included with the heater.
Install the Mounting Bracket
Locate Ceiling Joists: Use a stud finder to locate the ceiling joists where the mounting bracket will be secured.
Attach the Bracket: Secure the mounting bracket to the ceiling joists using screws. Ensure it is firmly in place to support the weight of the heater.
Connect the Heater
Wiring/Electrical Connection: If installing an electric heater, connect the wiring according to the manufacturer’s instructions. For gas heaters, connect the gas line securely.
Mount the Heater: Attach the heater to the mounting bracket and secure it in place. Ensure all connections are tight and secure.
Test the System
Turn On Power/Gas Supply: Restore the power or gas supply and test the heater to ensure it is functioning correctly. Check for any leaks or issues.
Final Adjustments: Make any necessary adjustments to the heater’s position and settings to ensure optimal performance.
Maintaining Your Ceiling Mounted Patio Heater
Regular maintenance is essential to keep your Ceiling Mounted Patio Heater functioning properly and looking great. Here are some maintenance tips:
Regular Cleaning
Clean Heater Surface: Wipe down the heater surface regularly with a soft cloth to remove dust and debris.
Check Vents and Burners: Ensure vents and burners are clear of obstructions for proper airflow and combustion.
Inspect for Wear and Tear
Inspect Connections: Periodically check all connections for signs of wear or damage. Tighten any loose connections and replace worn parts as needed.
Check Ignition System: For gas heaters, inspect the ignition system to ensure it is functioning correctly.
Annual Servicing
Professional Inspection: Have a professional inspect and service your heater annually to ensure it is in good working condition and to address any potential issues.
Replace Worn Parts: Replace any worn or damaged parts during the annual servicing to maintain the heater’s efficiency and safety.
Design Inspirations: Incorporating a Ceiling Mounted Patio Heater
A Ceiling Mounted Patio Heater can transform your outdoor space into a comfortable and inviting retreat. Here are some design inspirations to help you incorporate this fixture into your patio:
Modern Minimalist
Pair a sleek, stainless steel ceiling mounted heater with contemporary outdoor furniture and minimalist décor. Use neutral tones and clean lines to create a modern and sophisticated patio.
Rustic Charm
Choose a bronze or copper-finished heater and combine it with rustic wooden furniture and warm, earthy colors. Add string lights and cozy textiles to enhance the rustic charm.
Coastal Retreat
Opt for a white or brushed nickel ceiling mounted heater and pair it with light-colored furniture and nautical accents. Use blues, whites, and natural textures to create a breezy coastal retreat.
Urban Oasis
Select a matte black or industrial-style heater and combine it with urban-inspired furniture and bold, modern colors. Use concrete planters and metal accents to complete the urban oasis look.
Conclusion
A Ceiling Mounted Patio Heater is a stylish and practical addition to any outdoor space, providing warmth and comfort while freeing up valuable floor space. By understanding the different types available and considering factors such as heating capacity, material, and installation requirements, you can choose the perfect heater to enhance your patio. With proper installation and maintenance, your ceiling mounted patio heater will provide years of reliable warmth, allowing you to enjoy your outdoor space year-round.
Creating a luxurious and spa-like experience in your bathroom is easier than ever with a Ceiling Mount Rain Shower System. This modern fixture is designed to deliver a soothing and immersive shower experience, transforming your daily routine into a relaxing retreat. In this comprehensive guide, we will explore the benefits, styles, installation tips, and maintenance of ceiling mount rain shower systems, helping you make an informed decision for your bathroom upgrade.
The Benefits of a Ceiling Mount Rain Shower System
Enhanced Shower Experience
A Ceiling Mount Rain Shower System offers a unique showering experience by simulating the feeling of standing in the rain. The wide coverage and gentle flow of water provide a relaxing and rejuvenating experience that can help relieve stress and tension.
Modern and Sleek Design
Ceiling mount rain shower systems are designed to blend seamlessly with modern bathroom aesthetics. Their sleek and minimalist design adds a touch of sophistication and elegance to any bathroom, creating a visually appealing and functional space.
Space-Saving Solution
Unlike traditional wall-mounted showerheads, a ceiling mount rain shower system saves valuable wall space, making it an ideal choice for smaller bathrooms or those looking to maximize their available space.
The design of a ceiling mount rain shower system ensures even water distribution across the entire showerhead. This uniformity eliminates the need for constant adjustments, allowing you to enjoy a consistent and pleasant shower every time.
Types of Ceiling Mount Rain Shower Systems
When choosing a Ceiling Mount Rain Shower System, it’s important to consider the different types available to find one that suits your preferences and bathroom design.
Single-Function Rain Showerheads
These showerheads offer a straightforward rain shower experience with a single water flow setting. They are ideal for those who prefer a simple and consistent shower experience without additional features.
Multi-Function Rain Showerheads
Multi-function rain showerheads come with adjustable settings, allowing you to switch between different spray patterns, such as rain, massage, or mist. These options provide a customizable shower experience to suit your mood and preferences.
LED Rain Showerheads
LED rain showerheads feature built-in LED lights that change color based on water temperature or settings. This adds a visually striking element to your shower and enhances the overall ambiance of your bathroom.
Thermostatic Rain Shower Systems
Thermostatic systems allow you to set and maintain a precise water temperature, ensuring a safe and comfortable shower experience. These systems are particularly useful for households with children or elderly individuals.
Choosing the Right Ceiling Mount Rain Shower System
Selecting the perfect Ceiling Mount Rain Shower System for your bathroom involves considering various factors to ensure it meets your needs and complements your bathroom design.
Material and Finish
Opt for materials that are durable and resistant to corrosion, such as stainless steel or brass. The finish should match the rest of your bathroom fixtures for a cohesive look. Popular finishes include chrome, brushed nickel, matte black, and gold.
Size and Coverage
Consider the size of the showerhead and its coverage area. Larger showerheads provide more extensive coverage, creating a more immersive experience. Ensure the size fits well within your shower space without overwhelming it.
Water Pressure and Flow Rate
Check the water pressure requirements and flow rate of the shower system. Ensure your home’s water pressure is sufficient to support the chosen showerhead for optimal performance.
Budget
Ceiling mount rain shower systems come in a range of prices. Set a budget and choose a system that offers the best value without compromising on quality. Keep in mind that additional features, such as LED lighting or multiple spray settings, may increase the cost.
Installing Your Ceiling Mount Rain Shower System
Proper installation of your Ceiling Mount Rain Shower System is crucial for optimal performance and safety. Follow these steps to ensure a successful installation:
Preparation
Turn Off Water Supply: Before beginning the installation, turn off the water supply to your bathroom to prevent any leaks or water damage.
Gather Tools and Materials: You will need a ladder, drill, screwdriver, adjustable wrench, plumber’s tape, and the necessary plumbing fittings.
Install the Mounting Bracket
Locate Ceiling Joists: Use a stud finder to locate the ceiling joists where the mounting bracket will be secured.
Attach the Bracket: Secure the mounting bracket to the ceiling joists using screws. Ensure it is firmly in place to support the weight of the showerhead.
Connect the Plumbing
Run Water Lines: If not already present, run the necessary water lines to the installation point. This may require professional plumbing services.
Attach the Showerhead: Connect the showerhead to the water lines, ensuring all connections are tight and secure. Use plumber’s tape to prevent leaks.
Test the System
Turn On Water Supply: Restore the water supply and test the shower system to ensure it is functioning correctly. Check for leaks and adjust as needed.
Final Adjustments: Install the cover plate to hide the mounting bracket and connections, ensuring a clean and finished look.
Maintaining Your Ceiling Mount Rain Shower System
Regular maintenance is essential to keep your Ceiling Mount Rain Shower System functioning properly and looking great. Here are some maintenance tips:
Regular Cleaning
Clean Showerhead: Wipe down the showerhead regularly with a soft cloth to prevent buildup of soap scum and hard water deposits.
Clean Nozzles: Use a toothbrush to clean the nozzles and remove any mineral deposits that may affect water flow.
Check for Leaks
Inspect Connections: Periodically check the plumbing connections for any signs of leaks and tighten as necessary.
Replace O-Rings: If you notice dripping or leaking, replace the O-rings inside the showerhead to restore a proper seal.
Descale Regularly
Remove Mineral Deposits: If you have hard water, descale the showerhead regularly to prevent buildup of mineral deposits that can affect water flow.
Check Water Pressure
Monitor Pressure: Ensure the water pressure remains consistent. If you notice a drop in pressure, inspect the plumbing for blockages or issues.
Design Inspirations: Incorporating a Ceiling Mount Rain Shower System
A Ceiling Mount Rain Shower System can transform your bathroom into a luxurious retreat. Here are some design inspirations to help you incorporate this fixture into your bathroom:
Modern Minimalist
Pair a sleek, chrome ceilings mount rain shower system with a frameless glass shower enclosure and minimalist décor. Use neutral tones and clean lines to create a modern and serene bathroom.
Spa-Like Retreat
Create a spa-like atmosphere by combining a large rain showerhead with natural stone tiles and lush greenery. Add soft lighting and soothing colors for a calming effect.
Elegant Traditional
Choose an ornate, gold-finished shower system and pair it with classic fixtures and rich colors. Use luxurious materials like marble and wood to enhance the traditional elegance.
Industrial Chic
Opt for a matte black ceilings mount rain shower system in an industrial-style bathroom. Exposed pipes, concrete walls, and vintage accessories complete the look.
Conclusion
A Ceiling Mount Rain Shower System is a stylish and functional addition to any bathroom, offering a unique blend of modern elegance and practicality. By understanding the different types available and considering factors such as design, material, and installation requirements, you can choose the perfect shower system to enhance your space. With proper installation and maintenance, your ceilings mount rain shower system will provide years of luxurious showering experiences, transforming your bathroom into a true sanctuary.