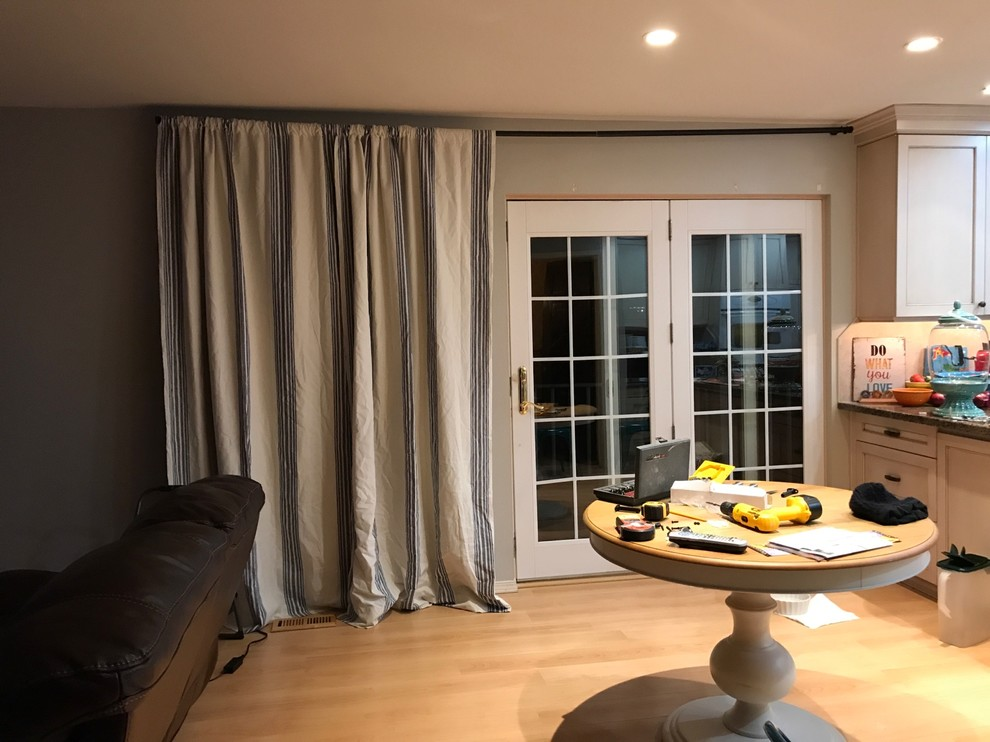
Extra Large Modern Chandeliers For High Ceiling: Elevate Your Space

Illuminate your home in style with Extra Large Modern Chandeliers For High Ceiling, the epitome of elegance and sophistication. Discover how these stunning fixtures can transform your space into a breathtaking masterpiece.

Extra Large Modern Chandeliers For High Ceilings

Introduction

Chandeliers have long been associated with luxury and grandeur, serving as focal points in any room they adorn. However, for spaces with high ceilings, finding the perfect chandelier can be a challenge. Enter Extra Large Modern Chandeliers For High Ceilings – the solution to your lighting woes. In this article, we’ll explore the beauty and functionality of these statement pieces and why they’re the perfect choice for tall spaces.

Understanding Extra Large Modern Chandeliers For High Ceilings

What sets these chandeliers apart?

Extra Large Modern Chandeliers For High Ceilings actively enhance tall spaces, making a bold statement while actively providing ample illumination. These fixtures feature sleek, contemporary designs that add a touch of modern sophistication to any room.

Benefits of Extra Large Modern Chandeliers For High Ceilings

  1. Dramatic Impact: With their impressive size and striking designs, Extra Large Modern Chandeliers For High Ceilings command attention and instantly elevate the ambiance of any room.
  2. Optimal Lighting: High ceilings can often result in poor lighting distribution, but Extra Large Modern Chandeliers are equipped to illuminate even the largest of spaces with ease, ensuring every corner is bathed in warm, inviting light.
  3. Contemporary Style: Unlike traditional chandeliers, which may feel outdated in modern spaces, Extra Large Modern Chandeliers boast sleek lines and innovative designs that complement contemporary interiors perfectly.
  4. Versatile Placement: While these chandeliers are ideal for high ceilings, their versatility allows them to enhance the beauty of any space, whether it’s a grand foyer, dining room, or even a commercial venue.

Applications of Extra Large Modern Chandeliers For High Ceilings

Extra Large Modern Chandeliers For High Ceilings are suitable for a variety of settings, including:

  • Luxury Homes: Make a statement in your high-ceilinged living room or foyer with a dazzling Extra Large Modern Chandelier that exudes elegance and sophistication.
  • Hotel Lobbies: Create a memorable first impression for guests with a show-stopping chandelier that adds a touch of opulence to your hotel’s entrance.
  • Event Spaces: Whether it’s a wedding venue or a corporate event space, Extra Large Modern Chandeliers can enhance the atmosphere and leave a lasting impression on attendees.

Conclusion

In conclusion, Extra Large Modern Chandeliers For High Ceiling are more than just lighting fixtures – they’re works of art that can transform any space into a luxurious haven. With their dramatic impact, optimal lighting, and contemporary style, these chandeliers are the perfect choice for spaces with soaring ceilings. Elevate your home or commercial venue with the timeless beauty of Extra Large Modern Chandeliers For High Ceilings today.

Read too: Exploring the Benefits and How-Tos of DIY Ceiling Cassette Mini Split Installation: Revolutionizing Comfort

Dual Oscillating Ceiling Fan Technology: Maximizing Comfort and Efficiency

In today’s fast-paced world, where comfort and efficiency are paramount, the humble ceiling fan has evolved into a technological marvel. Enter the Dual Oscillating Ceiling Fan – a revolution in air circulation that combines style, functionality, and innovation. Discover how this cutting-edge appliance can transform your living space into a haven of cool tranquility.

Dual Oscillating Ceiling Fan

Introduction

Ceiling fans have long been a staple in homes and offices worldwide, providing a cost-effective and energy-efficient way to stay cool during hot weather. However, traditional ceiling fans are limited in their ability to distribute air evenly throughout a room. This is where Dual Oscillating Ceiling Fans step in, offering a dynamic solution to this age-old problem.

Understanding Dual Oscillating Ceiling Fans

What sets Dual Oscillating Ceiling Fans apart?

Dual Oscillating Ceiling Fans actively feature dual fan heads that rotate both horizontally and vertically, enabling multidirectional airflow. This innovative design actively ensures even circulation of air throughout the room, actively eliminating hot spots and maximizing comfort.

Benefits of Dual Oscillating Ceiling Fans

  1. Enhanced Air Circulation: Unlike conventional ceiling fans that only move air in one direction, Dual Oscillating Ceiling Fans distribute air evenly in all directions, creating a pleasant breeze throughout the room.
  2. Improved Comfort: With dual oscillation capabilities, these fans can provide cooling relief to everyone in the room, regardless of their location. Say goodbye to feeling too hot or too cold in certain spots – Dual Oscillating Ceiling Fans ensure a consistent and comfortable temperature.
  3. Energy Efficiency: By circulating air more effectively, Dual Oscillating Ceiling Fans can help reduce the workload on your HVAC system, leading to potential energy savings. This eco-friendly option allows you to stay comfortable without breaking the bank.
  4. Stylish Design Options: Dual Oscillating Ceiling Fans come in a variety of styles and finishes to complement any décor. Whether you prefer a sleek and modern look or a more traditional aesthetic, there’s a Dual Oscillating Ceiling Fan to suit your taste.

Applications of Dual Oscillating Ceiling Fans

Dual Oscillating Ceiling Fans actively oscillate and provide versatility for use in a variety of settings, including:

  • Residential Spaces: Keep your home cool and comfortable year-round with a Dual Oscillating Ceiling Fan in your living room, bedroom, or even outdoor patio.
  • Commercial Buildings: From offices to restaurants, Dual Oscillating Ceiling Fans can help create a welcoming environment for customers and employees alike.
  • Industrial Facilities: Improve air circulation and ventilation in warehouses, workshops, and manufacturing plants with the powerful performance of Dual Oscillating Ceiling Fans.

Read too: Exploring the Benefits and How-Tos of DIY Ceiling Cassette Mini Split Installation: Revolutionizing Comfort

Conclusion

In conclusion, Dual Oscillating Ceiling Fans represent the pinnacle of ceiling fan technology, offering unmatched comfort, efficiency, and style. Whether you’re looking to upgrade your home’s cooling system or enhance the atmosphere of your business, investing in a Dual Oscillating Ceiling Fan is a decision you won’t regret.

Upgrade to Dual Oscillating Ceiling Fans today and experience the difference for yourself!

Drop Ceiling Tile Speaker: Elevate Your Audio Experience with Innovative

Are you searching for a discreet and sophisticated audio solution for your home or office? Look no further than drop ceiling tile speakers. In this comprehensive guide, we’ll explore the world of drop ceiling tile speaker, from their innovative design and installation process to the benefits of incorporating them into your audio setup. Whether you’re a music enthusiast, movie buff, or simply seeking to enhance your space with immersive sound, drop ceiling tile speakers offer a seamless and stylish solution.

Drop Ceiling Tile Speakers

Exploring Drop Ceiling Tile Speakers

Understanding Drop Ceiling Tile Speakers:

Drop ceiling tile speakers are audio devices designed to be installed directly into standard drop ceiling grid systems, allowing for a sleek and unobtrusive audio solution. These speakers are typically flush-mounted within ceiling tiles, blending seamlessly into the surrounding decor for a discreet yet immersive audio experience.

Key Features of Drop Ceiling Tile Speakers:

  • Low-profile design: Drop ceiling tile speakers are engineered to be unobtrusive, providing high-quality sound without taking up valuable floor or wall space.
  • Easy installation: With their simple installation process, drop ceiling tile speakers can be quickly and easily integrated into existing drop ceiling systems, making them an ideal choice for both residential and commercial spaces.
  • Customizable options: From single speakers to multi-zone audio systems, drop ceiling tile speakers offer a range of customizable options to suit different audio needs and preferences.

Benefits of Drop Ceiling Tile Speakers

1. Seamless Integration:

One of the primary benefits of drop ceiling tile speakers is their ability to seamlessly integrate into any space. By mounting directly within the ceiling tiles, these speakers become virtually invisible, allowing you to enjoy high-quality sound without disrupting the aesthetic of your room.

2. Enhanced Sound Distribution:

Drop ceiling tile speakers are strategically positioned to distribute sound evenly throughout the room, ensuring optimal audio performance regardless of the listener’s location. This even distribution creates a more immersive listening experience, whether you’re hosting a party or enjoying a quiet night at home.

3. Space-saving Solution:

Drop ceiling tile speakers conserve valuable floor and wall space, making them an excellent choice for rooms with limited space, unlike traditional floor-standing or wall-mounted speakers. By eliminating bulky speaker systems, you can maximize the functionality and versatility of your space without sacrificing audio quality.

Installing Drop Ceiling Tile Speakers

1. Planning and Preparation:

Before installing drop ceiling tile speakers, carefully plan the layout and placement of each speaker to ensure optimal sound coverage. Consider factors such as room size, ceiling height, and seating arrangement to determine the best placement for your speakers.

2. Cutting Ceiling Tiles:

Using a utility knife or ceiling tile cutter, carefully cut holes in the ceiling tiles to accommodate the speakers. Be sure to measure and mark the precise locations for each speaker before cutting to avoid errors or misalignment.

3. Wiring and Connection:

Once you cut the holes, carefully run speaker wire from the audio source to each speaker location. Follow the manufacturer’s instructions for wiring and connection, ensuring that all connections are secure and properly insulated.

Read too: Exploring Craftsman Style Ceiling Fans for Your Home: Embracing Timeless Elegance

Conclusion

Drop ceiling tile speaker offer a sleek, space-saving, and immersive audio solution for any home or office environment. By seamlessly integrating high-quality sound into your ceiling, these speakers provide an unparalleled listening experience while maintaining the aesthetic integrity of your space. Whether you’re hosting a movie night, entertaining guests, or simply enjoying your favorite music, drop ceiling tile speakers deliver crystal-clear sound and superior performance. Upgrade your audio experience today with the innovative technology of drop ceiling tile speakers.

Driftwood Ceiling Fan With Light Fixture: Enhance Your Home Decor with a Stylish

Are you looking to infuse your home with the tranquil vibes of coastal living? Consider adding a driftwood ceiling fan with a light fixture to your space. In this guide, we’ll delve into the allure and practicality of driftwood ceiling fans with lights, exploring their design, features, installation, and more. Whether you’re aiming for a beach house aesthetic or simply seeking to bring a touch of nature indoors, a driftwood ceiling fan with light is sure to captivate and elevate your home decor.

Driftwood Ceiling Fan With Light

Unveiling the Beauty of Driftwood Ceiling Fans With Lights

What Sets Driftwood Ceiling Fans With Lights Apart?

Driftwood ceiling fans with lights offer a unique blend of rustic charm and modern functionality, making them an ideal choice for coastal-inspired interiors. Crafted from weathered wood or finished to mimic the look of driftwood, these fans evoke the natural beauty of seaside landscapes, infusing any room with a sense of serenity and style.

Key Features of Driftwood Ceiling Fans With Lights:

  • Weathered finish: Driftwood ceiling fans often feature a distressed or weathered finish, giving them an authentic and aged appearance reminiscent of driftwood washed ashore.
  • Integrated lighting: Many driftwood ceiling fans come equipped with built-in light fixtures, providing both illumination and cooling comfort in one stylish package.
  • Versatile design: From traditional to contemporary styles, driftwood ceiling fans with lights come in a variety of designs to suit different decor preferences and room aesthetics.

Benefits of Choosing a Driftwood Ceiling Fan With Light

1. Coastal Elegance:

A driftwood ceiling fan with a light fixture instantly adds a touch of coastal elegance to any room. Whether installed in a living room, bedroom, or outdoor patio, these fans evoke the relaxed atmosphere of beachside living, creating a serene and inviting ambiance.

2. Dual Functionality:

Combining a ceiling fan with a light fixture offers dual functionality, allowing you to circulate air and illuminate your space simultaneously. This versatility makes driftwood ceiling fans with lights a practical and space-saving solution for rooms where both cooling and lighting are needed.

3. Energy Efficiency:

Many driftwood ceiling fans with lights are designed with energy-efficient motors and LED light bulbs, helping you reduce energy consumption and lower utility costs. By choosing an eco-friendly option, you can enjoy year-round comfort while minimizing your environmental footprint.

Installing a Driftwood Ceiling Fan With Light

1. Pre-Installation Preparation:

Before installing a driftwood ceiling fan with a light fixture, ensure that you have the necessary tools and equipment on hand. Measure the ceiling height and the space where the fan will be installed to ensure proper clearance and functionality.

2. Mounting the Fan:

Follow the manufacturer’s instructions for mounting the fan to the ceiling, taking care to secure it properly and balance the blades for smooth and efficient operation. Use a sturdy mounting bracket and hardware to ensure the fan is securely attached to the ceiling.

3. Wiring and Electrical Connections:

Carefully wire the fan to the electrical circuit, following the wiring diagram provided by the manufacturer. Make sure to turn off the power at the breaker box before making any electrical connections and consult a qualified electrician if you’re unsure about the wiring process.

Conclusion

A driftwood ceiling fan with a light fixture is more than just a functional appliance—it’s a statement piece that adds character, charm, and coastal flair to any room. By choosing a driftwood ceiling fan with light, you can create a relaxing and inviting atmosphere that captures the essence of beachside living. Whether you’re decorating a seaside retreat or bringing a touch of coastal style to your inland home, a driftwood ceiling fan with light is sure to become the focal point of your decor.

Read too: Exploring Craftsman Style Ceiling Fans for Your Home: Embracing Timeless Elegance

DIY Mini Split Ceiling Cassette Installation: Transform Your Space

Are you looking to upgrade your home’s cooling or heating system with a sleek and efficient solution? Consider installing a DIY mini split ceiling cassette system. In this guide, we’ll explore everything you need to know about DIY mini split ceiling cassettes, from their benefits and installation process to important considerations for a successful project. Whether you’re a seasoned DIY enthusiast or a first-time homeowner, a mini split ceiling cassette system can help you achieve optimal comfort in your space while maintaining a modern and unobtrusive aesthetic.

Diy Mini Split Ceiling Cassette

Understanding DIY Mini Split Ceiling Cassettes

What is a DIY Mini Split Ceiling Cassette?

A DIY mini split ceiling cassette is a compact and versatile heating and cooling system designed to be installed directly into the ceiling of a room. Unlike traditional HVAC systems that require bulky ductwork and extensive installation, mini split ceiling cassettes offer a streamlined and efficient solution for maintaining comfortable indoor temperatures.

Key Features of DIY Mini Split Ceiling Cassettes:

  • Compact design: Mini split ceiling cassettes are designed to be discreet and unobtrusive, blending seamlessly into the ceiling for a sleek and modern look.
  • Zone control: With individual air handlers installed in different rooms or zones, mini split ceiling cassettes offer customizable temperature control for enhanced comfort and energy efficiency.
  • Quiet operation: Advanced technology ensures that mini split ceiling cassettes operate quietly and efficiently, minimizing noise disturbance while providing reliable heating and cooling.

Benefits of DIY Mini Split Ceiling Cassettes

1. Space-saving Design:

One of the primary advantages of DIY mini split ceiling cassettes is their space-saving design. By eliminating the need for bulky ductwork and wall-mounted units, these systems free up valuable floor and wall space, allowing for greater flexibility in room layout and design.

2. Energy Efficiency:

DIY mini split ceiling cassettes are highly energy-efficient, allowing you to heat or cool specific rooms or zones without wasting energy on areas that are not in use. This targeted approach to heating and cooling can lead to significant energy savings and lower utility bills over time.

3. Enhanced Aesthetics:

Unlike traditional HVAC systems, which often feature bulky and unsightly components, DIY mini split ceiling cassettes are designed to blend seamlessly into the ceiling for a sleek and modern look. This minimalist design aesthetic can enhance the overall appearance of your space while maintaining optimal comfort.

Installing a DIY Mini Split Ceiling Cassette

1. Assessing Your Space:

Before installing a DIY mini split ceiling cassette, carefully assess your space to determine the best location for the unit. Consider factors such as room size, ceiling height, and existing electrical wiring to ensure proper installation and functionality.

2. Selecting the Right Unit:

Choose a DIY mini split ceiling cassette system that is appropriate for your space and heating/cooling needs. Consider factors such as BTU capacity, energy efficiency rating, and additional features such as Wi-Fi connectivity or programmable settings.

3. Professional Consultation:

While DIY installation is possible for some homeowners, it’s essential to consult with a professional HVAC technician or contractor before beginning the installation process. A professional can provide valuable guidance and ensure the correct and safe installation of the system.

Conclusion

DIY mini split ceiling cassettes offer a convenient, energy-efficient, and aesthetically pleasing solution for heating and cooling your space. By understanding the benefits, installation process, and considerations associated with these systems, you can confidently upgrade your home’s HVAC system and enjoy optimal comfort year-round. Whether you’re looking to cool a single room or multiple zones, a DIY mini split ceilings cassette can help you achieve your heating and cooling goals with ease.

Read too: Exploring Craftsman Style Ceiling Fans for Your Home: Embracing Timeless Elegance

Decorative 2X2 Ceiling Tile: Elevate Your Space with Stylish and Functional

Decorative 2X2 ceiling tiles offer a versatile and stylish solution for enhancing the aesthetics of any room. In this comprehensive guide, we’ll delve into the world of decorative 2X2 ceiling tile, exploring their benefits, design options, installation tips, and more. Whether you’re looking to add a touch of elegance to your home or create a stunning focal point in a commercial space, decorative 2X2 ceiling tiles are sure to elevate your interior design.

Decorative 2X2 Ceiling Tiles

Exploring the Beauty of Decorative 2X2 Ceiling Tiles

1. Versatile Design Options:

Decorative 2X2 ceiling tiles come in a wide range of styles, patterns, and finishes, allowing you to customize the look of your space to suit your taste and decor preferences. From classic designs like tin and faux tin to contemporary options like wood and metal, there’s a decorative 2X2 ceiling tile to complement any design aesthetic.

2. Enhanced Aesthetics:

One of the primary benefits of decorative 2X2 ceiling tiles is their ability to enhance the aesthetics of a room. Whether used as a subtle accent or a bold statement piece, these tiles add texture, depth, and visual interest to ceilings, transforming them from ordinary to extraordinary.

3. Easy Installation:

Despite their intricate appearance, decorative 2X2 ceiling tile are relatively easy to install, making them a popular choice for DIY enthusiasts and professional contractors alike. With the right tools and techniques, you can quickly and easily transform the look of your space with decorative ceiling tiles.

Read too: Exploring Craftsman Style Ceiling Fans for Your Home: Embracing Timeless Elegance

Benefits of Decorative 2X2 Ceiling Tiles

1. Conceal Imperfections:

Decorative 2X2 ceiling tiles are an excellent solution for concealing imperfections in ceilings, such as cracks, stains, and uneven surfaces. By covering these flaws with stylish tiles, you can create a smooth and uniform ceiling surface that enhances the overall appearance of the room.

2. Improved Acoustics:

In addition to their aesthetic benefits, decorative 2X2 ceiling tiles can also help improve acoustics in a room by absorbing sound and reducing echo. This makes them an ideal choice for spaces where noise control is a concern, such as offices, restaurants, and home theaters.

3. Durability and Longevity:

Decorative 2X2 ceiling tiles are typically made from durable materials such as metal, PVC, or fiberglass, ensuring long-lasting performance and resistance to damage. With proper care and maintenance, these tiles can retain their beauty and functionality for years to come.

Installing Decorative 2X2 Ceiling Tiles

1. Preparation:

Before installing decorative 2X2 ceiling tiles, ensure that the ceiling surface is clean, smooth, and free of any debris or obstructions. Remove existing ceiling tiles or panels, if necessary, and make any repairs or adjustments as needed.

2. Installation:

Begin by measuring the dimensions of the ceiling and marking the layout for the tiles. Use adhesive or nails to secure the tiles in place, following the manufacturer’s instructions for proper installation. Ensure that the tiles are aligned correctly and evenly spaced for a professional-looking finish.

3. Finishing Touches:

Once all the tiles are installed, add finishing touches such as trim pieces or decorative accents to complete the look. Caulk any gaps or seams between tiles to create a seamless appearance, and touch up any paint or finish as needed to ensure a polished finish.

Conclusion

Decorative 2X2 ceiling tiles offer a stylish, versatile, and easy-to-install solution for enhancing the aesthetics of any room. Whether used as a subtle accent or a bold statement piece, these tiles add texture, depth, and visual interest to ceilings, transforming them into stunning focal points. With a wide range of design options and easy installation process, decorative 2X2 ceiling tiles are sure to elevate the look of your space and impress visitors for years to come.

Ceiling Sprinkler Cover Plate: Enhance Safety and Style

Ceiling sprinkler cover plate play a crucial role in fire protection systems, offering both safety and aesthetic benefits. In this comprehensive guide, we’ll explore everything you need to know about ceiling sprinkler cover plates, including their importance, functionality, installation process, and design options. Whether you’re a homeowner, building manager, or safety professional, understanding the role of ceiling sprinkler cover plates is essential for ensuring the safety of occupants and protecting property in the event of a fire.

Ceiling Sprinkler Cover Plate

Understanding the Role of Ceiling Sprinkler Cover Plates

1. Fire Protection:

Ceiling sprinkler cover plates are an integral component of automatic fire sprinkler systems, designed to prevent water from prematurely discharging from the sprinkler head. By covering the sprinkler head with a heat-sensitive plate, ceiling sprinkler cover plates help contain the flow of water until activated by high temperatures caused by a fire.

2. Aesthetic Enhancement:

In addition to their fire protection function, ceiling sprinkler cover plates also contribute to the overall aesthetics of a space. With a variety of finishes and designs available, cover plates can blend seamlessly into the ceiling or add a decorative touch to complement the interior design of the room.

3. Safety Compliance:

Ceiling sprinkler cover plates are subject to strict regulatory standards and building codes to ensure their effectiveness in fire protection. Compliance with these standards is essential for ensuring the safety of building occupants and minimizing property damage in the event of a fire.

Read too: Exploring Craftsman Style Ceiling Fans for Your Home: Embracing Timeless Elegance

Exploring the Benefits of Ceiling Sprinkler Cover Plates

1. Concealed Protection:

Ceiling sprinkler cover plates provide discreet protection against fire hazards, blending into the ceiling when not in use to maintain the aesthetic integrity of the space. This concealed protection ensures that occupants feel safe without compromising the visual appeal of the environment.

2. Quick Response:

In the event of a fire, ceiling sprinkler cover plates are designed to respond rapidly to elevated temperatures, activating the sprinkler system and releasing water to suppress the fire. This quick response helps minimize the spread of flames and smoke, allowing occupants to evacuate safely and reducing property damage.

3. Versatile Design Options:

Ceiling sprinkler cover plates are available in a wide range of materials, finishes, and designs to suit various aesthetic preferences and architectural styles. Whether you prefer a seamless integration with the ceiling or a decorative embellishment, there’s a cover plate option to meet your needs.

Installing Ceiling Sprinkler Cover Plates

1. Professional Installation:

Ceiling sprinkler cover plates should be installed by qualified professionals familiar with fire protection system regulations and guidelines. Professional installers can ensure proper placement, alignment, and functionality of the cover plates to maximize their effectiveness in fire suppression.

2. Regular Maintenance:

It’s essential to conduct regular inspections and maintenance of ceiling sprinkler cover plates to ensure they are free from obstruction and damage. Any signs of wear or corrosion should be addressed promptly to maintain the integrity of the fire protection system.

3. Compliance with Regulations:

When installing or replacing ceiling sprinkler cover plates, ensure compliance with local building codes and fire protection regulations. Non-compliance can result in fines, penalties, and compromised safety in the event of a fire.

Conclusion

Ceiling sprinkler cover plates are vital for fire protection and aesthetics in automatic sprinkler systems. Understanding their role, benefits, and installation is crucial for safety and compliance. Investing in quality covers and following standards enhances safety, protects property, and maintains visual appeal.

Ceiling Hanging Sliding Door: Elevate Your Space with Stylish and Functional

Ceiling hanging sliding doors are not only practical space-saving solutions but also stylish additions to any interior space. In this comprehensive guide, we’ll explore the versatility and elegance of ceiling hanging sliding door, offering valuable insights into their benefits, design options, and installation tips to help you elevate your space with ease.

Ceiling Hanging Sliding Doors

Embracing the Versatility of Ceiling Hanging Sliding Doors

1. Maximizing Space:

Ceiling hanging sliding doors are ideal for maximizing space in any room, particularly in areas where traditional swinging doors may be impractical due to limited floor space. By suspending the doors from the ceiling track, you can free up valuable floor space and create a more open and spacious environment.

2. Modern Elegance:

With their sleek and minimalist design, ceiling hanging sliding doors add a touch of modern elegance to any interior space. Whether used as room dividers, closet doors, or pantry doors, these stylish doors make a statement while seamlessly blending into the overall aesthetic of the room.

3. Versatile Design Options:

From frosted glass panels to solid wood panels, ceiling hanging sliding doors come in a variety of materials and finishes to suit any decor style. Choose from different hardware finishes, track styles, and door designs to customize the look of your doors and complement your existing decor.

Read too: Exploring Craftsman Style Ceiling Fans for Your Home: Embracing Timeless Elegance

Exploring the Benefits of Ceiling Hanging Sliding Doors

1. Space Efficiency:

Ceiling hanging sliding doors are a space-efficient solution for rooms with limited square footage. Unlike traditional swinging doors that require clearance space to open and close, sliding doors glide along a ceiling-mounted track, allowing you to make the most of your available space.

2. Seamless Integration:

Ceiling hanging sliding doors seamlessly integrate into the architecture of a space, providing a clean and unobtrusive design solution. Whether used to divide a living area from a dining area or to conceal a closet or storage space, these doors create a seamless transition between rooms while maintaining a sense of openness.

3. Enhanced Privacy:

In addition to their space-saving benefits, ceiling hanging sliding doors also offer enhanced privacy when closed. Whether used in bedrooms, bathrooms, or home offices, these doors provide a barrier between spaces without compromising on style or functionality.

Tips for Installing Ceiling Hanging Sliding Doors

1. Measure Carefully:

Before purchasing ceiling hanging sliding doors, carefully measure the height and width of the door opening to ensure a proper fit. Take into account the height of the ceiling and any obstructions that may interfere with the installation process.

2. Choose Quality Hardware:

Invest in high-quality hardware for your ceiling hanging sliding doors to ensure smooth operation and long-lasting performance. Look for sturdy ceiling tracks, durable rollers, and reliable door handles to prevent issues such as sticking or jamming.

3. Consider Professional Installation:

While ceiling hanging sliding doors can be installed as a DIY project, consider hiring a professional contractor or carpenter for more complex installations. A professional installer can ensure proper alignment, secure mounting, and smooth operation, resulting in a flawless finished product.

Conclusion

Ceiling hanging sliding door offer a winning combination of style, functionality, and space efficiency, making them a valuable addition to any interior space. Whether used as room dividers, closet doors, or pantry doors, these versatile doors provide a sleek and modern solution for maximizing space and enhancing privacy. With careful planning and attention to detail, you can transform your space with the elegance and sophistication of ceiling hanging sliding doors.

Ceiling Fans with Uplighting Features: Elevate Your Home Decor with Stylish

Ceiling fans are not only practical cooling solutions but also essential elements of interior design. When equipped with uplighting features, ceiling fans become even more versatile, providing both functional illumination and enhancing the ambiance of any space. In this comprehensive guide, we’ll explore the elegance and functionality of ceiling fans with uplighting, offering valuable insights into their benefits, design options, and installation tips to help you elevate your home decor with ease.

Ceiling Fans With Uplighting

Unveiling the Beauty of Ceiling Fans with Uplighting

1. Dual Functionality:

Ceiling fans with uplighting features offer the dual benefit of providing both cooling and ambient lighting. The uplighting component directs soft, diffused light upwards towards the ceiling, creating a warm and inviting glow that enhances the overall ambiance of the room. This additional layer of illumination complements existing lighting fixtures and adds depth to the space.

2. Versatile Design Options:

From sleek and modern to classic and traditional, ceiling fans with uplighting features come in a variety of styles to suit any decor aesthetic. Choose from different finishes, blade designs, and uplighting fixtures to complement your home’s interior design and elevate its visual appeal. Whether you prefer a contemporary look or a more traditional style, there’s a ceiling fan with uplighting to suit your taste.

3. Energy Efficiency:

Many ceiling fans with uplighting features are equipped with energy-efficient LED bulbs, offering long-lasting illumination while minimizing energy consumption. LED bulbs are known for their durability and low heat output, making them an eco-friendly lighting option for your home. By choosing a ceiling fan with uplighting, you can enjoy stylish illumination without compromising on energy efficiency.

Exploring the Benefits of Ceiling Fans with Uplighting

1. Enhanced Ambiance:

The soft, diffused light emitted by the uplighting component of ceiling fans creates a warm and inviting ambiance in any room. Whether used alone or in conjunction with other lighting fixtures, uplighting adds a layer of sophistication and elegance to your home decor, enhancing the overall atmosphere of the space.

2. Flexible Lighting Control:

Many ceiling fans with uplighting features come with built-in dimmer switches or remote control capabilities, allowing you to adjust the brightness and intensity of the uplighting to suit your preferences. This flexibility allows you to create the perfect ambiance for any occasion, whether you’re entertaining guests or enjoying a quiet evening at home.

3. Space-Saving Solution:

Combining a ceiling fan with uplighting features eliminates the need for separate light fixtures and fans, saving valuable space in smaller rooms or areas with low ceilings. This streamlined design maximizes both functionality and visual appeal, creating a cohesive look in your home without sacrificing comfort or style.

Tips for Installing Ceiling Fans with Uplighting

1. Choose the Right Size:

When selecting a ceiling fan with uplighting features, consider the size of the room and the fan’s blade span. Choose a fan with an appropriate size and blade span to ensure optimal air circulation and lighting coverage.

2. Follow Installation Instructions:

Carefully follow the manufacturer’s installation instructions when installing your ceiling fan with uplighting features. Ensure proper wiring and mounting to prevent accidents and ensure safe operation.

3. Hire a Professional:

If you’re not comfortable installing the ceiling fan yourself, consider hiring a licensed electrician or handyman to handle the installation. A professional installer can ensure proper wiring, mounting, and safety compliance, giving you peace of mind.

Conclusion

Ceiling fan with uplighting features offer a winning combination of style, functionality, and energy efficiency, making them a valuable addition to any home. Whether you’re looking to enhance illumination, improve air circulation, or elevate your home decor, these versatile fixtures provide the perfect solution. Explore the endless design options and benefits of ceiling fan with uplighting features to create a comfortable and stylish indoor environment for you and your family to enjoy.

Read too: Exploring Craftsman Style Ceiling Fans for Your Home: Embracing Timeless Elegance

Ceiling Fan with Uplight and Downlight Features: Exploring the Beauty

Ceiling fans are not only functional cooling solutions but also stylish additions to any room. When combined with uplight and downlight features, ceiling fans become even more versatile, providing both illumination and air circulation. In this guide, we’ll delve into the beauty and functionality of ceiling fan with uplight and downlight features, exploring their benefits, design options, and installation tips to help you enhance your home decor with ease.

Ceiling Fans With Uplight And Downlight

Embracing the Versatility of Ceiling Fans with Uplight and Downlight

1. Enhanced Illumination:

Ceiling fans with uplight and downlight features offer the dual benefit of providing both ambient and task lighting. The uplight feature illuminates the ceiling, creating a soft, indirect glow that enhances the overall ambiance of the room. Meanwhile, the downlight provides focused illumination, perfect for reading, working, or highlighting specific areas of the space.

2. Energy Efficiency:

Many ceiling fans with uplight and downlight features are equipped with energy-efficient LED bulbs, offering long-lasting illumination while minimizing energy consumption. LED bulbs are known for their durability and low heat output, making them an eco-friendly lighting option for your home.

3. Stylish Design Options:

From sleek and modern to classic and traditional, ceiling fans with uplight and downlight features come in a variety of styles to suit any decor aesthetic. Choose from different finishes, blade designs, and light fixture designs to complement your home’s interior design and elevate its visual appeal.

Exploring the Benefits of Ceiling Fans with Uplight and Downlight

1. Year-Round Comfort:

Ceiling fans with uplight and downlight features are designed to provide year-round comfort by circulating air and providing supplemental lighting. In the summer months, the fan’s cooling breeze helps create a comfortable indoor environment, while the downlight provides additional illumination during the darker winter months.

Read too: Exploring Craftsman Style Ceiling Fans for Your Home: Embracing Timeless Elegance

2. Space-Saving Solution:

Combining a ceiling fan with uplight and downlight features eliminates the need for separate light fixtures and fans, saving valuable space in smaller rooms or areas with low ceilings. This streamlined design maximizes both functionality and visual appeal, creating a cohesive look in your home.

3. Remote Control Convenience:

Many ceiling fans with uplight and downlight features come with remote control capabilities, allowing you to adjust fan speed, light intensity, and direction from the comfort of your seat. This added convenience makes it easy to customize your indoor environment according to your preferences and needs.

Tips for Installing Ceiling Fans with Uplight and Downlight

1. Choose the Right Size:

When selecting a ceiling fan with uplight and downlight features, consider the size of the room and the fan’s blade span. Choose a fan with an appropriate size and blade span to ensure optimal air circulation and lighting coverage.

2. Follow Installation Instructions:

Carefully follow the manufacturer’s installation instructions when installing your ceiling fan with uplight and downlight features. Ensure proper wiring and mounting to prevent accidents and ensure safe operation.

3. Hire a Professional:

If you’re not comfortable installing the ceiling fan yourself, consider hiring a licensed electrician or handyman to handle the installation. A professional installer can ensure proper wiring, mounting, and safety compliance, giving you peace of mind.

Conclusion

Ceiling fan with uplight and downlight features offer a winning combination of style, functionality, and energy efficiency, making them a valuable addition to any home. Whether you’re looking to enhance illumination, improve air circulation, or elevate your home decor, these versatile fixtures provide the perfect solution. Explore the endless design options and benefits of ceiling fans with uplight and downlight features to create a comfortable and stylish indoor environment for you and your family to enjoy.

Ceiling Drapery for Wedding Receptions: Elevate Your Wedding Decor

When it comes to creating an enchanting atmosphere for your wedding reception, every detail matters. One element that can make a significant impact on the overall ambiance is ceiling drapery. In this guide, we’ll explore the magic of ceiling drapery for wedding receptions, offering creative ideas and inspiration to help you elevate your wedding decor and create a memorable experience for you and your guests.

Ceiling Drapery For Wedding

Unveiling the Beauty of Ceiling Drapery for Wedding Receptions

1. Romantic Elegance:

Ceiling drapery adds an element of romantic elegance to any wedding venue, instantly transforming the space into a fairytale setting. Soft, billowing fabrics cascading from the ceiling create a sense of intimacy and romance, setting the stage for a magical celebration of love.

2. Versatile Design Options:

One of the great advantages of ceiling drapery is its versatility. Whether you’re planning a rustic barn wedding, a glamorous ballroom affair, or an outdoor garden celebration, ceiling drapery can be tailored to suit any venue and style. From delicate chiffon to luxurious satin, there are endless fabric options to choose from to complement your wedding theme.

3. Customizable Decor Elements:

Ceiling drapery provides a blank canvas for incorporating other decor elements into your wedding design. Consider embellishing the drapery with fairy lights, floral garlands, or hanging lanterns to add texture and visual interest. Personalized touches such as monogrammed initials or decorative accents that reflect your love story can further enhance the ambiance and create a unique atmosphere for your celebration.

Read too: Exploring Craftsman Style Ceiling Fans for Your Home: Embracing Timeless Elegance

Creative Ideas for Ceiling Drapery at Wedding Receptions

1. Canopy of Love:

Create a romantic canopy of drapery above the dance floor or sweetheart table to make a focal point for your reception. Drape sheer fabric in soft, flowing layers and add twinkling fairy lights or cascading floral arrangements for an ethereal effect.

2. Tent of Tranquility:

Transform an outdoor wedding venue into a luxurious oasis with a tented ceiling draped in billowing fabric. Opt for sheer, lightweight materials that allow natural light to filter through during the day and glow softly under the stars at night.

3. Garden-Inspired Romance:

Bring the beauty of the outdoors inside by incorporating ceiling drapery adorned with fresh flowers and greenery. Create a lush canopy above the reception tables or hang floral chandeliers from the ceiling for a whimsical touch.

Tips for Incorporating Ceiling Drapery Into Your Wedding Decor

1. Consult with a Professional:

Work with a wedding decorator or event planner who specializes in ceiling drapery to bring your vision to life. They can offer expert advice on fabric selection, design options, and installation techniques to ensure a flawless execution on your wedding day.

2. Consider Venue Logistics:

Before finalizing your ceiling drapery design, consider the logistics of your wedding venue, including ceiling height, structural limitations, and access for installation. Conduct a site visit with your decorator to assess the space and discuss any potential challenges or considerations.

3. Lighting Matters:

Don’t underestimate the power of lighting when it comes to showcasing your ceiling drapery. Work with a lighting designer to create a custom lighting scheme that enhances the beauty of the drapery and sets the mood for your reception.

Conclusion

Ceiling drapery is a versatile and beautiful decor element that can transform any wedding venue into a magical setting. From romantic canopies to garden-inspired installations, the possibilities are endless when it comes to incorporating ceilings drapery into your wedding decor. With careful planning and attention to detail, you can create a breathtaking ambiance that will leave a lasting impression on you and your guests for years to come.

Armstrong Sahara Ceiling Tile: Elevate Your Space

When it comes to enhancing the aesthetics and functionality of interior spaces, Armstrong Sahara ceiling tiles stand out as a top choice for architects, designers, and homeowners alike. In this comprehensive guide, we’ll explore the beauty and versatility of Armstrong Sahara ceiling tile, providing valuable insights into their features, benefits, and installation process, allowing you to transform any space with ease.

Armstrong Sahara Ceiling Tiles

Introducing Armstrong Sahara Ceiling Tiles

1. Elegance and Style:

Armstrong Sahara ceiling tiles are renowned for their timeless elegance and sophisticated style, making them a popular choice for a wide range of commercial and residential applications. Featuring a subtle textured surface and clean lines, Sahara tiles add a touch of sophistication to any space, enhancing its overall aesthetics.

2. Versatility and Functionality:

One of the key advantages of Armstrong Sahara ceiling tiles is their versatility and functionality. Available in a variety of sizes, colors, and edge details, Sahara tiles can be customized to suit any design vision or architectural style. Whether you’re creating a contemporary office space, a classic retail environment, or a cozy residential setting, Sahara tiles offer the flexibility to bring your vision to life.

3. Acoustic Performance:

In addition to their visual appeal, Armstrong Sahara ceiling tiles are designed to enhance acoustic comfort in interior spaces. Featuring sound-absorbing properties, Sahara tiles help reduce noise levels, creating a quieter and more comfortable environment for occupants. This makes them an ideal choice for spaces such as offices, classrooms, healthcare facilities, and more.

Features and Benefits of Armstrong Sahara Ceiling Tiles

1. Durable Construction:

Constructed from high-quality materials, Armstrong Sahara ceiling tiles are built to withstand the rigors of daily use while maintaining their beauty and integrity over time. Their durable construction makes them resistant to sagging, warping, and discoloration, ensuring long-lasting performance in any environment.

2. Easy Installation:

Installing Armstrong Sahara ceiling tiles is a straightforward process that requires minimal time and effort. With a variety of installation options, including drop-in, concealed, and surface mount, Sahara tiles can be easily integrated into new construction or renovation projects. Their lightweight design and precise dimensions make them easy to handle and install, saving time and labor costs.

3. Low Maintenance:

Maintaining Armstrong Sahara ceiling tiles is simple and hassle-free, thanks to their smooth, non-porous surface. Routine cleaning with a mild detergent and water is all that’s needed to keep Sahara tiles looking fresh and vibrant for years to come. Their resistance to mold, mildew, and bacteria makes them an ideal choice for spaces where hygiene is a priority.

Installing Armstrong Sahara Ceiling Tiles

1. Preparation:

Before installing Armstrong Sahara ceiling tiles, ensure that the ceiling grid is properly installed and leveled. Remove any existing ceiling tiles or panels and clean the surface to remove dust, dirt, and debris.

2. Cutting and Fitting:

Measure the dimensions of the ceiling area and cut the Sahara tiles to size using a sharp utility knife or a specialized ceiling tile cutter. Take care to make precise cuts to achieve a seamless fit.

3. Installation:

Place the cut Sahara tiles into the ceiling grid, starting from one corner and working your way across the ceiling. Ensure that the tiles are properly aligned and securely seated within the grid.

4. Finishing Touches:

Once all Sahara tiles are installed, inspect the ceiling for any gaps or unevenness. Make any necessary adjustments and add trim or molding as desired to complete the installation.

Conclusion

Armstrong Sahara ceiling tile offer a perfect blend of style, versatility, and functionality, making them an excellent choice for enhancing interior spaces. Whether you’re designing a commercial office, a retail store, or a residential home, Sahara tiles provide the aesthetic appeal, acoustic comfort, and durability needed to create a truly exceptional environment. Explore the endless design possibilities with Armstrong Sahara ceiling tiles and elevate your space to new heights of sophistication and style.

Read too: Exploring Craftsman Style Ceiling Fans for Your Home: Embracing Timeless Elegance

Armstrong Ceiling Plank Installation: Tips and Techniques

Armstrong ceiling planks offer a stylish and durable solution for enhancing the look of any space. In this comprehensive guide, we’ll walk you through the steps of Armstrong ceiling plank installation, covering everything from preparation and tools to finishing touches. Whether you’re a seasoned DIY enthusiast or a first-time installer, this article will provide you with the knowledge and confidence to achieve professional results.

Armstrong Ceiling Plank Installation

Getting Started: Preparation and Planning

Before you begin the installation process, it’s essential to properly prepare your space and plan out the layout of your ceiling planks. Here are some key steps to consider:

  1. Measure the Space: Accurately measure the dimensions of your ceiling to determine how many planks you’ll need for the installation.
  2. Prepare the Surface: Ensure that the ceiling surface is clean, smooth, and free of any debris or imperfections that could affect the installation process.
  3. Gather the Necessary Tools: Gather all the tools and materials you’ll need for the installation, including ceiling planks, adhesive, nails or screws, a saw, a level, and safety equipment.

Armstrong Ceiling Plank Installation: Step-by-Step Guide

Follow these step-by-step instructions for a successful Armstrong ceiling plank installation:

  1. Prepare the First Row: Start by measuring and cutting the first row of planks to fit the length of the ceiling. Use a saw to make precise cuts as needed.
  2. Apply Adhesive: Apply a recommended adhesive to the back of the first plank using a caulk gun, following the manufacturer’s instructions.
  3. Secure the Planks: Press the first plank firmly onto the ceiling surface, ensuring that it is level and aligned with the starting point. Use nails or screws to secure the plank in place if necessary.
  4. Continue Installation: Repeat the process for the remaining rows of planks, making sure to stagger the joints for a seamless appearance.
  5. Cutting and Fitting: Use a saw to cut planks to size as needed to fit around corners, fixtures, and other obstacles.
  6. Finishing Touches: Once all the planks are installed, apply any finishing touches, such as trim or molding, to complete the look of your ceiling.

Read too: Exploring the Innovation and Efficiency of Ceiling Mounted Surgical Light Solutions: Illuminating Precision

Tips and Techniques for Success

  • Take Your Time: Patience is key when it comes to Armstrong ceiling plank installation. Take your time to ensure each plank is properly aligned and secured.
  • Use Proper Safety Gear: Wear safety goggles, gloves, and a dust mask to protect yourself during the installation process.
  • Follow Manufacturer’s Instructions: Always follow the manufacturer’s instructions and recommendations for the best results.
  • Check for Level: Regularly use a level to ensure even installation of the planks without any dips or unevenness.

Maintenance and Care

After installing your Armstrong ceiling planks, ensure proper maintenance to keep them looking their best. Here are some maintenance tips to keep in mind:

  • Regularly dust or vacuum the ceiling planks to remove any dirt or debris.
  • Avoid using harsh chemicals or abrasive cleaners, as they can damage the finish of the planks.
  • If necessary, touch up any scratches or dents with matching paint or stain to maintain the appearance of the planks.

Conclusion

With the right tools, preparation, and techniques, Armstrong ceiling plank installation can be a rewarding and enjoyable project. By following the steps outlined in this guide and incorporating expert tips and techniques, you can achieve professional-quality results that will enhance the beauty and functionality of any space.

Armstrong 1912 Ceiling Tile: Exploring the Beauty and Durability

Armstrong 1912 ceiling tile are renowned for their timeless design and superior quality. In this article, we’ll delve into the history of these iconic tiles, explore their features, and provide valuable insights into their installation and maintenance. Whether you’re renovating a historic building or updating your home with classic charm, Armstrong 1912 ceiling tiles offer unmatched beauty and durability.

Armstrong 1912 Ceiling Tile

Unveiling Armstrong 1912 Ceiling Tiles

Armstrong 1912 ceiling tiles are inspired by the elegance and sophistication of early 20th-century design. Crafted with meticulous attention to detail, these tiles capture the essence of a bygone era while offering modern performance and durability. With their intricate patterns, textured surfaces, and rich colors, Armstrong 1912 ceiling tiles add a touch of vintage charm to any space.

Features of Armstrong 1912 Ceiling Tiles

  1. Timeless Design: Armstrong 1912 ceiling tiles feature classic designs inspired by architectural styles from the early 20th century, including Art Deco, Victorian, and Craftsman.
  2. Durable Construction: Constructed from high-quality materials, such as mineral fiber and fiberglass, Armstrong 1912 ceiling tiles are designed to withstand the test of time and maintain their beauty for years to come.
  3. Variety of Patterns: These tiles are available in a wide range of patterns, including geometric motifs, floral designs, and intricate textures, allowing for endless design possibilities.
  4. Easy Installation: Armstrong 1912 ceiling tiles are designed for easy installation, with options for direct-mount or drop-ceiling applications, making them suitable for both residential and commercial projects.
  5. Fire and Moisture Resistance: Many Armstrong 1912 ceiling tiles are engineered to meet stringent fire and moisture resistance standards, ensuring safety and peace of mind.

Installation Methods for Armstrong 1912 Ceiling Tiles

  1. Direct Mount: Direct-mount installation involves attaching the ceiling tiles directly to the ceiling substrate using adhesive or screws. This method is ideal for ceilings with minimal clearance or where a seamless look is desired.
  2. Drop Ceiling Grid: Drop ceiling installation involves suspending the tiles from a grid system mounted to the ceiling joists. This method allows for easy access to utilities and ductwork while providing a clean and polished appearance.

Read too: Exploring the Innovation and Efficiency of Ceiling Mounted Surgical Light Solutions: Illuminating Precision

Maintenance Tips for Armstrong 1912 Ceiling Tiles

  1. Regular Cleaning: Keep Armstrong 1912 ceiling tiles looking their best by regularly dusting or vacuuming them to remove dirt and debris.
  2. Avoid Moisture Exposure: Minimize exposure to moisture to prevent water damage and mold growth. Use a mild detergent and water solution for cleaning, and avoid harsh chemicals or abrasive cleaning tools.
  3. Inspect for Damage: Periodically inspect the tiles for signs of damage, such as cracks, stains, or warping, and replace any damaged tiles as needed to maintain the integrity of the ceiling system.

Conclusion

Armstrong 1912 ceiling tile embody the timeless elegance and exceptional craftsmanship of a bygone era, making them a perfect choice for adding classic style to any space. With their durable construction, versatile designs, and easy installation, these tiles offer both aesthetic appeal and practical functionality. Whether you’re restoring a historic building or renovating a modern home, Armstrong 1912 ceiling tiles provide a timeless solution for enhancing your space with enduring beauty.

Now that you’re familiar with the features, installation methods, and maintenance tips for Armstrong 1912 ceiling tiles, why not incorporate these classic tiles into your next design project?

Antique White Ceiling Fan: Enhance Your Décor with Elegant

Antique white ceiling fan bring a touch of timeless elegance to any room. In this article, we’ll explore the allure of these vintage-inspired fixtures and provide valuable insights into their features, styles, and installation. Whether you’re seeking to enhance your traditional décor or add a classic accent to a contemporary space, antique white ceiling fans offer both style and functionality.

Antique White Ceiling Fans

Exploring Antique White Ceiling Fans

Antique white ceiling fans feature a classic design with a vintage-inspired finish that exudes sophistication and charm. These fans often incorporate intricate detailing, such as carved blades, ornate accents, and decorative light fixtures, adding a touch of old-world elegance to any room. With their versatile design, antique white ceiling fans complement a wide range of interior styles, from rustic farmhouse to French country chic.

Features of Antique White Ceiling Fans

  1. Timeless Design: Antique white ceiling fans feature a timeless design that never goes out of style, making them a versatile addition to any home décor.
  2. Efficient Cooling: These fans are equipped with high-performance motors and aerodynamic blades to provide efficient airflow and cooling comfort.
  3. Variable Speed Settings: Many antique white ceiling fans offer multiple speed settings, allowing users to adjust the fan’s airflow to suit their preferences and maintain optimal comfort.
  4. Integrated Lighting: Some models come with integrated light fixtures, providing both illumination and airflow in one stylish package.
  5. Remote Control Compatibility: Many antique white ceiling fans are compatible with remote controls, allowing for convenient operation and customization of fan settings from anywhere in the room.

Styles of Antique White Ceiling Fans

  1. Traditional: Traditional-style antique white ceiling fans feature ornate detailing, such as carved wood blades, intricate metalwork, and vintage-inspired finishes, adding a touch of old-world charm to any space.
  2. Transitional: Transitional-style ceiling fans combine elements of traditional and contemporary design, featuring clean lines, simple profiles, and subtle antique white finishes that complement a variety of décor styles.
  3. Farmhouse: Farmhouse-style antique white ceiling fans evoke a rustic, country-inspired aesthetic with distressed finishes, weathered blades, and vintage-inspired accents, creating a cozy and inviting atmosphere in any room.

Read too: Exploring the Innovation and Efficiency of Ceiling Mounted Surgical Light Solutions: Illuminating Precision

Installation Tips for Antique White Ceiling Fans

  1. Choose the Right Size: Select a fan size appropriate for the room dimensions to ensure optimal airflow and performance.
  2. Follow the Manufacturer’s Instructions: Follow the manufacturer’s installation instructions carefully to ensure safe and proper installation of your antique white ceiling fan.
  3. Consider Professional Installation: If you’re not comfortable installing the fan yourself, consider hiring a professional electrician to ensure proper wiring and mounting.

Conclusion

Antique white ceiling fan offer a perfect blend of style, functionality, and nostalgia, making them an ideal choice for homeowners seeking to enhance their décor with a touch of vintage charm. With their timeless design, efficient cooling capabilities, and versatile styles, these fans provide both aesthetic appeal and practical functionality. Whether you’re outfitting a traditional living room, a transitional bedroom, or a farmhouse-inspired kitchen, antique white ceiling fans are sure to elevate the ambiance of your space.

Now that you’re familiar with the features, styles, and installation tips for antique white ceiling fans, why not add one of these classic fixtures to your home décor?

Suspended Ceiling LED Light Panels: Illuminate Your Space with Stylish

Are you looking to enhance the ambiance of your space while maximizing energy efficiency? Explore the world of suspended ceiling LED light panels. In this comprehensive guide, we’ll delve into the features, installation techniques, and design possibilities of these modern lighting solutions, empowering you to transform any room with ease.

Suspended Ceiling Led Light Panels

Introducing Suspended Ceiling LED Light Panels

Suspended ceiling LED light panels, also known as drop ceiling light panels, are innovative lighting fixtures that are installed within a suspended ceiling grid. These panels offer a sleek and contemporary lighting solution for a variety of spaces, including offices, retail stores, schools, healthcare facilities, and more. They provide uniform illumination while seamlessly blending into the ceiling, creating a clean and minimalist aesthetic.

Features of Suspended Ceiling LED Light Panels

  1. Energy Efficiency: LED technology offers superior energy efficiency, consuming less power than traditional lighting sources while producing bright and consistent illumination.
  2. Customizable Designs: Suspended ceiling LED light panels are available in a range of sizes, shapes, and color temperatures to suit different applications and design preferences.
  3. Long Lifespan: LED light panels have a long lifespan, reducing maintenance costs and the need for frequent bulb replacements.
  4. Dimmable Options: Many LED light panels are dimmable, allowing users to adjust the brightness level to create the desired ambiance and save additional energy.

Read too: Exploring the Innovation and Efficiency of Ceiling Mounted Surgical Light Solutions: Illuminating Precision

Installation Methods for Suspended Ceiling LED Light Panels

  1. Standard Grid Installation: LED light panels are designed to fit seamlessly into standard drop ceiling grids. Simply remove the existing ceiling tile and replace it with the LED panel, ensuring that it is securely seated within the grid.
  2. Surface Mounting: In spaces without a suspended ceiling grid, LED light panel can be surface-mounted using mounting brackets or suspension kits. This installation method allows for greater flexibility in placement and design.
  3. Recessed Installation: For a sleek and integrated look, LED light panels can be recessed into the ceiling using recessed mounting kits. This installation method minimizes the profile of the panels while still providing ample illumination.

Design Options

  1. Panel Shapes: LED light panels are available in various shapes, including square, rectangular, and round, allowing for versatile design possibilities.
  2. Color Temperatures: Choose from different color temperatures, such as warm white, cool white, and daylight, to create the desired ambiance and mood in your space.
  3. Custom Graphics: Some LED light panels can be customized with graphics, logos, or patterns, adding a unique touch to your ceiling design.
  4. Diffuser Options: Select from different diffuser materials, such as acrylic or polycarbonate, to achieve the desired light distribution and visual effect.

Conclusion

Suspended ceiling LED light panel offer a modern, energy-efficient, and versatile lighting solution for a wide range of applications. Whether you’re illuminating an office, retail space, or educational facility, these sleek and stylish fixtures provide uniform illumination while seamlessly integrating into the ceiling design. With their customizable options and easy installation, suspended ceiling LED light panel are an excellent choice for enhancing the aesthetics and functionality of any space.

Now that you’re familiar with the features, installation methods, and design options of suspended ceiling LED light panel, why not brighten up your space with these innovative lighting solutions?

Monte Carlo 52 Ceiling Fans: Elevate Your Home Decor with the Stylish

Are you in search of a sophisticated and efficient ceiling fan to elevate your home decor? Look no further than the Monte Carlo 52 ceiling fans. In this comprehensive guide, we’ll explore the features, design options, and installation tips for this stylish and versatile fixture, ensuring that you make the perfect choice for your living space.

Monte Carlo 52 Ceiling Fan

Introducing the Monte Carlo 52 Ceiling Fan

The Monte Carlo 52 ceiling fan is renowned for its timeless design, superior performance, and exceptional craftsmanship. With its sleek lines, premium finishes, and whisper-quiet operation, this fan is the perfect blend of style and functionality for any room in your home.

Features of the Monte Carlo 52 Ceiling Fan

  1. Powerful Motor: Equipped with a high-performance motor, the Monte Carlo 52 ceiling fan delivers optimal airflow and cooling comfort, even in large rooms.
  2. Versatile Blade Options: Choose from a variety of blade options, including wood, metal, or reversible blades with different finishes on each side, to customize the look of your fan to suit your decor.
  3. Integrated Lighting: Some models of the Monte Carlo 52 ceiling fan come with integrated lighting fixtures, providing both illumination and airflow in one sleek package.
  4. Remote Control Operation: Convenient remote control allows you to adjust the fan speed, lighting intensity, and direction of airflow from anywhere in the room, providing ultimate comfort and convenience.

Read too: Exploring the Innovation and Efficiency of Ceiling Mounted Surgical Light Solutions: Illuminating Precision

Design Options for the Monte Carlo 52 Ceiling Fan

  1. Finish Options: The Monte Carlo 52 ceiling fan is available in a variety of finishes, including brushed nickel, matte black, oil-rubbed bronze, and more, allowing you to match your fan to your existing decor seamlessly.
  2. Blade Styles: Choose from different blade styles, such as traditional, contemporary, or rustic, to complement your home’s aesthetic and personal style.
  3. Light Kit Designs: Explore various light kit designs, including frosted glass, clear glass, or integrated LED panels, to enhance the ambiance of your space while providing functional illumination.

Installation Tips

  1. Follow the Instructions: Ensure that you carefully read and follow the manufacturer’s installation instructions to ensure proper installation and safe operation of your Monte Carlo 52 ceiling fan.
  2. Secure Mounting: Use a secure mounting bracket or ceiling fan box to safely install the fan to the ceiling, ensuring stability and reducing the risk of accidents.
  3. Balance the Blades: Use a balancing kit to ensure that the fan blades are properly balanced, minimizing wobbling and noise during operation.
  4. Professional Installation: If you’re unsure about installing the fan yourself, consider hiring a professional electrician or installer to ensure correct and safe installation.

Conclusion

The Monte Carlo 52 ceiling fans is the epitome of style, functionality, and craftsmanship, making it the perfect addition to any home decor. With its elegant design, powerful performance, and customizable options, this fan is sure to enhance the comfort and ambiance of your living space.

Now that you’re familiar with the features and design options of the Monte Carlo 52 ceiling fan, why not add one to your home and experience the perfect blend of style and functionality?

Maverick Ceiling Fan With Light: Elevate Your Home Decor with a Stylish

Are you looking to add both style and functionality to your home? Dive into our guide to the Maverick ceiling fan with light, a versatile fixture that combines elegant design with superior performance. Learn about the features, benefits, and design options available, and discover why the Maverick ceiling fan with light is the perfect addition to any room in your home.

Maverick Ceiling Fan With Light

Introducing the Maverick Ceiling Fan With Light

The Maverick ceiling fan with lights is a sophisticated lighting and cooling solution designed to enhance any room’s decor. With its sleek design, energy-efficient LED lighting, and powerful motor, this fan provides both illumination and comfort in one stylish package.

Features of the Maverick Ceiling Fan With Light

  1. Sleek Design: The Maverick ceiling fan boasts a modern and minimalist design, featuring clean lines, a streamlined silhouette, and premium finishes that complement any decor style.
  2. Integrated LED Lighting: Equipped with energy-efficient LED light fixtures, the Maverick ceiling fan provides ample illumination while consuming less energy than traditional incandescent bulbs.
  3. Remote Control Operation: Convenient remote control allows you to adjust the fan speed, lighting intensity, and direction of airflow from anywhere in the room, providing ultimate comfort and convenience.
  4. Whisper-Quiet Motor: The Maverick ceiling fan is powered by a high-performance motor that operates quietly and efficiently, ensuring a peaceful and comfortable environment without disruptive noise.

Benefits of the Maverick Ceiling Fan With Light

  1. Enhanced Comfort: With its powerful motor and adjustable fan speeds, the Maverick ceiling fan provides optimal airflow and cooling comfort during hot summer months.
  2. Energy Efficiency: The integrated LED lighting and energy-efficient motor of the Maverick ceiling fan help reduce energy consumption and lower utility bills, making it an environmentally friendly choice for your home.
  3. Versatile Installation: Whether installed in the living room, bedroom, or dining area, the Maverick ceiling fan with lights adds both style and functionality to any room, making it a versatile lighting and cooling solution for your home.
  4. Longevity and Durability: Crafted from high-quality materials and engineered for durability, the Maverick ceiling fan is built to last, providing years of reliable performance and enjoyment.

Design Options

  1. Finish Options: Choose from a variety of finish options, including brushed nickel, matte black, and oil-rubbed bronze, to match your existing decor and personal style.
  2. Blade Styles: Select from different blade styles, such as wood, metal, or reversible blades with different finishes on each side, to customize the look of your Maverick ceiling fan.
  3. Light Kit Designs: Explore different light kit designs, including frosted glass, clear glass, or integrated LED panels, to find the perfect combination of style and functionality for your space.

Read too: Exploring the Innovation and Efficiency of Ceiling Mounted Surgical Light Solutions: Illuminating Precision

Conclusion

The Maverick ceiling fan with lights offers the perfect blend of style, functionality, and energy efficiency for any room in your home. With its sleek design, powerful motor, and integrated LED lighting, this versatile fixture provides both illumination and cooling comfort while enhancing your home’s decor.

Now that you’re familiar with the features and benefits of the Maverick ceiling fan with lights, why not elevate your home decor and enjoy the perfect combination of style and functionality?

Made In USA Ceiling Fan: Elevate Your Home with a Stylish and Efficient

Are you in the market for a new ceiling fan that’s not only stylish and efficient but also proudly Made In USA? Dive into our comprehensive guide to explore the world of American-made ceiling fans. Learn about the craftsmanship, durability, and design options available, and discover why a Made In USA ceiling fan is the perfect addition to any home.

Made In Usa Ceiling Fan

The Superiority of Made In USA Ceiling Fans

When it comes to ceiling fans, those made in the USA are renowned for their superior craftsmanship, quality materials, and attention to detail. By choosing a Made In USA ceiling fan, you’re not only investing in a high-quality product but also supporting American workers and businesses.

Benefits of Choosing a Made In USA Ceiling Fan

  1. Exceptional Quality: Made In USA ceiling fans are manufactured to the highest standards of quality, ensuring durability, performance, and longevity.
  2. Energy Efficiency: Many Made In USA ceiling fans are ENERGY STAR certified, meaning they meet strict energy efficiency guidelines set by the U.S. Environmental Protection Agency.
  3. Customization Options: From classic designs to modern styles, Made In USA ceiling fans offer a wide range of customization options to suit any decor and personal preference.
  4. Local Support: By purchasing a Made In USA ceiling fan, you’re supporting local economies and American jobs, contributing to the growth and prosperity of communities across the country.

Features of Made In USA Ceiling Fans

  1. High-Quality Materials: Ceiling fans made in the USA craft from premium materials like stainless steel, aluminum, and solid wood, ensuring durability and performance.
  2. Quiet Operation: Advanced motor technology and precision engineering ensure whisper-quiet operation, allowing you to enjoy the comfort of a gentle breeze without the noise.
  3. Variable Speed Options: Many Made In USA ceiling fans come with variable speed options, allowing you to customize the airflow and control the comfort level in your home.
  4. Integrated Lighting: Some models of Made In USA ceiling fans feature integrated lighting fixtures, providing both illumination and airflow in one convenient package.

Design Options

  1. Traditional: Classic designs with ornate detailing and rich finishes add a touch of elegance and sophistication to any room.
  2. Contemporary: Sleek and modern styles with clean lines and minimalist aesthetics blend seamlessly with modern decor schemes.
  3. Rustic: Rustic-inspired designs with weathered finishes and natural wood accents bring a cozy and inviting vibe to rustic or farmhouse-style interiors.
  4. Outdoor: Ceiling fans made in the USA for outdoor use feature construction with weather-resistant materials and finishes, making them ideal for covered porches, patios, and outdoor living spaces.

Read too: Exploring the Innovation and Efficiency of Ceiling Mounted Surgical Light Solutions: Illuminating Precision

Conclusion

A Made In USA ceiling fan is more than just a functional appliance—it’s a symbol of quality, craftsmanship, and American pride. With their exceptional performance, energy efficiency, and customizable design options, Made In USA ceiling fans are the perfect addition to any home.

Now that you’re familiar with the benefits and features of Made In USA ceiling fans, why not invest in one for your home and experience the difference firsthand?

In Ceiling Speaker Back Box: Enhance Your Audio Experience

Looking to take your home audio system to the next level? Dive into our comprehensive guide on the benefits and installation of an in ceiling speaker back box. Discover how this essential accessory can enhance sound quality, protect your speakers, and optimize your listening experience.

In Ceiling Speaker Back Box

Understanding the Importance of an In Ceiling Speaker Back Box

An in ceiling speaker back box, also known as an enclosure or housing, is a protective casing designed to be installed behind in-ceiling speakers. While often overlooked, this accessory plays a crucial role in improving sound quality and ensuring the longevity of your speakers.

Benefits of Using an In Ceiling Speaker Back Box

  1. Improved Sound Performance: By providing a sealed enclosure around the speaker, a back box helps reduce sound leakage and resonance, resulting in clearer and more accurate audio reproduction.
  2. Enhanced Bass Response: The enclosure of a back box helps control bass frequencies, preventing them from dissipating into the ceiling cavity and resulting in tighter and more impactful bass.
  3. Protection Against Moisture and Debris: In ceiling speaker back boxes provide a barrier against moisture, dust, and debris, protecting the speaker components from damage and extending their lifespan.
  4. Noise Isolation: By isolating the speaker from adjacent rooms or floors, a back box helps minimize sound transfer between spaces, allowing you to enjoy your music or movies without disturbing others.

Installation Process of an In Ceiling Speaker Back Box

  1. Choose the Right Size: Select a back box that matches the size and shape of your in-ceiling speakers to ensure a proper fit and optimal performance.
  2. Locate the Installation Position: Determine the ideal location for installing the back box behind the ceiling speakers, taking into account factors such as structural obstructions and proximity to other components.
  3. Cut an Opening: Use a drywall saw or hole saw to cut an opening in the ceiling large enough to accommodate the back box.
  4. Secure the Back Box: Position the back box in the opening and secure it to the ceiling joists or rafters using screws or brackets.
  5. Seal the Edges: Use caulk or foam sealant to seal any gaps between the back box and the surrounding ceiling, ensuring an airtight seal.

Tips for Maximizing the Performance of an In Ceiling Speaker Back Box

  1. Use Insulation: Install insulation inside the back box to further dampen sound and improve thermal insulation.
  2. Consider Retrofitting: If your ceiling speakers are already installed, consider retrofitting them with back boxes to enhance their performance.
  3. Regular Maintenance: Inspect the back box periodically for signs of damage or deterioration and replace it if necessary to maintain optimal sound quality.

Read too: Exploring the Innovation and Efficiency of Ceiling Mounted Surgical Light Solutions: Illuminating Precision

Conclusion

An in ceiling speaker back box is a simple yet effective accessory that can significantly enhance the performance of your in-ceiling speakers. By reducing sound leakage, controlling bass response, and protecting the speakers from moisture and debris, a back box ensures that you enjoy crisp, clear audio in every corner of your home.

Now that you’re familiar with the benefits and installation process of an in ceiling speaker back box, why not take the next step towards optimizing your home audio system?