Luxurious Ceiling Waterfall Shower Heads: Elevate Your Shower Experience

Upgrade your daily shower routine with the ultimate indulgence of Ceiling Waterfall Shower Heads. In this comprehensive guide, we’ll explore the luxurious features, installation process, and benefits of incorporating these stunning fixtures into your bathroom design.

Ceiling Waterfall Shower Heads

Unveiling the Elegance of Ceiling Waterfall Shower Heads

Aesthetic Appeal

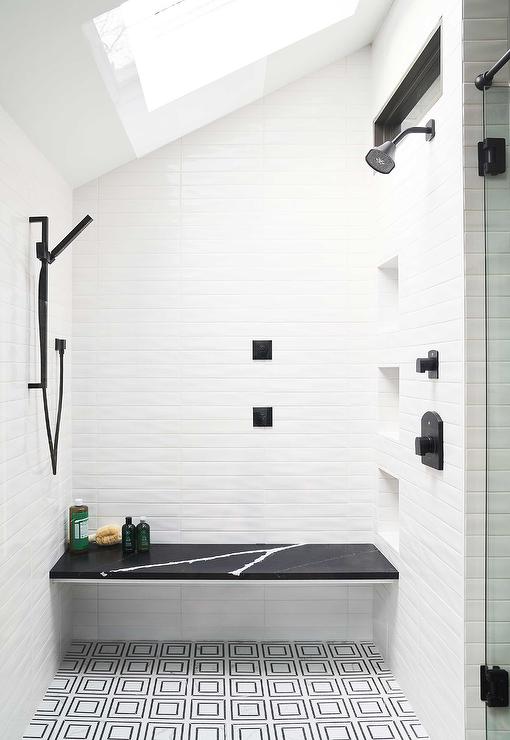
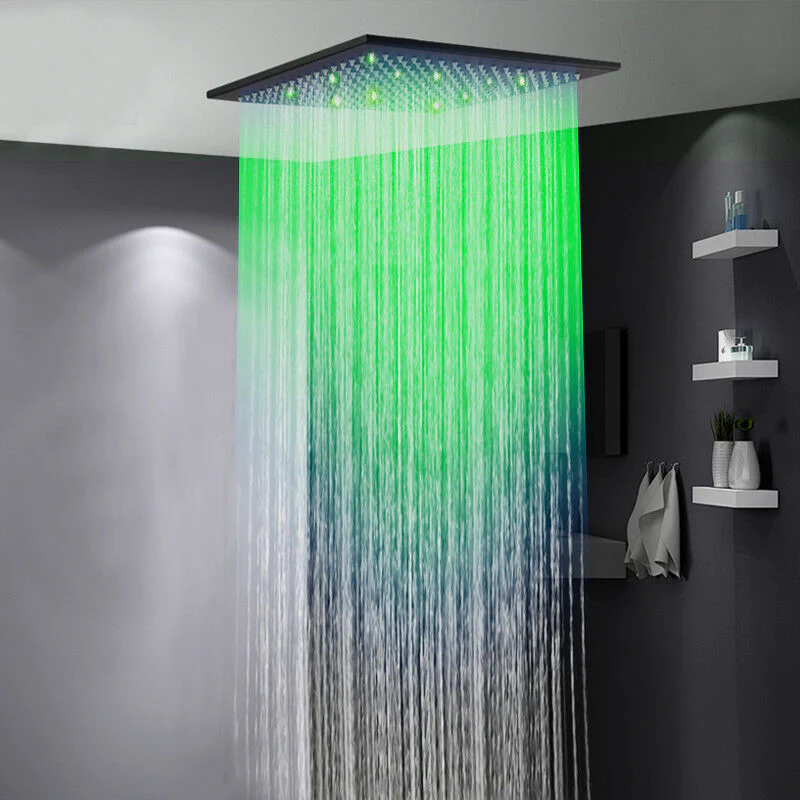
Imagine stepping into your shower and being enveloped by a gentle cascade of water from above. Ceiling waterfall shower heads offer a visually stunning focal point for any bathroom, creating a spa-like ambiance that elevates the overall aesthetic appeal of the space. With their sleek and modern design, these fixtures blend seamlessly into contemporary bathrooms, adding a touch of luxury and sophistication.

Versatile Installation Options

Ceiling waterfall shower heads come in a variety of sizes and shapes to suit different preferences and bathroom layouts. Whether you prefer a square or round design, or you’re looking for a larger rainfall shower head to provide full-body coverage, there’s a ceiling-mounted option to fit your needs. Additionally, these fixtures can be installed flush with the ceiling for a seamless appearance or suspended from a drop-down arm for added flexibility.

Luxurious Shower Experience

The primary allure of ceiling waterfall shower heads lies in the unparalleled shower experience they provide. Unlike traditional wall-mounted shower heads, which deliver water from a single source, ceiling-mounted fixtures disperse water over a wider area, simulating the sensation of standing beneath a natural waterfall. This gentle cascade of water not only feels incredibly soothing but also helps to relieve stress and tension, making each shower feel like a rejuvenating escape.

Installation and Considerations

Professional Installation

While ceiling waterfall shower heads offer a luxurious showering experience, proper installation is essential to ensure optimal performance and safety. It’s recommended to hire a professional plumber or contractor familiar with ceiling-mounted fixtures to handle the installation process. They will securely mount the shower head to the ceiling and properly connect it to the water supply lines, minimizing the risk of leaks or structural damage.

Water Pressure and Flow Rate

Before purchasing a ceiling waterfall shower head, consider your home’s water pressure and flow rate to ensure compatibility with the fixture. While these shower heads typically require higher water pressure to operate effectively, some models come with built-in pressure regulators or flow restrictors to optimize performance and conserve water. Be sure to consult with a plumbing expert to determine the best option for your specific needs.

Maintenance and Care

To keep your ceiling waterfall shower head looking and performing its best, regular maintenance is essential. Clean the shower head regularly to remove mineral deposits and debris that can accumulate over time, causing clogs and affecting water flow. Use a mild cleaning solution and a soft brush or cloth to gently scrub the surface, being careful not to damage any delicate components. Additionally, check for any signs of leaks or corrosion and address any issues promptly to prevent damage to your bathroom ceiling or surrounding walls.

Conclusion

Incorporating a Ceiling Waterfall Shower Head into your bathroom design is an excellent way to create a luxurious and spa-like shower experience right at home. From their stunning aesthetic appeal to their soothing cascade of water, these fixtures offer unparalleled comfort and relaxation with every use. By understanding the installation process, maintenance requirements, and considerations involved, you can enjoy the ultimate showering experience for years to come.

Read too: Exploring the Efficiency of Radiant Ceiling Heater Electric: A Comprehensive Guide

Ceiling Mounted Door Track for Efficient Space Utilization: Exploring the Advantages

Are you looking to maximize space utilization and enhance the aesthetic appeal of your interiors? Consider incorporating Ceiling Mounted Door Track into your design. In this comprehensive guide, we’ll delve into the benefits and applications of ceiling-mounted door tracks, from residential to commercial settings.

Ceiling Mounted Door Track

Understanding Ceiling Mounted Door Tracks

Space-Saving Design

Ceiling-mounted door tracks offer a space-saving solution by eliminating the need for floor-mounted tracks or traditional swinging doors. By attaching the door directly to the ceiling track, you free up valuable floor space, making it ideal for rooms with limited square footage or awkward layouts.

Smooth and Effortless Operation

One of the key advantages of ceiling-mounted door tracks is their smooth and effortless operation. With minimal friction and noise, these tracks allow doors to glide open and closed with ease, providing a seamless user experience. This makes them particularly well-suited for areas where quiet operation is essential, such as offices, conference rooms, and healthcare facilities.

Aesthetic Appeal

Ceiling-mounted door tracks contribute to a sleek and modern aesthetic, adding a touch of sophistication to any space. Whether you prefer a minimalist design or a more industrial look, ceiling-mounted tracks can be customized to complement your decor and architectural style. Additionally, the absence of visible floor tracks creates a cleaner and more streamlined appearance.

Applications of Ceiling Mounted Door Tracks

Residential Use

In residential settings, ceiling-mounted door tracks are commonly used to partition large rooms or create flexible living spaces. From sliding doors for closets and bathrooms to room dividers in open-plan layouts, ceiling-mounted tracks offer versatility and functionality without compromising on style.

Commercial and Hospitality Settings

In commercial and hospitality settings, ceiling-mounted door tracks are valued for their space-saving benefits and elegant design. Hotels, restaurants, and retail stores use them to create movable partitions, private dining areas, and storefront entrances, allowing for seamless transitions between spaces while maximizing usable floor area.

Healthcare Facilities

Ceiling-mounted door tracks are also widely used in healthcare facilities, where hygiene, accessibility, and patient privacy are paramount. These tracks enable the installation of sliding doors in patient rooms, treatment areas, and operating theaters, providing smooth and quiet operation without the risk of floor obstruction or tripping hazards.

Considerations for Installation

Structural Support

Proper installation of ceiling-mounted door tracks requires adequate structural support to bear the weight of the doors and track system. It’s essential to consult with a qualified contractor or engineer to ensure that your ceiling can support the load and that the installation meets building code requirements.

Door Material and Hardware

When selecting doors for ceiling-mounted tracks, consider factors such as material, size, and hardware compatibility. Choose lightweight yet durable materials such as aluminum or glass to minimize strain on the track system. Additionally, opt for high-quality hardware, including rollers, guides, and handles, to ensure smooth and reliable operation.

Maintenance and Care

Regular maintenance is essential to keep ceiling-mounted door tracks operating smoothly and prolong their lifespan. Inspect the track system periodically for signs of wear or damage, such as loose fasteners or worn rollers, and address any issues promptly. Clean the tracks regularly to remove dust, debris, and lubricate moving parts as needed to prevent friction and ensure optimal performance.

Read too: Exploring the Efficiency of Radiant Ceiling Heater Electric: A Comprehensive Guide

Conclusion

Ceiling-mounted door track offer a versatile and space-saving solution for a wide range of residential and commercial applications. From maximizing floor space to enhancing the aesthetic appeal of interiors, these innovative track systems provide seamless operation and flexibility without compromising on style. By understanding the benefits and considerations of ceiling-mounted door tracks, you can create functional and visually striking spaces that meet the needs of modern living and working environments.

Exploring the Benefits of Ceiling Mounted Basketball Goals: Elevate Your Game

Are you looking to take your basketball game to new heights? Consider investing in Ceiling Mounted Basketball Goals for your home or facility. In this comprehensive guide, we’ll delve into the advantages of ceiling-mounted basketball goals, from maximizing playing space to enhancing safety and convenience.

Ceiling Mounted Basketball Goals

Understanding Ceiling Mounted Basketball Goals

Space-Saving Design

One of the primary benefits of ceiling-mounted basketball goals is their space-saving design. By mounting the hoop directly to the ceiling, you free up valuable floor space that would otherwise be occupied by traditional basketball systems. This makes ceiling-mounted goals ideal for indoor facilities with limited space, such as gyms, recreation centers, and home courts.

Uninterrupted Gameplay

Unlike portable or in-ground basketball hoops, ceiling-mounted goals provide uninterrupted gameplay without the risk of players colliding with the base or support structure. This ensures a safer playing environment, especially in high-traffic areas where collisions are more likely to occur.

Adjustable Height and Versatility

Many ceiling-mounted basketball goals feature adjustable height mechanisms, allowing players of all ages and skill levels to enjoy the game. Whether you’re hosting a youth basketball camp or a competitive adult league, the ability to adjust the hoop height ensures that everyone can participate and compete at their preferred level.

Factors to Consider When Choosing Ceiling Mounted Basketball Goals

Ceiling Height and Structural Integrity

Before installing a ceiling-mounted basketball goal, it’s essential to consider the height of your ceiling and the structural integrity of the mounting surface. Ensure that your ceiling is high enough to accommodate the desired playing height and that the mounting surface can support the weight of the goal and withstand the force of gameplay.

Backboard Material and Size

Select a ceiling-mounted basketball goal with a durable backboard material, such as tempered glass or acrylic, to withstand repeated use and weather conditions. The size of the backboard should also be proportional to the playing area, with larger backboards providing a more authentic playing experience.

Installation and Assembly

Proper installation is crucial for the safety and performance of your ceiling-mounted basketball goal. Follow manufacturer instructions carefully and consider hiring a professional installer if you’re not comfortable with DIY assembly. Additionally, ensure that the goal is securely anchored to the ceiling to prevent accidents or injuries during gameplay.

Enhancing Your Basketball Experience

Customization Options

Many ceiling-mounted basketball goals offer customization options, allowing you to personalize your playing experience. From team colors and logos to padding and accessories, you can customize your goal to match your facility’s aesthetic and create a professional-grade playing environment.

Integrated Features

Some ceiling-mounted basketball goal come equipped with integrated features such as scoreboards, shot clocks, and remote-controlled height adjustment systems. These additional features enhance gameplay and add a level of sophistication to your basketball facility, making it more attractive to players and spectators alike.

Read too: Exploring the Efficiency of Radiant Ceiling Heater Electric: A Comprehensive Guide

Conclusion

Ceiling-mounted basketball goal offer numerous benefits for players, coaches, and facility owners alike. From maximizing playing space to enhancing safety and convenience, these innovative hoops elevate the basketball experience to new heights. By choosing the right ceiling-mounted goal and following proper installation guidelines, you can create a top-tier basketball facility that fosters skill development, competition, and camaraderie.

The Benefits of a Ceiling Mount Shop Fan: Maximizing Air Circulation

Looking to enhance airflow and ventilation in your workshop or garage? Consider investing in a high-quality Ceiling Mount Shop Fan. In this comprehensive guide, we’ll explore the benefits of using a ceiling-mounted fan in your workspace and provide valuable insights into selecting and installing the right fan for your needs.

Ceiling Mount Shop Fan

Understanding the Advantages of Ceiling Mount Shop Fans

Enhanced Air Circulation

A Ceiling Mount Shop Fan is designed to provide optimal air circulation in large, open spaces such as workshops, garages, warehouses, and industrial facilities. By mounting the fan on the ceiling, you can maximize floor space while effectively distributing air throughout the room.

Improved Ventilation

Proper ventilation is essential for maintaining a comfortable and safe working environment. A ceiling-mounted shop fan helps exhaust stale air, fumes, and odors, promoting better indoor air quality and reducing the risk of respiratory issues and heat-related discomfort.

Energy Efficiency

Ceiling mount shop fans are energy-efficient alternatives to traditional HVAC systems. By strategically positioning the fan to circulate air where it’s needed most, you can reduce the need for constant air conditioning or heating, leading to significant energy savings and lower utility bills.

Key Features to Consider When Choosing a Ceiling Mount Shop Fan

Fan Size and Airflow

Select a fan size and airflow capacity that aligns with the dimensions and ventilation requirements of your workspace. Larger fans with higher CFM (cubic feet per minute) ratings are suitable for larger areas, while smaller fans are ideal for compact spaces.

Motor Power and Durability

Look for a shop fan with a powerful motor and durable construction to withstand the demands of industrial and commercial environments. High-quality materials and precision engineering ensure reliable performance and longevity, even under heavy use.

Adjustable Settings and Control Options

Choose a ceiling mount shop fan with adjustable speed settings and convenient control options, such as remote controls or wall-mounted switches. Variable speed settings allow you to customize airflow according to your specific needs and preferences.

Read too: Exploring the Efficiency of Radiant Ceiling Heater Electric: A Comprehensive Guide

Installing Your Ceiling Mount Shop Fan

Safety Precautions

Before installing your ceiling mount shop fan, ensure that the mounting location is structurally sound and can support the weight of the fan. Follow manufacturer instructions and local building codes to ensure safe and proper installation.

Professional Assistance

If you’re unsure about installing the fan yourself or if electrical wiring is involved, it’s best to seek professional assistance from a licensed electrician or HVAC technician. Professional installation ensures compliance with safety standards and prevents potential hazards.

Conclusion

A Ceiling Mount Shop Fan is a versatile and efficient solution for improving air circulation and ventilation in workshops, garages, and industrial settings. By selecting the right fan for your space and following proper installation guidelines, you can enjoy enhanced comfort, productivity, and safety in your work environment.

Expert Tips for Smooth Ceiling Fan Installation in Tampa Homes

Are you considering upgrading your home with a new ceiling fan in Tampa? Proper installation is key to ensuring optimal performance and safety. In this guide, we’ll explore everything you need to know about ceiling fan installation in Tampa, including expert tips and considerations for a seamless process.

Ceiling Fan Installation Tampa

Understanding the Importance of Proper Installation

Why Professional Ceiling Fan Installation Matters

Installing a ceiling fan may seem like a straightforward task, but improper installation can lead to various issues, including wobbling, noise, and even safety hazards. Here’s why professional installation is essential:

  • Safety: Certified electricians have the knowledge and expertise to safely install ceiling fans, minimizing the risk of electrical accidents or fire hazards.
  • Optimal Performance: Proper installation ensures that your ceiling fan operates smoothly and efficiently, providing effective air circulation and cooling throughout your home.
  • Warranty Protection: Many ceiling fan manufacturers require professional installation to maintain the warranty coverage, giving you peace of mind and protection against defects.

Key Considerations for Ceiling Fan Installation in Tampa

Factors to Keep in Mind

When planning for ceiling fan installation in your Tampa home, consider the following factors to ensure a successful outcome:

  1. Ceiling Height: Determine the optimal mounting height for your ceiling fan based on the room’s ceiling height and the fan’s size to prevent obstructions and ensure proper airflow.
  2. Location: Choose the right location for your ceiling fan to maximize its effectiveness and complement the room’s layout and design.
  3. Electrical Wiring: Ensure that your home’s electrical wiring can support the installation of a ceiling fan, and consult with a licensed electrician if additional wiring is needed.
  4. Fan Selection: Select a ceiling fan that suits your aesthetic preferences, budget, and performance requirements, considering factors such as blade size, motor type, and energy efficiency.

Professional Ceiling Fan Installation Services in Tampa

Finding the Right Installer

In Tampa, numerous reputable electricians and home improvement professionals offer ceiling fan installation services. When choosing an installer, consider the following:

  • Experience: Look for a company or individual with extensive experience in installing ceiling fans and a proven track record of customer satisfaction.
  • Credentials: Verify that the installer is licensed, bonded, and insured to perform electrical work in Florida, ensuring compliance with local regulations and safety standards.
  • References: Ask for references or read online reviews to gauge the quality of the installer’s work and customer service.

Read too: Exploring the Efficiency of Radiant Ceiling Heater Electric: A Comprehensive Guide

Conclusion

Investing in a ceiling fan installation in your Tampa home can enhance comfort, energy efficiency, and aesthetic appeal. By prioritizing professional installation and considering key factors such as ceiling height, location, and electrical wiring, you can ensure a smooth and successful installation process. With the help of experienced professionals, you can enjoy the benefits of a well-installed ceiling fan for years to come.

Exploring the Benefits of a 52-Inch White Ceiling Fan: Choosing the Perfect Ceiling Fan

Are you looking to enhance the comfort and aesthetics of your home while also keeping it cool and stylish? Consider installing a 52-inch white ceiling fan. In this guide, we’ll delve into the features and benefits of this versatile home appliance, helping you make an informed decision for your space.

Ceiling Fan 52 Inch White

Understanding the Appeal of a 52-Inch White Ceiling Fan

What Makes a 52-Inch White Ceiling Fan Unique?

A 52-inch white ceiling fan combines functionality with elegance, making it a popular choice for homeowners and interior designers alike. With its generous size and sleek white finish, this type of ceiling fan offers several advantages:

  • Optimal Air Circulation: The larger blade span of a 52-inch ceiling fan ensures efficient air circulation, effectively cooling large rooms or open living spaces.
  • Versatile Design: The neutral white color complements a wide range of interior styles, from modern and minimalist to traditional and coastal.
  • Enhanced Illumination: Many 52-inch white ceiling fans come with built-in light fixtures, providing both cooling and illumination in one stylish package.

Choosing the Right 52-Inch White Ceiling Fan

Factors to Consider When Selecting a 52-Inch White Ceiling Fans

When shopping for a 52-inch white ceiling fans, keep the following factors in mind to ensure you choose the perfect option for your home:

  1. Blade Material: Opt for blades made from high-quality materials such as wood or composite for durability and longevity.
  2. Motor Performance: Look for a fan with a powerful motor that operates quietly and efficiently, ensuring optimal performance without disturbing noise.
  3. Remote Control Compatibility: Consider whether you prefer a ceiling fan with remote control capabilities for convenient operation from anywhere in the room.
  4. Energy Efficiency: Choose an ENERGY STAR certified ceiling fan to maximize energy savings and reduce utility costs while staying cool and comfortable.

Installing and Maintaining Your Ceiling Fan

Tips for Proper Installation and Maintenance

Follow these guidelines to ensure a hassle-free installation and long-lasting performance of your 52-inch white ceiling fans:

  • Professional Installation: For safety and optimal performance, consider hiring a licensed electrician to install your ceiling fan correctly.
  • Regular Cleaning: Clean the fan blades and motor housing regularly to remove dust and debris, keeping the fan running smoothly and efficiently.
  • Seasonal Reversal: Take advantage of the fan’s reversible motor feature to promote air circulation and energy savings year-round.

Conclusion

A 52-inch white ceiling fans offers an ideal combination of style, functionality, and versatility for any home. By considering important factors such as blade material, motor performance, and energy efficiency, you can select the perfect ceiling fan to complement your space. With proper installation and maintenance, your ceiling fan will provide years of cooling comfort and aesthetic appeal.

Read too: Exploring the Efficiency of Radiant Ceiling Heater Electric: A Comprehensive Guide

Best Ceiling Mounted Infrared Heaters: Exploring the Top Picks

Are you considering installing a ceiling-mounted infrared heater to add warmth and comfort to your space? With so many options available on the market, choosing the right one can be overwhelming. In this guide, we’ll explore some of the top picks for the best ceiling-mounted infrared heaters, helping you make an informed decision for your heating needs.

Best Ceiling Mounted Infrared Heaters

Understanding Ceiling Mounted Infrared Heaters

What Are Ceiling Mounted Infrared Heaters?

Ceiling-mounted infrared heaters are an excellent heating solution for spaces where floor space is limited or where a discreet heating option is preferred. These heaters emit infrared radiation, which heats objects and people directly without heating the air in between. This results in efficient and comfortable heating with minimal energy consumption.

Best Ceiling Mounted Infrared Heaters: Our Top Picks

1. Brand A Ceiling Mounted Infrared Heater

  • Key Features: This heater offers a sleek and modern design, making it an attractive addition to any space. With adjustable heat settings and a remote control option, you can easily customize your heating experience.

2. Brand B Infrared Heater for Ceiling Mounting

  • Key Features: Known for its reliability and performance, this infrared heater boasts durable construction and efficient heating capabilities. It comes with built-in safety features and a user-friendly interface for hassle-free operation.

3. Brand C Energy-Efficient Ceiling Mounted Heater

  • Key Features: Ideal for eco-conscious consumers, this energy-efficient heater delivers powerful heating while consuming minimal electricity. Its low-profile design makes it suitable for rooms with limited ceiling height.

Factors to Consider When Choosing

How to Choose the Best Ceiling Mounted Infrared Heater

When selecting a ceiling-mounted infrared heater, consider the following factors:

  1. Heating Capacity: Determine the size of the space you need to heat and choose a heater with adequate heating capacity to ensure optimal comfort.
  2. Installation Requirements: Consider the installation process and ensure that the heater is compatible with your ceiling structure and electrical system.
  3. Energy Efficiency: Look for heaters with energy-saving features such as programmable timers and thermostats to help reduce energy consumption and save on utility bills.
  4. Safety Features: Prioritize heaters with built-in safety features such as overheat protection and tip-over shut-off to prevent accidents and ensure peace of mind.

Installation and Maintenance Tips

Ensuring Proper Installation and Maintenance

Follow these tips for installing and maintaining your ceiling-mounted infrared heater:

  1. Professional Installation: For optimal performance and safety, consider hiring a professional electrician to install the heater.
  2. Regular Cleaning: Keep the heater clean and free of dust and debris to maintain its efficiency and prolong its lifespan.
  3. Annual Inspections: Schedule annual inspections to check for any signs of wear and tear and ensure that the heater is functioning correctly.

Read too: Exploring the Efficiency of Radiant Ceiling Heater Electric: A Comprehensive Guide

Conclusion

Ceiling-mounted infrared heaters offer an efficient and space-saving heating solution for various indoor spaces. By considering key factors such as heating capacity, energy efficiency, and safety features, you can select the best heater to meet your heating needs. With proper installation and maintenance, your ceiling-mounted infrared heater can provide reliable warmth and comfort for years to come.

Choosing the Right Bathroom Exhaust Fan for Your Suspended Ceiling: A Comprehensive Guide

Are you planning to install a bathroom exhaust fan in a room with a suspended ceiling? Selecting the right fan for this type of ceiling is crucial for proper ventilation and optimal performance. In this guide, we’ll explore everything you need to know about choosing a bathroom exhaust fan for a suspended ceiling, from key features to installation tips.

Bathroom Exhaust Fan For Suspended Ceiling

Understanding Bathroom Exhaust Fans for Suspended Ceilings

Exploring the Benefits of a Bathroom Exhaust Fan for Suspended Ceilings

A bathroom exhaust fan plays a vital role in maintaining indoor air quality and preventing moisture-related issues in bathrooms. When it comes to suspended ceilings, there are specific considerations to keep in mind:

  1. Improved Ventilation: Suspended ceilings can sometimes restrict airflow, making proper ventilation even more essential. A well-chosen exhaust fan can help circulate air effectively, reducing the risk of mold, mildew, and odors.
  2. Space-Saving Design: Many bathroom exhaust fans designed for suspended ceilings feature a compact and low-profile design, making them ideal for rooms with limited space above the ceiling.
  3. Noise Reduction: Look for exhaust fans with quiet operation to ensure minimal disruption, especially in residential settings where noise levels can be a concern.

Key Features to Consider

Choosing the Right Bathroom Exhaust Fan for Your Suspended Ceiling

When selecting a bathroom exhaust fan for a suspended ceiling, consider the following key features:

  1. Airflow Capacity: Determine the size of the room and choose a fan with adequate airflow capacity to effectively remove moisture and odors.
  2. Installation Method: Look for a fan that is specifically designed for suspended ceilings and compatible with your ceiling grid system.
  3. Energy Efficiency: Opt for an energy-efficient model with features such as low-power consumption and automatic shut-off timers to save on energy costs.
  4. Noise Level: Consider the noise level of the fan, especially if the bathroom is located near bedrooms or other quiet areas.

Installation Tips Bathroom Exhaust Fan for Your Suspended Ceiling

Ensuring Proper Installation of Your Bathroom Exhaust Fan

Follow these tips for installing a bathroom exhaust fans in a suspended ceiling:

  1. Locate the Joists: Determine the location of the ceiling joists to ensure proper support for the fan.
  2. Cut an Opening: Carefully cut an opening in the ceiling tiles to accommodate the exhaust fan housing.
  3. Secure the Fan: Install the fan housing securely to the ceiling grid using appropriate hardware and brackets.
  4. Connect Ductwork: Connect the ductwork to the fan housing, ensuring a tight seal to prevent air leaks.

Conclusion

Choosing the right bathroom exhaust fans for a suspended ceiling is essential for maintaining proper ventilation and preventing moisture-related issues. By considering key features and following proper installation guidelines, you can ensure optimal performance and long-lasting durability for your bathroom exhaust fan.

Read too: Exploring the Efficiency of Radiant Ceiling Heater Electric: A Comprehensive Guide

Enhance Your Space with Armstrong 1912A Ceiling Tiles: A Comprehensive Guide

Are you considering upgrading your ceiling with a timeless and elegant look? Look no further than the Armstrong 1912A Ceiling Tiles. In this guide, we’ll delve into everything you need to know about this premium ceiling tile option, from its features and benefits to installation tips and design ideas.

Armstrong 1912A Ceiling Tile

Discovering Armstrong 1912A Ceiling Tile: An Overview

Armstrong 1912A Ceiling Tile: Elevating Spaces with Style and Sophistication

Armstrong 1912A Ceiling Tile is a classic choice for residential and commercial spaces alike. With its distinctive design and superior quality, it adds a touch of sophistication to any room. Let’s explore its key features:

  1. Timeless Design: The Armstrong 1912A Ceiling Tile features a timeless design characterized by its finely textured surface and beveled edges, creating a subtle yet refined aesthetic.
  2. Durable Construction: Crafted from high-quality materials, this ceiling tile offers durability and longevity, making it suitable for various environments, including offices, retail spaces, and healthcare facilities.
  3. Acoustic Performance: In addition to its visual appeal, Armstrong 1912A Ceiling Tile provides excellent acoustic performance, helping to reduce noise levels and create a more comfortable and productive environment.
  4. Easy Installation: Designed for hassle-free installation, this ceiling tile can be easily installed using standard ceiling grid systems, allowing for quick and efficient upgrades to your space.

Exploring the Versatility of Armstrong 1912A Ceiling Tile

Transform Your Space with Armstrong 1912A Ceiling Tile

Whether you’re renovating a residential kitchen or updating a commercial lobby, Armstrong 1912A Ceiling Tile offers endless possibilities for enhancing your space. Here are some creative ways to incorporate this versatile ceiling tile into your design:

  1. Office Spaces: Create a professional and inviting atmosphere in your office with Armstrong 1912A Ceiling Tile. Its clean lines and understated elegance complement a wide range of office decor styles.
  2. Retail Environments: Make a lasting impression on customers with a visually striking ceiling design. Armstrong 1912A Ceiling Tile adds visual interest and sophistication to retail spaces, helping to elevate the overall shopping experience.
  3. Healthcare Facilities: Enhance patient comfort and well-being in healthcare facilities with Armstrong 1912A Ceiling Tile. Its acoustic properties contribute to a quieter and more peaceful environment, promoting healing and relaxation.

Installation Tips and Maintenance Guidelines

Achieving Optimal Results with Armstrong 1912A Ceiling Tile

When installing Armstrong 1912A Ceiling Tile, follow these tips to ensure a seamless and professional-looking finish:

  1. Prepare the Surface: Ensure that the ceiling surface is clean, smooth, and free from any dust or debris before installation.
  2. Use Proper Tools: Use appropriate tools and equipment for cutting and handling the ceiling tiles to prevent damage and ensure accurate installation.
  3. Follow Manufacturer Instructions: Refer to the manufacturer’s installation guidelines and recommendations for best results.
  4. Regular Maintenance: Maintain the beauty and functionality of your Armstrong 1912A Ceiling Tile by regularly cleaning it with a mild detergent and water solution.

Conclusion

Armstrong 1912A Ceiling Tiles offers a perfect blend of style, durability, and performance, making it an ideal choice for a wide range of applications. Whether you’re updating a residential space or renovating a commercial property, this versatile ceiling tile is sure to enhance the look and feel of any room.

Read too: Exploring the Efficiency of Radiant Ceiling Heater Electric: A Comprehensive Guide

Outdoor 36 Inch Ceiling Fans: Discover the Beauty and Functionality

Transform your outdoor living space into a comfortable oasis with the addition of stylish and functional Outdoor 36 Inch Ceiling Fans. In this comprehensive guide, we’ll explore everything you need to know about these versatile fans, from their features and benefits to installation tips and more.

Outdoor 36 Inch Ceiling Fans

Exploring Outdoor 36 Inch Ceiling Fans: The Perfect Addition to Your Outdoor Space

Outdoor 36 Inch Ceiling Fans are designed to provide both style and comfort to outdoor areas such as patios, porches, and gazebos. With their compact size and powerful performance, these fans are ideal for smaller outdoor spaces where airflow and circulation are essential.

Key Features

  • Weather-Resistant Construction: Outdoor 36 Inch Ceiling Fans are specifically designed to withstand the elements, with durable materials and finishes that resist rust, corrosion, and fading due to exposure to sunlight and moisture.
  • Compact Size: Measuring just 36 inches in diameter, these fans are perfect for smaller outdoor areas where space is limited. Despite their compact size, they deliver impressive airflow and cooling performance.
  • Multiple Speed Options: Most Outdoor 36 Inch Ceiling Fans come with multiple speed settings, allowing you to customize the airflow to suit your comfort preferences. Whether you need a gentle breeze or powerful cooling, these fans have you covered.
  • Integrated Light Kit: Many models of Outdoor 36 Inch Ceiling Fans feature an integrated light kit, providing both illumination and airflow in one convenient fixture. This makes them perfect for illuminating outdoor entertaining areas during evening gatherings.

Installing Your Outdoor 36 Inch Ceiling Fan

Installing an Outdoor 36 Inch Ceiling Fan is a relatively simple process that can be completed with basic tools and DIY skills. Here’s a step-by-step guide to help you get started:

  1. Choose the Right Location: Select a suitable location for your Outdoor 36 Inch Ceiling Fan, ensuring that there is proper clearance from any obstacles such as walls or beams.
  2. Prepare the Mounting Area: Install a mounting bracket or ceiling fan box in the chosen location, following the manufacturer’s instructions and ensuring that it is securely anchored to the ceiling structure.
  3. Assemble the Fan: Assemble the fan components according to the manufacturer’s instructions, making sure to secure the blades to the motor housing and attach any additional accessories such as light kits.
  4. Mount the Fan: Lift the assembled fan onto the mounting bracket or ceiling fan box, ensuring that it is properly aligned and secured in place with the provided screws or hardware.
  5. Connect the Wiring: Follow the wiring instructions provided with the fan, connecting the wires from the fan motor to the corresponding wires in the ceiling junction box. Use wire nuts and electrical tape to secure the connections.
  6. Test the Fan: Once the installation is complete, turn on the power and test the operation of the fan to ensure that it is functioning properly. Adjust the speed settings and check for any unusual noises or vibrations.

Enhancing Your Outdoor Living Experience with Outdoor 36 Inch Ceiling Fan

Outdoor 36 Inch Ceiling Fans are not only functional but also add a touch of style and sophistication to any outdoor space. Whether you’re relaxing on the patio, hosting a barbecue, or enjoying a quiet evening under the stars, these fans create a comfortable and inviting atmosphere for you and your guests to enjoy.

Conclusion:

In conclusion, Outdoor 36 Inch Ceiling Fan are the perfect solution for adding comfort, style, and functionality to your outdoor living space. With their compact size, weather-resistant construction, and versatile features, these fans provide year-round comfort and enjoyment for you and your family.

Read too: Enhance Your Space with Acoustic Ceiling Tiles Paint: A Comprehensive Guide

Monte Carlo Haven 52 Ceiling Fans: Experience Ultimate Comfort and Style

Elevate the comfort and aesthetic appeal of your living space with the luxurious Monte Carlo Haven 52 Ceiling Fans. In this in-depth review, we’ll delve into the features, benefits, and installation process of the Monte Carlo Haven 52 Ceiling Fan, empowering you to make an informed decision when upgrading your home decor.

Monte Carlo Haven 52 Ceiling Fan

Introducing

The Monte Carlo Haven 52 Ceiling Fan is more than just a cooling solution; it’s a design statement that adds elegance and sophistication to any room. With its sleek design, powerful motor, and customizable options, this ceiling fan offers the perfect balance of form and function.

Key Features of the Monte Carlo Haven 52 Ceiling Fan

  • Sleek Design: The Monte Carlo Haven 52 Ceiling Fan features a sleek and modern design with clean lines and a contemporary finish, making it a stylish addition to any interior decor scheme.
  • Powerful Motor: Equipped with a high-performance motor, the Monte Carlo Haven 52 Ceiling Fan delivers exceptional airflow, ensuring optimal comfort and circulation in any room.
  • Customizable Options: Choose from a variety of blade finishes, motor finishes, and accessory options to customize the look of your Monte Carlo Haven 52 Ceiling Fan and complement your unique style.
  • Integrated LED Light Kit: Many models of the Monte Carlo Haven 52 Ceiling Fan come with an integrated LED light kit, providing both illumination and cooling in one convenient fixture.

Installing Your Monte Carlo Haven 52 Ceiling Fan

Installing the Monte Carlo Haven 52 Ceiling Fan is a straightforward process that can be completed in just a few simple steps. Follow these guidelines for a seamless installation experience:

  1. Preparation: Begin by turning off the power to the existing ceiling fan or light fixture at the circuit breaker. Remove the old fixture and prepare the ceiling junction box for installation.
  2. Mounting: Attach the mounting bracket to the ceiling junction box using the provided hardware. Ensure that the bracket is securely fastened and level.
  3. Wiring: Connect the wires from the ceiling junction box to the corresponding wires on the ceiling fan motor, following the manufacturer’s instructions carefully. Secure the wire connections with wire nuts and electrical tape.
  4. Blade Installation: Attach the fan blades to the motor housing using the included screws, making sure to align them properly and tighten the screws securely.
  5. Light Kit Installation: If your Monte Carlo Haven 52 Ceiling Fan includes an integrated LED light kit, install it according to the provided instructions, ensuring that all connections are secure.
  6. Testing: Once the installation is complete, turn the power back on at the circuit breaker and test the operation of the ceiling fan and light kit to ensure everything is functioning properly.

Enhancing Your Home Decor with the Monte Carlo Haven 52 Ceiling Fan

The Monte Carlo Haven 52 Ceiling Fan serves as more than just a functional fixture; it’s a design element that enhances the overall look and feel of your living space. Whether you’re looking to update your living room, bedroom, or office, this ceiling fan is sure to make a stylish statement.

Read too: Enhance Your Space with Acoustic Ceiling Tiles Paint: A Comprehensive Guide

Conclusion:

In conclusion, the Monte Carlo Haven 52 Ceiling Fans offers unparalleled style, performance, and versatility, making it the perfect addition to any home decor. With its sleek design, powerful motor, and customizable options, this ceiling fan is sure to enhance the comfort and elegance of your living space for years to come.

Minka Roto Ceiling Fans: Experience Unmatched Performance and Style

Elevate the comfort and elegance of your living space with the exceptional Minka Roto Ceiling Fans. In this detailed review, we’ll explore the features, benefits, and installation process of the Minka Roto Ceiling Fan, providing you with all the information you need to enhance your home decor with this stylish and functional fixture.

Minka Roto Ceiling Fan

Introducing

The Minka Roto Ceiling Fan is not just an ordinary cooling solution; it’s a design statement that brings both functionality and style to any room. With its sleek design and powerful performance, this ceiling fan is sure to become the focal point of your living space.

Key Features of the Minka Roto Ceiling Fan

  • Minimalist Design: The Minka Roto Ceiling Fan features a minimalist design with clean lines and a sleek profile, making it suitable for a wide range of interior styles, from modern to transitional.
  • High-Performance Motor: Equipped with a powerful motor, the Minka Roto Ceiling Fan delivers exceptional airflow, keeping your room cool and comfortable even on the hottest days.
  • Versatile Blade Options: Choose from a variety of blade finishes and sizes to customize the look of your Minka Roto Ceiling Fan and complement your existing decor.
  • Integrated Light Kit: Many models of the Minka Roto Ceiling Fan come with an integrated light kit, providing both illumination and cooling in one stylish package.

Installing Your Minka Roto Ceiling Fan

Installing the Minka Roto Ceiling Fan is a straightforward process that can be completed in just a few simple steps. Follow these guidelines for a hassle-free installation experience:

  1. Preparation: Begin by turning off the power to the existing ceiling fan or light fixture at the circuit breaker. Remove the old fixture and prepare the ceiling junction box for installation.
  2. Mounting: Attach the mounting bracket to the ceiling junction box using the provided hardware. Ensure that the bracket is securely fastened and level.
  3. Wiring: Connect the wires from the ceiling junction box to the corresponding wires on the ceiling fan motor, following the manufacturer’s instructions carefully. Secure the wire connections with wire nuts and electrical tape.
  4. Blade Installation: Attach the fan blades to the motor housing using the included screws, making sure to align them properly and tighten the screws securely.
  5. Light Kit Installation: If your Minka Roto Ceiling Fan includes an integrated light kit, install it according to the provided instructions, ensuring that all connections are secure.
  6. Testing: Once the installation is complete, turn the power back on at the circuit breaker and test the operation of the ceiling fan and light kit to ensure everything is functioning properly.

Enhancing Your Home Decor with the Minka Roto Ceiling Fan

The Minka Roto Ceiling Fan not only provides superior comfort and functionality but also adds a touch of sophistication to any room. Whether you’re looking to update your living room, bedroom, or office space, this ceiling fan is sure to make a stylish statement.

Read too: Enhance Your Space with Acoustic Ceiling Tiles Paint: A Comprehensive Guide

Conclusion:

In conclusion, the Minka Roto Ceiling Fans offers unmatched performance, style, and versatility, making it the perfect addition to any home decor. With its sleek design, powerful motor, and customizable options, this ceiling fan is sure to enhance the comfort and elegance of your living space for years to come.

Minka Delano Ceiling Fans: A Comprehensive Review

Upgrade the aesthetic appeal and functionality of your living space with the exquisite Minka Delano Ceiling Fans. In this detailed review, we’ll explore the features, benefits, and installation process of the Minka Delano Ceiling Fan, providing you with all the information you need to make an informed decision for your home decor.

Minka Delano Ceiling Fan

Introducing

The Minka Delano Ceiling Fans is more than just a cooling solution; it’s a design statement that elevates any room’s ambiance. Combining sleek aesthetics with powerful functionality, this ceiling fan offers the perfect balance of form and function.

Key Features of the Minka Delano Ceiling Fan

  • Modern Design: With its contemporary design and clean lines, the Minka Delano Ceiling Fan adds a touch of sophistication to any space, from modern lofts to traditional homes.
  • High-Quality Construction: Crafted from premium materials and precision-engineered for durability, the Minka Delano Ceiling Fan is built to last and withstand the test of time.
  • Integrated Light Kit: Many models of the Minka Delano Ceiling Fan come equipped with an integrated light kit, providing both illumination and cooling in one convenient fixture.
  • Remote Control Operation: Enjoy effortless control of your ceiling fan with the included remote control, allowing you to adjust fan speed, lighting, and more from the comfort of your seat.

Installing Your Minka Delano Ceiling Fan

Installing the Minka Delano Ceiling Fan is a straightforward process that can be completed in just a few simple steps. Follow these guidelines for a hassle-free installation experience:

  1. Preparation: Begin by turning off the power to the existing ceiling fan or light fixture at the circuit breaker. Remove the old fixture and prepare the ceiling junction box for installation.
  2. Mounting: Attach the mounting bracket to the ceiling junction box using the provided hardware. Make sure to actively secure the bracket and ensure it is level.
  3. Wiring: Connect the wires from the ceiling junction box to the corresponding wires on the ceiling fan motor, following the manufacturer’s instructions carefully. Secure the wire connections with wire nuts and electrical tape.
  4. Blade Installation: Attach the fan blades to the motor housing using the included screws, making sure to align them properly and tighten the screws securely.
  5. Light Kit Installation: If your Minka Delano Ceiling Fan includes an integrated light kit, install it according to the provided instructions, ensuring that all connections are secure.
  6. Testing: Once the installation is complete, turn the power back on at the circuit breaker and test the operation of the ceiling fan and light kit to ensure everything is functioning properly.

Elevating Your Home Decor with the Minka Delano Ceiling Fan

The Minka Delano Ceiling Fan serves as more than just a functional fixture; it’s a design element that enhances the overall look and feel of your living space. Whether you’re looking to add a touch of elegance to your living room, bedroom, or dining area, this ceiling fan is sure to make a stylish statement.

Conclusion: Elevate Your Living Space with the Minka Delano Ceiling Fan

In conclusion, the Minka Delano Ceiling Fan offers a winning combination of style, performance, and convenience, making it the perfect addition to any home decor. With its sleek design, high-quality construction, and advanced features, this ceiling fan is sure to enhance the comfort and ambiance of your living space for years to come.

Read too: Enhance Your Space with Acoustic Ceiling Tiles Paint: A Comprehensive Guide

Minka Aire Napoli Ceiling Fans: Exploring the Beauty and Functionality

Transforming the ambiance of your living space while ensuring optimal comfort has never been easier, thanks to the exquisite Minka Aire Napoli Ceiling Fans. In this comprehensive guide, we’ll delve into the features, benefits, and installation process of this stunning ceiling fan, allowing you to make an informed decision when enhancing your home decor.

Minka Aire Napoli Ceiling Fan

Discovering the Elegance of the Minka Aire Napoli Ceiling Fan

The Minka Aire Napoli Ceiling Fan is more than just a functional fixture; it’s a statement piece that exudes sophistication and style. Designed with meticulous attention to detail and crafted from high-quality materials, this ceiling fan is the epitome of luxury and performance.

Key Features

  • Exquisite Design: The Minka Aire Napoli Ceiling Fan boasts a timeless design with intricately carved blades and a beautifully crafted housing, adding a touch of elegance to any room.
  • Powerful Performance: Equipped with a high-performance motor and precision-balanced blades, this ceiling fan delivers powerful airflow to effectively circulate air and maintain a comfortable environment.
  • Integrated Light Kit: Many models of the Minka Aire Napoli Ceiling Fan come with an integrated light kit, providing both illumination and functionality in one stylish package.
  • Remote Control Operation: Enjoy convenient control of your ceiling fan from anywhere in the room with the included remote control, allowing you to adjust the fan speed and lighting settings with ease.

Installing Your Minka Aire Napoli Ceiling Fan

Installing the Minka Aire Napoli Ceiling Fan is a straightforward process that can be completed in just a few simple steps. Follow these guidelines for a seamless installation experience:

  1. Preparation: Begin by turning off the power to the existing ceiling fan or light fixture at the circuit breaker. Remove the old fixture and prepare the ceiling junction box for installation.
  2. Mounting: Attach the mounting bracket to the ceiling junction box using the provided hardware. Ensure that the bracket is securely fastened and level.
  3. Wiring: Connect the wires from the ceiling junction box to the corresponding wires on the ceiling fan motor, following the manufacturer’s instructions carefully. Secure the wire connections with wire nuts and electrical tape.
  4. Blade Installation: Attach the fan blades to the motor housing using the included screws, making sure to align them properly and tighten the screws securely.
  5. Light Kit Installation: If your Minka Aire Napoli Ceiling Fan includes an integrated light kit, install it according to the provided instructions, ensuring that all connections are secure.
  6. Testing: Once the installation is complete, turn the power back on at the circuit breaker and test the operation of the ceiling fan and light kit to ensure everything is functioning properly.

Enhancing Your Living Space with the Minka Aire Napoli Ceiling Fan

The Minka Aire Napoli Ceiling Fan is not only a functional addition to your home; it’s also a stunning centerpiece that enhances the aesthetic appeal of any room. Whether you’re looking to add a touch of elegance to your living room, bedroom, or dining area, this ceiling fan is sure to make a statement.

Read too: Enhance Your Space with Acoustic Ceiling Tiles Paint: A Comprehensive Guide

Conclusion:

In conclusion, the Minka Aire Napoli Ceiling Fans combines exquisite design, powerful performance, and convenient functionality to create a truly exceptional addition to any home. With its timeless elegance and superior craftsmanship, this ceiling fan is sure to elevate your living space to new heights of style and comfort.

Transforming Your Room with Suspended Ceiling Fluorescent Light: Illuminate Your Space

Suspended ceiling fluorescent light, also known as drop ceiling lights, offer a versatile and efficient lighting solution for a variety of spaces, including offices, schools, retail stores, and residential areas. In this comprehensive guide, we’ll explore the benefits of suspended ceiling fluorescent lights, discuss their installation and maintenance, and provide creative ideas for incorporating them into your space.

Suspended Ceiling Fluorescent Lights

Understanding Suspended Ceiling Fluorescent Lights

Suspended ceiling fluorescent lights are fixtures mounted within a dropped ceiling grid, creating a seamless and uniform lighting effect. These lights consist of fluorescent tubes housed in a decorative or functional fixture, suspended from the ceiling by wires or rods. They are available in various sizes, shapes, and styles to suit different aesthetic preferences and lighting requirements.

Benefits of Suspended Ceiling Fluorescent Lights

  1. Energy Efficiency: Suspended ceiling fluorescent lights are known for their energy efficiency, consuming less power than traditional incandescent bulbs while providing ample illumination. This makes them an eco-friendly lighting option that can help reduce energy costs and environmental impact.
  2. Even Illumination: One of the key advantages of fluorescent lighting is its ability to produce uniform and flicker-free illumination across a large area. Suspended ceiling fluorescent lights distribute light evenly, reducing glare and shadows for a comfortable and visually pleasing environment.
  3. Long Lifespan: Fluorescent tubes have a longer lifespan compared to incandescent bulbs, lasting up to 10,000 hours or more with proper maintenance. This reduces the frequency of bulb replacements and lowers maintenance costs for commercial and residential properties.
  4. Versatility: Suspended ceiling fluorescent lights come in a variety of styles and configurations, allowing for versatile design possibilities. Whether you prefer sleek and modern fixtures or traditional and decorative designs, there are options available to complement any space.

Installation and Maintenance

Installing suspended ceiling fluorescent lights requires careful planning and attention to detail to ensure optimal performance and safety. Here are some essential steps to follow:

  1. Prepare the Ceiling Grid: Before installing the lights, ensure that the ceiling grid is properly aligned and securely fastened. Make any necessary adjustments to accommodate the size and layout of the light fixtures.
  2. Mount the Fixtures: Attach the fluorescent light fixtures to the ceiling grid using the provided mounting hardware. Ensure that the fixtures are level and evenly spaced for uniform lighting distribution.
  3. Connect the Wiring: Follow the manufacturer’s instructions to wire the fixtures to the electrical system. Be sure to turn off the power supply before making any electrical connections and consult a licensed electrician if necessary.
  4. Test the Lights: Once the installation is complete, test the lights to ensure they are functioning correctly. Check for any flickering, buzzing, or dimming issues and address them promptly.
  5. Regular Maintenance: To maintain optimal performance, clean the light fixtures regularly to remove dust and debris buildup. Replace fluorescent tubes as needed to prevent dimming or flickering.

Creative Ideas for Using Suspended Ceiling Fluorescent Lights

  1. Office Lighting: Create a bright and productive work environment by installing suspended ceiling fluorescent lights in office spaces. Opt for recessed fixtures for a streamlined look or decorative pendant lights for added visual interest.
  2. Retail Displays: Illuminate retail displays and merchandise with strategically placed fluorescent lights. Use track lighting systems or adjustable spotlights to highlight products and attract customers’ attention.
  3. Classroom Lighting: Enhance learning environments with suspended ceiling fluorescent lights in classrooms and educational facilities. Choose fixtures with diffusers to reduce glare and provide comfortable illumination for students and teachers.
  4. Residential Lighting: Incorporate suspended ceiling fluorescent lights into residential spaces such as kitchens, bathrooms, and basements. Install dimmable fixtures to create mood lighting or bright task lighting as needed.

Read too: Exploring the Efficiency of Radiant Ceiling Heater Electric: A Comprehensive Guide

Conclusion

Suspended ceiling fluorescent light offer a versatile, energy-efficient, and cost-effective lighting solution for various indoor environments. Whether used in offices, retail stores, classrooms, or residential spaces, these lights provide even illumination and enhance the aesthetic appeal of any room. By understanding their benefits, installation process, and creative applications, you can transform your space with stylish and functional lighting solutions.

Ideas for a Stunning Shower With Sloped Ceiling: Transform Your Bathroom

Are you faced with the challenge of designing a shower in a bathroom with a sloped ceiling? While sloped ceilings can pose design obstacles, they also offer unique opportunities to create a visually stunning and functional shower space. In this guide, we’ll explore creative ideas and practical solutions for designing a shower with a sloped ceiling that combines style and functionality seamlessly.

Shower With Sloped Ceiling

Understanding the Challenges and Opportunities

Designing a shower under a sloped ceiling presents both challenges and opportunities for homeowners and designers alike. While limited headroom and awkward angles may seem daunting, they can be leveraged to create a cozy and intimate shower experience. With thoughtful planning and innovative design solutions, you can transform your shower into a focal point of your bathroom.

Design Considerations for Shower With Sloped Ceiling

When planning a shower with a sloped ceiling, several key factors should be taken into account to ensure a successful design:

  1. Maximize Vertical Space: Since sloped ceilings limit vertical space, it’s essential to make the most of the available height. Consider installing taller shower doors or opting for a frameless glass enclosure to create a sense of openness and maximize natural light.
  2. Choose the Right Showerhead: Selecting the appropriate showerhead is crucial when working with a sloped ceiling. Opt for a wall-mounted or ceiling-mounted showerhead with adjustable height and spray settings to accommodate varying ceiling heights and ensure optimal water flow and coverage.
  3. Incorporate Built-In Storage: To optimize space and minimize clutter, consider integrating built-in storage solutions into your shower design. Recessed shelves or niches can be installed directly into the sloped walls to provide convenient storage for toiletries and bath essentials.
  4. Embrace Creative Lighting: Lighting plays a significant role in enhancing the ambiance of a shower with a sloped ceiling. Incorporate recessed lighting, LED strips, or waterproof sconces to illuminate the space effectively and create a spa-like atmosphere. Additionally, installing a skylight or a strategically placed window can introduce natural light and visually expand the shower area.
  5. Choose Durable and Waterproof Materials: Since showers are exposed to moisture and humidity, it’s essential to select durable and waterproof materials for the walls, floors, and ceiling. Opt for waterproof tile, stone, or glass surfaces that are easy to clean and maintain, ensuring longevity and performance in wet environments.

Inspirational Ideas for Shower With Sloped Ceiling

Now that we’ve covered the essential design considerations, let’s explore some inspirational ideas for creating a stunning shower with a sloped ceiling:

  1. Spa-Inspired Retreat: Transform your shower into a luxurious spa retreat by incorporating calming elements such as natural stone tile, rainfall showerhead, and built-in bench seating. Add a touch of elegance with a freestanding soaking tub and lush greenery for a serene and relaxing ambiance.
  2. Contemporary Elegance: Achieve a sleek and modern look with a monochromatic color scheme, minimalist fixtures, and geometric tile patterns. Install a linear drain along the shower floor for a seamless and stylish finish, complemented by recessed lighting and sleek glass partitions.
  3. Rustic Charm: Embrace the warmth and character of rustic design by incorporating reclaimed wood accents, exposed beams, and earthy textures. Opt for a walk-in shower with a stone or brick accent wall, paired with antique-inspired fixtures and vintage-style lighting for a cozy and inviting atmosphere.

Conclusion

Designing a shower with a sloped ceiling requires careful planning and attention to detail, but the results can be truly spectacular. By maximizing vertical space, incorporating built-in storage, embracing creative lighting, and choosing durable materials, you can create a shower that not only functions beautifully but also elevates the overall aesthetic of your bathroom.

Read too: Exploring the Efficiency of Radiant Ceiling Heater Electric: A Comprehensive Guide

Popcorn Ceiling Removal in Charlotte: Expert Tips

Are you tired of the outdated popcorn ceiling in your Charlotte home? If so, you’re not alone. Many homeowners in Charlotte are seeking to modernize their living spaces by removing popcorn ceilings and opting for a smoother, more contemporary look. In this comprehensive guide, we’ll explore everything you need to know about popcorn ceiling removal in Charlotte, including expert tips, cost considerations, and the benefits of hiring professional contractors.

Popcorn Ceiling Removal Charlotte

Understanding Popcorn Ceiling Removal in Charlotte

Popcorn ceilings, also known as acoustic ceilings or textured ceilings, were once a popular choice for homes due to their affordability and ability to hide imperfections. However, they have fallen out of favor in recent years due to their dated appearance and potential health hazards associated with asbestos-containing materials in older homes.

Why Remove Popcorn Ceilings?

  • Modern Aesthetics: Smooth ceilings offer a more modern and streamlined look compared to popcorn ceilings, making them ideal for contemporary interior design.
  • Increased Property Value: Removing popcorn ceilings can enhance the overall value and marketability of your home, especially if you plan to sell in the future.
  • Improved Air Quality: Popcorn ceilings can trap dust, allergens, and other airborne particles, contributing to poor indoor air quality. Removing them can help create a healthier living environment.
  • Elimination of Asbestos Risk: Homes built before the 1980s may contain asbestos in their popcorn ceilings, posing a potential health risk. Professional removal ensures safe and thorough asbestos abatement.

Expert Tips for Popcorn Ceiling Removal in Charlotte

When it comes to removing popcorn ceilings in Charlotte, proper preparation and execution are key. Here are some expert tips to ensure a smooth and successful removal process:

  1. Conduct a Professional Inspection: Before embarking on a popcorn ceiling removal project, it’s essential to have your ceiling inspected by a qualified professional. This will help determine whether asbestos or other hazardous materials are present and require specialized removal procedures.
  2. Choose the Right Removal Method: There are several methods for removing popcorn ceilings, including scraping, wetting, and covering with drywall. The best approach depends on factors such as the age of the ceiling, the presence of asbestos, and personal preference.
  3. Protect Your Home: Prior to starting the removal process, take steps to protect your furniture, flooring, and walls from dust and debris. Covering surfaces with plastic sheeting and removing or covering furniture can prevent damage and facilitate easier cleanup.
  4. Consider Hiring Professionals: While DIY popcorn ceiling removal is possible, it can be a time-consuming and labor-intensive task, especially for larger areas or ceilings with asbestos. Hiring experienced contractors ensures efficient and safe removal, saving you time and effort in the long run.

Conclusion

Popcorn ceiling removal in Charlotte offers homeowners an opportunity to update their living spaces and improve the overall aesthetics and air quality of their homes. By following expert tips and enlisting the help of professional contractors, you can achieve smooth and stylish ceilings that enhance the beauty and value of your property.

Read too: Exploring the Efficiency of Radiant Ceiling Heater Electric: A Comprehensive Guide

Modern High Ceiling Lighting Ideas: Illuminate Your Space in Style

Elevating the aesthetic appeal of your home’s interior involves careful consideration of lighting solutions, particularly when dealing with high ceilings. Modern high ceiling lighting ideas offer innovative ways to illuminate and enhance the grandeur of lofty spaces. In this guide, we’ll explore a variety of contemporary lighting concepts and designs tailored specifically for high ceilings, providing you with inspiration to transform your living space into a well-lit haven of style and sophistication.

Modern High Ceiling Lighting Ideas

Exploring Modern High Ceiling Lighting Ideas

High ceilings present both unique opportunities and challenges when it comes to lighting design. While they offer a sense of spaciousness and grandeur, they also require lighting fixtures that can effectively illuminate the entire space without overwhelming it. Let’s delve into some modern lighting ideas that are perfectly suited for high ceilings:

1. Statement Chandeliers:

Make a bold statement with an eye-catching chandelier that commands attention and serves as a focal point in the room. Opt for contemporary designs featuring sleek lines, geometric shapes, or intricate patterns to complement the modern aesthetic of your space. Hang the chandelier at an appropriate height to maximize its impact without obstructing sightlines.

2. Recessed Lighting:

Recessed lighting fixtures are a versatile and practical option for high ceilings, providing ample illumination while maintaining a clean and streamlined look. Install recessed lights strategically throughout the space to evenly distribute light and minimize shadows. Consider incorporating dimmer switches to adjust the lighting intensity according to your preferences and needs.

3. Pendant Lights:

Pendant lights offer a stylish and customizable lighting solution for high ceilings, allowing you to create visual interest and define different zones within the room. Choose pendant lights with adjustable heights to accommodate varying ceiling heights and create a sense of balance in the space. Experiment with different shapes, sizes, and materials to achieve the desired aesthetic effect.

4. Track Lighting Systems:

For flexibility and versatility, consider installing a track lighting system that can be easily adjusted to illuminate specific areas or highlight architectural features. Modern track lighting fixtures come in a variety of styles and configurations, allowing you to customize the layout according to your lighting requirements and design preferences.

5. Floor Lamps and Uplights:

Supplement overhead lighting with strategically placed floor lamps and uplights to add warmth and ambiance to your high-ceilinged space. Choose sleek and contemporary designs that complement the overall décor scheme and provide targeted illumination where needed. Position floor lamps near seating areas or in dark corners to create cozy reading nooks or accentuate artwork and décor elements.

Conclusion

With the right lighting choices, you can transform your high-ceilinged space into a stunning showcase of modern design and sophistication. From statement chandeliers to recessed lighting and everything in between, the possibilities are endless when it comes to illuminating your home in style. Explore these modern high ceiling lighting ideas to create a luminous environment that reflects your unique taste and enhances the beauty of your living space.

Read too: Exploring the Efficiency of Radiant Ceiling Heater Electric: A Comprehensive Guide

Exploring Milk Glass Flush Mount Ceiling Light: Illuminate Your Space with Elegance

Enhancing the ambiance of your living space often involves finding the perfect lighting solution. Milk glass flush mount ceiling light offer a blend of elegance and functionality, providing both ample illumination and stylish aesthetics. In this comprehensive guide, we’ll delve into the world of milk glass flush mount ceiling lights, exploring their design, functionality, installation, and how they can elevate the look of any room.

Milk Glass Flush Mount Ceiling Light

Unveiling Milk Glass Flush Mount Ceiling Lights

Milk glass flush mount ceiling lights are fixtures that combine the timeless appeal of milk glass with the practicality of flush mount installation. These lights are designed to be mounted directly to the ceiling, making them ideal for rooms with low ceilings or spaces where a sleek, unobtrusive lighting solution is desired. The milky white appearance of the glass diffuses light evenly, creating a soft, inviting glow that enhances the atmosphere of any room.

Exploring the Features of Milk Glass Flush Mount Ceiling Lights

  1. Design Versatility: Milk glass flush mount ceiling lights come in a variety of styles and designs, allowing you to find the perfect fixture to complement your home décor. From vintage-inspired designs with intricate detailing to modern minimalist styles, there’s a milk glass flush mount ceiling light to suit every taste and aesthetic preference.
  2. Enhanced Illumination: The opaque nature of milk glass diffuses light evenly, reducing glare and harsh shadows. This creates a warm, inviting ambiance that is ideal for living rooms, bedrooms, kitchens, and hallways. Whether you’re reading a book, preparing a meal, or entertaining guests, milk glass flush mount ceiling lights provide the perfect level of illumination for any occasion.
  3. Easy Installation: Flush mount ceiling lights are designed to be installed directly onto the ceiling surface, making them a practical choice for homeowners and DIY enthusiasts. With a few simple tools and basic electrical knowledge, you can quickly and easily install milk glass flush mount ceiling lights in any room of your home.

Choosing the Right Milk Glass Flush Mount Ceiling Light

When selecting a milk glass flush mount ceiling light for your space, consider factors such as the size and layout of the room, the overall design aesthetic, and the level of illumination required. Additionally, pay attention to the quality of materials and craftsmanship to ensure durability and longevity.

Read too: Exploring the Efficiency of Radiant Ceiling Heater Electric: A Comprehensive Guide

Conclusion

Milk glass flush mount ceiling lights offer a winning combination of style, functionality, and versatility, making them an ideal lighting solution for any home. Whether you’re looking to update your existing lighting fixtures or enhance the ambiance of a new space, consider incorporating milk glass flush mount ceiling lights into your décor. With their timeless appeal and practical design, these fixtures are sure to illuminate your home with elegance and charm for years to come.

Enhance Your Log Cabin Retreat with a Rustic Log Cabin Ceiling Fan

Are you looking to elevate the ambiance of your log cabin retreat while improving air circulation and comfort? Consider installing a log cabin ceiling fan. In this guide, we’ll explore everything you need to know about log cabin ceiling fans, from their rustic design to their practical functionality, to help you choose the perfect fixture for your cozy getaway.

Log Cabin Ceiling Fan

Embracing Rustic Elegance: Log Cabin Ceiling Fan Designs

Log cabin ceiling fans are designed to complement the natural beauty and rustic charm of log cabin interiors. These fans often feature rugged materials like wood and wrought iron, along with finishes that mimic the look of weathered wood or aged metal. Whether you prefer a traditional, lodge-style fan or a more modern rustic design, there are plenty of options to suit your taste.

Choosing the Right Size and Style: Log Cabin Ceiling Fan

When selecting a log cabin ceiling fan, consider the size and style of your space. For smaller rooms or low ceilings, opt for a compact fan with a flush-mount design to maximize headroom. In larger rooms or spaces with high ceilings, choose a larger fan with longer blades to ensure adequate air circulation and cooling.

Read too: Exploring Craftsman Style Ceiling Fans for Your Home: Embracing Timeless Elegance

Features to Consider

Beyond aesthetics, there are several features to consider when choosing a log cabin ceiling fan:

  1. Blade Material: Look for blades made from natural wood or reclaimed lumber for an authentic rustic look. These blades can be stained or finished to complement your cabin’s decor.
  2. Lighting Options: Many log cabin ceiling fans come with integrated lights or light kits, providing both illumination and airflow in one fixture. Choose between traditional light fixtures or rustic-inspired designs like antler chandeliers or lanterns.
  3. Remote Control: Consider a fan with remote control capabilities for added convenience. Remote-controlled fans allow you to adjust the fan speed, direction, and lighting settings from anywhere in the room.
  4. Reversible Motor: Look for a fan with a reversible motor that allows you to switch between downdraft mode for cooling in the summer and updraft mode for circulating warm air in the winter, helping to improve energy efficiency year-round.

Installation and Maintenance Tips

Installing a log cabin ceiling fan is relatively straightforward, but it’s essential to follow the manufacturer’s instructions carefully. Make sure to balance the fan blades during installation to prevent wobbling and ensure smooth, quiet operation. Additionally, regular maintenance, such as dusting the blades and tightening screws, will help keep your fan running smoothly for years to come.

Conclusion

A log cabin ceiling fans is the perfect addition to any log cabin retreat, combining rustic charm with practical functionality. Whether you’re looking to improve air circulation, add lighting, or enhance the ambiance of your space, there’s a log cabin ceiling fan to suit your needs. Explore our selection of rustic log cabin ceiling fans and take your cabin to new heights of comfort and style.