Kitchen design has evolved significantly over the years, with a focus on maximizing both style and functionality. One of the latest trends that cater to both these aspects is the use of ceiling hung kitchen cabinets. These innovative cabinets not only provide additional storage space but also add a modern and unique touch to your kitchen. In this comprehensive guide, we will explore everything you need to know about ceiling hung kitchen cabinets, including their benefits, design considerations, installation tips, and how they can transform your kitchen space.
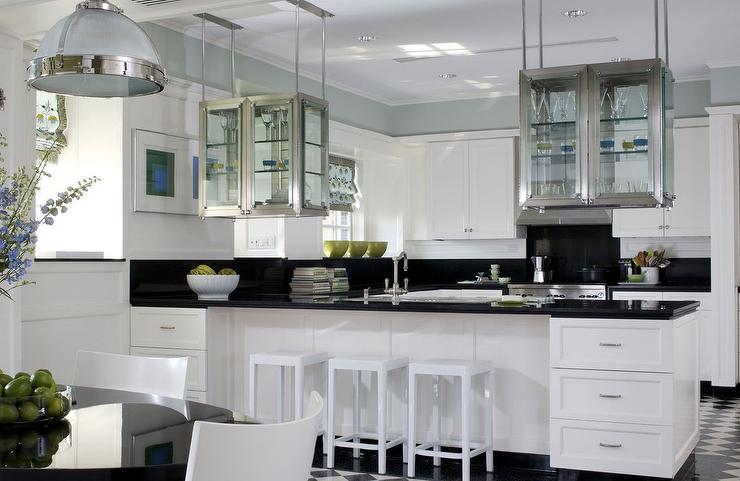
The Benefits of Ceiling Hung Kitchen Cabinets
Maximizing Storage Space
One of the primary benefits of ceiling hung kitchen cabinets is their ability to maximize storage space in your kitchen. By utilizing the vertical space between the countertop and the ceiling, you can significantly increase the amount of storage available. This is especially beneficial in smaller kitchens where space is at a premium.
Creating an Open and Airy Feel
Traditional wall-mounted cabinets can sometimes make a kitchen feel cramped and closed in. Ceiling hung cabinets, on the other hand, can create an open and airy feel. They allow for more natural light to flow through the space and provide a less obstructed view, making your kitchen appear larger and more inviting.
Adding a Modern Touch
Ceiling hung kitchen cabinets are a contemporary design element that can instantly update the look of your kitchen. They offer a sleek and minimalist aesthetic that is perfect for modern and transitional kitchen styles. The unique placement of these cabinets can serve as a focal point, adding visual interest to the space.
Enhancing Accessibility
For those who find it difficult to reach items stored in traditional upper cabinets, ceiling hung cabinets can be a more accessible option. They are typically mounted at a height that makes it easier to access everyday items without the need for a step stool.
Design Considerations for Ceiling Hung Kitchen Cabinets
Choosing the Right Style
When selecting ceiling hung kitchen cabinets, it’s important to choose a style that complements your overall kitchen design. There are several styles to consider, including:
- Open Shelving: This style features open shelves without doors, allowing you to display decorative items and keep frequently used items within easy reach. Open shelving creates a casual and airy feel in the kitchen.
- Glass-Front Cabinets: Glass-front cabinets offer a compromise between open shelving and traditional closed cabinets. They allow you to showcase your dishes and glassware while keeping them protected from dust.
- Closed Cabinets: For a more streamlined look, closed cabinets with solid doors provide ample storage while keeping your items out of sight. This style is ideal for those who prefer a clean and clutter-free kitchen.
Selecting the Right Material
The material of your ceiling hung kitchen cabinets can significantly impact their durability and appearance. Some popular materials include:
- Wood: Wood is a classic and versatile material that can be stained or painted to match your kitchen decor. It offers a warm and natural look but requires regular maintenance to prevent damage from moisture and heat.
- Metal: Metal cabinets, such as stainless steel or aluminum, are durable and easy to clean. They are ideal for modern and industrial kitchen styles and can withstand the wear and tear of a busy kitchen.
- Glass: Glass cabinets add a touch of elegance and sophistication to your kitchen. They can be combined with wood or metal frames for added durability. However, they require frequent cleaning to keep them looking their best.
Color and Finish Options
The color and finish of your ceiling hung kitchen cabinets can set the tone for your kitchen design. Neutral colors like white, gray, and beige create a timeless and versatile look, while bold colors like navy blue, emerald green, and deep red can make a statement. Matte finishes offer a contemporary and understated look, while glossy finishes add a touch of glamour and reflect light to brighten the space.
Installation Tips for Ceiling Hung Kitchen Cabinets
Hiring a Professional
Installing ceiling hung kitchen cabinets can be a complex task that requires precise measurements and secure mounting. It’s recommended to hire a professional contractor or cabinet installer to ensure the cabinets are properly and safely installed. A professional can also help with any necessary modifications to the ceiling or walls.
Ensuring Proper Support
Ceiling hung cabinets need to be securely anchored to the ceiling to prevent them from falling. This typically involves using heavy-duty brackets or support rods that are attached to ceiling joists. It’s important to ensure the ceiling structure can support the weight of the cabinets and their contents.
Measuring and Planning
Accurate measurements are crucial for a successful installation. Measure the height, width, and depth of the space where the cabinets will be installed. Plan the layout to ensure the cabinets are evenly spaced and aligned with other elements in the kitchen, such as countertops and appliances.
Installing Lighting
Consider integrating lighting into your ceiling hung kitchen cabinets to enhance their functionality and aesthetic appeal. Under-cabinet lighting can illuminate the countertop workspace, while interior lighting can showcase the contents of glass-front cabinets.
Integrating Ceiling Hung Kitchen Cabinets Into Your Home Decor
Creating a Focal Point
Ceiling hung kitchen cabinets can serve as a striking focal point in your kitchen. Choose a bold color or unique design to make them stand out. Pair them with complementary elements, such as a stylish backsplash or statement lighting, to create a cohesive and visually appealing look.
Mixing and Matching Styles
Don’t be afraid to mix and match different cabinet styles and materials to create a personalized and eclectic look. For example, you can combine open shelving with closed cabinets or mix wood and metal finishes for added texture and interest.
Coordinating with Existing Elements
To ensure a harmonious and balanced design, coordinate your ceiling hung kitchen cabinets with existing elements in your kitchen, such as countertops, flooring, and appliances. Choose colors and finishes that complement the overall color scheme and style of your kitchen.
Adding Decorative Accents
Enhance the visual appeal of your ceiling hung kitchen cabinets by adding decorative accents, such as decorative brackets, trim, or hardware. These small details can add character and personality to your kitchen design.
Maintaining Ceiling Hung Kitchen Cabinets
Regular Cleaning
To keep your ceiling hung kitchen cabinets looking their best, regular cleaning is essential. Wipe down the exterior and interior surfaces with a mild detergent and water. For wood cabinets, use a wood cleaner or polish to maintain the finish. Avoid using abrasive cleaners or scouring pads that can damage the surface.
Checking for Wear and Tear
Periodically inspect your cabinets for any signs of wear and tear, such as loose hinges, damaged finishes, or sagging shelves. Address any issues promptly to prevent further damage and ensure the cabinets remain safe and functional.
Read too: A Comprehensive Mr Cool Ceiling Cassette Review: Unveiling Excellence
Reorganizing and Decluttering
To maximize the functionality of your ceiling hung kitchen cabinet, regularly reorganize and declutter the contents. Remove any items you no longer use or need, and keep frequently used items within easy reach. Use storage organizers, such as baskets, bins, and dividers, to keep the contents neat and organized.
Conclusion
Ceiling hung kitchen cabinet are a stylish and practical addition to any kitchen. They offer numerous benefits, including maximizing storage space, creating an open and airy feel, adding a modern touch, and enhancing accessibility. By carefully selecting the right style, material, color, and finish, you can create a kitchen that is both functional and visually appealing. Whether you choose to hire a professional for installation or tackle the project yourself, proper planning and support are essential for a successful outcome. With regular maintenance and thoughtful integration into your home decor, ceiling hung kitchen cabinet can transform your kitchen into a beautiful and efficient space.