How Much Does It Cost To Paint A Popcorn Ceiling?

Popcorn ceilings, also known as acoustic ceilings or textured ceilings, were once a popular choice in home construction due to their noise-reducing and light-reflecting properties. However, they have fallen out of favor over the years, and many homeowners are now looking to update or refresh their popcorn ceilings. If you’re considering painting your popcorn ceiling, you might be wondering, “How much does it cost to paint a popcorn ceiling?” In this article, we’ll explore the various cost factors and provide you with insights into this home improvement project.

How Much Does It Cost To Paint A Popcorn Ceiling
Young Painter In White Uniform Painting With Paint Roller

The Appeal of Painting a Popcorn Ceiling

Popcorn ceilings became less popular as they were associated with an outdated look and, in some cases, concerns about asbestos. However, painting a popcorn ceiling can offer several benefits:

  1. Modernization: Painting can give your popcorn ceiling a more contemporary and refreshed appearance.
  2. Improved Maintenance: Painted surfaces are easier to clean and maintain, making your ceiling more durable.
  3. Asbestos Encapsulation: If your popcorn ceiling contains asbestos, painting it can encapsulate the fibers, preventing them from becoming airborne.

Factors Influencing the Cost of Painting a Popcorn Ceiling

The cost of painting a popcorn ceiling varies based on several factors:

  1. Ceiling Size: The size of the ceiling, measured in square feet, directly affects the amount of paint and labor required. Larger ceilings naturally cost more to paint.
  2. Ceiling Condition: The condition of the popcorn texture is a significant factor. If the ceiling is in good condition, it might require minimal surface preparation. Ceilings with stains, cracks, or peeling texture may need more extensive prep work, affecting the cost.
  3. Paint Type: The type of paint you choose, including quality and specific properties, can impact the cost. Paint with stain-blocking and mildew-resistant features may be more expensive.
  4. Labor Costs: Labor costs depend on your location and the complexity of the project. Hiring a professional painter can be more costly but ensures a high-quality finish.
  5. Equipment and Supplies: Budget for additional costs such as paint rollers, brushes, drop cloths, and other tools and supplies.

Estimating the Cost to Paint a Popcorn Ceiling

On average, the cost to paint a popcorn ceiling can range from $1.00 to $3.00 per square foot, with the majority of expenses attributed to paint and labor. Here’s a general breakdown of estimated costs:

  • Material: A gallon of ceiling paint typically costs $20 to $50 and covers around 350 to 400 square feet.
  • Labor: Professional labor costs can range from $1.00 to $2.50 per square foot for a painter’s service, depending on your location and the complexity of the project.
  • Equipment and Supplies: Budget an additional $20 to $50 for brushes, rollers, drop cloths, and other necessary tools.

For a smaller room with a standard-sized popcorn ceiling, the cost may be closer to the lower end of the range. Larger rooms or those with more extensive surface preparation may fall toward the higher end.

Conclusion: A Fresh and Updated Look

How much does it cost to paint a popcorn ceiling? Painting a popcorn ceiling can be an effective way to modernize your space and improve its overall appeal. By considering the size, condition, paint type, and labor costs for your ceiling, you can better estimate the project’s expenses. Whether you decide to hire a professional or tackle the task yourself, a freshly painted popcorn ceiling can provide a fresh and updated look for your home.

How Much Does It Cost To Remove Asbestos Popcorn Ceiling?

Popcorn ceilings, once a popular choice in home design, have lost their appeal due to their dated appearance and potential health risks. If you have an older home with a popcorn ceiling that might contain asbestos, you might be wondering, “How much does it cost to remove asbestos popcorn ceiling?” In this article, we’ll explore the factors that influence the cost and provide you with insights into this essential home improvement project.

how much does it cost to remove asbestos popcorn ceiling

The Dangers of Asbestos in Popcorn Ceilings

Asbestos was commonly used in popcorn ceiling texture for its fire-resistant properties and soundproofing capabilities. However, asbestos is a known carcinogen, and inhaling asbestos fibers can lead to serious health issues, including lung cancer and mesothelioma. As a result, many homeowners are opting to remove popcorn ceilings that may contain asbestos, especially when renovations or repairs are planned.

Factors Affecting Asbestos Popcorn Ceiling Removal Costs

The cost of removing an asbestos popcorn ceiling can vary significantly depending on various factors. Here’s a breakdown of these cost considerations:

  1. Ceiling Size: The size of the ceiling, measured in square footage, directly affects the amount of material and labor required. Larger ceilings will naturally cost more to remove.
  2. Containment: Proper containment is essential when removing asbestos to prevent the spread of asbestos fibers. The level of containment, including sealing off the area and using specialized equipment, can affect the cost.
  3. Abatement Method: There are two primary methods for asbestos popcorn ceiling removal: wet removal and dry removal. Wet removal involves misting the ceiling to prevent asbestos fibers from becoming airborne, while dry removal can be faster but riskier due to the potential for fiber release.
  4. Testing and Inspection: Before removal, it’s necessary to test and confirm the presence of asbestos. The time and cost of testing and inspection can add to the overall expense.
  5. Repairs and Refinishing: After removal, the ceiling may require repairs and refinishing, further extending the project’s cost.

Estimating Asbestos Popcorn Ceiling Removal Costs

On average, the cost to remove an asbestos popcorn ceiling can range from $3 to $7 per square foot, with the majority of the expenses attributed to material and labor. Here’s a general breakdown of estimated costs:

  • Material: This includes the cost of asbestos removal supplies, such as containment materials and disposal bags, and can range from $1 to $2 per square foot.
  • Labor: Professional labor costs can range from $2 to $5 per square foot, depending on your location and the complexity of the project. Labor includes the removal, proper disposal, and cleanup.
  • Equipment and Supplies: Budget an additional $200 to $500 for necessary tools and supplies, including safety gear and asbestos testing.

For a smaller room with a standard-sized ceiling, the cost may be closer to the lower end of the range. Larger rooms or those with extensive repairs or refinishing needs may fall toward the higher end.

Conclusion: A Wise Investment in Health and Home Value

Removing an asbestos popcorn ceiling is a critical project that not only ensures your family’s safety but also enhances the overall aesthetics and value of your home. While the cost can vary, it’s essential to prioritize safety and compliance with asbestos regulations during the removal process. Hiring professionals experienced in asbestos abatement is strongly recommended to ensure the safe and efficient removal of your popcorn ceiling, protecting your family’s health and adding value to your home.

What Is The Red Wire For In A Ceiling Fan?

Ceiling fans are a common fixture in many homes, providing comfort and ventilation. However, when it comes to installing or replacing one, the wiring can be a bit puzzling. Among the wires you might encounter, the red wire often raises questions. What is the red wire for in a ceiling fan? In this article, we’ll delve into the role of the red wire, its importance, and how to correctly handle it during ceiling fan installation.

what is the red wire for in a ceiling fan

Understanding the Ceiling Fan Wiring

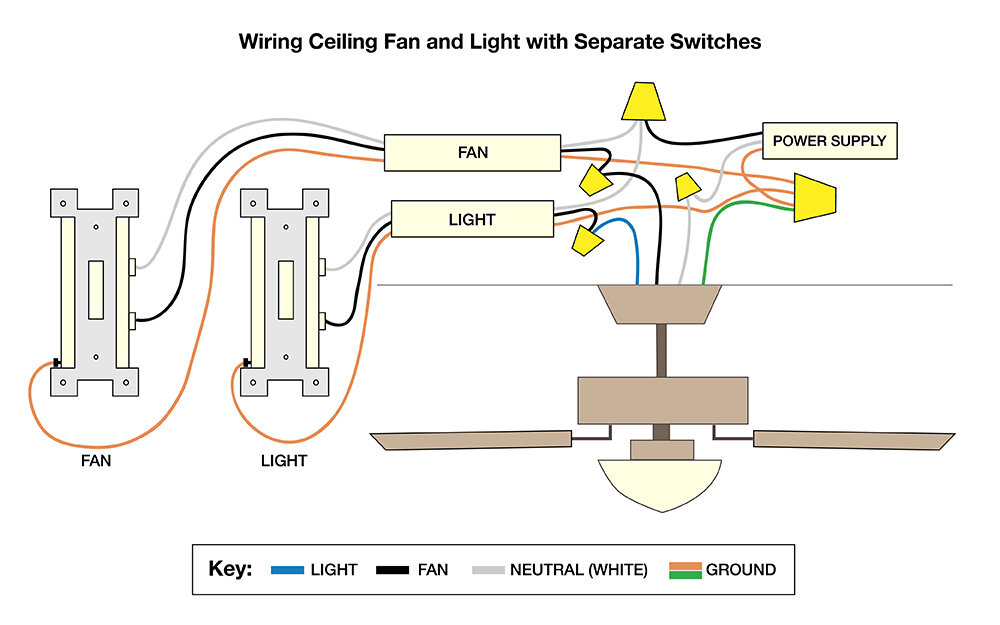
Before we tackle the red wire, let’s get familiar with the typical wiring in a ceiling fan. Most ceiling fans come with three main wires: black, white, and green or bare copper.

  • Black Wire: The black wire is the live or hot wire, carrying electrical current from the switch to power the fan.
  • White Wire: The white wire is the neutral wire, providing a return path for the current to complete the circuit.
  • Green or Bare Copper Wire: This wire is the ground wire, which serves as a safety feature, directing any electrical faults safely to the ground.

Now, where does the red wire fit into this setup?

The Role of the Red Wire

The red wire in a ceiling fan’s wiring is non-standard and can perform various functions depending on your fan’s design and the type of switch in use. Its typical roles include:

  1. Light Kit Power: In some ceiling fans, the red wire is used to power the light kit. If your fan has a light fixture, this wire may connect to the wiring of the light assembly. This setup allows you to control the fan and light separately with two switches, one for the fan motor and another for the lights.
  2. Multiple Fan Speeds: Some ceiling fans offer multiple fan speed settings. In such cases, the red wire can be used to control the fan’s speed. By connecting the red wire to a specific terminal on the fan’s motor, you can vary the speed by adjusting the switch connected to it.
  3. Alternative Functions: Depending on the manufacturer and model, the red wire might serve other functions or be capped off if not needed. Always consult the fan’s manual or instructions for specific guidance.

Dealing with the Red Wire During Installation

When installing or replacing a ceiling fan, it’s crucial to handle the red wire correctly. Here are some general steps to follow:

  1. Turn Off Power: Always turn off the power at the circuit breaker or fuse box before working on electrical wiring. This ensures your safety during installation.
  2. Identify the Function: Determine the function of the red wire in your ceiling fan. Consult the manufacturer’s instructions or manual for guidance.
  3. Proper Connections: Make sure to connect the red wire to the appropriate terminal on the fan, whether it’s for the light kit or fan speed control.
  4. Secure Wiring: Ensure that all wire connections are secure and properly insulated to prevent any electrical issues.
  5. Test the Setup: After installation, turn the power back on and test the fan and light, if applicable, to confirm that they are functioning correctly.

Conclusion: Red Wire, a Valuable Component

Understanding the red wire in a ceiling fan’s wiring can make the installation process smoother and more efficient. While its function can vary, it often plays a crucial role in providing options for fan speed control or powering the light kit. By following proper installation procedures and consulting the manufacturer’s instructions, you can enjoy the full functionality of your ceiling fan and the comfort it brings to your home.

How Long Does It Take To Remove Asbestos Popcorn Ceiling?

Asbestos popcorn ceilings, once a popular choice in home design, are now recognized for their potential health hazards. If you have one in your home and are considering removal, you may wonder how long it takes to remove an asbestos popcorn ceiling. In this article, we’ll explore the factors influencing the timeline and provide you with insights into this essential home improvement project.

how long does it take to remove asbestos popcorn ceiling

The Concerns Surrounding Asbestos Popcorn Ceilings

Before we dive into the time frame for asbestos popcorn ceiling removal, it’s essential to understand the health concerns associated with these ceiling types. Asbestos was commonly used in popcorn ceiling texture because of its fire-resistant properties and soundproofing capabilities. However, asbestos is a known carcinogen, and inhaling asbestos fibers can lead to serious health issues, including lung cancer and mesothelioma.

Due to these health risks, many homeowners are opting to remove asbestos popcorn ceilings. When the ceiling remains intact and undisturbed, it may not pose an immediate threat. But if renovations or repairs are planned, removal becomes a priority.

Factors Affecting Asbestos Popcorn Ceiling Removal Time

The timeline for removing an asbestos popcorn ceiling depends on several factors:

  1. Ceiling Size: The size of the ceiling, measured in square footage, directly impacts the time required for removal. Larger ceilings naturally take longer to complete.
  2. Containment: Asbestos removal requires strict containment to prevent the spread of asbestos fibers. The level of containment, including sealing off the area and using specialized equipment, can affect the timeline.
  3. Abatement Method: There are two primary methods for asbestos popcorn ceiling removal: wet removal and dry removal. Wet removal involves misting the ceiling to keep asbestos fibers from becoming airborne, while dry removal can be faster but is riskier due to the potential for fiber release.
  4. Testing and Inspection: Before removal, it’s necessary to test and confirm the presence of asbestos. The time it takes for testing and inspection can add to the overall duration.
  5. Repairs and Refinishing: After removal, the ceiling may require repairs and refinishing. These additional tasks can extend the project timeline.

Estimating the Time for Asbestos Popcorn Ceiling Removal

The time to remove an asbestos popcorn ceiling can vary widely based on the factors mentioned above. On average, the process can take anywhere from several days to a few weeks. Here’s a general breakdown of the time frame:

  1. Testing and Inspection: This stage can take a few days to confirm the presence of asbestos and plan the removal process.
  2. Containment Setup: Setting up containment measures usually takes a day or two to ensure the area is sealed off properly.
  3. Removal: The actual removal process can vary but generally takes several days to a week. Wet removal methods tend to be more time-consuming.
  4. Cleanup: Once the asbestos is removed, thorough cleaning and decontamination are essential and can take a day or two.
  5. Repairs and Refinishing: Depending on the extent of damage or the desired finish, this stage can take an additional several days to a week.
  6. Final Testing: Testing and inspection may be repeated to ensure the space is free of asbestos, which adds a few more days.

Conclusion: A Careful and Thorough Process

Removing an asbestos popcorn ceiling is a critical project that requires a careful and thorough approach. While the timeline can vary, it’s essential to prioritize safety and compliance with asbestos regulations during the removal process. Hiring professionals experienced in asbestos abatement is strongly recommended to ensure the safe and efficient removal of your popcorn ceiling, protecting the health of your household and adding value to your home.

How Much Does It Cost To Paint A Kitchen Ceiling?

Your kitchen is the heart of your home, and a fresh coat of paint on the ceiling can breathe new life into this essential space. But how much does it cost to paint a kitchen ceiling? In this article, we’ll explore the various factors that influence the cost and provide you with an estimate for this common home improvement project.

how much does it cost to paint a kitchen ceiling

Why Paint Your Kitchen Ceiling

Before we delve into the cost considerations, let’s understand why painting your kitchen ceiling is a worthwhile investment:

  1. Enhanced Aesthetics: A freshly painted ceiling can make your kitchen look brighter and more inviting. It’s an excellent way to update the overall appearance of your kitchen.
  2. Improved Hygiene: Kitchens can accumulate grease and grime over time. Painting the ceiling helps maintain a clean and hygienic environment.
  3. Prevent Stains: Kitchens are prone to stains and water damage, especially in areas near sinks and stovetops. A new coat of paint can hide these imperfections.
  4. Value Addition: A well-maintained and aesthetically pleasing kitchen can add value to your home, making it more appealing to potential buyers.

Factors Affecting Kitchen Ceiling Painting Costs

Several factors can influence the cost of painting a kitchen ceiling. Here’s a breakdown of these cost considerations:

  1. Ceiling Size: The size of your kitchen ceiling, measured in square footage, directly affects the amount of paint and labor required. Larger ceilings naturally cost more to paint.
  2. Ceiling Condition: Ceilings in poor condition may require more prep work, including patching cracks, addressing water damage, or removing old paint. This can increase the overall cost.
  3. Paint Type: The type of paint you choose, such as standard latex paint or specialty kitchen paint with moisture and stain resistance, affects costs. Specialized paints may be more expensive.
  4. Labor Costs: Labor costs depend on your location and the complexity of the project. Hiring a professional painter can be more costly but ensures a high-quality finish.

Estimating Kitchen Ceiling Painting Costs

On average, the cost to paint a kitchen ceiling can range from $100 to $300, with most costs attributed to paint and labor. Here’s a general breakdown of estimated costs:

  • Material: A gallon of quality kitchen paint typically costs $30 to $50 and covers approximately 350 square feet.
  • Labor: Professional labor costs can range from $50 to $150 for a painter’s service per hour, depending on your location and the complexity of the project.
  • Equipment and Supplies: Budget an additional $20 to $50 for brushes, rollers, drop cloths, and other necessary tools.

For a smaller kitchen with a standard-sized ceiling, the cost may be closer to the lower end of the range. Larger kitchens or those with more extensive repairs may fall toward the higher end.

Conclusion: A Fresh and Inviting Kitchen Space

Painting your kitchen ceiling is an effective and budget-friendly way to enhance your kitchen’s appearance and maintain a clean, inviting space. By considering the size, condition, and paint type for your ceiling, you can better estimate the project’s expenses. Whether you decide to hire a professional or take on the task yourself, a freshly painted kitchen ceiling provides a fresh and appealing environment for your cooking and dining activities.

How Much Does It Cost To Skim Coat A Ceiling?

A fresh coat of paint can transform the look of a room, but sometimes, the condition of the ceiling may require more attention. If your ceiling has imperfections, cracks, or an uneven surface, skim coating can provide the smooth, polished look you desire. But how much does it cost to skim coat a ceiling? In this article, we’ll explore the factors influencing the cost and help you estimate the expenses for this home improvement project.

how much does it cost to skim coat a ceiling

The Significance of Skim Coating a Ceiling

Skim coating is a technique used to create a smooth, uniform surface on a ceiling. It involves applying a thin layer of joint compound or plaster to the entire ceiling to hide imperfections, seams, and create a fresh canvas for paint or other finishes. Skim coating is essential for the following reasons:

  • Enhanced Aesthetics: A smooth ceiling looks more attractive and contributes to an overall polished appearance in a room.
  • Improved Paint Adhesion: Skim coating provides a suitable surface for paint, ensuring it adheres evenly and prevents splotches or streaks.
  • Hiding Imperfections: If your ceiling has visible cracks, uneven textures, or damage from previous repairs, skim coating can conceal these flaws.
  • Added Value: Skim coating can increase the value of your home and make it more appealing to potential buyers.

Factors Affecting Skim Coating Costs

Several factors can influence the cost of skim coating a ceiling. Here’s a breakdown of these cost considerations:

  1. Ceiling Size: The size of the ceiling, measured in square footage, significantly impacts the cost. Larger ceilings require more material and labor, leading to higher expenses.
  2. Ceiling Condition: Ceilings in poor condition may require more prep work, which can include patching cracks, addressing water damage, or repairing previous mistakes. This can increase the overall cost.
  3. Skim Coating Material: The type of skim coating material you choose affects costs. Joint compound is a common choice, but some projects may require specialized products, like plaster, which can be more expensive.
  4. Labor Costs: Labor costs depend on your location and the complexity of the project. Hiring a professional ensures a high-quality finish but may be more costly.

Estimating Skim Coating Ceiling Costs

On average, the cost to skim coat a ceiling can range from $1 to $2 per square foot, with the majority of costs attributed to material and labor. Here’s a general breakdown of estimated costs:

  • Material: Joint compound or plaster typically costs $20 to $40 for a 5-gallon bucket, which covers about 500 square feet.
  • Labor: Professional labor costs can range from $1 to $2 per square foot, depending on your location and the extent of the work.
  • Equipment and Supplies: Budget an additional $20 to $50 for brushes, rollers, drop cloths, and other necessary tools.

For a small room with a standard-sized ceiling, the cost may be closer to the lower end of the range. Larger rooms or those with more extensive repairs may fall toward the higher end.

Conclusion: A Smooth and Polished Finish

Skim coating a ceiling is a valuable home improvement project that can enhance the aesthetics and value of your home. By considering the size, condition, and material for your ceiling, you can better estimate the project’s expenses. Whether you decide to hire a professional or take on the task yourself, a freshly skim-coated ceiling provides a smooth and polished finish, creating an attractive and pristine space in your home.

How Much Does It Cost To Paint A Basement Ceiling?

The basement is often an underutilized space in many homes. However, with some thoughtful renovations, it can become a valuable addition to your living area. One way to transform the look and feel of your basement is by painting the ceiling. But, how much does it cost to paint a basement ceiling? In this article, we’ll provide you with insights into the factors that influence the cost and help you estimate the expenses for this home improvement project.

how much does it cost to paint a basement ceiling

The Importance of Painting a Basement Ceiling

Before we dive into the cost considerations, it’s essential to understand the significance of painting a basement ceiling. Basements are notorious for having low ceilings and exposed pipes, ducts, and other utilities. Painting the ceiling not only enhances the aesthetics but also offers practical benefits:

  • Brightening the Space: A fresh coat of paint can make your basement look brighter and more inviting. Light colors can help reflect the limited natural light in the space.
  • Hiding Imperfections: Painting can cover up unsightly marks, stains, and imperfections on the ceiling, creating a smoother and more finished appearance.
  • Protecting Surfaces: Painting can help protect ceiling materials from moisture, reducing the risk of mold or mildew growth in damp basement environments.
  • Adding Value: A well-painted basement ceiling can add value to your home, making it more appealing to potential buyers.

Factors Affecting Basement Ceiling Painting Costs

Several factors can influence the cost of painting a basement ceiling. Here’s a breakdown of these cost considerations:

  1. Ceiling Size: The size of your basement ceiling, measured in square footage, directly affects the amount of paint and labor required. Larger ceilings will naturally cost more to paint.
  2. Ceiling Height: The height of your basement ceiling plays a role in the cost. Higher ceilings may require additional equipment, such as ladders or scaffolding, which can add to labor costs.
  3. Ceiling Condition: If the ceiling requires repairs or significant preparation work, such as removing old paint or addressing water damage, this will increase the overall cost.
  4. Paint Type: The type of paint you choose, such as standard latex paint or a specialty basement paint, can impact costs. Some basement paints are designed to resist moisture and mold, but they may be more expensive.
  5. Labor Costs: Labor costs vary depending on your location and the complexity of the project. Hiring a professional painter can be more costly but ensures a high-quality finish.

Estimating Basement Ceiling Painting Costs

On average, the cost to paint a basement ceiling can range from $300 to $600, with most costs attributed to paint and labor. Here’s a general breakdown of estimated costs:

  • Paint: $30 to $50 per gallon for a quality paint suitable for basement ceilings.
  • Primer: $20 to $30 per gallon if needed for preparation.
  • Labor: $200 to $400 or more for a professional painter’s service, depending on the scope of work.
  • Equipment and Supplies: $20 to $50 for brushes, rollers, drop cloths, and other painting supplies.

For a smaller basement with a standard ceiling, the cost may be closer to the lower end of the range. Larger basements, those requiring extensive repairs, or specialty paints may fall toward the higher end.

Conclusion: Enhancing Your Basement Space

Painting your basement ceiling is a cost-effective and transformative way to enhance your basement space. By considering the size, height, condition, and paint type for your ceiling, you can better estimate the project’s expenses. Whether you decide to hire a professional or take on the task yourself, a freshly painted basement ceiling can make a significant difference in the overall appearance and functionality of your basement, turning it into a more inviting and valuable part of your home.

How Much Does It Cost To Paint A Bathroom Ceiling?

When it comes to bathroom renovations, painting is a cost-effective and transformative way to freshen up the space. Painting the bathroom ceiling, in particular, can breathe new life into the room. However, you may wonder how much it costs to paint a bathroom ceiling. In this article, we’ll break down the factors that influence the cost and provide you with an estimate for this common home improvement project.

how much does it cost to paint a bathroom ceiling

Understanding the Bathroom Ceiling Painting Process

Before we delve into the cost considerations, let’s briefly outline the steps involved in painting a bathroom ceiling. Painting a ceiling, especially in a bathroom, requires careful preparation and attention to detail:

  1. Preparation: Clear the bathroom of any obstacles, including shower curtains, fixtures, and personal items. Cover the floor and any remaining fixtures with drop cloths or plastic sheets to protect them from paint splatter.
  2. Cleaning: Ensure the ceiling is clean and free from dust, dirt, and any mold or mildew. If necessary, clean the surface and allow it to dry completely.
  3. Priming: Apply a coat of primer to the ceiling. Primer helps the paint adhere better and provides a uniform surface for the paint to cover.
  4. Painting: Once the primer is dry, apply the paint. Using a roller or paintbrush, paint the ceiling with your chosen paint color.
  5. Drying: Allow the paint to dry completely before removing any protective coverings and reassembling the bathroom.

Factors Affecting Bathroom Ceiling Painting Costs

Several factors can influence the cost of painting a bathroom ceiling. Let’s explore these considerations:

  1. Ceiling Size: The size of your bathroom ceiling is a primary cost factor. Larger ceilings require more paint and time, which increases the cost.
  2. Ceiling Height: Higher ceilings may require special equipment, such as ladders or scaffolding, which can add to the labor costs.
  3. Paint Type: The type of paint you choose, such as standard latex paint or a special bathroom paint with mold and mildew resistance, affects the cost.
  4. Repairs: If your bathroom ceiling has damage, such as cracks or water stains, repairs are necessary before painting. Repair costs are an additional expense.
  5. Labor Costs: Labor costs depend on the complexity of the project and the rates charged by professional painters. DIY painting may save on labor costs.

Estimating Bathroom Ceiling Painting Costs

On average, the cost to paint a bathroom ceiling can range from $100 to $300, with the majority of costs going towards paint and labor. Here’s a general breakdown of estimated costs:

  • Paint: $30 to $50 for a gallon of quality bathroom paint.
  • Primer: $20 to $30 for a gallon.
  • Labor: $50 to $150 for a professional painter per hour, depending on your location and the complexity of the job.
  • Repairs: Varies based on the extent of damage but can add $50 to $200 to the cost.
  • Equipment and Supplies: $20 to $50 for brushes, rollers, drop cloths, and other painting supplies.

For a small bathroom with a standard ceiling, the cost may be closer to the lower end of the range, while larger bathrooms or those with extensive repairs may fall toward the higher end.

Conclusion: Refreshing Your Bathroom on a Budget

Paint a bathroom ceiling is a simple and cost-effective way to give your bathroom a fresh look and feel. While the cost of this project can vary, estimating the expenses based on the size of your ceiling, required repairs, and the type of paint you choose will help you budget accordingly. Whether you decide to hire a professional or tackle the project yourself, a freshly painted bathroom ceiling can make a significant difference in the overall aesthetics of your bathroom space.

How Tall Do Ceilings Need To Be For Golf Simulator?

How Tall Do Ceilings Need To Be For Golf Simulator? Golf simulators have revolutionized the way golf enthusiasts practice and enjoy their favorite sport. These advanced systems offer a realistic golfing experience, allowing players to tee off from the comfort of their own homes or indoor facilities. One critical factor to consider when setting up a golf simulator is the height of the ceilings. In this article, we’ll explore how tall your ceilings need to be for a golf simulator and why it matters.

how tall do ceilings need to be for golf simulator

The Importance of Ceiling Height for Golf Simulators

Before we dive into the specific ceiling height requirements, let’s understand why ceiling height is a crucial consideration for your golf simulator setup.

1. Swing Space:

One of the primary reasons for adequate ceiling height is providing enough clearance for your golf swing. When you take a swing with a driver or any other golf club, your arms and club extend both backward and upward. If the ceiling is too low, you risk hitting the ceiling, which not only disrupts your game but can also damage the equipment and the ceiling itself.

2. Realism and Comfort:

To enjoy a realistic golfing experience, it’s essential to have enough overhead space. A taller ceiling allows for a more authentic feel, especially when using projection screens or high-quality monitors. Additionally, it provides a comfortable and safe environment for your swing.

3. Simulated Ball Flight:

Many golf simulators are designed to calculate ball flight and simulate the trajectory of your shots. To do this accurately, the system needs sufficient space for the ball to travel and gather data. Inadequate ceiling height can limit the system’s ability to provide accurate feedback on your shots.

Ceiling Height Requirements for Golf Simulators

The ideal ceiling height for a golf simulator can vary depending on several factors, including your height, the length of your golf clubs, and your swing characteristics. However, as a general guideline, a minimum ceiling height of 9 to 10 feet (2.7 to 3 meters) is recommended. This height should accommodate most golfers comfortably and allow for a full swing with standard-sized clubs.

For taller individuals or those who want more room for their swing, a ceiling height of 12 feet (3.7 meters) or more is preferable. This height provides extra clearance, ensuring that even the tallest golfers can swing freely without any concerns about hitting the ceiling.

Measuring Your Ceiling Height

Before purchasing or setting up a golf simulator, it’s essential to measure your ceiling height accurately. Here’s how you can do it:

  1. Gather your equipment: You’ll need a tape measure, a step ladder, and a friend or family member to assist you.
  2. Find a suitable location: Choose the spot where you plan to set up your golf simulator.
  3. Position the tape measure: Place the ladder in the selected location and extend the tape measure vertically from the floor to the ceiling. Ensure it’s level.
  4. Measure the height: Have your friend or family member read the measurement at the highest point where the ceiling meets the wall.
  5. Record the measurement: Note down the height in feet or meters.

Conclusion: Creating the Ideal Golf Simulator Space

To fully enjoy the benefits of a golf simulator, including improving your game and practicing from the comfort of your own space, it’s crucial to have the right ceiling height. A minimum height of 9 to 10 feet is typically recommended, but taller ceilings, such as 12 feet or more, can provide an even better experience. Measure your ceiling height accurately before investing in a golf simulator to ensure that you have the space needed for a realistic and enjoyable golfing experience at home.