In today’s world, indoor air quality is becoming increasingly important for maintaining health and well-being. A ceiling mounted air purifier can be a game-changer, offering efficient air filtration without taking up valuable floor space. Discover how these innovative devices work, their advantages, installation considerations, and more in this comprehensive guide.
Understanding Ceiling Mounted Air Purifier Systems
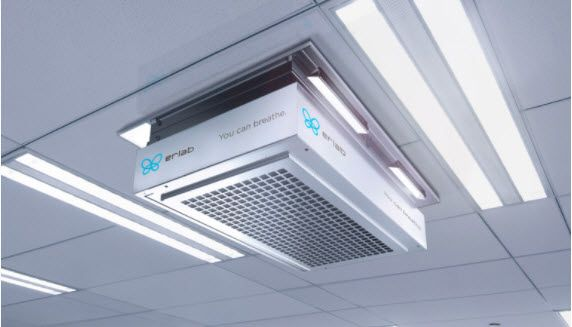
A ceiling mounted air purifier is designed to improve indoor air quality by removing airborne contaminants such as dust, pollen, pet dander, mold spores, and volatile organic compounds (VOCs). These purifiers typically use advanced filtration technologies to capture particles and neutralize odors, ensuring cleaner and fresher air in your living spaces.
How Does a Ceiling Mounted Air Purifier Work?
Ceiling mounted air purifiers operate by drawing in air from the room through filters that trap particles and pollutants. The purified air is then circulated back into the room, creating a continuous cycle of clean air. Some models may also include additional features like ionization or UV-C light to further enhance air purification effectiveness.
Benefits of Installing a Ceiling Mounted Air Purifier
Space-Saving Design: Ideal for rooms where floor space is limited, such as apartments, offices, or small bedrooms.
Efficient Air Filtration: Removes allergens, pollutants, and odors, improving overall indoor air quality.
Quiet Operation: Many models are designed to operate silently, making them suitable for use in bedrooms or offices.
Aesthetic Appeal: Integrates seamlessly into the ceiling, maintaining the room’s aesthetic without compromising on functionality.
Installation Considerations for Ceiling Mounted Air Purifiers
Installing a ceiling mounted air purifier requires careful consideration of several factors:
Ceiling Height: Ensure there is adequate clearance between the ceiling and the purifier to allow proper airflow and maintenance access.
Electrical Requirements: Verify the electrical specifications of the purifier and ensure compatibility with your home’s wiring.
Maintenance Access: Plan for easy access to the purifier for filter replacements and cleaning.
When selecting a ceiling mounted air purifier, consider the following factors:
Air Purification Technology: Look for purifiers with HEPA filters, activated carbon filters, or other advanced filtration technologies.
Room Size: Choose a purifier that is suitable for the size of the room where it will be installed.
Noise Level: Check the purifier’s noise rating to ensure it meets your preferences for quiet operation.
Additional Features: Consider features like remote control operation, air quality sensors, and programmable timers for added convenience.
Maintenance Tips for Ceiling Mounted Air Purifiers
To ensure optimal performance and longevity of your ceiling mounted air purifier, follow these maintenance tips:
Regular Filter Replacement: Replace filters as recommended by the manufacturer to maintain air purification efficiency.
Clean Exterior Surfaces: Wipe down the exterior of the purifier regularly to remove dust and maintain its appearance.
Check Airflow: Periodically check airflow vents to ensure they are clear of obstructions.
Professional Servicing: Schedule professional servicing annually to inspect internal components and ensure optimal operation.
Environmental and Health Benefits of Air Purification
Improving indoor air quality through the use of a ceilings mounted air purifier can have significant environmental and health benefits:
Reduced Allergens: Minimizes exposure to allergens such as pollen and pet dander, providing relief for allergy sufferers.
Better Respiratory Health: Cleaner air reduces the risk of respiratory issues and improves overall lung function.
Odor Control: Eliminates odors from cooking, pets, or smoking, creating a more pleasant indoor environment.
Conclusion
Investing in a ceilings mounted air purifier is a smart choice for anyone looking to enhance their indoor environment. By effectively removing airborne contaminants and improving air quality, these purifiers contribute to a healthier and more comfortable living space. Whether you’re concerned about allergies, odors, or simply want to breathe cleaner air, a ceilings mounted air purifier offers a practical and efficient solution.
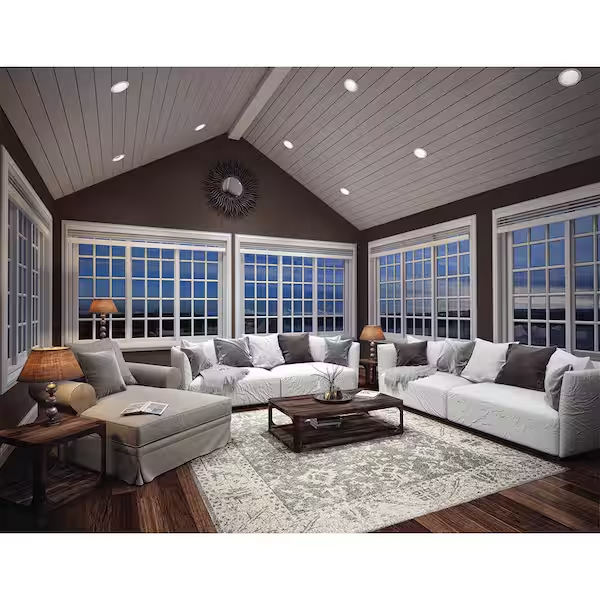
Lighting plays a crucial role in setting the mood and enhancing the aesthetic appeal of any space. When it comes to rooms with sloped ceilings, installing the right type of lighting can be challenging yet rewarding. One popular and effective solution is recessed lighting. This comprehensive guide will walk you through everything you need to know about recessed lighting for sloped ceiling, from benefits and installation tips to design ideas and troubleshooting common issues.
Why Choose Recessed Lighting for Sloped Ceilings?
Recessed lighting, also known as can lights or pot lights, is an excellent choice for sloped ceiling for several reasons:
Sleek and Modern Look: Recessed lights blend seamlessly with the ceiling, providing a clean and modern appearance.
Space-Saving: Unlike hanging fixtures, recessed lights do not take up visual space, making the room feel larger and less cluttered.
Versatility: They are suitable for various ceiling heights and slopes, providing even illumination throughout the space.
Customizable Lighting: With adjustable trims, recessed lights can be directed to highlight specific areas or features in the room.
Understanding Recessed Lighting Components
Before diving into the installation process, it’s essential to understand the components that make up a recessed lighting system:
Housing: The housing is the main component that is installed into the ceiling. It can be either new construction or remodel housing, depending on whether you are installing it in a new ceiling or an existing one.
Trim: The trim is the visible part of the recessed light. It comes in various styles and finishes, including adjustable trims specifically designed for sloped ceilings.
Bulb: The bulb type can vary, with LED being the most energy-efficient and long-lasting option.
IC Rating: If your recessed lights will be in contact with insulation, choose IC-rated housings to prevent overheating.
Installation Tips for Recessed Lighting on Sloped Ceilings
Planning and Layout
Determine the Purpose: Decide if the lighting is for general illumination, task lighting, or accent lighting. This will help you determine the placement and number of lights needed.
Measure and Mark: Measure the ceiling height and slope angle to ensure you choose the correct adjustable trims. Mark the spots where the lights will be installed, ensuring even spacing and alignment.
Selecting the Right Housing and Trim
Choose Adjustable Housings: For sloped ceilings, use adjustable housing that can accommodate the angle of the slope. This ensures that the light beam is directed properly.
Opt for Sloped Ceiling Trims: These trims are specifically designed to direct light downward on sloped ceilings, providing optimal illumination.
Installation Process
Cut the Openings: Use a template to cut the openings in the ceiling at the marked spots. Ensure the holes are the correct size for the housing.
Install the Housing: Insert the housing into the openings and secure it according to the manufacturer’s instructions. Make sure the housing is properly aligned with the slope of the ceiling.
Wiring: Connect the wiring according to local electrical codes and the manufacturer’s guidelines. If you’re not comfortable with electrical work, consider hiring a licensed electrician.
Attach the Trim and Bulb: Once the housing is installed and wired, attach the trim and insert the bulb. Adjust the trim as needed to ensure the light is directed properly.
Design Ideas for Recessed Lighting on Sloped Ceilings
General Illumination
For a bright and evenly lit room, install recessed lights in a grid pattern across the ceiling. This is ideal for living rooms, kitchens, and other areas where overall illumination is needed.
Task Lighting
In areas like kitchens or home offices, position recessed lights above work areas such as countertops, desks, or islands. Adjustable trims can direct light exactly where it’s needed, reducing shadows and providing clear, focused light.
Accent Lighting
Highlight architectural features, artwork, or decorative elements by installing recessed lights with adjustable trims. Aim the lights at the features you want to emphasize, creating a dramatic and visually appealing effect.
Layered Lighting
Combine recessed lighting with other types of lighting, such as pendant lights or wall sconces, to create a layered lighting scheme. This adds depth and dimension to the room, making it more functional and aesthetically pleasing.
Troubleshooting Common Issues with Recessed Lighting on Sloped Ceilings
Uneven Lighting
If your recessed lights are casting uneven light, check the alignment of the adjustable trims. Ensure they are correctly positioned to direct light downward.
Glare
To reduce glare, use recessed lights with frosted lenses or diffusers. These soften the light and prevent harsh reflections, especially on glossy surfaces.
Insufficient Lighting
If the room feels too dim, you may need to add more recessed lights or use higher-lumen bulbs. Consider the size and purpose of the room when determining the number of lights needed.
Overheating
Ensure you are using IC-rated housings if the lights are in contact with insulation. Overheating can also be caused by using bulbs with higher wattage than recommended for the housing.
Benefits of LED Recessed Lighting for Sloped Ceilings
Energy Efficiency: LED bulbs use significantly less energy compared to traditional incandescent or halogen bulbs, reducing your energy bills.
Long Lifespan: LEDs have a much longer lifespan, often lasting 25,000 hours or more, which means fewer replacements and lower maintenance costs.
Low Heat Emission: LED bulbs emit very little heat, reducing the risk of overheating and making them safer for use in enclosed spaces.
Instant Brightness: LEDs turn on instantly at full brightness, providing immediate illumination without any warm-up time.
Conclusion
Recessed lighting on sloped ceiling offers a sleek, modern, and functional lighting solution for various spaces in your home. By understanding the components, planning the layout, and following proper installation techniques, you can achieve beautiful and effective lighting. Whether you are looking to enhance general illumination, provide task lighting, or create accent lighting, recessed lights are versatile and efficient. With the added benefits of LED technology, your recessed lighting system will be energy-efficient and long-lasting. Invest in quality materials and professional installation to ensure the best results for your sloped ceiling lighting project.
High ceilings offer architectural grandeur and spaciousness to a room, but choosing the right Light Fixtures For High Ceilings can be a challenge. Explore the best options and considerations to illuminate your lofty spaces effectively.
Understanding Light Fixtures For High Ceilings
Light Fixtures For High Ceilings are specially designed to provide adequate illumination while complementing the room’s vertical space. These fixtures vary in size, style, and functionality to suit different aesthetic preferences and lighting needs.
Selecting the right Light Fixtures For High Ceilings is essential to optimizing both aesthetics and functionality in your space. Whether you’re aiming for dramatic impact or subtle elegance, these fixtures provide versatile solutions to illuminate and enhance your room’s ambiance.
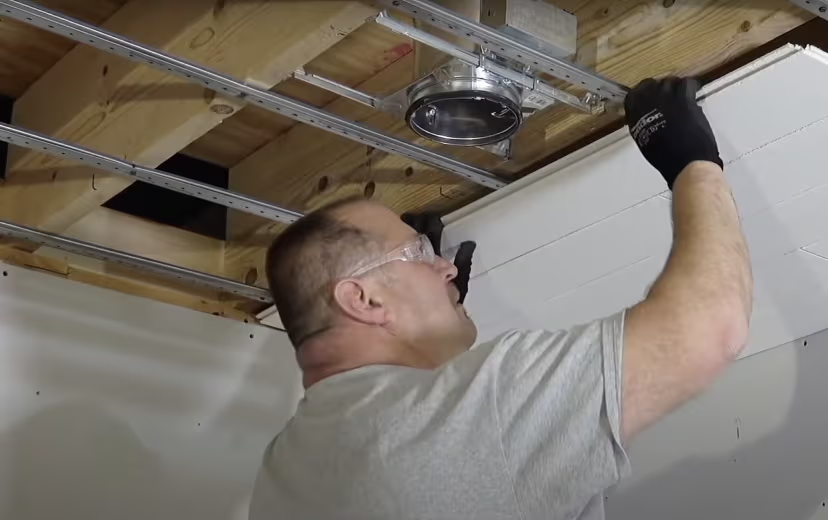
Insulated drop ceiling tiles are not just about aesthetics—they offer practical benefits that can transform the comfort and energy efficiency of any room. Learn everything you need to know about Insulated Drop Ceiling Tiles and how they can be a smart investment for your home or commercial space.
Understanding Insulated Drop Ceiling Tiles
Insulated Drop Ceiling Tiles are specially designed to provide thermal insulation and soundproofing in addition to their decorative function. They are typically made from materials like fiberglass, mineral wool, or foam, and are installed in suspended ceiling systems.
Benefits of Insulated Drop Ceiling Tiles
Explore the advantages these tiles bring to your space:
Thermal Insulation: Reduce heat loss in winter and heat gain in summer, improving energy efficiency.
Sound Absorption: Minimize noise transfer between rooms or floors, creating a quieter environment.
Aesthetic Appeal: Enhance the look of your space with a variety of styles, textures, and colors available.
Types of Insulated Drop Ceiling Tiles
Different materials offer varying levels of insulation and acoustic performance:
Fiberglass Tiles: Lightweight and cost-effective with good thermal and acoustic properties.
Mineral Wool Tiles: Excellent sound absorption capabilities and fire resistance.
Foam Tiles: Easy to install, offering moderate insulation and customization options.
Consider these factors when selecting tiles for your space:
R-Value: Opt for tiles with a higher R-value for better insulation performance.
Acoustic Rating: Choose tiles with higher NRC (Noise Reduction Coefficient) ratings for improved soundproofing.
Design and Style: Match tiles to your existing decor or architectural style to enhance visual appeal.
Installation Process and Considerations
Ensure proper installation for maximum benefits:
Ceiling Height: Measure ceiling height accurately to determine tile dimensions and suspension requirements.
Grid System: Select compatible suspension grids that support the weight and size of your chosen tiles.
Professional Installation: Hire experienced installers for precise fitting and alignment of tiles.
Maintenance and Upkeep
Keep your ceiling tiles in optimal condition:
Regular Cleaning: Dust tiles regularly to maintain their appearance and prevent buildup of dirt or allergens.
Inspection: Check for signs of damage or sagging, and replace damaged tiles promptly.
Repairs: Address any issues with the ceiling grid or support system to prevent further damage to tiles.
Applications of Insulated Drop Ceiling Tile
Utilize these tiles in various settings:
Residential Spaces: Bedrooms, living rooms, and basements benefit from improved comfort and noise reduction.
Commercial Buildings: Offices, conference rooms, and retail spaces create a more pleasant environment for occupants.
Educational Facilities: Classrooms and libraries enhance learning environments with reduced noise distractions.
Cost Considerations and Return on Investment
Evaluate the cost-effectiveness of insulated drop ceiling tile:
Initial Investment: Compare prices based on material, size, and performance characteristics.
Energy Savings: Calculate potential savings on heating and cooling costs due to improved insulation.
Long-Term Benefits: Consider the durability and maintenance requirements of different tile materials.
Conclusion
Investing in Insulated Drop Ceiling Tile offers multiple benefits beyond aesthetics, including enhanced comfort, energy efficiency, and noise reduction. Whether you’re upgrading a residential or commercial space, these tiles provide a practical solution to improve the overall environment.
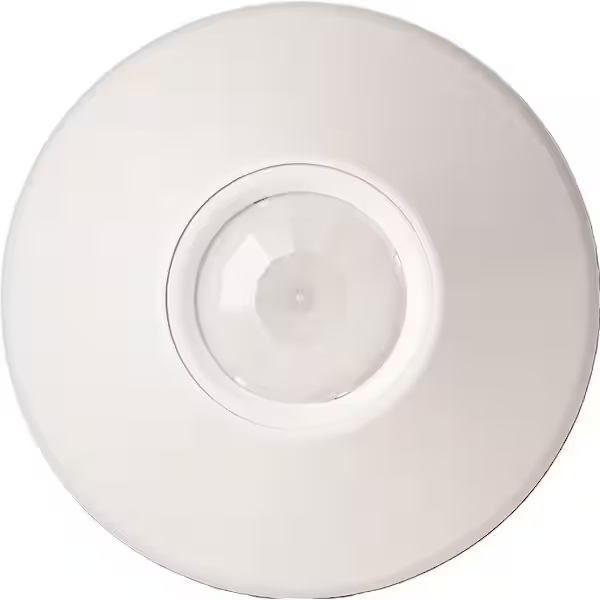
Ceiling mount motion sensor are revolutionizing home automation and security systems, providing a seamless way to detect movement and trigger various actions. Discover how these devices work, their benefits, and why they’re a valuable addition to any modern home.
Understanding Ceiling Mount Motion Sensor Technology
A Ceiling Mount Motion Sensor operates using passive infrared (PIR) technology or microwave sensors to detect motion within a specified range. These sensors are typically installed on ceilings to cover a wide area, making them ideal for both residential and commercial applications.
Benefits of Installing Ceiling Mount Motion Sensors
Explore the advantages of integrating Ceiling Mount Motion Sensors into your home:
Enhanced Security: Detect intruders or unauthorized movements in key areas of your home.
Energy Efficiency: Automatically control lighting or HVAC systems based on occupancy, reducing energy waste.
Convenience: Trigger lights or appliances to turn on/off as you enter or leave a room, enhancing convenience.
Passive Infrared (PIR) Sensors: Detect heat emitted by humans or animals, ideal for indoor applications.
Microwave Sensors: Emit microwave pulses to detect motion, suitable for outdoor or high-security areas.
Dual Technology Sensors: Combine PIR and microwave sensors for enhanced accuracy and reliability.
Applications of Ceiling Mount Motion Sensors
Utilize these sensors in diverse scenarios:
Home Security Systems: Integrate with alarm systems to alert homeowners of suspicious activity.
Smart Lighting Systems: Automate lighting control to enhance safety and energy efficiency.
Commercial Buildings: Monitor occupancy in offices, restrooms, or corridors for efficient space management.
Factors to Consider When Choosing Ceiling Mount Motion Sensors
Key considerations for selecting the right sensor:
Coverage Area: Determine the range and angle of detection required based on room size and layout.
Adjustability: Opt for sensors with adjustable sensitivity and time delay settings for customized functionality.
Power Source: Choose between hardwired sensors for continuous power or battery-operated options for flexibility.
Installation and Placement Tips
Ensure optimal performance with proper installation:
Height and Angle: Mount sensors at recommended heights and angles to maximize coverage and accuracy.
Avoid Obstructions: Install away from air vents, HVAC equipment, or direct sunlight to prevent false alarms.
Testing: Conduct thorough testing post-installation to fine-tune settings and ensure functionality.
Maintenance and Troubleshooting
Maintain sensor performance with regular upkeep:
Cleaning: Remove dust or debris from sensor lenses to maintain sensitivity and accuracy.
Battery Replacement: Replace batteries in wireless sensors as recommended by the manufacturer.
System Checks: Periodically test sensor functionality and connectivity to the main control panel.
Conclusion
Investing in a Ceiling Mount Motion Sensor enhances your home’s security, energy efficiency, and convenience. Whether you’re looking to upgrade your existing security system or automate lighting control, these sensors offer versatile solutions for modern living.
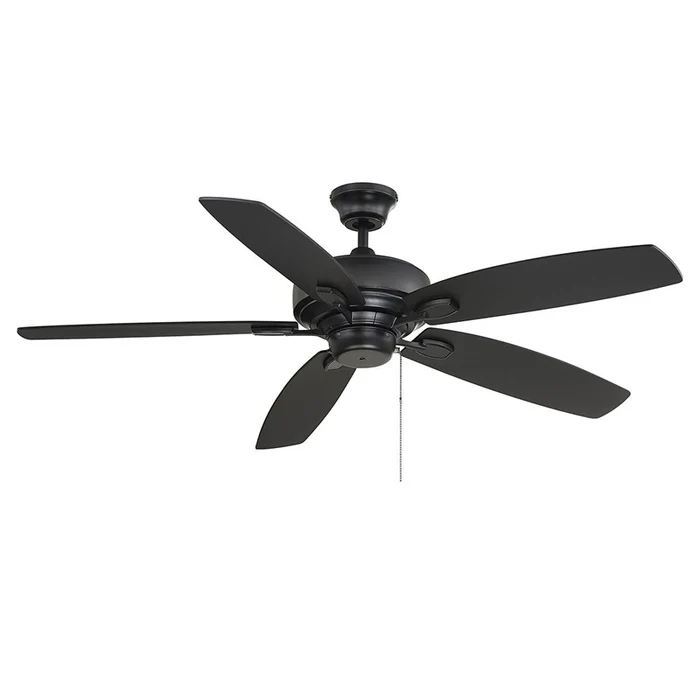
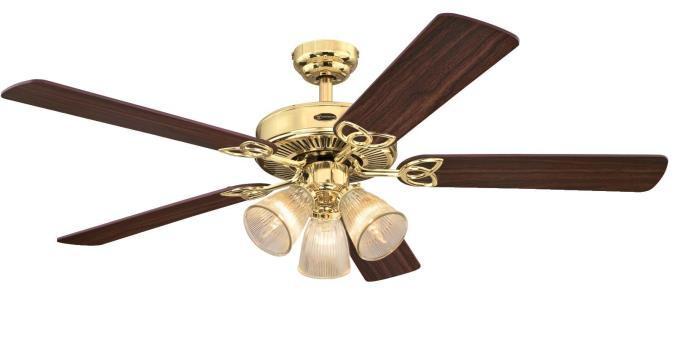
Savoy House ceiling fan are renowned for their elegant designs and superior functionality. Discover why these fans are a popular choice for homeowners looking to upgrade their living spaces with a touch of sophistication.
Choosing the Right Savoy House Ceiling Fan for Your Home
When selecting a Savoy House Ceiling Fan, consider these factors:
Design Variety: From classic to contemporary styles, Savoy House offers a wide range of fan designs to complement any decor.
Size and Room Compatibility: Choose a fan size suitable for your room’s dimensions to ensure optimal airflow and efficiency.
Motor Quality: Savoy House fans are equipped with high-quality motors for quiet operation and long-lasting performance.
Explore advanced features that set Savoy House fans apart:
Remote Control Accessibility: Conveniently adjust fan speed and settings from anywhere in the room.
Lighting Integration: Many models offer integrated light kits to provide both illumination and air circulation.
Reversible Blades: Optimize fan functionality with reversible blades that offer seasonal versatility.
Installation and Maintenance Tips
Ensure proper installation and upkeep for optimal performance:
Professional Installation: Hire a qualified electrician to safely install your Savoy House ceiling fan.
Regular Cleaning: Dust fan blades and motor housing to maintain efficiency and prolong lifespan.
Check for Balance: Periodically check and balance fan blades to prevent wobbling and noise issues.
Popular Savoy House Ceiling Fans Models
Explore some of the top-rated Savoy House fans loved by homeowners:
The Wind Star: A classic design featuring elegant blades and a powerful motor for efficient airflow.
The Builder Series: Affordable yet stylish options designed to fit various room sizes and decor styles.
The Monarch: Sleek and modern, perfect for contemporary interiors with advanced features like remote control and LED lighting.
Conclusion
Investing in a Savoy House Ceiling Fans not only enhances your home’s comfort but also adds a touch of sophistication to your living spaces. Whether you’re looking for a functional solution for better air circulation or a decorative element to complement your interior design, Savoy House offers a variety of fan options to meet your needs.
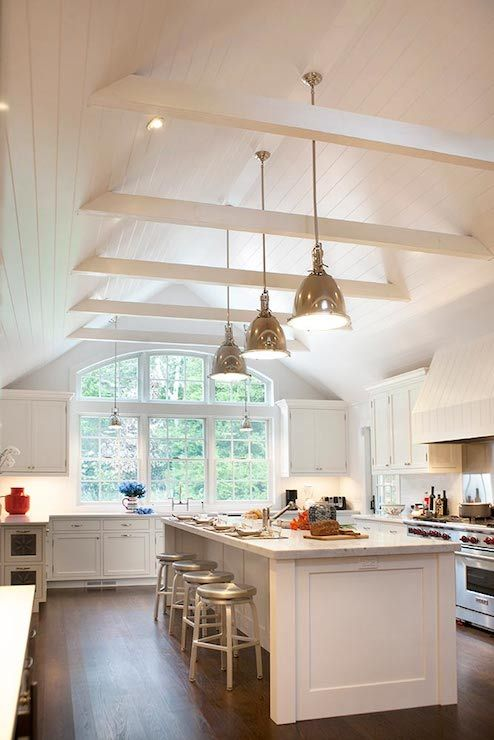
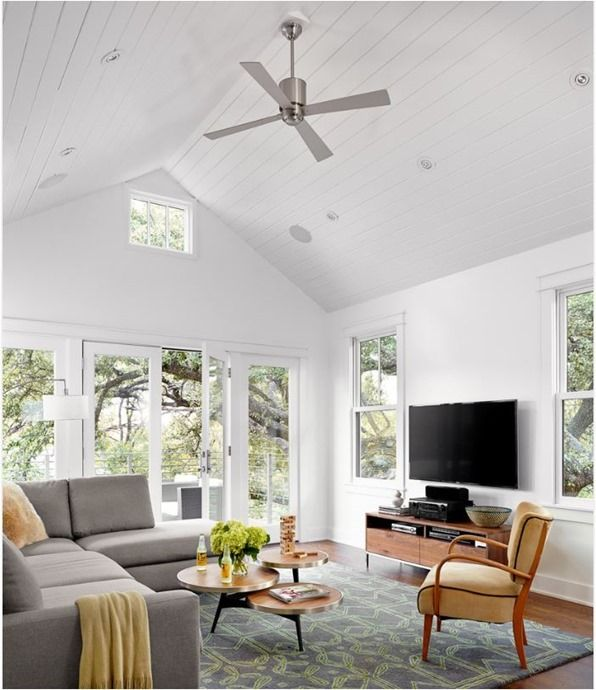
Lighting plays a crucial role in any kitchen, especially one with a vaulted ceiling. Discover how to effectively illuminate your space with Lighting For Kitchen With Vaulted Ceiling to create a functional and inviting environment.
Understanding the Importance of Lighting For Kitchen With Vaulted Ceiling
In kitchens with vaulted ceilings, proper lighting is essential for several reasons:
Enhanced Visibility: Evenly distributed light reduces shadows and enhances visibility while cooking or preparing meals.
Ambiance: Lighting sets the mood and ambiance of the kitchen, making it a comfortable space for daily activities.
Types of Lighting Fixtures Suitable for Kitchens With Vaulted Ceiling
Explore various lighting options that complement vaulted ceilings:
Pendant Lights: Hang at different heights to highlight the ceiling’s height and provide focused task lighting over kitchen islands or dining areas.
Recessed Lighting: Install in rows along the ceiling to evenly distribute light without obstructing the ceiling’s visual appeal.
Track Lighting: Adjustable fixtures can be directed towards different areas of the kitchen for flexibility in lighting up workspaces or decorative elements.
Chandeliers: Add elegance and style while providing ambient lighting suitable for larger kitchens with vaulted ceilings.
Considerations When Choosing Lighting For Kitchen With Vaulted Ceiling
Factors to keep in mind for optimal lighting solutions:
Ceiling Height: Vaulted ceilings vary in slope and height, influencing the placement and type of lighting fixtures.
Functionality: Determine the kitchen areas that require task lighting versus ambient or accent lighting.
Energy Efficiency: Opt for LED or energy-efficient fixtures to reduce electricity consumption and long-term maintenance costs.
Design Tips for Lighting a Kitchen With Vaulted Ceiling
Achieve balance and functionality with these design strategies:
Layered Lighting: Combine overhead, task, and accent lighting to create a cohesive and versatile lighting scheme.
Highlight Architectural Details: Use lighting to draw attention to exposed beams, arches, or other unique features of vaulted ceilings.
Scale and Proportion: Ensure lighting fixtures complement the scale of the kitchen and ceiling height without overwhelming the space.
Installation and Placement Guidelines
Ensure proper installation for optimal performance:
Professional Consultation: Seek advice from lighting experts or interior designers familiar with vaulted ceiling configurations.
Even Distribution: Place fixtures strategically to avoid glare and shadows while maximizing light coverage.
Safety and Regulations: Adhere to electrical codes and safety guidelines when installing lighting fixtures in kitchens.
Maintenance and Upkeep
Maintaining your kitchen lighting ensures longevity and efficiency:
Regular Cleaning: Dust fixtures and bulbs to maintain brightness and prevent buildup that can diminish light output.
Replace Bulbs: Replace bulbs promptly to maintain consistent lighting levels and prevent flickering or dimming.
Fixture Inspection: Periodically check wiring and connections to ensure safety and functionality.
Conclusion
Choosing the right Lighting For Kitchen With Vaulted Ceiling transforms your kitchen into a functional and visually appealing space. By understanding the various types of lighting fixtures, design considerations, and installation guidelines, you can create a kitchen that meets both aesthetic and practical needs.
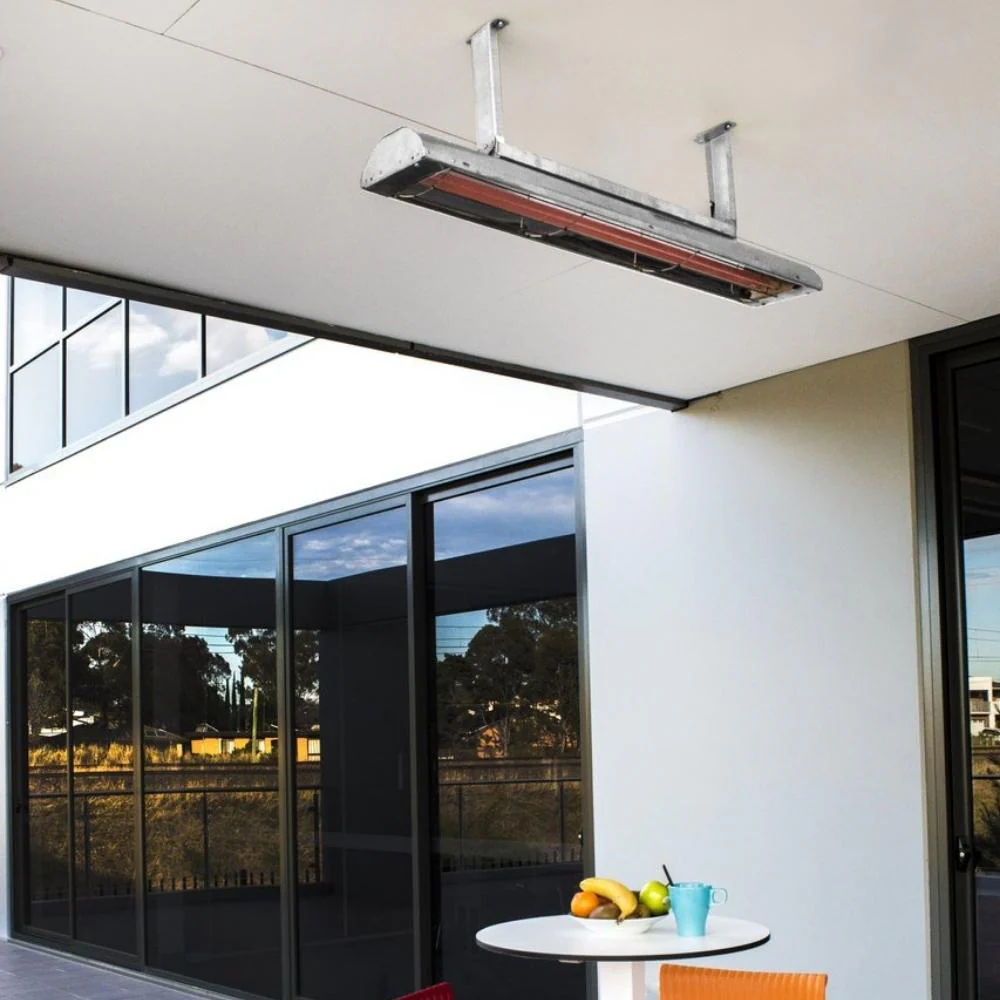
A ceiling mounted electric heater is a versatile and efficient solution for providing warmth in a variety of spaces. From residential homes to commercial settings, these heaters offer numerous advantages that make them a popular choice for heating needs. In this comprehensive guide, we will explore the benefits, types, installation tips, and maintenance of ceiling mounted electric heaters. Whether you are looking to upgrade your current heating system or install a new one, this article will provide you with all the information you need.
Why Choose a Ceiling Mounted Electric Heater?
Ceiling mounted electric heaters offer several unique benefits that make them a desirable option for heating. Here are some of the key advantages:
Efficient Use of Space
One of the primary benefits of a ceiling mounted electric heater is its efficient use of space. By being installed on the ceiling, these heaters free up valuable floor and wall space, making them ideal for rooms with limited space. This is especially useful in garages, workshops, and commercial settings where space is often at a premium.
Even Heat Distribution
Ceiling mounted electric heaters provide even heat distribution throughout the room. Since heat rises, placing the heater on the ceiling allows it to evenly disperse warmth across the entire space. This can help eliminate cold spots and ensure consistent comfort.
Safety is a significant consideration when it comes to heating solutions. Ceiling mounted electric heaters are generally considered safer than floor or wall-mounted options because they are out of reach and less likely to come into contact with flammable materials or be accidentally knocked over.
Versatility
Ceiling mounted electric heaters are highly versatile and can be used in a wide range of settings. They are suitable for residential spaces such as living rooms, bedrooms, and bathrooms, as well as commercial and industrial environments like warehouses, workshops, and retail stores.
Energy Efficiency
Modern ceiling mounted electric heaters are designed to be energy-efficient, converting most of the electricity they use into heat. Many models come with thermostats and timers, allowing you to control the temperature and reduce energy consumption.
Types of Ceiling Mounted Electric Heaters
There are several types of ceiling mounted electric heaters, each with its own features and benefits. Understanding the different options can help you choose the best heater for your needs.
Infrared Heaters
Infrared ceiling mounted electric heaters use infrared radiation to heat objects and people directly, rather than heating the air. This type of heater is highly efficient and provides instant warmth. It is ideal for spaces where quick, direct heat is needed, such as garages and outdoor areas.
Convection Heaters
Convection ceiling mounted electric heaters work by heating the air and allowing it to circulate naturally throughout the room. These heaters are quiet and provide even, consistent heat. They are well-suited for residential spaces and offices where a comfortable, ambient temperature is desired.
Fan-Forced Heaters
Fan-forced ceiling mounted electric heaters use a fan to blow air over a heating element, quickly distributing warm air throughout the space. This type of heater is effective for heating larger areas and can provide rapid warmth. It is ideal for workshops, warehouses, and commercial spaces.
Radiant Heaters
Radiant ceiling mounted electric heaters combine the benefits of infrared and convection heating. They emit infrared radiation to directly heat objects and people, while also providing some convection heat to warm the air. These heaters are versatile and can be used in both residential and commercial settings.
Installation Tips for Ceiling Mounted Electric Heaters
Proper installation is crucial for ensuring the optimal performance and safety of your ceiling mounted electric heater. Here are some tips to help you achieve a successful installation:
Choose the Right Location
Select an appropriate location for your ceiling mounted electric heater, considering factors such as ceiling height, room size, and the placement of furniture and fixtures. Ensure that the heater is positioned to provide even heat distribution and is clear of any obstructions.
Follow Manufacturer Instructions
Always follow the manufacturer’s instructions and guidelines for installation. This includes using the recommended mounting hardware, electrical connections, and clearance requirements. Adhering to the manufacturer’s instructions will help ensure a safe and effective installation.
Secure Mounting
Ensure that the heater is securely mounted to the ceiling. Use appropriate anchors and screws that can support the weight of the heater. A securely mounted heater will prevent accidents and ensure stable operation.
Electrical Considerations
Make sure that the electrical supply to the heater is adequate and meets the manufacturer’s specifications. If you are not comfortable working with electrical wiring, it is advisable to hire a licensed electrician to handle the installation. Proper electrical connections are essential for the safe and efficient operation of the heater.
Test the Heater
After installation, test the heater to ensure it is functioning correctly. Check for any unusual noises, vibrations, or signs of overheating. Testing the heater can help identify and resolve any issues before they become significant problems.
Maintenance of Ceiling Mounted Electric Heaters
Regular maintenance is essential for ensuring the longevity and performance of your ceiling mounted electric heater. Here are some maintenance tips to keep your heater in top condition:
Regular Cleaning
Dust and debris can accumulate on the heater’s surfaces and components, affecting its efficiency and performance. Regularly clean the heater with a soft cloth and a mild detergent. Avoid using abrasive cleaners or solvents that can damage the finish or components.
Inspect for Damage
Periodically inspect the heater for any signs of damage, such as cracks, corrosion, or loose connections. Address any issues promptly to prevent further damage and ensure the heater continues to function properly.
Check Electrical Connections
Ensure that all electrical connections are secure and free from corrosion. If you notice any loose or corroded connections, turn off the power and repair or replace the affected components. Proper electrical maintenance can help prevent potential safety hazards.
Replace Worn-Out Components
Over time, components such as heating elements and fans may wear out and require replacement. Monitor the performance of your heater and replace any worn-out components as needed. Using high-quality replacement parts can ensure consistent and reliable operation.
Test the Heater
Regularly test the heater to ensure it is functioning correctly. Check for any unusual noises, vibrations, or signs of overheating. Testing the heater can help identify and resolve any issues before they become significant problems.
Design Ideas with Ceiling Mounted Electric Heaters
Ceiling mounted electric heaters can enhance the comfort and functionality of various spaces. Here are some design ideas to inspire you:
Modern Living Room Heating
Install a sleek, modern ceiling mounted electric heater in your living room to provide efficient and stylish warmth. Choose a heater that complements your decor and adds a contemporary touch to the space. Combine it with other heating solutions, such as a fireplace or underfloor heating, for optimal comfort.
Efficient Garage Heating
Ceiling mounted electric heaters are ideal for garages and workshops, where space is often limited. Install a powerful heater that can quickly warm up the area and provide consistent heat during your projects. Ensure the heater is positioned to cover the entire space and avoid cold spots.
Cozy Bedroom Ambiance
Create a cozy and inviting ambiance in your bedroom with a ceiling mounted electric heater. Choose a heater with a quiet operation to ensure a peaceful environment. Use a thermostat to maintain a comfortable temperature and enhance your overall comfort.
Functional Home Office
Ensure your home office is well-lit and conducive to productivity with a ceiling mounted electric heater. Use a heater that provides even heat distribution and maintains a comfortable temperature. Combine it with other heating solutions, such as a desk heater, for optimal comfort.
Commercial Space Heating
Ceiling mounted electric heaters are perfect for commercial spaces, such as retail stores, restaurants, and offices. Install heaters that provide efficient and even heat distribution to ensure a comfortable environment for customers and employees. Use multiple heaters to cover larger areas and maintain consistent warmth.
Conclusion
Ceiling mounted electric heaters are an excellent choice for enhancing the comfort, safety, and aesthetics of your home or commercial space. Their efficient use of space, even heat distribution, and versatile design make them suitable for a wide range of applications. By understanding the different types of ceiling mounted electric heaters, following proper installation procedures, and maintaining the heaters, you can create a warm and inviting environment that you can enjoy for years to come.
When it comes to home lighting, the right fixtures can make all the difference in creating a welcoming and stylish environment. Among the many options available, the brushed nickel ceiling light stands out for its sleek design, versatility, and timeless appeal. This comprehensive guide will delve into everything you need to know about brushed nickel ceiling lights, including their benefits, types, installation tips, and design ideas. Whether you’re renovating your home or simply looking to update your lighting, this guide will help you make an informed decision.
Why Choose a Brushed Nickel Ceiling Light?
Brushed nickel ceiling lights offer several advantages that make them a popular choice for homeowners and designers alike. Here are some key benefits:
Modern and Timeless Aesthetic
Brushed nickel has a subtle, matte finish that gives it a sophisticated, modern look while maintaining a timeless appeal. It blends seamlessly with various decor styles, from contemporary to traditional, making it a versatile choice for any room in your home.
Durability
Brushed nickel is known for its durability and resistance to corrosion, tarnish, and fingerprints. This makes it an ideal material for ceiling lights, as it can withstand the test of time and maintain its appearance with minimal maintenance.
Versatility
Brushed nickel ceiling lights come in a wide range of styles, sizes, and designs, allowing you to find the perfect fixture for any room. Whether you’re looking for a statement piece for your living room or a subtle fixture for your hallway, there’s a brushed nickel ceiling light to suit your needs.
Easy to Clean
The brushed finish of nickel makes it easy to clean and maintain. Unlike polished metals, brushed nickel doesn’t show fingerprints or smudges as easily, ensuring your ceiling light looks pristine with minimal effort.
Complements Other Fixtures
Brushed nickel is a popular finish for other home fixtures, such as faucets, cabinet hardware, and door handles. Choosing a brushed nickel ceiling light can create a cohesive look throughout your home by matching or complementing these other fixtures.
Types of Brushed Nickel Ceiling Lights
There are several types of brushed nickel ceiling lights to choose from, each offering unique features and benefits. Understanding the different options can help you select the best lights for your specific needs.
Flush Mount Ceiling Lights
Flush mount ceiling lights are installed directly against the ceiling, providing a sleek and unobtrusive look. They are ideal for rooms with low ceilings or where a minimalist design is desired. Brushed nickel flush mount lights offer a clean and modern appearance while delivering ample illumination.
Semi-Flush Mount Ceiling Lights
Semi-flush mount ceiling lights hang slightly below the ceiling, creating a more decorative and eye-catching effect. They are suitable for spaces with higher ceilings and can add a touch of elegance to your home. These lights strike a balance between form and function, offering both style and illumination.
Chandeliers
Brushed nickel chandeliers are a statement piece that can elevate the aesthetic of any room. They come in various styles, from modern geometric designs to traditional candle-like fixtures. Chandeliers are perfect for adding a touch of luxury and sophistication to dining rooms, living rooms, or entryways.
Pendant lights hang down from the ceiling on a rod or chain, making a bold design statement. They are ideal for adding a decorative touch to areas such as kitchen islands, dining tables, or foyers. Brushed nickel pendant lights come in a variety of styles, from contemporary to vintage, allowing you to personalize your decor.
Recessed Lights
Recessed lights, also known as downlights, are installed within the ceiling, providing a streamlined and discreet lighting solution. They are perfect for creating a clean, uncluttered look and are often used to highlight specific areas or features. Brushed nickel recessed lights are versatile and can be arranged in various configurations to achieve the desired lighting effect.
Track Lighting
Track lighting consists of a series of adjustable light heads mounted on a track system. This type of lighting is ideal for highlighting artwork, architectural features, or workspaces. Brushed nickel track lighting adds a contemporary touch and allows for flexibility in directing light where it’s needed most.
Installation Tips for Brushed Nickel Ceiling Lights
Proper installation is crucial for ensuring the optimal performance and longevity of your brushed nickel ceiling lights. Here are some tips to help you achieve a successful installation:
Plan Your Lighting Layout
Before starting the installation, plan your lighting layout to ensure even and effective illumination. Consider the size and shape of the room, as well as any specific areas or features you want to highlight. A well-thought-out lighting plan can enhance the functionality and aesthetics of your space.
Choose the Right Location
Select appropriate locations for your brushed nickel ceiling lights, keeping in mind factors such as ceiling height, proximity to electrical sources, and the room’s purpose. Ensure that the chosen locations provide adequate coverage and complement the overall design of your space.
Follow Electrical Safety Guidelines
Always follow electrical safety guidelines when installing ceiling lights. Turn off the power at the circuit breaker before starting the installation and use proper wiring techniques. If you are not comfortable working with electrical systems, consider hiring a licensed electrician to ensure a safe and professional installation.
Use Proper Mounting Hardware
Ensure that you use the proper mounting hardware for your brushed nickel ceiling lights. This includes appropriate screws, anchors, and mounting brackets that can support the weight of the fixture. Using the right hardware will ensure a secure and stable installation.
Test the Lights
After installing the brushed nickel ceiling lights, test them to ensure they are functioning correctly. Check for any flickering, uneven lighting, or other issues that may need to be addressed. Proper testing can help identify and resolve any problems before they become major concerns.
Design Ideas with Brushed Nickel Ceiling Lights
Brushed nickel ceiling lights can enhance the beauty and functionality of your home in various ways. Here are some design ideas to inspire you:
Modern Living Room Lighting
Install a brushed nickel chandelier or semi-flush mount light in your living room to create a focal point and add a touch of elegance. Pair it with recessed lights for ambient lighting and adjustable track lights to highlight artwork or architectural features.
Kitchen Illumination
Use brushed nickel pendant lights above your kitchen island or dining table to provide task lighting and enhance the overall aesthetic. Combine them with recessed lights for general illumination and under-cabinet lighting for a well-lit and functional kitchen space.
Elegant Dining Room
A brushed nickel chandelier can make a stunning centerpiece in your dining room. Choose a design that complements your dining table and other decor elements. Add wall sconces or recessed lights to create layers of lighting and set the perfect mood for dining.
Cozy Bedroom Ambiance
Create a cozy and inviting ambiance in your bedroom with a brushed nickel ceiling light. Opt for a semi-flush mount light or a chandelier for a touch of sophistication. Use dimmable bulbs to adjust the lighting levels according to your preferences and activities.
Welcoming Entryway
Make a lasting first impression with a brushed nickel pendant light or chandelier in your entryway. This will create a welcoming and stylish atmosphere for guests as they enter your home. Consider adding wall sconces or recessed lights for additional illumination.
Functional Home Office
Ensure your home office is well-lit and conducive to productivity with brushed nickel ceiling lights. Use recessed lights for general illumination and adjustable track lights to focus on specific work areas. A pendant light can add a decorative touch while providing ample lighting for tasks.
Maintenance of Brushed Nickel Ceiling Lights
Proper maintenance is essential for ensuring the longevity and performance of your brushed nickel ceiling lights. Here are some maintenance tips:
Regular Cleaning
Regularly clean your brushed nickel ceiling lights to remove dust, dirt, and fingerprints. Use a soft cloth and a mild detergent to wipe down the fixtures, being careful not to damage the light bulbs or electrical components. Regular cleaning can help maintain the brightness and appearance of the lights.
Inspect for Damage
Periodically inspect your brushed nickel ceiling lights for any signs of damage, such as cracks, rust, or loose connections. Address any issues promptly to prevent further damage and ensure the lights continue to function properly.
Check Electrical Connections
Ensure that all electrical connections are secure and free from corrosion. If you notice any loose or corroded connections, turn off the power and repair or replace the affected components. Proper electrical maintenance can help prevent potential safety hazards.
Replace Worn-Out Bulbs
Although brushed nickel fixtures are durable, the light bulbs will eventually need to be replaced. Monitor the performance of your ceiling lights and replace any bulbs that show signs of dimming or flickering. Using high-quality replacement bulbs can ensure consistent and reliable illumination.
Conclusion
Brushed nickel ceiling lights are an excellent choice for enhancing the functionality, safety, and aesthetics of your home. Their durability, versatility, and timeless design make them suitable for a wide range of applications. By understanding the different types of brushed nickel ceiling lights, following proper installation procedures, and maintaining the fixtures, you can create a beautifully illuminated environment that you can enjoy for years to come.
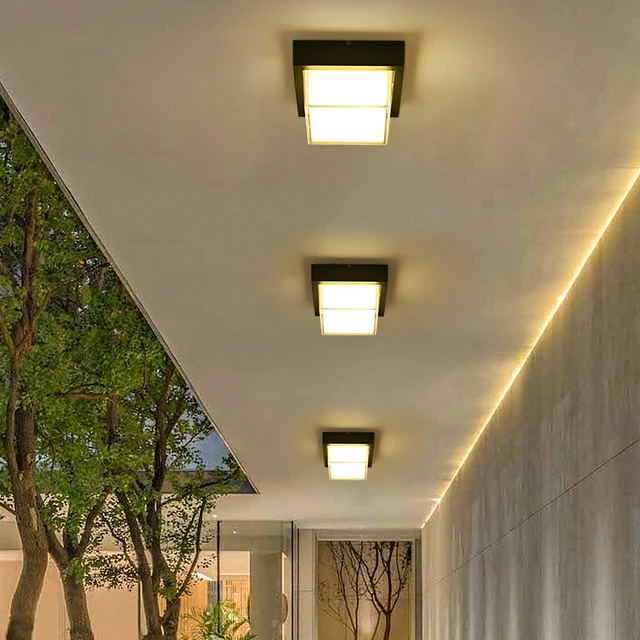
Outdoor lighting plays a crucial role in enhancing the aesthetics, safety, and functionality of your exterior spaces. Among the various options available, outdoor LED ceiling light stand out for their energy efficiency, durability, and versatile design. In this comprehensive guide, we will delve into everything you need to know about outdoor LED ceiling lights, including their benefits, types, installation tips, and design ideas. Whether you’re looking to illuminate your patio, porch, or any other outdoor area, this guide will help you make an informed decision.
Why Choose Outdoor LED Ceiling Lights?
Outdoor LED ceiling lights offer numerous advantages that make them a popular choice for homeowners and designers. Here are some of the key benefits:
Energy Efficiency
LED lights are known for their exceptional energy efficiency. They consume significantly less electricity compared to traditional incandescent or halogen bulbs, resulting in lower energy bills. Outdoor LED ceiling lights are an eco-friendly option that reduces your carbon footprint while providing ample illumination.
LED bulbs have an impressively long lifespan, often lasting up to 50,000 hours or more. This means you won’t have to worry about frequent replacements, saving both time and money in the long run. The durability of outdoor LED ceiling lights makes them a cost-effective lighting solution.
Brightness and Quality of Light
Outdoor LED ceiling lights provide bright, high-quality illumination that enhances visibility and safety. They come in various color temperatures, from warm white to cool white, allowing you to choose the perfect ambiance for your outdoor spaces. LED lights also offer excellent color rendering, making colors appear more vivid and natural.
Durability and Weather Resistance
Outdoor LED ceiling lights are designed to withstand harsh weather conditions, including rain, snow, and extreme temperatures. They are typically made from durable materials such as aluminum or stainless steel and feature weather-resistant seals to protect against moisture and dust. This ensures reliable performance in any outdoor environment.
Versatility in Design
Available in a wide range of styles and finishes, outdoor LED ceiling lights can complement any architectural design. Whether you prefer a modern, minimalist look or a more traditional aesthetic, there are LED ceiling lights to suit your taste. They can be used to highlight architectural features, create focal points, or provide general ambient lighting.
Types of Outdoor LED Ceiling Lights
There are several types of outdoor LED ceiling lights to choose from, each offering unique features and benefits. Understanding the different options can help you select the best lights for your specific needs.
Flush Mount LED Ceiling Lights
Flush mount LED ceiling lights are installed directly against the ceiling, providing a sleek and unobtrusive look. They are ideal for areas with low ceilings or where a minimalist design is desired. These lights offer a clean and modern appearance while delivering ample illumination.
Semi-Flush Mount LED Ceiling Lights
Semi-flush mount LED ceiling lights hang slightly below the ceiling, creating a more decorative and eye-catching effect. They are suitable for spaces with higher ceilings and can add a touch of elegance to your outdoor areas. These lights strike a balance between form and function, offering both style and illumination.
Recessed LED Ceiling Lights
Recessed LED ceiling lights, also known as downlights, are installed within the ceiling, providing a streamlined and discreet lighting solution. They are perfect for creating a clean, uncluttered look and are often used to highlight specific areas or features. Recessed lights are versatile and can be arranged in various configurations to achieve the desired lighting effect.
Pendant LED Ceiling Lights
Pendant LED ceiling lights hang down from the ceiling on a rod or chain, making a bold design statement. They are ideal for adding a decorative touch to outdoor spaces such as patios, gazebos, or covered porches. Pendant lights come in a variety of styles, from contemporary to vintage, allowing you to personalize your outdoor decor.
LED Ceiling Fans with Lights
For multifunctional outdoor lighting, consider LED ceiling fans with integrated lights. These fixtures not only provide illumination but also help keep your outdoor areas cool and comfortable. LED ceiling fans with lights are perfect for patios, decks, and other covered outdoor spaces where both lighting and airflow are needed.
Installation Tips for Outdoor LED Ceiling Lights
Proper installation is crucial for ensuring the optimal performance and longevity of your outdoor LED ceiling lights. Here are some tips to help you achieve a successful installation:
Plan Your Lighting Layout
Before starting the installation, plan your lighting layout to ensure even and effective illumination. Consider the size and shape of your outdoor space, as well as any specific areas or features you want to highlight. A well-thought-out lighting plan can enhance the functionality and aesthetics of your outdoor area.
Choose the Right Location
Select appropriate locations for your outdoor LED ceiling lights, keeping in mind factors such as ceiling height, proximity to electrical sources, and exposure to the elements. Ensure that the chosen locations provide adequate coverage and complement the overall design of your outdoor space.
Use Weatherproof Fixtures
When installing outdoor LED ceiling lights, make sure to use fixtures that are rated for outdoor use and are weatherproof. This will ensure that the lights can withstand exposure to moisture, dust, and extreme temperatures. Look for fixtures with an IP (Ingress Protection) rating that indicates their level of protection against environmental factors.
Follow Electrical Safety Guidelines
Always follow electrical safety guidelines when installing outdoor lighting. Turn off the power at the circuit breaker before starting the installation and use proper wiring techniques. If you are not comfortable working with electrical systems, consider hiring a licensed electrician to ensure a safe and professional installation.
Test the Lights
After installing the outdoor LED ceiling lights, test them to ensure they are functioning correctly. Check for any flickering, uneven lighting, or other issues that may need to be addressed. Proper testing can help identify and resolve any problems before they become major concerns.
Design Ideas with Outdoor LED Ceiling Lights
Outdoor LED ceiling lights can enhance the beauty and functionality of your exterior spaces in various ways. Here are some design ideas to inspire you:
Illuminate Pathways and Entrances
Use outdoor LED ceiling lights to illuminate pathways and entrances, providing safe and welcoming access to your home. Flush mount or recessed lights can create a clean and modern look, while pendant lights can add a touch of elegance and style.
Highlight Outdoor Dining Areas
Create a cozy and inviting atmosphere in your outdoor dining areas with LED ceiling lights. Semi-flush mount or pendant lights can provide ample illumination for dining and entertaining while adding a decorative element to the space. Choose warm white LEDs for a soft, ambient glow.
Enhance Covered Patios and Decks
Enhance the functionality and comfort of covered patios and decks with LED ceiling lights. Recessed lights can provide unobtrusive, even lighting, while LED ceiling fans with lights can offer both illumination and cooling. Consider adding dimmable LEDs to adjust the lighting levels according to the mood and occasion.
Accentuate Architectural Features
Use outdoor LED ceiling lights to accentuate architectural features such as pergolas, gazebos, or outdoor kitchens. Pendant lights or semi-flush mount lights can draw attention to these structures, creating focal points and enhancing the overall design of your outdoor space.
Create a Relaxing Retreat
Transform your outdoor space into a relaxing retreat with the right lighting. Install outdoor LED ceiling lights in seating areas, near water features, or around fire pits to create a serene and inviting ambiance. Choose LEDs with adjustable color temperatures to customize the lighting according to your preferences.
Maintenance of Outdoor LED Ceiling Lights
Proper maintenance is essential for ensuring the longevity and performance of your outdoor LED ceiling lights. Here are some maintenance tips:
Regular Cleaning
Regularly clean your outdoor LED ceiling lights to remove dust, dirt, and debris. Use a soft cloth and a mild detergent to wipe down the fixtures, being careful not to damage the light bulbs or electrical components. Regular cleaning can help maintain the brightness and appearance of the lights.
Inspect for Damage
Periodically inspect your outdoor LED ceiling lights for any signs of damage, such as cracks, rust, or loose connections. Address any issues promptly to prevent further damage and ensure the lights continue to function properly.
Check Electrical Connections
Ensure that all electrical connections are secure and free from corrosion. If you notice any loose or corroded connections, turn off the power and repair or replace the affected components. Proper electrical maintenance can help prevent potential safety hazards.
Replace Worn-Out Bulbs
Although LED bulbs have a long lifespan, they will eventually need to be replaced. Monitor the performance of your outdoor LED ceiling lights and replace any bulbs that show signs of dimming or flickering. Using high-quality replacement bulbs can ensure consistent and reliable illumination.
Conclusion
Outdoor LED ceiling light are an excellent choice for enhancing the functionality, safety, and aesthetics of your exterior spaces. Their energy efficiency, durability, and versatile design make them suitable for a wide range of outdoor applications. By understanding the different types of outdoor LED ceiling lights, following proper installation procedures, and maintaining the fixtures, you can create a beautifully illuminated outdoor environment that you can enjoy for years to come.
When designing or renovating a commercial kitchen, every detail counts. One often overlooked but critical component is the ceiling. Choosing the right ceiling tiles for your commercial kitchen can significantly impact both functionality and aesthetics. In this guide, we will explore the various aspects of commercial kitchen ceiling tiles, including their benefits, types, installation tips, and maintenance. Our goal is to provide you with the information needed to make an informed decision and optimize your kitchen environment.
Why Choose Commercial Kitchen Ceiling Tiles?
Ceiling tiles designed specifically for commercial kitchens offer several benefits that are essential for maintaining a safe, clean, and efficient workspace. Here are some of the primary reasons to consider them:
Hygiene and Cleanliness
Commercial kitchens require stringent hygiene standards. Ceiling tiles in these environments must be easy to clean and resistant to mold, mildew, and bacteria. Many commercial kitchen ceiling tiles are designed with smooth, non-porous surfaces that can be wiped down easily, ensuring a hygienic environment.
Fire Resistance
Safety is paramount in any commercial kitchen. Ceiling tiles with fire-resistant properties help prevent the spread of fire and provide additional time for evacuation in case of an emergency. Look for tiles that meet industry standards for fire resistance to enhance the safety of your kitchen.
Moisture and Humidity Resistance
Kitchens are exposed to high levels of moisture and humidity, which can damage regular ceiling tiles. Commercial kitchen ceiling tiles are typically designed to withstand these conditions without warping, sagging, or deteriorating, ensuring longevity and maintaining a clean appearance.
Aesthetic Appeal
While functionality is crucial, aesthetics should not be ignored. Commercial kitchen ceiling tiles are available in various styles and finishes, allowing you to choose options that complement your kitchen’s design. A well-designed ceiling can enhance the overall ambiance of the space.
Acoustic Control
Noise control is essential in a busy commercial kitchen. Ceiling tiles with acoustic properties can help reduce noise levels, creating a more comfortable and efficient working environment. This is particularly important in open kitchen designs where noise can easily travel to dining areas.
Types of Commercial Kitchen Ceiling Tiles
There are several types of ceiling tiles suitable for commercial kitchens, each with its unique properties and benefits. Understanding the different options can help you select the best tiles for your needs.
Vinyl Faced Gypsum Ceiling Tiles
Vinyl faced gypsum ceiling tiles are a popular choice for commercial kitchens due to their durability and ease of maintenance. The vinyl surface is smooth and non-porous, making it easy to clean and resistant to moisture and bacteria. These tiles are also fire-resistant, adding an extra layer of safety.
Fiberglass Ceiling Tiles
Fiberglass ceiling tiles are lightweight and offer excellent sound absorption, making them ideal for noisy kitchen environments. They are resistant to moisture and mold, ensuring they remain in good condition even in humid conditions. The tiles can be easily cleaned with a damp cloth, maintaining hygiene standards.
Metal ceiling tiles, such as aluminum or stainless steel, are highly durable and resistant to moisture, mold, and bacteria. They are easy to clean and maintain, making them a practical choice for commercial kitchens. Metal tiles also provide a sleek, modern aesthetic that can enhance the overall look of the kitchen.
PVC Ceiling Tiles
PVC ceiling tiles are another excellent option for commercial kitchens. They are lightweight, moisture-resistant, and easy to clean. PVC tiles are available in various styles and finishes, allowing you to achieve the desired look for your kitchen while maintaining functionality.
Mineral Fiber Ceiling Tiles
Mineral fiber ceiling tiles offer good acoustic properties and are fire-resistant, making them suitable for commercial kitchens. However, they may require more maintenance compared to other types of tiles, as they can be more susceptible to moisture damage.
Installation Tips for Commercial Kitchen Ceiling Tiles
Proper installation is crucial for ensuring the longevity and effectiveness of your ceiling tiles. Here are some tips to help you achieve a successful installation:
Prepare the Area
Before installation, ensure that the ceiling area is clean, dry, and free of any debris. This will help the tiles adhere properly and prevent any potential issues.
Measure Accurately
Accurate measurements are essential for ensuring that the tiles fit correctly. Measure the ceiling area carefully and cut the tiles to size if necessary. Having the right tools, such as a utility knife and a straight edge, can help achieve precise cuts.
Use the Right Adhesive
Using the appropriate adhesive is critical for ensuring that the tiles stay in place. Follow the manufacturer’s recommendations for the type of adhesive to use and apply it evenly to the back of each tile.
Follow a Grid Pattern
Installing the tiles in a grid pattern can help achieve a uniform and professional look. Start from the center of the ceiling and work your way outwards, ensuring that the tiles are aligned correctly.
Secure the Tiles
Make sure the tiles are securely attached to the ceiling. Press each tile firmly into place and ensure that there are no gaps or loose edges. This will help prevent any tiles from falling or shifting over time.
Maintenance of Commercial Kitchen Ceiling Tiles
Proper maintenance is essential for keeping your ceiling tiles in good condition and ensuring a hygienic environment. Here are some maintenance tips:
Regular Cleaning
Regularly clean the ceiling tiles to remove any dirt, grease, or grime. Use a mild detergent and a damp cloth to wipe down the tiles. For tougher stains, a soft-bristled brush may be used. Avoid using abrasive cleaners that could damage the tile surface.
Inspect for Damage
Periodically inspect the ceiling tiles for any signs of damage, such as cracks, warping, or discoloration. Replace any damaged tiles promptly to maintain the integrity of the ceiling and prevent further issues.
Check for Moisture
Ensure that the kitchen is well-ventilated to prevent moisture buildup, which can damage the tiles and promote mold growth. If you notice any signs of moisture damage, such as staining or sagging tiles, address the issue immediately.
Maintain Fire Safety
If your ceiling tiles have fire-resistant properties, ensure that they remain effective by following proper maintenance procedures. Do not paint over the tiles or apply any coatings that could compromise their fire resistance.
Design Ideas with Commercial Kitchen Ceiling Tiles
Commercial kitchen ceiling tiles can enhance the overall design and functionality of your space. Here are some design ideas to inspire you:
Modern Industrial
For a modern industrial look, consider metal ceiling tiles with a sleek finish. Pair them with exposed ductwork, stainless steel appliances, and concrete countertops for a contemporary and stylish kitchen.
Classic Elegance
Vinyl faced gypsum ceiling tiles in a neutral color can create a clean and elegant look. Combine them with white cabinetry, marble countertops, and classic lighting fixtures to achieve a timeless design.
Rustic Charm
Fiberglass or PVC ceiling tiles with a textured finish can add warmth and character to a rustic kitchen. Complement them with wooden beams, brick walls, and vintage-inspired decor for a cozy and inviting space.
Bold and Vibrant
For a bold and vibrant kitchen, choose ceiling tiles in bright colors or patterns. This can add a playful and dynamic element to the space. Pair them with colorful backsplashes, modern appliances, and unique lighting fixtures to create a lively atmosphere.
Conclusion
Choosing the right ceiling tiles for your commercial kitchen is crucial for maintaining a functional, safe, and aesthetically pleasing environment. Commercial kitchen ceiling tiles offer numerous benefits, including hygiene, fire resistance, moisture resistance, and acoustic control. By understanding the different types of tiles available and following proper installation and maintenance procedures, you can enhance the overall performance and appearance of your kitchen. Whether you prefer a modern, classic, rustic, or vibrant design, there are commercial kitchen ceiling tiles to suit your needs and style.
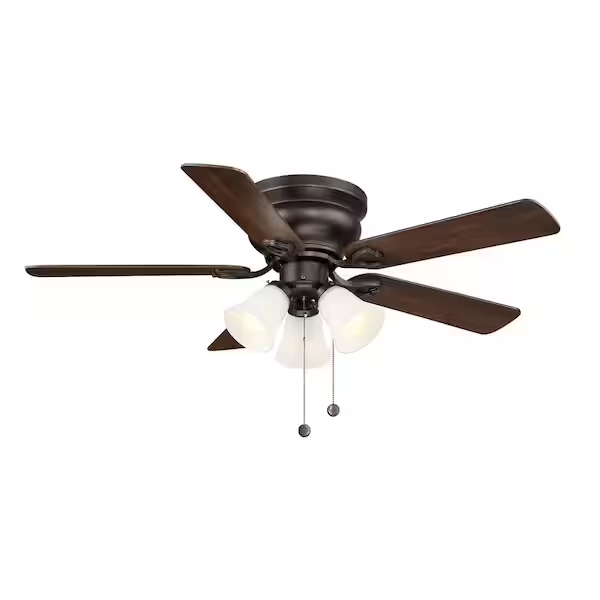
Ceiling fans are not just functional appliances; they are also key elements of home decor that can significantly enhance the aesthetic appeal of any room. Among the various finishes available, the oil rubbed bronze ceiling fan stands out for its timeless elegance and versatility. In this comprehensive guide, we will explore everything you need to know about oil rubbed bronze ceiling fans, from their features and benefits to installation tips and design ideas.
What is an Oil Rubbed Bronze Ceiling Fan?
An oil rubbed bronze ceiling fan features a finish that mimics the appearance of aged bronze with a dark, rich patina. This finish is achieved through a chemical process that creates a unique look, combining deep browns and subtle highlights of copper or gold. The result is a sophisticated and rustic appearance that complements a variety of interior styles.
Why Choose an Oil Rubbed Bronze Ceiling Fan?
There are several reasons why homeowners and interior designers prefer oil rubbed bronze ceiling fans. Here are some of the key benefits:
Timeless Aesthetic Appeal
Oil rubbed bronze is a classic finish that never goes out of style. Its rich, dark tones add a touch of elegance and sophistication to any room. Whether you have a traditional, rustic, or modern interior, an oil rubbed bronze ceiling fan can seamlessly blend in and enhance your decor.
Versatility
One of the greatest advantages of oil rubbed bronze ceiling fans is their versatility. They can complement a wide range of color schemes and design styles, from warm earth tones to cool neutrals. This makes them an ideal choice for various rooms, including living rooms, bedrooms, dining areas, and even outdoor spaces.
Durability
The oil rubbed bronze finish is not only beautiful but also durable. It is resistant to tarnishing and corrosion, ensuring that your ceiling fan maintains its attractive appearance for years to come. This durability makes it a practical choice for both indoor and outdoor applications.
Low Maintenance
Maintaining an oil rubbed bronze ceiling fan is relatively easy. The finish does not show fingerprints or smudges as readily as other finishes, and regular dusting is usually sufficient to keep it looking its best. This low maintenance requirement is a significant advantage for busy homeowners.
Features to Consider When Choosing an Oil Rubbed Bronze Ceiling Fan
When selecting an oil rubbed bronze ceiling fan, there are several features to consider to ensure you choose the right fan for your space and needs.
Size
The size of the ceiling fan is crucial for both functionality and aesthetics. A fan that is too small may not effectively circulate air, while a fan that is too large can overwhelm the room. Here are some general guidelines for choosing the right fan size:
Rooms up to 75 square feet: 29-36 inch fan
Rooms 76-144 square feet: 36-42 inch fan
Rooms 144-225 square feet: 44-50 inch fan
Rooms 225-400 square feet: 50-54 inch fan
Blade Count and Style
Ceiling fans typically have three to five blades. While the number of blades can impact the fan’s airflow and noise level, the overall style and design of the blades are also important. Look for blade styles that complement the oil rubbed bronze finish and match your room’s decor.
Lighting Options
Many oil rubbed bronze ceiling fans come with integrated lighting, providing both airflow and illumination. Consider whether you need a fan with a light kit and choose one that offers the right type and brightness of lighting for your space. Options include LED, incandescent, and halogen bulbs.
Motor Quality
The motor is the heart of the ceiling fan, determining its performance and longevity. Look for fans with high-quality, energy-efficient motors that offer quiet operation and reliable performance. DC motors are generally more energy-efficient and quieter than AC motors.
Control Options
Ceiling fans can be controlled via pull chains, wall switches, or remote controls. Some models even offer smart home compatibility, allowing you to control the fan with your smartphone or voice commands. Choose the control option that best suits your convenience and lifestyle.
Installation Tips for Oil Rubbed Bronze Ceiling Fans
Installing an oil rubbed bronze ceiling fan can be a straightforward process if you follow the proper steps. Here are some tips to help ensure a successful installation:
Preparation
Turn off the Power: Before starting the installation, turn off the power to the circuit you will be working on at the breaker box to ensure safety.
Gather Tools and Materials: You will need a ladder, screwdriver, wire stripper, pliers, electrical tape, and possibly a drill. Make sure you have all the necessary tools and materials on hand.
Read the Instructions: Carefully read the manufacturer’s installation instructions that come with the ceiling fan. Each fan may have specific requirements and steps.
Installation Steps
Mount the Ceiling Bracket: Secure the ceiling bracket to the electrical box in the ceiling. Make sure it is firmly attached and capable of supporting the weight of the fan.
Assemble the Fan: Follow the instructions to assemble the fan components, including the motor housing, blades, and light kit (if applicable).
Attach the Fan to the Bracket: Lift the assembled fan and attach it to the ceiling bracket. Ensure it is securely fastened and balanced.
Connect the Wiring: Connect the fan wiring to the house wiring, matching the wire colors (black to black, white to white, and green or bare copper to the ground wire). Use wire nuts to secure the connections and wrap them with electrical tape for added safety.
Install the Blades and Light Kit: Attach the fan blades to the motor housing, followed by the light kit if your fan includes one. Make sure all screws are tightened securely.
Test the Fan: Once everything is installed, turn the power back on and test the fan to ensure it is operating correctly. Check for any wobbling or unusual noises.
Design Ideas with Oil Rubbed Bronze Ceiling Fans
An oil rubbed bronze ceiling fan can be a focal point or a complementary element in various interior design styles. Here are some design ideas to inspire you:
Rustic Charm
Pair an oil rubbed bronze ceiling fan with natural wood elements, exposed beams, and earthy tones to create a cozy, rustic ambiance. Add vintage-inspired lighting fixtures and accessories to complete the look.
Modern Elegance
For a modern and elegant space, choose a sleek oil rubbed bronze ceiling fan with clean lines and minimalistic blades. Combine it with contemporary furniture, neutral color palettes, and metallic accents for a sophisticated vibe.
In an industrial-style room, an oil rubbed bronze ceiling fan can add warmth and texture. Look for fans with metal or distressed wood blades and pair them with exposed brick walls, metal furniture, and Edison bulb lighting.
Traditional Warmth
For a traditional or classic interior, opt for an oil rubbed bronze ceiling fan with ornate details and rich wood blades. Complement it with classic furniture, rich fabrics, and warm color schemes to create a timeless look.
Conclusion
An oil rubbed bronze ceiling fan is more than just a cooling appliance; it is a stylish addition that can enhance the beauty and functionality of any room. By considering factors such as size, blade style, lighting options, motor quality, and control features, you can choose the perfect fan for your needs. With proper installation and thoughtful design integration, an oil rubbed bronze ceiling fan can elevate your home decor and provide years of reliable performance. Whether you are aiming for a rustic, modern, industrial, or traditional look, this versatile finish offers endless possibilities for enhancing your living space.
Enhance your home’s ambiance and functionality with a ceiling fan equipped with an uplight, providing both practical illumination and aesthetic appeal.
Choosing the Right Ceiling Fan With Uplight for Your Home
Selecting a ceiling fan with uplighting can significantly elevate the atmosphere of your living space. Learn about the features, benefits, and installation considerations of these versatile fixtures.
Understanding Ceiling Fan With Uplight
A ceiling fans with uplight combines the cooling functionality of a traditional fan with the added feature of upward-facing lights. These fixtures are designed to provide ambient lighting while circulating air, making them ideal for living rooms, bedrooms, and dining areas.
Features of Ceiling Fan With Uplight
1. Dual Functionality
Ceiling fans with uplights offer dual functionality by providing cooling air circulation and ambient lighting. The uplight component directs illumination upwards, creating a soft, indirect glow.
2. Energy Efficiency
Many ceiling fans with uplights are designed to be energy-efficient, using LED bulbs that consume less electricity compared to traditional incandescent bulbs.
Some models come with remote controls for convenient operation of both fan speed and lighting settings, offering flexibility and ease of use.
4. Design Variety
Available in various styles and finishes, ceiling fans with uplights can complement any interior decor, from classic and traditional to modern and contemporary.
Benefits of Installing a Ceiling Fan With Uplight
– Enhanced Ambiance
The uplight feature creates a warm, inviting ambiance in the room, perfect for relaxing or entertaining.
– Space Saving
Combining a ceiling fan with lighting eliminates the need for separate fixtures, saving space and reducing clutter.
– Year-Round Use
Ceiling fans with reversible motor functions can be used year-round, providing both cooling during summer and distributing warm air in winter.
Installation Tips
– Ceiling Height Consideration
Ensure adequate ceiling height for both fans blades and uplight components. A minimum clearance is necessary for safe and effective operation.
– Proper Wiring
Consult a professional electrician to ensure proper wiring and compatibility with existing electrical circuits.
– Balancing and Maintenance
Regularly check and balance fan blades to prevent wobbling and noise during operation. Clean the uplight fixture periodically to maintain optimal light output.
Conclusion
A ceiling fan with uplight offers a practical and stylish solution to enhance your home’s comfort and ambiance. By choosing the right fixture and installing it correctly, you can enjoy efficient air circulation and atmospheric lighting in any room.
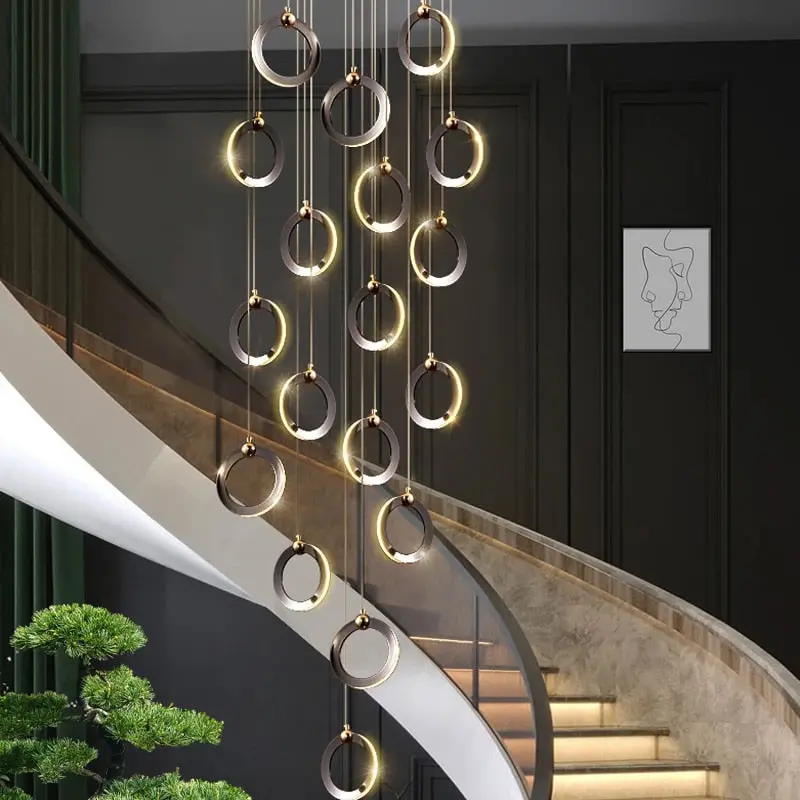
Large chandeliers for high ceilings can redefine the ambiance of any room, adding elegance and grandeur. Discover how these stunning fixtures can transform your space into a masterpiece.
Large Chandeliers For High Ceilings: A Perfect Blend of Style and Functionality
Large chandeliers for high ceilings are more than just lighting fixtures; they are statement pieces that create a focal point in any room. Here’s everything you need to know about choosing and installing these magnificent fixtures.
Understanding Large Chandeliers For High Ceilings
Large chandeliers are designed to complement spacious interiors with high ceilings, providing ample illumination while enhancing the aesthetic appeal of the room. These fixtures typically feature intricate designs and multiple light sources, making them ideal for grand entrances, dining rooms, and ballrooms.
Factors to Consider When Choosing Large Chandeliers For High Ceilings
1. Size and Scale
Select a chandelier that suits the scale of your space. Measure the height and width of the room to ensure the chandelier’s proportions are balanced and visually appealing.
2. Design and Style
Choose a design that complements your interior decor. Options range from classic crystal chandeliers to modern, minimalist designs. Consider the overall theme of your space to find a chandelier that enhances the ambiance.
3. Lighting Capacity
Ensure the chandelier provides sufficient light for the room. High ceilings require fixtures with multiple bulbs or larger wattage capacity to effectively illuminate the space.
4. Installation Requirements
Consider the weight and installation requirements of the chandelier. High ceilings may require professional installation due to the complexity of mounting and wiring the fixture.
Benefits of Large Chandeliers For High Ceilings
– Visual Impact
Large chandeliers serve as a striking focal point, drawing attention upward and highlighting the architectural features of high ceilings.
– Ambiance and Atmosphere
These fixtures create a luxurious ambiance, transforming ordinary rooms into elegant spaces suitable for entertaining and relaxation.
– Versatility
Large chandeliers are versatile and can be customized to suit various interior styles, from traditional to contemporary, adding character and charm to any room.
Installation Tips for Large Chandeliers For High Ceilings
– Determine Hanging Height
Ensure the chandelier hangs at an appropriate height to maximize visual impact and light distribution. Consider the viewing angles from different parts of the room.
– Use a Supportive Ceiling Mount
Install the chandelier using a sturdy ceiling mount capable of supporting its weight. Consult a professional if unsure about the structural integrity of your ceiling.
– Coordinate with Other Lighting
Supplement chandelier lighting with additional fixtures such as wall sconces or recessed lights to create layered lighting effects.
Maintenance and Care
– Cleaning and Dusting
Regularly clean the chandelier to maintain its sparkle and remove dust buildup. Use a soft cloth or duster to gently wipe each crystal or fixture.
– Bulb Replacement
Replace bulbs as needed to ensure consistent illumination. Consider energy-efficient LED bulbs to reduce energy consumption and maintenance frequency.
Conclusion
Large chandeliers for high ceilings are more than just lighting fixtures; they are symbols of luxury and sophistication. By carefully selecting and installing these fixtures, you can enhance the beauty and functionality of your space while creating a lasting impression on guests and visitors.
Drop ceiling recessed light, also known as can lights or pot lights, are a stylish and functional lighting solution for various spaces. Whether you’re renovating a room or building from scratch, understanding how to choose and install these lights is crucial. In this comprehensive guide, we’ll delve into everything you need to know about drop ceiling recessed lights to help you make informed decisions.
Drop Ceiling Recessed Lights: What You Need to Know
Drop ceiling recessed lights are designed to fit seamlessly into suspended ceilings, providing a sleek and modern lighting option without compromising ceiling height or aesthetics. Here’s a detailed look at the factors to consider when incorporating these lights into your space:
Understanding Drop Ceiling Recessed Lights
Drop ceiling recessed lights are fixtures that sit flush with the ceiling surface, directing light downward. They are housed within the ceiling structure, with the light bulb recessed into a metal canister or housing. This design minimizes glare and provides a clean, unobtrusive appearance.
Factors to Consider When Choosing Drop Ceiling Recessed Lights
1. Type of Bulb
Select the type of bulb based on your lighting needs and preferences. Options include incandescent, LED, and CFL bulbs. LED bulbs are energy-efficient and long-lasting, making them a popular choice for drop ceiling recessed lights.
Consider the size and shape of the recessed light fixture. Standard sizes include 4-inch, 5-inch, and 6-inch diameter fixtures. The size you choose may depend on the size of the room and the desired lighting coverage.
3. Trim Style
The trim of the recessed light fixture affects its appearance. Choose from various trim styles such as baffle, reflector, and adjustable. Baffle trims reduce glare, while adjustable trims allow you to direct the light beam.
4. Ceiling Type
Ensure your drop ceiling is compatible with recessed lights. Standard suspended ceilings with removable ceiling tiles are ideal for easy installation and maintenance of recessed lights.
Benefits of Drop Ceiling Recessed Lights
– Space-Saving Design
Drop ceiling recessed lights do not protrude from the ceiling, making them ideal for rooms with limited overhead space.
– Versatile Lighting
These lights provide even illumination without casting harsh shadows, making them suitable for various settings including offices, kitchens, and living rooms.
– Aesthetic Appeal
The flush-mount design of recessed lights contributes to a modern and streamlined look, enhancing the overall aesthetic of the room.
Installation Tips for Drop Ceiling Recessed Lights
– Plan Lighting Layout
Create a lighting plan to determine the number and placement of recessed lights needed for optimal illumination.
– Consider Spacing
Follow manufacturer recommendations for spacing between recessed lights to ensure even lighting distribution.
– Electrical Considerations
Ensure proper electrical wiring and connections are in place before installing recessed lights. Consult a qualified electrician if necessary.
Maintenance and Care
– Cleaning
Regularly dust the trim and housing of recessed lights to maintain their appearance and prevent accumulation of debris.
– Bulb Replacement
Replace bulbs as needed to maintain optimal lighting performance. LED bulbs have a longer lifespan compared to traditional incandescent bulbs.
Conclusion
Drop ceiling recessed light offer a versatile and stylish lighting solution for both residential and commercial spaces. By understanding the various factors involved in choosing and installing these lights, you can create well-lit environments that enhance functionality and aesthetics.
Vaulted ceilings add architectural interest and spaciousness to any room, but they also present unique challenges when it comes to installing ceiling fans. In this guide, we’ll explore everything you need to know about selecting and installing ceiling fans for vaulted ceilings to ensure optimal air circulation and aesthetic appeal.
Understanding Vaulted Ceilings
Vaulted ceilings, also known as cathedral ceilings, are characterized by their steep angles that rise upward from the walls. This design creates a sense of openness and grandeur in rooms, making them popular in both modern and traditional homes.
Ceiling Fans For Vaulted Ceilings
Installing ceiling fans in vaulted ceilings requires careful consideration of several factors to ensure functionality and safety. Here’s what you need to know:
Factors to Consider
1. Blade Span
For vaulted ceilings, choose ceiling fans with a larger blade span to effectively circulate air throughout the expansive space. Optimal blade spans typically range from 52 inches to 72 inches, depending on the ceiling height and room size.
A downrod is essential for mounting ceiling fans on vaulted ceilings. Measure the height of your ceiling to determine the appropriate downrod length. The downrod helps to lower the fan to the optimal height for efficient air circulation.
3. Angled Ceiling Mount
Look for ceiling fans specifically designed for angled or sloped ceilings. These fans come with mounting kits that accommodate the angle of vaulted ceilings, ensuring stability and proper operation.
4. Blade Pitch
The blade pitch refers to the angle of the fan blades relative to the horizontal plane. Opt for ceiling fans with a steeper blade pitch (typically between 12 to 15 degrees) for better air movement in rooms with vaulted ceilings.
5. Remote Control or Wall Control
Considering the height of vaulted ceilings, choose ceiling fan with remote control or wall control options for convenience. These controls allow you to adjust fan speed and direction without needing a ladder.
Benefits of Ceiling Fans in Vaulted Ceilings
– Enhanced Air Circulation
Ceiling fan help circulate air effectively in rooms with vaulted ceilings, promoting better airflow and comfort.
– Energy Efficiency
Properly installed ceiling fans can complement your HVAC system, reducing the need for heating and cooling, thus lowering energy costs.
– Aesthetic Appeal
Ceiling fans come in various styles and finishes to complement the décor of your room, enhancing its overall aesthetic appeal.
Installation Tips
– Hire a Professional
Due to the height and complexity of vaulted ceilings, it’s advisable to hire a professional electrician or contractor for ceiling fan installation. They have the expertise and equipment to ensure safe and secure installation.
– Balance and Stability
Ensure the ceiling fan is properly balanced and secured to prevent wobbling or shaking, which can occur on vaulted ceilings due to their angle.
– Test for Airflow
After installation, test the ceiling fan at various speeds to ensure optimal airflow throughout the room. Adjust the direction of the fan blades seasonally for maximum efficiency.
Maintenance and Care
– Regular Cleaning
Dust and debris can accumulate on ceiling fan blades over time. Regularly clean the blades and motor housing to maintain optimal performance and prolong the fan’s lifespan.
– Check for Loose Connections
Periodically check for loose screws or connections and tighten them as needed to prevent noise and ensure safe operation.
Conclusion
Selecting and installing ceiling fan for vaulted ceilings involves careful consideration of blade span, downrod length, and mounting options. By choosing the right ceiling fan and following proper installation practices, you can enhance airflow, energy efficiency, and aesthetic appeal in rooms with vaulted ceilings.
Discovering that your bathroom is flooded through the ceiling is a homeowner’s nightmare. Water damage can be extensive and costly if not addressed quickly. In this article, we’ll explore the causes of ceiling floods, immediate actions to take, steps for damage control, and preventive measures to avoid future incidents.
Understanding the Causes of a Bathroom Flooded Through the Ceiling
Ceiling floods in bathrooms often result from several common issues:
1. Pipe Leaks
Leaky pipes, whether from aging infrastructure or accidental damage, are a frequent cause of water damage. Even a small, slow leak can lead to significant flooding over time.
2. Faulty Plumbing Fixtures
Malfunctioning toilets, sinks, or bathtubs can cause water to overflow and seep through the ceiling. Faulty plumbing fixtures are often due to wear and tear or improper installation.
3. Roof Leaks
In some cases, a roof leak can be the culprit. Water can travel along beams and walls, eventually making its way to the bathroom ceiling.
Clogged drains in bathtubs, sinks, or showers can cause water to back up and overflow, leading to ceiling damage.
Immediate Actions to Take When Your Bathroom Flooded Through Ceiling
1. Shut Off the Water Supply
The first step is to turn off the main water supply to prevent further flooding. Locate the shut-off valve, typically found in the basement or near the water meter, and turn it off.
2. Turn Off Electricity
Water and electricity are a dangerous combination. Turn off the power supply to the affected area to avoid electrical hazards. If you’re unsure how to do this safely, call a professional.
3. Document the Damage
Take photos and videos of the damage for insurance purposes. Documenting the extent of the flooding will be useful when filing a claim with your insurance company.
4. Remove Standing Water
Use a wet/dry vacuum, mop, or towels to remove as much standing water as possible. Quick removal helps minimize water damage and mold growth.
5. Ventilate the Area
Open windows and doors to allow air circulation. Use fans and dehumidifiers to dry out the affected area. Proper ventilation helps prevent mold and mildew.
Steps for Damage Control and Repair
1. Assess the Damage
Once the immediate crisis is managed, thoroughly assess the extent of the damage. Check for structural damage, weakened drywall, and any signs of mold.
2. Remove Damaged Materials
Remove any water-damaged materials, such as soaked drywall, insulation, and flooring. These materials can harbor mold and compromise the structural integrity of your home.
3. Inspect for Mold
Mold can start growing within 24 to 48 hours after a flood. Inspect the affected area for signs of mold and take necessary precautions to remove it safely. If mold is extensive, consider hiring a professional mold remediation service.
4. Repair Plumbing Issues
Identify and repair the source of the leak. This may involve replacing faulty pipes, fixtures, or even parts of the roof. Ensure that all plumbing work is done by a licensed professional to prevent future issues.
5. Restore and Rebuild
Once the area is dry and mold-free, begin the restoration process. This includes replacing drywall, insulation, flooring, and repainting. Ensure that all materials used are mold-resistant to prevent future problems.
Preventive Measures to Avoid Future Ceiling Floods
Regular Inspections
Conduct regular inspections of your plumbing system, including pipes, fixtures, and the roof. Early detection of potential issues can prevent major water damage.
Install Water Alarms
Water alarms can detect leaks early and alert you to potential flooding. Install these alarms near plumbing fixtures and in areas prone to water damage.
Maintain Your Roof
Ensure your roof is in good condition and free from leaks. Regularly clean gutters and downspouts to prevent water buildup.
Upgrade Plumbing Fixtures
Consider upgrading to modern, water-efficient fixtures that are less prone to leaks. Regular maintenance and prompt repairs can also help keep your plumbing system in good condition.
Insulate Pipes
Insulate pipes in colder areas of your home to prevent freezing and bursting. Frozen pipes can cause significant water damage when they thaw and leak.
The Role of Insurance in Ceiling Floods
Homeowners insurance typically covers water damage caused by sudden and accidental incidents, such as burst pipes or roof leaks. However, it may not cover damage due to neglect or poor maintenance. It’s essential to:
Understand Your Policy
Review your homeowners insurance policy to understand what is covered. Some policies may exclude certain types of water damage, so be sure to clarify with your insurance provider.
File a Claim
If your policy covers the damage, file a claim as soon as possible. Provide documentation, such as photos and videos, and a detailed account of the incident. An adjuster will assess the damage and determine the payout for repairs.
Work with Professionals
Insurance companies often have a list of preferred contractors for repairs. Working with these professionals can expedite the claims process and ensure quality repairs.
Conclusion
Dealing with a bathroom flooded through the ceiling can be overwhelming, but taking immediate action and following the right steps can mitigate damage and prevent future incidents. Regular maintenance, prompt repairs, and understanding your insurance coverage are crucial in protecting your home from water damage. Remember, when in doubt, always consult with professionals to ensure the safety and integrity of your home.
Why Choose Westinghouse Ceiling Fan Light Fixtures?
Westinghouse has been a trusted name in home appliances and lighting solutions for over a century. Their ceiling fan light fixtures combine innovation, reliability, and aesthetic appeal to offer a wide range of benefits for homeowners.
Features
Westinghouse ceiling fan light fixtures are designed with several key features that make them stand out in the market:
Efficient Lighting: These fixtures provide bright and energy-efficient illumination, perfect for both practical tasks and enhancing the atmosphere of any room.
Variety of Styles: From traditional to modern designs, Westinghouse offers a variety of styles to complement any interior décor theme.
Remote Control Options: Many models come with remote control options for convenient operation of both fan speed and lighting settings.
Quiet Operation: Westinghouse engineers their ceiling fan light fixtures for quiet performance, ensuring a peaceful environment in your home.
Installing Westinghouse Ceiling Fan Light Fixtures
You can install a Westinghouse ceiling fan light fixture easily with basic tools and DIY skills. Here is a general guide to assist you in getting started:
Turn Off Power: Always turn off the power at the circuit breaker before beginning any electrical work.
Assemble the Fixture: Follow the manufacturer’s instructions to assemble the ceiling fan and light fixture components.
Mounting the Fan: Securely mount the ceiling fan to the ceiling using the included hardware, ensuring it is properly aligned and balanced.
Wiring Connections: Connect the wiring according to the fixture’s instructions, matching each wire securely with its corresponding connection.
Attach the Blades: Attach the fan blades to the motor housing, following the manufacturer’s guidelines for blade alignment and balance.
Install the Light Kit: If the ceiling fan includes a light kit, install it according to the provided instructions, making sure all connections are secure.
Test Operation: Once installed, restore power at the circuit breaker and test the operation of both the fan and the light fixture to ensure they are functioning properly.
Maintaining Westinghouse Ceiling Fan Light Fixtures
To ensure optimal performance and longevity of your Westinghouse ceiling fans light fixture, consider the following maintenance tips:
Regular Cleaning: Dust the fan blades and light fixture regularly to prevent buildup that can affect performance and appearance.
Check for Loose Connections: Periodically inspect and tighten any loose electrical connections to maintain safety and efficiency.
Replace Bulbs as Needed: Replace light bulbs promptly when they burn out to maintain consistent illumination.
Balance the Fan: If you notice any wobbling or noise during operation, use a balancing kit (typically included) to adjust and stabilize the fan blades.
Conclusion
Westinghouse ceiling fans light fixtures offer an ideal blend of functionality, style, and reliability for enhancing your home’s comfort and aesthetic appeal. Whether you’re looking to upgrade an existing ceiling fan or install a new fixture, Westinghouse provides a range of options to suit your needs and preferences.
Explore the diverse selection of Westinghouse ceiling fans light fixtures available today and transform your living spaces with superior lighting and cooling solutions.
Water damage on popcorn ceiling can be a troubling issue for homeowners, leading to unsightly stains, structural issues, and potentially hazardous mold growth. In this comprehensive guide, we delve into the causes of water damage on popcorn ceilings, effective remediation strategies, and essential tips for prevention.
What is Water Damage on Popcorn Ceilings?
Water damage on popcorn ceilings refers to any form of moisture infiltration that compromises the integrity and appearance of the textured surface. Popcorn ceilings, also known as acoustic or stipple ceilings, are characterized by their rough, bumpy texture, which can absorb and retain moisture when exposed to water leaks or high humidity levels.
Causes of Water Damage on Popcorn Ceilings
Plumbing Leaks
One of the most common causes of water damage on popcorn ceilings is plumbing leaks. Leaky pipes, whether from supply lines or drain lines, can release water into ceiling cavities, gradually saturating the popcorn texture and causing it to sag, discolor, or even collapse in severe cases.
Roof Leaks
Roof leaks are another frequent culprit behind water damage on popcorn ceilings. Damaged shingles, improper flashing, or clogged gutters can allow rainwater to seep into the attic space and eventually penetrate through to the ceiling below, compromising the popcorn texture and underlying materials.
Excessive condensation due to poor ventilation or high humidity levels can also contribute to water damage on popcorn ceilings. When warm, moist air comes into contact with cooler ceiling surfaces, condensation forms, leading to damp spots, staining, and deterioration of the popcorn texture over time.
Bathroom Moisture
In bathrooms, inadequate ventilation during showers or baths can cause moisture to accumulate on popcorn ceilings. This moisture can gradually degrade the texture and create an environment conducive to mold growth, posing health risks and further compromising the ceiling’s structural integrity.
Signs of Water Damage on Popcorn Ceilings
Recognizing the signs of water damage early can help prevent extensive repairs and mitigate potential health hazards. Common indicators include:
Staining: Discoloration or yellowing spots on the ceiling surface.
Sagging: Visible bulging or softening of the popcorn texture.
Peeling or Bubbling: Texture that appears to peel away or form bubbles.
Musty Odor: Mold or mildew growth often accompanies water damage and emits a distinct musty smell.
Remediation and Repair Options
Assessing the Extent of Damage
Before proceeding with repairs, assess the extent of water damage on your popcorn ceiling. Determine whether the damage is localized or widespread, and identify the source of the water intrusion to prevent future issues.
Repairing Small Areas of Damage
For minor water stains or small areas of popcorn texture damage, consider spot cleaning and patching techniques. Use a stain-blocking primer to cover water stains, and carefully apply new popcorn texture to blend with the existing ceiling.
Removing and Replacing Damaged Areas
In cases of extensive water damage or significant mold growth, it may be necessary to remove and replace sections of the popcorn ceiling. Hire a professional contractor experienced in handling textured ceiling repairs to ensure safe removal and proper installation of new materials.
Addressing Underlying Issues
Address the underlying causes of water damage to prevent future incidents. Repair leaking pipes, fix roof issues, improve ventilation in bathrooms, and consider installing dehumidifiers or exhaust fans to reduce moisture levels.
Prevention Tips for Water Damage on Popcorn Ceilings
Regular Maintenance
Perform routine inspections of your home’s plumbing and roofing systems to detect and repair leaks promptly. Check for signs of water stains or mold growth on ceilings and walls, as these can indicate hidden water damage.
Roof Maintenance
Inspect your roof regularly for damaged or missing shingles, deteriorated flashing, and clogged gutters. Clean gutters and downspouts to ensure proper drainage and prevent water from seeping into the attic and ceilings.
Ventilation Improvement
Improve ventilation in bathrooms, kitchens, and attics to reduce humidity levels and minimize condensation on ceilings. Use exhaust fans during showers or cooking, and consider installing roof vents or ridge vents to promote airflow.
Professional Inspections
Schedule annual inspections with qualified professionals to assess the condition of your home’s plumbing, roofing, and HVAC systems. Address any issues promptly to prevent costly repairs and potential water damage to ceilings and other structural components.
Conclusion
Water damage on popcorn ceilings can compromise the aesthetic appeal, structural integrity, and indoor air quality of your home. By understanding the causes of water damage, recognizing early signs of moisture infiltration, and implementing effective prevention and remediation strategies, you can protect your popcorn ceilings and maintain a safe and comfortable living environment.
Whether you’re dealing with a minor water stain or significant ceiling damage, taking proactive measures and seeking professional assistance when needed will help preserve the beauty and value of your home for years to come.
T-Bar ceiling lighting is an essential feature in many commercial and residential buildings, offering both functionality and aesthetic appeal. This lighting system integrates seamlessly with T-bar or drop ceilings, providing an efficient and stylish way to illuminate spaces. In this article, we will explore the benefits of T-Bar ceiling lighting, various types available, installation tips, and how to maintain these lighting systems. Our goal is to provide a comprehensive understanding of T-Bar ceiling lighting, ensuring you make informed decisions for your lighting needs.
The Benefits of T-Bar Ceiling Lighting
Efficient and Uniform Illumination
One of the primary advantages of T-Bar ceiling lighting is its ability to provide efficient and uniform illumination. These lighting systems are designed to distribute light evenly across large areas, reducing shadows and dark spots. This makes them ideal for offices, classrooms, retail stores, and other commercial spaces where consistent lighting is crucial.
Easy Installation and Maintenance
T-Bar ceiling lighting is known for its ease of installation and maintenance. The fixtures are designed to fit into the grid of a T-bar ceiling, allowing for quick and straightforward installation. Additionally, maintenance is simplified as the fixtures can be easily accessed and replaced without requiring significant structural changes.
Versatility and Flexibility
T-Bar ceiling lighting offers versatility and flexibility in terms of design and application. These lighting systems come in various sizes, shapes, and styles, allowing you to choose fixtures that complement your interior decor. Whether you prefer recessed, surface-mounted, or suspended fixtures, T-Bar ceiling lighting can be customized to meet your specific needs.
Energy Efficiency
Modern T-Bar ceiling lighting solutions are designed with energy efficiency in mind. Many fixtures utilize LED technology, which consumes less power and has a longer lifespan compared to traditional fluorescent or incandescent bulbs. This not only reduces energy costs but also minimizes environmental impact.
T-Bar ceiling lighting enhances the aesthetics of a space by providing a clean and modern look. The fixtures integrate seamlessly with the ceiling, creating a cohesive and polished appearance. This is particularly important in commercial settings where a professional and inviting ambiance is essential.
Types of T-Bar Ceiling Lighting
Recessed Lighting
Recessed lighting, also known as can lights or downlights, is a popular choice for T-Bar ceilings. These fixtures are installed above the ceiling grid, with only the trim and lens visible. Recessed lighting provides a sleek and unobtrusive look, making it ideal for spaces where a minimalist design is desired.
Surface-Mounted Lighting
Surface-mounted lighting fixtures are installed directly onto the ceiling grid. These fixtures are more visible compared to recessed lighting and can serve as a design element in addition to providing illumination. Surface-mounted lights are available in various shapes and sizes, including square, rectangular, and round fixtures.
Suspended Lighting
Suspended or pendant lighting fixtures hang from the ceiling grid, providing a stylish and modern lighting solution. These fixtures are often used in spaces with higher ceilings or where a more dramatic lighting effect is desired. Suspended lighting can be used to highlight specific areas, such as reception desks or conference tables.
Troffer Lighting
Troffer lights are rectangular or square fixtures that fit into the grid of a T-Bar ceiling. They are commonly used in commercial and institutional settings, such as offices, schools, and hospitals. Troffer lights provide broad and even illumination, making them ideal for large spaces.
LED Panels
LED panels are a contemporary and energy-efficient option for T-Bar ceiling lighting. These slim panels provide uniform light distribution and are available in various sizes to fit standard ceiling grids. LED panels are known for their long lifespan and low maintenance requirements, making them a popular choice for many applications.
Installing T-Bar Ceiling Lighting
Planning and Preparation
Before installing T-Bar ceiling lighting, it is essential to plan and prepare adequately. Determine the number of fixtures needed based on the size of the space and the desired level of illumination. Consider the layout of the ceiling grid and the location of electrical outlets to ensure proper placement of the fixtures.
Tools and Materials
Gather the necessary tools and materials for the installation process. This may include a ladder, measuring tape, screwdriver, wire stripper, electrical tape, and the lighting fixtures themselves. Ensure that all components are compatible with the T-Bar ceiling system.
Step-by-Step Installation
Turn Off the Power: Before starting the installation, turn off the power to the area where the lighting will be installed. This is crucial for safety purposes.
Remove Ceiling Tiles: Carefully remove the ceiling tiles where the fixtures will be installed. Set the tiles aside for reinstallation after the lighting fixtures are in place.
Install the Fixtures: Position the lighting fixtures in the desired locations within the ceiling grid. Secure the fixtures using the appropriate mounting brackets or clips provided by the manufacturer.
Wiring the Fixtures: Connect the fixtures to the electrical wiring according to the manufacturer’s instructions. Ensure that all connections are secure and insulated properly with electrical tape.
Reinstall Ceiling Tiles: Once the fixtures are installed and wired, replace the ceiling tiles around the fixtures. Make any necessary adjustments to ensure the tiles fit snugly around the fixtures.
Test the Lighting: Turn the power back on and test the lighting to ensure that all fixtures are working correctly. Make any necessary adjustments to the alignment or positioning of the fixtures.
Maintaining T-Bar Ceiling Lighting
Regular Cleaning
To maintain the appearance and performance of T-Bar ceiling lighting, regular cleaning is essential. Dust and debris can accumulate on the fixtures and lenses, reducing light output and affecting the overall look. Use a soft cloth or duster to clean the fixtures periodically, and avoid using harsh chemicals that could damage the finish.
Replacing Bulbs and Components
Over time, bulbs and other components may need to be replaced. Follow the manufacturer’s guidelines for replacing bulbs and other parts to ensure compatibility and proper functioning. If using LED fixtures, the need for replacements will be less frequent due to their longer lifespan.
Inspecting for Damage
Periodically inspect the lighting fixtures for any signs of damage or wear. Check for loose connections, cracks in the lenses, or other issues that could affect performance. Address any problems promptly to prevent further damage and ensure consistent illumination.
Conclusion
T-Bar ceilings lighting offers numerous benefits, including efficient and uniform illumination, easy installation and maintenance, versatility, energy efficiency, and enhanced aesthetics. By understanding the various types of T-Bar ceilings lighting available and following proper installation and maintenance practices, you can create a well-lit and visually appealing space that meets your specific needs.
Whether you’re outfitting a commercial office, a retail store, or a residential area, T-Bar ceiling lighting provides a practical and stylish solution. Consider your lighting requirements, explore the different options, and enjoy the advantages of a well-lit environment with T-Bar ceilings lighting.