Black mold on ceiling tiles can be a concerning issue for homeowners. Not only does it ruin the aesthetic of your living space, but it also poses potential health risks. If you’ve noticed dark spots or discolored patches on your ceiling tiles, there’s a good chance that black mold is present. In this comprehensive guide, we’ll explain how to identify black mold, the dangers it poses, how to effectively remove it, and preventive measures to keep it from returning.
What is Black Mold and Why Does It Appear on Ceiling Tiles?
Black mold, scientifically known as Stachybotrys chartarum, is a type of toxic fungus that thrives in damp, humid environments. It can grow in various parts of your home, including your ceiling tiles, when certain conditions are present.
Read too: Kitchen Lighting For A Vaulted Ceiling: Illuminating Your Space with Style and Functionality
Why Black Mold Grows on Ceiling Tiles
Ceiling tiles are particularly susceptible to mold growth due to the following reasons:
- Moisture: Excessive moisture or water leaks from plumbing issues, roof damage, or high humidity can create the perfect environment for mold to grow.
- Poor Ventilation: Spaces with inadequate airflow, such as attics or bathrooms, are often breeding grounds for mold.
- Condensation: In areas where warm, moist air meets cold surfaces (such as the ceiling), condensation can form, providing moisture for mold growth.
If you see black mold on your ceiling tiles, it’s important to address the underlying moisture problem before attempting to remove it. Otherwise, the mold is likely to return.
Signs of Black Mold on Ceiling Tiles
Recognizing black mold early can help prevent the issue from spreading. Here are the signs to watch out for:
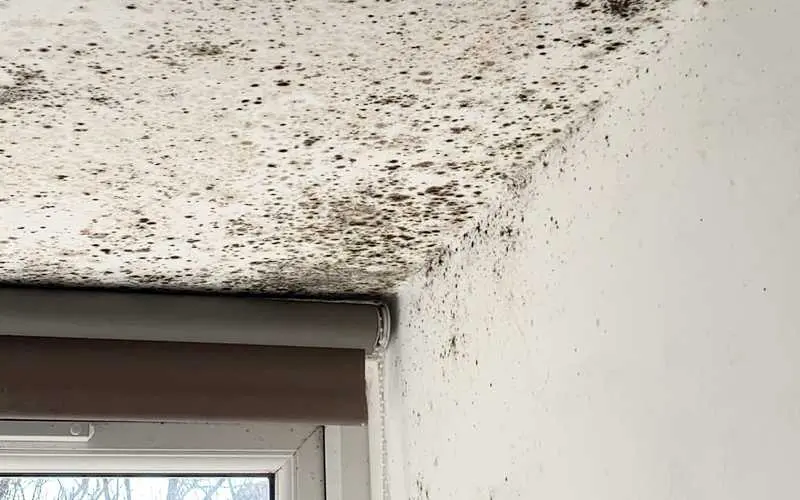
- Black or Greenish Patches: Black mold typically appears as dark green, gray, or black patches or spots on the surface of ceiling tiles.
- Musty Odor: A strong, musty smell is often the first clue that mold is present. If you notice an unpleasant odor in the room, it’s worth inspecting the ceiling tiles.
- Water Stains or Dampness: If you see water stains, discoloration, or areas that feel damp to the touch, mold may be growing in those spots.
- Health Symptoms: Exposure to black mold can cause health issues such as coughing, sneezing, headaches, and respiratory problems. If you or your family members experience these symptoms, mold may be the cause.
Health Risks of Black Mold on Ceiling Tiles
Black mold is not only unsightly, but it can also have significant health consequences. The mold spores release mycotoxins, which can be harmful to humans, especially when inhaled. Prolonged exposure to these toxins may lead to:
- Respiratory Issues: Coughing, wheezing, and shortness of breath are common symptoms.
- Allergic Reactions: People with mold allergies may experience skin rashes, eye irritation, or nasal congestion.
- Asthma Attacks: Those with asthma may experience severe flare-ups in the presence of black mold.
- Chronic Fatigue: Mold exposure can lead to fatigue, headaches, and difficulty concentrating.
If you suspect you have black mold on ceiling tiles, it’s crucial to address the problem promptly to avoid these health risks.
How to Safely Remove Black Mold on Ceiling Tiles
If you discover black mold on your ceiling tiles, it’s important to act quickly and remove it safely. Mold removal can be a hazardous task, especially for large infestations, so it’s vital to follow the right steps.
What You’ll Need
- Rubber gloves
- N95 mask or respirator
- Plastic sheeting (to cover furniture and flooring)
- Soap and water
- White vinegar or hydrogen peroxide
- A scrub brush or sponge
- A bucket
- A fan or dehumidifier
Step-by-Step Process
- Prepare the Area
Before starting the removal process, remove any furniture or items under the affected area. Use plastic sheeting to cover the floor and protect it from mold spores. - Wear Protective Gear
Mold spores can be harmful if inhaled or come into contact with your skin, so make sure to wear gloves, an N95 mask, and safety goggles to protect yourself. - Identify the Source of Moisture
Locate the source of the moisture causing the mold growth. It could be a leaky roof, plumbing issue, or poor ventilation. Fix this problem before proceeding with mold removal. - Clean the Moldy Ceiling Tiles
- Start by gently scrubbing the black mold off the ceiling tiles using a mixture of soap and water or a mold-killing solution like white vinegar or hydrogen peroxide.
- Apply the solution directly to the moldy spots and allow it to sit for about 10-15 minutes.
- Use a scrub brush to remove the mold. Avoid using a wire brush, as it may damage the ceiling tiles.
- Dry the Area
Once the mold is removed, use a fan or dehumidifier to dry the area completely. Moisture is the root cause of mold growth, so it’s crucial to ensure the area is dry to prevent further issues. - Dispose of Contaminated Materials
If the ceiling tiles are severely damaged or the mold has penetrated deep into the material, it may be necessary to replace the tiles entirely. Dispose of any contaminated materials properly in a sealed bag to prevent spreading mold spores.
How to Prevent Black Mold on Ceiling Tiles
Preventing black mold from forming on ceiling tiles is the key to keeping your home safe and healthy. Here are a few steps you can take:
- Fix Water Leaks
Leaky roofs, pipes, or windows can introduce moisture into your ceiling tiles, creating an ideal environment for mold. Regularly inspect your roof and plumbing for leaks and address them immediately. - Improve Ventilation
Poor ventilation can lead to condensation and humidity, which encourage mold growth. Increase airflow in your basement, attic, or bathrooms by using exhaust fans, opening windows, or installing a dehumidifier. - Use Mold-Resistant Materials
When renovating or replacing ceiling tiles, consider using mold-resistant materials. Certain ceiling tiles are designed to resist mold growth, reducing the risk of future infestations. - Monitor Humidity Levels
Mold thrives in humid environments, so keep your home’s humidity levels below 60%. Use a hygrometer to measure the humidity, and run a dehumidifier if necessary.
When to Call a Professional Mold Remediation Service
While small mold patches on ceiling tiles can be tackled by homeowners, larger infestations or severe water damage may require professional help. Mold remediation specialists have the expertise and equipment to handle extensive mold issues safely.
You should call a professional if:
- The mold covers a large area (more than 10 square feet).
- You’re unable to locate the source of the moisture.
- You have health concerns or respiratory issues that make DIY removal unsafe.
Conclusion
Black mold on ceiling tiles can be a serious problem if left untreated, posing risks to your health and your home. By understanding the causes, recognizing the signs, and taking swift action, you can effectively eliminate black mold and prevent it from returning. Regular maintenance, proper ventilation, and moisture control are essential for keeping your ceilings mold-free. If you encounter a larger infestation, don’t hesitate to consult a mold remediation professional to ensure a safe and thorough removal process.