If you’re a car enthusiast, DIY mechanic, or simply looking to maximize the storage and functionality of your garage, installing a car lift can be a game-changer. A car lift provides an easy and efficient way to work on your vehicle or park a second car without taking up additional space. But what if you have a 10-foot ceiling in your garage? Can you still install a car lift that fits perfectly in such a space?
In this comprehensive guide, we will explore everything you need to know about installing and using a car lift with a 10-foot ceiling. From different types of lifts to installation considerations and practical tips, we’ll cover it all so you can make an informed decision.
What Is a Car Lift and Why Should You Consider One?
A car lift is a mechanical device designed to raise a vehicle off the ground, creating extra space beneath it. This makes it easier to work on the car’s underside, change the oil, or store an additional car in the same garage. A car lift also provides improved safety and efficiency when performing maintenance tasks.
There are several reasons why a car lift could be a great investment for your home garage:
- Space-saving: With limited garage space, a car lift allows you to stack vehicles vertically, effectively doubling your parking capacity.
- Increased functionality: It gives you access to your car’s undercarriage, making it easier to perform maintenance and repairs.
- Enhanced safety: Using a lift is safer than crawling under a car on a jack, reducing the risk of accidents.
Read too: Kitchen Lighting For A Vaulted Ceiling: Illuminating Your Space with Style and Functionality
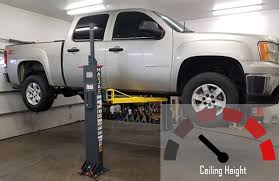
For garages with 10-foot ceilings, you need to choose a car lift that is suitable for such dimensions. A 10-foot ceiling is slightly higher than the average ceiling height in many homes, but it’s important to choose a lift that can operate effectively in this space.
Types of Car Lifts for a 10-Foot Ceiling
When considering a car lift for a garage with a 10-foot ceiling, it’s essential to understand the different types of lifts available. Depending on the type of work you plan to do, you may find one lift better suited to your needs than another. Let’s take a look at the most common car lift types:
1. Two-Post Lifts
Two-post lifts are the most popular choice for home garages due to their simplicity, affordability, and efficiency. They consist of two vertical posts with adjustable arms that lift the car from the frame. This type of lift requires adequate ceiling height to ensure safe operation.
Pros:
- Affordable: Generally cheaper than other types of lifts.
- Compact design: Takes up less space in your garage compared to four-post lifts.
- Versatile: Works for most car models and is perfect for DIY repairs.
Cons:
- Ceiling height requirements: Two-post lifts often require more than 10 feet of clearance, so make sure the lift you choose is rated for your ceiling height.
- Less stability: As the car is lifted from the frame, there is a chance of the vehicle tilting or shifting if not positioned correctly.
2. Four-Post Lifts
Four-post lifts are ideal for owners who want to store a second vehicle or need a more stable platform for lifting heavy cars. The four-post design offers better stability and allows you to store a vehicle on top of another one.
Pros:
- Stable and secure: The four-post design provides better stability compared to two-post lifts.
- Storage capabilities: You can store a second vehicle on top of the lifted car, making it perfect for garages with limited space.
- Better for heavier vehicles: Can accommodate heavier cars and trucks with ease.
Cons:
- Higher cost: Four-post lifts are generally more expensive than two-post models.
- Takes up more space: While they provide excellent storage options, they require more room in the garage than a two-post lift.
3. Scissor Lifts
Scissor lifts use a crisscrossing mechanism that raises the vehicle straight up. These lifts are often more compact than their two- or four-post counterparts, making them suitable for garages with lower ceilings or limited space.
Pros:
- Compact design: Takes up less space and works well in smaller garages.
- Easy to install: Scissor lifts are relatively easy to set up and don’t require as much ceiling clearance as other types.
- Affordable: Typically more affordable than four-post lifts.
Cons:
- Limited storage: Unlike four-post lifts, scissor lifts do not offer the option to store a second car underneath.
- Less stable for heavy vehicles: Scissor lifts may not be ideal for lifting heavy trucks or SUVs.
Key Considerations When Choosing a Car Lift for a 10-Foot Ceiling
When choosing a car lift for a 10-foot ceiling, several factors should be considered to ensure that you select the best option for your needs:
1. Ceiling Height and Lift Design
As mentioned earlier, ceiling height plays a crucial role in determining which type of lift will work for your garage. A 10-foot ceiling is higher than average, but you should still check the specifications for the lift you’re considering to ensure it will fit in your space. Some two-post lifts require additional ceiling height for full operation, while scissor lifts or low-rise lifts may be more appropriate for a 10-foot ceiling.
2. Weight Capacity
Make sure the lift you select can support the weight of the vehicles you plan to lift. If you’re lifting a car, a two-post lift with a 7,000 to 10,000-pound capacity is usually sufficient. However, if you plan to lift heavier vehicles like trucks, SUVs, or large vans, you’ll need a lift with a higher weight capacity.
3. Lift Height
Another important factor is the height the lift can reach. For a 10-foot ceiling, you’ll want a lift that can raise your vehicle high enough to work under the car comfortably. Most lifts have a maximum lifting height of around 6 to 7 feet, but some lifts are designed to extend higher.
4. Space and Garage Layout
Think about the layout of your garage and how much space you’re willing to sacrifice for a car lift. If you’re using the lift to store a second vehicle, a four-post lift might be the best option. On the other hand, if you have limited space, a two-post or scissor lift will work better.
5. Budget
Car lifts can be a significant investment, so it’s important to consider your budget. While two-post lifts are usually the most affordable, four-post lifts and electric lifts tend to be more expensive. You should balance your desire for features and lift capacity with your budget.
Installation Tips for Car Lifts in a 10-Foot Ceiling Garage
Once you’ve selected the perfect car lift, it’s important to install it correctly to ensure safety and functionality. Here are a few tips to guide you through the installation process:
- Professional Installation: It’s often best to have a professional install your car lift, especially if you’re not familiar with the process. A licensed technician can ensure that everything is installed according to safety standards.
- Prepare the Floor: Car lifts require a solid, level surface. Make sure your garage floor is reinforced to support the weight of the lift and the vehicle.
- Ensure Adequate Clearance: Before installation, double-check that your garage has the necessary ceiling clearance for the lift’s full range of motion.
- Follow Manufacturer Instructions: Always follow the manufacturer’s guidelines for installation, maintenance, and weight limits to ensure safe operation.
Conclusion
A car lift with a 10-foot ceiling can transform your garage into a more efficient and functional space. By understanding the different types of lifts available and considering factors such as ceiling height, weight capacity, and space requirements, you can choose the perfect lift for your needs. Whether you’re lifting a car for maintenance, storing a second vehicle, or simply looking to optimize your garage, the right car lift will make all the difference.