Drop Ceiling Tiles for Basements: A Complete Guide to Installation and Benefits

When finishing a basement, one of the most important decisions you’ll make is how to handle the ceiling. Drop ceilings are a popular choice for basement remodels due to their ease of installation, versatility, and accessibility. They are an effective solution for concealing wiring, pipes, and ducts while providing a polished look. But when it comes to drop ceiling tiles for basements, choosing the right material, size, and design can make all the difference.

Drop Ceiling Tiles For Basements

This guide will walk you through the advantages of drop ceiling tiles for basements, how to select the best tiles for your space, and the factors to consider for a successful installation.


Why Choose Drop Ceiling Tiles for Basements?

Basements present unique challenges for ceiling design. Since many basements contain exposed plumbing, ducts, and wiring, a drop ceiling is a practical solution to hide these elements while maintaining accessibility for future repairs. But beyond their functional advantages, drop ceiling tiles for basements also offer several aesthetic and acoustic benefits.

1. Concealing Utilities

A key reason to install drop ceiling tiles in your basement is to conceal the plumbing, electrical wiring, and HVAC ducts that are often present. With a drop ceiling, these components are hidden behind the tiles, creating a clean and organized look. Additionally, drop ceilings allow for easy access to these systems if repairs are needed, as individual tiles can be removed without disturbing the entire ceiling.

Read too: Kitchen Lighting For A Vaulted Ceiling: Illuminating Your Space with Style and Functionality

2. Moisture Resistance

Basements are often prone to high humidity, which can lead to mold and mildew. Many drop ceiling tiles are designed to resist moisture, making them a good choice for this type of environment. Moisture-resistant tiles help prevent damage and extend the life of your ceiling.

3. Sound Absorption

Basements, especially if used as a home theater, gym, or recreation room, can benefit from the soundproofing properties of drop ceiling tiles. Many tiles are made from materials that absorb sound, reducing echoes and noise transfer between rooms. If you plan to use your basement as a media room, this can significantly enhance your experience.

4. Aesthetic Versatility

Drop ceiling tiles are available in a variety of colors, textures, and finishes, allowing you to choose the perfect look for your basement. Whether you prefer a modern, sleek design or a more traditional appearance, drop ceiling tiles offer flexibility in style. You can select tiles that complement the overall design of your basement, from bright white tiles that reflect light to darker tiles that create a cozier feel.


Factors to Consider When Choosing Drop Ceiling Tiles for Basements

When selecting drop ceiling tiles for your basement, several factors come into play. It’s essential to choose tiles that meet both aesthetic and functional requirements. Here are some of the key considerations:

1. Tile Material

The material of the drop ceiling tiles plays a significant role in their performance. Popular materials include:

  • Mineral Fiber: Mineral fiber tiles are highly absorbent, making them ideal for soundproofing and moisture resistance. They are often used in basements where acoustics and humidity are a concern.
  • PVC (Plastic): PVC tiles are waterproof and resistant to mold and mildew, making them a good choice for wet basements. They are also available in a wide variety of styles and finishes.
  • Fiberglass: Fiberglass tiles are lightweight, moisture-resistant, and durable. They also provide excellent sound absorption and are often used in areas where acoustic performance is a priority.
  • Metal: For a more industrial or modern look, metal tiles are available. They are durable and moisture-resistant, though they may not offer the same acoustic benefits as fiber-based materials.

2. Tile Size

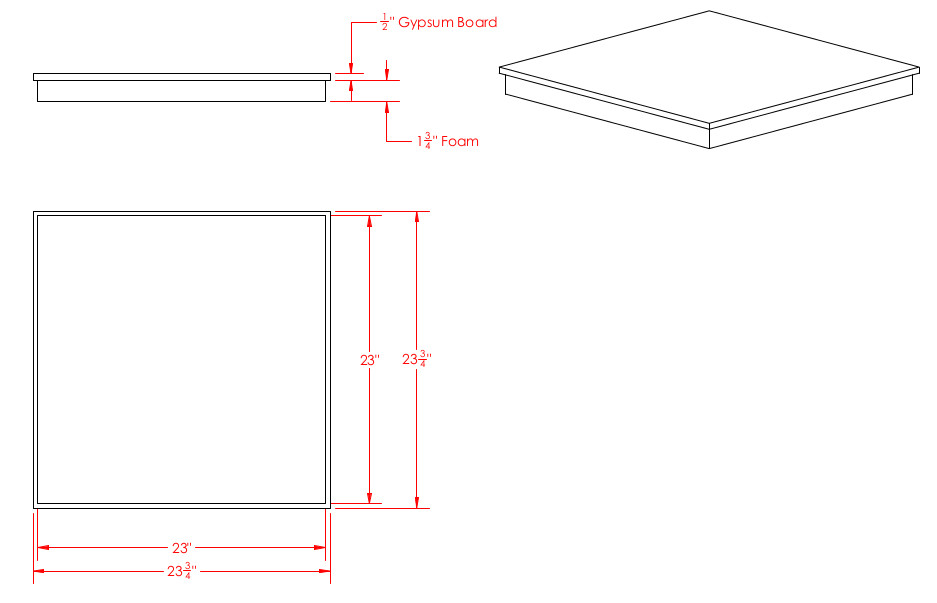
The most common sizes for drop ceiling tiles are 24 x 24 inches (2 x 2 feet) and 24 x 48 inches (2 x 4 feet). Both sizes can be used in basement spaces, but each has distinct advantages:

  • 24 x 24-inch tiles: Smaller tiles create a grid pattern that offers a more detailed, intricate look. They are ideal for smaller rooms or areas where you want a more visually complex ceiling.
  • 24 x 48-inch tiles: Larger tiles create a more modern, streamlined appearance. They are often used in larger basement spaces where fewer tiles are needed, and the larger format can help create a more open feel.

3. Acoustics

If your basement is being converted into a home theater, music studio, or entertainment room, soundproofing is a key consideration. Some drop ceiling tiles are designed specifically to absorb sound, reducing echoes and improving sound quality. Acoustical tiles with high NRC (Noise Reduction Coefficient) ratings are your best option for achieving optimal sound control.

4. Fire Resistance

In basements, where electrical wiring and other hazards may be present, fire-resistant drop ceiling tiles can provide added peace of mind. Many ceiling tiles come with fire-resistant coatings or are made from naturally fire-resistant materials.

5. Aesthetic Preferences

Your aesthetic preferences will play a role in choosing the right tile. Drop ceiling tiles for basements come in various colors, patterns, and textures, allowing you to customize the look of your basement. Choose from traditional white tiles, more contemporary black tiles, or textured finishes that replicate wood, stone, or even metal.


Advantages of Using Drop Ceiling Tiles for Basements

Installing drop ceiling tiles in your basement offers numerous benefits, both functional and aesthetic. Here are some of the key advantages:

1. Easy Access to Utilities

The most significant benefit of drop ceilings is the easy access to plumbing, wiring, and HVAC ducts. In a basement where these utilities are often visible, having a drop ceiling provides the ability to maintain and repair systems without the hassle of removing large sections of drywall.

2. Better Lighting

Because drop ceiling tiles are suspended below the main ceiling, they can also be used to conceal lighting fixtures like recessed lights. This creates a more polished, modern look. Additionally, the reflective surfaces of some tiles can help brighten the basement by bouncing light off the ceiling.

3. Cost-Effective Solution

Compared to traditional drywall ceilings, drop ceilings are generally more affordable to install. The tiles are inexpensive, and the installation process is straightforward, making it a cost-effective solution for basement ceiling needs.

4. Quick Installation

Installing a drop ceiling is often quicker and easier than installing drywall. Since the tiles simply drop into the grid system, it requires less labor and can be completed in less time, especially if the basement’s ceiling is relatively small.

5. Moisture Protection

Basements are notorious for their humidity and moisture problems. Many drop ceiling tiles are specifically designed to resist moisture and mold growth. If moisture does become a problem, tiles can be easily replaced without having to redo the entire ceiling.


How to Install Drop Ceiling Tiles in Your Basement

Once you’ve chosen the best drop ceiling tiles for your basement, the next step is installation. While the process may seem complex, it is relatively simple with the right tools and preparation.

Step 1: Measure the Basement Ceiling

Start by measuring the length and width of the ceiling. This will help you calculate how many tiles you need, as well as the layout of the grid system.

Step 2: Install the Grid System

The grid system is the framework that holds the drop ceiling tiles in place. Use a level to mark a reference line along the perimeter of the room. Once the reference line is set, you can install the main runners and cross tees to create the grid structure.

Step 3: Cut the Tiles

Depending on the size of your basement, you may need to cut the tiles to fit around the edges of the room or around obstacles like light fixtures or vents. Use a utility knife to make straight cuts.

Step 4: Place the Tiles

Once the grid is installed and the tiles are cut to size, simply drop the tiles into the grid. Ensure that they sit securely in place and that all seams align properly.

Step 5: Add Finishing Touches

After installing the tiles, consider adding finishing touches like lighting fixtures, crown molding, or trim to complete the look.


Conclusion

Drop ceiling tiles for basements are a practical, cost-effective, and aesthetically versatile solution for improving your basement’s appearance and functionality. By considering factors like material, tile size, acoustics, and moisture resistance, you can choose the perfect tiles for your space. Whether you’re looking to conceal utilities, improve soundproofing, or simply enhance the design of your basement, drop ceiling tiles are an excellent choice for a finished basement ceiling. With easy installation and maintenance, they offer long-lasting benefits that enhance both the look and function of your basement.

Drop Ceiling Tile Sizes: A Complete Guide to Choosing the Right Fit for Your Space

When planning a ceiling upgrade, drop ceilings, also known as suspended ceilings, are popular for their versatility, cost-effectiveness, and easy installation. A crucial factor in creating a visually appealing and functional drop ceiling is choosing the correct tile size. Drop ceiling tile sizes vary, and selecting the right size can impact the room’s aesthetics, acoustics, and even lighting. This article will walk you through the different drop ceiling tile sizes available, factors to consider when choosing, and the advantages of each size for different types of spaces.

Drop Ceiling Tile Sizes

What are Drop Ceiling Tiles?

Drop ceiling tiles are panels suspended below the actual ceiling using a grid framework. These tiles offer a range of benefits, including easy access to electrical wiring, HVAC systems, and other overhead fixtures, while also allowing for quick tile replacements if damaged. They come in a variety of sizes, patterns, and materials to suit aesthetic preferences and functional needs.

Drop ceilings are often used in commercial spaces, but they are also becoming popular in residential areas like basements, kitchens, and home offices. To create the right look and functionality, it’s essential to choose drop ceiling tile sizes that fit both the space and your practical needs.

Read too: Kitchen Lighting For A Vaulted Ceiling: Illuminating Your Space with Style and Functionality


Drop Ceiling Tile Sizes Overview

The most common drop ceiling tile sizes are:

  1. 24 x 24 inches (2 x 2 feet)
  2. 24 x 48 inches (2 x 4 feet)

These two sizes are widely used because they fit standard grid systems and offer flexibility in design. Other custom sizes are available, but the above dimensions are the most prevalent and easiest to source.

Each of these tile sizes has distinct benefits and is suitable for different spaces. Let’s explore each option in more detail.


Common Drop Ceiling Tile Sizes and Their Applications

Understanding the most popular drop ceiling tile sizes and how they perform in different environments is crucial for a successful installation.

1. 24 x 24 Inch Tiles

Tiles with dimensions of 24 x 24 inches are widely popular because they provide a balanced look in both small and large spaces. This size is ideal for offices, hallways, kitchens, and smaller rooms where a compact and symmetrical appearance is desired.

  • Benefits:
    • Versatility: Due to their smaller size, they can fit in almost any room without overwhelming the space.
    • Easy to Replace: The 24 x 24-inch tiles are generally easier to remove and replace than larger tiles, making maintenance convenient.
    • Improved Sound Absorption: Smaller tiles offer better sound-dampening properties, making them a good choice for offices or study rooms where reducing noise is essential.

2. 24 x 48 Inch Tiles

For larger spaces like auditoriums, conference rooms, and commercial spaces, 24 x 48-inch tiles are a popular choice. Their larger surface area means fewer tiles are needed, resulting in faster installation.

  • Benefits:
    • Enhanced Aesthetic Flow: These tiles create a continuous look and reduce the appearance of gridlines, which can be distracting in larger rooms.
    • Cost-Effective Installation: With fewer tiles to install, the labor cost is often lower, especially in expansive spaces.
    • Good for High Ceilings: In rooms with higher ceilings, 24 x 48-inch tiles provide a seamless look that’s hard to achieve with smaller tiles.

Factors to Consider When Choosing Drop Ceiling Tile Sizes

When choosing the right drop ceiling tile size, it’s important to consider factors such as room dimensions, function, aesthetic preferences, and acoustic needs. Here are some points to keep in mind:

Room Size and Shape

For smaller rooms, smaller tiles (like 24 x 24 inches) often work best, while larger tiles (24 x 48 inches) can be more effective in larger, open spaces. The tile size should complement the room’s layout without overwhelming it.

Aesthetic Preferences

The appearance of your drop ceiling can dramatically impact the feel of a space. Smaller tiles create a more intricate look, while larger tiles give a streamlined, modern feel. Decide whether you want the ceiling tiles to stand out as a design feature or to blend seamlessly with the room’s decor.

Acoustic Needs

If sound control is a priority, like in an office or study room, smaller tiles may offer better sound absorption. Many 24 x 24-inch tiles are made with noise-reducing materials, making them ideal for creating a quieter environment.

Lighting Requirements

Incorporating lighting into drop ceilings is another key factor. Smaller tiles allow for more grid options to place recessed lighting. For larger tiles, ensure that lighting placement aligns with your functional needs.

Maintenance and Accessibility

If you anticipate regular maintenance or access to overhead wiring, smaller tiles may be more convenient for easier removal and replacement. Larger tiles, however, reduce the number of access points, which can simplify the grid structure.


Materials and Styles for Drop Ceiling Tiles

Drop ceiling tiles are available in various materials, each offering different benefits in terms of appearance, sound control, and durability. Here are a few popular options:

Acoustic Tiles

Acoustic ceiling tiles are usually made from fiberglass or mineral fiber, both excellent for sound absorption. They’re ideal in settings where noise control is essential, like offices or classrooms.

Metal Tiles

Metal tiles are durable and give a modern, industrial aesthetic. Often available in both 24 x 24 and 24 x 48-inch sizes, metal tiles are more popular in commercial and industrial spaces due to their sleek look and durability.

Wood-Look Tiles

For a warmer, more natural feel, wood-look tiles are available. These tiles offer a rustic look suitable for cafes, residential basements, or home offices. They may not have the same acoustic properties but can enhance the ambiance.


Drop Ceiling Tile Sizes: Making the Right Choice

When choosing between 24 x 24-inch and 24 x 48-inch tiles, consider both practical and aesthetic factors:

  • For small rooms or spaces with frequent maintenance, 24 x 24-inch tiles are often better.
  • For large rooms where a continuous aesthetic is preferred, 24 x 48-inch tiles offer a more streamlined look.

Ultimately, the tile size should enhance the room’s function, acoustic needs, and design style.


Drop Ceiling Tile Installation Tips

Proper installation ensures that your ceiling is stable and visually appealing. Here are some basic tips for installing drop ceiling tiles:

  1. Measure the Room Accurately: Determine the total area and grid size needed for a precise fit.
  2. Choose the Right Grid System: Ensure the grid you choose is compatible with your tile size.
  3. Install Supports Properly: Use support wires to secure the grid and tiles in place.
  4. Cut Tiles Carefully: For edges or areas around fixtures, use a sharp utility knife for clean cuts.

Following these steps can ensure your drop ceiling looks professional and functions as intended.


Conclusion

Selecting the correct drop ceiling tile size is an essential part of creating a functional, aesthetically pleasing space. By understanding the benefits and applications of 24 x 24-inch and 24 x 48-inch tiles, you can make an informed choice that aligns with your needs. Consider factors like room size, aesthetics, acoustics, and accessibility to determine the best fit for your space.

Whether for a home office, commercial space, or a school classroom, the right drop ceiling tile size can elevate your interior while addressing practical considerations. With a bit of planning, you can achieve a drop ceiling that not only looks great but also enhances the room’s functionality and comfort.

Chandelier for Slanted Ceiling: A Complete Guide to Illuminating Unique Spaces

A chandelier for a slanted ceiling can transform a room, adding elegance and functionality to an often challenging architectural feature. Slanted ceilings, whether in modern homes or rustic cabins, provide an architectural charm but can pose unique challenges in selecting and installing lighting. Traditional lighting solutions may not work well on angled surfaces, so choosing the right chandelier for your slanted ceiling is essential for both aesthetics and functionality.

Chandelier For Slanted Ceiling

This guide will cover everything you need to know about selecting the perfect chandelier for slanted ceilings, from design considerations and installation tips to style ideas for various types of spaces. Whether your ceiling is steep or subtly angled, this guide will help you find a chandelier that adds beauty and light to your home.


Why a Chandelier for Slanted Ceiling Spaces?

Slanted ceilings often require more specialized lighting solutions to achieve balanced lighting and a cohesive look. Here’s why chandeliers are a great choice for these spaces:

1. Enhances the Architectural Beauty

A well-chosen chandelier emphasizes the unique structure of a slanted ceiling, drawing the eye upward and adding a sense of grandeur. Whether your room has a vaulted ceiling, attic slant, or angled loft, the right chandelier can serve as a focal point that highlights the space’s distinctive architecture.

Read too: Kitchen Lighting For A Vaulted Ceiling: Illuminating Your Space with Style and Functionality

2. Provides Even Lighting

Because slanted ceilings are often taller than standard ceilings, they need light fixtures that can illuminate a larger area. A chandelier positioned on a slant with adjustable angles can provide ambient light throughout the room, reducing shadows and creating a warm, inviting glow.

3. Creates a Stylish Statement

Chandeliers are statement pieces that add elegance, style, and even drama to a room. In spaces with slanted ceilings, the choice of a chandelier becomes an artistic addition to the decor. Whether you prefer rustic, modern, or classic styles, there is a chandelier designed to suit your aesthetic and bring balance to the room.


Key Considerations When Selecting a Chandelier for Slanted Ceilings

Selecting a chandelier for a slanted ceiling requires some special considerations. Here’s what to keep in mind:

1. Adjustable Height and Mounting Options

Chandeliers with adjustable height or chain lengths are ideal for slanted ceilings, as they allow you to set the chandelier at an appropriate level, regardless of the angle. Many chandeliers also offer mounting options that enable them to hang straight even when installed on an angled ceiling.

2. Size and Proportion

For slanted ceilings, the size and scale of the chandelier are crucial. If your room has a very tall vaulted ceiling, you can opt for a larger chandelier that fills the space without overwhelming it. Rooms with lower slants may benefit from smaller or medium-sized chandeliers. Be sure to measure your ceiling height and the room’s dimensions to select a chandelier that is proportionate.

3. Type of Slant

Consider the angle of your ceiling. For steeply sloped or vaulted ceilings, chandeliers that have flexible or adjustable rods work well to ensure proper alignment. For slightly angled ceilings, most chandeliers with chain or cord suspensions will work, as they naturally adjust to the angle.

4. Lighting Requirements

Think about the type of light your room requires. For example, living rooms and dining areas may need brighter illumination, whereas bedrooms can often get by with softer, ambient light. Many chandeliers are compatible with dimmer switches, allowing you to adjust the brightness according to the room’s needs.


Types of Chandeliers for Slanted Ceilings

With so many styles available, finding the right chandelier for slanted ceilings comes down to choosing a design that complements your space. Here are some popular chandelier types to consider:

1. Pendant Chandeliers

Pendant chandeliers offer versatility, especially for slanted ceilings. The individual pendants can be adjusted in height, allowing you to stagger them along the ceiling’s angle. This setup works especially well in modern and minimalist spaces, where the simplicity of pendant lighting creates a stylish, uncluttered look.

2. Linear Chandeliers

Linear chandeliers feature a series of lights arranged in a line, making them a great choice for long dining tables or kitchen islands in rooms with sloped ceilings. Linear chandeliers add a sense of continuity, following the angle of the ceiling while still offering ample light coverage.

3. Multi-Tiered Chandeliers

If you have a tall vaulted ceiling, a multi-tiered chandelier is an excellent way to fill the space and create a sense of grandeur. Multi-tiered chandeliers are typically found in traditional and formal settings but can also be used in rustic or farmhouse-style homes with a slanted ceiling.

4. Sputnik Chandeliers

For a modern and stylish look, consider a Sputnik chandelier. These chandeliers feature arms that radiate outward in all directions, adding a touch of mid-century charm. Their unique design allows for even light distribution, which is ideal for rooms with slanted ceilings as they provide light across multiple levels.

5. Rustic and Industrial Chandeliers

If your home has a more rustic or industrial feel, consider chandeliers with wood, wrought iron, or exposed bulbs. These designs are often compatible with chain suspensions, allowing them to hang naturally even on slanted ceilings, while adding character to the space.


Installation Tips for a Chandelier on a Slanted Ceiling

Installing a chandelier on a slanted ceiling can be challenging. Here are some tips to make the installation process smoother:

1. Use a Swivel Mount

A swivel mount is essential for chandeliers on angled ceilings. It allows the chandelier to hang straight regardless of the ceiling’s angle. Most modern chandeliers come with a swivel mount or have the option to add one, ensuring the fixture hangs properly.

2. Check the Electrical Box

Ensure that your ceiling’s electrical box is rated to support the weight of the chandelier. Since some chandeliers can be quite heavy, particularly multi-tiered or large models, it’s crucial that the box can handle the fixture’s weight.

3. Adjust the Chain or Rod Length

With slanted ceilings, adjusting the chain or rod length is key. Most chandeliers have adjustable chains or rods, allowing you to lower or raise the chandelier based on the height and angle of the ceiling.

4. Hire a Professional

If you’re uncertain about the installation process, it’s best to hire a professional electrician. They’ll ensure that the chandelier is mounted securely, properly aligned, and meets all electrical safety standards. A professional can also provide recommendations for additional adjustments to make sure the chandelier looks its best.


Design Inspiration: Using a Chandelier for Slanted Ceilings in Different Rooms

A well-chosen chandelier for a slanted ceiling can make a dramatic impact on various rooms throughout the house. Here’s how to incorporate chandeliers into different spaces with angled ceilings:

Living Room

A grand chandelier can serve as the centerpiece of a living room with a vaulted or slanted ceiling. Opt for a larger, multi-tiered design to draw attention upward, creating a focal point that enhances the room’s architectural lines.

Dining Room

For dining rooms, a linear chandelier works well over the dining table. It follows the length of the table, providing focused light while adding a sense of balance to the space. Make sure the chandelier is hung at an appropriate height so it doesn’t obstruct views across the table.

Bedroom

In a bedroom with a slanted ceiling, a smaller, more subtle chandelier adds ambiance without overwhelming the space. Choose a design with softer lighting to create a cozy, relaxing environment. Pendant chandeliers are a popular choice for bedrooms, especially when arranged in a way that complements the ceiling’s angle.

Entryway or Foyer

A slanted ceiling in an entryway or foyer provides an ideal opportunity for a statement chandelier. A large, eye-catching chandelier can make a lasting first impression, welcoming guests with elegance and style.


Conclusion

Selecting a chandelier for a slanted ceiling requires thoughtful consideration of design, size, lighting needs, and installation specifics. By taking these factors into account, you can choose a chandelier that not only illuminates the room effectively but also enhances the architectural beauty of the space.

From pendant lights to multi-tiered chandeliers, the right lighting fixture can add warmth, sophistication, and character to your home. A beautiful chandelier transforms a slanted ceiling from a challenging feature to a stunning focal point, creating a unique look that reflects your personal style.

Whether you’re upgrading an existing room or decorating a new space, the right chandelier will illuminate and elevate your home’s aesthetic. Enjoy the elegance and ambiance that a carefully chosen chandelier brings to your slanted ceiling.

Why a Ceiling Mounted Tub Filler is the Perfect Addition to Your Bathroom for Style and Functionality

When it comes to bathroom renovations, finding a functional and aesthetically pleasing fixture can make all the difference. One of the most popular and stylish choices for modern bathrooms is the ceiling mounted tub filler. This unique fixture is not only visually striking but also provides several practical advantages. Whether you are upgrading an old bathroom or designing a new one, a ceiling mounted tub filler can transform your space into a luxurious, spa-like retreat. In this article, we’ll explore the benefits of ceiling mounted tub fillers, how they work, and why you should consider installing one in your bathroom.

Ceiling Mounted Tub Filler

What is a Ceiling Mounted Tub Filler?

A ceiling mounted tub filler is a type of faucet fixture that is installed directly into the ceiling above your bathtub, as opposed to the more traditional wall-mounted or deck-mounted faucets. This unique installation style involves a long, sturdy pipe that extends from the ceiling to deliver water into the tub. The faucet itself is typically designed with a minimalistic, modern appearance, making it a popular choice for contemporary bathroom designs.

The ceiling mounted tub filler not only adds a touch of elegance to your bathroom but also has practical advantages. It is an excellent space-saving option for bathrooms where wall space is limited, and it helps achieve a sleek, open design without the clutter of traditional faucets and pipes.

Read too: Shiplap Ceiling in Kitchen: A Timeless Trend for a Stylish and Cozy Space

Benefits of a Ceiling Mounted Tub Filler

1. Space-Saving Design

One of the key advantages of a ceiling mounted tub filler is its space-saving design. Traditional faucets often require a significant amount of space on the walls or deck of your bathtub, which can make your bathroom feel cramped and less open. By mounting the tub filler directly from the ceiling, you free up valuable space and create a cleaner, more open look. This is especially beneficial in small bathrooms or when you want to enhance the feeling of openness in your bathroom.

The absence of bulky faucets and knobs on the side of the tub also means fewer objects to clean and maintain, contributing to a more streamlined and minimalist aesthetic.

2. Sleek and Modern Aesthetic

A ceiling mounted tub filler instantly adds a sense of sophistication and modernity to any bathroom. With its clean lines and contemporary design, this type of tub filler can become a striking focal point in your bathroom. Whether your bathroom is styled with a minimalist, industrial, or luxury aesthetic, a ceiling mounted tub filler complements a wide range of design themes.

The visually appealing installation creates an uninterrupted, open space that exudes elegance, providing a spa-like feel that enhances your overall bathroom experience.

3. Improved Functionality and Comfort

In addition to its aesthetic appeal, a ceiling mounted tub filler also offers functional benefits. For one, it provides easy access to the tub’s faucet without the need to reach around a traditional deck-mounted fixture. The height and positioning of the ceiling-mounted faucet are often adjustable, allowing you to customize the water flow to your preference.

Furthermore, the lack of clutter around the tub area ensures you have more space to relax. There’s nothing more comfortable than filling up your bathtub without the annoyance of obstructing pipes or a faucet taking up precious space around the tub.

4. Flexibility in Bathroom Layout

Traditional bathtubs often require specific placements for faucets, limiting your bathroom layout options. With a ceiling mounted tub filler, you have the freedom to place the bathtub anywhere in the room without having to worry about whether there’s enough space for a wall-mounted faucet.

This flexibility allows you to experiment with different arrangements and layouts to create a more personalized and unique bathroom design. Whether you want to place the tub in the center of the room for a more dramatic effect or along the wall for a more traditional look, the ceiling mounted tub filler allows for more creative freedom.

5. Easy Installation

While the installation process for a ceiling mounted tub filler might sound more complex than traditional faucet installations, it is actually a relatively straightforward process when done correctly. Professional plumbers are accustomed to installing ceiling-mounted fixtures, and the process generally involves drilling holes in the ceiling for the pipe, securing the faucet, and connecting it to the water supply.

Because the fixture is mounted to the ceiling, the plumbing is usually hidden and doesn’t take up any additional space in the bathroom. This makes the installation process both functional and aesthetically pleasing.

Types of Ceiling Mounted Tub Fillers

There are a variety of ceiling mounted tub fillers to choose from, each offering different features to suit your needs. The two primary types are:

1. Fixed Ceiling Mounted Tub Fillers

Fixed ceiling mounted tub fillers are the most common type. These faucets are permanently installed to the ceiling and cannot be adjusted or moved once they are in place. They offer a more permanent solution to your tub filling needs, making them ideal for bathrooms that are part of a larger remodel or construction project.

Fixed tub fillers typically come with a spout that delivers water into the tub in a steady, controlled stream. The design is often sleek and simple, contributing to a modern, minimalist look.

2. Adjustable Ceiling Mounted Tub Fillers

Adjustable ceiling mounted tub fillers provide flexibility in terms of water flow. These models allow you to adjust the height and angle of the faucet to better suit your preferences. Some adjustable models even feature handheld showerheads, allowing you to use the fixture for both bath and shower functions.

These types of ceiling mounted fillers are ideal if you want to personalize your experience and have more control over the water flow. The adjustable option also makes it easier to clean and maintain the faucet, as you can move the spout to access hard-to-reach areas.

Choosing the Right Ceiling Mounted Tub Filler for Your Bathroom

When selecting a ceiling mounted tub filler, there are several factors to consider to ensure it matches your needs and bathroom design:

1. Design and Finish

Ceiling mounted tub fillers come in various designs and finishes, including polished chrome, matte black, brushed nickel, and gold. Choose a finish that complements the overall aesthetic of your bathroom. For example, if you have an industrial-style bathroom, matte black or brushed nickel finishes would look striking. For a more luxurious look, gold or polished chrome might be more fitting.

2. Water Flow and Pressure

Ensure that the ceiling mounted tub filler you choose provides sufficient water flow and pressure. Low water pressure may result in a disappointing experience, especially if you are used to a strong, relaxing bath. If your home has lower water pressure, consider a model designed for high-efficiency flow to ensure you enjoy a satisfying bath.

3. Height and Reach

The height of the ceiling mounted tub filler should be appropriate for your bathtub size and your height. If the faucet is too low or too high, it may impact the functionality and the visual appeal of the fixture. Ensure that the faucet is positioned to allow water to flow smoothly into the tub without splashing over the edges.

4. Durability and Quality

Since the ceiling mounted tub filler is a fixture that will be used regularly, it’s important to choose a model made from high-quality materials that will withstand the test of time. Look for brands that are known for their durability and offer warranties for their products.

Installation Tips

The installation of a ceiling mounted tub filler is best left to a professional plumber, as it requires knowledge of plumbing and ceiling structures. The process typically includes the following steps:

  1. Positioning the Tub: The plumber will determine the best location for the tub in relation to the ceiling and the water supply line.
  2. Drilling Holes: Holes will be drilled in the ceiling to accommodate the pipes that will carry water from the ceiling-mounted faucet to the tub.
  3. Connecting Water Lines: The plumber will connect the ceiling-mounted filler to the water supply line and ensure the connections are secure and leak-free.
  4. Testing the Faucet: Once installed, the faucet will be tested to ensure proper water flow and pressure.

Conclusion

A ceiling mounted tub filler is a sophisticated and functional addition to any modern bathroom. With its sleek design, space-saving benefits, and ability to enhance the overall aesthetic of your bathroom, it offers an innovative solution for homeowners looking to upgrade their bath space. Whether you opt for a fixed or adjustable model, this type of filler provides both style and convenience, making it a worthwhile investment for your home. By following the right installation procedures and choosing the appropriate features, you can enjoy a luxurious, spa-like experience every time you step into the tub.

Why Ceiling Heaters for Patio Are a Game Changer for Outdoor Comfort

When the temperature drops, the outdoor spaces we cherish can become less inviting. However, one solution to ensure comfort even in chilly weather is the use of ceiling heaters for patio. These innovative heating devices are designed to keep your patio warm, allowing you to enjoy outdoor gatherings year-round. Whether you’re hosting a dinner party or simply relaxing with a book, ceiling heaters can make all the difference. This article will explore the various benefits of ceiling heaters for patio, how they work, and the best options to consider for your outdoor space.

Ceiling Heaters For Patio

What Are Ceiling Heaters for Patio?

Ceiling heaters for patio are mounted heating systems designed to provide warmth to outdoor areas such as patios, decks, and balconies. They are typically installed on the ceiling or overhead structure of a patio, offering efficient heat distribution without taking up valuable space on the ground. Unlike portable space heaters, ceiling heaters are more permanent fixtures that blend seamlessly into the design of your outdoor space.

These heaters use infrared or radiant heating technology to warm the surrounding area directly. Rather than heating the air, infrared ceiling heaters for patios warm objects and people within their range, creating a comfortable environment without wasting energy on heating the air. This makes them highly efficient and effective for outdoor settings.

Read too: Shiplap Ceiling in Kitchen: A Timeless Trend for a Stylish and Cozy Space

Benefits of Ceiling Heaters for Patio

1. Energy Efficiency

One of the most significant advantages of ceiling heaters for patio is their energy efficiency. Traditional outdoor heaters often rely on convection heat, which can take longer to warm up an area and result in more energy consumption. Ceiling-mounted infrared heaters, however, work by directly warming objects and people, meaning less heat is lost to the air. This can reduce energy bills and ensure that you’re heating only the areas that need it.

2. Maximized Space

Outdoor spaces, especially patios, are often designed for relaxation, dining, or entertaining. The last thing you want is to clutter your space with bulky heaters. Ceiling heaters for patios are mounted above, leaving your floor area open and unobstructed. This allows you to enjoy a spacious and comfortable environment while still benefiting from efficient warmth.

3. Aesthetic Appeal

Ceiling-mounted heaters come in various sleek and modern designs that can enhance the overall look of your outdoor space. Whether you have a minimalist design or a more rustic outdoor retreat, there are ceiling heaters that can blend in seamlessly with your décor. Some models even feature dimming lights or other aesthetic touches that contribute to the ambiance of your patio area.

4. Extended Outdoor Season

Ceiling heaters for patios can help extend your outdoor living season. Whether you live in a cooler climate or experience chilly evenings year-round, a ceiling heater ensures that you can continue to enjoy your outdoor space even when the temperatures drop. These heaters allow you to enjoy the outdoors without feeling uncomfortable or shivering, making your patio a year-round destination.

5. Targeted Heating

Instead of attempting to heat an entire outdoor area, ceiling heaters for patio offer focused heating. They can be positioned to target specific areas, such as seating or dining spaces, ensuring that everyone remains warm and comfortable. This targeted heating system maximizes energy efficiency and prevents unnecessary heating of unoccupied areas.

Types of Ceiling Heaters for Patio

When it comes to choosing the right ceiling heater for your patio, you’ll encounter several types, each offering distinct advantages. Let’s take a closer look at the most common options available.

1. Infrared Ceiling Heaters

Infrared ceiling heaters are by far the most popular option for outdoor spaces. These heaters work by emitting infrared radiation that heats objects and people directly, instead of warming the air. The warmth provided is similar to the sun’s heat, which feels natural and comfortable.

Infrared heaters are known for their energy efficiency and immediate heat production. Once you turn them on, you’ll begin to feel the warmth almost instantly. Additionally, infrared heaters do not dry out the air, making them ideal for areas where humidity is important, such as outdoor gardens or patios with plants.

2. Electric Ceiling Heaters

Electric ceiling heaters are another common choice. They work by converting electrical energy into heat, which is then distributed across the patio area. These heaters can be controlled via remote control or a wall switch and can be easily adjusted to suit your desired temperature.

Electric ceiling heaters are typically more affordable than gas models and are available in a range of sizes and power outputs. They are ideal for smaller patios or areas where a quick setup is required.

3. Gas Ceiling Heaters

If you’re looking for powerful heat for larger patios or outdoor spaces, gas ceiling heaters might be the way to go. These heaters use natural gas or propane to produce heat, making them a popular choice for those who have access to a gas line or prefer the flexibility of using propane. Gas heaters are known for their high heat output and can warm larger areas more effectively than electric models.

However, gas heaters tend to be more expensive to install and maintain. Additionally, they may not be as energy-efficient as infrared or electric models, so they may not be the best choice for everyone.

4. Halogen Ceiling Heaters

Halogen ceiling heaters are similar to infrared models, but they use halogen lamps to produce heat. These heaters provide immediate warmth and are often used for more localized heating. Halogen heaters can be more energy-efficient than other types because they do not rely on fan systems to distribute heat. Their compact size and powerful heat output make them a good choice for small patios or terraces.

How to Choose the Best Ceiling Heater for Your Patio

When selecting a ceiling heater for your patio, there are several factors to consider. Each type of heater has its advantages, but the best choice depends on your specific needs.

1. Size of Your Patio

The size of your outdoor space is one of the most important factors in determining the best heater for your patio. If you have a small or medium-sized patio, an electric or infrared heater might be sufficient. For larger areas, you may want to consider a gas-powered heater or multiple infrared units strategically placed around the space.

2. Energy Source

Consider what energy source works best for your patio setup. If you have easy access to electricity, electric heaters are convenient and easy to install. If you have a natural gas line available, a gas heater might offer more heat output. Infrared heaters are great for energy efficiency and even warmth distribution.

3. Weather Resistance

Your ceiling heater should be designed to withstand outdoor elements. Look for models that are rated for outdoor use and are resistant to rain, wind, and varying temperatures. Weatherproof heaters are essential to ensure that your investment lasts and continues to perform well throughout the seasons.

4. Budget

Ceiling heaters come in a wide range of prices, so it’s essential to set a budget before shopping. Electric and halogen heaters tend to be more affordable, while gas heaters and high-end infrared models can be more expensive. However, consider the long-term savings on energy efficiency when making your choice.

Conclusion

Ceiling heaters for patio are a fantastic solution to keep your outdoor spaces comfortable throughout the year. By choosing the right model, you can enjoy your patio even on chilly evenings, making it a functional and enjoyable extension of your home. Whether you opt for electric, gas, infrared, or halogen heaters, each type offers unique benefits suited to different patio sizes, budgets, and preferences.

With energy efficiency, space-saving benefits, and a variety of styles available, ceiling heaters for patios are an investment that will keep you warm and cozy all year long. Whether you’re looking to entertain guests, relax, or simply enjoy a quiet evening outdoors, a ceiling heater can make the experience even better.


Capiz Petal Flush Mount Ceiling Lights: Illuminate Your Space with Elegance

When it comes to home decor, lighting plays a pivotal role in setting the ambiance and enhancing the overall aesthetic of any room. One of the most elegant lighting fixtures available today is the Capiz Petal Flush Mount Ceiling Lights. This stunning light fixture combines natural beauty with sophisticated craftsmanship, creating a focal point that can transform any space. Whether you’re looking to update your living room, bedroom, or hallway, the Capiz Petal Flush Mount Ceiling Light offers an exquisite solution that seamlessly blends with various design styles.

Capiz Petal Flush Mount Ceiling Light

In this article, we’ll explore the features, benefits, and unique qualities of the Capiz Petal Flush Mount Ceiling Lights, and how you can incorporate it into your home. From its stunning design to its functionality, this lighting fixture has the potential to redefine your space.


What is a Capiz Petal Flush Mount Ceiling Light?

The Capiz Petal Flush Mount Ceiling Lights is a beautifully crafted light fixture designed to offer soft, ambient lighting while adding a touch of elegance to your home. Made from Capiz shells, this light fixture gets its name from the delicate petals formed from the natural shells. Capiz shells are known for their translucent qualities, which allow the light to shine through, creating a warm, inviting glow that enhances the atmosphere of any room.

The flush mount design ensures that the light fixture sits close to the ceiling, making it an ideal option for rooms with low ceilings or spaces that require a more subtle lighting option. The combination of Capiz shells and the flush mount design creates a sophisticated yet understated look that can complement both traditional and contemporary interior designs.

Read too: Shiplap Ceiling in Kitchen: A Timeless Trend for a Stylish and Cozy Space


Why Choose a Capiz Petal Flush Mount Ceiling Light?

There are several reasons why a Capiz Petal Flush Mount Ceiling Light stands out as an exceptional lighting option. Let’s dive into the key benefits:

1. Natural Elegance

One of the main attractions of the Capiz Petal Flush Mount Ceiling Light is its natural, organic elegance. Capiz shells have been used for centuries in various decorative pieces, and they bring a timeless beauty to any room. The shells’ natural translucence gives the light a soft, diffused glow, making it ideal for creating a serene, welcoming environment. Whether you’re designing a coastal-inspired home or seeking a more traditional aesthetic, the Capiz Petal Flush Mount Ceiling Light fits seamlessly into various interior styles.

2. Versatile Design

The flush mount design of the Capiz Petal Flush Mount Ceiling Light makes it an incredibly versatile fixture that can be used in a wide range of spaces. Its compact design allows it to fit in smaller rooms where hanging light fixtures may not be suitable. It’s perfect for bedrooms, living rooms, dining areas, or even bathrooms. Additionally, the soft, neutral color palette of the Capiz shells allows the light fixture to complement many different decor schemes, from minimalist to bohemian or classic to contemporary.

3. Soft, Ambient Lighting

The Capiz Petal Flush Mount Ceiling Light provides a soft and even distribution of light, making it perfect for creating a cozy and relaxed atmosphere. The natural translucence of Capiz shells ensures that the light is gentle on the eyes and doesn’t overpower the space. Whether you’re reading, entertaining guests, or unwinding after a long day, the soothing glow from this fixture enhances the comfort of your home.

4. Durability and Sustainability

Capiz shells are known for their durability, making the Capiz Petal Flush Mount Ceiling Light a long-lasting addition to your home. Unlike other materials, Capiz shells are resistant to cracking and breaking, ensuring that your light fixture will remain beautiful for years to come. Additionally, Capiz shells are sustainably sourced, making this lighting option an eco-friendly choice for homeowners who are conscious of their environmental impact.


How to Incorporate the Capiz Petal Flush Mount Ceiling Light Into Your Home

Now that we’ve discussed the benefits of the Capiz Petal Flush Mount Ceiling Light, let’s explore how you can incorporate this stunning fixture into various areas of your home.

1. Living Room

In the living room, the Capiz Petal Flush Mount Ceiling Light can serve as a beautiful statement piece. The soft, diffused lighting creates a warm and inviting ambiance that encourages relaxation and conversation. Consider placing this fixture above your seating area or in the center of the room for a balanced, cohesive look. The light fixture’s organic design adds texture and visual interest to the room, elevating the overall decor.

2. Bedroom

For the bedroom, the Capiz Petal Flush Mount Ceiling Light creates a serene and tranquil atmosphere, perfect for unwinding at the end of a long day. Its gentle lighting provides just the right amount of illumination without being too harsh. Place it above your bed or in the center of the room to enhance the peaceful mood. The natural elegance of the Capiz petals adds a touch of luxury, turning your bedroom into a relaxing retreat.

3. Dining Area

In the dining area, a Capiz Petal Flush Mount Ceiling Light can add sophistication and charm. The warm, soft light makes it ideal for dinner parties and family gatherings. Because the fixture is flush to the ceiling, it provides ample light without obstructing the view or overwhelming the space. You can pair it with other decorative elements like glassware or textured furniture to create a balanced, inviting dining experience.

4. Hallways and Entryways

The Capiz Petal Flush Mount Ceiling Light is an excellent choice for hallways or entryways. These areas often have limited natural light, and the soft glow from this fixture can brighten up the space without being too overpowering. In smaller spaces like these, the flush mount design ensures that the light fixture won’t hang too low, maintaining a clean and clutter-free look.


Care and Maintenance

To ensure that your Capiz Petal Flush Mount Ceiling Light continues to shine beautifully for years, it’s important to care for it properly. Here are some maintenance tips:

  • Dust Regularly: Capiz shells are naturally delicate, so dusting the light fixture regularly will help maintain its shine and prevent dirt buildup. Use a soft, dry cloth to gently wipe down the surface.
  • Avoid Harsh Cleaning Products: When cleaning the fixture, avoid using harsh chemicals or abrasive materials that could damage the Capiz shells. Stick to mild soap and water for cleaning.
  • Check the Bulbs: Regularly check the bulbs in your Capiz Petal Flush Mount Ceiling Light to ensure they are working properly. If a bulb burns out, replace it with an energy-efficient LED bulb to keep the fixture eco-friendly.

Conclusion

The Capiz Petal Flush Mount Ceiling Light is a stunning addition to any home, offering natural elegance, versatility, and functionality. With its soft, ambient lighting and unique design, it can transform your space into a more inviting, stylish environment. Whether you’re updating your living room, bedroom, or entryway, the Capiz Petal Flush Mount Ceiling Light adds an element of luxury that is both timeless and sustainable. Make a statement in your home with this beautiful, nature-inspired lighting fixture today.


Lighting For 20 Foot Ceilings: Best Ideas, Tips, and Solutions to Illuminate High Ceilings with Style

Lighting is an essential element in any room, as it influences both the mood and functionality of the space. When dealing with high ceilings, such as those that reach 20 feet, choosing the right lighting becomes even more critical. The wrong light fixtures can create areas of darkness or lead to excessive brightness in certain spots, making the room uncomfortable. On the other hand, the right lighting solutions can emphasize the space’s grandeur while ensuring adequate illumination.

Lighting For 20 Foot Ceilings

In this article, we’ll dive into the best lighting for 20 foot ceilings, offering tips on the types of fixtures, installation methods, and design elements that can maximize both the aesthetics and functionality of your high-ceilinged spaces.

Read too: Discovering the Charm of Nautical Outdoor Ceiling Fans for Your Coastal Retreat: Sail into Style


Why Is Lighting for 20 Foot Ceilings Important?

When designing the lighting for a space with 20-foot ceilings, you face a unique set of challenges. The height of the ceiling demands a different approach compared to standard ceiling heights. Here are the main reasons why it’s crucial to carefully select lighting fixtures for high ceilings:

  1. Light Distribution: High ceilings can make it difficult to achieve even lighting throughout the room. Fixtures that hang too high may not distribute light evenly, leaving areas of the room underlit.
  2. Aesthetic Appeal: The right lighting fixtures can accentuate the verticality of a room with 20-foot ceilings. Whether you prefer modern or traditional design, the fixtures you choose will have a significant impact on the space’s overall aesthetic.
  3. Energy Efficiency: With tall ceilings, it’s important to ensure that the room gets adequate lighting without being overly bright or wasting energy. Choosing energy-efficient lighting is crucial to balancing function and cost-effectiveness.
  4. Visual Comfort: High ceilings can sometimes create a sense of emptiness or coldness. Proper lighting can soften these effects by filling the space with warmth and comfort, making the room feel inviting and cozy.

Types of Lighting for 20 Foot Ceilings

Choosing the right type of lighting fixture for 20-foot ceilings requires understanding the function, style, and level of illumination that you need. Here are some common lighting solutions that work well in spaces with high ceilings:

1. Pendant Lighting

Pendant lights are an excellent choice for 20-foot ceilings, especially when used as a focal point. These lights hang down from the ceiling and can provide both ambient and task lighting, depending on their design.

  • Multi-Pendant Installations: For added visual interest, consider a group of pendant lights at varying heights to create a cascading effect. This arrangement works well over dining tables, kitchen islands, or large seating areas.
  • Long Pendant Chains: Another option is to use pendant lights with long chains or cords. These fixtures can be lowered to provide more direct illumination to the areas below, effectively lighting a large space without sacrificing style.
  • Chandeliers: A large chandelier with cascading pendants or a grand design can become a stunning centerpiece in a room with 20-foot ceilings. It not only provides light but also enhances the visual appeal of the space.

2. Recessed Lighting

Recessed lighting, also known as can lights or downlights, is often used in high ceilings to provide consistent, even illumination without taking up much visual space. These lights are installed directly into the ceiling, making them a sleek option for rooms where you don’t want hanging fixtures.

  • Layered Lighting: In large rooms with high ceilings, a combination of recessed lights installed around the perimeter and in the center can help to evenly distribute light across the entire room.
  • Dimming Options: Recessed lights with dimming features allow you to adjust the light output based on your needs, which is especially helpful in spaces with high ceilings that may require different levels of brightness throughout the day.

3. Track Lighting

Track lighting provides a versatile and adjustable solution for illuminating areas with 20-foot ceilings. Track systems consist of multiple light fixtures mounted on a single track, and the fixtures can be directed to various points in the room.

  • Targeted Lighting: The ability to adjust and direct the light makes track lighting perfect for high ceilings, as it can be used to highlight specific areas like artwork, architectural details, or furniture.
  • Modern Design: Track lighting offers a sleek, contemporary look that works well with industrial, minimalist, or modern designs. It can also be customized with different light bulb types to suit your preferred lighting style.

4. Wall-Mounted Fixtures

For areas with 20-foot ceilings, wall-mounted fixtures such as sconces or wall-mounted track lighting can help provide additional light at a lower level without relying solely on overhead lighting. These lights work particularly well for accent lighting or illuminating specific sections of a room, such as stairways, hallways, or entryways.

  • Accent Lighting: Wall sconces placed strategically along the walls of a room can create an ambient glow that contrasts with the overhead lighting, adding a layer of visual interest and warmth.

5. Smart Lighting Solutions

In today’s age of smart homes, using smart lighting for 20-foot ceilings can add both convenience and functionality. These fixtures can be controlled via an app, voice command, or automated schedules.

  • Automated Dimming: With smart lights, you can adjust the brightness levels and change the color of your lighting depending on the time of day or your mood. For high ceilings, smart lighting ensures that you can optimize your room’s lighting with minimal effort.
  • Energy Efficiency: Many smart lighting systems offer energy-saving features that adjust lighting levels based on natural light levels or occupancy sensors, helping to reduce electricity usage while still providing adequate illumination.

Best Placement for Lighting in High Ceilings

When lighting a room with 20-foot ceilings, placement is key to achieving the best lighting effects. The following tips can help ensure that your lighting is both functional and stylish:

1. Layer Your Lighting

Using different types of lighting at various levels creates a layered effect that adds depth and dimension to the space. Consider combining overhead lighting with wall-mounted fixtures, table lamps, and floor lamps. This approach not only makes the room more visually appealing but also helps in distributing light more evenly throughout the space.

2. Use a Dimming System

With high ceilings, lighting needs may vary depending on the time of day and the activity taking place. A dimming system or smart lighting can be invaluable in adjusting the brightness levels to suit different needs, whether you’re hosting a dinner party or simply enjoying a quiet evening at home.

3. Accentuate Architectural Features

When dealing with high ceilings, it’s important to emphasize architectural features like exposed beams, tall windows, or a grand staircase. Use targeted lighting such as track lighting or spotlights to highlight these elements and create a dramatic effect.

4. Consider the Room’s Function

Different rooms with 20-foot ceilings will require different lighting setups. For example, in a living room or dining room, a statement chandelier or pendant light may work well as a central focal point. In a workspace or kitchen, more direct and adjustable lighting such as recessed lights or track lighting may be more appropriate.


Conclusion

Lighting for 20-foot ceilings presents unique challenges, but with the right approach, you can transform your space into a visually stunning and functional area. Whether you choose pendant lights, recessed lighting, or track lighting, each type of fixture can enhance your room’s aesthetic while providing the necessary illumination. By layering different types of lighting, incorporating smart lighting systems, and positioning fixtures thoughtfully, you can create a well-lit, inviting space that makes the most of your high ceilings.

Remember to consider the room’s function, the atmosphere you wish to create, and energy efficiency when selecting your lighting. With the right lighting for 20-foot ceilings, you can ensure your space is bright, welcoming, and visually dynamic.

Hexagon LED Ceiling Light for Modern Spaces: Benefits, Styles, and Installation Tips

In today’s world of interior design, lighting has evolved beyond just a functional necessity to an essential element that enhances the overall aesthetic of a space. Among the latest trends, Hexagon LED Ceiling Light fixtures have taken the spotlight, offering a modern and stylish way to illuminate any room. The clean lines, geometric design, and energy efficiency of these lights make them a popular choice for those looking to add a touch of elegance and contemporary appeal to their home or office.

Whether you’re renovating your living room, upgrading your office, or designing a brand new space, the Hexagon LED Ceiling Light can elevate your environment while providing optimal illumination. This article will delve into the features, benefits, and styles of Hexagon LED Ceiling Lights, as well as offer guidance on installation and maintenance.


What is a Hexagon LED Ceiling Light?

A Hexagon LED Ceiling Light is a light fixture designed with a hexagonal shape, typically made from modern materials like aluminum, acrylic, or plastic. LED (Light Emitting Diode) technology is integrated into these fixtures, making them energy-efficient, long-lasting, and capable of producing bright, even light. The hexagonal design often adds a sleek, geometric touch to the ceiling, creating a striking focal point that enhances the aesthetic appeal of the room.

Why Choose a Hexagon LED Ceiling Light?

Hexagon LED Ceiling Lights are more than just attractive—they come with a variety of benefits that make them a top choice for modern homes and commercial spaces. Here’s why:

  1. Energy Efficiency: One of the primary reasons to opt for LED lighting is its energy efficiency. Compared to traditional incandescent bulbs, LED lights consume much less energy, translating to reduced electricity bills over time. The Hexagon LED Ceiling Light is no exception, offering an eco-friendly solution without compromising on brightness or functionality.
  2. Longevity: LED lights have an impressive lifespan, often lasting up to 50,000 hours or more. This longevity means fewer bulb replacements, making your lighting system more cost-effective in the long run.
  3. Stylish Design: The geometric beauty of the hexagon shape adds a contemporary touch to any room. Whether installed in the living room, kitchen, bedroom, or office, Hexagon LED Ceiling Lights serve as a statement piece that complements modern decor and adds a layer of sophistication.
  4. Even Lighting: Unlike traditional bulbs, which can create harsh shadows or uneven lighting, LED ceiling lights like the hexagonal ones provide a uniform and diffused light. This can brighten up a space more effectively and create a comfortable, welcoming atmosphere.
  5. Variety of Styles and Customization: Hexagon LED Ceiling Lights come in a range of styles, from minimalist designs to more elaborate, multi-panel configurations. Many models also allow for color temperature adjustments, letting you switch between warm and cool light to suit different moods and tasks.

Read too: Discovering the Charm of Nautical Outdoor Ceiling Fans for Your Coastal Retreat: Sail into Style


Types of Hexagon LED Ceiling Lights

Hexagon LED Ceiling Lights are available in several styles and designs. Depending on your needs and aesthetic preferences, you can choose from various options that enhance the ambiance of your space.

1. Single Panel Hexagon LED Lights

These are simple and sleek designs, typically featuring a single hexagonal panel that can be installed at the center of a room. These lights work well in spaces where you want the lighting to be functional yet subtle. They are ideal for small rooms or as accent lighting in larger spaces.

2. Multi-Panel Hexagon LED Lights

For those who want to make a bold statement, multi-panel Hexagon LED Ceiling Lights offer a modular design that allows you to connect several hexagonal panels together. This type of fixture works well in large rooms, open spaces, or areas where you want to create a unique light installation.

3. Smart Hexagon LED Lights

With the advent of smart home technology, many Hexagon LED Ceiling Lights now feature smart capabilities. These lights can be controlled remotely via apps or voice commands (through systems like Alexa or Google Assistant). Some models also offer color-changing options, dimming features, and scheduling for added convenience and customization.

4. Dimmable Hexagon LED Lights

For those who need to adjust the light intensity, dimmable Hexagon LED Ceiling Lights provide a flexible solution. These lights can be dimmed to create a soft ambiance for relaxation or brightened for tasks that require more illumination.


How to Install a Hexagon LED Ceiling Light

Installing a Hexagon LED Ceiling Light can seem like a daunting task, but with the right tools and guidance, it’s a relatively straightforward process. Here are the basic steps involved:

Step 1: Gather the Necessary Tools and Materials

Before you begin, make sure you have the following tools on hand:

  • Screwdriver
  • Mounting bracket (usually provided with the light)
  • Screws and anchors
  • Drill (for creating holes in the ceiling if needed)
  • Wire stripper and electrical tape
  • Voltage tester (optional)

Step 2: Turn Off the Power

Safety is key when working with electricity, so always turn off the power at the breaker box before attempting to install the light fixture.

Step 3: Mount the Bracket

Start by attaching the mounting bracket to the ceiling. Most Hexagon LED Ceiling Lights come with a bracket that should be secured to the ceiling using screws and anchors. Ensure the bracket is firmly in place before proceeding.

Step 4: Wire the Light Fixture

Once the bracket is secure, it’s time to connect the wires. Typically, the Hexagon LED Ceiling Light will have three wires: a live wire (usually black), a neutral wire (usually white), and a ground wire (usually green or copper). Using a wire stripper, strip the ends of the wires and connect them to the corresponding wires in the ceiling. Be sure to use electrical tape to secure the connections.

Step 5: Attach the Light Fixture

After wiring the fixture, attach the light to the mounting bracket. This will involve securing the light with screws or clips, depending on the design. Once the fixture is in place, double-check that it is secure.

Step 6: Turn On the Power and Test

Once everything is installed, turn the power back on at the breaker box and test the light to make sure it’s working properly. If you have a dimmable or smart light, try adjusting the settings to ensure that all features are functioning.


Maintenance and Care for Your Hexagon LED Ceiling Light

While Hexagon LED Ceiling Lights are known for their durability and long lifespan, regular maintenance can help ensure that they continue to perform optimally. Here are a few tips:

  1. Cleaning: Over time, dust and dirt can accumulate on the surface of the light. Use a soft cloth to gently wipe down the fixture. If there is stubborn grime, lightly dampen the cloth with water or a gentle cleaner—just be sure not to use harsh chemicals that could damage the finish.
  2. Inspecting for Issues: Occasionally, check the light for signs of wear or malfunction. If the light flickers, dims unexpectedly, or stops working entirely, check the wiring and connections to ensure they are intact. If the issue persists, consult the manufacturer’s warranty or a professional electrician.
  3. Avoiding Overheating: Though LED lights are generally cool to the touch, it’s still important to ensure that your Hexagon LED Ceiling Light has proper ventilation. Overheating can cause the light to degrade over time. Avoid installing the light in areas with excessive heat or in locations where the ventilation is restricted.

Conclusion

The Hexagon LED Ceiling Light is a modern, stylish, and energy-efficient lighting solution that can transform any space. Whether you’re upgrading your home, office, or commercial space, these lights provide the perfect blend of functionality and aesthetics. Their clean, geometric design suits contemporary interiors, while their energy-saving capabilities make them an eco-friendly option for today’s homes.

From single-panel designs to customizable, smart lighting systems, there are plenty of options to suit your specific needs. With easy installation, minimal maintenance, and a long lifespan, the Hexagon LED Ceiling Light offers both convenience and sophistication.

If you’re ready to update your lighting, consider adding a Hexagon LED Ceiling Light to your space for a modern touch that’s sure to impress.

Floor to Ceiling Wine Racks: Styles, Benefits, and Installation Tips

A floor to ceiling wine rack is more than just a storage solution—it’s an elegant way to display your wine collection while optimizing space in any home. These racks combine function and style, offering the versatility to fit into small spaces as well as large wine rooms. If you’re a wine enthusiast or simply looking to add a sophisticated touch to your decor, floor to ceiling wine racks may be the perfect choice. This article dives into the different types of floor to ceiling wine racks, the advantages they bring, installation tips, and how to find the right one for your space.

Floor To Ceiling Wine Racks

What are Floor to Ceiling Wine Racks?

Floor to ceiling wine racks are vertical storage systems designed to securely hold wine bottles from floor level up to the ceiling. These racks often have modular designs that can be customized in size and style, making them adaptable for both small and large spaces. Floor to ceiling racks are typically mounted for stability and often come in metal or wood finishes to suit various aesthetics.

They are popular among wine enthusiasts and interior designers for their practicality, capacity, and aesthetic appeal, providing a seamless way to store and showcase a wine collection in homes, wine cellars, or even commercial spaces.


Benefits of Floor to Ceiling Wine Racks

There are numerous benefits to choosing a floor to ceiling wine rack, whether you’re an avid collector or simply a wine lover who enjoys having a variety of options on hand. Here are some of the main advantages:

1. Space Optimization

Floor to ceiling wine racks make the most of vertical space, allowing you to store a significant number of bottles without taking up too much floor area. This is especially useful for smaller homes, apartments, or dedicated wine rooms.

Read too: Discovering the Charm of Nautical Outdoor Ceiling Fans for Your Coastal Retreat: Sail into Style

2. Improved Accessibility and Display

Unlike traditional wine racks that stack bottles horizontally, floor to ceiling racks make it easy to access each bottle individually. This design allows for clear labeling and quick access to specific wines, which is particularly helpful if you frequently select from your collection.

3. Enhanced Aesthetic Appeal

Floor to ceiling wine racks can become a beautiful focal point in your home. The racks have a sophisticated look that not only adds to the decor but also elevates the ambiance of the space, making it ideal for entertaining guests and showcasing prized bottles.

4. Flexible Storage Capacity

These racks are available in various sizes and configurations, making it easy to adjust the storage capacity based on the available space. You can add multiple racks side by side, or install a single column rack in a narrow area. The flexibility to store any number of bottles makes these racks a favorite for collectors with expanding wine selections.

5. Durable and Long-lasting

Constructed with high-quality materials like stainless steel, wrought iron, or solid wood, floor to ceiling wine racks are built to last. They offer sturdy storage that supports a variety of bottle sizes and withstands the weight of larger collections.


Types of Floor to Ceiling Wine Racks

There are different types of floor to ceiling wine racks to suit various storage needs and design preferences. Here are a few popular options:

Metal Wine Racks

Metal wine racks are sleek, modern, and very durable. They often have a minimalist design that makes them a great choice for contemporary spaces. Metal racks can also come with powder-coated finishes in various colors, allowing customization to match your decor.

Wooden Wine Racks

Wooden floor to ceiling wine racks have a classic look that fits traditional or rustic settings. Made from durable woods such as oak, mahogany, or walnut, these racks add a warm, timeless feel to the room. Wooden racks can also be stained or painted in different finishes to coordinate with your interior style.

Modular Wine Racks

Modular wine racks are versatile and customizable. They consist of several units that can be added or rearranged, allowing flexibility in storage size. Modular systems are ideal for collectors who anticipate growing their collection over time, as additional modules can be installed as needed.

Wall-Mounted Wine Racks

Though slightly different from standalone floor to ceiling racks, wall-mounted racks are often used in conjunction with floor to ceiling storage systems. These racks can be installed on the wall to add visual interest, create a unique layout, and maximize bottle capacity while keeping them securely displayed.


Choosing the Right Floor to Ceiling Wine Rack for Your Space

Selecting the ideal floor to ceiling wine rack depends on your collection size, aesthetic preference, and available space. Here are some factors to consider when making your decision:

Storage Capacity

Assess how many bottles you plan to store. If you have a modest collection, a single column rack may be sufficient. For larger collections, consider multiple racks or a modular system that you can expand as your collection grows.

Style and Material

Your wine rack should complement the overall decor of your home. Metal racks are ideal for modern or industrial interiors, while wooden racks suit traditional or rustic spaces. If you’re after a mixed look, some manufacturers offer combination racks with metal framing and wood accents.

Ceiling Height and Wall Support

Measure the ceiling height to ensure the rack will fit your space. If your ceiling is particularly high, consider custom racks or units that allow for taller installations. Ensure that the wall is sturdy enough to support the rack’s weight when fully loaded.

Lighting Considerations

Proper lighting can enhance the look of your wine display. Avoid placing racks in direct sunlight, which can degrade wine. Instead, use ambient or LED lighting to highlight the collection without affecting the wine quality.


Installation Tips for Floor to Ceiling Wine Racks

Installing floor to ceiling wine racks is a straightforward process but requires careful planning. Here are some steps to guide you:

Step 1: Measure Your Space

Begin by measuring the floor-to-ceiling height and the available wall space. Ensure that the rack fits comfortably and doesn’t obstruct other furniture or pathways.

Step 2: Prepare the Wall

Identify the wall studs for secure mounting if the rack will be attached to the wall. Use anchors or brackets if the rack is freestanding, and consider a stabilizing base for larger, heavier racks.

Step 3: Assemble the Rack

Follow the manufacturer’s instructions to assemble the rack. If it’s a modular system, arrange each section separately and plan the layout before attaching them together.

Step 4: Secure the Rack

Once assembled, carefully secure the rack to the wall or ceiling. For ceiling attachments, ensure that the ceiling material can hold the weight. Use sturdy screws and brackets for a secure and stable fit.

Step 5: Load Your Collection

After confirming the stability, begin placing bottles on the rack. Start with heavier bottles on the lower shelves for balance, and evenly distribute weight as you go up.


Caring for Your Floor to Ceiling Wine Rack

To keep your floor to ceiling wine rack in top condition, follow these maintenance tips:

Regular Dusting

Dust can accumulate on racks, especially if they’re made of metal. Regularly dust the shelves and bottles to maintain a clean, attractive display.

Check for Rust or Wear

For metal racks, inspect for signs of rust or wear. Apply a protective coating if necessary to keep the metal surfaces in good condition. Wooden racks may need occasional polishing or refinishing to prevent drying or cracking.

Adjust for Expansion

If you plan to expand your collection, consider rearranging bottles or adding modular pieces to ensure that you’re optimizing the space.


Transform Your Space with Floor to Ceiling Wine Racks

Whether you’re a seasoned collector or a casual wine enthusiast, floor to ceiling wine racks provide an elegant and practical way to display your collection. Their flexibility, durability, and design make them a valuable addition to any home. With the right type of rack and a bit of careful installation, you can turn any space into a beautiful showcase for your wines, creating an inviting atmosphere that’s both functional and stylish. So start planning your perfect wine display today, and enjoy the benefits of an organized, easily accessible collection that’s ready to impress!

Chrome Flush Mount Ceiling Light: Enhance Your Home’s Lighting with a Stylish

Lighting is an essential aspect of home design, influencing both the functionality and ambiance of your space. Whether you are designing a living room, hallway, or bedroom, the right lighting can dramatically improve the atmosphere and aesthetic. One popular choice for modern homes is the Chrome Flush Mount Ceiling Light. These fixtures provide an elegant and sleek lighting solution that can work seamlessly in various interior styles, from contemporary to transitional.

Chrome Flush Mount Ceiling Light

Flush mount lights are mounted directly on the ceiling without a gap between the fixture and the ceiling, offering a clean, modern look. The chrome finish, with its reflective properties, adds a touch of sophistication while being easy to integrate with most room designs. In this article, we’ll explore the features, benefits, design options, and tips for choosing and maintaining a Chrome Flush Mount Ceiling Light.

What is a Chrome Flush Mount Ceiling Light?

A Chrome Flush Mount Ceiling Light is a type of light fixture that is attached directly to the ceiling without any hanging components. The flush mount design ensures that the fixture sits close to the ceiling, offering a clean and unobtrusive look. The term “chrome” refers to the finish of the fixture, which has a shiny, metallic surface that reflects light and complements modern interior designs.

Flush mount ceiling lights are typically used in areas where the ceiling height is low, making them ideal for hallways, bedrooms, kitchens, and bathrooms. They are available in various styles, from simple and functional designs to more ornate, decorative options that serve as both light sources and statement pieces. Chrome is a versatile finish, fitting well with various color schemes and design aesthetics, including industrial, contemporary, and even traditional interiors.

Read too: Discovering the Charm of Nautical Outdoor Ceiling Fans for Your Coastal Retreat: Sail into Style

Benefits of Choosing a Chrome Flush Mount Ceiling Light

1. Sleek and Modern Design

One of the main advantages of a Chrome Flush Mount Ceiling Light is its modern, sleek appearance. The shiny chrome finish gives the fixture a high-end look that can elevate the style of any room. Chrome is reflective and can brighten up a space, adding a touch of luxury without overwhelming the design.

Flush mount lights are particularly beneficial for spaces with low ceilings or areas where you want the light fixture to blend seamlessly into the ceiling without drawing too much attention. The clean lines and minimalistic design of a chrome flush mount ceiling light make it an excellent option for contemporary, industrial, or mid-century modern decor styles.

2. Space-Saving Solution

For homes with lower ceilings, a Chrome Flush Mount Ceiling Light is a perfect lighting solution. Because it is mounted directly to the ceiling, it does not take up valuable space, unlike pendant lights or chandeliers, which hang down and can make a room feel cramped. By choosing a flush mount design, you can maximize your available ceiling height and ensure that the room feels open and airy.

In addition, flush mount lights are ideal for rooms with smaller dimensions, such as bathrooms, kitchens, or corridors. They provide ample lighting without interfering with the room’s flow or feeling intrusive.

3. Versatility in Style and Function

Chrome flush mount ceiling lights come in a variety of designs and sizes, making them suitable for many different room types and functions. From simple, minimalist fixtures to more ornate designs with multiple bulbs, there is a chrome flush mount light for every taste and need. Some models feature integrated LED lighting, which is energy-efficient and provides long-lasting illumination, while others may allow for the use of standard bulbs, giving you the flexibility to choose the brightness level you prefer.

Additionally, chrome flush mount ceiling lights work well with various other lighting styles, such as recessed lighting or wall sconces, to create a layered and balanced lighting scheme throughout your space. Whether you need task lighting for your kitchen or ambient lighting for your bedroom, a Chrome Flush Mount Ceiling Light can be customized to meet your needs.

4. Durability and Low Maintenance

Chrome is a durable and easy-to-maintain material that resists corrosion and tarnishing. This makes it an excellent choice for lighting fixtures in areas prone to moisture, such as bathrooms or kitchens. The smooth surface of chrome is also easy to clean, requiring only occasional dusting or wiping to maintain its shiny finish.

Compared to other finishes, such as polished brass or matte gold, chrome is more resistant to wear and tear, ensuring that your Chrome Flush Mount Ceiling Light will continue to look good for many years. Its durability also makes it an ideal choice for high-traffic areas where the light fixture may be subject to frequent cleaning or handling.

5. Energy Efficiency

Many modern Chrome Flush Mount Ceiling Lights feature energy-efficient LED technology, which uses significantly less energy than traditional incandescent bulbs. LED lights are known for their long lifespan and bright, even illumination. By choosing an LED-equipped flush mount light, you can save on your electricity bills while contributing to environmental sustainability.

In addition to being energy-efficient, LED lights do not produce heat like incandescent bulbs, which makes them safer for use in various areas of the home, including bedrooms and nurseries. The cool light produced by LEDs helps maintain a comfortable temperature in your space, especially during the summer months.

How to Choose the Right Chrome Flush Mount Ceiling Light

When selecting a Chrome Flush Mount Ceiling Light, there are several factors to consider. Here are some important tips to help you choose the best fixture for your space:

1. Room Size and Function

Consider the size of the room where you plan to install the light. Larger rooms may require multiple flush mount lights or a larger fixture with multiple bulbs to ensure adequate illumination. In smaller rooms, a compact chrome flush mount light may be sufficient to provide ample lighting without overwhelming the space.

Additionally, think about the function of the room. For example, if you are choosing a flush mount light for a bathroom or kitchen, you may want a fixture that provides bright, focused light for tasks. In contrast, a bedroom or living room may benefit from a fixture that provides softer, ambient lighting.

2. Style and Decor

The style of your chrome flush mount ceiling light should complement the overall decor of the room. Chrome fixtures work well with modern, industrial, or contemporary themes but can also add a touch of sophistication to more traditional settings. Look for a fixture that complements the colors and materials in the room, such as a brushed chrome finish for a more subtle look or a polished chrome finish for a bolder, reflective appearance.

3. Lighting Type and Bulb Compatibility

Check the type of lighting that the fixture uses, especially if you prefer LED lighting. Many Chrome Flush Mount Ceiling Lights are equipped with integrated LED bulbs, which are energy-efficient and long-lasting. Alternatively, some flush mount lights allow for traditional bulbs, giving you the option to choose the brightness and light temperature you prefer.

If you opt for a light with standard bulb compatibility, be sure to check the recommended wattage and whether the fixture supports dimming capabilities. This is especially important if you want to control the lighting levels in your room.

4. Installation and Maintenance

Consider the ease of installation and maintenance when choosing a flush mount ceiling light. Some fixtures are easier to install than others, especially if they come with a simple mounting bracket or require minimal wiring. If you’re not comfortable with electrical work, it’s best to hire a professional electrician for installation.

Once the light is installed, remember that chrome fixtures are low-maintenance. Regular cleaning and dusting will keep the fixture looking pristine. Be sure to follow the manufacturer’s recommendations for cleaning products to avoid damaging the chrome finish.

Popular Designs of Chrome Flush Mount Ceiling Lights

1. Crystal Accents

For a more luxurious look, some Chrome Flush Mount Ceiling Lights feature crystal accents or glass elements. These designs add glamour and elegance, making them ideal for dining rooms, entryways, or bedrooms. The reflective surfaces of the crystals complement the chrome finish, creating a sophisticated and radiant light display.

2. Minimalist Styles

If you prefer a more minimalist design, opt for a simple chrome flush mount light with clean lines and a sleek finish. These fixtures blend effortlessly into any space, providing soft and even lighting without drawing attention away from other design elements in the room.

3. Industrial-Inspired

For a more industrial or vintage-inspired look, choose a Chrome Flush Mount Ceiling Light with exposed bulbs or a metal cage design. This style adds character and a touch of ruggedness to the room while still offering the polished shine of chrome.

Conclusion

A Chrome Flush Mount Ceiling Light is an excellent addition to any modern home. Its sleek, stylish design, energy efficiency, and low-maintenance qualities make it a perfect choice for many spaces. Whether you are looking for a statement piece or a subtle light fixture, the chrome flush mount option provides versatility and functionality that can complement any interior style. By considering the size of the room, the fixture’s style, and your lighting needs, you can choose the perfect chrome flush mount ceiling light to enhance the ambiance of your home.

Silver Flush Mount Ceiling Light: A Stylish and Functional Lighting Solution

Lighting plays a crucial role in setting the mood and functionality of a room. Whether you are redesigning a space or simply upgrading your current fixtures, a Silver Flush Mount Ceiling Light offers a stylish and practical solution to brighten your home. These lighting fixtures are not only functional but also add a modern, sleek touch to any room. In this article, we will explore the benefits of choosing a silver flush mount ceiling light, how it enhances the aesthetic of your space, and some tips on selecting the right one for your home.

Silver Flush Mount Ceiling Light

What is a Silver Flush Mount Ceiling Light?

A Silver Flush Mount Ceiling Light is a type of light fixture that is installed directly against the ceiling, with no gap or space between the light and the ceiling surface. Flush mount lights are generally compact and ideal for spaces with low ceilings. The silver finish gives these lights a modern, sophisticated look that complements a variety of interior designs, from contemporary to industrial to transitional.

Unlike pendant lights or chandeliers, flush mount lights are mounted directly to the ceiling, making them ideal for rooms with limited vertical space. These fixtures often feature clean, sleek lines, and the silver tone adds an element of elegance, reflecting light in a way that brightens the space without being too overpowering.


Benefits of Choosing a Silver Flush Mount Ceiling Light

There are several reasons why a Silver Flush Mount Ceiling Light could be the perfect addition to your home. Let’s dive into some of the key benefits:

1. Space-Saving Design

One of the major advantages of a flush mount ceiling light is its space-saving design. Since the light is mounted directly on the ceiling, it doesn’t hang down like pendant lights or chandeliers. This is especially important for rooms with low ceilings, where a hanging light fixture could be a hazard or make the space feel cramped. A silver flush mount ceiling light offers both style and functionality without intruding into your living space.

Read too: Discovering the Charm of Nautical Outdoor Ceiling Fans for Your Coastal Retreat: Sail into Style

2. Sleek and Modern Look

The silver finish of these lights provides a sleek, modern aesthetic that can elevate any room. Whether you’re looking to update your kitchen, bathroom, bedroom, or hallway, the shiny and reflective surface of silver can add sophistication and a contemporary touch to the space. Silver fixtures are incredibly versatile and can complement a wide range of interior styles, including minimalist, industrial, and even traditional designs.

3. Even Light Distribution

Flush mount lights, due to their close proximity to the ceiling, distribute light more evenly across the room. This ensures a more uniform and consistent level of illumination, making it ideal for general lighting purposes. Whether you’re using the light for ambient lighting or for task lighting, a silver flush mount ceiling light will ensure the space is brightly lit without creating harsh shadows.

4. Easy Installation and Maintenance

Flush mount lights are generally easier to install compared to pendant lights or chandeliers. Since they don’t require a hanging mechanism, they can be directly mounted onto the ceiling, making them a convenient option for those looking for a quick and simple installation. Maintenance is also straightforward, as the light fixture is easy to access and clean. A quick wipe-down of the silver finish is usually all it takes to keep the light looking as good as new.

5. Energy Efficiency

Many Silver Flush Mount Ceiling Lights come equipped with energy-efficient LED bulbs, which help reduce electricity consumption while providing excellent light output. LED lights are long-lasting and require less maintenance than traditional incandescent or fluorescent bulbs, making them an eco-friendly choice that will save you money on your energy bills over time.


How to Choose the Right Silver Flush Mount Ceiling Light for Your Home

When selecting a Silver Flush Mount Ceiling Light, there are several factors to consider. The right light fixture can enhance the beauty of your space and provide the appropriate level of lighting. Here’s a guide to help you choose the perfect light for your room:

1. Consider the Room Size

The size of the room plays a significant role in determining the type of flush mount light that will be most effective. For larger rooms, you may want to choose a larger fixture to ensure adequate light distribution. In smaller rooms, a smaller, more compact flush mount ceiling light will work well without overpowering the space.

2. Choose the Right Lighting Style

There are many styles of Silver Flush Mount Ceiling Lights, from simple and sleek to more intricate and ornate designs. Consider the overall style of the room when choosing your light fixture. If you have a modern or minimalist space, a simple silver fixture with clean lines will blend well. For a more eclectic or traditional room, you may want a more decorative light with additional detailing, such as glass shades or decorative metalwork.

3. Light Output and Bulb Type

The light output of your flush mount ceiling light is crucial to ensuring the room is well-lit. Check the wattage of the fixture to ensure it provides the amount of light you need. Additionally, consider the type of bulb the light uses. LED bulbs are highly energy-efficient and long-lasting, making them a great option for most modern homes. Some flush mount lights also offer dimmable features, which can provide flexibility in adjusting the light intensity based on your needs.

4. Installation Location

Think about where you’ll be installing the light. Flush mount lights are perfect for hallways, kitchens, bathrooms, or rooms with lower ceilings. However, they are also a great choice for areas where you need a bright, even light, such as closets or laundry rooms. If you’re looking for a statement piece, consider using a silver flush mount light in a large entryway or foyer for a stylish first impression.


How to Install a Silver Flush Mount Ceiling Light

Installing a Silver Flush Mount Ceiling Light is generally straightforward, especially if you’re replacing an existing light fixture. However, if you’re installing a flush mount light for the first time, it’s essential to follow a few key steps to ensure the installation goes smoothly.

Step 1: Turn Off the Power

Before beginning any electrical work, always turn off the power to the room at the circuit breaker. This ensures your safety while installing the light fixture.

Step 2: Remove the Old Fixture

If you’re replacing an old light fixture, carefully remove it by unscrewing it from the ceiling. You may need to disconnect the wiring as well. Be sure to keep track of the wiring configuration so you can connect the new fixture properly.

Step 3: Install the Mounting Bracket

The new Silver Flush Mount Ceiling Light will typically come with a mounting bracket that attaches to the ceiling box. Install this bracket by securing it with screws or bolts.

Step 4: Connect the Wires

Connect the wires from the light fixture to the corresponding wires in the ceiling. Typically, you will connect the black (hot) wire, white (neutral) wire, and green (ground) wire. Ensure that the connections are secure by using wire nuts.

Step 5: Attach the Fixture

Once the wiring is secure, attach the fixture to the mounting bracket and ensure it is properly aligned and flush with the ceiling. Tighten the screws to secure the fixture in place.

Step 6: Turn On the Power

Once the fixture is installed, turn the power back on at the circuit breaker and test the light to ensure it’s working correctly.


Popular Silver Flush Mount Ceiling Light Designs

There are many different designs of Silver Flush Mount Ceiling Lights to choose from. Some popular options include:

1. Crystal and Glass Accents

Flush mount lights with crystal or glass accents offer a luxurious touch. The silver finish combined with shimmering crystals or frosted glass can create a sophisticated, glamorous look in your home.

2. Industrial Style

For a more industrial or modern aesthetic, consider a silver flush mount light with exposed bulbs or metal detailing. These fixtures often feature minimalist designs and can work well in both modern and transitional spaces.

3. Transitional Designs

Transitional designs combine elements of both traditional and contemporary styles. Silver flush mount ceiling lights in this style often have intricate detailing, soft curves, and a balance of classic and modern touches.


Conclusion

A Silver Flush Mount Ceiling Light is a fantastic way to brighten your home while adding a touch of elegance and style. These versatile fixtures offer both function and fashion, fitting seamlessly into various interior design styles. By considering the room size, light output, and design style, you can select the perfect fixture to enhance your space. Whether you’re updating your living room, kitchen, or hallway, a silver flush mount ceiling light is sure to provide the illumination and aesthetic appeal you desire.

Garage Ceiling Storage Rack Lift: The Ultimate Storage Solution

When it comes to maximizing garage storage, a Garage Ceiling Storage Rack Lift is an innovative solution that allows you to store items up high, making use of otherwise unused ceiling space. Whether you have seasonal gear, bulky items, or just need extra storage, a ceiling rack lift provides a convenient, accessible, and safe way to keep your garage organized and clutter-free. In this guide, we’ll cover the benefits of using a garage ceiling storage rack lift, different types available, how to install one, and practical tips for making the most out of your garage space.

Garage Ceiling Storage Rack Lift

Why Use a Garage Ceiling Storage Rack Lift?

If you’re struggling to find storage space in your garage, a ceiling rack lift offers numerous benefits:

  1. Space Efficiency: By lifting items off the floor and into unused ceiling space, you can free up valuable room for parking, workbenches, or other storage needs.
  2. Convenience: Many ceiling storage lifts are designed with manual or motorized pulleys, making it easy to raise and lower items without hassle.
  3. Safety: A secure lift prevents heavy items from taking up floor space where they might cause accidents or get damaged.
  4. Organization: Ceiling storage lifts can be used to store seasonal decorations, outdoor equipment, or seldom-used items, keeping everything neatly out of the way.

A garage ceiling storage rack lift is ideal for anyone looking to make better use of garage space, whether it’s for storing camping gear, sports equipment, or extra boxes of belongings.


Types of Garage Ceiling Storage Rack Lifts

There are several types of garage ceiling storage rack lifts available on the market. Each type offers unique features and may be better suited to different storage needs and garage layouts. Here are the most common types:

1. Manual Pulley Lift Systems

Manual pulley systems are an affordable and straightforward option for lifting light to moderately heavy items. They operate using a rope and pulley mechanism, allowing you to hoist items up to the ceiling by hand.

  • Advantages: Cost-effective, easy to install, suitable for light to moderate loads
  • Disadvantages: Requires manual effort, which may not be ideal for heavy items or frequent use

Read too: Discovering the Charm of Nautical Outdoor Ceiling Fans for Your Coastal Retreat: Sail into Style

2. Motorized Ceiling Rack Lifts

Motorized lifts are a more convenient option, especially if you’re planning to store heavy items or want a lift that’s easy to operate at the push of a button. These lifts use a motor to raise and lower items, making them a great choice for those who need quick access to stored items.

  • Advantages: Effortless operation, supports heavy loads, ideal for frequent access
  • Disadvantages: Higher cost, requires an electrical outlet for installation

3. Fixed Rack Systems with Adjustable Platforms

These racks come with adjustable platforms that allow you to customize the height and storage area based on your needs. Fixed rack systems do not lift or lower, but they can be a good solution if you need sturdy, high-capacity storage.

  • Advantages: High weight capacity, durable, customizable height
  • Disadvantages: Requires a ladder for access, less convenient than lift systems

4. Hydraulic Ceiling Rack Lifts

For those who require heavy-duty storage solutions, hydraulic ceiling lifts offer superior weight support and ease of use. These lifts can handle large, bulky items and are commonly used in professional settings.

  • Advantages: Extremely high weight capacity, stable and durable
  • Disadvantages: High cost, may require professional installation

5. Hoist Ceiling Rack Lifts

Hoist lifts are similar to pulley systems but are designed with a hoisting mechanism that can often support heavier weights than standard pulleys. These systems are ideal for lifting bulky items like kayaks or bikes.

  • Advantages: Great for odd-shaped or bulky items, strong lifting capacity
  • Disadvantages: Requires manual effort, which may limit ease of use for some individuals

How to Choose the Right Garage Ceiling Storage Rack Lift

When selecting a garage ceiling storage rack lift, it’s important to consider several factors to ensure that you choose the right system for your needs. Here are key points to think about:

  1. Weight Capacity: Consider the weight of the items you plan to store. Motorized and hydraulic lifts are better for heavy items, while manual pulley lifts work well for lighter loads.
  2. Frequency of Use: If you’ll be accessing items regularly, a motorized lift may be more convenient. For seasonal or rarely-used items, a fixed rack or manual lift may be sufficient.
  3. Ceiling Height: Measure the height of your garage ceiling to determine how much clearance you’ll need. Make sure that the lift system will fit without obstructing garage doors or lighting fixtures.
  4. Budget: Garage ceiling storage lifts vary widely in price, so it’s important to consider your budget. Manual systems are generally more affordable, while motorized and hydraulic lifts cost more but offer additional convenience.
  5. Installation Requirements: Some lifts can be installed as DIY projects, while others may require professional installation. Be sure to read the manufacturer’s guidelines before making a purchase.

Installing a Garage Ceiling Storage Rack Lift

The installation process for a ceiling storage rack lift varies depending on the type of lift you choose. Here is a general guide for installing a basic manual pulley lift, one of the most common DIY ceiling storage solutions:

Step 1: Gather Your Tools

For a basic manual pulley lift, you’ll need a power drill, screws, a ladder, and a stud finder. Some installations may also require anchors or additional mounting hardware, depending on the weight capacity.

Step 2: Find the Ceiling Joists

Using a stud finder, locate the ceiling joists where you will attach the storage lift. Joists provide the support needed to handle the weight of your stored items.

Step 3: Attach the Pulley System

Follow the manufacturer’s instructions to attach the pulley system to the ceiling joists. Be sure to use screws or bolts rated for the weight of your items. It’s essential to secure the system firmly to prevent any accidents.

Step 4: Test the Lift Mechanism

Before placing any items on the lift, test the pulley system to ensure that it raises and lowers smoothly. Confirm that it can hold the weight you intend to store without strain.

Step 5: Load and Lift

Once the system is securely installed, load your items onto the rack and use the pulley to lift them to the desired height. Ensure that all ropes, cables, or mechanisms are locked in place.


Benefits of a Garage Ceiling Storage Rack Lift

Maximizes Space

A ceiling storage lift allows you to use overhead space efficiently, which is especially valuable in smaller garages where floor space is limited.

Enhances Organization

By keeping items off the floor and in designated storage, you can improve the organization of your garage, making it easier to find and access the items you need.

Reduces Clutter

A ceiling storage lift is a great way to store seasonal or seldom-used items out of sight, helping to keep your garage free from unnecessary clutter.

Protects Valuables

Using a lift can protect items from accidental damage that might occur if they were stored on the floor. Keeping items up high can also prevent water damage in areas prone to flooding.


Tips for Using Your Garage Ceiling Storage Rack Lift

  1. Label Stored Items: If you’re storing multiple boxes or containers, label each one to make retrieval easier.
  2. Balance the Load: Distribute weight evenly across the lift to prevent strain on the system and ensure stable operation.
  3. Inspect Regularly: Check the lift mechanism and mounting hardware periodically to ensure that everything is secure and functioning properly.
  4. Avoid Overloading: Always stay within the weight limits specified by the manufacturer to prevent accidents or damage.

Frequently Asked Questions

1. Can I Install a Garage Ceiling Storage Rack Lift Myself?

Yes, many ceiling storage rack lifts are designed for DIY installation. However, if you’re installing a motorized or hydraulic lift, or if you’re unsure about handling the project, consider hiring a professional.

2. What Types of Items Can I Store on a Ceiling Rack Lift?

You can store a variety of items, such as holiday decorations, sports equipment, camping gear, and seasonal tools. Just make sure they are within the weight capacity of the lift.

3. How Much Weight Can a Garage Ceiling Storage Rack Lift Hold?

Weight capacity varies widely, from around 100 pounds for basic pulley systems to over 600 pounds for motorized or hydraulic lifts. Be sure to check the specifications before purchase.

4. Is a Ceiling Storage Lift Safe for Heavy Items?

Yes, as long as it is installed correctly and used within its weight capacity, a ceiling storage lift is safe for heavy items. For added security, motorized or hydraulic systems are recommended for heavy-duty storage.


Ceiling Mounted Low Profile Island Range Hood: A Sleek and Efficient Solution for Your Kitchen

In modern kitchens, having a functional, stylish, and efficient range hood is essential for maintaining a clean, fresh, and pleasant cooking environment. A Ceiling Mounted Low Profile Island Range Hood is an innovative solution that offers both style and performance. With its sleek, unobtrusive design, this type of range hood is particularly ideal for kitchens with islands, where space is often limited and aesthetic appeal is a priority.

Ceiling Mounted Low Profile Island Range Hood

In this article, we’ll explore the benefits of a Ceiling Mounted Low Profile Island Range Hood, its features, and how it can improve your kitchen’s ventilation system. Additionally, we will provide you with key considerations for choosing the right model for your home, installation tips, and maintenance advice.


What is a Ceiling Mounted Low Profile Island Range Hood?

A Ceiling Mounted Low Profile Island Range Hood is a type of ventilation system designed to hang from the ceiling above your kitchen island. Unlike traditional range hoods that mount to the wall, ceiling-mounted models are installed directly on the ceiling, offering a cleaner, more streamlined appearance. The low-profile design ensures that the range hood doesn’t dominate the space, providing powerful ventilation without taking up excessive visual or physical space.

Read too: Discovering the Charm of Nautical Outdoor Ceiling Fans for Your Coastal Retreat: Sail into Style

These hoods are designed to capture smoke, steam, and odors produced while cooking, ensuring that the air quality in your kitchen remains fresh. They typically come equipped with powerful motors and multi-speed settings, allowing you to adjust the airflow according to your cooking needs. The design is minimalistic, making it a great option for homeowners who want to maintain an open, spacious kitchen feel while ensuring excellent ventilation.


Advantages of a Ceiling Mounted Low Profile Island Range Hood

1. Space Efficiency and Aesthetic Appeal

The primary benefit of a Ceiling Mounted Low Profile Island Range Hood is its sleek, modern design that does not obstruct sightlines or take up space in your kitchen. This type of range hood is especially suited for kitchens with islands where the range hood needs to be functional without compromising the open space. By being mounted on the ceiling, it provides a minimalist look, enhancing the overall aesthetics of the kitchen.

2. Improved Ventilation

Another significant advantage of a Ceiling Mounted Low Profile Island Range Hood is its ability to effectively eliminate cooking odors, grease, and smoke. The ventilation system is designed to capture airborne particles and direct them outside through an exhaust duct. This keeps your kitchen fresh and free of unwanted smells, while also preventing grease buildup that can stain kitchen walls and surfaces.

3. Quiet Operation

Modern Ceiling Mounted Low Profile Island Range Hoods are designed to be quiet, which means you can cook in a peaceful environment without the loud noise often associated with traditional hoods. These units are built with noise reduction technology, ensuring that even at high fan speeds, the sound levels remain relatively low.

4. Energy Efficiency

Most contemporary ceiling-mounted range hoods come with energy-efficient features, including LED lighting and low-wattage fans that consume less energy compared to older models. This makes them an environmentally friendly option that reduces energy consumption while still providing powerful ventilation.

5. Customization and Advanced Features

A Ceiling Mounted Low Profile Island Range Hood often comes with customizable settings, such as adjustable fan speeds, dimmable lights, and even remote control options. Many models also come with features like smart technology integration, allowing you to control the hood through your smartphone or voice commands.


How Does a Ceiling Mounted Low Profile Island Range Hood Work?

A Ceiling Mounted Low Profile Island Range Hood works by drawing in the air from the cooking area, filtering out contaminants such as smoke, steam, and grease, and expelling the cleaned air outside. This process is carried out in several steps:

1. Air Intake

As you cook, heat, smoke, and steam rise from your stove. The range hood’s motor pulls in the hot, polluted air from the cooking area.

2. Filtration

Once the air is pulled into the range hood, it passes through filters that capture grease and other impurities. Most range hoods use either aluminum mesh or charcoal filters. Aluminum mesh filters are reusable, while charcoal filters absorb odors and need replacement.

3. Exhaust Venting

After the air is filtered, it is expelled outside of the home through an exhaust vent. Some models offer recirculation features, where the filtered air is returned to the kitchen instead of venting outside. This can be a good option for kitchens that don’t have easy access to the outside or where ductwork installation is challenging.

4. Lighting

Most ceiling-mounted range hoods come equipped with LED or halogen lights, providing ample illumination for your cooking surface. These lights are typically energy-efficient and offer a bright, clear view of your cooking area.


Key Considerations When Choosing a Ceiling Mounted Low Profile Island Range Hood

Selecting the right Ceiling Mounted Low Profile Island Range Hood for your kitchen involves several important factors. Here are some of the most critical considerations:

1. Size and Coverage Area

Ensure that the range hood is the appropriate size for your kitchen island and cooking area. The general rule is that the range hood should be at least as wide as your stove or cooktop to capture all the smoke and steam effectively. Additionally, consider the height of the ceiling. If your ceiling is unusually high, you may need a more powerful range hood to ensure optimal performance.

2. Power and Ventilation Capacity

The power of a range hood is measured in CFM (Cubic Feet per Minute), which indicates how much air the hood can move per minute. Higher CFM ratings are better for larger kitchens or spaces with heavy cooking activity. For average kitchen sizes, look for a range hood with a CFM rating of 600 to 900. If your kitchen has a commercial stove or if you do a lot of heavy cooking, you may need a more powerful unit.

3. Noise Level

Although modern range hoods are quieter than older models, noise level is still an important factor to consider. Look for range hoods that offer low decibel levels for quieter operation, especially if you want to keep your kitchen peaceful while cooking.

4. Design and Style

The design of the range hood should complement the overall aesthetics of your kitchen. Ceiling Mounted Low Profile Island Range Hoods are available in a range of finishes, including stainless steel, black, and glass. Choose a style that matches the rest of your kitchen’s decor, whether you prefer a sleek, minimalist look or a more industrial, modern design.

5. Maintenance

Some models require regular maintenance, such as cleaning the filters or replacing them every few months. Be sure to choose a model that fits your maintenance preferences and lifestyle. Some models have dishwasher-safe filters that make cleaning easy and convenient.


Installation Tips for a Ceiling Mounted Low Profile Island Range Hood

The installation of a Ceiling Mounted Low Profile Island Range Hood can be more complicated than wall-mounted models due to the need for proper ductwork and ceiling mounting. It’s recommended that you hire a professional to ensure the installation is done safely and correctly. Here are a few things to keep in mind during installation:

1. Choose the Right Location

Make sure that the range hood is centered above the cooktop or stove. This ensures optimal coverage of the cooking area and prevents smoke and steam from escaping around the edges.

2. Install Ductwork

If your range hood vents outside, you’ll need to install ductwork that directs the air to an exterior vent. Make sure that the ductwork is properly sealed to prevent leaks and reduce noise.

3. Height Considerations

The range hood should be installed at a proper height above the cooktop. Generally, it should be about 30 to 36 inches above an electric stove and 30 to 34 inches above a gas stove for optimal performance.

4. Electrical and Ventilation Connections

Ensure that the electrical wiring is correctly installed to power the fan and lights. Additionally, ensure the ventilation system is connected properly to expel air efficiently.


Maintenance and Care for a Ceiling Mounted Low Profile Island Range Hood

To ensure that your Ceiling Mounted Low Profile Island Range Hood continues to operate at peak performance, regular maintenance is required. Here are some simple steps you can take:

1. Clean the Filters Regularly

Check and clean the filters regularly, as grease and dirt can accumulate. Aluminum mesh filters can be hand-washed or dishwasher-safe, while charcoal filters must be replaced periodically.

2. Wipe Down the Exterior

Use a soft cloth to wipe down the exterior of the range hood. Stainless steel models may require a special cleaner to avoid streaking or scratching the surface.

3. Check the Fan and Lighting

Ensure that the fan and lights are working properly. Replace bulbs as necessary and make sure the fan is running smoothly without any unusual noise.


Conclusion

A Ceiling Mounted Low Profile Island Range Hood is an excellent addition to any kitchen, offering powerful ventilation, a sleek design, and energy-efficient performance. By choosing the right model for your kitchen, you can enjoy fresh air, reduced odors, and improved air quality. Whether you’re renovating your kitchen or building a new one, this stylish and functional range hood will be a valuable investment for years to come.

Ceiling Mount Gas Heater: A Comprehensive Guide to Efficient Heating Solutions for Your Home

When it comes to home heating solutions, finding an efficient, space-saving, and cost-effective option is essential. A Ceiling Mount Gas Heater can be the perfect solution for those seeking to heat large spaces efficiently without taking up valuable floor space. Whether you are looking to warm up your garage, workshop, warehouse, or even a large living area, ceiling-mounted gas heaters offer numerous benefits. These heaters are designed to save space, reduce clutter, and provide effective heating where it’s needed most.

Ceiling Mount Gas Heater

In this article, we will dive deep into what a Ceiling Mount Gas Heater is, how it works, its advantages, and tips on selecting the right one for your space. We’ll also discuss the installation process, safety considerations, and maintenance to ensure your heater works efficiently for years.


What is a Ceiling Mount Gas Heater?

A Ceiling Mount Gas Heater is a type of heating system that is installed on the ceiling of a room or space. This type of heater uses gas, typically natural gas or propane, as its fuel source to generate heat. The warmth generated is then distributed throughout the space via a combination of convection and radiation.

Read too: Discovering the Charm of Nautical Outdoor Ceiling Fans for Your Coastal Retreat: Sail into Style

Unlike traditional heaters that take up floor space, Ceiling Mount Gas Heaters are mounted high on the ceiling, saving valuable space in your home or business. They are commonly used in large, open areas such as garages, warehouses, factories, workshops, and even commercial spaces where heating needs are higher, and floor space is limited.

Key Features:

  1. Space-Saving Design: These heaters are installed high on the ceiling, so they don’t occupy valuable floor space.
  2. Efficient Heating: They use gas to generate heat, which can be more economical than electric heating, especially in larger areas.
  3. Quick Heat Distribution: Ceiling-mounted gas heaters distribute heat evenly across a room, making them ideal for large, open spaces.

How Does a Ceiling Mount Gas Heater Work?

A Ceiling Mount Gas Heater operates using the principle of convection, where the heated air rises and circulates throughout the room, warming up the space. Here’s a breakdown of how the system works:

1. Gas Combustion:

The heater uses gas (typically natural gas or propane) to fuel the burner. The combustion process generates heat, which is then transferred to the surrounding air.

2. Heat Distribution:

Once the air is heated, it begins to rise toward the ceiling. Because the heater is mounted high, the warm air is released from the top and spreads across the room.

3. Thermostat Control:

Most modern Ceiling Mount Gas Heaters come with a built-in thermostat that allows you to control the temperature. The thermostat ensures that the room remains at a consistent temperature, providing comfort without overheating or wasting energy.

4. Airflow:

Many ceiling-mounted heaters come with fans or blowers to help circulate the heated air more efficiently. This ensures that warm air reaches every corner of the room, preventing cold spots and keeping the temperature uniform.


Advantages of a Ceiling Mount Gas Heater

The Ceiling Mount Gas Heater offers several advantages over traditional heating systems. Here are some key reasons why homeowners and business owners are turning to ceiling-mounted gas heaters for their heating needs:

1. Space Efficiency

One of the biggest advantages of installing a ceiling-mounted gas heater is the space-saving design. Since it is mounted on the ceiling, it doesn’t take up any valuable floor space. This makes it ideal for small spaces or rooms with limited floor area.

2. Cost-Effective

Gas heating is generally more cost-effective than electric heating, especially in large areas. Ceiling Mount Gas Heaters use gas, which is typically cheaper than electricity. If you’re heating a large garage or warehouse, the savings in energy costs can add up quickly.

3. Even Heat Distribution

Because the heater is mounted on the ceiling, the heat rises and circulates throughout the room more efficiently. This ensures that the space is heated evenly, with fewer cold spots. Additionally, the natural airflow in the room allows the heater to warm up the space faster compared to other heating methods.

4. Ideal for High Ceilings

Many commercial spaces or industrial buildings have high ceilings, which can make it difficult to heat the area evenly with traditional heaters. A Ceiling Mount Gas Heater solves this issue by being mounted high up where it can distribute heat effectively across the room.

5. Minimal Maintenance

Ceiling-mounted gas heaters are low maintenance, requiring only occasional checks for gas connections and general upkeep. Many models also come with built-in safety features like automatic shut-off valves to prevent overheating.


Factors to Consider When Choosing a Ceiling Mount Gas Heater

When selecting a Ceiling Mount Gas Heater, there are several factors to keep in mind to ensure you get the best unit for your specific needs:

1. Size of the Area

The size of the room or space you need to heat is one of the most important factors to consider. For larger spaces, such as warehouses or factories, you’ll need a more powerful heater with a higher BTU (British Thermal Unit) rating. A BTU rating indicates the amount of heat a heater can produce. Make sure to choose a unit that can efficiently heat the entire area.

2. Gas Type

Ceiling-mounted gas heaters typically use either natural gas or propane. Natural gas is often the preferred choice if you have a gas line already installed in your home or business, but propane can be used in areas without access to a natural gas line.

3. Energy Efficiency

Look for energy-efficient models that have high ratings for fuel consumption. Energy-efficient Ceiling Mount Gas Heaters will help you save money on your energy bills while providing consistent heat. Models with thermostats that adjust the temperature based on the room’s needs are ideal for maintaining efficiency.

4. Installation Requirements

Proper installation is crucial for the safety and efficiency of your Ceiling Mount Gas Heater. Ensure that the unit is installed by a licensed professional to meet local building codes and safety standards. The installation process will depend on the type of heater, the size of your space, and the gas source available.

5. Safety Features

Safety is always a priority when dealing with gas heaters. Ensure that the unit you choose has safety features like automatic shut-off valves, overheat protection, and flame failure sensors to prevent accidents and malfunctions.


Installation Process for Ceiling Mount Gas Heaters

The installation of a Ceiling Mount Gas Heater should always be handled by a professional to ensure that it is done safely and correctly. Here’s a general overview of the installation process:

1. Location Selection

The first step is choosing the right location for the heater. The heater should be mounted on a flat, stable surface, ideally in the center of the room. The area should also be free of obstructions and provide enough clearance for the heater to function properly.

2. Gas Line Connection

If your building does not already have a gas line, one will need to be installed to connect the heater. This step must be completed by a licensed professional plumber or gas technician to avoid gas leaks or other hazards.

3. Mounting the Heater

The heater is then mounted securely on the ceiling using brackets or other mounting hardware. Proper mounting ensures that the heater remains stable and works efficiently without the risk of falling.

4. Electrical Connection

Some models may require electrical connections for the fan or thermostat. This step will also be performed by a licensed technician to ensure proper wiring and avoid any electrical hazards.

5. Testing the Heater

Once installed, the heater will be tested to ensure that it is working properly and that all safety features are functioning. The technician will check for gas leaks, proper heat distribution, and overall system efficiency.


Maintenance and Care for Ceiling Mount Gas Heaters

Proper maintenance is key to ensuring the longevity and efficiency of your Ceiling Mount Gas Heater. Here are some tips for maintaining your heater:

1. Check for Gas Leaks

Regularly inspect the gas lines and connections for any signs of leaks. If you smell gas or notice any unusual odors, contact a professional immediately.

2. Clean the Unit

Dust and debris can accumulate on the heater, affecting its performance. Clean the exterior and vents regularly to ensure proper airflow.

3. Test the Thermostat

Make sure the thermostat is working correctly and maintains the temperature you set. Replace batteries or perform any necessary adjustments to ensure consistent performance.

4. Annual Professional Inspections

Schedule annual professional inspections to ensure that your heater is functioning at optimal efficiency and safety. A technician will check for any potential issues, perform cleaning, and ensure all parts are in working order.


Conclusion

A Ceiling Mount Gas Heater is an excellent choice for homeowners and businesses looking for an efficient, space-saving heating solution. With benefits like even heat distribution, low maintenance, and cost savings, these heaters are an ideal option for large spaces. By considering factors like space size, gas type, and safety features, you can find the perfect unit for your needs. Always ensure that the installation and maintenance are handled by professionals to keep your heater operating safely and efficiently for years to come.

Whether you’re heating a large garage, warehouse, or workshop, a Ceiling Mount Gas Heater can provide reliable and cost-effective warmth, ensuring that your space stays comfortable during the colder months.

Ceiling Hanging Wine Rack: A Stylish and Functional Addition to Your Home Bar or Kitchen

If you’re looking to add a touch of elegance and functionality to your home, consider a ceiling hanging wine rack. This innovative storage solution not only saves valuable space but also elevates the aesthetic of any room. Whether you’re a wine enthusiast with a growing collection or simply want to display your wine bottles in a stylish way, a ceiling hanging wine rack could be the perfect choice for your home.

Ceiling Hanging Wine Rack

In this article, we’ll explore the many benefits of installing a ceiling hanging wine rack, how to choose the right one for your space, and some design ideas to make the most of this functional piece. From creating a sophisticated home bar to organizing your kitchen, a ceiling hanging wine rack can enhance the look and feel of your living space.


What is a Ceiling Hanging Wine Rack?

A ceiling hanging wine rack is a type of wine storage that is mounted to the ceiling, freeing up valuable floor or counter space. These racks typically hang from a sturdy bar or fixture, allowing wine bottles to be suspended securely. Ceiling-mounted racks can accommodate a wide variety of bottle types, including traditional wine bottles, as well as champagne or other specialty bottles.

In addition to their practical use, ceiling hanging wine racks add an element of style to a room. They create a modern, industrial, or rustic look depending on their design and materials. Whether you’re looking for a minimalist, sleek option or a more ornate piece, a ceiling rack offers flexibility in both style and functionality.

Read too: Shiplap Ceiling in Kitchen: A Timeless Trend for a Stylish and Cozy Space


Benefits of a Ceiling Hanging Wine Rack

1. Space-Saving Solution

One of the greatest benefits of a ceiling hanging wine rack is its ability to maximize space. In many homes, especially those with smaller kitchens or living areas, finding enough room for wine storage can be a challenge. By using the ceiling as storage space, you can keep your wine collection out of the way but still easily accessible. This is particularly useful in apartments or homes with limited floor space.

In addition, hanging racks allow you to utilize vertical space in rooms where a traditional wine rack or cabinet might not fit. A ceiling hanging wine rack is the perfect solution if you want to store multiple bottles while keeping your countertops or shelves clutter-free.

2. Stylish Home Décor

Not only do ceiling hanging wine racks serve a functional purpose, but they also add a stylish flair to your room. These racks are often designed to be eye-catching, showcasing your wine collection as part of your décor. They can become a focal point in your kitchen, dining area, or even in a dedicated wine cellar.

Whether you prefer a rustic, farmhouse style or a sleek, modern aesthetic, you can find ceiling hanging wine racks that match your décor. The choice of materials, such as wood, metal, or glass, offers a wide range of options to suit any interior design. Additionally, the suspended nature of these racks can give your room a more open, airy feel, adding to the overall design.

3. Easy Access and Display

With a ceiling hanging wine rack, your bottles are within easy reach and fully visible, making it easier to choose your wine without digging through cabinets or drawers. This accessibility is especially beneficial for those who entertain frequently or have a large wine collection.

Moreover, ceiling hanging wine racks are an excellent way to display your finest bottles. If you have rare or special wines, a ceiling rack lets you showcase them as part of the room’s décor, providing a touch of elegance and sophistication.

4. Durability and Stability

Ceiling hanging wine racks are typically designed with durability in mind. These racks are securely anchored to the ceiling, ensuring that your bottles are stored safely and won’t fall. High-quality racks are made of materials that are strong enough to support multiple bottles without warping or bending over time. This makes them a long-lasting investment for your home.


Types of Ceiling Hanging Wine Racks

When choosing a ceiling hanging wine rack, there are several types to consider. Your choice will depend on factors such as your space, style preferences, and how many bottles you wish to store. Here are some popular types of ceiling hanging wine racks:

1. Single Bottle Racks

For smaller spaces or for those who prefer a minimalist approach, single bottle ceiling racks are a great option. These racks can hold one bottle at a time, making them perfect for display or storing a favorite bottle. They are often designed with a modern or industrial look and can be hung individually or in rows for a unique, custom display.

2. Multi-Bottle Racks

For larger wine collections, multi-bottle ceiling hanging wine racks offer more storage. These racks can hold anywhere from a few to dozens of bottles, depending on the design. Some multi-bottle racks feature horizontal storage, while others may have vertical bottle holders. These racks are ideal for anyone with an extensive collection of wine that needs to be neatly stored and easily accessible.

3. Wine Barrel Racks

A more rustic and vintage-style option, wine barrel ceiling racks feature actual wine barrels or barrel-inspired designs. These racks are often made from reclaimed wood or metal, giving them an old-world charm. They can hold a significant number of bottles and are perfect for creating a country-style or rustic wine cellar in your home.

4. Wine Glass and Bottle Combination Racks

Some ceiling hanging wine racks are designed to store both bottles and glasses. These racks have spaces for wine bottles along with hanging sections for wine glasses, providing a convenient all-in-one storage solution. This type of rack is especially popular in home bars or dining areas where you want to keep everything within reach.

5. Adjustable Racks

For those who need flexibility, adjustable ceiling hanging wine racks are a great option. These racks allow you to adjust the number of bottles stored or the distance between them, depending on your changing storage needs. Adjustable racks are perfect if you like to collect different types of wine or if your collection tends to grow over time.


How to Choose the Right Ceiling Hanging Wine Rack

Choosing the right ceiling hanging wine rack involves considering several factors:

1. Size of Your Collection

Before choosing a rack, consider how many bottles you need to store. If you have a modest collection, a single or small multi-bottle rack may suffice. However, if you have a large collection or plan to expand, opt for a larger, multi-bottle rack that provides more storage.

2. Available Space

Measure the available space in the room where you plan to install the rack. Ceiling hanging wine racks come in various sizes and designs, so it’s essential to ensure that the rack fits the space without overcrowding the room. Consider both the width and height of the rack to ensure it suits the area.

3. Material and Design

Choose a material that complements the style of your room. Ceiling hanging wine racks come in a variety of materials, such as metal, wood, or wrought iron. Each material offers a different aesthetic and level of durability, so it’s important to pick one that matches your décor and will stand the test of time.

4. Installation

While most ceiling hanging wine racks are relatively easy to install, some may require professional installation depending on the size and weight of the rack. Ensure that the ceiling can support the weight of the wine rack and that you follow all safety guidelines for installation.


Design Ideas for Ceiling Hanging Wine Racks

Ceiling hanging wine racks can serve as both a functional storage solution and a statement piece in your home. Here are a few design ideas to consider:

1. Industrial Style

For a modern, industrial look, choose a ceiling hanging wine rack made of black metal or brushed steel. This can create a sleek, urban vibe that complements contemporary kitchens, living rooms, or home bars.

2. Rustic Charm

Opt for a wood and metal design if you want a more rustic or farmhouse-style feel. A wine rack made from reclaimed wood with metal accents can bring a touch of country charm to your dining room or kitchen.

3. Contemporary Elegance

If you prefer a more refined look, a ceiling hanging wine rack with a polished finish and a minimalist design can add sophistication to your home. Choose a rack with clean lines and subtle lighting to create a stylish yet functional wine storage solution.


Conclusion

A ceiling hanging wine rack is a functional and stylish addition to any home. It provides an elegant way to store and display your wine collection while saving valuable space. With a variety of styles, sizes, and designs available, you can find the perfect rack to suit your needs and enhance your home décor. Whether you’re an avid wine collector or just want a beautiful storage solution, a ceiling rack offers a blend of practicality and style that will elevate your living space.

Ceiling Fans With Uplight: The Ultimate Guide to Elegance and Functionality in Your Home

When selecting a ceiling fan for your home, most people focus on functionality and aesthetics, but what if you could have both? Ceiling fans with uplight are a stylish and innovative solution that not only circulate air effectively but also provide ambient lighting that enhances your room’s atmosphere. These fans have become increasingly popular because they offer a combination of energy-efficient cooling and mood-setting lighting, making them ideal for spaces like living rooms, bedrooms, and even large dining areas.

Ceiling Fans With Uplight

In this article, we’ll explore the many advantages of ceiling fans with uplight, including how they work, where to place them, and why they are such a great investment for your home. Whether you’re redesigning your living space or simply looking for a more efficient cooling solution, a ceiling fan with uplight might be the perfect addition.

Read too: Shiplap Ceiling in Kitchen: A Timeless Trend for a Stylish and Cozy Space


What Are Ceiling Fans With Uplight?

To begin, let’s define what a ceiling fan with uplight actually is. These fans come equipped with an integrated lighting fixture that directs light upwards, typically towards the ceiling. This creates a soft, ambient glow in the room, which helps to set a relaxing, inviting atmosphere. Unlike traditional ceiling fans, which often feature downward-facing light bulbs, ceiling fans with uplight provide indirect lighting, offering a gentle illumination that can be less harsh and more calming.

The uplight design is ideal for creating mood lighting, and when paired with the cooling power of a ceiling fan, it makes for an incredibly versatile addition to any room. Whether you want to illuminate a dark corner or soften the lighting in a large room, ceiling fans with uplight combine air circulation and light in one efficient, stylish unit.


Benefits of Ceiling Fans With Uplight

Ceiling fans with uplight offer several advantages that make them a valuable choice for any home. Here are some key benefits:

1. Energy Efficiency

One of the biggest advantages of ceiling fans with uplight is their energy efficiency. Ceiling fans, in general, are an excellent way to improve the airflow in your home and reduce the need for air conditioning. By circulating the air, they help to maintain a comfortable temperature, which can result in lower energy bills.

The uplight feature is also energy-efficient since it uses indirect lighting to create a warm, ambient glow. This allows you to use a lower wattage bulb, which reduces your energy consumption compared to brighter, direct lighting fixtures. In the long run, this combination of air circulation and energy-efficient lighting can contribute to both comfort and savings.

2. Ambient Lighting

If you’re looking to enhance the atmosphere of a room, ceiling fans with uplight are an ideal solution. The upward-facing lights create a soft, diffused glow that can fill the room with warmth without being overwhelming. This type of lighting works well in spaces where you want to create a more relaxed environment, such as living rooms, bedrooms, or home offices.

Moreover, the combination of a ceiling fan and uplight fixture can reduce the need for additional light sources, such as lamps or overhead lighting, simplifying the overall design of your room. If you enjoy a cozy, ambient lighting setup, a ceiling fan with uplight offers a stylish and effective way to achieve that.

3. Space-Saving Design

In rooms with limited space, ceiling fans with uplight are an excellent choice. Rather than having separate ceiling fans and light fixtures, these fans combine both functions into a single unit, saving you space. This is particularly useful in smaller rooms or areas where you don’t want bulky light fixtures or extra wiring. By incorporating both a fan and a light source in one fixture, you streamline your room’s design while still achieving both airflow and illumination.

4. Versatility in Design

Ceiling fans with uplight come in a variety of styles and designs, making them versatile enough to fit any décor. Whether your home features modern, traditional, or industrial styles, there’s a ceiling fan with uplight to match. Many designs include sleek, minimalist aesthetics, while others feature more decorative elements, such as intricate metalwork or glass light covers.

The uplight feature itself can also be customized to match your needs. You can find fans with a variety of light types, such as LED, incandescent, or halogen bulbs, and even choose models with dimming capabilities for greater control over the ambiance.


Where to Use Ceiling Fans With Uplight

The versatility of ceiling fans with uplight extends to their use in different rooms and settings. Let’s explore the best places to install these fans:

1. Living Rooms

Living rooms are one of the most popular places for ceiling fans with uplight. In these spaces, you want a fan that can circulate air effectively while also providing ambient lighting that doesn’t overpower the room’s décor. The soft, diffused lighting from the uplight feature creates a welcoming atmosphere for relaxation or entertaining guests, while the ceiling fan ensures comfort even during the hottest months.

2. Bedrooms

For bedrooms, a ceiling fan with uplight is a great choice. The ambient lighting can help create a tranquil environment, while the ceiling fan improves airflow to keep the room cool during sleep. This is particularly important for those who live in warmer climates or who prefer a cool breeze while they sleep. The gentle light is perfect for winding down, and it can provide just enough illumination for reading or other activities before bed.

3. Home Offices and Study Areas

A ceiling fan with uplight can also be an excellent addition to a home office or study area. The fan ensures that the room stays comfortable, especially in warmer months, while the uplight creates a softer lighting environment that’s ideal for focused work. Whether you’re writing, studying, or working on creative projects, the combination of cooling airflow and ambient lighting can help improve concentration and productivity.

4. Dining Rooms

For dining rooms, ceiling fans with uplight can serve both functional and aesthetic purposes. The uplight helps to illuminate the table without being too harsh, while the fan circulates air to keep the room comfortable during mealtime. Whether you’re hosting a dinner party or having a quiet meal with family, these fans provide both style and comfort.

5. Kitchens

In kitchens, a ceiling fan with uplight can provide much-needed airflow, especially in larger or open-plan kitchens. The uplight can also help brighten up the room, making it more inviting and functional. Since kitchen spaces often require extra lighting for food preparation, a fan with uplight can offer a two-in-one solution.


Features to Look for in Ceiling Fans With Uplight

When shopping for ceiling fans with uplight, consider the following features to ensure you select the best one for your needs:

1. Size and Blade Span

Make sure to choose a fan that is appropriately sized for your room. Larger rooms require fans with a broader blade span, while smaller spaces benefit from more compact designs. The size of the fan should provide adequate airflow for the space it’s intended to cool.

2. Lighting Options

Look for a fan with lighting options that suit your preferences. Some ceiling fans with uplight come with dimmable features, allowing you to control the intensity of the light. Others may offer different types of bulbs, such as LED, which are energy-efficient and long-lasting.

3. Motor and Speed Settings

The motor of a ceiling fan is essential for smooth operation and longevity. Choose a fan with a high-quality motor that operates quietly and efficiently. Fans with multiple speed settings can provide flexibility in adjusting the airflow to your liking.

4. Design and Finish

Ceiling fans come in a variety of designs and finishes. Whether you prefer a modern, sleek design or a more traditional style, you can find ceiling fans with uplight that complement your room’s décor. Popular finishes include brushed nickel, bronze, and matte black, each offering a different aesthetic.


Conclusion

Ceiling fans with uplight offer the perfect blend of style, comfort, and functionality. With their energy-efficient design, ambient lighting, and versatility in placement, these fans can be a valuable addition to any room in your home. Whether you’re looking to enhance your living room, bedroom, or office, a ceiling fan with uplight provides a solution that combines cooling and lighting in a single, space-saving unit.

Investing in a ceiling fan with uplight allows you to enjoy improved air circulation, reduced energy bills, and an elegant lighting solution, all while elevating the atmosphere of your home. Choose a fan that complements your space’s design and enjoy the comfort and style it brings for years to come.

Ceiling Clouds for Apartments: A Guide to Style and Functionality

When designing or renovating an apartment, many homeowners focus on making the most of their space with modern and stylish décor. While much attention is paid to furniture, walls, and floors, the ceiling is often overlooked. However, ceiling design plays a crucial role in the overall aesthetic and functionality of a room. One innovative way to elevate your apartment’s design is by incorporating ceiling clouds.

Ceiling Clouds For Apartments

Ceiling clouds for apartments are not just about style—they also offer practical benefits like improving acoustics and enhancing comfort. In this guide, we’ll explore everything you need to know about ceiling clouds, from their purpose and benefits to installation tips and design ideas. Whether you’re looking to improve your apartment’s acoustics or simply add a unique design feature, ceiling clouds can help you achieve your goals.


What Are Ceiling Clouds?

Ceiling clouds are large, suspended panels that hang from the ceiling, typically designed to improve sound quality within a room. They are usually made of materials like foam, fabric, or other sound-absorbing materials, and they can be custom-made to fit the size and aesthetic of your space. Ceiling clouds are often used in offices, commercial spaces, and performance venues, but their use in residential apartments is becoming increasingly popular.

While ceiling clouds are commonly associated with soundproofing and acoustics, they also serve a decorative function. Available in various shapes, sizes, and colors, ceiling clouds can enhance the visual appeal of a room while simultaneously improving its acoustic properties.


Benefits of Ceiling Clouds for Apartments

Ceiling clouds are versatile and can offer numerous benefits for apartments, particularly in urban settings where noise levels tend to be higher. Here are some of the key advantages of installing ceiling clouds in your apartment:

1. Acoustic Improvement

One of the main reasons people opt for ceiling clouds for apartments is their ability to improve acoustics. In a space with hard surfaces like concrete, wood, or tile, sound can bounce off the walls and ceiling, causing echoes and an unpleasant reverberation. Ceiling clouds act as sound-absorbing panels that reduce these noises, making your living environment quieter and more comfortable.

Read too: Shiplap Ceiling in Kitchen: A Timeless Trend for a Stylish and Cozy Space

By strategically placing ceiling clouds in areas where noise is a concern, you can minimize echo and create a more pleasant listening experience. This is particularly beneficial in apartments with open floor plans or those located in noisy city environments.

2. Aesthetic Appeal

Ceiling clouds can significantly enhance the design of a room. Whether you opt for sleek, modern panels or more artistic designs, ceiling clouds are an excellent way to add a unique touch to your apartment. They can be customized to complement your existing décor or serve as a focal point that grabs attention.

With their modern and stylish appearance, ceiling clouds for apartments can make a bold statement in your living room, bedroom, or even your home office. The floating effect they create can also make the ceiling appear higher, giving the space a more open and airy feel.

3. Enhanced Comfort

In addition to improving acoustics and aesthetics, ceiling clouds can enhance your overall comfort. They can help regulate the acoustics in a room, preventing harsh noises from disrupting your relaxation or work. Ceiling clouds can also create a softer, more welcoming environment, particularly in larger rooms or spaces with high ceilings.

Moreover, because they help dampen sound, ceiling clouds can improve your privacy, allowing you to have quiet conversations without disturbing others or being overheard.

4. Energy Efficiency

While ceiling clouds for apartments are often associated with aesthetics and sound control, they can also contribute to the energy efficiency of a room. Certain ceiling cloud materials can help with thermal insulation by reducing heat loss in the winter and minimizing heat gain in the summer. This can help lower your heating and cooling bills, contributing to a more sustainable living environment.


Types of Ceiling Clouds for Apartments

When choosing ceiling clouds for apartments, it’s essential to understand the different types available to find the best fit for your space. Here are a few common types of ceiling clouds:

1. Acoustic Foam Ceiling Clouds

These are the most common type of ceiling clouds, designed primarily for sound absorption. Acoustic foam is lightweight, durable, and effective at reducing noise levels. It is available in a variety of shapes, including rectangular, square, or even more abstract forms, allowing for flexibility in design.

2. Fabric-Wrapped Ceiling Clouds

Fabric-wrapped ceiling clouds offer a sleek and more visually appealing option compared to basic foam panels. They consist of a sound-absorbing core wrapped in fabric, which can be chosen to match the room’s décor. Fabric-wrapped panels are available in various colors, textures, and patterns, allowing for a more customizable design.

3. Custom-Made or Sculptural Ceiling Clouds

For apartments with a unique design, custom-made or sculptural ceiling clouds offer the opportunity to create a truly one-of-a-kind look. These ceiling clouds can be made from a variety of materials, including wood, metal, or fabric, and can be designed to fit specific dimensions or artistic styles. Sculptural ceiling clouds are often used as a statement piece that adds drama and creativity to a room.


How to Install Ceiling Clouds for Apartments

Installing ceiling clouds for apartments is a relatively straightforward process, but it requires attention to detail and the right tools. Here’s a basic overview of the installation steps:

Step 1: Measure Your Space

Before purchasing or installing ceiling clouds, measure the dimensions of your room and ceiling. This will help you determine the size and number of panels you need to achieve the desired effect. Keep in mind that larger rooms or spaces with high ceilings may require more or larger ceiling clouds.

Step 2: Choose the Right Material

Based on your goals—whether it’s soundproofing, style, or both—choose the right material for your ceiling clouds. Acoustic foam is excellent for noise reduction, while fabric-wrapped panels offer a more elegant look. If you’re looking for something truly unique, consider custom-made or sculptural panels.

Step 3: Determine Placement

The placement of your ceiling clouds is crucial for maximizing their effectiveness. Typically, these panels are hung in areas where noise reverberation is most prominent, such as above seating areas or near sources of noise like speakers. You can also arrange them in a symmetrical or random pattern to create a visually dynamic ceiling design.

Step 4: Install the Suspension System

Most ceiling clouds are suspended using a system of wires, cables, or rods. Depending on the size and weight of your panels, you may need to install anchors or a more secure mounting system. It’s essential to ensure that the panels are evenly spaced and level.

Step 5: Hang the Ceiling Clouds

Once the suspension system is in place, you can hang the ceiling clouds. Make sure each panel is securely attached, and check that they are aligned correctly. Take care to place the panels at varying heights to create visual interest and enhance their acoustic performance.


Design Ideas for Ceiling Clouds in Apartments

Incorporating ceiling clouds for apartments into your décor opens up a world of design possibilities. Here are a few ideas to inspire your project:

1. Minimalist and Modern

For a sleek, contemporary look, opt for simple, rectangular acoustic foam panels. These can be arranged in symmetrical patterns across the ceiling, offering a clean, streamlined look that complements a modern apartment.

2. Artistic and Sculptural

If you want to make a statement, go for sculptural ceiling clouds made of custom materials like wood or metal. These can be designed to fit your space’s aesthetic and serve as a focal point in the room.

3. Layered Look

For a more dynamic look, layer different sizes of ceiling clouds at varying heights. This can create a dramatic effect, especially in larger rooms with high ceilings, and enhance the room’s acoustics.

4. Bold Colors and Fabrics

Use fabric-wrapped ceiling clouds in bold colors or patterns to make a statement. These are ideal for apartments with colorful or eclectic décor, as the fabric panels can tie the room’s design together.


Conclusion

Incorporating ceiling clouds for apartments is a fantastic way to enhance the acoustics, aesthetics, and comfort of your living space. Whether you’re looking to reduce noise, add a modern design element, or improve your apartment’s overall feel, ceiling clouds can provide the perfect solution. With various materials, styles, and installation options, you can easily customize them to suit your apartment’s needs and your personal style.

By investing in ceiling clouds for apartments, you not only improve the sound quality of your space but also elevate its visual appeal, making it a more comfortable and stylish place to live.

Home Theater Star Ceiling: Transform Your Entertainment Experience

Imagine watching your favorite movie or TV show while looking up at a sky full of stars—only you’re inside the comfort of your home. A Home Theater Star Ceiling transforms your viewing experience into something magical and immersive. This design feature uses fiber optic or LED lights to create a stunning starry effect on your ceiling, simulating the night sky in a dark room. It brings a sense of awe and wonder to your home theater, making it a perfect spot for relaxation, movie marathons, or even stargazing from the comfort of your couch.

Home Theater Star Ceiling

Not only does a Home Theater Star Ceiling enhance the ambiance of your space, but it can also add value to your home. The intricate design and unique lighting effect elevate your home theater’s aesthetic, offering a high-end touch to your entertainment space. Whether you want to recreate a cinematic feel, boost your relaxation experience, or impress guests, a star ceiling is a feature that never goes unnoticed.

In this guide, we will explore everything you need to know about Home Theater Star Ceilings—from how they work and the benefits they offer, to installation tips and design ideas. Let’s dive into the world of starry skies and discover how this innovative ceiling design can transform your home theater into a stunning, multi-sensory experience.


Benefits of a Home Theater Star Ceiling

A Home Theater Star Ceiling offers several benefits that go beyond its captivating aesthetic. It’s not just about creating a beautiful ambiance—it’s about enhancing your entire entertainment experience. Here are some of the top reasons to consider installing a star ceiling in your home theater:

1. Immersive Movie Experience

One of the main reasons to install a Home Theater Star Ceiling is to create an immersive movie-watching experience. By simulating a starry sky, you can transport yourself into the movie or show you’re watching, making you feel like you’re part of the story. The soft, twinkling lights help set the mood, adding to the cinematic magic. Whether you’re watching a space-themed movie or enjoying a relaxing evening with a romantic film, the star ceiling sets the perfect atmosphere.

Read too: Discovering the Charm of Nautical Outdoor Ceiling Fans for Your Coastal Retreat: Sail into Style

2. Unique Aesthetic Appeal

A star ceiling is undoubtedly a conversation starter. Its unique design adds an element of sophistication and charm to your home theater. It’s the perfect way to create a focal point in the room, turning the ceiling into a stunning feature. The combination of dark walls and a glowing starry sky provides a stark contrast, drawing attention to the beautiful lighting above.

3. Improved Acoustics and Lighting

While the Home Theater Star Ceiling is primarily known for its aesthetic impact, it can also contribute to improving the overall acoustics of the room. The lights can help diffuse sound waves, reducing harsh echoes and creating a more pleasant sound environment. Additionally, some star ceiling systems are equipped with dimmable features, giving you full control over the brightness and creating a more customized lighting experience.

4. Versatile Design Options

Whether you prefer a subtle, elegant glow or a dazzling, full-blown galaxy, Home Theater Star Ceilings offer a variety of design options to fit your personal style. You can choose from fiber optic lights, LED strips, or a combination of both, each offering different levels of brightness and effects. You can also adjust the design to fit the shape and size of your room, ensuring the ceiling complements the overall interior design.

5. Relaxation and Ambiance

A starry ceiling doesn’t only improve your entertainment experience; it also creates an atmosphere of relaxation. The soft glow from the stars can calm your mind, making it an excellent feature for winding down at the end of a long day. It can even serve as a nightlight, providing a gentle, soothing ambiance as you fall asleep.


How a Home Theater Star Ceiling Works

To better understand how to install and maintain a Home Theater Star Ceiling, it’s important to know how these systems work. Star ceilings can be created using two primary types of lighting technology: fiber optics and LEDs. Let’s take a closer look at both.

1. Fiber Optic Lighting

Fiber optic lighting is a popular choice for creating a Home Theater Star Ceiling. The system consists of tiny, flexible fiber optic strands that are connected to a light source (usually an LED or halogen bulb). The light travels through the fibers and emerges from the tiny ends, creating the illusion of stars in the sky.

The key advantage of fiber optic lighting is that it can be tailored to create a range of effects. You can use dimmers or controllers to change the brightness and color of the lights. This flexibility allows you to customize your star ceiling to fit your desired atmosphere.

Fiber optic lighting is also energy-efficient and produces very little heat, making it safe to use in home theaters.

2. LED Lighting

LED lighting is another popular option for creating a Home Theater Star Ceiling. While it doesn’t offer the same “starry” effect as fiber optics, LED lights are still effective in creating a glowing ceiling. LED lights can be installed in strips along the edges of the ceiling or used in small, discrete points to create a twinkling effect.

The benefit of LED lights is that they are incredibly energy-efficient and long-lasting, making them a cost-effective solution for home theater lighting. They are also available in a wide range of colors and can be paired with dimmable features to achieve your desired look.

Both fiber optic and LED lighting can be used together for a more dramatic effect, or they can be used independently to suit your preferences.


Designing Your Home Theater Star Ceiling

When designing your Home Theater Star Ceiling, there are a few key elements to consider. These include the size of your room, the type of lighting system you want to use, and how you want the stars to appear. Here are some tips to help you create the perfect design for your home theater:

1. Room Size and Shape

The size and shape of your room will impact how you install your Home Theater Star Ceiling. Larger rooms may require more lights or a combination of fiber optics and LEDs to create an evenly distributed glow. For smaller rooms, you may want to opt for a more subtle design with fewer lights.

Consider the height and layout of your ceiling as well. A higher ceiling may allow for a more expansive starry sky, while a lower ceiling may require more focused lighting.

2. Choosing the Right Lighting System

As mentioned earlier, fiber optic lighting and LED lights are the most common options for star ceilings. Each system has its own set of benefits, so choose the one that best suits your needs. Fiber optics tend to create a more realistic, “twinkling” star effect, while LED lights can be brighter and more customizable.

Some Home Theater Star Ceiling kits come with built-in dimmers and color-changing features, allowing you to change the mood of your room with the touch of a button. Choose a system that offers flexibility and customization.

3. Star Patterns and Effects

When designing your star ceiling, think about how you want the stars to appear. Do you want a full galaxy with thousands of tiny stars, or do you prefer a more minimalistic approach with just a few twinkling points of light? You can also customize the patterns of the stars, arranging them to resemble constellations, the Milky Way, or a completely unique design.

Some systems allow you to create motion effects, like shooting stars or slow-fading lights, adding an extra layer of magic to your home theater.


Installation Tips for Your Home Theater Star Ceiling

While installing a Home Theater Star Ceiling can be a DIY project, it’s important to have the right tools and knowledge to ensure a successful installation. Here are some tips to help guide you through the process:

1. Planning the Layout

Before starting, plan the layout of your star ceiling carefully. Consider the placement of the lights and how they will be distributed across the ceiling. If you’re using fiber optics, measure the distance between the light source and the fiber optic strands to ensure they’ll reach the desired areas.

2. Installation Process

For fiber optic systems, start by drilling small holes in the ceiling to insert the fiber optic strands. The light source is usually installed in the attic or a nearby room, with fiber optic cables running through the ceiling to the star points. For LED systems, install the strips along the edges or in points where you want the light to appear.

It’s important to follow the manufacturer’s instructions to ensure safe and effective installation. You may also want to consider hiring a professional if you’re unsure about handling electrical work.

3. Maintenance

After installation, regular maintenance is essential to keep your Home Theater Star Ceiling in good working condition. Check for any loose connections, and clean the lights periodically to prevent dust buildup. With proper care, your star ceiling can last for years.


Conclusion

A Home Theater Star Ceiling is the perfect way to enhance your entertainment space, offering both aesthetic appeal and functionality. Whether you’re watching a film, listening to music, or simply relaxing, the mesmerizing glow of a starry ceiling can elevate your experience.

By choosing the right lighting system, designing a layout that suits your space, and following proper installation tips, you can transform your home theater into a truly magical destination. Get ready to immerse yourself in an unforgettable cinematic experience under a sky full of stars.

Egg Crate Ceiling Tile: A Guide to Benefits, Uses, and Installation Tips

Egg crate ceiling tiles are a popular choice in both commercial and residential spaces, known for their unique grid design that offers practical benefits such as improved airflow and enhanced lighting. These tiles are lightweight, durable, and easy to install, making them a versatile solution for various ceiling needs. Whether you’re looking to create a modern aesthetic, improve ventilation, or enhance the lighting in a space, egg crate ceiling tiles might be the ideal option for you. In this comprehensive guide, we’ll explore everything you need to know about egg crate ceiling tile, including their benefits, types, and practical tips for installation and maintenance.

Egg Crate Ceiling Tile

What Are Egg Crate Ceiling Tiles?

Egg crate ceiling tiles are ceiling panels with a grid-like structure, resembling the pattern of an egg crate. They are typically made from materials such as aluminum, plastic, or polycarbonate and are often installed in drop ceilings. The open grid design of these tiles is functional and decorative, offering unique advantages that distinguish them from solid ceiling panels. Egg crate ceiling tiles are especially popular in settings where airflow and light diffusion are important, such as offices, retail spaces, hospitals, and even in homes with specific ventilation or lighting requirements.

Read too: Kitchen Lighting For A Vaulted Ceiling: Illuminating Your Space with Style and Functionality


Advantages of Using Egg Crate Ceiling Tiles

Egg crate ceiling tiles are more than just a stylish ceiling option; they offer several practical benefits that make them an appealing choice for various applications. Here are some of the main advantages:

1. Improved Air Circulation

The open design of egg crate ceiling tiles promotes better airflow throughout the space. This is especially beneficial in areas that require proper ventilation, as the grid structure allows air to pass freely, helping to regulate temperature and prevent moisture buildup. This design can also enhance the efficiency of HVAC systems by reducing the resistance to air movement.

2. Enhanced Lighting

Egg crate ceiling tiles are frequently used in settings where lighting is essential. The grid structure helps diffuse light, reducing glare and creating a softer, more evenly lit environment. These tiles can be paired with various lighting setups, such as fluorescent or LED fixtures, to enhance ambient light and create an inviting atmosphere.

3. Aesthetic Appeal

These ceiling tiles add a modern, industrial look to any space. The clean lines and geometric pattern are visually appealing and can give a room a sense of depth and openness. Whether you’re working with a contemporary office design or an industrial-style home interior, egg crate ceiling tiles can add a touch of sophistication to your ceiling.

4. Durability and Ease of Maintenance

Egg crate ceiling tiles are made from durable materials like aluminum or polycarbonate, which are resistant to corrosion and damage. They are easy to clean and maintain, making them ideal for high-traffic or commercial spaces. Unlike traditional ceiling panels that can collect dust and grime, the open grid structure of egg crate tiles makes them easier to wipe down or even vacuum.


Common Uses for Egg Crate Ceiling Tiles

Egg crate ceiling tiles are versatile and can be used in various settings. Here are some common applications:

1. Offices and Commercial Spaces

In office and commercial settings, egg crate ceiling tiles are used to optimize lighting and ventilation, creating a comfortable environment for employees and customers. They also help in reducing energy costs by enhancing the effectiveness of air conditioning and lighting systems.

2. Hospitals and Healthcare Facilities

Egg crate ceiling tiles are ideal for healthcare settings where cleanliness, air circulation, and lighting are essential. The tiles are easy to clean and don’t collect as much dust as traditional ceiling panels, making them a hygienic choice for hospitals and clinics.

3. Retail Stores

Retail stores benefit from egg crate ceiling tiles because of their ability to diffuse light, making products more visible and enhancing the overall shopping experience. Additionally, the open structure allows the HVAC systems to maintain a comfortable temperature for customers.

4. Residential Spaces

While they are more commonly seen in commercial spaces, egg crate ceiling tiles are also being used in modern residential interiors. They add a unique look to kitchens, basements, and living rooms while enhancing ventilation and lighting, especially in areas where traditional ceiling panels might obstruct airflow.


Types of Egg Crate Ceiling Tiles

Egg crate ceiling tiles are available in different materials, finishes, and sizes, each suited to different needs. Here are some popular types:

1. Aluminum Egg Crate Ceiling Tiles

Aluminum tiles are lightweight, corrosion-resistant, and suitable for both indoor and outdoor use. They are highly durable, making them a popular choice for industrial and commercial applications where strength is essential. Aluminum also has a reflective quality that enhances lighting.

2. Plastic Egg Crate Ceiling Tiles

Plastic or polycarbonate egg crate tiles are lightweight, affordable, and versatile. They are easy to install and come in various colors, making them a good choice for decorative applications. Plastic tiles are also moisture-resistant, which is ideal for humid environments like kitchens and bathrooms.

3. Custom-Finished Egg Crate Tiles

For those who want a unique look, custom-finished egg crate ceiling tiles are available in different colors, textures, and finishes. These can be tailored to match specific design schemes, such as wood-grain finishes for a rustic look or metallic finishes for a more industrial feel.


Installing Egg Crate Ceiling Tiles: Key Tips and Considerations

Proper installation is key to ensuring your egg crate ceiling tiles look great and function effectively. Here are some helpful tips for installing these tiles:

1. Measure Your Space Carefully

Before purchasing your tiles, measure your ceiling space accurately. Egg crate ceiling tiles come in standard sizes, but you may need to cut or trim them to fit custom ceiling layouts. Precise measurements will save time and ensure a clean, professional finish.

2. Choose the Right Grid System

The grid system for drop ceilings will affect the installation and stability of your egg crate tiles. Make sure the grid you choose is compatible with your ceiling tiles in terms of size and weight capacity. Check with the tile manufacturer for grid system recommendations to ensure a secure fit.

3. Consider Lighting and Ventilation Needs

If you’re using egg crate tiles to enhance lighting or ventilation, consider the placement of lights and vents. Pairing these tiles with strategically placed light fixtures will help create an evenly lit space, while vents should be placed near tiles to maximize airflow.

4. Safety and Maintenance

Always use safety gear, such as gloves and goggles, when cutting or installing tiles. To keep your tiles looking clean, dust and wipe them down regularly. If they become damaged, egg crate tiles are relatively easy to replace without disrupting the rest of the ceiling.


Maintenance Tips for Egg Crate Ceiling Tiles

Regular maintenance is essential for keeping egg crate ceiling tiles in top shape. Here are some simple steps to maintain these tiles:

  1. Dust and Clean Regularly: Use a soft cloth or a vacuum cleaner with a brush attachment to remove dust and dirt from the tiles.
  2. Inspect for Damage: Periodically check for cracks or other signs of damage, especially in high-traffic or commercial spaces.
  3. Replace Filters (if applicable): In areas with high airflow requirements, you may need to install filters above your egg crate ceiling tiles. Replace these filters regularly to maintain air quality.
  4. Deep Clean Annually: For a more thorough clean, take down the tiles and wash them with a mild detergent. Make sure to dry them completely before re-installing.

Choosing the Right Egg Crate Ceiling Tile for Your Needs

Selecting the right egg crate ceiling tile involves considering factors like the material, finish, and application. Aluminum tiles are ideal for durability, while plastic tiles are more affordable and versatile. Custom-finished tiles offer additional aesthetic options for specific design requirements. Whether you prioritize airflow, lighting, or aesthetics, there’s an egg crate ceiling tile that will meet your needs.

If you’re unsure which type is best for your space, consult with a professional or explore various options at a local supplier to find the style and material that suit your design goals.


Conclusion

Egg crate ceiling tiles are a versatile and functional choice for both commercial and residential applications. Their unique grid design enhances ventilation, improves lighting, and adds a modern touch to any space. By understanding the benefits, types, and installation tips covered in this guide, you’ll be well-equipped to select and maintain the perfect egg crate ceiling tiles for your needs. Whether you’re designing a contemporary office, upgrading your retail space, or renovating your home, egg crate ceiling tiles offer an attractive, efficient solution to elevate your interior environment.

Rustic Ceiling Fan With Lights: Enhance Your Home Decor

In the world of home decor, few elements can transform a space quite like a ceiling fan. Beyond their practical function of providing cooling relief, ceiling fans can significantly enhance the aesthetic of a room. One particularly popular style is the rustic ceiling fan with lights. This design choice not only brings a cozy, warm atmosphere to your home but also integrates functional lighting solutions. Whether you’re aiming for a cabin-inspired look, a farmhouse aesthetic, or simply want to incorporate natural materials into your decor, rustic ceiling fans with lights offer an attractive and versatile option.

Rustic Ceiling Fan With Lights

What Is a Rustic Ceiling Fan With Lights?

A rustic ceiling fan with lights combines the cooling functionality of a ceiling fan with the illumination of integrated lighting. Typically featuring wood or metal finishes, these fans embody the charm of rural design and are perfect for settings where a cozy, inviting atmosphere is desired. They often incorporate features like:

  • Natural Wood Blades: Fans may have blades made from reclaimed wood, offering unique grain patterns and textures that contribute to a rustic look.
  • Industrial Metal Accents: Combining wood with iron or steel elements adds an industrial flair, balancing the warmth of wood with a rugged edge.
  • Integrated Lighting: Many models include built-in light fixtures that can serve as the primary light source in a room, making them practical as well as stylish.
  • Varied Styles: Rustic ceiling fans come in various styles, from vintage designs to more contemporary interpretations, ensuring there’s an option to fit your specific decor needs.

Read too: Kitchen Lighting For A Vaulted Ceiling: Illuminating Your Space with Style and Functionality


Benefits of Choosing a Rustic Ceiling Fan With Lights

1. Aesthetic Appeal

One of the most significant advantages of a rustic ceiling fan with lights is its ability to enhance the decor of a room. The blend of natural materials and stylish design creates a focal point that draws the eye. This makes it an ideal choice for living rooms, bedrooms, and even outdoor spaces like porches or patios.

2. Functional Lighting

In addition to cooling your space, these fans provide essential lighting. Many rustic ceiling fans come equipped with adjustable brightness settings and different light color options, allowing you to create the perfect ambiance for any occasion. Whether you need bright light for reading or a warm glow for a cozy evening, these fans can accommodate your needs.

3. Energy Efficiency

Rustic ceiling fans with lights often use energy-efficient LED bulbs, which consume less power than traditional incandescent bulbs. This means you can enjoy the benefits of both lighting and cooling while keeping your energy bills in check. Additionally, many ceiling fans can help circulate air, reducing the need for air conditioning in warmer months.

4. Versatility in Design

Rustic ceiling fans with lights can be integrated into various decor styles. Whether your home is designed in a country, farmhouse, industrial, or even a modern aesthetic, you can find a rustic fan that complements your overall theme. They blend well with other rustic decor elements, such as wooden furniture, stone accents, and warm color palettes.

5. Improved Air Circulation

Using a ceiling fan effectively can improve the air circulation in a room, making it feel more comfortable year-round. In winter, running the fan in reverse can help distribute warm air from heating sources, while in summer, it can create a cooling breeze. This functionality makes rustic ceiling fans an excellent choice for climate control in your home.


Choosing the Right Rustic Ceiling Fan With Lights

When selecting the perfect rustic ceiling fan with lights for your home, consider the following factors:

1. Room Size

The size of the room where you plan to install the fan is crucial. Larger rooms may require more powerful fans with larger blade spans, while smaller spaces may benefit from compact designs. Here’s a quick guide for blade size based on room size:

  • Small Rooms (up to 75 sq ft): 29″ to 36″ blade span
  • Medium Rooms (up to 144 sq ft): 36″ to 42″ blade span
  • Large Rooms (over 144 sq ft): 44″ or larger blade span

2. Style and Finish

Choose a fan that complements your existing decor. Consider materials, colors, and finishes. A fan with a distressed wood finish can add a rustic charm, while metal accents can enhance the industrial feel. Don’t hesitate to mix materials for a unique look that suits your style.

3. Lighting Options

Look for fans with integrated lighting features that fit your needs. Options may include adjustable brightness, dimmable lights, and various light color temperatures (warm, cool, or daylight). Make sure the light output is sufficient for the room’s size and intended use.

4. Noise Level

Consider the noise level of the fan. High-quality models typically operate quietly, ensuring you can enjoy a peaceful environment. If possible, test the fan before purchasing to gauge its sound level during operation.

5. Installation Requirements

Some ceiling fans can be more complicated to install than others. If you are not comfortable with electrical work, you might want to hire a professional to ensure a safe and proper installation. Check if the fan comes with clear installation instructions and all necessary hardware.


Installation of a Rustic Ceiling Fan With Lights

Installing a rustic ceiling fan with lights can be a rewarding DIY project if you have some basic skills. Here’s a step-by-step guide to help you through the process:

Tools and Materials Needed

  • Screwdriver (flat and Phillips head)
  • Ladder
  • Wire cutters/strippers
  • Electrical tape
  • Voltage tester
  • Rustic ceiling fan with lights

Step-by-Step Installation Guide

  1. Turn Off Power: Before starting, turn off the power at the circuit breaker to prevent any electrical accidents.
  2. Remove the Old Fixture: If you are replacing an existing light fixture, carefully remove it. Use a voltage tester to ensure that no electricity is flowing through the wires.
  3. Install the Mounting Bracket: Most ceiling fans come with a mounting bracket. Attach it securely to the ceiling using screws provided in the fan kit.
  4. Prepare the Wires: Strip about half an inch of insulation from the ends of the wires. Generally, you’ll have a black (live) wire, a white (neutral) wire, and a green or bare wire (ground).
  5. Connect the Wires:
    • Connect the black wire from the fan to the black wire in the ceiling.
    • Connect the white wire from the fan to the white wire in the ceiling.
    • Connect the green or bare wire from the fan to the ground wire in the ceiling.
    • Use wire nuts to secure each connection and wrap them with electrical tape for added safety.
  6. Attach the Fan: Lift the fan and attach it to the mounting bracket according to the manufacturer’s instructions. Ensure it is secured properly.
  7. Install the Light Kit: If your fan includes a light kit, install it following the provided instructions. This usually involves attaching the light fixture and connecting the corresponding wires.
  8. Final Adjustments: Adjust the fan blades if necessary and ensure everything is secure.
  9. Restore Power and Test: Turn the power back on at the circuit breaker. Test the fan and light to ensure they are functioning correctly.

Maintenance Tips for Your Rustic Ceiling Fan With Lights

To ensure your rustic ceiling fan with lights continues to perform well and look great, follow these maintenance tips:

1. Regular Dusting

Ceiling fans can accumulate dust, especially on the blades and light fixtures. Use a soft cloth or a duster to wipe down the blades and fixtures regularly to keep them looking clean and functioning efficiently.

2. Check for Wobbling

If your fan starts to wobble during operation, it may need adjustment. Tighten any loose screws and ensure the blades are correctly aligned. A level can help you check the alignment of the fan.

3. Lubricate Moving Parts

Consult the manufacturer’s instructions regarding lubrication. Some ceiling fans have specific lubrication points that should be maintained to keep the fan running smoothly.

4. Inspect Wiring Annually

Once a year, inspect the wiring and connections for any signs of wear or damage. If you notice any frayed wires or loose connections, address them immediately to prevent potential hazards.

5. Replace Bulbs as Needed

If the integrated lighting in your fan begins to flicker or goes out, replace the bulbs according to the specifications outlined in the product manual.


Conclusion

A rustic ceiling fan with lights is an excellent addition to any home, providing not only practical benefits like improved airflow and lighting but also enhancing the overall aesthetic appeal. By choosing the right fan for your space, you can create a warm, inviting atmosphere that reflects your personal style. With proper installation and maintenance, your rustic ceiling fan can serve as a beautiful and functional centerpiece in your home for years to come.

Whether you’re redecorating or starting from scratch, consider the charm and efficiency of a rustic ceiling fan with lights as an integral part of your home decor strategy.