Ceiling mounted exit sign play a crucial role in ensuring safety and compliance with building codes. Learn about the importance of these signs, their features, and installation tips to enhance emergency preparedness in your facility.
Understanding Ceiling Mounted Exit Signs
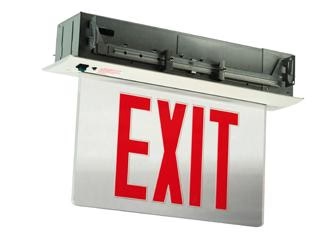
Ceiling mounted exit signs are essential safety fixtures designed to guide occupants to safety during emergencies, such as fires or power outages. Installed strategically above exit doors or in corridors, these signs provide clear directions and visibility in low-light conditions. Their placement on ceilings ensures visibility from various angles, enhancing their effectiveness in emergency situations.
Importance of Ceiling Mounted Exit Signs
Compliance with Building Codes
Building codes and regulations mandate the installation of exit signs to ensure occupant safety. Ceiling mounted exit signs not only meet these requirements but also contribute to a safe evacuation process by providing clear and visible guidance.
Visibility in Emergencies
During emergencies, visibility can be compromised due to smoke, darkness, or panic. Ceiling mounted exit signs are designed with bright, long-lasting LEDs or other illumination sources that remain visible even in adverse conditions, guiding occupants to the nearest exit.
Versatility and Design
Modern ceiling mounted exit signs come in various designs to suit different architectural styles and interior décors. They are available in different sizes, shapes, and materials, offering versatility without compromising on functionality.
Features of Ceiling Mounted Exit Signs
LED Technology
Most contemporary ceiling mounted exit signs utilize LED technology for illumination. LEDs offer several benefits, including energy efficiency, long lifespan, and brightness. They are also maintenance-free compared to traditional incandescent bulbs.
Read too: Bathroom Flooded Through the Ceiling: A Comprehensive Guide
Battery Backup
To ensure continuous operation during power outages, many ceiling mounted exit signs are equipped with battery backup systems. These batteries automatically activate when the main power source fails, providing reliable illumination until power is restored.
Self-Testing Capabilities
Some advanced exit signs feature self-testing capabilities, which automatically diagnose the functionality of LEDs, batteries, and circuitry. Regular self-tests ensure that the sign meets safety standards and is always ready for emergencies.
Installation Tips for Ceiling Mounted Exit Signs
Proper installation is crucial to the effectiveness of ceiling mounted exit signs. Follow these tips to ensure correct placement and functionality:
Location and Height
Install ceiling mounted exit signs above each exit door and along escape routes. Signs should be placed at a height that ensures clear visibility without obstruction, typically between 7 and 10 feet above the finished floor.
Wiring and Electrical Requirements
Ensure that the exit signs are connected to a reliable power source and comply with local electrical codes. Consider hiring a licensed electrician for installation to guarantee safety and compliance.
Accessibility and Maintenance
Position ceiling mounted exit signs in locations that are easily accessible for maintenance and inspections. Regularly clean the sign’s surface and lenses to maintain optimal visibility.
Types of Ceiling Mounted Exit Signs
Edge-Lit Exit Signs
Edge-lit exit signs feature LEDs along the edges of an acrylic panel, creating a uniform illumination. These signs are sleek and modern, blending well with contemporary interiors.
Surface-Mounted Exit Signs
Surface-mounted exit signs are directly mounted on the ceiling surface. They are robust and easy to install, making them suitable for various indoor environments.
Recessed Exit Signs
Recessed exit signs are installed into the ceiling, providing a flush appearance. These signs are ideal for spaces where aesthetics and space-saving are priorities.
Choosing the Right Ceiling Mounted Exit Sign
When selecting a ceiling mounted exit sign for your facility, consider the following factors:
Regulatory Compliance
Ensure the exit sign meets local building codes and safety regulations. Look for certifications such as UL (Underwriters Laboratories) listing to verify compliance with industry standards.
Visibility and Illumination
Select a sign with bright, visible illumination that remains effective in various lighting conditions. LEDs are preferred for their brightness and energy efficiency.
Durability and Maintenance
Choose a sign constructed from durable materials that withstand environmental conditions and require minimal maintenance. Opt for models with long-lasting LEDs and reliable battery backups.
Maintaining Ceiling Mounted Exit Signs
Regular maintenance ensures that ceiling mounted exit signs remain operational and compliant with safety standards:
- Testing: Conduct periodic tests to ensure the sign illuminates properly during simulated power outages.
- Cleaning: Clean the sign’s lenses and surfaces regularly to remove dust and debris that can obscure visibility.
- Battery Replacement: Replace batteries according to manufacturer recommendations to maintain reliable backup power.
Conclusion
Ceiling mounted exit sign are indispensable safety features in any commercial or residential building. By providing clear guidance during emergencies, these signs enhance occupant safety and ensure compliance with building codes. Choose a sign that meets regulatory standards, offers reliable illumination, and fits your facility’s aesthetic requirements. Proper installation and regular maintenance are key to maximizing the effectiveness and lifespan of ceiling mounted exit signs, ensuring they remain ready to guide occupants to safety when needed most.