Termites are notorious for causing extensive damage to homes and buildings, often going unnoticed until the problem becomes severe. One of the most alarming signs that termites may be present in your home is the discovery of termite tubes hanging from the ceiling. These mud tubes can indicate an infestation that has reached critical levels, requiring immediate action.
In this article, we’ll delve into what termite tubes are, why they form on ceilings, how to identify them, and most importantly, how to treat and prevent termite infestations. By understanding the behavior of termites and recognizing the signs early, you can protect your home from costly damage.
What Are Termite Tubes?
Termite tubes, also known as mud tubes or shelter tubes, are tunnels constructed by termites to protect themselves from predators and maintain moisture as they travel between their food source and the soil. These tubes are typically made from a mixture of soil, wood fibers, and saliva. Termites build them to shield their soft, pale bodies from the outside environment, as they are highly sensitive to light and air.
Termite tubes can appear on walls, foundations, and ceilings, and are one of the most obvious signs of termite activity. These tubes act as passageways for termites, allowing them to move from the ground into your home, where they can feed on wooden structures.
Why Are There Termite Tubes Hanging From the Ceiling?
While termite tubes are most commonly found on walls and near the foundation of a home, termite tubes hanging from the ceiling can be a particularly worrisome sign. This typically happens when termites have infested the structural wood in the upper parts of your home, including the ceiling joists, rafters, or attic space. Here’s why termite tubes might appear on your ceiling:
1. Extensive Infestation
If termite tubes are visible on the ceiling, it usually means the infestation is advanced. Termites have likely been feeding on the wood in your home for an extended period, weakening the structure. The tubes on the ceiling indicate that the termites are seeking new food sources or trying to expand their colony.
2. Drywood Termites
While subterranean termites are the most common species responsible for mud tubes, drywood termites can also create infestations in upper areas of the home, such as ceilings. Unlike subterranean termites, drywood termites don’t need contact with the soil and can live entirely within the wooden structures of your home. The appearance of tubes in the ceiling may indicate that drywood termites are present, feeding on the wood framing in your attic or upper floors.
3. Moisture Problems
Termites thrive in moist environments. If there’s a leak in your roof or ceiling that has gone unnoticed, it could create the perfect conditions for termites to build their colonies. Moist wood is easier for termites to chew through, and if the problem persists, the termites will continue to expand their presence, leading to visible tubes on the ceiling.
4. Looking for New Food Sources
Termites may create tubes hanging from the ceiling if they are searching for new sources of cellulose (the primary component of wood). The tubes allow them to explore different areas of the home while staying protected. The presence of these tubes means that termites are already well-established in the walls and ceiling of your home.
How to Identify Termite Tubes Hanging From Ceiling
Spotting termite tubes hanging from the ceiling is a clear indication of an infestation, but how do you know for sure that what you’re seeing is caused by termites? Here are some tips for identifying termite mud tubes:
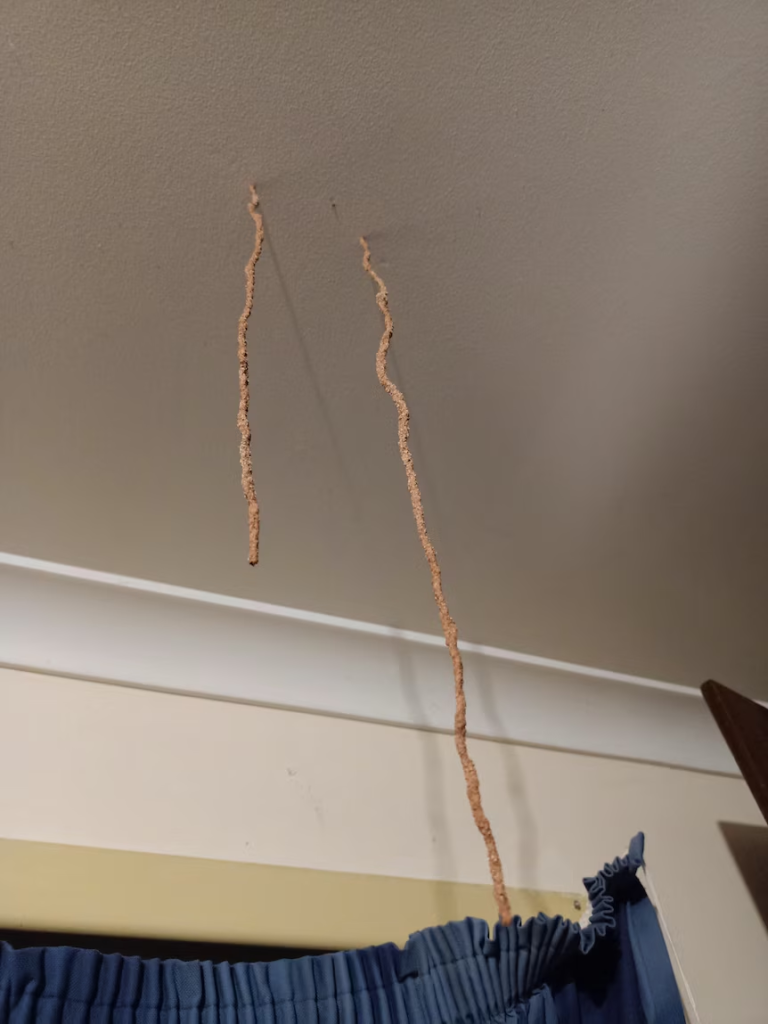
1. Shape and Size
Termite tubes are typically thin and cylindrical, about the width of a pencil. They can extend several feet in length, running from the floor to the ceiling, across walls, or hanging down from the ceiling itself. If you see any tube-like structures hanging from your ceiling, it’s worth investigating further.
2. Texture
Termite mud tubes are usually rough and made from a combination of dirt, wood particles, and termite saliva. If you touch the tube, it will feel gritty or sandy. The surface of the tube may look cracked or uneven, as termites are constantly building and expanding their tunnels.
3. Location
Termite tubes on ceilings are more common in areas where moisture is present, such as near plumbing fixtures, bathrooms, kitchens, and areas of the roof where water may be pooling. However, they can also appear in attics and other parts of the home where termites have access to wood.
4. Break Open the Tube
If you’re unsure whether the tube is active, carefully break it open. If the infestation is current, you may see live termites inside the tube, which can be a clear sign that immediate treatment is needed. Even if no termites are present, a fresh tube that hasn’t crumbled or dried out may still indicate an active colony nearby.
What to Do If You Find Termite Tubes Hanging From Your Ceiling
Discovering termite tubes hanging from the ceiling is certainly alarming, but it’s important to act quickly to minimize damage. Here’s what you should do if you encounter this sign of infestation:
1. Contact a Professional Pest Control Company
The first step is to contact a professional pest control company that specializes in termite infestations. Termites can cause significant structural damage, and handling the problem yourself may not be enough to fully eradicate the infestation. A licensed pest control expert can inspect your home, assess the severity of the infestation, and develop a treatment plan.
2. Treat the Infestation
Once a professional has confirmed the presence of termites, they will likely recommend a treatment option. Some common methods for treating termites include:
- Liquid Termiticides: These are chemicals that are applied to the soil around your home or directly to infested areas. They create a barrier that prevents termites from entering your home and kills any termites that come into contact with it.
- Bait Stations: Termite bait stations are placed around the perimeter of your home. The bait attracts termites, which then carry the toxic substance back to their colony, ultimately killing the entire colony.
- Fumigation: In severe cases, fumigation may be required. This involves sealing off the entire home and filling it with a gas that kills termites. While highly effective, fumigation can be disruptive, and you’ll need to vacate your home during the process.
3. Address Moisture Issues
Since termites are attracted to moisture, it’s crucial to address any leaks or water damage in your home. Fixing roof leaks, ensuring proper drainage, and repairing any broken pipes can make your home less hospitable to termites.
4. Inspect Your Home Regularly
After treatment, regular inspections can help ensure that termites don’t return. Even after an infestation has been treated, termites can re-enter your home if preventive measures aren’t taken. A professional can provide ongoing monitoring to detect any new termite activity before it becomes a problem again.
Preventing Termite Infestations
While termite infestations can be costly and damaging, there are steps you can take to prevent them from occurring in the first place. By following these preventive measures, you can reduce the risk of seeing termite tubes hanging from your ceiling.
1. Maintain Proper Ventilation
Moisture attracts termites, so it’s essential to maintain good ventilation in your home. Use dehumidifiers in damp areas like basements or crawl spaces, and ensure that attics and other spaces are well-ventilated to prevent moisture buildup.
2. Remove Wood Debris
If there are piles of wood, mulch, or other organic materials near your home, they can serve as a food source for termites. Keep your yard clear of wood debris and ensure that firewood is stored away from your home’s foundation.
3. Use Termite-Resistant Materials
When building or renovating, consider using termite-resistant building materials such as treated wood or metal. These materials can help reduce the risk of termite infestations in the future.
4. Regular Inspections
Annual termite inspections by a licensed pest control professional are one of the best ways to catch a termite problem early. They can identify signs of termites before they cause significant damage and recommend preventive treatments to protect your home.
Conclusion
Finding termite tubes hanging from the ceiling is a serious warning sign of a termite infestation that requires immediate attention. These tubes indicate that termites have infiltrated your home’s structure, possibly causing significant damage. By identifying the signs of termites early and taking swift action, you can prevent further destruction and safeguard your property.
Contacting a pest control professional, addressing moisture issues, and taking preventive measures can all help in managing termite infestations. Don’t wait until the damage becomes too severe—regular inspections and early detection are key to protecting your home from these destructive pests.