Ceiling fans are a great addition to any room, providing comfort and energy efficiency. However, installing or replacing a ceiling fan involves some electrical work, and it’s crucial to understand the wiring involved. One particular component that often confuses homeowners is the red wire in the ceiling. In this article, we’ll demystify ceiling fan wiring with a red wire, explaining its purpose and how to correctly connect it during installation.
Understanding Ceiling Fan Wiring Components
Before delving into the red wire, let’s review the primary components of ceiling fan wiring:
- Black Wire: This wire is the hot wire that provides power to the fan.
- White Wire: The white wire is the neutral wire that completes the electrical circuit.
- Green or Bare Wire: This wire is the ground wire and serves to protect against electrical shock.
- Red Wire: The red wire, when present, is often a secondary hot wire, used for separate fan and light control.
The Role of the Red Wire
The red wire in ceiling fan wiring serves a specific purpose: it allows for separate control of the fan and the light fixture. When you have a ceiling fan with a red wire, it typically means that you can operate the fan and the light independently. The black wire is usually for the fan, and the red wire is for the light.
Installing a Ceiling Fan with a Red Wire
If you’re installing a ceiling fan with a red wire, follow these steps to ensure a safe and correct installation:
1. Turn Off the Power
Before working on any electrical project, it’s essential to turn off the power at the circuit breaker or fuse box. This ensures your safety while handling the wires.
2. Identify the Wires
After removing the existing fixture or exposing the ceiling wires, identify the wires. In most cases, you will see a black, white, and green (or bare) wire. If there is a red wire, it will be separate from these and should be easily distinguishable.
3. Connect the Wires
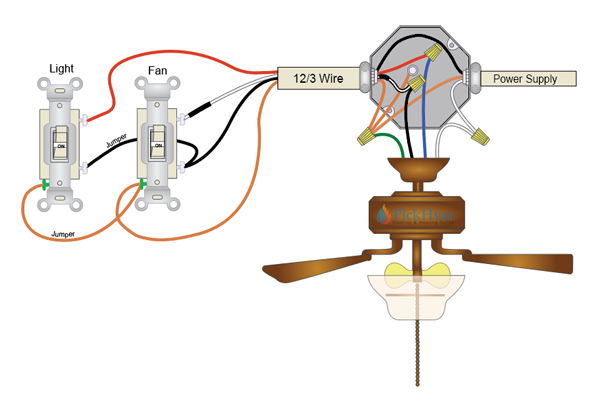
Connect the ceiling fan wires to the corresponding wires in your ceiling:
- Black to Black: Connect the black wire from the fan to the black wire from the ceiling. This controls the fan motor.
- Red to Red: Connect the red wire from the fan to the red wire from the ceiling. This controls the light kit.
- White to White: Connect the white wire from the fan to the white wire from the ceiling. This is the neutral connection.
- Green or Bare to Green or Bare: Connect the ground wire from the fan to the ground wire from the ceiling.
4. Secure the Connections
After connecting the wires, secure them using wire nuts and electrical tape. Ensure that all connections are tight and free from exposed wires.
5. Install the Fan
Follow the manufacturer’s instructions to install the fan blades, light kit, and any additional components. Make sure the fan is securely attached to the ceiling bracket.
6. Restore Power and Test
Once the fan is installed, turn the power back on and test the fan and light separately to ensure they operate correctly.
Conclusion
Ceiling fan wiring with a red wire may seem intimidating, but it’s a relatively straightforward process when you understand its purpose. The red wire allows you to control the fan and light independently, providing convenience and versatility. By following the correct wiring steps and observing safety precautions, you can install or replace your ceiling fan with confidence and enjoy the comfort it provides in your home.