White Pine Tongue and Groove Ceiling: A Timeless Addition to Your Home

When it comes to enhancing the interior of your home, few features offer the elegance, warmth, and timeless appeal of a White Pine Tongue and Groove Ceiling. Whether you’re renovating a room or designing a new space, this style of ceiling is a perfect way to add character and sophistication to your living environment. It combines the natural beauty of wood with a clean, polished look that complements both modern and traditional interiors.

White Pine Tongue And Groove Ceiling

This article will explore everything you need to know about White Pine Tongue and Groove Ceilings, including their benefits, design options, installation tips, and how to maintain them for years of enjoyment. Let’s dive into why this ceiling style is becoming increasingly popular in home design.

Read too: Bathroom Flooded Through the Ceiling: A Comprehensive Guide


What is a White Pine Tongue and Groove Ceiling?

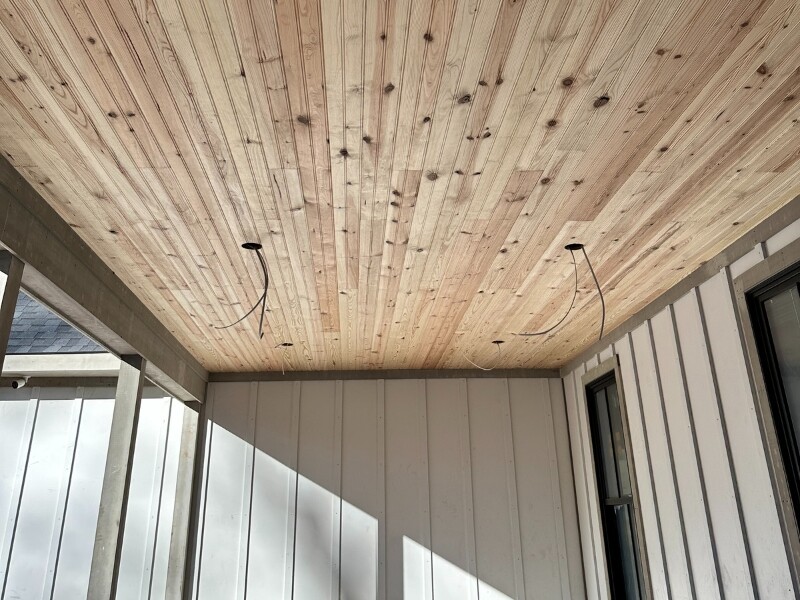
A White Pine Tongue and Groove Ceiling refers to a ceiling made from white pine wood planks that are interlocked using the tongue and groove method. This means that each plank has a protruding “tongue” on one edge and a corresponding “groove” on the other. When the boards are installed, the tongue of one plank fits into the groove of the next, creating a seamless and sturdy surface.

White pine is a popular choice for this type of ceiling because of its light, natural color and attractive grain patterns. The White Pine Tongue and Groove Ceiling is particularly appreciated for its classic appeal, offering a rustic yet elegant aesthetic that fits well in a variety of home designs. From contemporary living rooms to cozy cabins, this ceiling style can transform the ambiance of any space.


Why Choose a White Pine Tongue and Groove Ceiling?

There are many reasons why a White Pine Tongue and Groove Ceiling can be the perfect addition to your home. Below, we’ll explore some of the most notable advantages:

1. Natural Beauty and Warmth

One of the standout features of a White Pine Tongue and Groove Ceiling is its inherent beauty. White pine wood has a soft, pale hue with light, creamy tones and subtle grain patterns, creating an inviting and airy atmosphere. This natural warmth can make any room feel more comfortable and welcoming.

2. Versatility in Design

Whether you’re going for a rustic, modern, or traditional look, White Pine Tongue and Groove Ceilings offer a high degree of flexibility in design. The clean lines of the tongue and groove system lend themselves to contemporary interiors, while the natural texture of the wood is perfect for country or farmhouse-style rooms. You can also finish the wood with a variety of stains, paints, or finishes to match your decor.

3. Increased Property Value

Installing a White Pine Tongue and Groove Ceiling can increase the value of your home by enhancing its overall aesthetic. The classic and elegant look of wood ceilings is often associated with high-end homes, which means prospective buyers may be more attracted to a property that has this feature.

4. Durability and Strength

White pine is a relatively strong and durable wood, making it ideal for ceilings that need to stand the test of time. The tongue and groove installation method adds strength and stability to the ceiling, helping to prevent warping, cracking, or shifting over time. The solid connection between each plank ensures that the ceiling will remain intact, even in areas that experience fluctuations in temperature and humidity.

5. Ease of Installation

Another benefit of a White Pine Tongue and Groove Ceiling is that it is relatively easy to install. Whether you choose to tackle the project yourself or hire a professional, the tongue and groove system simplifies the process. The interlocking planks make it easier to align and secure the boards to the ceiling, reducing the risk of gaps or unevenness.


Design Ideas for White Pine Tongue and Groove Ceilings

There are numerous ways to incorporate a White Pine Tongue and Groove Ceiling into your home. Below are some design ideas to inspire your next renovation project:

1. Rustic Cabin Charm

If you’re looking to achieve a cozy, cabin-inspired feel, a White Pine Tongue and Groove Ceiling is a perfect choice. Pair it with exposed wooden beams, stone accents, and warm furniture to create an inviting retreat. The light color of white pine creates a beautiful contrast against darker wooden accents, giving your space an authentic, rustic atmosphere.

2. Modern Minimalism

In contemporary homes, a White Pine Tongue and Groove Ceiling can bring a natural touch to minimalist designs. To achieve a clean and modern look, opt for a smooth, unfinished white pine ceiling. The subtle grain patterns will add texture without overwhelming the space, creating a calming and sophisticated environment.

3. Beachy Vibes

If you live near the coast or want to bring a beachy feel to your home, a White Pine Tongue and Groove Ceiling is a fantastic option. The pale wood tones mimic the look of driftwood and enhance the breezy, relaxed vibe of a coastal home. Combine it with light, airy furniture and coastal-inspired decor to create the perfect beach retreat.

4. Traditional Elegance

For those seeking a more classic or traditional look, a White Pine Tongue and Groove Ceiling can easily be incorporated into traditional spaces. Pair it with crown molding, wainscoting, and elegant chandeliers to create a sophisticated dining room or living area that exudes timeless charm.
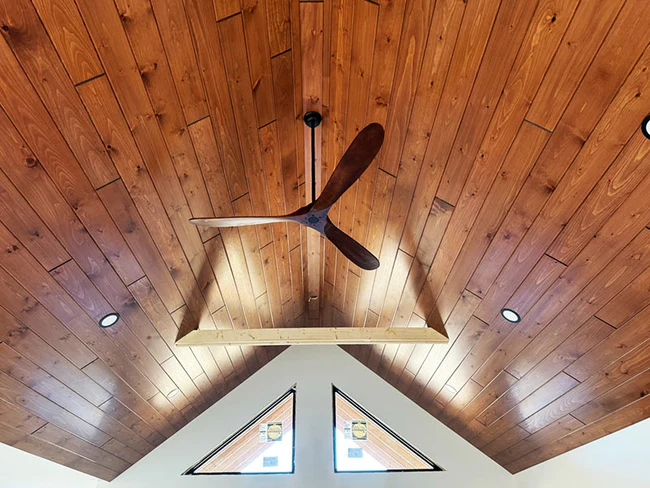
5. Vaulted Ceilings

In homes with high or vaulted ceilings, a White Pine Tongue and Groove Ceiling can add depth and dimension to the room. The interlocking boards highlight the height of the ceiling, making the space feel grander and more open. To accentuate the beauty of the ceiling, consider adding pendant lights or chandeliers that draw attention to the architectural feature.


Installation Tips for White Pine Tongue and Groove Ceilings

Installing a White Pine Tongue and Groove Ceiling can be a rewarding DIY project if you’re up for the challenge. However, it’s essential to follow the right steps to ensure a professional-looking and durable installation. Here are some tips for a successful installation:

1. Prepare the Space

Before you begin installation, ensure that your ceiling is clean, level, and free from debris. Check for any cracks or damage that might affect the integrity of the ceiling. You should also take the time to measure the area to determine how much white pine material you’ll need.

2. Choose the Right Planks

Select high-quality White Pine Tongue and Groove planks that are free from defects or warping. Make sure the planks are appropriate for ceiling use, as ceiling boards are typically thinner and lighter than wall planks. Additionally, decide whether you want to install the planks in a horizontal or vertical orientation, as both offer different aesthetic effects.

3. Allow the Wood to Acclimate

Wood is sensitive to changes in humidity, so it’s essential to allow your White Pine Tongue and Groove planks to acclimate to the room before installation. Let the planks sit in the room where they will be installed for at least 48 hours, so they can adjust to the temperature and moisture levels.

4. Install the Planks

Begin by attaching the first row of planks to the ceiling, making sure they’re level. Use a nail gun or screws to secure the planks, driving the nails into the grooves to hide them from view. Continue installing the remaining planks, making sure the tongue and groove system locks together snugly as you go.

5. Finishing Touches

Once the planks are installed, you can finish the ceiling with a variety of stains or paints. If you prefer to maintain the natural look of the white pine, a clear wood finish will highlight the wood’s beautiful grain. Alternatively, you can stain the wood for a deeper tone or paint it to match your room’s decor.


Maintenance and Care Tips

To keep your White Pine Tongue and Groove Ceiling looking its best, regular maintenance is necessary. Here are some tips for maintaining your wood ceiling:

1. Dusting

Dust the ceiling regularly with a soft cloth or a dusting brush to prevent dirt buildup. Be sure to clean the grooves between the planks to maintain the smooth look of your ceiling.

2. Cleaning Stains

If your ceiling becomes stained, clean it with a gentle wood cleaner and a soft cloth. Avoid using harsh chemicals that could damage the finish or discolor the wood.

3. Inspect for Damage

Over time, wood can be susceptible to damage from moisture or insects. Periodically inspect your White Pine Tongue and Groove Ceiling for any signs of wear, cracks, or insect activity, and address any issues promptly to prevent further damage.


Conclusion

A White Pine Tongue and Groove Ceilings is a fantastic investment for homeowners looking to add beauty, warmth, and elegance to their space. Whether you prefer a rustic cabin feel, a modern minimalist design, or a traditional touch, this ceiling style can complement various decor themes. With its durability, ease of installation, and timeless appeal, it’s no wonder that White Pine Tongue and Groove Ceilings are a popular choice in home design.

By following the right installation techniques and performing regular maintenance, you can enjoy the charm of your wood ceiling for many years to come. Consider adding this stunning feature to your home today and transform your living space into something truly exceptional.

Elevate Your Space: A Step-by-Step Guide to Installing Tongue and Groove Ceiling Panels

Transform your living area with elegance! Learn the art of “Installing Tongue and Groove Ceiling” effortlessly and enhance the aesthetic appeal of your home.

Installing Tongue And Groove Ceiling

Unveiling Charm: Installing Tongue and Groove Ceiling Panels with Finesse

Discover the timeless allure of a tongue and groove ceiling as we guide you through the process of “Installing Tongue and Groove Ceiling.” Elevate your space with this classic and sophisticated design element that adds character and warmth.

The Essence of Elegance

Delve into the world of design sophistication and architectural beauty by mastering the skill of “Installing Tongue and Groove Ceiling.” This section provides a comprehensive guide for homeowners and enthusiasts seeking to enhance their spaces.

Understanding the Basics:

Before embarking on the installation journey, acquaint yourself with the fundamentals of tongue and groove ceiling panels. These interlocking boards create a seamless, visually appealing surface.

Steps for Installing Tongue and Groove Ceiling Panels

Follow these steps to ensure a smooth and successful installation process:

  1. Gather Materials and Tools:
  2. Measure and Cut:
    • Measure the ceiling area and the panels to determine the number of cuts needed.
    • Use a saw to make precise cuts, ensuring a snug fit.
  3. Prepare the Surface:
    • Ensure the ceiling is clean, dry, and free of any protrusions.
    • Apply adhesive to the back of each panel for additional stability.
  4. Start Installation:
    • Begin installing panels at one corner of the room.
    • Insert the tongue of the first panel into the groove of the adjacent panel.
    • Use a level to maintain straight alignment.
  5. Secure Panels in Place:
    • Nail or screw panels into the ceiling joists for a secure and stable attachment.
    • Repeat the process, ensuring tight joints between each panel.
  6. Continue Across the Ceiling:
    • Work systematically across the ceiling, connecting panels until the entire area is covered.
  7. Finishing Touches:
    • Trim the last row of panels if necessary for a polished finish.
    • Fill any gaps with wood filler and sand the surface for a smooth appearance.

Benefits of Installing Tongue and Groove Ceiling Panels

Explore the advantages that come with the installation of tongue and groove ceiling panels:

  1. Aesthetic Appeal: Create a visually stunning and cohesive ceiling design that complements various architectural styles.
  2. Durability: Tongue and groove construction enhances the structural integrity of the ceiling, providing a robust and long-lasting solution.
  3. Insulation: The interlocking nature of the panels provides an additional layer that contributes to insulation, helping regulate temperature and reduce energy costs.
  4. Versatility: Tongue and groove ceilings suit a variety of spaces, from traditional to contemporary, making them a versatile design choice.

Read too: Water Coming From Ceiling Light

Conclusion: Elevate Your Space with Timeless Elegance

In conclusion, “Installing Tongue and Groove Ceiling” adds a touch of timeless elegance to any space. By following the step-by-step guide and understanding the benefits of this installation, homeowners can embark on a transformative journey, enhancing the beauty and charm of their living environments. Whether you choose this classic style for its aesthetic appeal or functional advantages, a tongue and groove ceiling promises to elevate your space with sophistication and warmth.

Demystifying Tongue and Groove Ceiling Cost Per Square Foot

When it comes to upgrading the look of your interior, installing a tongue and groove ceiling is an elegant choice. However, it’s essential to consider the cost, specifically the tongue and groove ceiling cost per square foot. In this article, we’ll break down the factors that influence this cost, helping you make an informed decision for your home improvement project.

Tongue And Groove Ceiling Cost Per Square Foot

Understanding Tongue and Groove Ceilings

Before we dive into the details of cost, let’s establish what a tongue and groove ceiling is. This type of ceiling features individual planks with an interlocking system, where the “tongue” of one plank fits into the “groove” of the adjacent plank. This creates a seamless, visually appealing surface that is often used to add a touch of warmth and character to a room.

Material Costs

The first and most significant factor in determining the tongue and groove ceiling cost per square foot is the cost of materials. Tongue and groove ceiling planks come in various materials, with different price points. The most common materials include:

  • Pine: Pine is a popular and budget-friendly choice for tongue and groove ceilings. It offers a warm, rustic look and is relatively affordable.
  • Cedar: Cedar is a durable and aromatic wood that can be used for tongue and groove ceilings. It’s typically more expensive than pine but offers unique benefits.
  • Redwood: Redwood is a premium option for a tongue and groove ceiling, known for its durability and rich color. It is one of the more expensive choices.
  • MDF (Medium Density Fiberboard): For a more budget-friendly option, some homeowners choose MDF planks. These engineered wood planks are typically lower in cost but may not have the same natural wood appeal.

The choice of material can significantly affect the overall cost. Keep in mind that the quality and finish of the material will also influence pricing.

Labor Costs

The installation of a tongue and groove ceiling is labor-intensive and will incur costs. Labor costs can vary widely depending on factors such as your location, the complexity of the project, and the expertise of the professionals you hire.

  • Complexity: The complexity of the project can influence labor costs. If your ceiling has intricate details, is uneven, or requires additional structural work, expect higher labor costs.
  • Experience: Experienced contractors may charge more for their expertise, but their skills and precision can result in a more polished finished product.
  • Location: Labor rates can vary based on the cost of living in your area. In regions with a higher cost of living, you can expect higher labor costs.

Finishing and Detailing

The level of finishing and detailing you desire for your tongue and groove ceiling will impact the cost per square foot. For example, if you plan to have the planks stained or painted, this will require additional time and effort, leading to increased costs. Additionally, if you want to incorporate intricate patterns or other decorative features, this will also affect the overall price.

Ceiling Height and Size

The dimensions of your ceiling directly affect the cost. Ceilings with greater height or larger surface areas will naturally require more material and labor, resulting in a higher cost per square foot.

Installation Method

The method used to install the tongue and groove ceiling can also impact the cost. Two common installation methods are:

  • Blind Nailing: In this method, nails are driven through the tongue of each plank, hiding the nail heads from view. This technique is more time-consuming but creates a seamless appearance.
  • Face Nailing: With face nailing, nails are driven through the face of each plank, which is visible after installation. This method is faster but may not be as aesthetically pleasing.

Your choice of installation method will influence both labor costs and the final look of your ceiling.

Additional Costs

When budgeting for your tongue and groove ceiling, remember to account for additional costs, such as insulation, underlayment, and any structural modifications needed to support the new ceiling.

Conclusion

A tongue and groove ceiling can be a beautiful addition to your interior space, adding warmth and character. The cost per square foot for this project is influenced by several factors, including material costs, labor costs, finishing and detailing, ceiling height and size, installation method, and additional costs. To obtain an accurate estimate for your project, it’s advisable to consult with experienced contractors and obtain multiple quotes. By considering these factors and planning accordingly, you can enjoy the elegance of a tongue and groove ceiling while staying within your budget.

Breaking Down the Labor Cost to Install Tongue and Groove Ceiling

Transforming your space with a beautiful tongue and groove ceiling is an excellent way to add character and charm to your home. However, beyond the cost of materials, you must also consider the labor cost to install a tongue and groove ceiling. In this article, we’ll explore the various factors that influence the labor cost and provide insights into what to expect when undertaking this home improvement project.

Labor Cost To Install Tongue And Groove Ceiling

Understanding Tongue and Groove Ceilings

Before delving into labor costs, let’s clarify what a tongue and groove ceiling is. This type of ceiling features planks that have a unique interlocking system, with one side (the “tongue”) fitting into the groove of the adjacent plank. This design creates a seamless, visually appealing surface that’s often used to give a room a cozy and rustic ambiance.

1. Project Complexity

The complexity of your tongue and groove ceiling project is a significant factor in determining labor costs. Factors like the ceiling’s height, slope, and any irregularities in the existing ceiling can all impact the complexity of the installation. Additionally, if you plan to incorporate decorative features or incorporate lighting fixtures, these factors will also affect labor costs.

2. Preparation Work

Preparing the space for installation is a crucial step in the process. This may involve removing an existing ceiling, such as a drop ceiling or drywall, or making necessary repairs to the current ceiling. The condition of your existing ceiling will dictate the amount of preparation work required, and this, in turn, will influence labor costs.

3. Labor Rates

Labor costs can vary significantly based on your location and the experience of the contractors you hire. In areas with a higher cost of living, you can expect higher labor rates. Experienced contractors typically charge more for their expertise, but their skill and precision can result in a more polished finished product.

4. Installation Method

There are various installation methods for tongue and groove ceilings, each with its own labor cost. The two most common methods are:

  1. Blind Nailing: In this method, nails are driven through the tongue of each plank, hiding the nail heads from view. This technique is more time-consuming but creates a seamless appearance.
  2. Face Nailing: With face nailing, nails are driven through the face of each plank, which is visible after installation. This method is faster but may not be as aesthetically pleasing.

Your choice of installation method will impact both labor costs and the final look of your ceiling.

5. Finish and Detailing

The type of finish you desire for your tongue and groove ceiling will also affect labor costs. For instance, if you want a stained or painted finish, this will require additional time and effort for the application. Similarly, if you plan to include intricate details or patterns in the ceiling, expect labor costs to increase.

6. Team Size and Duration

The size of the installation team and the estimated duration of the project will contribute to labor costs. More extensive projects that require larger teams and longer timelines will naturally have higher labor expenses.

Read too: What To Do With Water Bubble In Ceiling

Conclusion

Installing a tongue and groove ceiling can be a visually stunning addition to your home, but it’s essential to understand the labor costs involved. The total labor cost to install a tongue and groove ceiling is influenced by various factors, including project complexity, preparation work, labor rates, installation method, finish and detailing, and the size and duration of the team. To ensure an accurate estimate, it’s advisable to consult with experienced contractors and obtain multiple quotes. By doing so, you can plan your project effectively and enjoy the beauty and elegance of your new tongue and groove ceiling.