Why Choose a Tongue And Groove Cedar Porch Ceiling for Your Home?

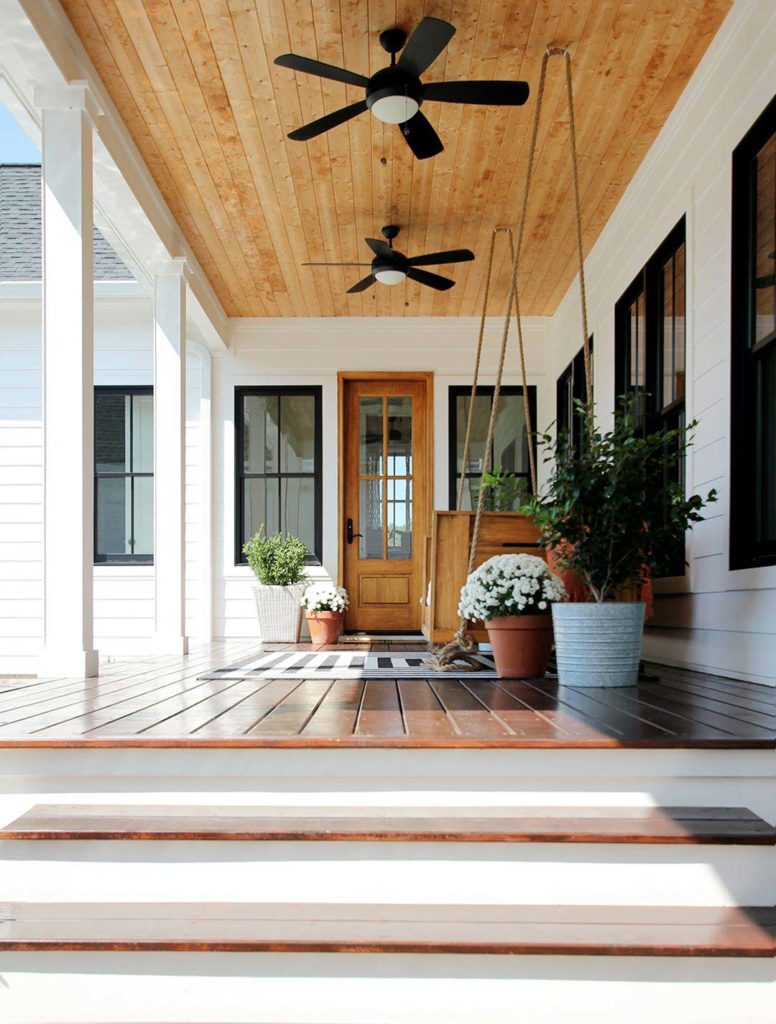
When designing an inviting outdoor space, the ceiling of your porch often sets the tone for its overall ambiance. Among the many materials available, a tongue and groove cedar porch ceiling stands out for its timeless beauty, durability, and versatility. This design choice not only enhances the aesthetic appeal of your home but also provides practical benefits, such as resistance to weather and pests.

Tongue And Groove Cedar Porch Ceiling

In this article, we’ll explore why a tongue and groove cedar porch ceiling is a popular choice, how to install one, and ways to maintain it for long-lasting charm. Whether you’re renovating your porch or building one from scratch, this guide has everything you need to know.


What Is a Tongue and Groove Cedar Porch Ceiling?

A tongue and groove (T&G) system is a woodworking technique where boards are fitted together edge-to-edge with one side featuring a tongue (a projecting edge) and the other side a groove (a matching slot). When assembled, these boards lock tightly, creating a seamless surface.

Read too: Understanding and Dealing with Ants in the Ceiling Spaces: Navigating the Intrusion

Cedar wood is particularly well-suited for this application due to its:

  • Natural Beauty: Cedar’s warm tones and rich grain patterns bring a classic yet modern look to any porch.
  • Durability: Cedar resists rot, decay, and insect damage.
  • Lightweight Properties: Makes it easier to handle during installation.

Together, tongue and groove cedar boards create a smooth, polished ceiling that can elevate your outdoor space’s aesthetic.


Benefits of Using Tongue and Groove Cedar for Your Porch Ceiling

1. Timeless Aesthetic Appeal

The natural beauty of cedar offers a unique charm. Its warm tones, ranging from pale honey to deep reddish-brown, create a cozy and inviting atmosphere.

2. Exceptional Durability

Cedar is a hardy material that can withstand various environmental conditions, including high humidity, rain, and sun exposure. This makes it an excellent choice for outdoor applications.

3. Ease of Installation

The tongue and groove design simplifies the installation process, ensuring tight-fitting boards that remain secure over time.

4. Low Maintenance Requirements

With proper sealing or staining, a cedar ceiling can retain its beauty for years, requiring minimal upkeep.

5. Customization Options

You can finish cedar in numerous ways, from clear sealants that highlight its natural grain to colored stains for a bold statement.

6. Enhanced Property Value

A cedar porch ceiling adds a luxurious touch to your home, potentially increasing its market value.


How to Install a Tongue And Groove Cedar Porch Ceiling

1: Gather Your Materials and Tools

You’ll need the following:

  • Tongue and groove cedar boards
  • Measuring tape
  • Circular saw or miter saw
  • Nail gun and nails
  • Ladder
  • Wood stain or sealant

2: Prepare the Area

  • Ensure the porch ceiling framework is clean and level.
  • Remove any existing material or debris to create a smooth base.

3: Measure and Cut the Boards

  • Measure the length and width of your porch ceiling.
  • Cut the cedar boards to the appropriate length, accounting for any joints or overlaps.

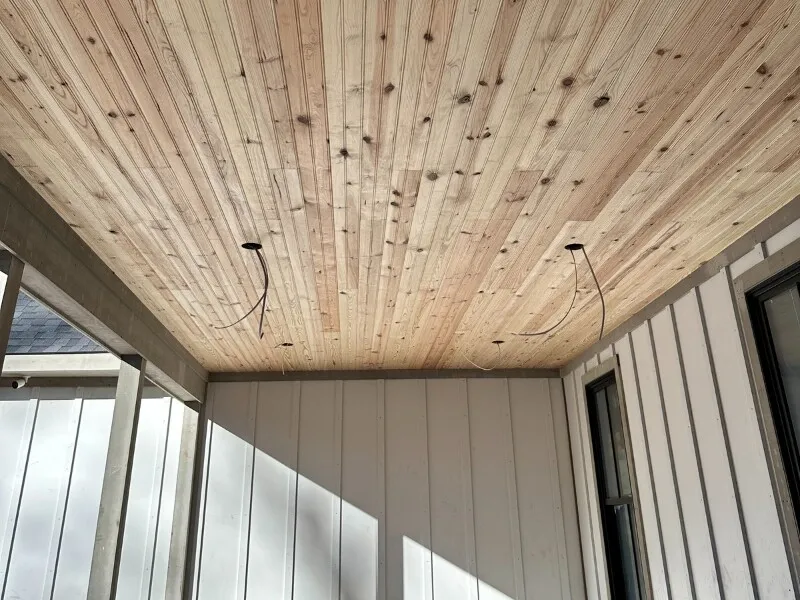
4: Start Installation

  • Begin at one end of the ceiling framework.
  • Position the first board with the groove facing the wall and secure it using a nail gun.
  • Fit the tongue of the next board into the groove of the installed board. Tap gently to ensure a snug fit before nailing it in place.

5: Continue Across the Ceiling

  • Repeat the process, working your way across the ceiling.
  • For edges or corners, trim boards to fit using a saw.

6: Apply the Finish

  • Once the ceiling is fully installed, apply a wood stain or sealant to protect against moisture and UV damage.

Maintenance Tips for a Long-Lasting Ceiling

  1. Seal or Stain Regularly: Protect the cedar from weathering by applying a fresh coat of sealant every 1-2 years.
  2. Clean Periodically: Remove dirt and dust using a soft cloth or gentle vacuum attachment.
  3. Inspect for Damage: Check for cracks, warping, or signs of pest activity and address issues promptly.
  4. Avoid Harsh Chemicals: Use wood-safe cleaners when necessary.

Design Ideas for Tongue And Groove Cedar Porch Ceilings

1. Rustic Charm

Pair cedar ceilings with exposed wooden beams and natural stone accents for a cabin-like feel.

2. Coastal Vibes

Combine cedar with whitewashed finishes and pastel decor to create a breezy, seaside-inspired space.
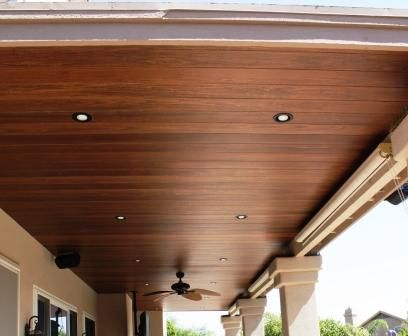
3. Modern Elegance

Opt for dark-stained cedar with sleek, minimal furniture to achieve a contemporary look.

4. Outdoor Living Room

Install recessed lighting or a ceiling fan to transform your porch into an extension of your indoor living area.


Frequently Asked Questions

1. Is cedar suitable for humid climates?

Yes, cedar’s natural resistance to moisture makes it ideal for humid environments.

2. How long does a cedar porch ceiling last?

With proper maintenance, a cedar ceiling can last 20 years or more.

3. Can I install a cedar ceiling over an existing surface?

Yes, as long as the existing surface is stable and clean.

4. Do I need to treat cedar for outdoor use?

Applying a sealant or stain is recommended to enhance cedar’s natural weather resistance and longevity.


Conclusion

A tongue and groove cedar porch ceiling is an excellent choice for homeowners looking to enhance their outdoor living space with a combination of natural beauty, durability, and timeless appeal. Its straightforward installation process and low maintenance requirements make it a practical and stylish option.

Whether you prefer a rustic, modern, or coastal aesthetic, a cedar ceiling can be tailored to match your vision. By following the steps and tips outlined in this guide, you’ll enjoy a stunning porch ceiling that stands the test of time.

Invest in a tongue and groove cedar ceiling today, and transform your porch into a space where you’ll love to spend time with family and friends.

Discover the Best Tongue and Groove for Outdoor Ceiling: Transform Your Outdoor Space

Explore the top options for the best tongue and groove for outdoor ceiling and elevate the aesthetic appeal of your outdoor living area.

Best Tongue And Groove For Outdoor Ceiling

Understanding

Tongue and groove (T&G) ceiling panels are popular choices for outdoor spaces due to their durability, weather resistance, and aesthetic appeal. When selecting the best tongue and groove for outdoor ceilings, it’s essential to consider factors such as material, installation method, and maintenance requirements.

Factors to Consider When Choosing Tongue and Groove for Outdoor Ceilings

Before making a decision, here are some key factors to consider:

  1. Material: Opt for materials that are suitable for outdoor use, such as cedar, pine, or composite materials like PVC or vinyl.
  2. Weather Resistance: Choose tongue and groove panels that are resistant to moisture, mold, and rot, ensuring longevity and durability in outdoor environments.
  3. Installation Method: Consider whether you prefer traditional nail-down installation or newer systems like tongue and groove ceiling planks with clips for easier installation and removal.
  4. Aesthetic Appeal: Select tongue and groove panels that complement the design aesthetic of your outdoor space, whether you prefer a rustic, traditional, or contemporary look.

Best Tongue and Groove Options for Outdoor Ceilings

  1. Cedar Tongue and Groove: Cedar is a popular choice for outdoor ceilings due to its natural beauty, durability, and resistance to rot and insect damage. Cedar tongue and groove panels add warmth and character to outdoor living areas.
  2. PVC Tongue and Groove: PVC tongue and groove panels are engineered for outdoor use, offering exceptional durability, low maintenance, and resistance to moisture, mold, and mildew. PVC panels are available in a variety of colors and finishes to suit any design preference.
  3. Composite Tongue and Groove: Composite tongue and groove panels combine the natural look of wood with the durability and low maintenance of synthetic materials. These panels are resistant to rot, decay, and insect infestation, making them ideal for outdoor applications.

Installation Tips for Tongue and Groove Outdoor Ceilings

Follow these tips for a successful installation:

  1. Prepare the Surface: Ensure the outdoor ceiling surface is clean, dry, and level before installing tongue and groove panels.
  2. Use Stainless Steel Fasteners: Choose stainless steel nails or screws to prevent rust and corrosion in outdoor environments.
  3. Allow for Expansion and Contraction: Leave a small gap between panels to accommodate natural expansion and contraction due to temperature and humidity changes.

Maintenance and Care of Tongue and Groove Outdoor Ceilings

To maintain the beauty and longevity of your outdoor ceiling, follow these maintenance tips:

  1. Regular Cleaning: Clean the ceiling surface periodically with a mild detergent and water to remove dirt, grime, and stains.
  2. Sealing: Apply a protective sealant or stain to enhance durability and weather resistance, especially for wood tongue and groove panels.
  3. Inspect for Damage: Regularly inspect the ceiling for signs of damage, such as cracks, rot, or insect infestation, and address any issues promptly.

Read too: Flush Mount Rustic Ceiling Lights: Illuminate Your Space with Stunning

Conclusion

Choosing the best tongue and groove for outdoor ceilings is essential for creating a functional and visually appealing outdoor living space. By considering factors such as material, weather resistance, and installation method, you can select the perfect tongue and groove panels to enhance your outdoor environment for years to come.

Wood for Outdoor Ceiling Projects: Exploring the Best Types

Are you considering adding a touch of warmth and natural beauty to your outdoor space with a wooden ceiling? Choosing the right type of wood is essential for ensuring durability, weather resistance, and aesthetic appeal. In this guide, we’ll explore the best types of wood for outdoor ceiling projects to help you make an informed decision.

Wood For Outdoor Ceiling

Understanding the Importance of Wood Selection for Outdoor Ceilings

When it comes to outdoor ceilings, selecting the appropriate wood is crucial due to exposure to elements such as sunlight, moisture, and temperature fluctuations. The right type of wood can withstand these environmental factors and maintain its structural integrity and appearance over time. Factors to consider when choosing wood for outdoor ceilings include:

  • Durability: Choose a wood species that is naturally resistant to decay, rot, and insect damage to ensure longevity.
  • Weather Resistance: Opt for wood that can withstand exposure to sunlight, rain, snow, and humidity without warping, splitting, or fading.
  • Aesthetic Appeal: Consider the color, grain pattern, and texture of the wood to achieve the desired look for your outdoor space.

Best Types of Wood for Outdoor Ceiling Projects

  1. Cedar: Cedar is a popular choice for outdoor ceilings due to its natural resistance to decay, rot, and insect infestation. It has a beautiful reddish-brown hue and a distinct aroma that adds character to outdoor spaces.
  2. Redwood: Redwood is another excellent option known for its durability and rich, reddish-brown color. It contains natural oils that protect it from moisture and decay, making it an ideal choice for outdoor applications.
  3. Pressure-Treated Pine: Pressure-treated pine is a cost-effective option for outdoor ceilings. It undergoes a treatment process that enhances its resistance to decay, rot, and insect damage, making it suitable for outdoor use.
  4. Mahogany: Mahogany is prized for its rich, dark color and elegant grain pattern. It is naturally resistant to rot and decay, making it a durable choice for outdoor ceilings. However, it may require periodic sealing or staining to maintain its appearance.
  5. Ipe: Ipe, also known as Brazilian walnut, is an extremely durable and weather-resistant hardwood. It has a rich, dark brown color and a dense grain pattern that adds sophistication to outdoor spaces. While more expensive than other options, ipe requires minimal maintenance and can last for decades.

Read too: Discovering the Charm of Nautical Outdoor Ceiling Fans for Your Coastal Retreat: Sail into Style

Factors to Consider When Installing Wood Outdoor Ceilings

  • Proper Ventilation: Ensure adequate ventilation to prevent moisture buildup and reduce the risk of mold and mildew growth.
  • Sealing or Staining: Apply a protective sealant or stain to the wood to enhance its durability and weather resistance.
  • Regular Maintenance: Perform routine inspections and maintenance tasks, such as cleaning and resealing, to prolong the life of your outdoor ceiling.

Conclusion

Choosing the right type of wood for your outdoor ceiling is essential for creating a durable, weather-resistant, and visually appealing outdoor space. By considering factors such as durability, weather resistance, and aesthetic appeal, you can select the perfect wood for your outdoor ceiling project and enjoy years of beauty and functionality.