Black Ceiling Tiles With White Grid: A Stylish Choice for Modern Interiors

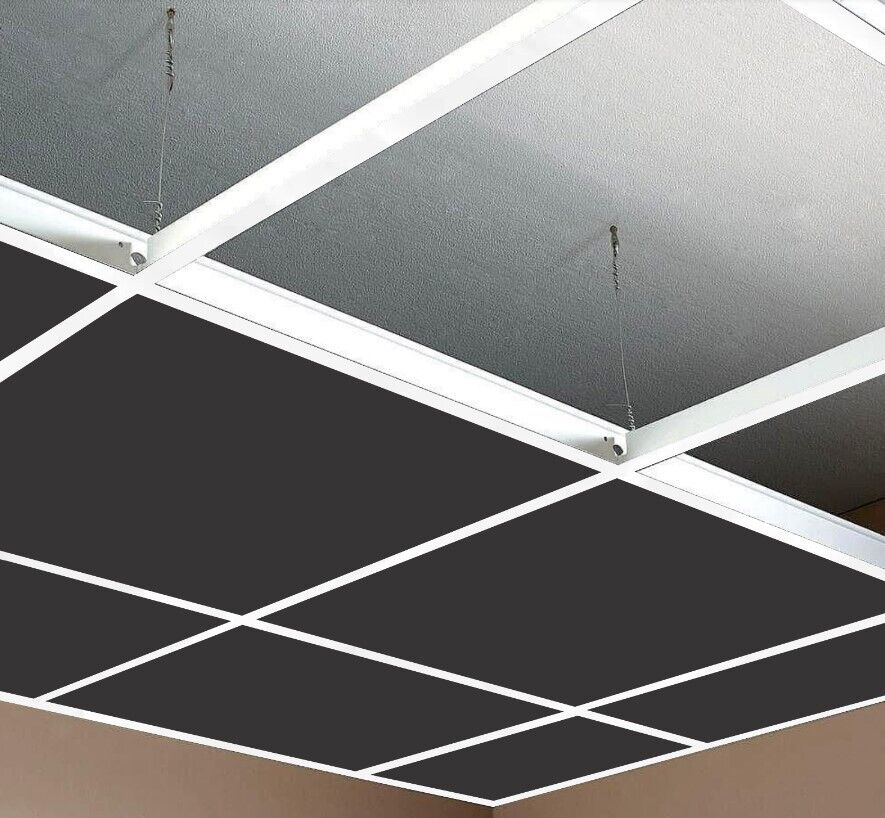
When it comes to modern interior design, ceiling tiles are often overlooked, but they can play a major role in the overall look and feel of a room. One design choice that is gaining popularity is Black Ceiling Tiles With White Grid. This combination creates a sleek, sophisticated look that contrasts beautifully with lighter walls and furnishings. Whether you are remodeling a home, updating an office, or designing a commercial space, these tiles can add a touch of elegance and personality to any room.

Black Ceiling Tiles With White Grid

In this article, we will explore why Black Ceiling Tiles With White Grid are such a popular design choice, their benefits, how to install them, and where to use them. If you’re considering this design for your space, this guide will provide you with all the information you need to make an informed decision.

Read too: Shiplap Ceiling in Kitchen: A Timeless Trend for a Stylish and Cozy Space


Why Choose Black Ceiling Tiles With White Grid?

Before we delve into the specifics, let’s understand what makes Black Ceiling Tile With White Grid so appealing. This aesthetic combines two powerful design elements: the bold, modern look of black with the classic, clean lines of a white grid. Here’s why many homeowners, businesses, and designers are turning to this option:

1. Modern Aesthetic

Black and white have been timeless colors in the design world, often used for their high contrast and minimalist style. The combination of Black Ceiling Tile With White Grid brings a contemporary, stylish vibe to any room. The deep black tiles create a sense of richness, while the white grid provides a crisp, organized look. This design works perfectly in modern, industrial, and even contemporary settings.

2. Creates Depth and Dimension

One of the most appealing features of black ceiling tiles is the depth they bring to a room. They make the ceiling appear lower, which can create a cozy and intimate atmosphere. The white grid, on the other hand, contrasts with the black tiles, helping to break up the visual mass and add a sense of balance. This effect creates a striking dimensional look, perfect for creating a visually interesting ceiling design.

3. Versatile Design

Black Ceiling Tile With White Grid work well with a variety of other design elements. They can be paired with bright walls, colorful furniture, or even dark furniture for a monochromatic look. These tiles also complement various room styles, from modern and industrial to minimalist and urban. Whether you want to create an edgy space or something more neutral and elegant, this combination is highly versatile.

4. Conceals Imperfections

Ceilings can often have imperfections, such as stains, cracks, or uneven surfaces. Black ceiling tile are great for concealing these flaws because the dark color hides blemishes, while the white grid adds an element of structure. This allows you to create a clean, polished look without having to do major ceiling repairs.

5. Enhances Acoustics

In addition to their aesthetic appeal, ceiling tiles also have a functional purpose. Many Black Ceiling Tiles With White Grid are made from materials that help with acoustics, reducing echo and noise in a room. This is especially beneficial in spaces like offices, restaurants, or entertainment venues, where sound control is important. The right ceiling tiles can improve the overall acoustics of a room, making it more comfortable and practical.


Where to Use Black Ceiling Tiles With White Grid?

The versatility of Black Ceiling Tiles With White Grid allows them to work in various spaces. Whether you’re designing a residential or commercial area, these tiles can be a perfect fit. Let’s explore some ideal locations where this design will shine.

1. Living Rooms and Bedrooms

For modern homes, Black Ceiling Tiles With White Grid can be a statement feature in living rooms and bedrooms. The high contrast between black and white creates a chic, sophisticated atmosphere that can be paired with neutral-colored furniture, textured throws, and artistic light fixtures. This ceiling design is perfect for creating a dramatic look in the living area while still keeping the room cozy and inviting.

2. Kitchens

Kitchens are often overlooked when it comes to ceiling design, but Black Ceiling Tiles With White Grid can be an excellent choice. The bold black color creates an interesting focal point that contrasts well with white cabinetry or stainless steel appliances. In open-concept kitchens, these tiles can help create visual division between the kitchen and other areas.

3. Offices and Commercial Spaces

For commercial spaces, especially those with an industrial or modern design, Black Ceiling Tiles With White Grid are a great option. They give off a professional and sleek vibe while still maintaining a stylish edge. Many offices, co-working spaces, and restaurants use black ceilings with white grids to achieve an upscale yet approachable atmosphere. This design is ideal for creating a productive and inspiring environment.

4. Retail Spaces

For retail stores, Black Ceiling Tiles With White Grid can enhance the shopping experience by creating a contemporary and upscale ambiance. The contrast between black and white helps to define the space, making it feel more inviting and polished. These tiles can also provide a nice backdrop for merchandise, allowing the products to take center stage.


Installation Tips

Now that we’ve discussed the reasons to choose Black Ceiling Tiles With White Grid, you may be wondering how to install them. While it’s always recommended to hire a professional for complex installations, Black Ceiling Tiles With White Grid are often part of drop ceiling systems, which are relatively simple to install yourself with the right tools and instructions.

Step 1: Prepare Your Space

Before you begin, measure your ceiling to determine how many tiles you’ll need. You should also clear the area of any furniture or obstructions. It’s also helpful to have a ladder or scaffolding for easy access to the ceiling.

Step 2: Install the Grid System

Start by installing the metal grid system, which is responsible for holding the tiles in place. The grid will need to be hung using suspension wires that are attached to the ceiling. Follow the instructions provided by the manufacturer for precise measurements and installation guidelines.

Step 3: Cut the Tiles

Depending on your space, you may need to cut the tiles to fit around the edges or around any obstacles (like lights or vents). Use a utility knife or tile cutter to make straight cuts. Measure carefully to avoid mistakes.

Step 4: Insert the Tiles

Once your grid system is in place and the tiles are cut, you can begin inserting the Black Ceiling Tiles With White Grid into the grid. Start from one corner and work your way across the ceiling. Gently place each tile into the grid until they fit securely.

Step 5: Make Final Adjustments

Once all tiles are in place, check for any gaps or misalignments. Adjust the tiles as needed to make sure they fit snugly and evenly.


Benefits of Using Black Ceiling Tiles With White Grid

Here’s a recap of the key benefits of Black Ceiling Tiles With White Grid:

  • Modern Look: Provides a stylish, contemporary aesthetic perfect for a variety of spaces.
  • Depth & Dimension: Adds visual interest to your ceiling while creating a sense of balance.
  • Conceals Flaws: Hides imperfections in the ceiling, providing a clean and polished look.
  • Improved Acoustics: Helps with noise reduction, making spaces more comfortable.
  • Versatile: Can be used in various settings, including homes, offices, and commercial spaces.

Conclusion

Black Ceiling Tiles With White Grid are an excellent choice for those looking to add a bold yet sophisticated element to their space. Whether you’re designing a home, office, or commercial space, this ceiling style brings depth, dimension, and modern flair to any room. Not only do they enhance the aesthetics of a space, but they also provide practical benefits such as improved acoustics and the ability to hide ceiling imperfections.

If you’re considering updating your space with this design, be sure to follow the installation steps outlined above or consult with a professional to achieve the best results.

Modern Tongue and Groove Ceiling Designs: Exploring the Elegance and Benefits

The modern tongue and groove ceiling is a timeless and versatile design element that adds both style and functionality to various types of interiors. This article explores the concept of modern tongue and groove ceilings, their benefits, installation tips, and design ideas to help you transform your space with this classic yet contemporary feature.

Modern Tongue And Groove Ceiling

What is a Modern Tongue and Groove Ceiling?

A modern tongue and groove ceiling refers to a ceiling treatment using planks or boards that fit together through interlocking tongue-and-groove joints. This method creates a seamless and smooth surface without visible gaps or seams. The “modern” aspect of this design often involves using contemporary materials, finishes, and techniques that enhance the traditional look of tongue and groove ceilings.

Benefits of a Modern Tongue and Groove Ceiling

Modern tongue and groove ceilings offer several advantages over traditional ceiling treatments:

1. Aesthetic Appeal

The clean lines and uniform appearance of tongue and groove ceilings contribute to a sophisticated and elegant look. Modern designs often incorporate sleek finishes and minimalist styles, making them suitable for a wide range of interior aesthetics, from rustic to contemporary.

2. Durability

Tongue and groove ceilings are known for their durability. The interlocking system ensures that the boards stay securely in place, reducing the likelihood of warping or separation over time. This makes them a reliable choice for both residential and commercial spaces.

Read too: Discovering the Charm of Nautical Outdoor Ceiling Fans for Your Coastal Retreat: Sail into Style

3. Ease of Installation

Modern tongue and groove ceilings are relatively easy to install, especially with pre-finished boards. The interlocking mechanism simplifies the process, and the boards can be installed directly onto the ceiling joists or existing ceiling surfaces.

4. Insulation and Acoustic Benefits

The overlapping nature of tongue and groove boards can provide additional insulation and acoustic benefits. They help in minimizing sound transmission between rooms and can contribute to better temperature regulation.

5. Versatility

Modern tongue and groove ceilings are versatile and can be customized to fit various styles and preferences. They can be stained, painted, or left in their natural state, allowing homeowners to achieve the desired look and complement their existing decor.

Types of Modern Tongue and Groove Ceilings

There are several types of modern tongue and groove ceiling options, each with unique characteristics and benefits:

1. Wood Tongue and Groove Ceilings

Wood tongue and groove ceilings are a popular choice for adding warmth and character to a room. They are available in various wood species, such as pine, oak, and cedar, and can be finished in different stains or paints to match the interior design.

2. Metal Tongue and Groove Ceilings

For a more industrial or contemporary look, metal tongue and groove ceilings are an excellent option. These ceilings can be made from materials like aluminum or steel and are often used in modern lofts or commercial spaces.

3. PVC Tongue and Groove Ceilings

PVC (polyvinyl chloride) tongue and groove ceilings are a low-maintenance alternative to wood or metal. They are resistant to moisture and can be used in areas with high humidity, such as bathrooms and kitchens.

4. Composite Tongue and Groove Ceilings

Composite materials, such as MDF (medium-density fiberboard), offer a cost-effective and versatile option for tongue and groove ceilings. These materials can be designed to mimic the appearance of wood or metal while being more affordable.

How to Install a Modern Tongue and Groove Ceiling

Installing a modern tongue and groove ceiling involves several steps to ensure a smooth and professional finish:

1. Prepare the Space

Before installation, ensure that the ceiling surface is clean, dry, and level. Remove any old ceiling coverings or debris and make any necessary repairs to the underlying surface.

2. Measure and Plan

Measure the dimensions of the ceiling and plan the layout of the tongue and groove boards. Start from the center of the room and work outward to ensure an even and symmetrical design.

3. Install Furring Strips

If installing on an existing ceiling, attach furring strips (wood or metal strips) perpendicular to the ceiling joists. This provides a secure base for the tongue and groove boards and helps with leveling.

4. Start Installation

Begin installing the tongue and groove boards by placing the first board against the ceiling. Use a nail gun or adhesive to secure the boards in place. Continue adding boards, ensuring that each one interlocks with the previous one.

5. Finish and Trim

Once all the boards are installed, trim any excess material and add any finishing touches, such as molding or trim pieces. Sand and paint or stain the ceiling as desired to achieve the final look.

Design Ideas for Modern Tongue and Groove Ceilings

Here are some design ideas to inspire your modern tongue and groove ceiling project:

1. Whitewashed Wood

A whitewashed wood tongue and groove ceiling adds a bright and airy feel to a room. This design works well in coastal or Scandinavian-inspired interiors.

2. Dark Stained Wood

For a dramatic and sophisticated look, consider a dark stained wood ceiling. This design can create a striking contrast with lighter walls and furnishings.

3. Painted Metal

Painted metal tongue and groove ceilings can add an industrial edge to modern spaces. Choose bold colors or metallic finishes to make a statement.

4. Patterned Layout

Experiment with different patterns, such as diagonal or chevron layouts, to create visual interest and enhance the architectural elements of your space.

5. Backlit Ceilings

Incorporate backlighting to highlight the texture and depth of your tongue and groove ceiling. This can create a dramatic effect and add a touch of luxury to your interior.

Maintenance and Care

Maintaining a modern tongue and groove ceiling is relatively straightforward:

  • Regular Dusting: Dust the ceiling regularly to keep it looking clean and fresh. Use a soft cloth or a duster to avoid scratching the surface.
  • Spot Cleaning: For any stains or marks, use a mild cleaner and a soft cloth. Avoid abrasive cleaners that can damage the finish.
  • Inspect for Damage: Periodically inspect the ceiling for any signs of damage or wear. Address any issues promptly to prevent further problems.

Conclusion

A modern tongue and groove ceiling is an elegant and versatile choice for enhancing the look and functionality of your space. With its aesthetic appeal, durability, and ease of installation, it offers a timeless design solution that can complement various interior styles. Whether you opt for wood, metal, PVC, or composite materials, a modern tongue and groove ceiling can add significant value and charm to your home or commercial property.

Smooth Drop Ceiling Tile: Transform Your Space

Smooth drop ceiling tiles are an excellent choice for both residential and commercial spaces, providing a sleek and modern look. In this comprehensive guide, we’ll explore everything you need to know about smooth drop ceiling tile – from their benefits and installation process to design tips and maintenance.

Smooth Drop Ceiling Tiles

What Are Smooth Drop Ceiling Tiles?

Smooth drop ceiling tiles are a type of ceiling tile designed to be suspended from a metal grid system. Unlike traditional textured tiles, smooth drop ceiling tiles offer a flat, polished finish that can enhance the aesthetic appeal of any room. They are available in various materials, including mineral fiber, PVC, and gypsum.

Benefits of Smooth Drop Ceiling Tiles

Opting for smooth drop ceiling tiles comes with numerous advantages:

  • Aesthetic Appeal: Their smooth, clean finish provides a modern and sophisticated look.
  • Easy Installation: Designed to fit into a suspended ceiling grid system, making installation straightforward.
  • Acoustic Properties: Many smooth tiles offer sound-absorbing qualities, improving room acoustics.
  • Durability: Resistant to sagging and warping, ensuring a long-lasting ceiling solution.
  • Maintenance: Easy to clean and maintain, keeping your ceiling looking pristine.

Choosing the Right Smooth Drop Ceiling Tiles

When selecting smooth drop ceiling tiles for your space, consider the following factors:

Material
  • Mineral Fiber: Offers excellent acoustic properties and fire resistance.
  • PVC: Moisture-resistant and easy to clean, ideal for kitchens and bathrooms.
  • Gypsum: Provides a solid, durable surface with good sound insulation.
Size and Dimensions
  • Standard Size: Typically 24×24 inches or 24×48 inches, fitting most grid systems.
  • Custom Sizes: Available for unique ceiling layouts or design requirements.
Design and Color
  • White: The most common choice, providing a bright and clean appearance.
  • Custom Colors: Available to match specific decor themes or branding.
  • Smooth Finish: Ensures a sleek and modern look, enhancing the overall aesthetics.

Installation Process of Smooth Drop Ceiling Tiles

Installing smooth drop ceiling tiles involves several key steps:

Preparation
  1. Measure the Room: Calculate the square footage to determine the number of tiles needed.
  2. Plan the Layout: Design the grid system layout, considering any obstacles like lights or vents.
  3. Gather Tools: Ensure you have all necessary tools, including a tape measure, level, utility knife, and ladder.
Installing the Grid System
  1. Mark the Ceiling: Use a chalk line to mark where the grid system will be installed.
  2. Install Wall Angles: Attach wall angles around the room’s perimeter, ensuring they are level.
  3. Hang Main Runners: Secure main runners from the ceiling, spaced according to tile size.
  4. Install Cross Tees: Insert cross tees between main runners to create the grid pattern.
Installing the Tiles
  1. Cut Tiles to Size: Trim tiles as needed to fit around obstacles or along the edges.
  2. Place Tiles in Grid: Gently lift and place tiles into the grid system, ensuring they sit flush.
  3. Adjust and Secure: Make any necessary adjustments to ensure all tiles are level and secure.

Design Tips for Smooth Drop Ceiling Tiles

Enhance the look of your space with these design tips for smooth drop ceiling tiles:

Create Patterns
  • Grid Variations: Experiment with different grid patterns to add visual interest.
  • Accent Tiles: Use colored or textured accent tiles to create focal points.
Incorporate Lighting
  • Recessed Lights: Install recessed lighting within the grid for a seamless look.
  • LED Panels: Use LED light panels to provide even, energy-efficient lighting.
Add Decorative Elements
  • Ceiling Medallions: Incorporate decorative medallions around light fixtures for added elegance.
  • Coffered Ceilings: Create a coffered ceiling effect by adding beams or trim within the grid.

Maintenance and Care for Smooth Drop Ceiling Tiles

Keeping your smooth drop ceiling tiles in top condition is simple with these maintenance tips:

Regular Cleaning
  • Dusting: Use a soft cloth or duster to remove dust and debris regularly.
  • Spot Cleaning: Wipe away stains or marks with a damp cloth and mild detergent.

Read too: Kitchen Lighting For A Vaulted Ceiling: Illuminating Your Space with Style and Functionality

Inspection and Repairs
  • Check for Damage: Regularly inspect tiles for signs of damage or wear.
  • Replace Damaged Tiles: Promptly replace any damaged tiles to maintain the ceiling’s appearance and integrity.
Preventive Measures
  • Control Humidity: Use dehumidifiers in damp areas to prevent moisture-related issues.
  • Ensure Proper Ventilation: Maintain good ventilation to avoid condensation and mold growth.

Conclusion

Smooth drop ceiling tile offer a stylish and practical ceiling solution for various settings. By understanding the benefits, installation process, and maintenance tips, you can confidently choose and install smooth drop ceiling tiles to transform your space. Whether you are renovating a home, office, or commercial space, these tiles provide a sleek, modern look that enhances any room’s aesthetics and functionality.