Embark on a journey of restoration as we explore the intricacies of “Plaster Ceiling Water Damage.” This comprehensive guide offers insights into identifying, addressing, and remedying the impact of water damage on your plaster ceiling, ensuring your living space remains a testament to elegance.
Understanding the Impact: Plaster Ceiling Water Damage Demystified
Delve into the world of plaster ceiling water damage as we uncover the signs, causes, and effective solutions for a seamless restoration process.
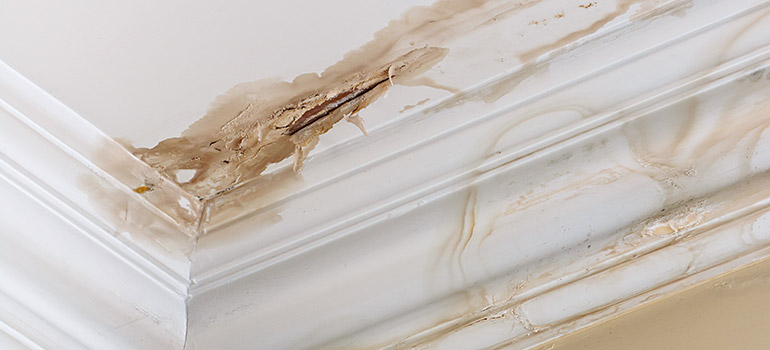
1. Staining and Discoloration*
Water stains and discoloration on your plaster ceiling are telltale signs of water damage. These marks often appear as brown or yellowish patches, indicating a need for prompt attention.
2. Sagging or Bubbling*
Excess water can weaken the plaster, causing it to sag or bubble. If you notice irregularities in the ceiling surface, it may be a sign of water infiltration.
3. Peeling Paint or Wallpaper*
Water damage can compromise the adhesion of paint or wallpaper on your ceiling. Peeling or bubbling of these materials may signal underlying water issues.
4. Musty Odors*
The presence of water in your ceiling can lead to mold growth, resulting in musty odors. If you detect a persistent, unpleasant smell, it could be indicative of hidden water damage.
Read too: Understanding and Addressing a Leaky Ceiling in Your Apartment: Navigating the Drips
Addressing Plaster Ceiling Water Damage: Steps to Restoration
Navigate the restoration process with confidence by following these practical steps to address and repair this damage.
1. Identify and Fix the Source of Water Infiltration
Begin by identifying and addressing the source of water infiltration. Whether it’s a leaky roof, plumbing issue, or condensation problem, resolving the root cause is paramount to preventing future damage.
2. Assess the Extent of Damage
Thoroughly inspect the plaster ceiling to determine the extent of the damage. Identify areas that require repair or replacement and prioritize the restoration process accordingly.
3. Remove Damaged Plaster and Materials
Carefully remove any damaged plaster, as well as compromised paint or wallpaper. This step ensures a clean slate for the restoration process and prevents further deterioration.
4. Allow for Proper Drying
Before initiating repairs, allow the affected areas to dry completely. Adequate drying time prevents the growth of mold and ensures a solid foundation for restoration efforts.
5. Patch and Restore
Patch any holes or cracks in the plaster using a suitable repair compound. Once the patching is complete, restore the aesthetic appeal of your plaster ceiling with a fresh coat of paint or wallpaper.
Conclusion: Restoring Elegance, One Patch at a Time
By understanding the nuances of “Plaster Ceiling Water Damage” and implementing proactive restoration measures, you can preserve the elegance of your living space. Swift identification, targeted repairs, and a meticulous restoration process ensure that your plaster ceiling remains a symbol of sophistication and charm.
Embrace the journey of restoring elegance, and witness the transformation of your space as you bid farewell to the lingering effects of water damage.