Mount Surround Speakers on Ceiling. Are you looking to enhance your home theater experience? Mounting surround speakers on the ceiling is a fantastic way to optimize sound quality and achieve a more immersive environment for movie nights, gaming, and music listening. By placing your surround speakers on the ceiling, you can fill your room with high-quality audio that seems to come from all around you, enhancing every sound effect, song, and dialogue.

In this comprehensive guide, we’ll cover the essentials of how to mount surround speakers on the ceiling, the benefits of doing so, and some important considerations to keep in mind. Whether you’re a DIY enthusiast or someone new to home audio setup, this article will provide you with all the information you need to get started.
Benefits of Mounting Surround Speakers on the Ceiling
Before we dive into the “how,” it’s important to understand why mounting your surround speakers on the ceiling is such a popular and effective choice for home theaters.
1. Enhanced Sound Experience
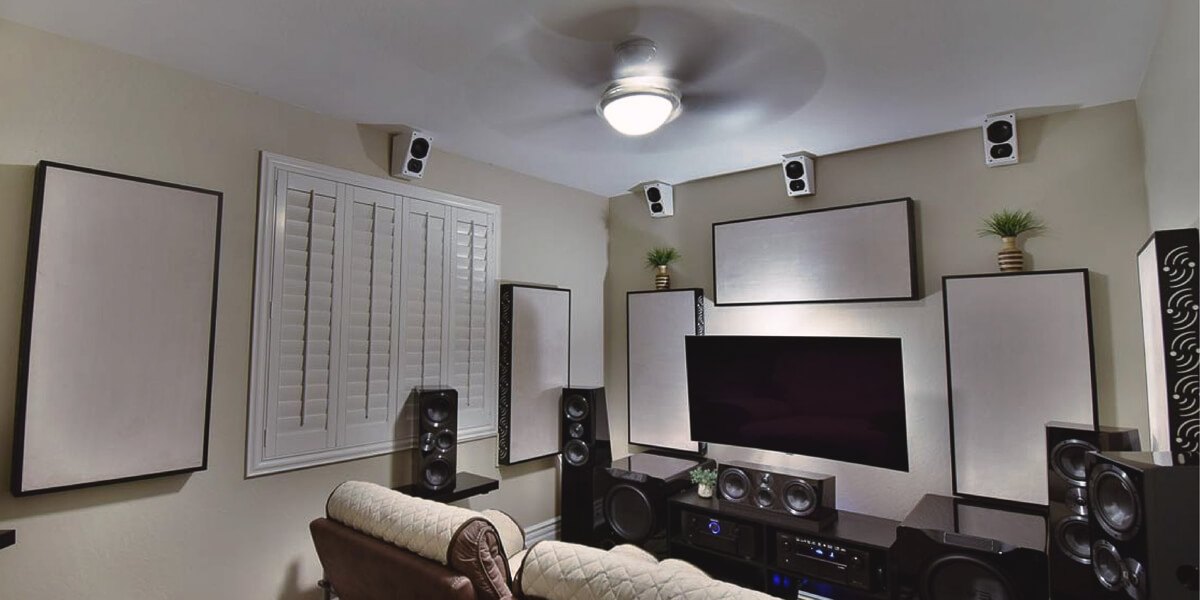
The biggest advantage of ceiling-mounted speakers is the enhanced sound distribution. Traditional floor-standing or wall-mounted speakers can only direct sound from certain angles. However, when mounted on the ceiling, speakers can broadcast sound across the entire room, creating an all-encompassing auditory experience. This setup simulates the feeling of being in a commercial movie theater, where the audio seems to come from every direction.
2. Space Efficiency
Mounting surround speakers on the ceiling is a space-saving solution for homes with limited floor space or minimal wall space. Instead of occupying precious space with bulky speakers, you can install them discreetly on the ceiling, maintaining the aesthetic appeal of your room. This also frees up room for other furniture or decorations without compromising sound quality.
Read too: Discovering the Charm of Nautical Outdoor Ceiling Fans for Your Coastal Retreat: Sail into Style
3. Ideal for Dolby Atmos and DTS
If you are building a home theater system that supports Dolby Atmos or DTS, ceiling-mounted speakers are almost essential. Both of these advanced audio formats rely on height channels to create a three-dimensional soundscape, which is best achieved by positioning speakers above the listener. This adds an extra layer of immersion that’s hard to replicate with standard surround setups.
4. Safer and Less Cluttered
By mounting your speakers on the ceiling, you can avoid the clutter of speaker stands, cables running across the floor, or potential tripping hazards. With a clean, wire-free setup, your living space becomes not only safer but also visually streamlined.
5. Better Sound Coverage in Large Rooms
For larger rooms or open floor plans, ceiling-mounted speakers can offer more consistent sound coverage compared to wall-mounted or bookshelf speakers. Since the speakers are elevated, they can distribute sound more evenly across a wider area, ensuring that everyone in the room enjoys the same high-quality audio experience.
How to Mount Surround Speakers on the Ceiling
Mounting surround speakers on the ceiling might sound like a complex task, but with the right tools and careful planning, you can achieve a professional-looking setup. Below, we’ll walk through the step-by-step process of getting those speakers overhead and in position for optimal sound performance.
1. Choose the Right Speakers
Not all surround speakers are designed for ceiling mounting, so the first step is to make sure your speakers are compatible with a ceiling installation. Look for speakers specifically labeled as ceiling speakers or in-ceiling speakers. These are typically designed to be more compact and are built with hardware that makes ceiling installation easier.
If you prefer to use traditional speakers, make sure they can be safely mounted using brackets that support ceiling installation. Rotating, tilting, or angled brackets can help direct sound where you need it, and many manufacturers offer speaker-specific mounts.
2. Find the Ideal Placement
Speaker placement is crucial for achieving the best sound. A common surround sound setup is a 5.1 or 7.1 system. In such systems, the ideal placement for ceiling-mounted speakers is above and slightly behind the listener’s seating area. However, the exact placement will depend on the layout of your room and your home theater setup.
For Dolby Atmos systems, ceiling speakers should be placed at specific points above the listening area to create the height channels. Consult your speaker’s user manual or the Dolby Atmos guidelines for precise speaker placement tips.
3. Check Ceiling Structure and Prepare for Mounting
Before drilling any holes, inspect your ceiling’s structure to locate beams or joists that can provide a secure anchor point for your speakers. Use a stud finder to mark these locations. It’s important to mount the speakers directly onto joists or using appropriate drywall anchors if you’re mounting on plasterboard.
In-ceiling speakers often come with a template for cutting holes. Use this template to outline where the speaker will go and then carefully cut into the ceiling with a drywall saw. Ensure you have the necessary wiring in place or can run it through the ceiling.
4. Install Mounting Brackets and Wire the Speakers
Once your holes are cut, install the mounting brackets or speaker enclosures. Be sure to use sturdy mounting hardware that can support the weight of the speakers. Most ceiling-mounted speakers will require you to run wiring through the ceiling. If your home theater setup has an AV receiver, wire the speakers directly to it for full surround sound integration.
If you’re not comfortable running cables yourself, it’s a good idea to hire a professional to do the wiring for you. Proper cable management is key to a clean, professional-looking installation.
5. Attach the Speakers and Adjust
With the mounting brackets installed and the wiring in place, you’re ready to attach the speakers. Carefully secure each speaker to its bracket, making sure they are stable and properly angled to direct sound toward the listening area.
Once the speakers are mounted, adjust their angles to achieve the best possible sound coverage. Many ceiling-mounted speakers have adjustable tweeters or pivoting drivers to allow for fine-tuning. Experiment with different angles and positions to see what works best for your room.
6. Test the Sound
After mounting the surround speakers on the ceiling, the final step is to test your home theater sound system. Play a variety of media—such as movies, music, and games—to evaluate the performance of your new speaker setup. You may need to adjust the settings on your AV receiver or speaker system to optimize sound quality based on your room’s acoustics.
Key Considerations When Mounting Surround Speakers on the Ceiling
Before mounting your speakers, here are a few more important factors to consider:
1. Acoustic Treatment
Ceiling-mounted speakers can sometimes cause sound to reflect off hard surfaces, such as walls, floors, or furniture. Consider adding acoustic panels, rugs, or curtains to absorb excess sound and reduce echoes, ensuring that your audio remains crisp and clear.
2. Wiring Management
Running cables through the ceiling can be challenging. For a neat installation, make sure to plan your wiring carefully. You may need fish tape, wire conduits, or a professional electrician to help with wiring in tight spaces.
3. Speaker Type Compatibility
Not all ceiling speakers are created equal. Make sure to choose speakers that are designed for the type of sound system you’re using, whether it’s a standard surround sound setup or an advanced Dolby Atmos configuration.
Conclusion
Mounting surround speakers on the ceiling is an excellent way to take your home theater to the next level. It enhances sound quality, creates a cleaner aesthetic, and is ideal for advanced audio formats like Dolby Atmos. By carefully choosing the right speakers, finding the ideal placement, and following the proper installation steps, you can achieve a professional-grade setup that will make every movie night unforgettable.