
When you think about home improvement, your garage might not be the first area that comes to mind. However, a well-maintained garage can significantly enhance the overall appeal and functionality of your home. One common issue that many homeowners face is garage ceiling drywall cracking at seams. Not only is it unsightly, but it can also be a sign of underlying problems. In this article, we’ll explore the causes, potential risks, and steps to repair and prevent garage ceiling drywall cracking.
Understanding Garage Ceiling Drywall Cracking
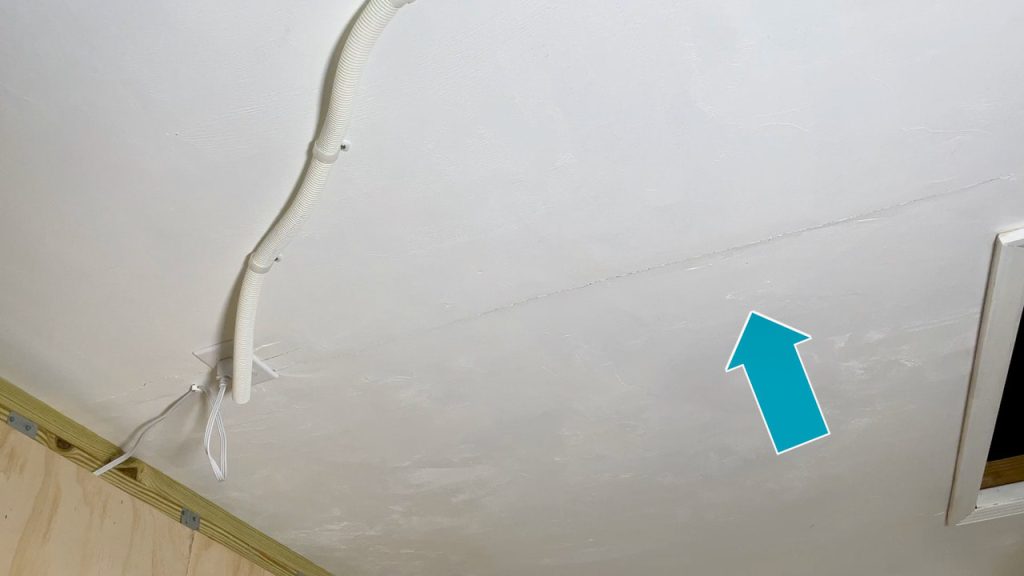
Drywall cracking at seams in your garage’s ceiling can be caused by various factors, and it’s essential to understand what’s behind this issue to address it effectively.
Causes of Garage Ceiling Drywall Cracking
Several factors can contribute to drywall cracking at the seams of your garage ceiling. These include:
- Temperature Fluctuations: The garage is exposed to a wide range of temperatures throughout the year. Fluctuations in temperature can cause the materials to expand and contract, leading to stress on the drywall seams.
- Poor Installation: If the drywall was not installed correctly, with proper fastening and seam taping, it can lead to cracks over time.
- Moisture and Humidity: Garages often experience higher humidity levels due to their proximity to the outdoors. Moisture can weaken the drywall and lead to cracking.
- Structural Issues: Sometimes, cracks in the garage ceiling drywall are symptoms of underlying structural problems. These could include foundation settling, roof issues, or even earthquakes in areas prone to seismic activity.
The Risks Associated with Cracking Drywall in Your Garage
While a few cracks in your garage’s drywall may seem like a minor aesthetic issue, they can lead to more significant problems if left unattended. These risks include:
- Further Structural Damage: Cracking drywall can be an early warning sign of deeper structural problems, like roof leaks or foundation issues. Ignoring these cracks may lead to costly repairs down the road.
- Mold and Mildew: The presence of moisture in your garage can create an environment conducive to mold and mildew growth. This not only affects the appearance of your garage but can also pose health risks to you and your family.
- Reduced Energy Efficiency: Gaps in your garage ceiling can allow heat or cold air to escape, making it harder to maintain a comfortable temperature in your home. This, in turn, can increase your energy bills.
Repairing Garage Ceiling Drywall Cracking
Now that you understand the causes and risks associated with garage ceiling drywall cracking, it’s time to address the issue and prevent it from getting worse.
Steps to Repair Cracked Drywall in Your Garage
- Assess the Damage: Begin by examining the extent of the damage. Are the cracks minor, or do they span a significant portion of the ceiling? Understanding the severity will help you determine whether you can handle the repair yourself or if you need professional assistance.
- Gather Materials: For minor cracks, you’ll need drywall joint compound, a putty knife, sandpaper, and paint. For larger cracks or more extensive damage, you may need additional materials and possibly a drywall patch.
- Preparation: Clean the cracked area, removing any loose debris. If there is peeling paint or old joint compound, scrape it away. Sand the area to create a smooth surface for the new joint compound to adhere.
- Apply Joint Compound: Use a putty knife to apply a thin layer of joint compound over the crack. Feather the edges to blend it with the surrounding surface. Allow it to dry according to the manufacturer’s instructions, usually 24 hours.
- Sand and Repeat: After the first layer of joint compound has dried, sand it smooth, and apply a second layer. Repeat this process until the crack is no longer visible, feathering the edges each time.
- Prime and Paint: Once the joint compound is dry and the repaired area is smooth, prime and paint the ceiling to match the existing finish. This will not only make the repair visually seamless but also protect the drywall from future moisture damage.
Preventing Future Cracking
Preventing garage ceiling drywall cracking at seams is essential to avoid recurring issues. Here are some preventive measures:
- Control Humidity: Install a dehumidifier in your garage to maintain consistent humidity levels and reduce the chances of moisture-related damage.
- Proper Installation: If you’re building a new garage or renovating an existing one, ensure that the drywall is installed correctly by a professional to minimize the risk of cracking.
- Regular Inspections: Periodically inspect your garage’s ceiling for signs of cracking or damage. Catching issues early can prevent them from escalating.
Conclusion:
Garage ceiling drywall cracking at seams may start as a minor cosmetic concern but can lead to more significant problems if not addressed promptly. By understanding the causes, assessing the risks, and following the steps to repair and prevent future cracking, you can maintain a functional and aesthetically pleasing garage. Don’t let these cracks go unnoticed; take action to preserve the integrity of your home.