Popcorn ceilings, once a popular choice in home design, have fallen out of favor due to their outdated appearance and potential health concerns related to asbestos in older popcorn ceilings. Many homeowners are now opting to remove their popcorn ceilings and replace them with a more modern and aesthetically pleasing alternative. If you’re one of those homeowners wondering, “What to do with the ceiling after removing popcorn?” you’ve come to the right place. In this article, we’ll explore the steps and options available for transforming your ceiling post-popcorn removal.
Step 1: Safety First
Before diving into any renovation project, it’s essential to prioritize safety. If your popcorn ceiling was installed before the late 1970s, it may contain asbestos, a hazardous material known for its adverse health effects when disturbed. Therefore, it’s crucial to have a sample tested for asbestos before proceeding with removal. If asbestos is present, it’s highly recommended to hire a licensed asbestos abatement professional to safely handle the removal process.
Step 2: Remove Popcorn Texture
Assuming your popcorn ceiling is asbestos-free or has been professionally abated, the next step is removing the popcorn texture. Here’s how to do it:
Tools and Materials
To remove the popcorn texture, you’ll need the following tools and materials:
- Plastic sheeting or drop cloths
- Painter’s tape
- Safety goggles
- Dust mask or respirator
- Garden sprayer filled with water
- Putty knife or a ceiling texture scraper
- Large garbage bags
- Sandpaper
- Primer
- Paint and painting supplies
The Removal Process
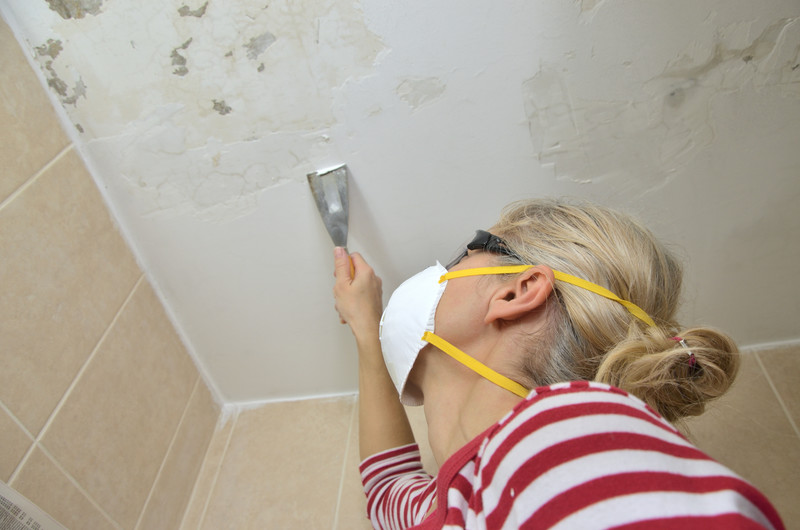
- Prepare the Area: Cover the floor and any furniture with plastic sheeting or drop cloths to protect them from falling debris. Use painter’s tape to secure the plastic in place.
- Safety Gear: Don safety goggles and a dust mask or respirator to protect yourself from dust and debris.
- Moisten the Texture: Fill a garden sprayer with water and lightly moisten a small section of the popcorn texture. Allow it to soak for a few minutes, but be cautious not to oversaturate, as it could damage the drywall underneath.
- Scrape Away: Gently scrape the moistened popcorn texture using a putty knife or ceiling texture scraper. Work in small sections, being careful not to gouge the drywall. Collect the scraped texture in large garbage bags for disposal.
- Smooth and Sand: After removing the popcorn texture, you may need to smooth the ceiling’s surface using sandpaper. This will ensure an even finish once you proceed to the next steps.
Step 3: Repair and Prepare
After removing the popcorn texture, your ceiling may have imperfections, such as small holes, dents, or cracks. It’s essential to address these issues before moving forward. Here’s how:
Repair and Prepare
- Fill Holes and Cracks: Use a suitable patching compound to fill any holes or cracks in the ceiling. Once the compound is dry, sand it smooth.
- Prime the Surface: Apply a coat of primer to the entire ceiling. Primer helps paint adhere better and ensures a uniform finish.
Step 4: Choose Your New Ceiling Finish
Now that you have a smooth, primed ceiling, it’s time to decide on the finish you want. Here are a few popular options:
Ceiling Finish Options
- Paint: Painting your ceiling is a classic choice. Opt for a color that complements your overall decor and design.
- Textured Ceiling: If you prefer a textured look, there are various options available, such as knockdown, orange peel, or swirl textures. These can add depth and character to your ceiling.
- Wood Paneling: For a warm and rustic feel, consider installing wood paneling on your ceiling. It can create a cozy atmosphere in any room.
- Tin Ceiling Tiles: Tin ceiling tiles can add a touch of elegance and vintage charm to your space. They come in various designs and finishes to suit your style.
Conclusion
Removing popcorn texture from your ceiling is a significant improvement that can modernize and enhance the aesthetics of your home. After the removal process is complete, the key is to repair any imperfections, choose a suitable ceiling finish, and enjoy the transformed space. Whether you opt for a classic painted ceiling, a textured look, wood paneling, or decorative tiles, your choice will greatly impact the overall ambiance of the room. So, go ahead and bid farewell to that outdated popcorn ceiling and say hello to a fresh and updated look for your home.