Sloped Ceiling Slanted Ceiling TV Mount: A Complete Guide to Elevate Your Viewing Experience

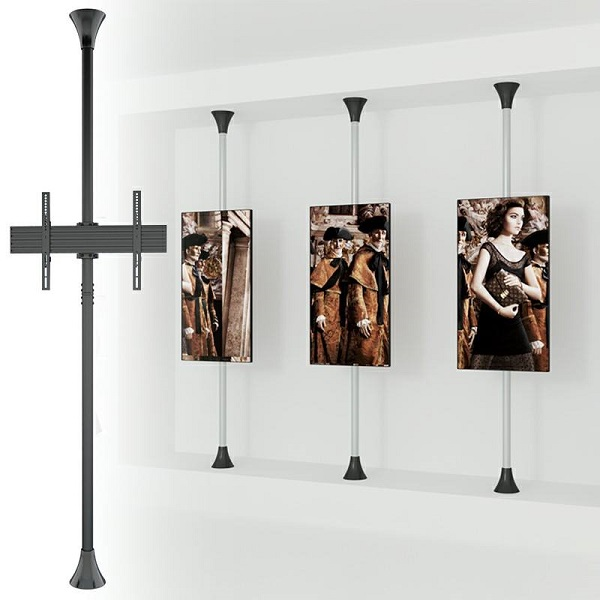
When it comes to setting up a home theater or maximizing your living space, choosing the right TV mount is crucial. One of the most common challenges homeowners face is mounting a TV on a sloped ceiling. Whether you have a slanted roof in your attic, a vaulted living room ceiling, or an angled ceiling in your basement, a Sloped Ceiling Slanted Ceiling TV Mount can offer a stylish and functional solution.

Sloped Ceiling Slanted Ceiling Tv Mount

In this guide, we will walk you through everything you need to know about mounting your TV on a sloped or slanted ceiling. From selecting the right mount to installation tips, we’ll cover it all to help you achieve the perfect viewing angle, stability, and aesthetics.


Why Choose a Sloped Ceiling Slanted Ceiling TV Mount?

Before we dive into the installation process, it’s important to understand the benefits of opting for a Sloped Ceiling Slanted Ceiling TV Mount.

1. Optimized Viewing Angle

A sloped or slanted ceiling mount can help you achieve the ideal viewing angle. Whether you’re lying on a couch or sitting in a recliner, you want your TV to be positioned for comfortable viewing without straining your neck. A ceiling mount allows you to position your TV at a variety of angles, offering more flexibility than traditional wall mounts.

Read too: Shiplap Ceiling in Kitchen: A Timeless Trend for a Stylish and Cozy Space

2. Space-Saving

In homes with sloped ceilings, such as attic spaces or lofts, mounting the TV to the ceiling maximizes your wall space. This approach prevents the need for bulky furniture or wall-mounted TV stands that can take up valuable space.

3. Aesthetic Appeal

A ceiling-mounted TV adds a modern touch to any room. The sleek and minimalist look eliminates the clutter of traditional furniture and wall mounts. It also provides a unique way to showcase your TV, turning it into a focal point without overwhelming the space.

4. Safety and Stability

Ceiling mounts designed for slanted ceilings are built to handle the unique weight distribution caused by the angle. They are engineered to ensure that your TV stays securely in place, even on a sloped surface. Many mounts also feature adjustable arms, which allow for fine-tuning of the viewing angle.


How to Choose the Right Sloped Ceiling Slanted Ceiling TV Mount

When selecting a Sloped Ceiling Slanted Ceiling TV Mount, there are several factors to consider to ensure you choose the best one for your space:

1. Ceiling Angle

First and foremost, determine the angle of your ceiling. Ceiling mounts are designed to accommodate a variety of slopes, but the angle of the ceiling will impact the type of mount you need. Some mounts are adjustable, while others are fixed, so it’s essential to choose one that can accommodate your ceiling’s specific angle.

2. TV Size and Weight

The size and weight of your TV will determine the mount you need. Always check the weight capacity of the mount to ensure it can safely support your TV. If you have a larger TV, make sure you opt for a mount that can handle heavier loads.

3. Adjustability

Look for a Sloped Ceiling Slanted Ceiling TV Mount that offers both tilt and swivel options. This will allow you to adjust the angle of your TV for optimal viewing. Adjustable mounts give you the flexibility to fine-tune the positioning as needed, depending on the seating area and lighting conditions.

4. Mounting System Compatibility

Ensure the mount is compatible with your TV’s VESA (Video Electronics Standards Association) pattern. The VESA pattern refers to the distance between the mounting holes on the back of the TV. Most modern TVs use standard VESA patterns, but it’s always a good idea to double-check to avoid compatibility issues.


Step-by-Step Installation of a Sloped Ceiling Slanted Ceiling TV Mount

Now that you have chosen the right mount, it’s time to install it. Here’s a step-by-step guide to help you mount your TV on a sloped ceiling:

Step 1: Gather the Necessary Tools and Materials

Before you start, make sure you have the following tools and materials:

  • Sloped Ceiling Slanted Ceiling TV Mount (make sure it’s compatible with your TV)
  • Drill and appropriate drill bits
  • Screwdriver
  • Stud finder (to locate the ceiling joists)
  • Measuring tape for accurate measurements
  • Level to ensure the TV is mounted straight
  • Pencil for marking the ceiling
  • TV and mounting hardware

Step 2: Find the Ceiling Joists

The most important step in installing a ceiling mount is ensuring that you are mounting your TV into the ceiling joists, as they provide the necessary support. Use a stud finder to locate the joists in your ceiling. Mark their location with a pencil.

Step 3: Mark the Mounting Locations

Once the joists are located, use your measuring tape to determine the center of where you want to mount the TV. Mark the drill holes for the mounting bracket based on your TV mount’s instructions. If you are mounting an adjustable bracket, make sure to account for the tilting and swiveling features.

Step 4: Drill Pilot Holes

Using the appropriate drill bit, drill pilot holes into the ceiling where you’ve marked the locations. Make sure the holes are aligned with the joists to ensure proper support.

Step 5: Install the Mounting Bracket

Attach the mounting bracket to the ceiling using screws and anchors (if necessary). Tighten the screws securely, but be careful not to overtighten, as this can damage the ceiling or the bracket.

Step 6: Attach the TV to the Mounting Bracket

Once the ceiling bracket is securely installed, attach the mounting plate to the back of your TV. This plate will be used to connect the TV to the ceiling mount.

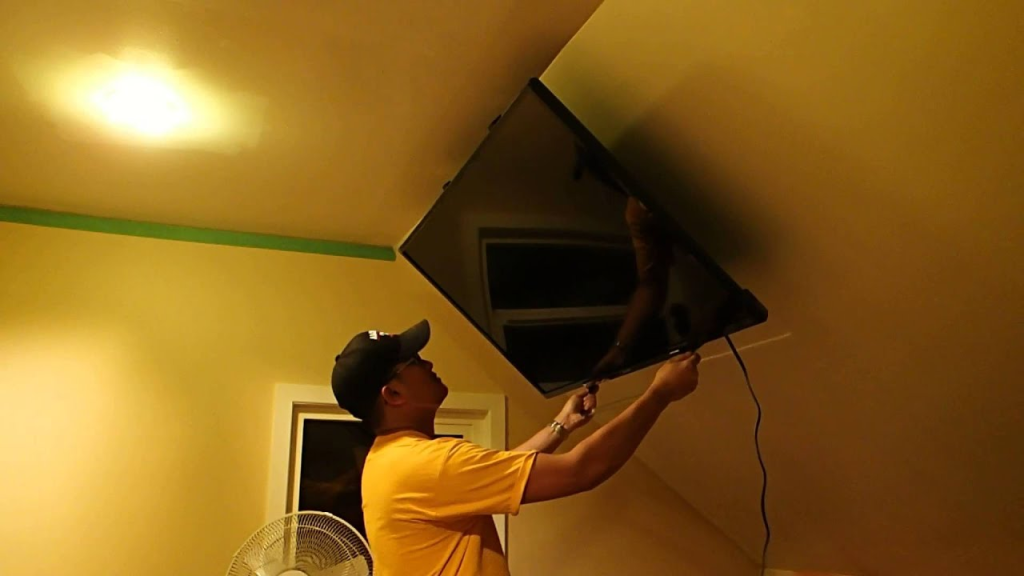
Step 7: Mount the TV on the Ceiling Bracket

With help (since TV mounting can be heavy and tricky), carefully lift the TV and attach it to the ceiling bracket. Follow the manufacturer’s instructions for securing the TV onto the mount, making sure it is locked into place.

Step 8: Adjust the TV’s Position

Finally, adjust the tilt and swivel settings on the mount to achieve the desired viewing angle. Use the level to check that the TV is perfectly aligned.


Tips for Successful Installation

  • Double-Check Measurements: Measure and remeasure before drilling any holes. Getting the placement right the first time will save you time and effort.
  • Use High-Quality Mounting Hardware: For safety and durability, always use the mounting hardware provided by the manufacturer or purchase high-quality screws and anchors if necessary.
  • Get Help: TV mounting can be heavy and requires careful lifting. It’s a good idea to have a friend or family member assist you during installation.
  • Consult a Professional if Necessary: If you’re uncomfortable with mounting a TV on a sloped ceiling or unsure about the installation, it’s always wise to seek professional help to ensure everything is securely mounted.

Conclusion

Mounting a TV on a Sloped Ceiling Slanted Ceiling TV Mount offers numerous benefits, from maximizing space to improving your viewing angle and aesthetics. By following the steps outlined above, you can successfully install a ceiling mount that enhances your home theater experience.

Whether you’re upgrading a room with a vaulted ceiling, attic, or basement, a Sloped Ceiling Slanted Ceiling TV Mount provides a modern solution that’s both practical and stylish. With careful planning and the right tools, you can achieve the perfect TV setup in no time.


TV Mount for Sloped Ceiling: Optimizing Your Space

Mounting a TV on a wall is a common solution for maximizing space and enhancing the viewing experience, but what happens when your ceiling is sloped? A sloped ceiling presents unique challenges when it comes to installing a TV mount, but with the right tools and techniques, you can achieve a professional and aesthetically pleasing result. This article will explore everything you need to know about choosing and installing the perfect TV mount for sloped ceiling.

Tv Mount For Sloped Ceiling

Understanding the Challenges of Sloped Ceilings

Sloped ceilings add architectural interest and charm to a space, but they can complicate certain installations, like mounting a TV. The angle of the ceiling, the height, and the position of the studs all play crucial roles in determining the best way to secure your television.

1. Angle Considerations

The slope of your ceiling will affect the angle at which the TV mount needs to be installed. If the mount isn’t adjustable, the TV might end up tilted too far upward or downward, leading to an uncomfortable viewing experience.

Read too: Discovering the Charm of Nautical Outdoor Ceiling Fans for Your Coastal Retreat: Sail into Style

2. Height and Viewing Distance

The height of the ceiling and the distance from the seating area to the TV must be considered. Sloped ceilings often lead to higher mounting points, so it’s essential to calculate the optimal height for comfortable viewing.

3. Stud Placement

Finding studs on a sloped ceiling can be tricky, but it’s crucial for a secure installation. The angle may cause the studs to be positioned differently than on a flat ceiling, so locating them accurately is key to a stable mount.

Choosing the Right TV Mount for a Sloped Ceiling

Not all TV mounts are created equal, especially when it comes to mounting on a sloped ceiling. Here’s what to look for in a TV mount for sloped ceilings:

1. Adjustable Angle Mounts

One of the most critical features to look for is adjustability. A mount that allows you to tilt and swivel the TV will give you the flexibility to find the perfect viewing angle, regardless of the ceiling’s slope.

2. Ceiling Mounts vs. Wall Mounts

While wall mounts are common, ceiling mounts might be a better option for sloped ceilings. Ceiling mounts often provide more flexibility in positioning and can be angled to match the slope, ensuring the TV is perfectly aligned with the viewer’s line of sight.

3. Weight Capacity

Ensure the mount you choose can support the weight of your TV. Sloped ceilings might require extra reinforcement, so always check the weight ratings and, if in doubt, opt for a mount with a higher capacity than you think you’ll need.

4. Cable Management

A good TV mount should also offer some form of cable management, especially on a sloped ceiling where cables can be more visible. Look for mounts that allow you to route cables neatly and out of sight.

Top TV Mount Options for Sloped Ceilings

When it comes to finding the best TV mount for sloped ceilings, certain models stand out for their versatility, ease of installation, and ability to accommodate different ceiling angles. Here are a few top picks:

1. VIVO Ceiling TV Mount

The VIVO Ceiling TV Mount is a popular choice for sloped ceilings due to its robust design and wide range of motion. It offers a 360-degree swivel and a 15-degree tilt, making it easy to adjust the TV to the perfect angle. This mount is also height-adjustable, which is ideal for high or vaulted ceilings.

2. VideoSecu TV Ceiling Mount

Another excellent option is the VideoSecu TV Ceiling Mount, which is known for its durability and flexibility. It supports a variety of TV sizes and weights, and it features an adjustable tilt and swivel mechanism to accommodate sloped ceilings. Its integrated cable management system helps keep wires organized and out of sight.

3. Loctek CM2 Adjustable TV Ceiling Mount

The Loctek CM2 is a versatile mount that works well on sloped ceilings. It offers extensive adjustability with tilt, swivel, and rotation features, making it easy to position the TV at the perfect viewing angle. Its sturdy construction ensures your TV stays securely in place, even on the most angled ceilings.

Installation Guide for Mounting a TV on a Sloped Ceiling

Mounting a TV on a sloped ceiling might seem daunting, but with the right approach, you can achieve a professional result. Here’s a step-by-step guide to help you through the process:

1. Measure and Mark the Spot

Start by determining the optimal height and position for the TV. Consider the viewing angle and distance from the seating area. Use a stud finder to locate the studs in the ceiling and mark the spot where the mount will be attached.

2. Pre-Drill Holes

Once you’ve marked the spots, pre-drill holes into the studs. This will make it easier to install the mounting bracket and ensure that the screws are securely anchored.

3. Attach the Mounting Bracket

Secure the mounting bracket to the ceiling using heavy-duty screws. Make sure the bracket is level, even if the ceiling is sloped. Most adjustable mounts will allow you to make slight adjustments to ensure the TV hangs straight.

4. Attach the TV to the Bracket

Carefully lift the TV and attach it to the mounting bracket. Depending on the size and weight of the TV, you might need an extra set of hands to help with this step. Ensure the TV is securely fastened to the bracket and that all connections are tight.

5. Adjust the Viewing Angle

Once the TV is mounted, adjust the tilt and swivel settings to achieve the desired viewing angle. Sit in different spots in the room to ensure the TV is visible from all intended viewing positions.

6. Organize the Cables

Use the mount’s cable management system to hide and organize the cables. This will give your installation a clean, professional look.

7. Test the Setup

Finally, turn on the TV and test the setup. Make sure the picture is clear from all angles and that the mount is holding the TV securely. Make any necessary adjustments to the angle or height.

Enhancing the Viewing Experience

Mounting a TV on a sloped ceiling opens up new possibilities for room design and viewing comfort. Here are some tips to enhance the viewing experience:

1. Consider the Lighting

Sloped ceilings can affect how light is distributed in a room. Make sure there is no glare on the TV screen by adjusting the angle or using curtains to block out sunlight.

2. Sound Setup

Ensure your sound system is configured to complement the TV’s position. Sloped ceilings can sometimes cause sound to bounce differently, so you may need to adjust speaker placement.

3. Use a Soundbar

A soundbar mounted just below the TV can improve audio quality and keep the setup sleek and simple.

Conclusion

Choosing the right TV mount for sloped ceilings involves careful consideration of the ceiling’s angle, height, and the weight of the TV. By selecting a mount with adjustable features and following proper installation techniques, you can create a comfortable and aesthetically pleasing viewing experience in any room with a sloped ceiling. Whether you’re looking to save space or add a modern touch to your home, the right TV mount can make all the difference.

Floor To Ceiling TV Mount: The Ultimate Guide for Stylish and Functional Home Entertainment

A floor to ceiling TV mount is a modern solution that offers both aesthetic appeal and practical benefits for your home entertainment setup. This type of mounting system can transform your living space, providing a sleek, contemporary look while optimizing viewing angles and saving floor space. In this comprehensive guide, we’ll explore the advantages, installation tips, design ideas, and practical considerations of floor to ceiling TV mounts.

Floor To Ceiling Tv Mount

What is a Floor To Ceiling TV Mount?

A floor to ceiling TV mount is a mounting system designed to hold a television between the floor and ceiling. Unlike traditional wall mounts, which are attached to a flat surface, these mounts utilize vertical supports to anchor the TV. This system is particularly useful in rooms with limited wall space or where a floating TV design is desired.

Benefits of Floor To Ceiling TV Mounts

  1. Enhanced Aesthetic Appeal: Floor to ceiling mounts offer a modern, minimalist look. They create a floating effect that can make your TV appear as a piece of art, integrating seamlessly into the room’s decor.
  2. Flexible Viewing Angles: These mounts often come with adjustable arms, allowing you to tilt or swivel the TV to achieve the perfect viewing angle from anywhere in the room.
  3. Space Efficiency: By mounting the TV from floor to ceiling, you save wall space and avoid clutter. This is especially beneficial in rooms with limited wall area or where you prefer a clean, unobstructed look.
  4. Improved Cable Management: Many floor to ceiling mounts come with built-in cable management systems, keeping cables hidden and organized. This contributes to a cleaner, more streamlined appearance.
  5. Safety and Stability: Floor to ceiling mounts provide sturdy support for larger TVs. They are designed to handle the weight of heavy televisions, reducing the risk of accidents or damage.

Choosing the Right Floor To Ceiling TV Mount

When selecting a floor to ceiling TV mount, consider the following factors to ensure you choose the right one for your needs:

1. TV Size and Weight

Different mounts are designed to accommodate various TV sizes and weights. Check the specifications of the mount to ensure it is compatible with your TV. Overloading a mount can lead to instability or damage.

2. Adjustability

Look for mounts with adjustable features such as tilting and swiveling. This allows you to customize the viewing angle based on your seating arrangement and room layout.

3. Installation Requirements

Some floor to ceiling mounts require professional installation, especially if they involve complex assembly or if your ceiling and floor materials are not standard. Make sure you understand the installation requirements and whether you need to hire a professional.

4. Material and Finish

Choose a mount that complements your room’s decor. Floor to ceiling mounts come in various materials and finishes, including metal, glass, and wood. Select a finish that blends well with your existing furniture and design elements.

Read too: Discovering the Charm of Nautical Outdoor Ceiling Fans for Your Coastal Retreat: Sail into Style

5. Cable Management

Effective cable management is crucial for maintaining a clean look. Look for mounts that include cable management features or consider adding cable concealers to hide the cables.

Installation Tips for Floor To Ceiling TV Mounts

Proper installation is key to ensuring that your floor to ceiling TV mount is secure and functional. Here are some tips to guide you through the installation process:

1. Measure and Plan

Before installation, measure the height and placement of the mount. Consider the optimal viewing height and ensure the mount is positioned correctly to avoid glare and ensure comfort.

2. Find Studs or Anchors

If the mount attaches to the floor and ceiling, ensure you use proper anchors or studs to secure the mount. For drywall ceilings or floors, use appropriate anchors to provide stability.

3. Assemble the Mount

Follow the manufacturer’s instructions to assemble the mount. Ensure all components are securely attached and that you have all necessary tools and hardware.

4. Attach the TV

Once the mount is in place, attach the TV according to the instructions. Ensure that the TV is securely mounted and that all connections are properly made.

5. Check Stability

After installation, check the stability of the mount and TV. Make sure there is no wobbling or movement and that the TV is securely held in place.

Design Ideas for Floor To Ceiling TV Mounts

Floor to ceiling TV mounts can be integrated into various design styles. Here are some ideas to inspire your home entertainment setup:

1. Modern Minimalist

For a sleek, contemporary look, opt for a simple metal mount with a minimalist design. Combine it with a slim-profile TV and keep the surrounding decor minimal.

2. Industrial Chic

If you prefer an industrial style, choose a mount with a raw metal finish and exposed components. Pair it with industrial-style furniture and decor for a cohesive look.

3. Elegant and Sophisticated

For a more elegant design, consider a mount with a glass or polished metal finish. Integrate it with luxurious furniture and decor for a sophisticated entertainment area.

4. Integrated Design

Incorporate the mount into custom cabinetry or a feature wall. This can create a seamless look where the TV appears to be part of the room’s architecture.

Maintenance and Care

To ensure the longevity and optimal performance of your floor to ceiling TV mount, regular maintenance is essential:

1. Dust Regularly

Dust the mount and TV regularly to prevent buildup, which can affect performance and appearance.

2. Check Stability

Periodically check the stability of the mount and TV. Tighten any loose screws or components to ensure the mount remains secure.

3. Inspect Cables

Ensure cables are in good condition and properly managed. Replace any damaged cables to avoid interference or safety issues.

Conclusion

A floor to ceiling TV mount is an innovative and stylish solution for modern home entertainment setups. By understanding the benefits, installation requirements, and design possibilities, you can enhance your living space with a mount that combines form and function. Whether you’re looking for a sleek minimalist design or a sophisticated statement piece, a floor to ceiling TV mount can elevate your home’s aesthetic while optimizing your viewing experience.