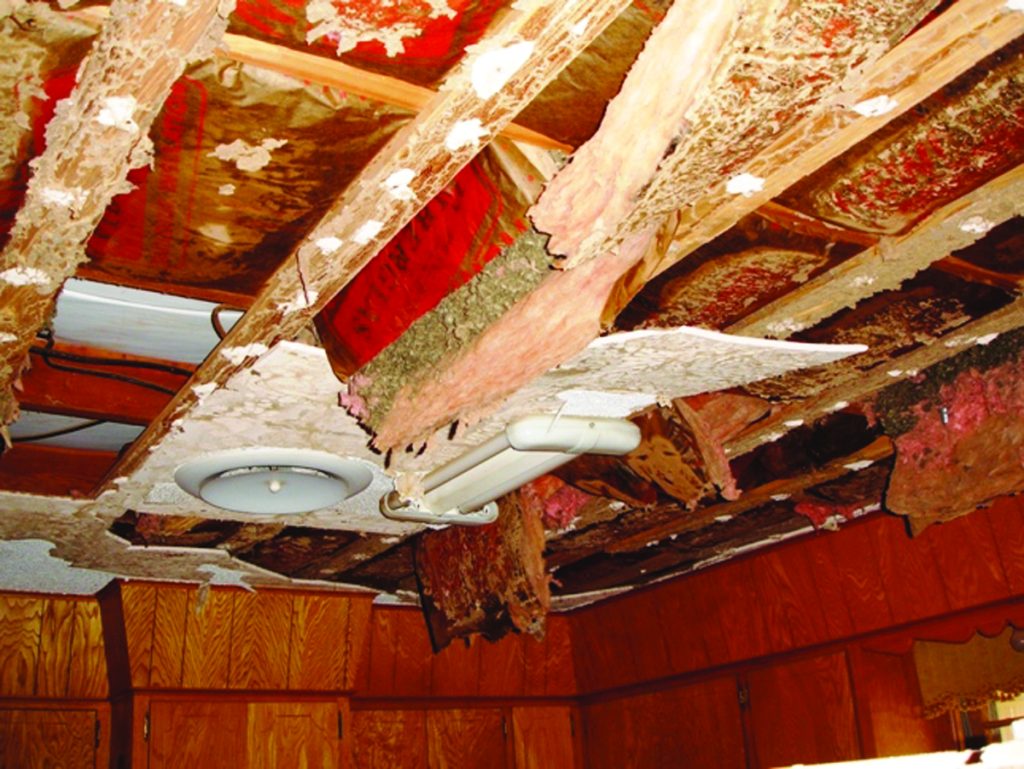
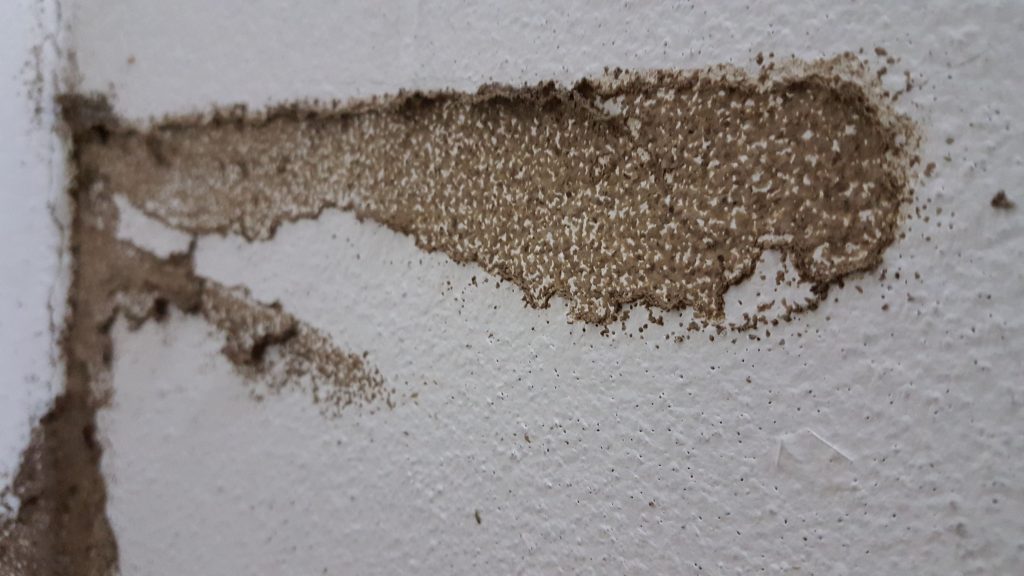
Termites are among the most destructive pests, capable of causing significant damage to wooden structures in your home, including the ceiling. Understanding the implications of termite damage in ceilings is essential for homeowners, as early detection and intervention can save thousands of dollars in repairs. This article delves into the signs of termite damage, the causes behind it, prevention strategies, and the necessary steps for repair.

What Causes Termite Damage in Ceilings?
Termite infestations usually start in the foundation or wooden parts of the house but can quickly spread to other areas, including ceilings. The main causes of termite damage in ceiling include:
- Moisture: Termites are attracted to moist environments. Leaks in your roof, plumbing issues, or high humidity can create the ideal conditions for termite infestations.
- Wooden Structures: Any wooden structures in your home, including beams, rafters, and ceiling joists, can become targets for termites.
- Poor Ventilation: Insufficient ventilation in attics can increase humidity levels, further attracting termites.
- Improper Construction: If your home was not constructed correctly, it may have gaps or weaknesses that allow termites to access the wooden parts of your ceiling.
- Lack of Treatment: If your home has not been treated for termites or is overdue for preventative treatments, it is more susceptible to infestations.
Read too: Shiplap Ceiling in Kitchen: A Timeless Trend for a Stylish and Cozy Space
Signs of Termite Damage in Ceilings
Detecting termite damage in ceilings early is crucial. Here are some signs to watch for:
1. Sagging Ceilings
If you notice that your ceiling appears to be sagging or bowing, it could be a sign of termite damage. The insects consume wood, weakening the structural integrity of ceiling joists and beams.
2. Hollow Sounds
When you tap on the ceiling, it should sound solid. If you hear a hollow sound, it may indicate that termites have consumed the wood inside, leaving only a thin layer intact.
3. Discolored or Stained Ceilings
Water stains or discoloration can be caused by moisture, which attracts termites. If you notice unusual stains, it’s worth investigating further.
4. Frass
Frass is the term used for termite droppings. These tiny, wood-colored pellets can accumulate under damaged areas of the ceiling. If you find frass, it’s a clear sign of an active infestation.
5. Wings and Insect Parts
Termites shed their wings after mating. Finding discarded wings near windows or ceilings can indicate a nearby colony.
6. Presence of Termites
Of course, seeing actual termites is a strong indication of an infestation. They are typically light brown and have a soft body, making them less visible than other insects.
Understanding the Types of Termites
Different types of termites can cause damage, and knowing which type is affecting your home can help you decide on the best course of action:
- Subterranean Termites: These are the most common types that cause damage in homes. They live underground and build mud tubes to access wooden structures. They can enter through cracks in foundations.
- Drywood Termites: These termites do not require contact with the soil and can infest the wood in your home directly. They are often found in wooden furniture and beams.
- Dampwood Termites: As their name suggests, dampwood termites thrive in moist environments. They are usually found in decaying wood and require high moisture levels to survive.
The Cost of Termite Damage Repair
Repairing termite damage in ceilings can be costly, depending on the extent of the damage and the affected areas. Here’s a breakdown of potential costs:
1. Inspection Costs
Before repairs can begin, a professional inspection is essential to assess the damage. Inspection costs can range from $100 to $300, depending on the size of your home and the company you choose.
2. Treatment Costs
The cost of termite treatments varies based on the type of treatment required and the size of the infestation. Typical costs range from $200 to $2,500 for professional extermination services, including chemical treatments and bait systems.
3. Repair Costs
The cost of repairing termite damage in ceilings can vary widely:
- Minor Repairs: If only small sections need repair, costs can range from $200 to $600.
- Moderate Repairs: Replacing damaged joists or beams can range from $600 to $1,500.
- Extensive Repairs: For extensive damage requiring major structural repairs, costs can exceed $2,000.
How to Prevent Termite Damage in Ceilings
Preventing termite damage in ceilings starts with taking proactive measures in your home:
1. Regular Inspections
Schedule regular inspections with a pest control professional to identify potential issues early. Annual inspections are recommended for homes in termite-prone areas.
2. Moisture Control
Fix any leaks in your roof or plumbing promptly. Ensure proper drainage around your foundation to prevent moisture accumulation.
3. Improve Ventilation
Ensure adequate ventilation in attics and crawl spaces to reduce humidity levels. Installing vents can help circulate air and keep moisture at bay.
4. Use Termite-Resistant Materials
When building or renovating, consider using termite-resistant materials, such as treated wood or alternative materials like steel.
5. Maintain Landscaping
Keep wood mulch, firewood, and other organic materials away from your home’s foundation. Trim back trees and shrubs to prevent them from touching your house.
6. Apply Preventative Treatments
Consider applying preventative termite treatments to your home’s foundation and any wooden structures. Consult with a pest control professional for appropriate options.
Repairing Termite Damage in Ceilings
If you discover termite damage in your ceiling, it’s crucial to act quickly. Here’s a step-by-step guide to the repair process:
Step 1: Call a Professional
The first step in addressing termite damage is to contact a pest control professional. They can assess the extent of the infestation and recommend a treatment plan.
Step 2: Treatment
Once the pest control expert has treated the infestation, it’s time to start repairs. Make sure the area is free of termites before proceeding.
Step 3: Assess the Damage
Determine the extent of the damage to the ceiling. You may need to remove sections of the ceiling to evaluate the condition of the joists and beams.
Step 4: Replace Damaged Wood
Cut out and replace any damaged joists or beams. Ensure that new wood is treated to resist future termite infestations.
Step 5: Repair the Ceiling
After replacing any damaged wood, you can repair the ceiling. This may involve drywall installation, plastering, or painting to match the surrounding area.
Step 6: Prevent Future Infestations
Once repairs are complete, take steps to prevent future infestations by implementing the preventive measures mentioned earlier.
Conclusion
Termite damage in ceiling can be a serious issue that requires prompt attention. Recognizing the signs of an infestation, understanding the potential costs involved, and taking preventative measures can help protect your home from these destructive pests. If you suspect termite damage, don’t hesitate to contact a pest control professional for assistance. Early detection and intervention can save you time, stress, and money in the long run.

