Ceiling Support Box For Wood Burning Stove: Essential Guide for Safe Installation

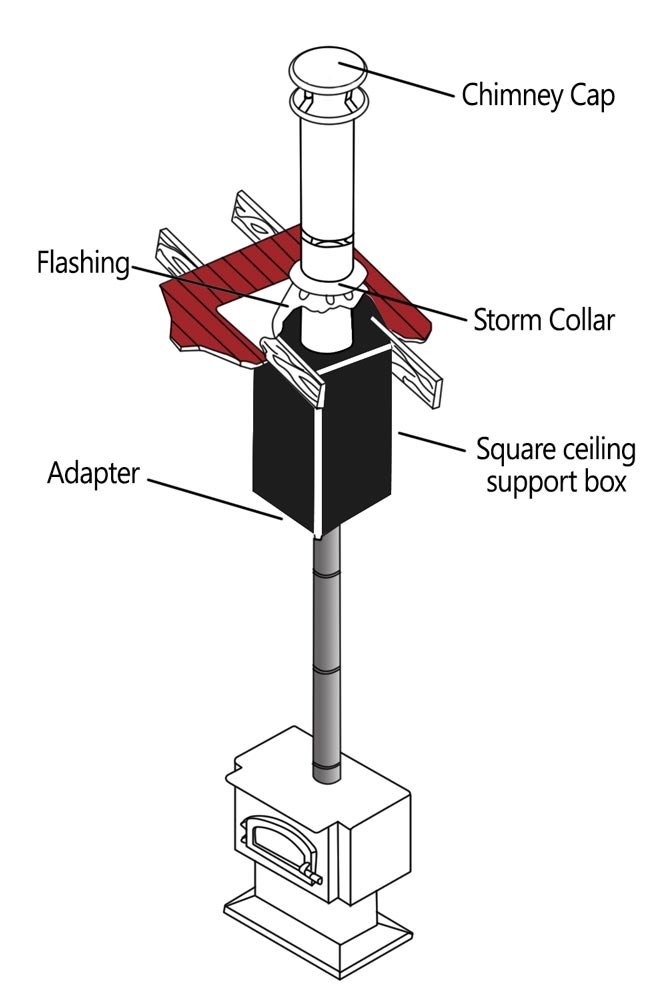
When installing a wood-burning stove, ensuring safety and efficiency is paramount. One critical component of the installation process is the ceiling support box for wood burning stove. This essential piece plays a dual role: it supports the chimney system structurally and creates a safe passage for the stovepipe through the ceiling.

Ceiling Support Box For Wood Burning Stove

Whether you’re planning a new installation or upgrading an existing one, understanding the purpose and proper installation of a ceiling support box can make a significant difference in your stove’s performance and your home’s safety. This guide provides detailed insights into selecting, installing, and maintaining a ceiling support box.

Read too: Bathroom Flooded Through the Ceiling: A Comprehensive Guide


What Is a Ceiling Support Box for Wood Burning Stove?

A ceiling support box is a crucial part of a wood stove’s chimney system. It acts as both a support structure for the stovepipe and a barrier that protects combustible materials in the ceiling from the intense heat generated by the stove.

Key Functions:

  1. Structural Support: Holds the chimney pipe securely in place, especially in multi-story homes.
  2. Heat Protection: Maintains a safe distance between the hot chimney pipe and surrounding combustible materials, such as wood and insulation.
  3. Seamless Connection: Provides a transition point between the stovepipe and the chimney system.

Types of Ceiling Support Boxes

There are several types of ceiling support boxes available, each designed for specific installations.

1. Flat Ceiling Support Box

This is the most common type, designed for installations with flat ceilings. It is typically mounted between joists and allows the stovepipe to pass directly through the ceiling.

2. Cathedral Ceiling Support Box

Ideal for sloped or cathedral ceilings, this type accommodates the angle of the ceiling while still providing secure support for the chimney pipe.

3. Adjustable Support Box

These versatile boxes can be adjusted to fit various ceiling angles, making them suitable for both flat and sloped installations.

4. Decorative Support Boxes

Some support boxes come with decorative finishes, allowing them to blend seamlessly with the interior design of your room.


Why You Need a Ceiling Support Box for Wood Burning Stove

1. Ensures Safety

Without a support box, the intense heat from the stovepipe can pose a fire hazard. A properly installed support box prevents heat transfer to combustible materials.

2. Structural Integrity

It holds the chimney securely, reducing the risk of shifting or collapsing due to the pipe’s weight or external forces like wind.

3. Compliance with Building Codes

Most building codes require the installation of a ceiling support box for wood-burning stoves to ensure safety and efficiency.

4. Improved Performance

By maintaining a proper connection between the stove and chimney, a support box enhances draft performance, ensuring efficient burning and reduced smoke buildup.


How to Install a Ceiling Support Box for Wood Burning Stove

Installing a ceiling support box requires precision and adherence to safety guidelines. Below is a step-by-step guide:

Tools and Materials Needed:

  • Measuring tape
  • Screwdriver or drill
  • Saw (for cutting ceiling material)
  • Ceiling support box
  • Chimney pipe
  • Fire-rated caulk

Step-by-Step Instructions:

1. Choose the Right Support Box

Select a support box compatible with your ceiling type (flat or sloped) and chimney diameter.

2. Mark the Installation Spot

Use a measuring tape to locate the center of your stove’s flue pipe and mark the corresponding spot on the ceiling. Ensure the area is free of obstacles like electrical wiring or plumbing.

3. Cut the Ceiling Opening

Using the support box as a template, cut a hole in the ceiling. The opening should be slightly larger than the stovepipe diameter but within the support box’s specifications.

4. Install the Support Box

Secure the support box to the ceiling joists using screws or brackets provided in the installation kit. Ensure it is firmly anchored to bear the chimney’s weight.

5. Connect the Chimney Pipe

Insert the chimney pipe through the support box and attach it to the stovepipe. Seal any gaps with fire-rated caulk to prevent heat or smoke leaks.

6. Test for Stability

Ensure the support box and chimney are securely installed before using the stove.


Maintenance Tips for Ceiling Support Boxes

Regular maintenance is essential to ensure the longevity and safety of your ceiling support box.

1. Inspect Annually

Check the support box for any signs of damage, corrosion, or loose connections.

2. Clean the Chimney Regularly

A clean chimney reduces the risk of creosote buildup, which can cause chimney fires and affect the support box.

3. Seal Any Gaps

Over time, gaps may develop between the support box and the ceiling. Use fire-rated caulk to reseal them as needed.

4. Check for Heat Damage

Inspect surrounding ceiling materials for discoloration or warping, which may indicate excessive heat.


Common Mistakes to Avoid

1. Skipping the Support Box

Never install a wood-burning stove without a ceiling support box. It is a critical safety component.

2. Improper Sizing

Using a support box that doesn’t match your chimney diameter can lead to poor performance and safety risks.

3. Neglecting Local Building Codes

Always adhere to building codes and manufacturer guidelines to ensure compliance and avoid potential fines.

4. DIY Without Experience

If you’re unsure about installation, hire a professional to avoid mistakes that could compromise safety.


FAQs: Ceiling Support Box for Wood Burning Stove

1. Can I install a wood stove without a ceiling support box?

No, a ceiling support box is essential for safety and structural integrity.

2. How do I choose the right size support box?

Refer to your stove and chimney specifications to select a support box that matches the chimney diameter and ceiling type.

3. Are ceiling support boxes universal?

No, support boxes vary in design and size. Ensure compatibility with your stove and chimney system.

4. Can I install a support box on a cathedral ceiling?

Yes, cathedral ceiling support boxes are specifically designed for sloped ceilings.


Conclusion

A ceiling support box for wood burning stove is a vital component that ensures safety, functionality, and compliance with building codes. Whether you’re installing a new wood stove or upgrading an existing setup, investing in the right support box is crucial for long-term performance and peace of mind.

By understanding the types, installation process, and maintenance tips, you can make informed decisions and enjoy the warmth and charm of a wood-burning stove in your home.
Chimney Ceilings Support Box: Everything You Need to Know

Upgrade your fireplace safety measures with a chimney ceilings support box, ensuring stability and durability for your chimney system. Explore the functionality, installation process, and benefits of this essential component for maintaining a secure and efficient chimney structure.

Chimney Ceiling Support Box

Introduction

A chimney ceiling support box is a critical component of any chimney system, providing support and stability where the chimney penetrates the ceiling or attic space. This essential fixture plays a vital role in ensuring the structural integrity of the chimney, as well as the safety of the surrounding areas. In this comprehensive guide, we’ll delve into the importance of a chimney ceiling support box, its functionality, installation considerations, and why it’s an indispensable addition to your fireplace setup.

Understanding the Chimney Ceiling Support Box

A chimney ceiling support box, also known as a chimney support box or attic insulation shield, is a metal enclosure designed to surround the chimney pipe where it passes through the ceiling or attic space. This box serves several essential functions:

  1. Support: The chimney ceiling support box provides structural support for the chimney pipe, preventing it from sagging or shifting under its own weight or external forces.
  2. Insulation: In some cases, the chimney support box may include insulation material to protect nearby combustible materials from the heat generated by the chimney pipe.
  3. Fire Protection: By containing the chimney pipe within a metal enclosure, the support box helps prevent the spread of fire to the surrounding building materials in the event of a chimney fire.

Benefits of a Chimney Ceiling Support Box

  1. Enhanced Safety: The primary benefit of a chimney ceiling support box is enhanced safety for your home and family. By providing structural support and fire protection for the chimney pipe, the support box reduces the risk of chimney-related accidents and ensures peace of mind.
  2. Stability: The chimney support box helps maintain the stability and alignment of the chimney pipe, preventing it from shifting or becoming dislodged over time. This is especially important in areas prone to seismic activity or extreme weather conditions.
  3. Compliance: Many building codes and regulations require the installation of a chimney support box in certain situations, such as when the chimney penetrates a ceiling or attic space. Installing a support box ensures compliance with these codes and helps avoid potential fines or penalties.

Installing a Chimney Ceiling Support Box

Installing a chimney ceiling support box requires careful planning and attention to detail to ensure proper alignment and support for the chimney pipe. Here are some key steps to consider:

  1. Measurements: Start by accurately measuring the diameter of the chimney pipe and the dimensions of the ceiling or attic space where the support box will be installed. Choose a support box that matches the size of your chimney pipe and provides adequate clearance from combustible materials.
  2. Location: Determine the optimal location for the chimney support box based on the layout of your chimney system and the structural requirements of your building. Ensure that the support box is installed securely and aligns properly with the chimney pipe.
  3. Installation: Follow the manufacturer’s instructions carefully when installing the chimney support box. Secure the box to the ceiling or attic framing using appropriate fasteners and ensure that it is level and flush with the surrounding surfaces.
  4. Sealing: Seal any gaps or openings around the chimney support box with fireproof sealant to prevent the escape of smoke, gases, or sparks into the surrounding spaces.

Maintaining a Chimney Ceiling Support Box

Regular maintenance of your chimney support box is essential to ensure its continued functionality and safety. Here are some tips for maintenance:

  • Inspection: Periodically inspect the chimney support box for signs of damage, corrosion, or wear. Replace any damaged or deteriorated components promptly to maintain structural integrity.
  • Cleaning: Keep the chimney support box clean and free of debris to prevent blockages or obstructions that could impede airflow or ventilation.
  • Professional Inspection: Consider scheduling a professional chimney inspection annually to identify any potential issues with the chimney support box or other components of the chimney system.

Conclusion

A chimney ceilings support box is a crucial component of any chimney system, providing structural support, fire protection, and peace of mind for homeowners. By investing in a quality chimney support box and ensuring proper installation and maintenance, you can enhance the safety and efficiency of your fireplace setup. Explore the functionality and benefits of a chimney ceiling support box and take proactive steps to safeguard your home and family.

Read too: Exploring the Innovation and Efficiency of Ceiling Mounted Surgical Light Solutions: Illuminating Precision

Elevate Your Home Design with the Perfect Cathedral Ceiling Chimney Kit – A Comprehensive Guide

When it comes to creating a cozy and stylish ambiance in your home, the right fireplace can make a significant difference. Explore the world of design possibilities with the ideal solution for cathedral ceilings – the Cathedral Ceiling Chimney Kit. Discover how this kit can enhance both the aesthetic appeal and functionality of your space, providing a focal point that stands out in any room.

Cathedral Ceiling Chimney Kit

Understanding the Cathedral Ceiling Chimney Kit

A Cathedral Ceiling Chimney Kit is a specialized system designed to accommodate fireplaces in rooms with cathedral or high vaulted ceilings. This kit ensures proper venting and installation of the chimney, catering to the unique architectural features of such spaces.

The Importance of Proper Ventilation

Proper ventilation is crucial in any fireplace installation, but it becomes even more critical when dealing with cathedral ceilings. The Cathedral Ceiling Chimney Kit addresses the challenges posed by high ceilings, providing a solution that ensures efficient smoke and gas evacuation.

Components of a Cathedral Ceiling Chimney Kit

To better understand how the Cathedral Ceiling Chimney Kit works, let’s delve into its key components:

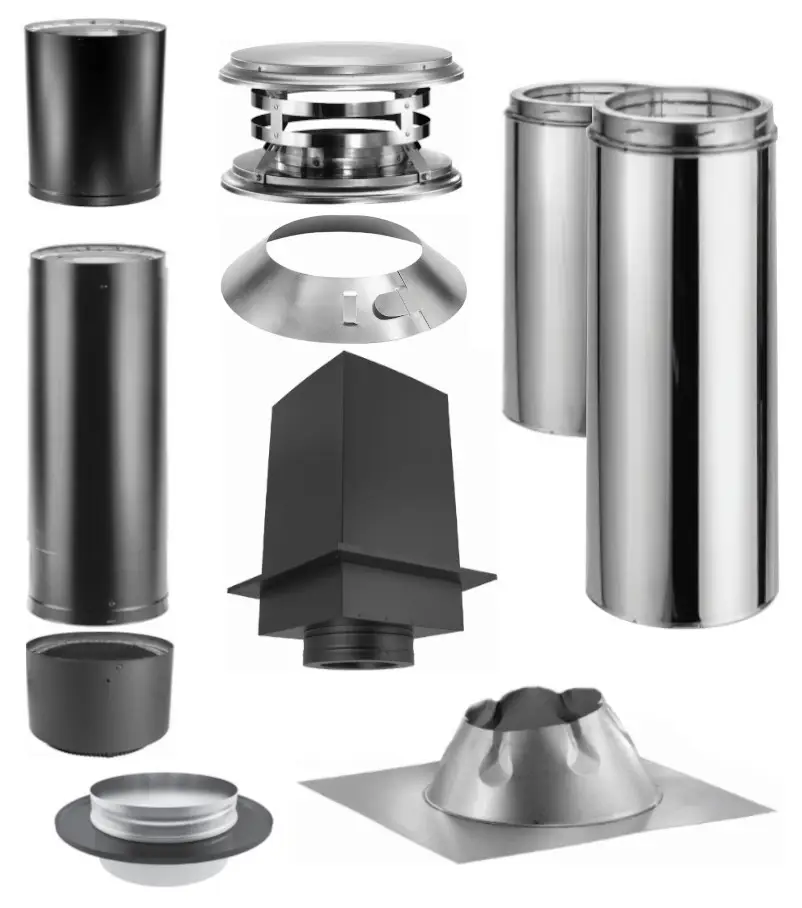
  1. Chimney Pipe: The kit includes a specialized chimney pipe designed for cathedral ceilings, allowing for the safe passage of smoke and gases.
  2. Support Box: This component provides structural support for the chimney pipe as it passes through the ceiling and into the attic space.
  3. Attic Insulation Shield: Ensures that the chimney’s heat does not affect the surrounding insulation in the attic, preventing potential fire hazards.
  4. Roof Flashing: Seals the area where the chimney pipe exits the roof, preventing leaks and ensuring a watertight seal.

Installing a Cathedral Ceiling Chimney Kit

Proper installation is key to the functionality and safety of your Cathedral Ceiling Chimney Kit. Here is a step-by-step guide to help you through the installation process:

1. Planning and Measurement

Before you begin, carefully measure the height of your cathedral ceiling to determine the appropriate length for the chimney pipe. Consider factors such as roof pitch and the distance the chimney must extend above the roofline.

2. Cut an Opening in the Ceiling

Create an opening in the ceiling where the chimney will pass through. Use the support box to frame the opening, ensuring a secure fit.

3. Install the Chimney Pipe

Carefully assemble the chimney pipe, ensuring a secure connection. Extend the pipe through the support box and into the attic space.

4. Secure the Attic Insulation Shield

Attach the attic insulation shield to the chimney pipe, ensuring it covers the opening in the ceiling. This shield prevents heat transfer to the attic insulation.

5. Extend the Chimney Above the Roof

Extend the chimney pipe above the roofline and secure it in place using the roof flashing. Properly seal the flashing to prevent water leaks.

6. Inspect and Test

Conduct a thorough inspection of the entire chimney system, checking for any loose connections or potential issues. Once satisfied, test the fireplace to ensure proper ventilation and functionality.

Advantages of Using a Cathedral Ceiling Chimney Kit

Investing in a Cathedral Ceiling Chimney Kit offers numerous advantages for homeowners with high or vaulted ceilings:

Aesthetic Appeal

The kit adds a touch of sophistication to your home, turning your fireplace into a stunning focal point. The elongated chimney pipe complements the height of cathedral ceilings, creating a visually appealing design element.

Efficient Ventilation

Designed specifically for cathedral ceilings, the kit ensures efficient smoke and gas evacuation, maintaining air quality and safety within your home.

Versatility in Design

Cathedral Ceiling Chimney Kits come in various designs and finishes, allowing you to choose one that complements your interior decor. Whether you prefer a sleek stainless steel finish or a classic black design, there’s a kit to suit your style.

Choosing the Right Cathedral Ceiling Chimney Kit

When selecting a Cathedral Ceiling Chimney Kits, consider the following factors:

  1. Ceiling Height: Choose a kit that is suitable for the height of your cathedral ceiling to ensure proper venting.
  2. Materials and Finishes: Select a kit with materials and finishes that match your interior design preferences.
  3. Brand Reputation: Opt for reputable brands that are known for producing quality chimney kits and providing reliable customer support.

Read too: Unveiling the Essentials of Vaulted Ceiling Insulation Requirements: Elevate Your Space

Conclusion

In conclusion, a Cathedral Ceiling Chimney Kits is the perfect solution for homeowners looking to enhance the aesthetics and functionality of their fireplaces in rooms with high or vaulted ceilings. Proper installation and consideration of key factors such as materials, finishes, and brand reputation are crucial in ensuring the success of your fireplace project. Elevate your home design with the timeless charm of a Cathedral Ceiling Chimney Kits.