When it comes to bathroom renovations or simple upgrades, shower curtain rods can often be overlooked. However, a DIY Ceiling Mount Shower Curtain Rod is not only functional but also adds an elegant, modern touch to your space. Traditional shower curtain rods are mounted on the wall, but ceiling-mounted rods provide a cleaner, more sophisticated look while maximizing space in smaller bathrooms.
In this article, we’ll take you through the step-by-step process of installing your own DIY Ceiling Mount Shower Curtain Rod, the materials you’ll need, the benefits of this installation, and some tips on how to make it an easy, enjoyable project. If you want to upgrade your bathroom with a simple, yet stylish, fixture, then this guide is for you.
Read too: Shiplap Ceiling in Kitchen: A Timeless Trend for a Stylish and Cozy Space
Why Choose a DIY Ceiling Mount Shower Curtain Rod?
Before we jump into the process, it’s essential to understand why a DIY Ceiling Mount Shower Curtain Rod is a great choice for your bathroom. Here are several reasons why this option has become increasingly popular among homeowners:
1. Modern, Sleek Look
A ceiling-mounted shower curtain rod has a contemporary, streamlined appearance. Unlike traditional wall-mounted rods, which are visible and can make a space feel more cluttered, a DIY Ceiling Mount Shower Curtain Rod keeps everything neatly tucked away, creating a minimalist look that suits modern bathrooms.
2. Maximizes Space
If you have a smaller bathroom, mounting the curtain rod on the ceiling frees up wall space, making the room feel larger. This is especially helpful in apartments, guest bathrooms, or bathrooms with limited square footage.
3. Easy to Install
A ceiling-mounted rod can often be simpler to install than wall-mounted versions, as you don’t have to worry about precise alignment with the studs in the wall. With the right tools and a little patience, you can easily handle the installation yourself.
4. Better Stability
Because the rod is anchored to the ceiling, it tends to be more stable than wall-mounted rods. This added stability can prevent the curtain from swaying or pulling down during use, ensuring that your bathroom remains neat and tidy.
5. Suitable for All Shower Types
Whether you have a bathtub-shower combo or a walk-in shower, a DIY Ceiling Mount Shower Curtain Rod works for all configurations. It’s also an excellent choice if you want to create a more open, walk-in feel with a shower curtain that doesn’t crowd the space.
Materials You’ll Need for Your DIY Ceiling Mount Shower Curtain Rod
Before starting your project, gather the materials and tools you’ll need to successfully install your DIY Ceiling Mount Shower Curtain Rod. Here’s a list of the essential items:
Materials:
- Shower Curtain Rod: You can choose between a straight or curved rod, depending on your preference and the size of your shower area.
- Ceiling Mount Brackets: These will hold the curtain rod in place, attached to the ceiling.
- Shower Curtain Rings: These are essential for hanging the shower curtain.
- Screws and Anchors: Choose screws that are suitable for your ceiling type (drywall, plaster, or concrete). Be sure to have wall anchors if you’re attaching the rod to drywall.
- Shower Curtain (Optional): If you don’t already have a curtain, choose one that complements the bathroom’s style.
Tools:
- Drill: For making holes in the ceiling to attach the brackets.
- Measuring Tape: To ensure precise measurements.
- Level: To make sure the curtain rod is perfectly straight.
- Screwdriver: To tighten screws once the brackets are in place.
- Pencil: For marking the drill spots on the ceiling.
Step-by-Step Instructions: How to Install a DIY Ceiling Mount Shower Curtain Rod
Now that you have your materials and tools ready, it’s time to begin the installation process. Follow these simple steps to complete your DIY Ceiling Mount Shower Curtain Rod project.
Step 1: Measure and Mark the Ceiling
The first step is to determine where you want the curtain rod to be positioned on the ceiling. Measure the width of your shower or bathtub area to ensure the rod will be long enough to span the space.
Once you have your measurements, use a pencil to mark where you’ll install the brackets. Use a measuring tape to ensure that the marks are evenly spaced and centered along the ceiling.
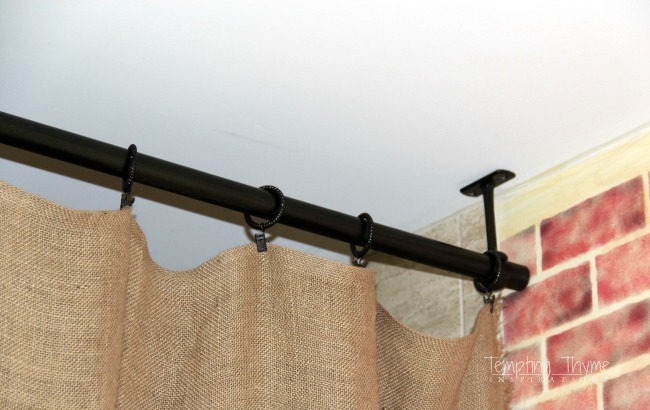
Step 2: Install the Ceiling Mount Brackets
Using your drill, make holes at the marked spots. If you’re drilling into drywall, use wall anchors to ensure a secure hold. For concrete or wood ceilings, use appropriate screws without anchors.
Once the holes are drilled, attach the ceiling mount brackets using screws. Make sure the brackets are securely fastened and level. A level is essential to make sure your rod will hang straight.
Step 3: Attach the Curtain Rod
After the brackets are securely installed, slide the curtain rod into the brackets. If your rod has any additional mounting hardware, make sure it’s properly aligned with the bracket before securing it in place. Tighten the screws to hold the rod firmly in place.
Step 4: Hang the Shower Curtain
Once the rod is installed, it’s time to hang your shower curtain. Use shower curtain rings to attach the curtain to the rod. Simply slide the rings onto the rod and make sure the curtain is even along the length of the rod.
Step 5: Test the Rod and Curtain
Once everything is in place, test the curtain rod to make sure it’s secure. Gently pull on the curtain to ensure the rod stays in place and that the curtain opens and closes easily. If everything is functioning properly, your DIY Ceiling Mount Shower Curtain Rod installation is complete!
Tips for a Successful DIY Ceiling Mount Shower Curtain Rod Installation
- Choose the Right Curtain Rod: The type of rod you choose will depend on your personal style and the size of your bathroom. For a larger shower area, consider a curved curtain rod for extra space. Straight rods are perfect for smaller spaces.
- Consider Adjustable Rods: Some ceiling-mounted curtain rods come with adjustable lengths, which can be helpful if you need to customize the size to fit your space.
- Use High-Quality Materials: Invest in high-quality curtain rods and brackets to ensure durability and prevent future issues.
- Check for Electrical Wiring: Before drilling, check for electrical wiring in the ceiling to avoid accidents. If you’re unsure, consult a professional.
Advantages of a Ceiling-Mounted Shower Curtain Rod
While you may be familiar with wall-mounted shower curtain rods, ceiling-mounted rods offer several benefits that may make them a better choice for your bathroom:
- Maximized Space: Free up valuable wall space and make your bathroom feel larger by opting for a ceiling-mounted rod.
- Sleek, Modern Look: A ceiling-mounted curtain rod has a minimalistic, stylish appearance that works well in contemporary bathroom designs.
- Increased Durability: Ceiling-mounted rods tend to be more stable, making them less prone to bending or falling over time.
Conclusion
A DIY Ceiling Mount Shower Curtain Rod is an excellent way to add a modern touch to your bathroom while improving its functionality. This simple project can be completed with just a few basic tools and materials, and the results can transform your space into a stylish and sleek bathroom retreat.
By following the steps outlined in this guide, you can enjoy the benefits of a ceiling-mounted shower curtain rod, including a clutter-free look, maximized space, and added durability. So grab your tools and start your DIY project today!