Perforated Metal Ceiling Panel in Modern Architecture: Exploring the Versatility

Innovative architectural design often relies on the seamless integration of form and function, and one element that has gained popularity for its versatility and aesthetic appeal is perforated metal ceiling panel. These panels, characterized by their pattern of holes or voids, offer a unique blend of visual interest, acoustic performance, and practicality. In this article, we’ll delve into the world of perforated metal ceiling panels, exploring their uses, benefits, and design considerations.

Perforated Metal Ceiling Panels

Understanding Perforated Metal Ceiling Panels

What are Perforated Metal Ceiling Panels?

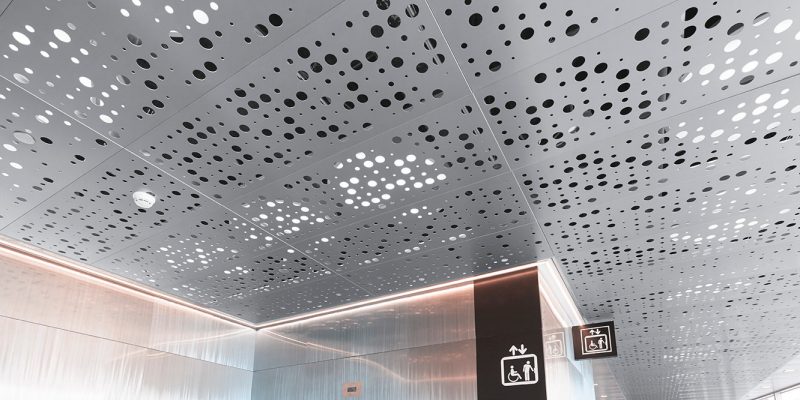
Perforated metal ceiling panels are architectural elements made from metal sheets that have been punctured with a pattern of holes or voids. These panels are available in various materials, including aluminum, steel, and stainless steel, and can be customized to achieve different perforation patterns and sizes.

Read too: Understanding and Dealing with Ants in the Ceiling Spaces: Navigating the Intrusion

Applications of Perforated Metal Ceiling Panels

1. Aesthetic Enhancement: Perforated metal ceiling panels add visual interest and texture to interior spaces, making them a popular choice for modern architectural designs. The perforations create unique patterns of light and shadow, adding depth and dimension to ceilings.

2. Acoustic Control: Beyond their visual appeal, perforated metal ceiling panels also offer acoustic benefits. By absorbing sound waves and reducing reverberation, these panels help improve the acoustic performance of spaces such as offices, restaurants, and auditoriums.

3. Ventilation and Airflow: In addition to their aesthetic and acoustic properties, perforated metal ceiling panels can also serve practical functions, such as providing ventilation and promoting airflow in interior environments. This makes them suitable for use in areas where air circulation is important, such as kitchens and bathrooms.

Design Considerations for Perforated Metal Ceiling Panels

Perforation Patterns

When selecting perforated metal ceiling panels, consider the desired perforation pattern carefully. Different patterns, such as staggered, square, or slotted, can create distinct visual effects and affect the panel’s acoustic performance. Choose a pattern that complements the overall design aesthetic and functional requirements of the space.

Panel Size and Thickness

The size and thickness of perforated metal ceiling panels can impact both their structural integrity and acoustic performance. Thicker panels may offer better sound absorption but could be heavier and more challenging to install. Consider the ceiling height and load-bearing capacity when selecting panel size and thickness.

Material Selection

Perforated metal ceiling panels are available in various materials, each offering unique characteristics in terms of durability, corrosion resistance, and aesthetic appeal. Aluminum panels, for example, are lightweight and corrosion-resistant, making them suitable for indoor and outdoor applications, while stainless steel panels offer exceptional durability and a sleek, modern look.

Installation and Maintenance

Installation

Proper installation is crucial to ensure the structural integrity and longevity of perforated metal ceiling panels. Follow manufacturer guidelines and enlist the services of experienced professionals to ensure accurate panel placement and secure attachment to the ceiling structure.

Maintenance

Regular maintenance is essential to preserve the appearance and functionality of perforated metal ceiling panels. Depending on the material and finish, cleaning methods may vary, but generally, gentle cleaning with a mild detergent and soft cloth is sufficient to remove dust and dirt buildup.

Conclusion

Perforated metal ceiling panel offer a versatile and stylish solution for enhancing the aesthetic appeal and functionality of interior spaces. Whether used for aesthetic enhancement, acoustic control, or ventilation, these innovative architectural elements have become integral components of modern design. By considering factors such as perforation patterns, panel size, material selection, and proper installation and maintenance, architects and designers can harness the full potential of perforated metal ceiling panels in their projects.

Unlocking the Potential of 9 16 Ceiling Grid: A Comprehensive Guide to Installation and Benefits

In the realm of interior design and architecture, every detail matters. From the color of the walls to the flooring, each element contributes to the overall aesthetic and functionality of a space. One often-overlooked aspect is the ceiling grid, specifically the 9 16 ceiling grid. While it may seem insignificant compared to other design elements, the ceiling grid plays a crucial role in both commercial and residential settings. In this comprehensive guide, we will delve into the world of 9 16 ceiling grids, exploring their installation process, benefits, and design possibilities.

9 16 Ceiling Grid

Understanding the 9 16 Ceiling Grid

The 9 16 ceiling grid, also known as the 15/16-inch ceiling grid, refers to the standard size of ceiling grid systems commonly used in commercial and residential buildings. The term “9 16” denotes the width of the grid’s main runners, which measure 9/16 of an inch. These grids are designed to accommodate various ceiling tiles, providing a versatile solution for different spaces.

Installation Process

Installing a 9 16 ceiling grid requires careful planning and execution to ensure optimal functionality and aesthetics. Here are the basic steps involved in the installation process:

  1. Preparation: Before beginning the installation, assess the ceiling’s condition and ensure that it can support the weight of the grid and tiles. Clear the area of any obstacles and gather all necessary tools and materials.
  2. Layout and Measurement: Determine the layout of the ceiling grid, taking into account the dimensions of the space and any obstructions such as lights or vents. Use a chalk line or laser level to mark the layout on the ceiling accurately.
  3. Installation of Main Runners: Start by installing the main runners along the perimeter of the room, ensuring they are straight and securely attached to the ceiling. Use screws or clips to secure the runners in place, following the manufacturer’s instructions.
  4. Installation of Cross Tees: Once the main runners are in place, install the cross tees to create the grid pattern. Ensure that the tees are aligned correctly and securely locked into the main runners to prevent sagging.
  5. Placement of Ceiling Tiles: With the grid framework in place, install the ceiling tiles by inserting them into the grid openings. Ensure a snug fit to prevent any gaps or unevenness in the ceiling surface.
  6. Finishing Touches: Once all the tiles are in place, make any necessary adjustments to ensure a uniform appearance. Trim any excess tile edges if needed, and clean the ceiling surface to remove any dust or debris.

Benefits of 9 16 Ceiling Grid

The 9 16 ceilings grid offers several advantages that make it a popular choice for both commercial and residential applications:

  1. Versatility: The standard size of the 9 16 ceiling grid allows for compatibility with a wide range of ceiling tiles, giving designers flexibility in choosing the right style and material for their project.
  2. Ease of Installation: Compared to other ceiling grid systems, the 9 16 grid is relatively easy to install, making it a cost-effective option for both DIY enthusiasts and professional installers.
  3. Accessibility: The modular nature of the ceiling grid system makes it easy to access the space above the ceiling for maintenance or repairs, ensuring long-term durability and functionality.
  4. Aesthetic Appeal: With its clean lines and uniform grid pattern, the 9 16 ceilings grid adds a polished and professional look to any space, enhancing its overall aesthetic appeal.

Design Possibilities

Beyond its practical benefits, the 9 16 ceiling grids opens up a world of design possibilities for architects and interior designers. By combining different tile materials, colors, and patterns, designers can create custom ceiling designs that complement the overall theme of the space. Whether it’s a sleek and modern office environment or a cozy residential setting, the versatility of the 9 16 ceiling grid allows for endless creative expression.

Conclusion

In conclusion, the 9 16 ceiling grid is a versatile and practical solution for enhancing the aesthetic appeal and functionality of any interior space. From its ease of installation to its design flexibility, this standard grid size offers numerous benefits for both commercial and residential applications. Whether you’re renovating an existing space or designing a new one from scratch, consider incorporating the 9 16 ceilings grid into your project for a stylish and functional finish.

Read too: Discovering the Charm of Nautical Outdoor Ceiling Fans for Your Coastal Retreat: Sail into Style