When it comes to modern lighting solutions, LED ceiling light panels have become a popular choice due to their energy efficiency, long lifespan, and superior illumination. However, like all electrical components, they can eventually wear out or become outdated, necessitating a replacement. This comprehensive guide will walk you through everything you need to know about LED ceiling light panel replacement, from identifying the need for a replacement to the step-by-step process of installation.
Why You Might Need an LED Ceiling Light Panel Replacement
There are several reasons why you might consider replacing your LED ceiling light panel:
- Diminished Brightness: Over time, LED panels can lose their brightness, making your space less illuminated.
- Flickering Issues: If your LED panel starts to flicker, it could indicate a problem with the panel itself or the wiring.
- Outdated Design: Newer LED panels offer better designs and features, making an upgrade appealing for aesthetic or functional reasons.
- Energy Efficiency: Older panels might not be as energy-efficient as newer models, leading to higher electricity bills.
Tools and Materials Needed for LED Ceiling Light Panel Replacement
Before starting the replacement process, ensure you have the following tools and materials:
- New LED ceiling light panel
- Screwdriver
- Ladder
- Voltage tester
- Wire connectors
- Safety gloves
- Safety glasses
Steps to Replace an LED Ceiling Light Panel
1. Turn Off the Power
Safety should always be your first priority. Turn off the power supply to the room where you will be replacing the LED ceiling light panel. Use a voltage tester to ensure that the power is completely off before proceeding.
2. Remove the Old Panel
Carefully remove the old LED panel. If it’s screwed into place, use a screwdriver to unscrew it. If it’s mounted in a different way, follow the manufacturer’s instructions for removal. Be gentle to avoid damaging the ceiling or the existing wiring.
3. Disconnect the Wiring
Once the old panel is removed, you will need to disconnect the wiring. Make sure to note how the wires are connected, as this will help when connecting the new panel. Typically, you will see three wires: live (brown or black), neutral (blue), and ground (green or yellow-green).
4. Connect the New LED Panel
Connect the new LED panel to the existing wiring. Match the wires from the panel to the corresponding wires in the ceiling: live to live, neutral to neutral, and ground to ground. Use wire connectors to secure the connections. Ensure all connections are tight and secure to prevent any electrical issues.
5. Secure the New Panel
Mount the new LED panel to the ceiling. Follow the manufacturer’s instructions for the specific mounting method. This may involve screwing the panel into place or using other mounting hardware. Make sure the panel is securely attached to prevent it from falling.
6. Test the New Panel
Once the new panel is installed, turn the power back on and test the panel to ensure it is working correctly. If the light does not turn on or if it flickers, turn off the power and check your connections again.
Tips for Choosing the Right LED Ceiling Light Panel Replacement
When selecting a new LED ceiling light panel, consider the following factors:
Brightness
The brightness of the panel is measured in lumens. Choose a panel that provides adequate lighting for your space. For general lighting, a panel with around 4,000 lumens is typically sufficient for a standard room.
Color Temperature
LED panels come in various color temperatures, ranging from warm white (2700K) to daylight (6500K). Choose a color temperature that suits the ambiance you want to create in your space.
Energy Efficiency
Look for panels with high energy efficiency ratings. LED panels with the ENERGY STAR label are a good choice as they meet strict energy efficiency guidelines set by the U.S. Environmental Protection Agency.
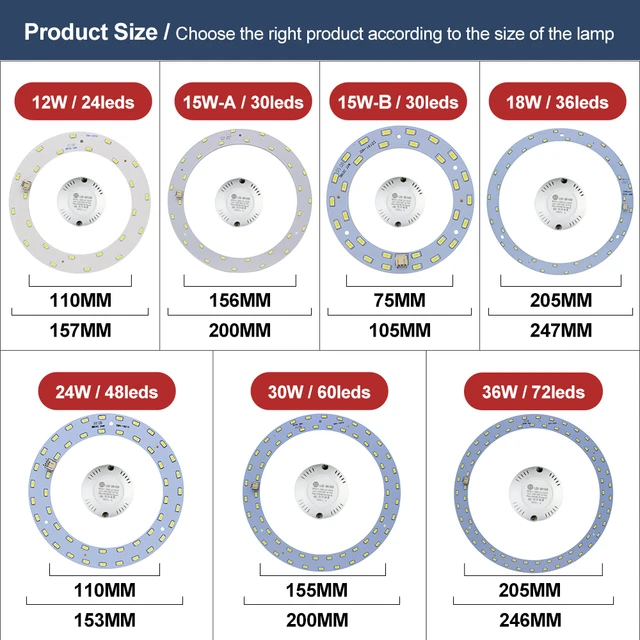
Size and Design
Ensure that the new panel fits the dimensions of your existing fixture. Additionally, choose a design that complements the aesthetics of your room.
Dimming Capabilities
If you prefer adjustable lighting, opt for an LED panel with dimming capabilities. This allows you to control the brightness to suit different activities and moods.
Maintaining Your LED Ceiling Light Panel
To extend the lifespan of your new LED ceiling light panel and ensure it operates efficiently, follow these maintenance tips:
- Regular Cleaning: Dust and dirt can accumulate on the panel, reducing its brightness. Clean the panel regularly with a soft, dry cloth.
- Avoid Overloading: Ensure that the electrical circuit is not overloaded, as this can cause the panel to malfunction.
- Check Connections: Periodically check the wiring connections to ensure they remain tight and secure.
Benefits of Replacing Your LED Ceiling Light Panel
Enhanced Energy Efficiency
Newer LED panels are designed to be more energy-efficient than older models. This means you can enjoy the same level of brightness while using less electricity, leading to lower energy bills.
Improved Lighting Quality
Advancements in LED technology have led to better lighting quality. New panels offer more uniform light distribution and reduced glare, creating a more comfortable and visually appealing environment.
Longer Lifespan
Modern LED panels have a longer lifespan compared to older models. This means fewer replacements over time, saving you money and reducing environmental waste.
Better Aesthetic Appeal
Upgrading to a new LED panel can enhance the aesthetic appeal of your space. Newer panels come in sleek designs and can be integrated seamlessly into various interior styles.
Troubleshooting Common Issues After Replacement
Light Doesn’t Turn On
If your new LED panel doesn’t turn on, check the following:
- Ensure the power supply is turned on.
- Verify that all wire connections are secure.
- Test the panel with a different power source to rule out a faulty panel.
Flickering Light
Flickering can be caused by several issues:
- Loose wiring connections: Check and tighten all connections.
- Incompatible dimmer switch: Ensure the dimmer switch is compatible with LED lighting.
- Voltage fluctuations: Consult an electrician if you suspect voltage issues.
Uneven Lighting
If the light output appears uneven, ensure that the panel is mounted correctly and that there are no obstructions blocking the light.
Read too: Striped Schoolhouse Ceiling Light Fixtures: Unveiling the Timeless Charm
Conclusion
Replacing an LED ceiling light panel is a straightforward process that can significantly improve the lighting quality and energy efficiency of your space. By following the steps outlined in this guide, you can safely and effectively replace your old LED panel with a new, more efficient model. Remember to choose a panel that suits your needs in terms of brightness, color temperature, and design. Regular maintenance will ensure your new panel lasts for many years, providing you with reliable and high-quality lighting.