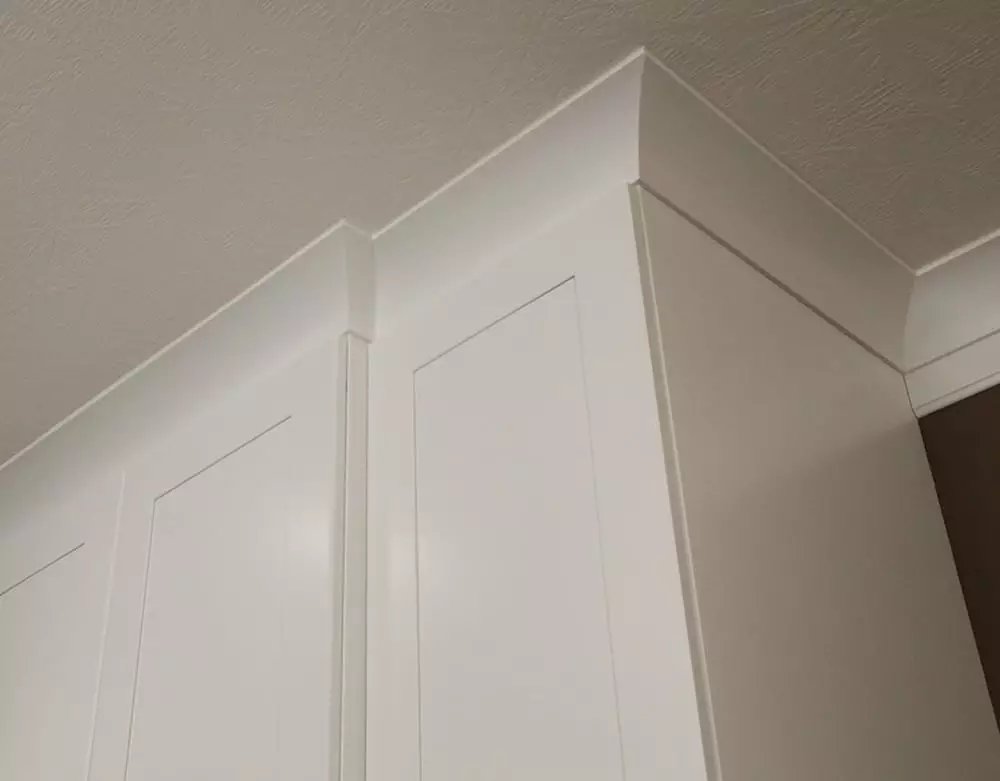
When it comes to enhancing the aesthetic appeal and functionality of your home, few features are as striking as crown molding cabinets to ceiling. This design element adds a touch of elegance and sophistication, transforming ordinary cabinetry into a stunning focal point. In this comprehensive guide, we’ll explore everything you need to know about incorporating crown molding on cabinets that reach up to the ceiling, including benefits, installation tips, and design ideas.
Why Choose Crown Molding Cabinets to Ceiling?
Crown molding is a traditional design element that has been used in interior decoration for centuries. When applied to cabinets that extend to the ceiling, it creates a seamless and cohesive look that enhances the overall aesthetic of your space. Here’s why you should consider this elegant upgrade:
- Visual Appeal: Crown molding adds a luxurious and classic touch to your cabinets. It creates a polished, high-end look that elevates the entire room.
- Enhanced Proportions: Cabinets that reach the ceiling can sometimes look imposing or disconnected from the rest of the room. Adding crown molding helps to visually integrate the cabinets with the ceiling and walls, providing a balanced and harmonious appearance.
- Increased Storage: Cabinets that go all the way to the ceiling provide additional storage space. Adding crown molding makes these cabinets look intentional and well-designed, rather than just functional.
- Hide Imperfections: Crown molding can help conceal any gaps or imperfections where the cabinets meet the ceiling, creating a more refined and seamless look.
Choosing the Right Crown Molding for Your Cabinets
Selecting the perfect crown molding for your cabinets involves considering various factors to ensure that it complements your existing decor and meets your aesthetic goals. Here’s what to keep in mind:
1. Style and Design
Crown molding comes in various styles and designs, from classic and ornate to modern and minimalist. The style you choose should reflect your overall design theme:
- Traditional: Ornate, detailed crown molding with intricate patterns and flourishes works well in classic or traditional settings.
- Modern: Sleek, simple crown molding with clean lines and minimal detailing suits contemporary or modern interiors.
- Transitional: A blend of traditional and modern elements, transitional crown molding features subtle details that work well in various design styles.
Read too: Kitchen Lighting For A Vaulted Ceiling: Illuminating Your Space with Style and Functionality
2. Material
Crown molding is available in several materials, each with its own benefits:
- Wood: Offers a rich, classic look and can be stained or painted. It’s durable but may require more maintenance.
- MDF (Medium Density Fiberboard): Affordable and easy to paint, MDF is a popular choice for modern and transitional designs. It’s not as durable as wood but is less prone to warping.
- Polyurethane: Lightweight and resistant to moisture, polyurethane is ideal for areas with high humidity. It can mimic the look of wood and is easy to install.
3. Size and Proportion
The size of the crown molding should be proportional to the height of the cabinets and the room. Larger, more elaborate moldings work well in rooms with high ceilings, while smaller, simpler designs are better suited for lower ceilings.
Installing Crown Molding Cabinets to Ceiling
Proper installation is key to achieving a polished and professional look. Here’s a step-by-step guide to help you with the process:
1. Preparation
Before installation, gather all necessary tools and materials, including crown molding, a saw, a measuring tape, a miter box, a nail gun, and wood glue. Ensure that the cabinets and ceiling are clean and free of debris.
2. Measure and Cut
Accurate measurements are crucial for a successful installation. Measure the length of each cabinet section where the crown molding will be installed. Use a miter saw to cut the crown molding at the appropriate angles, typically 45 degrees for inside and outside corners.
3. Fit and Secure
Dry-fit the crown molding pieces to ensure they fit properly. Apply wood glue to the back of the molding, then position it against the cabinets and ceiling. Use a nail gun to secure the molding in place, making sure to countersink the nails so they can be filled and painted over later.
4. Fill and Sand
Once the molding is secured, fill any nail holes or gaps with wood filler or caulk. Allow it to dry, then sand the area smooth to ensure a seamless finish.
5. Paint or Stain
If you’re painting the crown molding, apply a primer followed by your chosen paint color. For stained wood moldings, apply a wood stain followed by a clear sealer. Allow the paint or stain to dry completely before touching or using the cabinets.
Design Ideas for Crown Molding Cabinets to Ceiling
Incorporating crown molding into your cabinetry opens up a world of design possibilities. Here are some creative ideas to inspire you:
1. Classic Elegance
For a timeless look, opt for ornate crown molding with intricate details and a traditional finish. This works well in formal dining rooms, living rooms, or grand kitchens.
2. Modern Minimalism
Choose sleek, simple crown molding with clean lines for a modern, understated look. Pair it with minimalist cabinetry and neutral colors to create a contemporary space.
3. Transitional Style
Combine traditional and modern elements with transitional crown molding. This versatile style blends well with various decor themes and provides a balanced look.
4. Two-Tone Finish
Consider a two-tone finish for your crown molding and cabinets. For example, you could paint the crown molding a contrasting color from the cabinets to highlight the design feature.
5. Integrated Lighting
Install LED lighting along the top edge of the crown molding for an elegant touch. This creates a soft glow that enhances the ambiance and highlights the molding.
Maintenance and Care for Crown Molding
Proper maintenance ensures that your crown molding remains beautiful and functional over time. Here are some tips for keeping it in top condition:
- Regular Dusting: Dust the crown molding regularly to prevent buildup. Use a soft cloth or duster to gently clean the surface.
- Spot Cleaning: Address any stains or marks promptly. Use a mild cleaner and a soft cloth to clean the affected area without damaging the finish.
- Inspect for Damage: Periodically check for signs of damage or wear, such as cracks or peeling paint. Address any issues promptly to prevent further damage.
- Repaint or Refinish: Over time, the paint or finish on your crown molding may need touching up. Repaint or refinish as needed to maintain its appearance.
Conclusion
Incorporating crown molding cabinets to ceiling is an excellent way to enhance the elegance and functionality of your space. With careful selection of styles, materials, and installation techniques, you can achieve a beautiful and timeless look that elevates your home’s decor. Whether you prefer classic sophistication, modern minimalism, or a transitional design, crown molding offers endless possibilities for creating a stunning focal point in your interior design.