When it comes to updating or enhancing the look of a room with a drop ceiling, “can lights” (also known as recessed lighting) offer a sleek and contemporary solution. Can lights for drop ceilings are an excellent choice for improving illumination and adding a touch of modern design to your space. This comprehensive guide will cover everything you need to know about installing and utilizing can lights for drop ceilings, including benefits, installation tips, design ideas, and maintenance.
Why Choose Can Lights for Drop Ceiling?
Can lights for drop ceilings provide a number of advantages over traditional lighting options. Here’s why they are a popular choice:
Benefits of Can Lights for Drop Ceiling
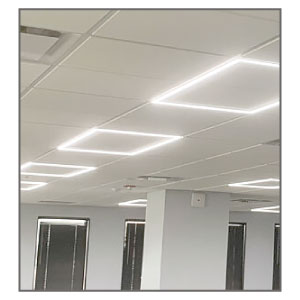
- Sleek and Modern Appearance: Can lights offer a clean, unobtrusive look that complements modern décor. Their recessed design helps maintain a smooth ceiling profile without bulky fixtures interrupting the visual flow.
- Enhanced Illumination: These lights provide even, consistent illumination, which helps eliminate shadows and brighten up your space effectively. This is particularly useful in rooms with drop ceilings where achieving balanced light can be challenging.
- Space Efficiency: Can lights are installed directly into the ceiling, which can be especially advantageous in rooms with limited ceiling height. They don’t take up any extra space and provide unobtrusive lighting.
- Customizable Lighting: Many can lights are adjustable, allowing you to direct light where it’s needed most. This flexibility is useful for highlighting specific areas or features within a room.
- Energy Efficiency: Modern can lights often use LED technology, which offers energy-efficient lighting with a longer lifespan compared to traditional incandescent bulbs.
Types of Can Lights for Drop Ceiling
When selecting can lights for your drop ceiling, it’s essential to understand the different types available. Each type serves different needs and preferences:
1. New Construction Can Lights
These lights are designed for installation in new construction projects. They are installed before the ceiling is completed and are typically built into the ceiling framing. They require more space behind the ceiling tiles for housing and wiring.
Read too: Bathroom Flooded Through the Ceiling: A Comprehensive Guide
2. Remodel Can Lights
Remodel can lights are ideal for retrofitting into existing ceilings. They are designed to fit into smaller spaces and often come with adjustable brackets that allow for easy installation without the need for significant modifications.
3. Adjustable Can Lights
Adjustable or gimbal can lights have a swiveling feature that allows you to direct the light beam in different directions. This is useful for highlighting artwork, architectural features, or specific areas in a room.
4. LED Can Lights
LED can lights are energy-efficient and have a longer lifespan compared to traditional bulbs. They provide bright, high-quality light and often come with dimming capabilities for added flexibility.
Installing Can Lights for Drop Ceiling
Proper installation is crucial for achieving the best results with can lights. Follow these steps to install can lights in a drop ceiling:
1. Plan the Layout
Before installation, plan the layout of your can lights. Determine the number of fixtures needed and their placement to ensure even lighting throughout the room. Consider factors such as the size of the room, existing furniture, and the purpose of the lighting.
2. Turn Off Power
Ensure the power is turned off at the circuit breaker before starting any electrical work. This is essential for your safety during installation.
3. Cut Holes for Can Lights
Use a template or the provided template with your can light kit to cut holes in the drop ceiling tiles. Make sure the holes are sized appropriately for the can lights you are installing.
4. Install Mounting Brackets
For remodel can lights, install the mounting brackets according to the manufacturer’s instructions. These brackets will secure the can lights in place within the ceiling grid.
5. Wire the Can Lights
Connect the wiring according to the instructions provided with the can lights. This typically involves connecting the fixture’s wires to the existing ceiling wiring using wire nuts. Ensure all connections are secure and properly insulated.
6. Insert the Can Lights
Place the can lights into the holes you cut and secure them with the provided clips or brackets. Ensure they are flush with the ceiling and adjust if necessary.
7. Install Light Bulbs or LEDs
Once the can lights are securely installed, insert the light bulbs or LED modules. If using LED can lights, ensure they are compatible with your dimmer switches if applicable.
8. Turn On Power and Test
Turn the power back on at the circuit breaker and test the can lights to ensure they are working correctly. Make any necessary adjustments to the direction or positioning of the lights.
Design Ideas for Can Lights in Drop Ceilings
Can lights offer flexibility in design and can be used in various ways to enhance the look and feel of a room. Here are some design ideas to consider:
1. Layered Lighting
Combine can lights with other types of lighting, such as pendant lights or wall sconces, to create a layered lighting effect. This approach adds depth and dimension to your space.
2. Accent Lighting
Use adjustable can lights to highlight architectural features, artwork, or specific areas of interest. This creates focal points and adds visual interest to your room.
3. Even Illumination
Install can lights in a grid pattern for even illumination across the entire ceiling. This is particularly useful in rooms where balanced lighting is essential, such as kitchens or workspaces.
4. Dimmer Switches
Incorporate dimmer switches to adjust the brightness of the can lights according to your needs. This provides flexibility and allows you to create different moods and atmospheres in the room.
5. Color Temperature
Choose can lights with adjustable color temperatures to suit various activities. For example, warm light is ideal for relaxing areas, while cool light is better for workspaces.
Maintenance and Care for Can Lights
To ensure the longevity and optimal performance of your can lights, follow these maintenance tips:
1. Regular Cleaning
Dust and clean the can light fixtures regularly to prevent dirt buildup. Use a soft cloth or a duster to clean the outer surfaces and the area around the light.
2. Check for Bulb Replacement
If you notice any dimming or flickering, it may be time to replace the bulbs or LED modules. Follow the manufacturer’s instructions for bulb replacement and ensure the power is off before changing bulbs.
3. Inspect Wiring
Periodically inspect the wiring and connections to ensure they remain secure and in good condition. Address any signs of wear or damage promptly to prevent electrical issues.
4. Address Overheating
Ensure the can lights are installed with adequate ventilation to prevent overheating. If you notice excessive heat, check the installation and make sure the fixtures are suitable for your ceiling type.
When to Seek Professional Help
While installing can lights can be a DIY project, there are instances when professional assistance is advisable:
- Complex Installations: If you are installing can lights in a complex ceiling setup or require extensive electrical work, consulting a professional electrician can ensure a safe and accurate installation.
- Existing Electrical Issues: If you encounter any electrical issues or complications during installation, a licensed electrician can diagnose and address these problems effectively.
- Design Expertise: For intricate lighting designs or if you need help with layout planning, a lighting designer can provide valuable expertise to achieve the desired effect.
Conclusion
Can lights for drop ceilings offer a sleek and modern lighting solution that enhances the appearance and functionality of your space. By understanding the benefits, types, installation techniques, and design ideas, you can make informed decisions and achieve a well-lit, aesthetically pleasing environment. With proper maintenance and care, your can lights will provide reliable and stylish illumination for years to come.