When considering a home renovation, especially in the realm of interior design, one often overlooked element is the ceiling. Many homeowners aim to enhance their living spaces through decorative features, and ceiling tiles have become a popular choice. Whether you are replacing old tiles or installing new ones, understanding Standard Ceiling Tile Measurements is crucial to ensure a seamless fit and aesthetically pleasing outcome.
In this article, we will dive deep into the standard measurements of ceiling tiles, their types, installation processes, and tips for selecting the right tiles for your space. By the end of this guide, you’ll have a comprehensive understanding of ceiling tile measurements and how to apply that knowledge effectively.
Why Ceiling Tile Measurements Matter
The importance of Standard Ceiling Tile Measurements cannot be overstated. Correct measurements not only guarantee a professional finish but also help in avoiding costly mistakes. Installing the wrong size tiles can lead to gaps, uneven finishes, and even structural issues.
Here are a few reasons why you should pay close attention to ceiling tile measurements:
- Aesthetic Appeal: Properly measured and installed ceiling tiles contribute to the overall design and ambiance of a room. Misfitting tiles can disrupt the visual flow, making the space appear chaotic.
- Efficiency: Correct measurements lead to fewer wasted materials and reduced installation time. This efficiency can save you money and effort in the long run.
- Compatibility: Knowing the standard measurements helps you choose tiles that fit well with other design elements, such as lighting fixtures, crown moldings, and wall heights.
- Value Addition: A well-finished ceiling enhances the value of your home. Prospective buyers are often attracted to spaces that appear well thought-out and meticulously designed.
Read too: A Comprehensive Mr Cool Ceiling Cassette Review: Unveiling Excellence
Common Standard Ceiling Tile Measurements
When it comes to Standard Ceiling Tile Measurements, several sizes are commonly used in residential and commercial spaces. Understanding these standard sizes will help you make informed choices when selecting tiles for your project.
1. Square Ceiling Tiles
Square ceiling tiles are one of the most common types, particularly for suspended ceilings. The standard measurements for square tiles include:
- 12 x 12 inches: This size is often used in residential applications. It offers a classic look and is easy to handle during installation.
- 24 x 24 inches: Common in commercial spaces, these larger tiles cover more area, making installation quicker. They are ideal for larger rooms or spaces where a more open look is desired.
- 30 x 30 inches: Less common, these tiles provide a unique look and are often used in larger commercial environments. They can give a dramatic effect when combined with lighting.
2. Rectangular Ceiling Tiles
Rectangular tiles are also popular and can create a unique design. Standard measurements for rectangular tiles include:
- 24 x 48 inches: Frequently used in commercial settings, these tiles provide a sleek, modern appearance and allow for fewer seams.
- 12 x 48 inches: These tiles offer flexibility in design and can create interesting patterns on the ceiling.
3. Thickness of Ceiling Tiles
The thickness of ceiling tiles varies, which can impact their sound absorption, durability, and insulation properties. Common thickness measurements include:
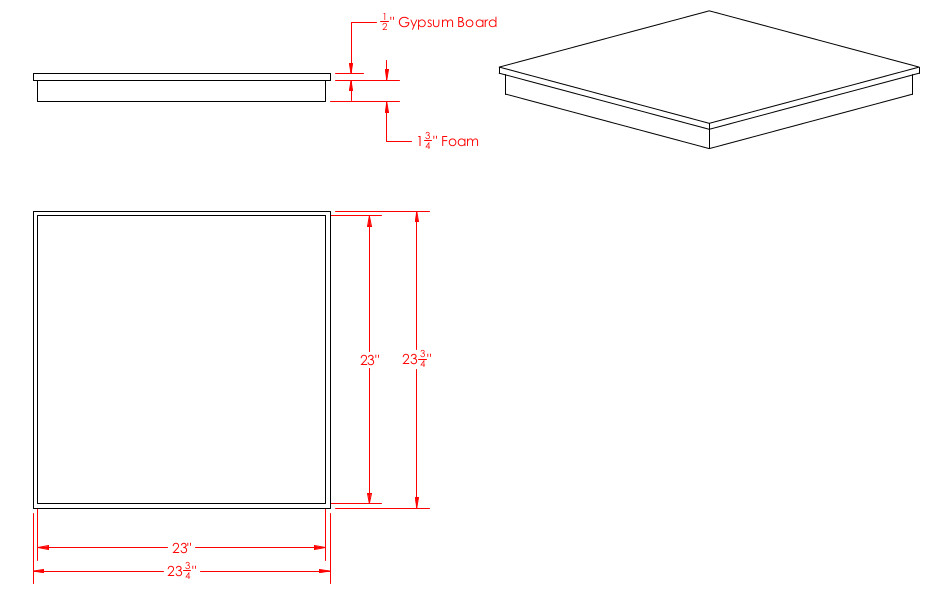
- 1/2 inch: This thickness is standard for lightweight tiles and is often used in residential applications.
- 3/4 inch: Thicker tiles can provide better sound absorption and insulation, making them ideal for commercial spaces.
4. Height Considerations
While ceiling tile measurements primarily refer to width and length, it’s essential to consider the height of your ceiling. Standard residential ceilings typically range from 8 to 10 feet. In spaces with higher ceilings, such as foyers or great rooms, taller tiles or creative installations may be used to enhance the visual height of the space.
Different Types of Ceiling Tiles
Understanding the types of ceiling tiles available is just as important as knowing their measurements. Here are some common types of ceiling tiles that you might consider:
1. Acoustic Ceiling Tiles
These tiles are designed to reduce sound transmission, making them ideal for spaces like offices, theaters, and schools. They typically come in standard sizes like 12 x 12 inches or 24 x 24 inches.
2. Tin Ceiling Tiles
Tin tiles are known for their vintage aesthetic and intricate designs. They are often used in kitchens, dining areas, and commercial spaces. These tiles come in various sizes, including 12 x 12 inches and 24 x 24 inches.
3. Vinyl Ceiling Tiles
Vinyl tiles are moisture-resistant, making them a great choice for areas with high humidity, such as bathrooms and kitchens. They come in various standard sizes, including 12 x 12 inches and 24 x 24 inches.
4. Wood Ceiling Tiles
Wood tiles provide a warm, natural look and can be used in various settings. They are typically available in both square and rectangular measurements and can be stained or painted to match your decor.
Installation Process for Ceiling Tiles
Installing ceiling tiles can be a straightforward DIY project, but proper measurement and planning are essential. Here’s a step-by-step guide on how to install ceiling tiles:
Step 1: Measure the Ceiling
Start by measuring the length and width of the ceiling where you plan to install the tiles. Record these measurements to calculate how many tiles you will need.
Step 2: Choose the Right Tile Size
Based on your measurements, choose the appropriate size of ceiling tiles. Be mindful of how the tile size will affect the design and overall look of the ceiling.
Step 3: Prepare the Surface
Ensure the ceiling surface is clean, dry, and free from any debris. If you are installing tiles over an existing ceiling, check for any loose or damaged sections and repair them before proceeding.
Step 4: Mark the Grid
Using a chalk line or a level, mark the grid where the tiles will be installed. This grid will serve as a guide to keep your installation straight and even.
Step 5: Cut Tiles as Necessary
If you need to fit tiles around the edges or in corners, use a utility knife or a saw to cut the tiles to size. Make sure to wear safety goggles when cutting tiles to protect your eyes from debris.
Step 6: Install the Tiles
Begin installing the tiles according to the manufacturer’s instructions. For adhesive tiles, apply the adhesive to the back of the tile and press it firmly against the ceiling. For suspended tiles, place them into the grid you created.
Step 7: Finishing Touches
Once all tiles are installed, inspect the ceiling for any gaps or misaligned tiles. If necessary, use caulk to fill gaps and achieve a seamless look.
Maintenance Tips for Ceiling Tiles
To keep your ceiling tiles looking fresh and new, follow these maintenance tips:
- Regular Cleaning: Dust and dirt can accumulate on ceiling tiles over time. Use a soft broom or microfiber cloth to regularly dust the surface.
- Spot Cleaning: For any stains or spills, spot clean with a damp cloth and a mild cleaning solution. Avoid using abrasive cleaners that could damage the tile surface.
- Periodic Inspections: Inspect the tiles periodically for any signs of damage, such as cracks or warping. Early detection can help prevent more extensive repairs down the line.
Conclusion
Understanding Standard Ceiling Tile Measurements is essential for anyone looking to enhance their home’s interior through ceiling design. By knowing the common sizes, types, and installation methods, you can make informed decisions that not only improve the aesthetic of your space but also add value to your home.
Whether you’re a DIY enthusiast or hiring a professional, proper measurements and thoughtful design choices will ensure that your ceiling tiles contribute positively to your home’s overall charm and functionality.