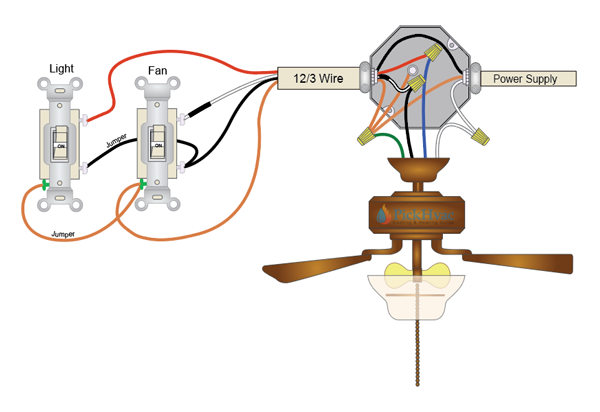
Ceiling fans are a common fixture in many homes, providing comfort and ventilation. However, when it comes to installing or replacing one, the wiring can be a bit puzzling. Among the wires you might encounter, the red wire often raises questions. What is the red wire for in a ceiling fan? In this article, we’ll delve into the role of the red wire, its importance, and how to correctly handle it during ceiling fan installation.
Understanding the Ceiling Fan Wiring
Before we tackle the red wire, let’s get familiar with the typical wiring in a ceiling fan. Most ceiling fans come with three main wires: black, white, and green or bare copper.
- Black Wire: The black wire is the live or hot wire, carrying electrical current from the switch to power the fan.
- White Wire: The white wire is the neutral wire, providing a return path for the current to complete the circuit.
- Green or Bare Copper Wire: This wire is the ground wire, which serves as a safety feature, directing any electrical faults safely to the ground.
Now, where does the red wire fit into this setup?
The Role of the Red Wire
The red wire in a ceiling fan’s wiring is non-standard and can perform various functions depending on your fan’s design and the type of switch in use. Its typical roles include:
- Light Kit Power: In some ceiling fans, the red wire is used to power the light kit. If your fan has a light fixture, this wire may connect to the wiring of the light assembly. This setup allows you to control the fan and light separately with two switches, one for the fan motor and another for the lights.
- Multiple Fan Speeds: Some ceiling fans offer multiple fan speed settings. In such cases, the red wire can be used to control the fan’s speed. By connecting the red wire to a specific terminal on the fan’s motor, you can vary the speed by adjusting the switch connected to it.
- Alternative Functions: Depending on the manufacturer and model, the red wire might serve other functions or be capped off if not needed. Always consult the fan’s manual or instructions for specific guidance.
Dealing with the Red Wire During Installation
When installing or replacing a ceiling fan, it’s crucial to handle the red wire correctly. Here are some general steps to follow:
- Turn Off Power: Always turn off the power at the circuit breaker or fuse box before working on electrical wiring. This ensures your safety during installation.
- Identify the Function: Determine the function of the red wire in your ceiling fan. Consult the manufacturer’s instructions or manual for guidance.
- Proper Connections: Make sure to connect the red wire to the appropriate terminal on the fan, whether it’s for the light kit or fan speed control.
- Secure Wiring: Ensure that all wire connections are secure and properly insulated to prevent any electrical issues.
- Test the Setup: After installation, turn the power back on and test the fan and light, if applicable, to confirm that they are functioning correctly.
Conclusion: Red Wire, a Valuable Component
Understanding the red wire in a ceiling fan’s wiring can make the installation process smoother and more efficient. While its function can vary, it often plays a crucial role in providing options for fan speed control or powering the light kit. By following proper installation procedures and consulting the manufacturer’s instructions, you can enjoy the full functionality of your ceiling fan and the comfort it brings to your home.