Ceiling fans are an essential part of home comfort, providing both cooling and air circulation with efficiency and style. Craftmade, known for its high-quality ceiling fans, offers a range of fans equipped with remote controls for added convenience. However, to fully enjoy this feature, it’s crucial to understand how to program the remote correctly. In this comprehensive guide, we’ll walk you through the process of Craftmade ceiling fan remote programming, ensuring that you can operate your fan with ease and precision.
Understanding the Importance of Remote Programming
Remote controls add a layer of convenience to ceiling fan operation by allowing users to adjust the fan speed, control the light (if applicable), and even reverse the fan direction—all from the comfort of your seat. However, this convenience is only possible if the remote is properly programmed to the fan. Without correct programming, the remote may not communicate with the fan, rendering it useless or partially functional.
Read too: Kitchen Lighting For A Vaulted Ceiling: Illuminating Your Space with Style and Functionality
Why Program Your Craftmade Ceiling Fan Remote?
Proper Craftmade ceiling fan remote programming is essential for several reasons:
- Efficient Operation: Ensure that all fan and light settings respond accurately to the remote control inputs.
- Personalized Settings: Tailor the fan’s operation to your preferences, such as setting specific speeds, light dimming levels, and more.
- Troubleshooting Issues: Correct programming can resolve common issues like the remote not responding or the fan operating inconsistently.
- Multiple Fans: If you have more than one ceiling fan, programming allows you to control each fan independently, even if they are in close proximity.
Step-by-Step Guide to Craftmade Ceiling Fan Remote Programming
Programming your Craftmade ceiling fan remote is a straightforward process, but it requires careful attention to detail. Follow these steps to ensure successful programming:
Step 1: Gather the Necessary Materials
Before you begin, make sure you have the following items:
- Your Craftmade ceiling fan remote control
- The corresponding ceiling fan
- Fresh batteries for the remote
- A small screwdriver (if needed to access the remote’s battery compartment)
Step 2: Power Off the Fan
For safety and to prevent any interference during programming, turn off the power to your ceiling fan at the circuit breaker or by using the wall switch. Wait a few moments to ensure the fan has completely powered down.
Step 3: Install or Replace Remote Batteries
Open the battery compartment on your remote control using a small screwdriver if necessary. Insert fresh batteries, ensuring they are placed in the correct orientation as indicated inside the compartment. A low battery can cause the remote to malfunction or fail to program correctly.
Step 4: Locate the Programming Buttons
Most Craftmade ceiling fan remotes have a set of buttons specifically for programming. These buttons may be hidden under the battery cover or located on the back of the remote. Familiarize yourself with these buttons before proceeding.
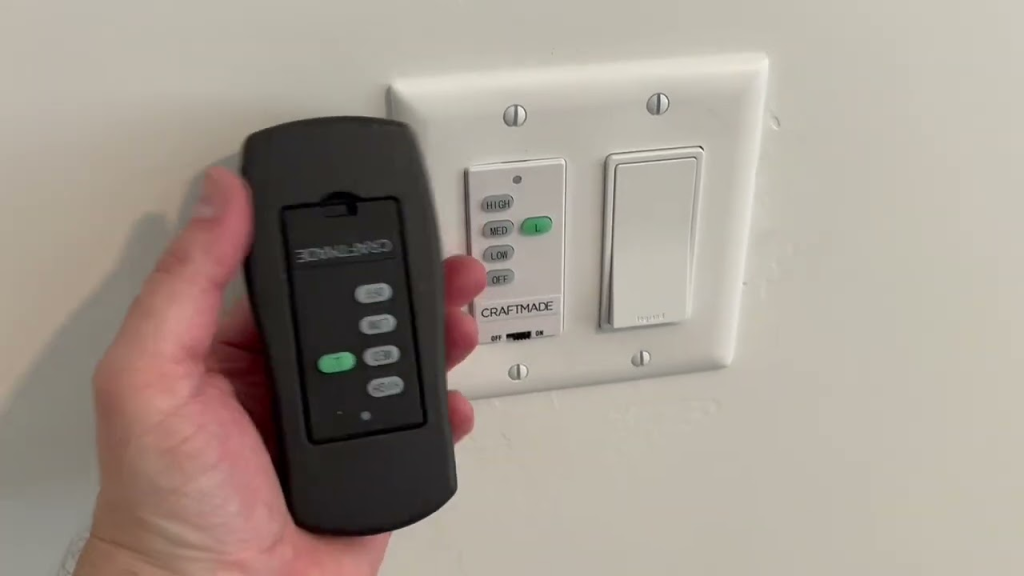
Step 5: Set the Dip Switches
Craftmade remotes often feature dip switches, small toggles inside the remote that help pair the remote with the fan. The positions of these switches must match between the remote and the fan’s receiver (located inside the fan’s canopy). Set the dip switches on the remote to your desired positions, making sure they align with those on the fan’s receiver.
Step 6: Power On the Fan
After setting the dip switches, restore power to the ceiling fan by turning on the circuit breaker or wall switch. The fan and remote should now be ready for programming.
Step 7: Initiate the Programming Sequence
Press the programming button on the remote control. Depending on the model, this button may need to be held down for several seconds until the remote’s indicator light begins to flash. This signals that the remote is in programming mode.
Step 8: Sync the Remote with the Fan
With the remote in programming mode, press the “ON” button or the button corresponding to fan speed. The fan should respond by turning on or changing speeds, indicating that the programming was successful. If your fan includes a light, test the light function as well to ensure everything is synced.
Step 9: Test the Remote
Once programming is complete, test all the remote’s functions—speed control, light control, and reverse direction (if applicable). Ensure that each function works smoothly and as expected.
Step 10: Troubleshoot if Necessary
If the fan does not respond to the remote, repeat the steps above, paying close attention to the dip switch settings and ensuring that the batteries are fresh. If issues persist, consult the fan’s user manual or contact Craftmade customer support for further assistance.
Common Issues and Troubleshooting Tips
Even with careful programming, you may encounter some common issues. Here’s how to address them:
1. Remote Not Responding
If your remote isn’t working, first check the batteries. Weak or dead batteries are the most common cause of a non-responsive remote. If the batteries are fine, try reprogramming the remote from the beginning.
2. Fan Only Operates at Certain Speeds
If the fan doesn’t respond to all speed settings, this could be due to incorrect dip switch settings. Recheck the switches on both the remote and the fan receiver to ensure they match.
3. Light Function Not Working
If the fan’s light isn’t responding to the remote, make sure the light bulb is installed correctly and is functional. Also, check that the remote is set to control the light by verifying the programming settings.
4. Interference from Other Devices
If you have multiple ceiling fans or other remote-controlled devices nearby, they may interfere with each other. To resolve this, try changing the dip switch settings on one or more devices to create unique codes for each remote.
Enhancing Your Experience with Craftmade Ceiling Fan Remote Programming
Programming your Craftmade ceiling fan remote is just the beginning. There are several ways to enhance your experience and make the most of your ceiling fan’s capabilities:
1. Advanced Remote Features
Some Craftmade remotes offer advanced features such as timers, dimming controls, and temperature sensors. If your remote includes these features, take the time to program and customize them according to your preferences.
2. Smart Home Integration
For tech-savvy homeowners, integrating your ceiling fan with a smart home system can provide additional convenience. Check if your Craftmade fan is compatible with smart home hubs like Alexa or Google Home, and consider programming your remote to work with these systems for voice-controlled operation.
3. Regular Maintenance
To ensure your ceiling fan operates smoothly, regular maintenance is essential. This includes cleaning the fan blades, checking for loose screws, and periodically reprogramming the remote to maintain optimal performance.
Conclusion: Mastering Craftmade Ceiling Fan Remote Programming
Craftmade ceiling fan remote programming is a straightforward process that enhances the convenience and functionality of your ceiling fan. By following the steps outlined in this guide, you can easily program your remote to ensure reliable operation and enjoy the full range of features your fan has to offer. Whether you’re a first-time user or a seasoned pro, proper programming can make all the difference in your home comfort and satisfaction.